
Looking for an easy Halloween costume you can make without starting from scratch? This Black Hoodie to Bat Costume is a fun, beginner-friendly upcycle that transforms a basic black hoodie into a dramatic bat costume using simple sewing techniques.
Instead of buying an expensive costume that may only be worn once, you can reuse an old hoodie, sweatshirt fabric, felt, or even leftover black fabric from your sewing stash. The hood naturally creates the perfect base for bat ears, while fabric wings sewn between the sleeves and body give the costume its recognizable bat shape.
This project works especially well for kids, teens, or adults. You can keep the costume simple with classic black wings or customize it with purple lining, glitter details, reflective trim, or spooky embroidered accents.
For simple sewing projects, explore last-minute women’s halloween clothing upcycles that can be completed in less than an hour. If you are searching for an easy DIY bat costume, Halloween hoodie upcycle, or beginner sewing Halloween costume, this tutorial walks you through the process step by step.
Materials You Will Need
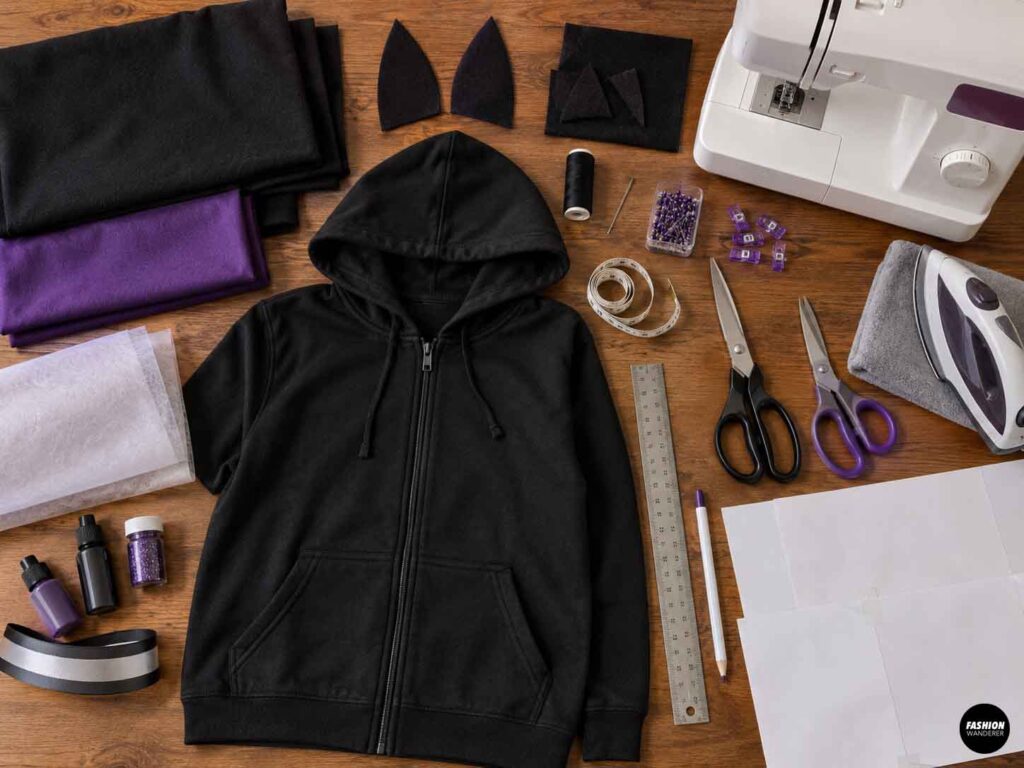
To make one DIY bat hoodie costume, gather:
- 1 black hoodie or zip-up sweatshirt
- 1 to 1½ yards black knit fabric, fleece, felt, or lightweight sweatshirt fabric
- Small scraps of black fabric or felt for bat ears
- Coordinating black thread
- Sewing machine
- Hand-sewing needle
- Fabric scissors
- Paper scissors
- Large paper or taped-together printer paper
- Pencil or fabric marker
- Measuring tape
- Pins or sewing clips
- Ruler
- Iron and pressing cloth
- Optional lightweight fusible interfacing
- Optional purple fabric for wing lining
- Optional reflective trim
- Optional fabric paint or glitter details
A hoodie that already fits comfortably is the easiest starting point. Slightly oversized hoodies work particularly well because they allow plenty of movement underneath the wings.
DIY Black Hoodie into Bat Costume
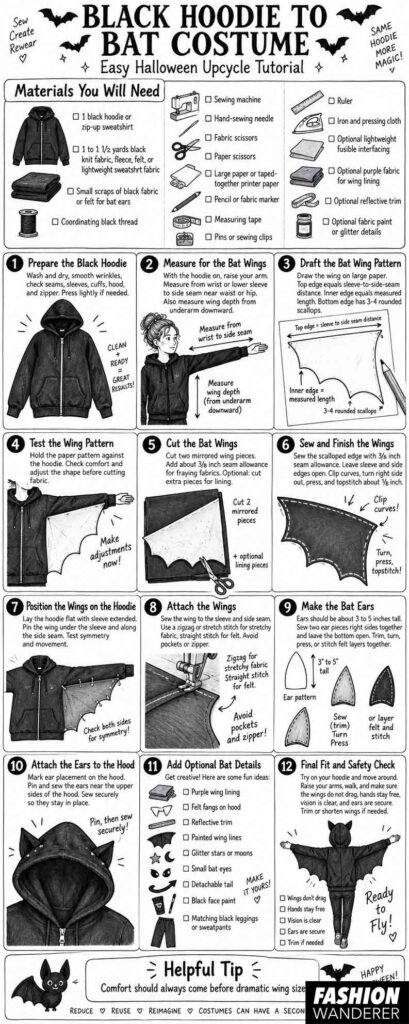
Step 1: Prepare the Black Hoodie
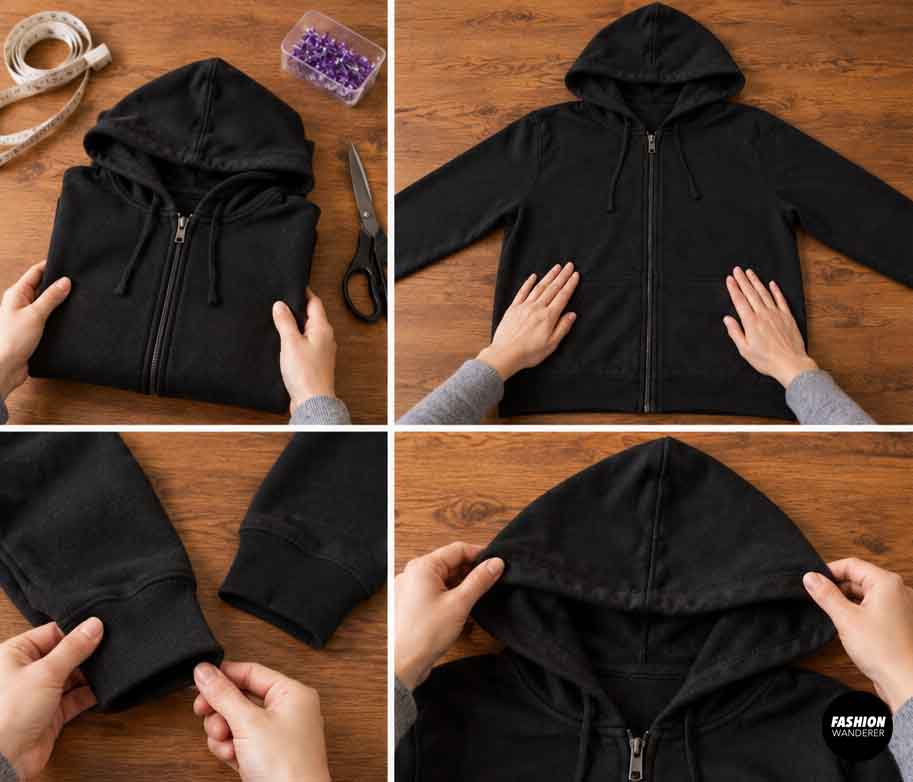
Wash and dry the hoodie before beginning, especially if it has never been washed before.
Lay the hoodie flat on your work surface and smooth out all wrinkles.
Check the side seams, sleeves, cuffs, and hood for damage. Repair any loose seams before adding the costume pieces.
If you are using a zip-up hoodie, make sure the zipper still opens and closes smoothly.
Press the hoodie lightly if needed, but use a pressing cloth if the fabric contains polyester.
Step 2: Measure for the Bat Wings
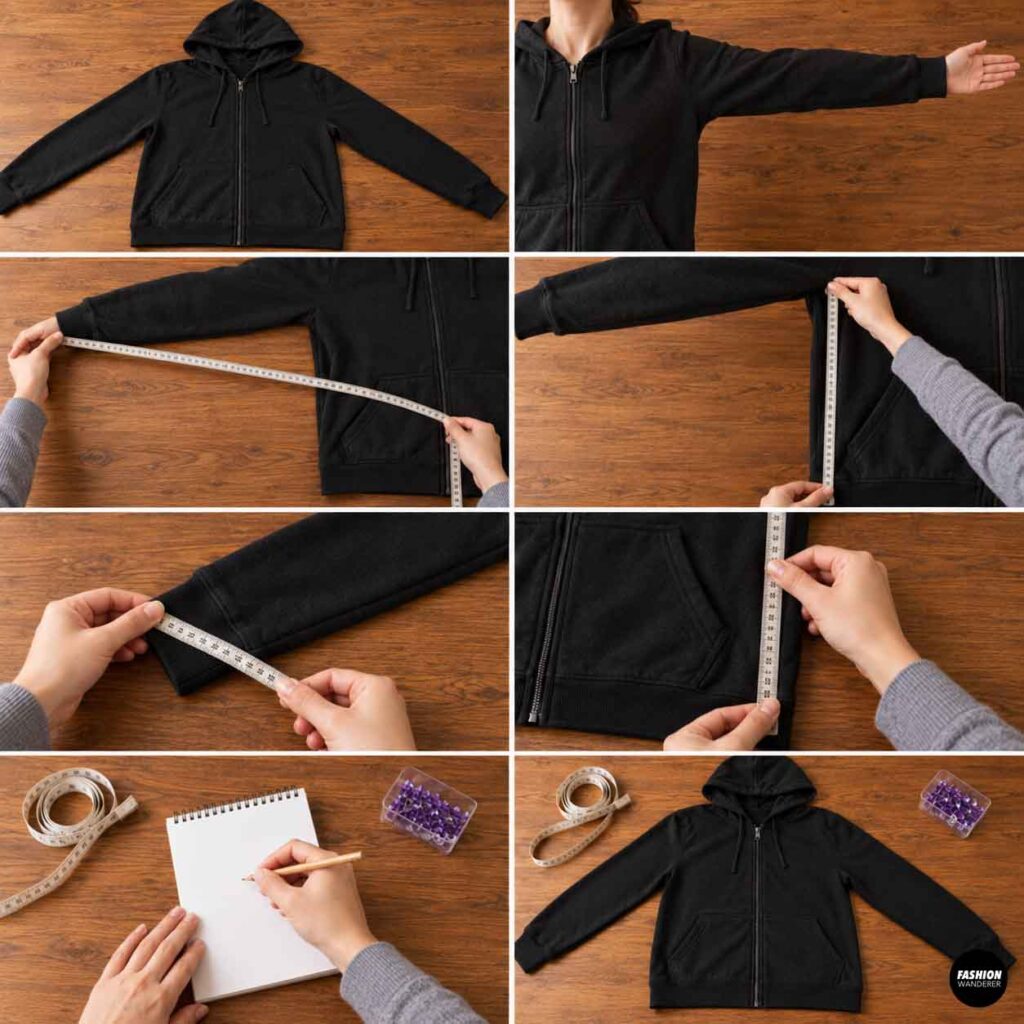
Put the hoodie on the person who will wear the costume.
Raise one arm out to the side.
Measure from approximately the wrist or lower sleeve area to the side seam of the hoodie near the waist or hip.
Next, measure vertically from the underarm area down to the desired bottom of the wing.
For children, the wings can end around the waist or upper hip.
For adults or older kids, longer wings that reach toward the lower hip can create a more dramatic costume.
Write down the measurements before drafting the wing.
Step 3: Draft the Bat Wing Pattern
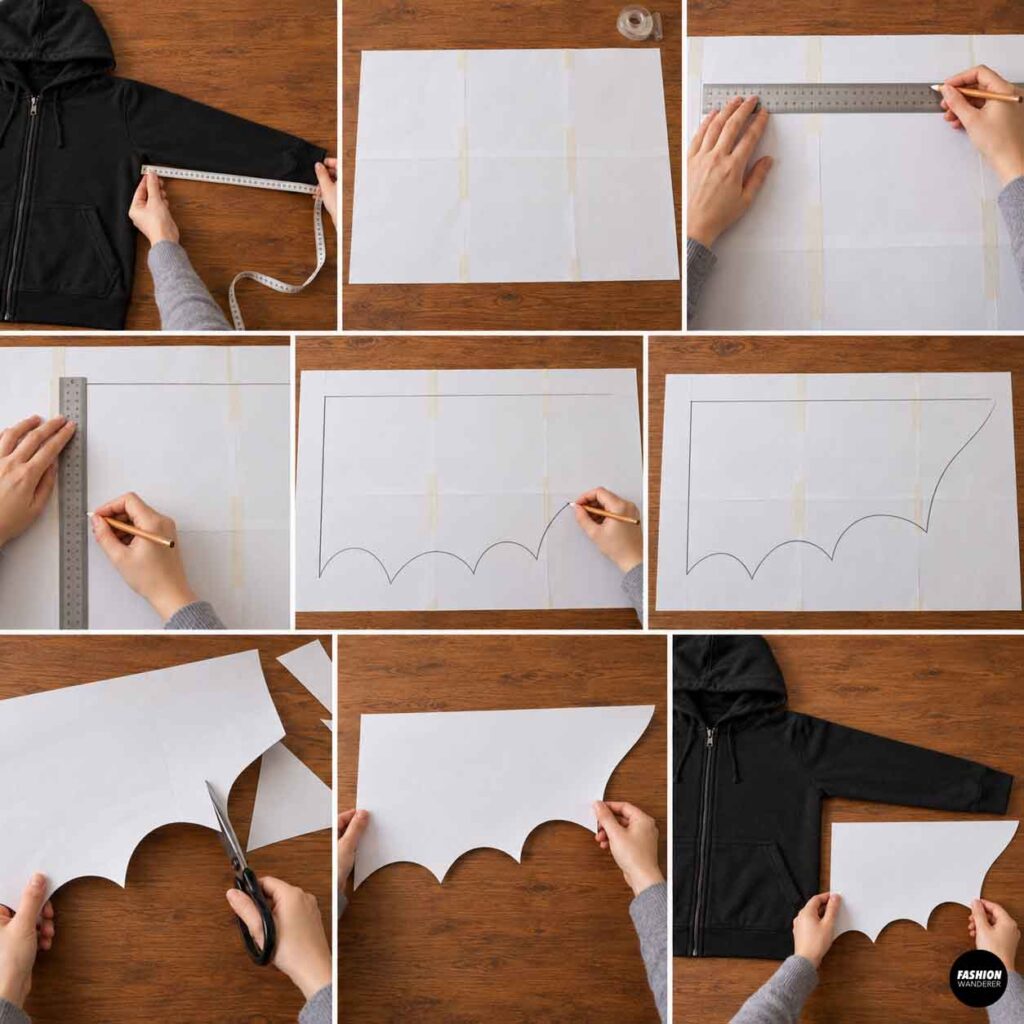
Tape together several sheets of paper if you do not have pattern paper.
Draw a straight upper edge equal to the distance from the sleeve to the side seam.
Draw the inner edge downward to match the length you measured.
Now create the classic bat-wing shape along the bottom.
Instead of drawing one smooth curve, create three or four large scalloped points.
Think of the bottom edge as a series of shallow curved “V” shapes.
Keep the points rounded rather than extremely sharp. Rounded points are easier to sew and more comfortable to wear.
Cut out the paper pattern.
Step 4: Test the Wing Pattern
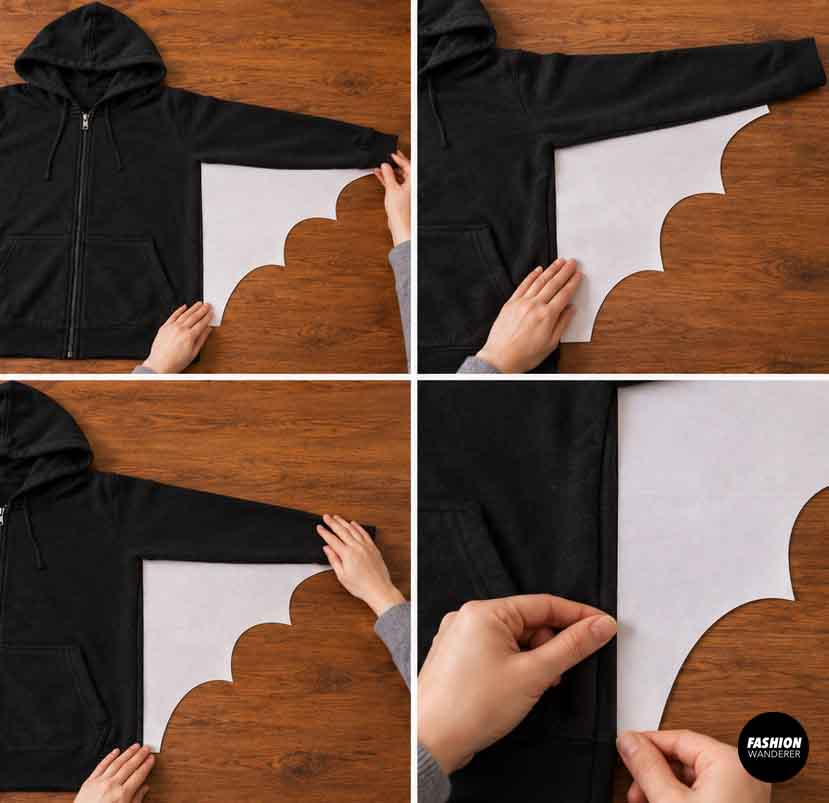
Before cutting your fabric, hold the paper wing against the hoodie.
Position the top edge under the sleeve and the inner edge along the hoodie side.
Move the sleeve upward and downward to make sure the wing is not too tight.
The wearer should still be able to raise and lower their arms comfortably.
Adjust the pattern if necessary.
This simple fitting step can save you from wasting fabric later.
Step 5: Cut the Bat Wings
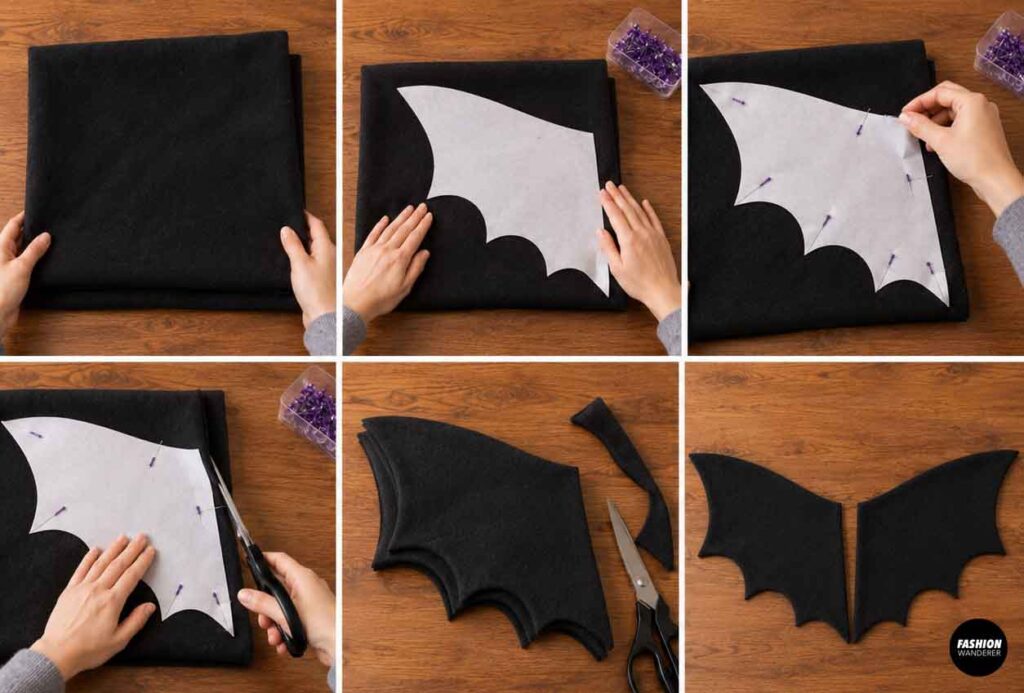
Fold your black wing fabric in half.
Place the paper pattern on top and pin it in place.
Cut through both layers so you create two mirrored wings.
If you are using fabric that frays, add approximately ⅜ inch seam allowance around the pattern.
Felt and some fleece fabrics do not fray, so you can leave the edges unfinished for an even faster project.
For lined wings, cut two additional mirrored pieces from your lining fabric.
Step 6: Sew and Finish the Wings
If you are using a non-fraying fabric, you can skip directly to attaching the wings.
For woven or fraying fabric, place two wing pieces right sides together.
Sew around the scalloped outer edge using a ⅜-inch seam allowance, leaving the sleeve and side attachment edges open.
Clip into the curved areas carefully without cutting through the stitching.
Turn the wing right side out and press gently.
Topstitch approximately ⅛ inch from the finished edge.
Repeat for the second wing.
Step 7: Position the Wings on the Hoodie
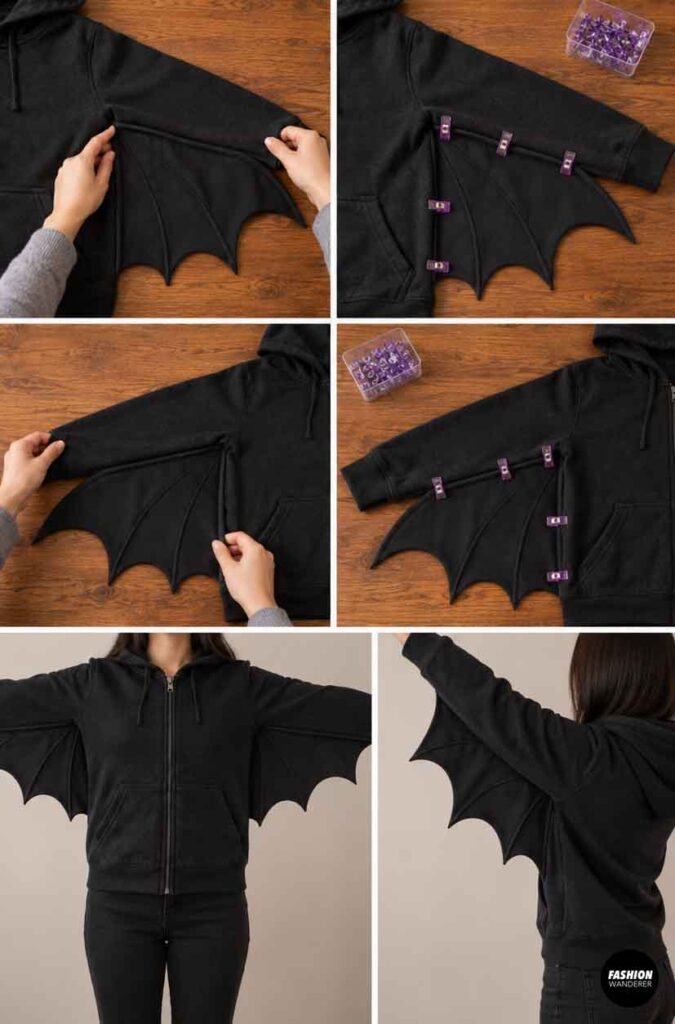
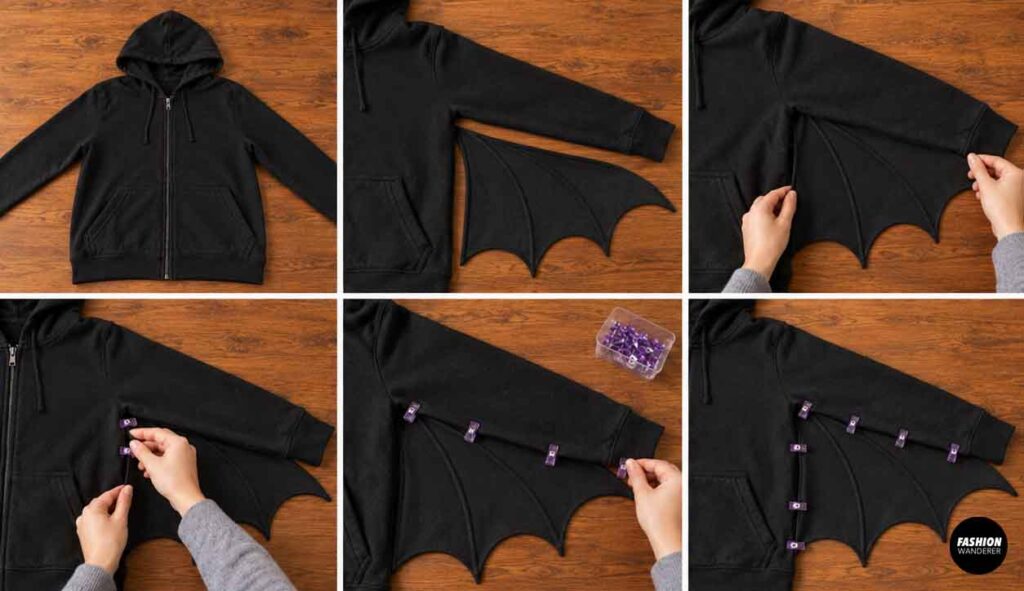
Lay the hoodie flat with one sleeve extended.
Place the wing beneath the sleeve.
The upper edge of the wing should follow the lower sleeve seam.
The inner vertical edge should follow the side seam of the hoodie.
Pin or clip the wing into position.
Repeat on the other side.
Before sewing, carefully have the wearer try on the hoodie.
Ask them to slowly raise and lower their arms.
Make sure the wings are symmetrical and do not pull excessively on the sleeves.
Step 8: Attach the Wings
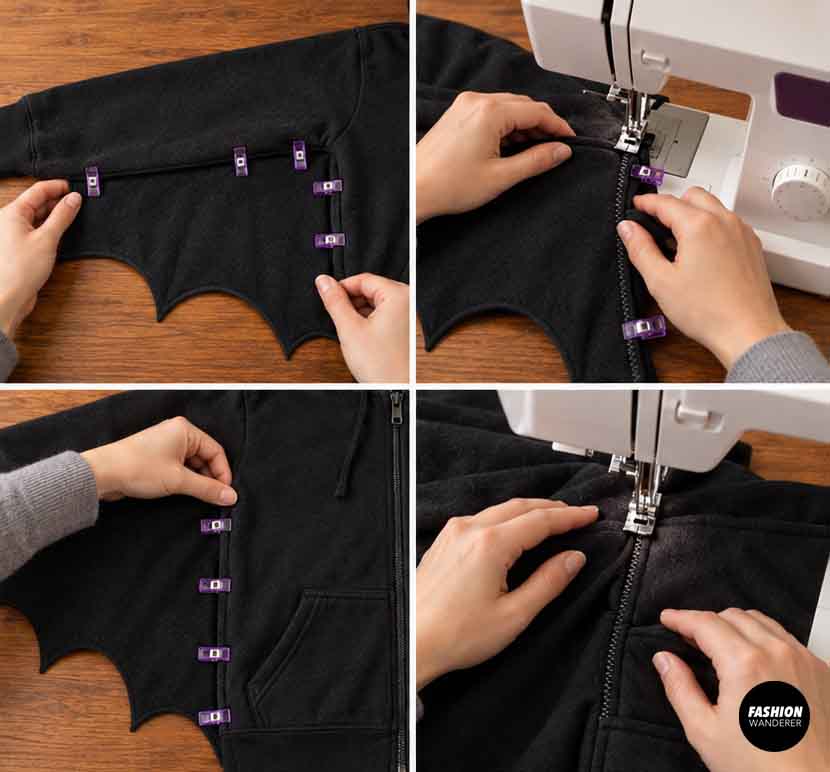
Sew the upper edge of each wing to the lower sleeve area.
Use a narrow zigzag stitch or stretch stitch if your hoodie and wing fabric are stretchy.
For non-stretch felt wings, a regular straight stitch can work.
Next, sew the inner edge of the wing along the side seam of the hoodie.
Backstitch securely at the beginning and end.
Avoid sewing across the hoodie pocket or zipper.
If necessary, stop the wing attachment slightly above the pocket.
Repeat on the second side.
Step 9: Make the Bat Ears
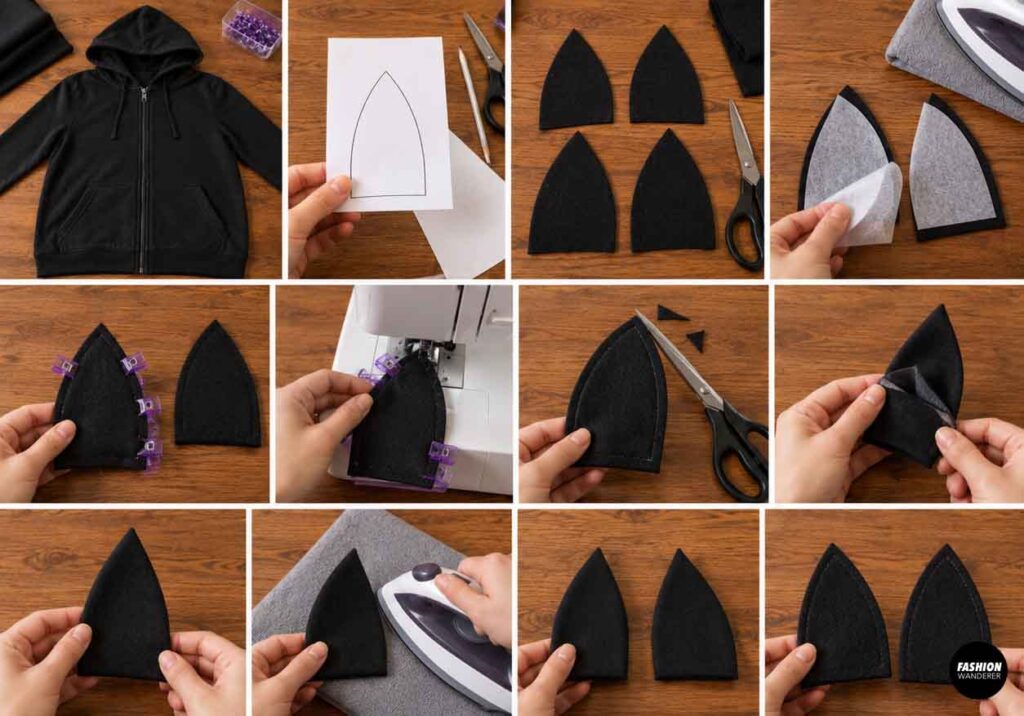
Draw a simple bat-ear shape approximately 3 to 5 inches tall.
Cut four ear pieces from black fabric or felt.
For soft fabric, add lightweight fusible interfacing to two pieces for extra structure.
Place two ear pieces right sides together.
Sew along the outer edges, leaving the bottom open.
Trim the point carefully, turn the ear right side out, and press.
Repeat for the second ear.
For felt, you can simply cut two layers and stitch them together around the edge.
Step 10: Attach the Ears to the Hood
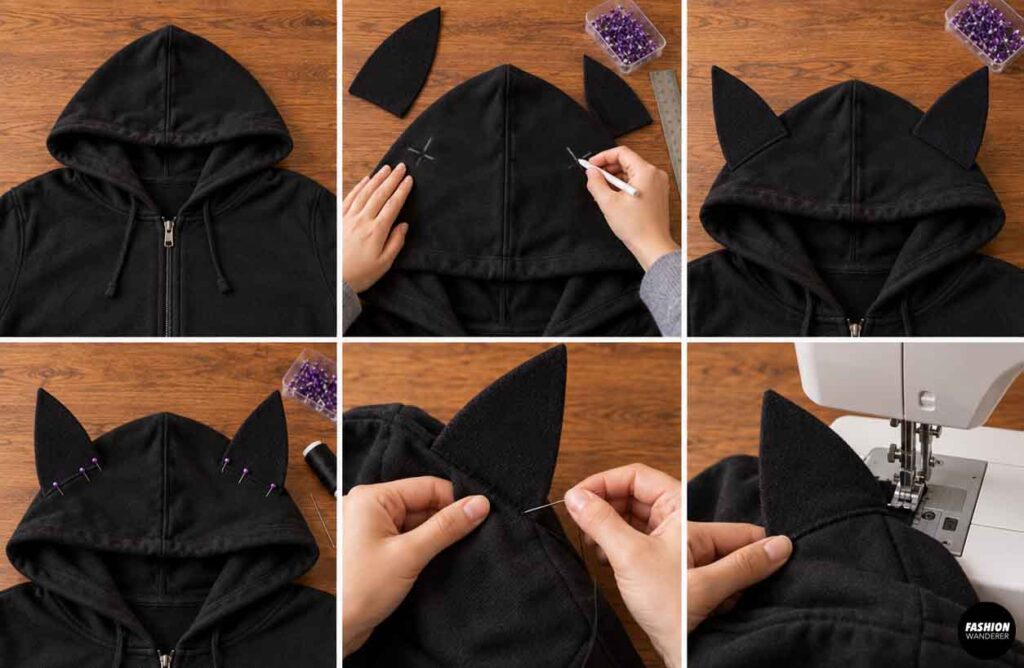
Put the hoodie on and lightly mark where you would like the ears positioned.
Generally, the ears look best placed toward the upper sides of the hood rather than directly on top.
Pin the ears in place.
Hand sew them securely using small stitches, or machine stitch across the base if the hood can fit comfortably under your presser foot.
Check that both ears are positioned at approximately the same angle.
Step 11: Add Optional Bat Details
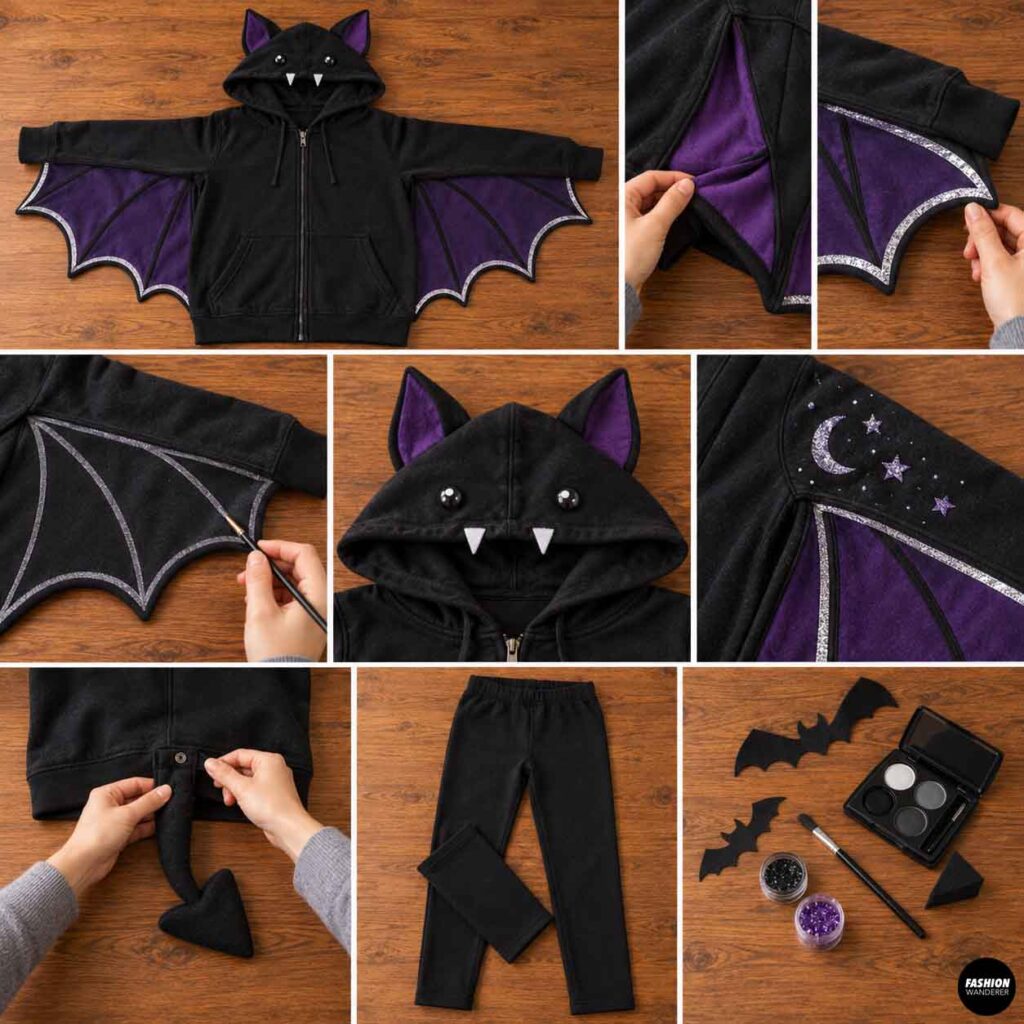
Your basic DIY bat hoodie costume is now complete, but you can add extra details to make it even more fun.
Try adding:
- Purple fabric underneath the wings
- Small felt fangs on the hood
- Reflective tape along the wing edges
- Fabric-painted wing lines
- Glitter stars or moons
- Small bat eyes
- A detachable tail
- Black face paint or bat makeup
- Matching black leggings or sweatpants
Step 12: Final Fit and Safety Check
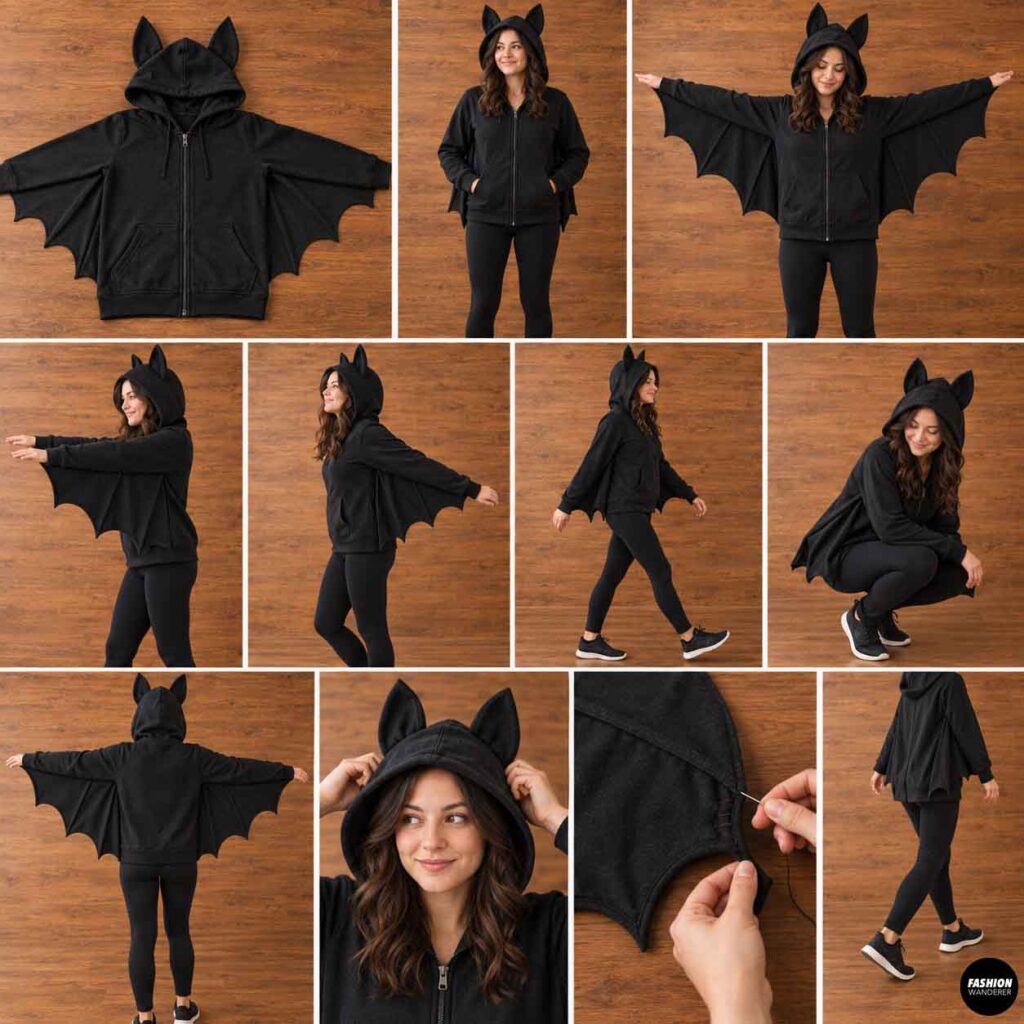
Have the wearer put on the entire costume.
Raise both arms.
Walk around.
Sit down.
Move the arms forward and backward.
Make sure the wings do not drag on the ground or wrap around the hands.
Check that the hood does not block vision and that the ears are securely attached.
If the wings feel too large, trim them slightly or add a few small hand stitches to shorten the span.
Comfort should always come before dramatic wing size.
Easy Ways to Customize Your Bat Costume
One of the best things about this black hoodie Halloween upcycle is that the same basic idea can create several different costumes.
Use purple and black fabrics for a colorful cartoon bat.
Add red lining for a vampire-inspired look.
Create tiny wings for a toddler costume or oversized wings for a theatrical adult version.
You can even make matching family bat costumes using different hoodie sizes.
Final Thoughts
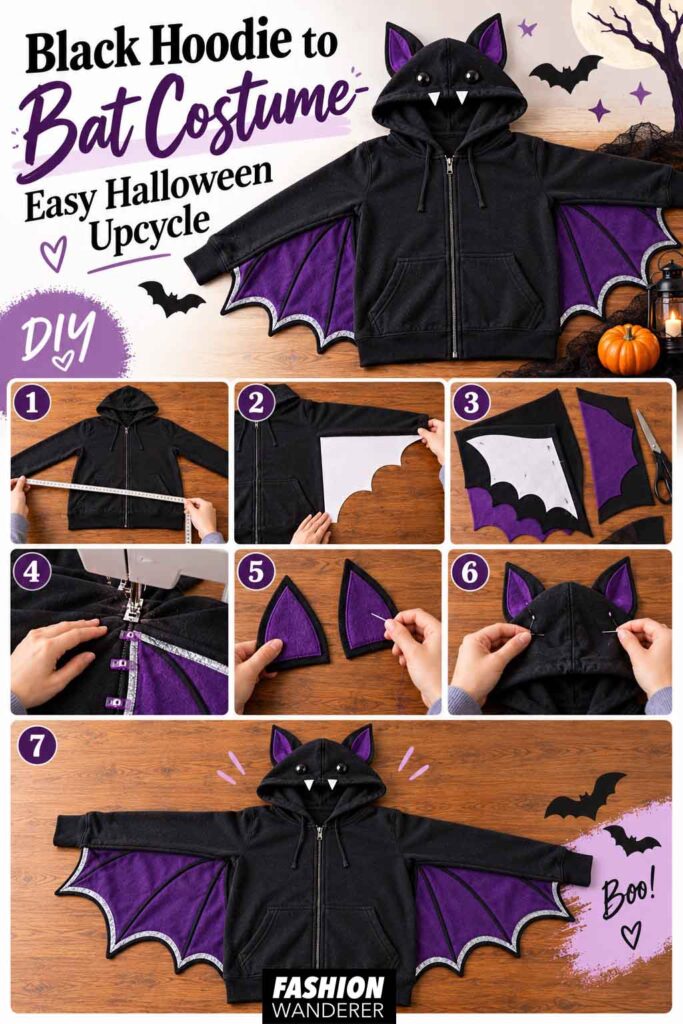
Turning a black hoodie into a DIY bat costume is an easy way to create a memorable Halloween outfit without sewing an entire garment from scratch.
The hoodie already provides the main body, sleeves, hood, and closure, so most of the sewing is limited to creating the wings and ears.
It is also a great beginner sewing project because small imperfections usually blend naturally into the dramatic bat-wing shape.
Whether you are making a last-minute Halloween costume, upcycling clothes you already own, or creating matching costumes for the family, this easy bat hoodie costume tutorial is inexpensive, customizable, and fun to sew.
Grab an old black hoodie, add a pair of dramatic wings, and you have a handmade Halloween costume ready to fly.