
Looking for a quick Halloween sewing project that costs almost nothing? Turn an old black T-shirt into a spooky DIY skeleton cutout top using just scissors, chalk, and a few basic sewing supplies.
This easy Halloween upcycle is perfect for beginners because most of the design is created by cutting the fabric rather than sewing complicated seams. You can make the skeleton design subtle and stylish or dramatic and oversized depending on your costume.
A T-shirt skeleton cutout top works well for Halloween parties, school events, last-minute costumes, haunted house outfits, or a fun DIY fashion project. Wear it over a white tank top for the classic skeleton effect, layer it over a bright neon shirt for a modern look, or leave the openings unlined for an edgier style.
Discover halloween clothing upcycles for women that you can sew in an hour when you need a fast and budget-friendly costume solution. Best of all, you can use a T-shirt you already own to make this skeleton costume upcycle.
Materials You Will Need
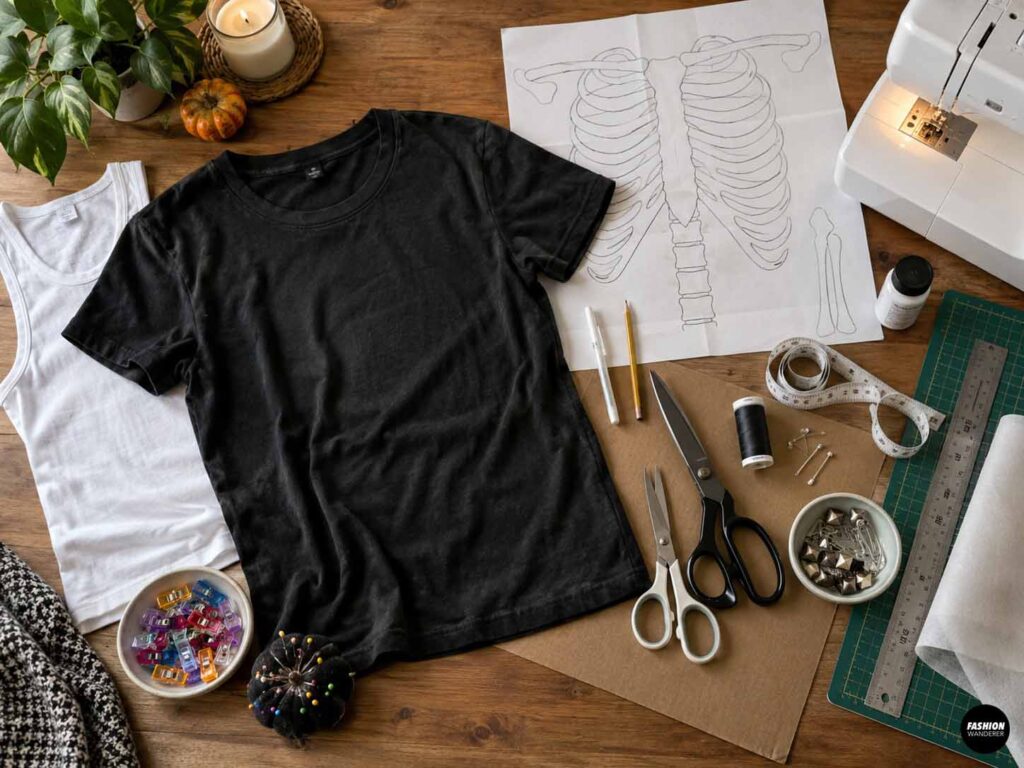
- 1 old black or dark-colored T-shirt
- White chalk or washable fabric marker
- Fabric scissors
- Paper scissors
- Large sheet of paper or taped printer paper
- Pencil
- Measuring tape or ruler
- Pins or sewing clips
- Cutting mat or cardboard
- Sewing machine, optional
- Coordinating thread, optional
- White tank top or fitted T-shirt for layering
- Optional lightweight fusible interfacing
- Optional fabric paint
- Optional safety pins or decorative studs
Choose a T-shirt that is slightly loose rather than extremely fitted. A relaxed shirt gives you more room for the skeleton cutouts without stretching the fabric too much.
DIY Old T-Shirt into Skeleton Cutout Top
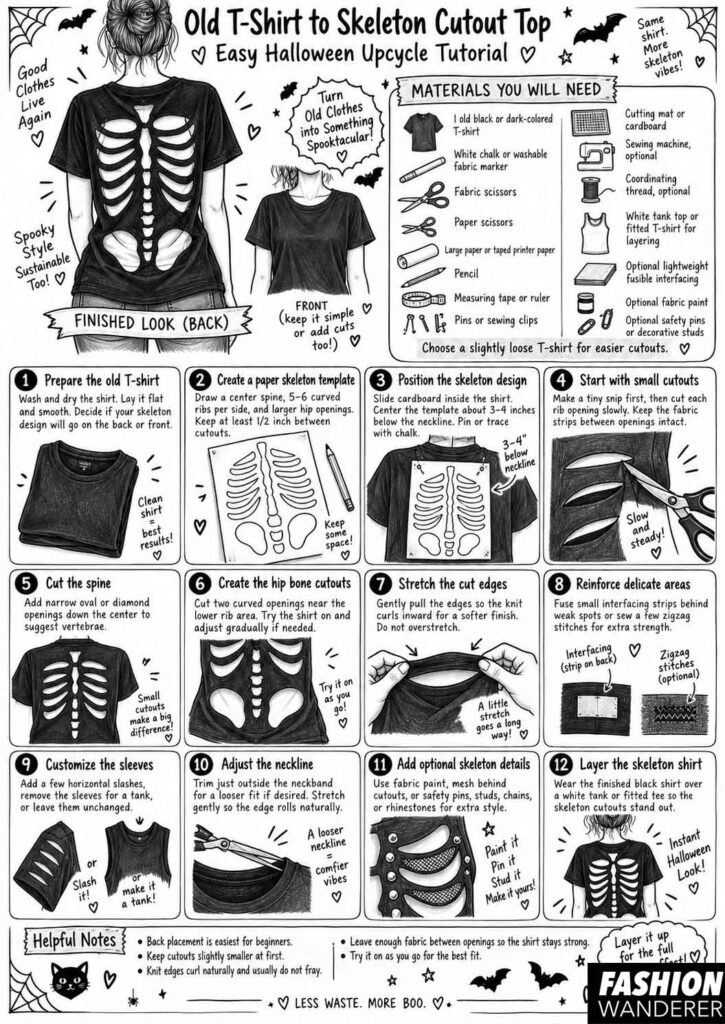
Step 1: Prepare the Old T-Shirt
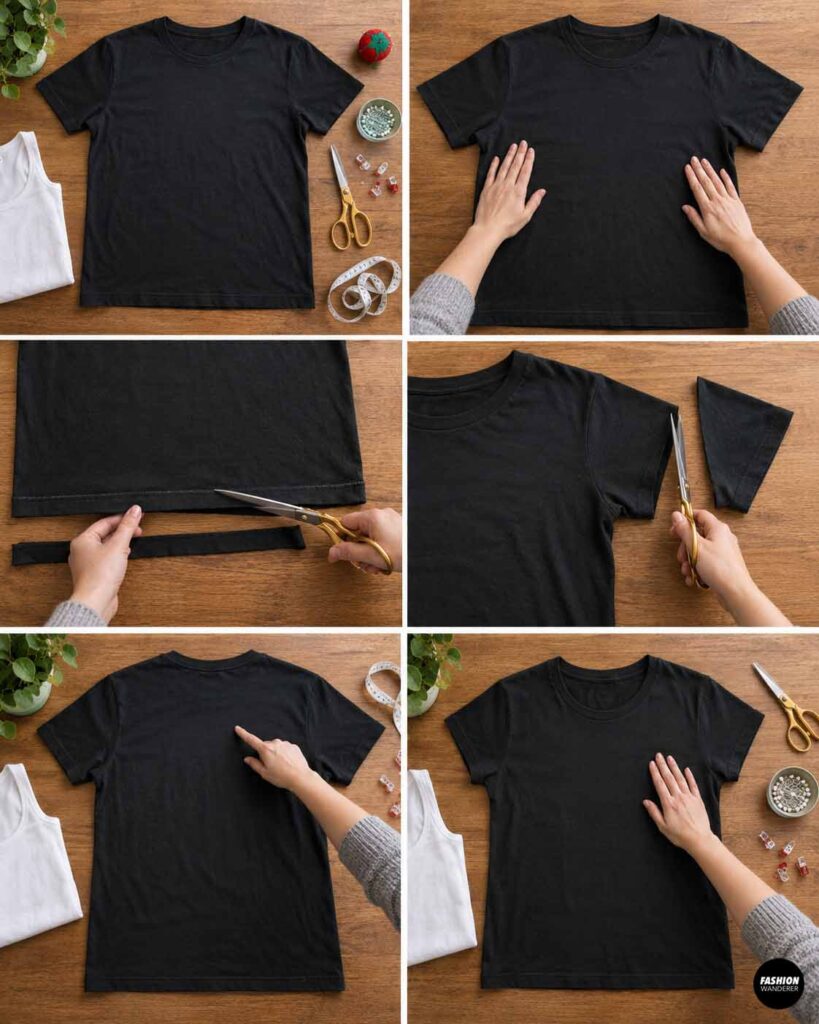
Wash and dry the shirt before beginning.
Lay the T-shirt completely flat on your work surface and smooth away wrinkles.
If the shirt is very oversized, you can shorten the hem or trim the sleeves before creating the skeleton design.
Try the shirt on and decide where you want the skeleton cutouts to appear.
For the easiest version, place the design on the back of the T-shirt. This gives you a large flat area to work with and keeps the front simple.
You can also make a smaller skeleton rib design on the front.
Step 2: Create a Paper Skeleton Template
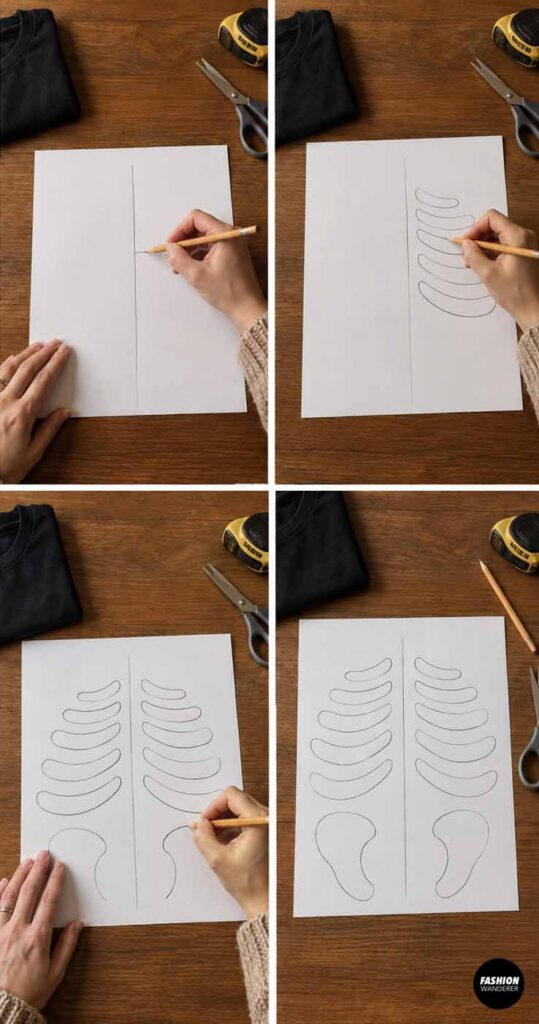
Place a large sheet of paper on your table.
Draw a simple vertical line down the center. This represents the spine.
Next, sketch approximately five or six curved rib shapes on each side of the spine.
The ribs do not have to be anatomically perfect. A simplified graphic shape usually looks better on fabric.
Each rib opening can be approximately:
- 1 to 1½ inches tall
- 4 to 6 inches long
Make the upper ribs slightly shorter and gradually increase the length toward the center.
At the bottom of the design, draw two larger curved openings to suggest hip bones.
Keep at least ½ inch of fabric between every cutout so the shirt remains strong.
Step 3: Position the Skeleton Design
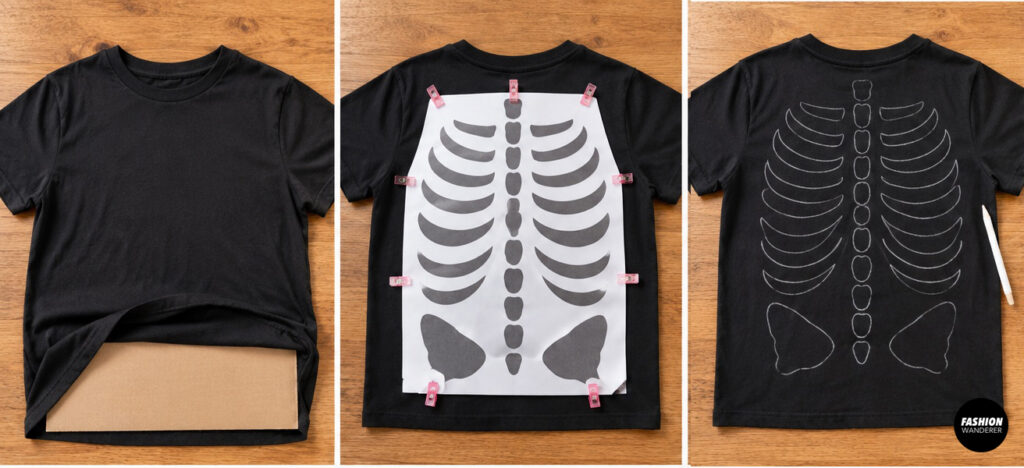
Place the T-shirt flat with the area you want to cut facing upward.
Slide cardboard or a cutting mat inside the shirt.
This is important because it prevents you from accidentally cutting through both the front and back layers.
Place your paper skeleton template over the shirt.
Center the design approximately 3 to 4 inches below the neckline.
Pin the paper in place or trace around the shapes using tailor’s chalk.
Remove the paper after you have transferred the entire design.
Stand back and check the placement before cutting.
Step 4: Start with Small Cutouts
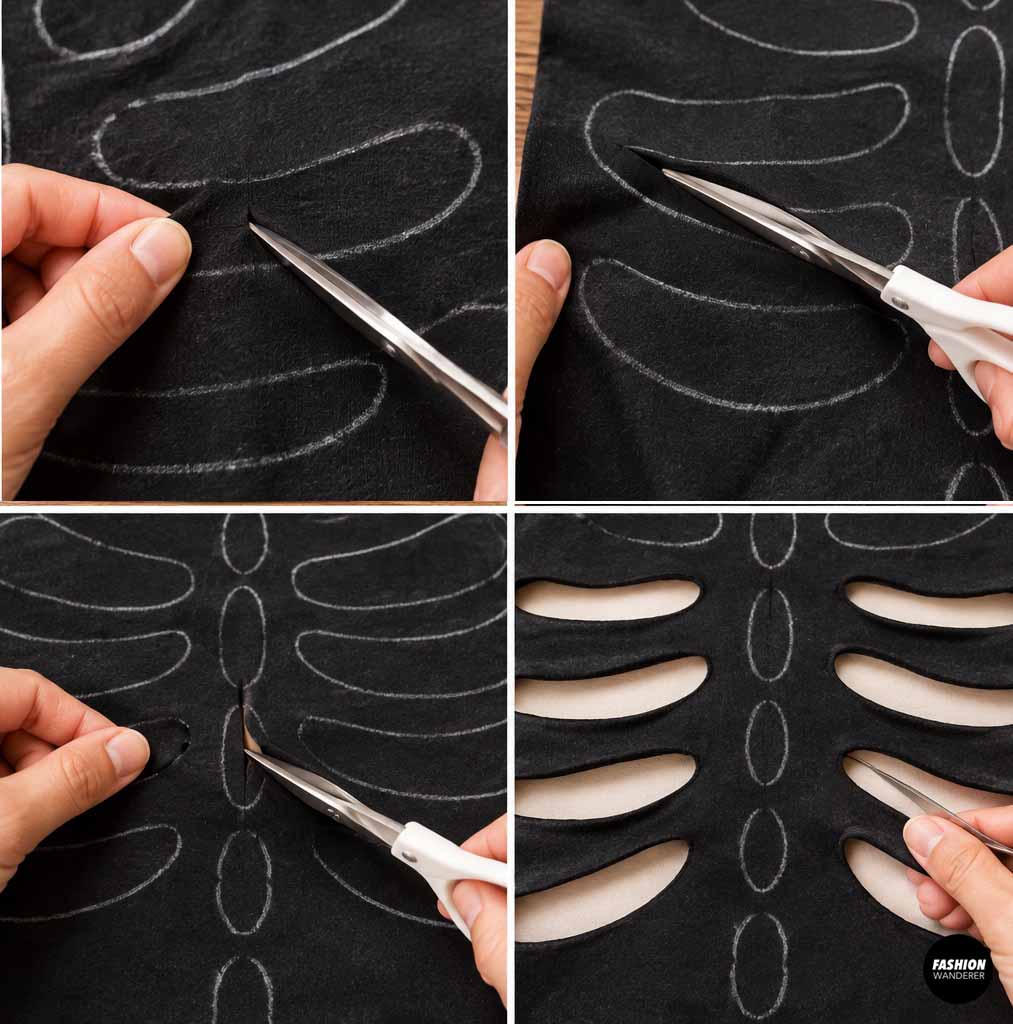
Do not immediately cut along the full chalk line.
Instead, pinch the center of one marked area and make a very small snip.
Insert the scissors into the opening and slowly cut around the shape.
Keeping your first cut slightly smaller than planned gives you room to adjust the shape later.
Repeat for the remaining ribs.
Take your time around narrow sections of fabric.
The strips between the rib openings become part of the skeleton design, so avoid accidentally cutting through them.
Step 5: Cut the Spine
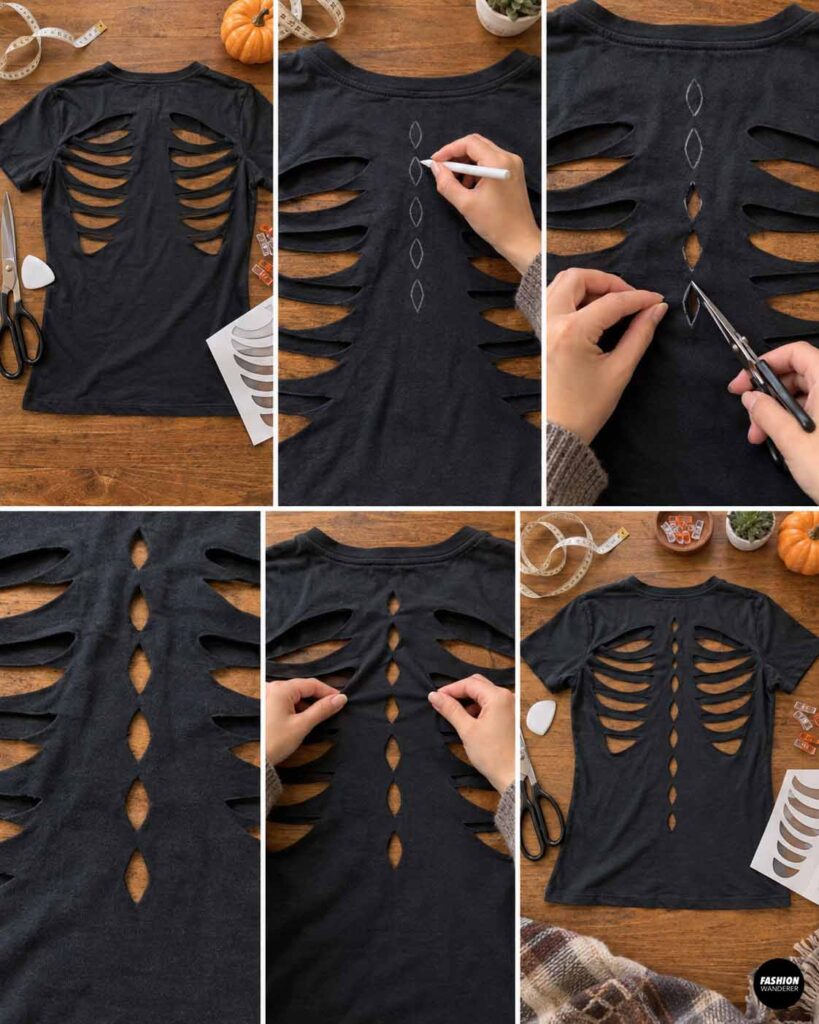
Once the ribs are finished, create small cutouts down the center of the back to suggest vertebrae.
Draw several narrow oval or diamond-shaped openings vertically along the center line.
Keep approximately ½ to ¾ inch between the openings.
Carefully cut each shape.
You do not need to create a completely open spine. Small openings often look cleaner and help the shirt hold its shape.
Step 6: Create the Hip Bone Cutouts
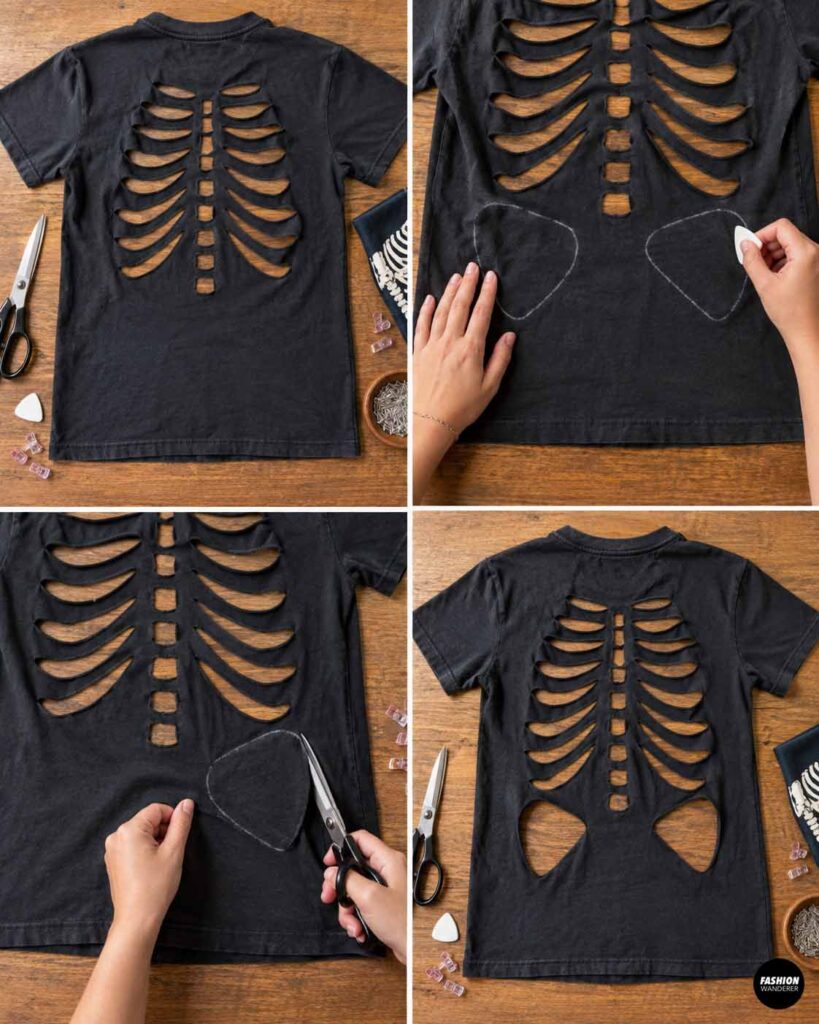
Near the bottom of the rib cage, draw two curved openings on either side of the center.
These shapes can resemble rounded triangles or curved teardrops.
Keep them several inches above the bottom hem.
Cut them carefully using the same method as the ribs.
Try the shirt on after this step to check the overall design.
If you want a more dramatic skeleton effect, enlarge the openings gradually.
Step 7: Stretch the Cut Edges
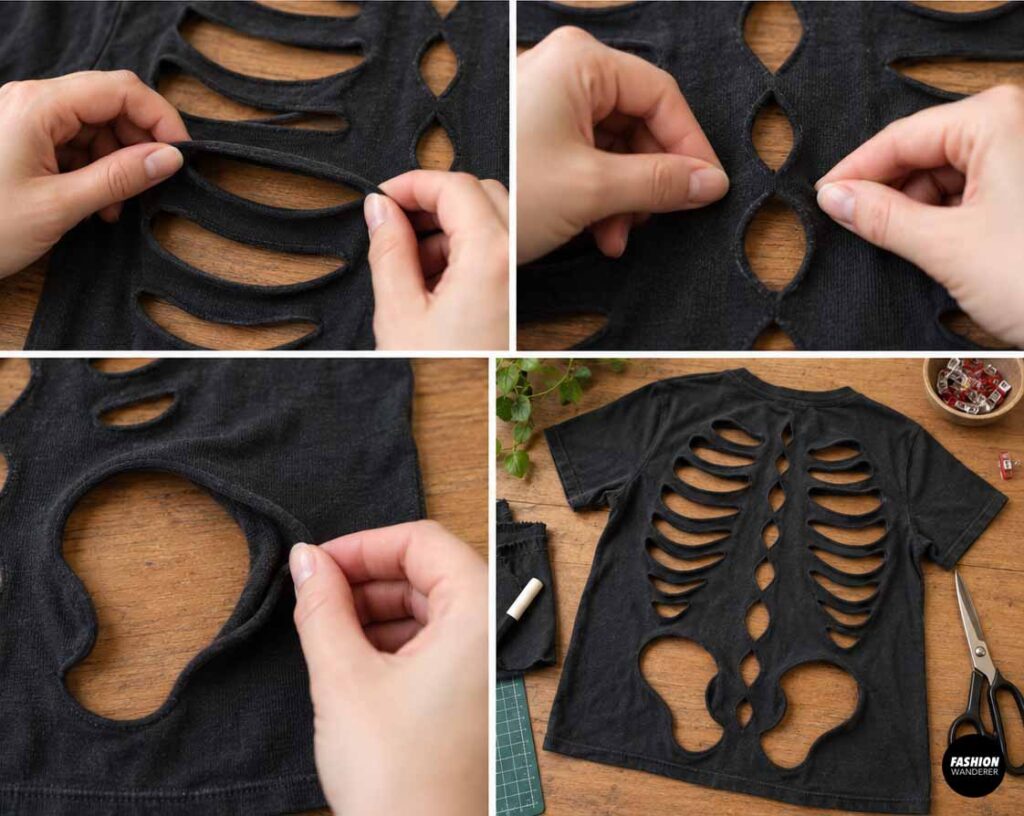
One advantage of using knit T-shirt fabric is that the raw edges usually do not fray like woven fabric.
Gently pull along each cut edge.
The knit fabric will naturally curl inward and create a softer finished appearance.
Do not stretch too aggressively.
Excessive pulling can distort the skeleton shapes or cause narrow sections of fabric to break.
Step 8: Reinforce Delicate Areas
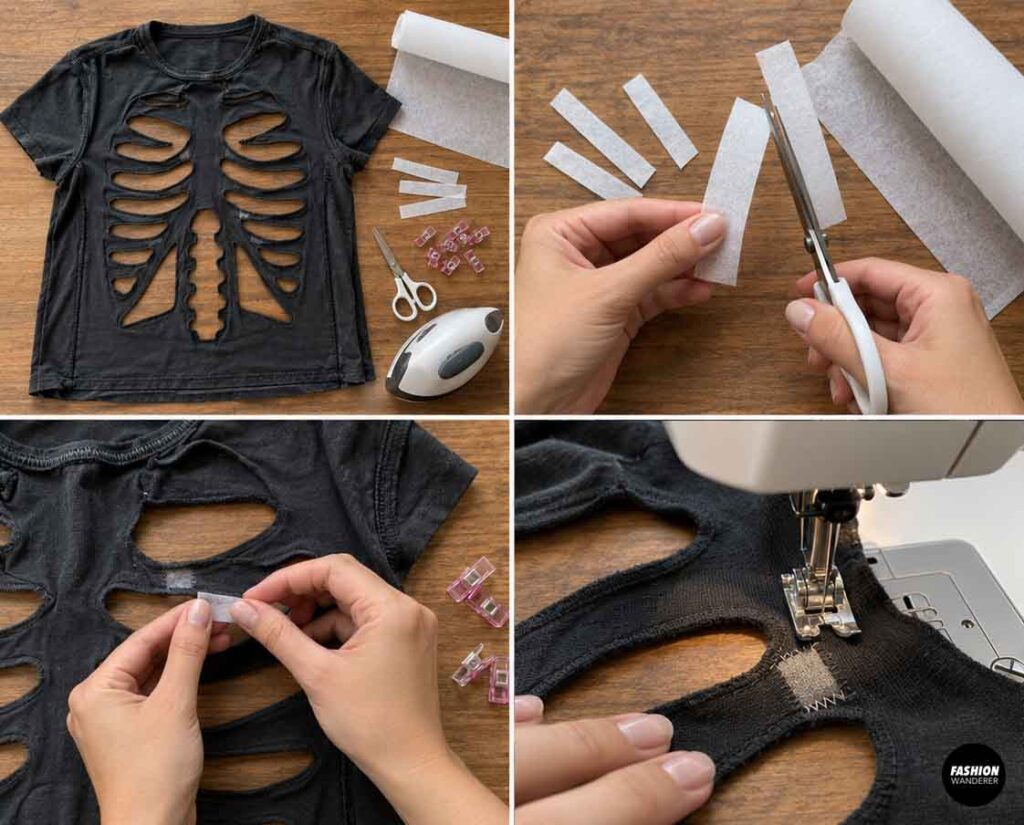
If some of the fabric between your cutouts feels too narrow, reinforce it.
Turn the T-shirt inside out.
Cut small strips of lightweight fusible interfacing and place them behind the weakest areas.
Follow the manufacturer’s instructions to fuse them in place.
You can also sew a few short zigzag stitches across delicate points.
This step is especially helpful if you plan to wear the skeleton shirt more than once.
Step 9: Customize the Sleeves
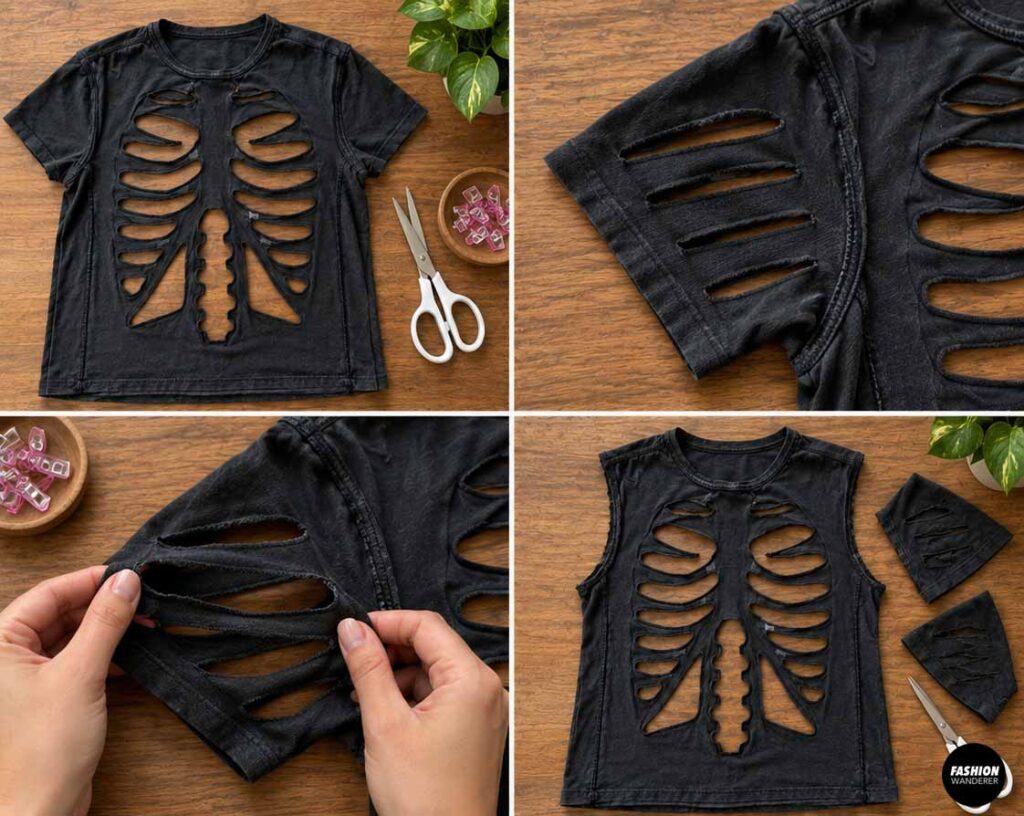
For an even more distressed Halloween look, alter the sleeves.
You can make three or four horizontal cuts across each sleeve.
Keep the cuts approximately ½ to 1 inch apart.
Gently stretch the openings so they curl.
Another option is to cut away the sleeves completely and turn the T-shirt into a skeleton tank top.
For a cleaner finish, leave the original sleeves unchanged.
Step 10: Adjust the Neckline
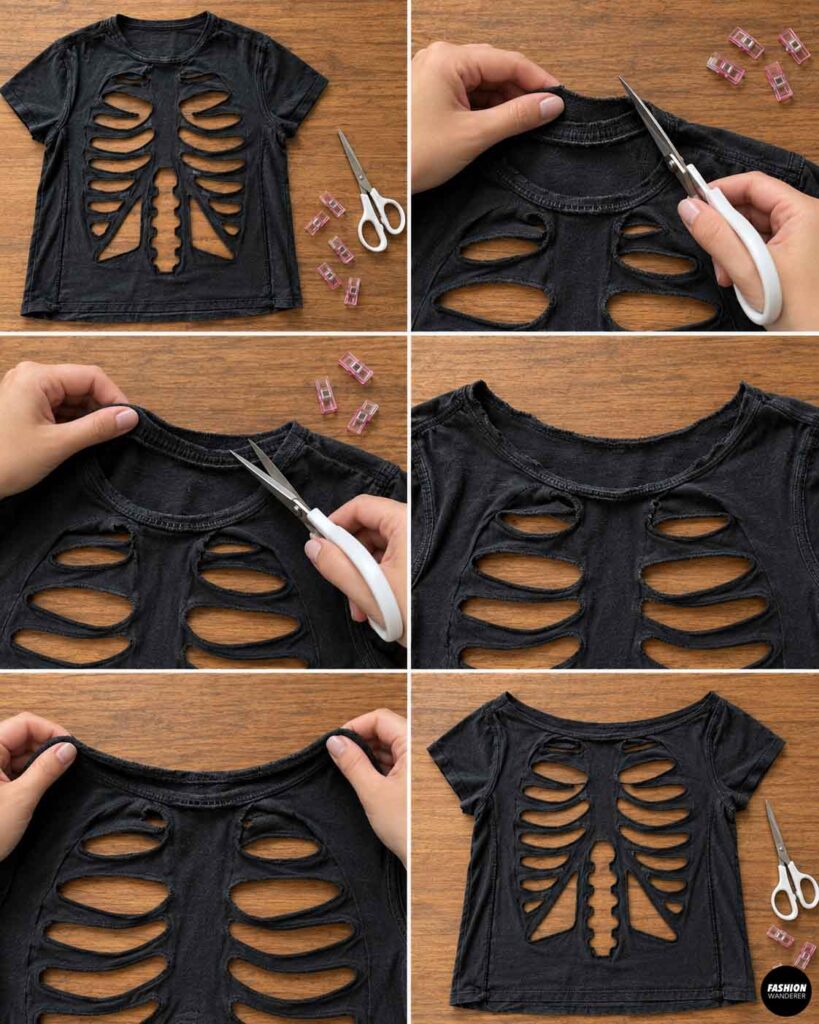
Try on the shirt and check the neckline.
If you want a relaxed off-the-shoulder style, carefully cut just outside the original neckband.
Start conservatively because knit fabric stretches.
You can always make the neckline larger after trying it on.
Gently stretch the cut edge to help it roll naturally.
Step 11: Add Optional Skeleton Details
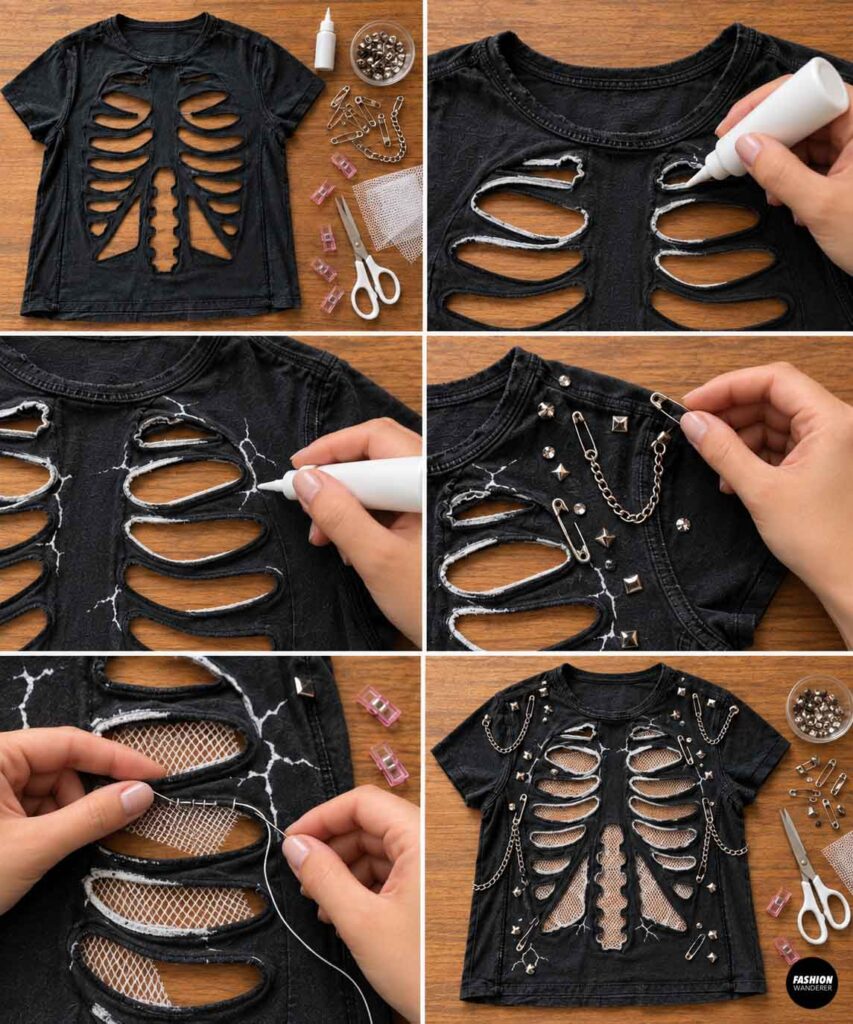
You can make your DIY skeleton top more dramatic with additional decorations.
Use white fabric paint to outline several ribs.
Add tiny painted cracks around the cutouts.
You can also attach silver safety pins, studs, rhinestones, or chains for a punk-inspired Halloween costume.
Another fun option is to sew small pieces of white mesh behind several openings.
Step 12: Layer the Skeleton Shirt
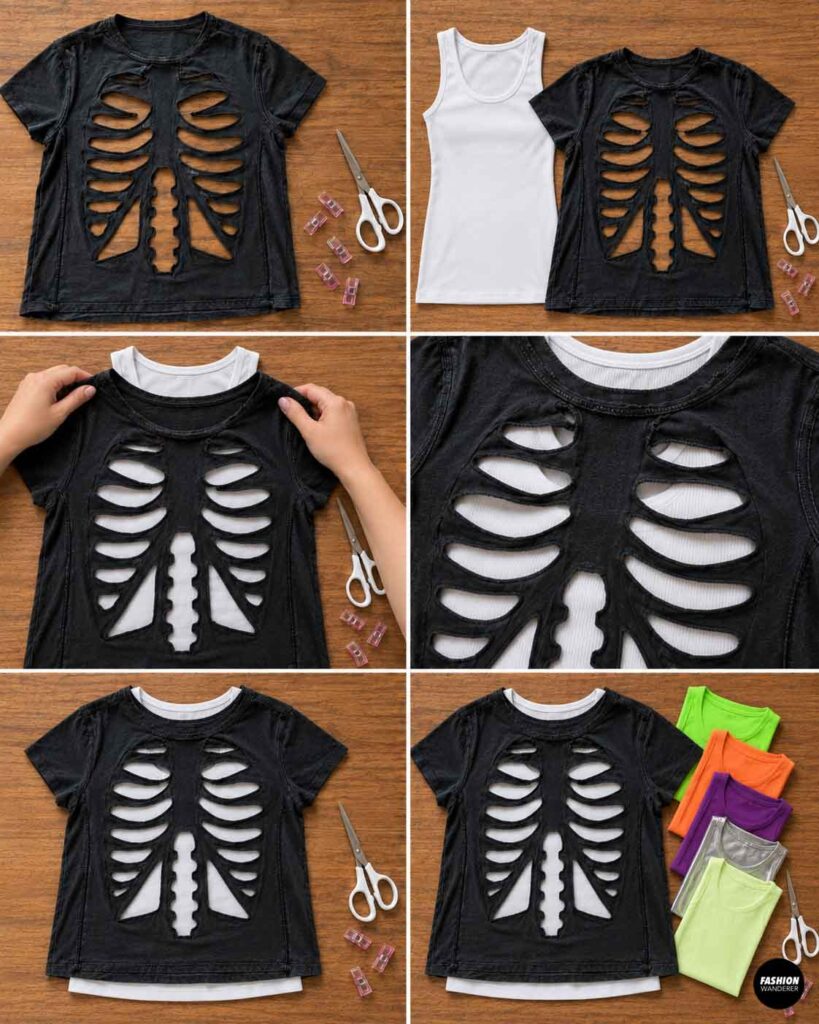
The easiest way to make the skeleton design stand out is to layer the finished black T-shirt over a fitted white tank or T-shirt.
The white fabric shows through the openings and creates the appearance of bones.
For a different Halloween look, experiment with:
- Neon green
- Bright orange
- Purple
- Metallic silver
- Glow-in-the-dark fabric
You can even change the layer underneath throughout the Halloween season.
Tips for Creating Clean Skeleton Cutouts
Always cut fewer and smaller openings first.
Once fabric is removed, you cannot put it back.
Keep enough fabric between the ribs to prevent the shirt from tearing during wear.
Sharp fabric scissors will give you much cleaner curves than dull household scissors.
If you are nervous about cutting directly into the shirt, practice your skeleton shapes on an old scrap of knit fabric first.
Easy Ways to Style Your DIY Skeleton Top
Pair your skeleton cutout T-shirt with black jeans, leggings, boots, or a simple black skirt.
Add skeleton makeup for a complete costume.
For a casual Halloween outfit, wear it with distressed denim and sneakers.
You can also create matching skeleton shirts for friends, couples, or family costumes using different colored shirts.
Final Thoughts
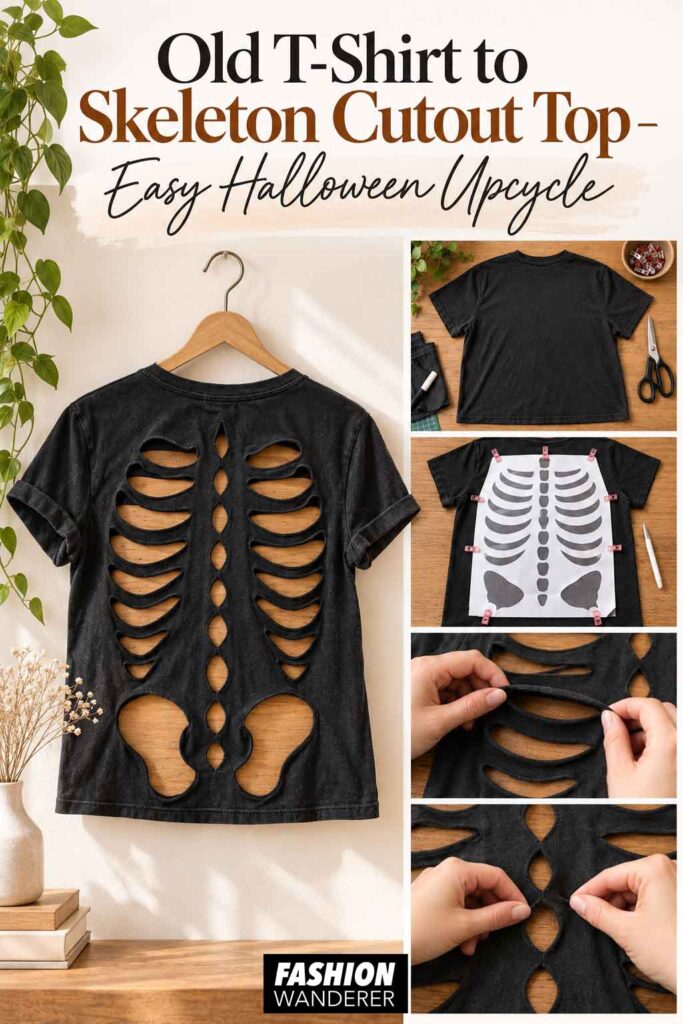
Transforming an old T-shirt into a DIY skeleton cutout top is one of the easiest ways to create a unique Halloween costume without buying new clothing.
The project requires very little sewing, uses inexpensive materials, and can be completed with a shirt that might otherwise sit unused in your closet.
Once you understand the basic cutting technique, customize the rib shapes, neckline, sleeves, and layering colors to create your own version.
Whether you are planning a last-minute costume or simply looking for an easy Halloween T-shirt upcycle, this skeleton cutout top is a fun beginner-friendly project that turns an ordinary shirt into something completely different.