
A slouchy crochet shoulder bag with oversized tassels is the perfect handmade accessory for fall. It has a relaxed, slightly bohemian shape, plenty of room for everyday essentials, and those dramatic tassels give the finished bag a stylish boutique look.
These easy October crochet projects are also surprisingly beginner-friendly. You only need to know a few basic crochet stitches, and the bag is constructed from simple rectangular pieces rather than complicated shaping.
Use a soft neutral yarn for a minimalist everyday bag, or choose rust, olive, mustard, chocolate brown, burgundy, or cream for a cozy fall-inspired version.
In this step-by-step tutorial, you will learn how to crochet a slouchy shoulder bag, create a sturdy strap, assemble the pieces, and make oversized yarn tassels for the finishing touch.
Finished Bag Size
The finished bag measures approximately:
14 inches wide x 12 inches tall
The shoulder strap measures approximately:
26 to 30 inches long
You can easily adjust both measurements if you prefer a larger tote or a shorter shoulder strap.
Materials You Will Need
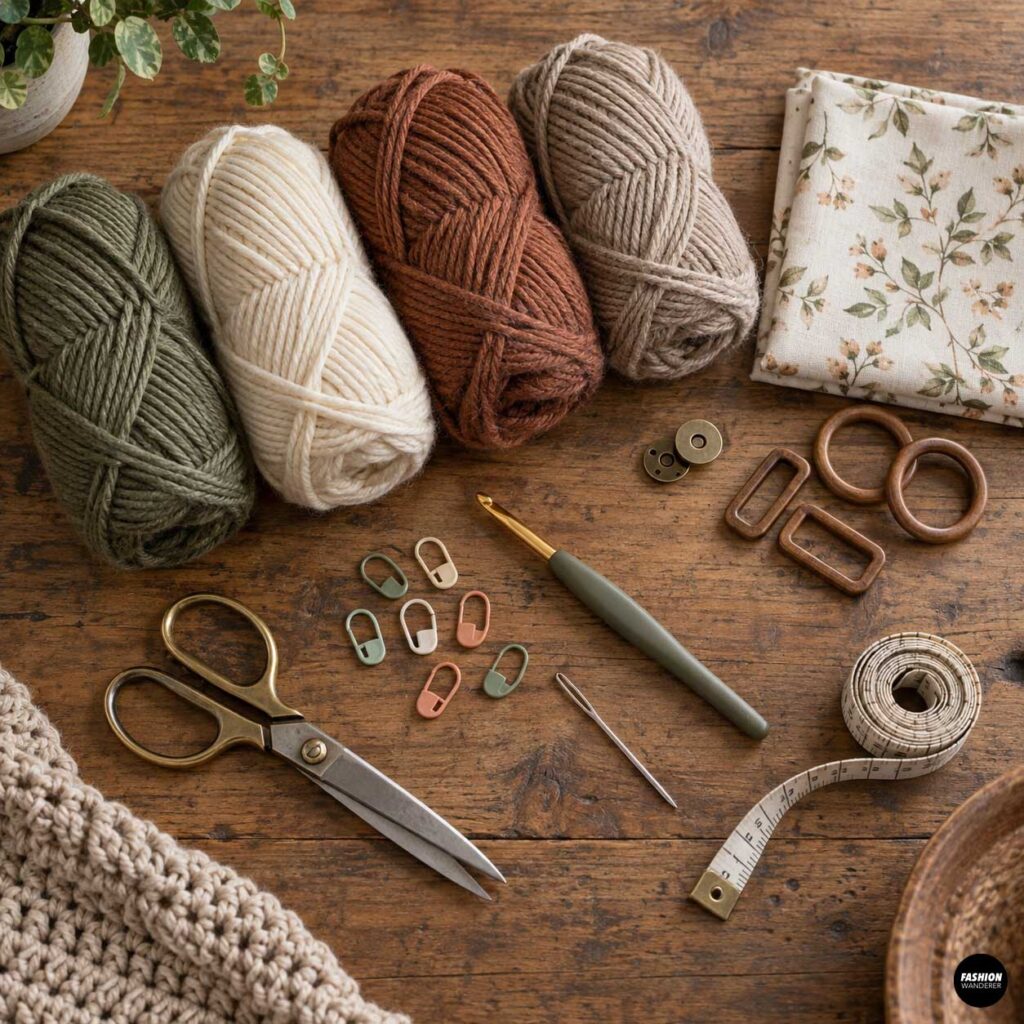
- Approximately 500 to 600 yards Category 4 worsted-weight yarn
- 5.5 mm crochet hook
- Yarn needle
- Scissors
- Stitch markers
- Measuring tape
- Optional fabric lining
- Optional magnetic snap
- Optional wooden or metal bag hardware
Recommended Yarn
Choose a yarn with enough structure to hold the bag shape.
Cotton, cotton-blend, acrylic, or wool-blend yarns work well.
For a softer, slouchier bag, choose a relaxed acrylic or wool blend.
For a firmer bag, cotton yarn is a great option.
Crochet Abbreviations
- ch = chain
- sc = single crochet
- hdc = half double crochet
- sl st = slip stitch
- st = stitch
- sts = stitches
This pattern uses mostly half double crochet, which creates a soft but substantial fabric.
How to Crochet a Slouchy Shoulder Bag with Tassels
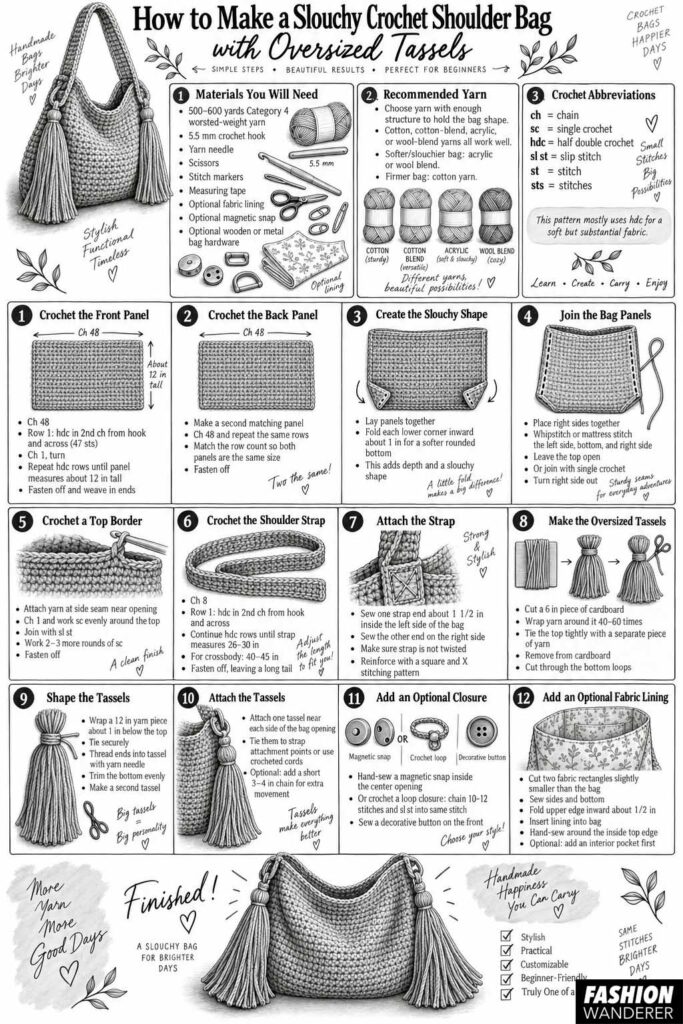
Step 1: Crochet the Front Panel
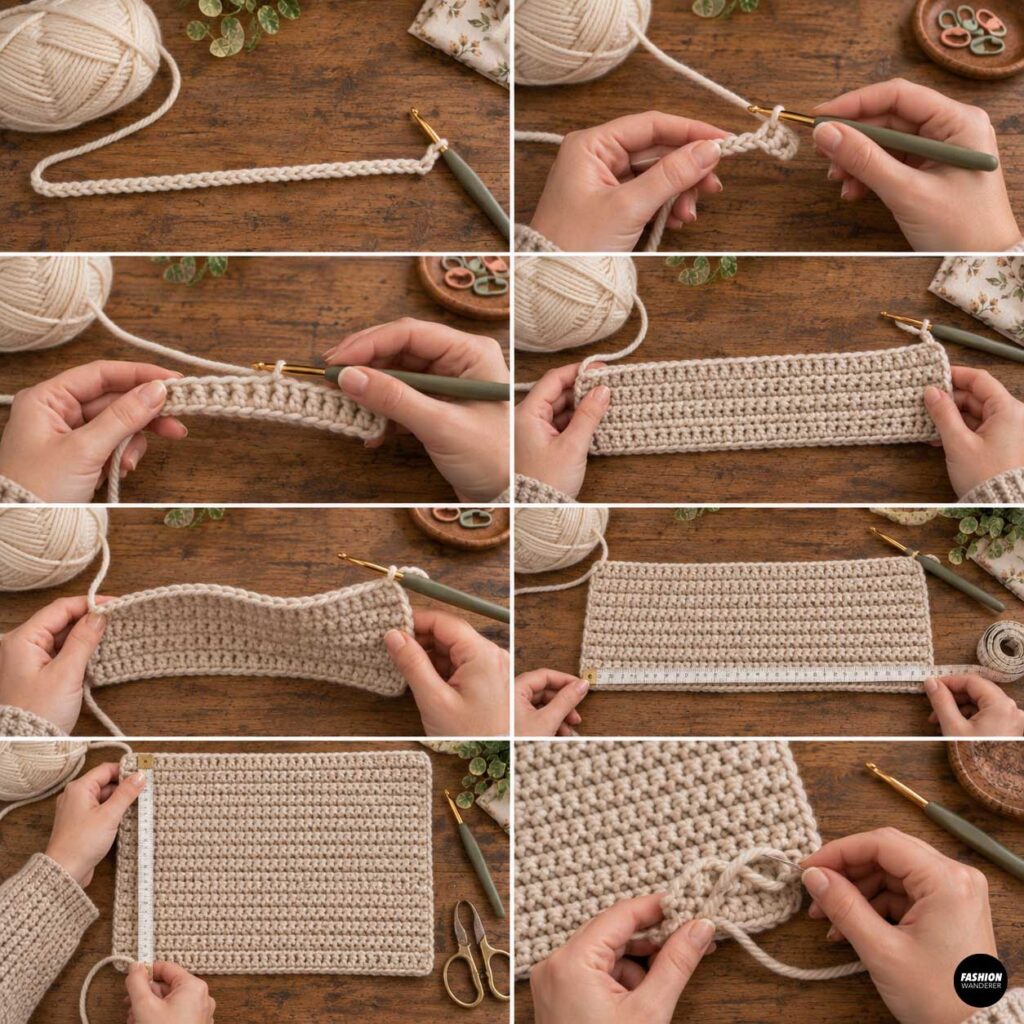
Begin by making a foundation chain approximately 15 inches wide.
For most medium-weight yarns, this will be around:
Ch 48
Row 1: Hdc in the second chain from the hook and in every chain across.
You should have approximately 47 stitches.
Ch 1 and turn.
Row 2: Hdc in each stitch across.
Repeat Row 2 until the panel measures approximately 12 inches tall.
Fasten off and weave in the yarn tail.
Your first rectangle is complete.
Step 2: Crochet the Back Panel
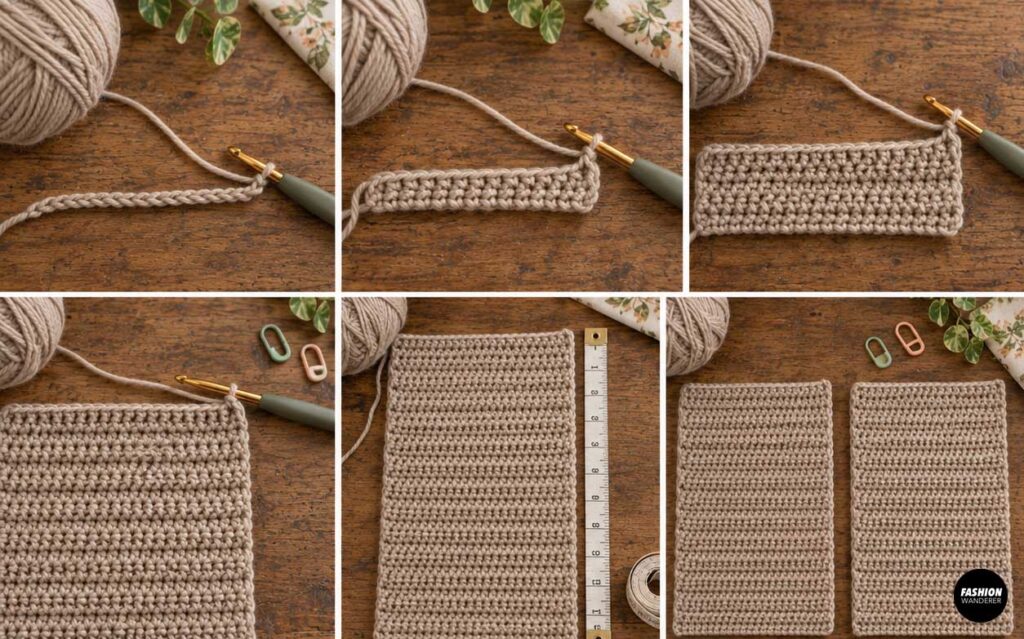
Make a second panel exactly the same way.
Ch 48.
Work one row of half double crochet across.
Continue working rows until the second panel measures approximately 12 inches tall.
Try to match the row count of your first panel so both pieces are the same size.
Fasten off.
Step 3: Create the Slouchy Shape
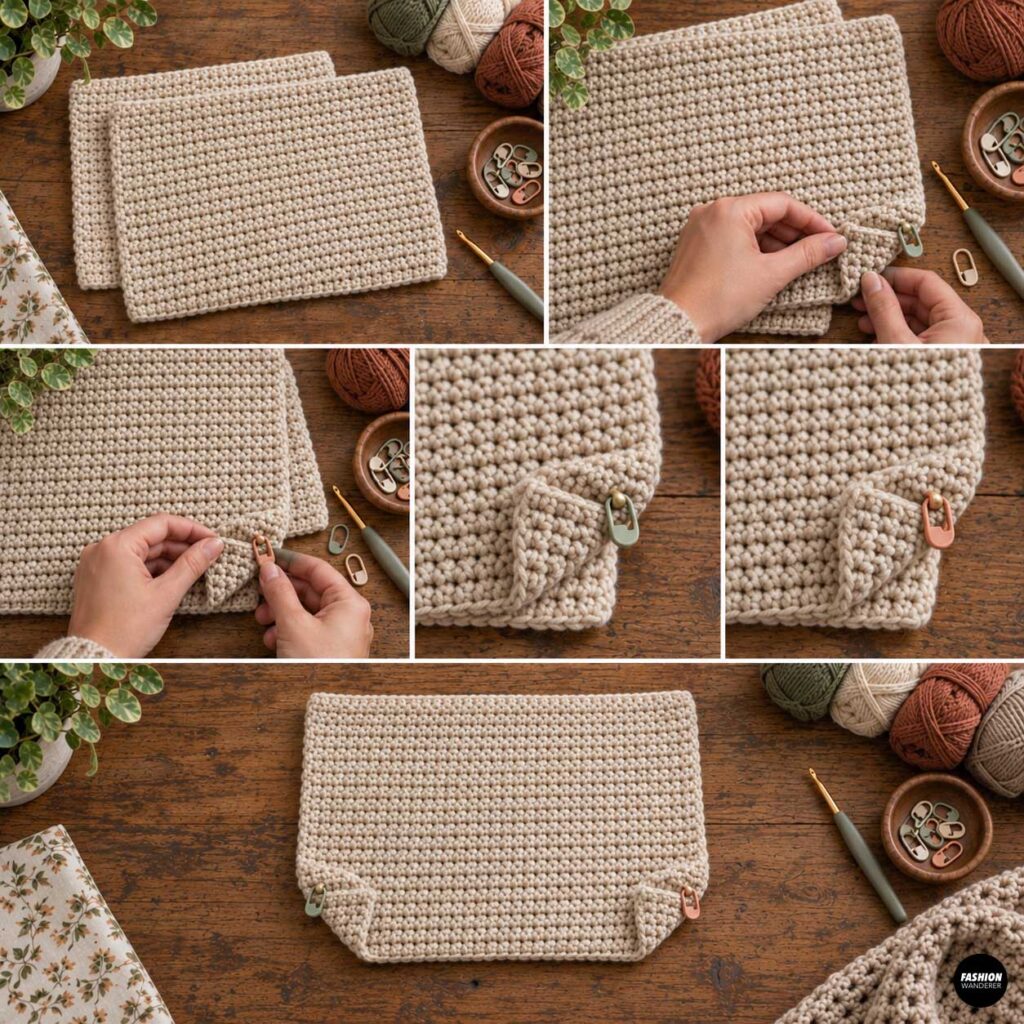
Lay the front and back panels on top of each other.
You can leave the rectangles exactly as they are, but slightly rounding the bottom corners will create a softer slouchy shape.
To do this, fold each lower corner inward approximately 1 inch.
Pin or hold the fold in place.
When the bag is seamed, these small folded corners create extra depth and make the bag look less flat.
Step 4: Join the Bag Panels
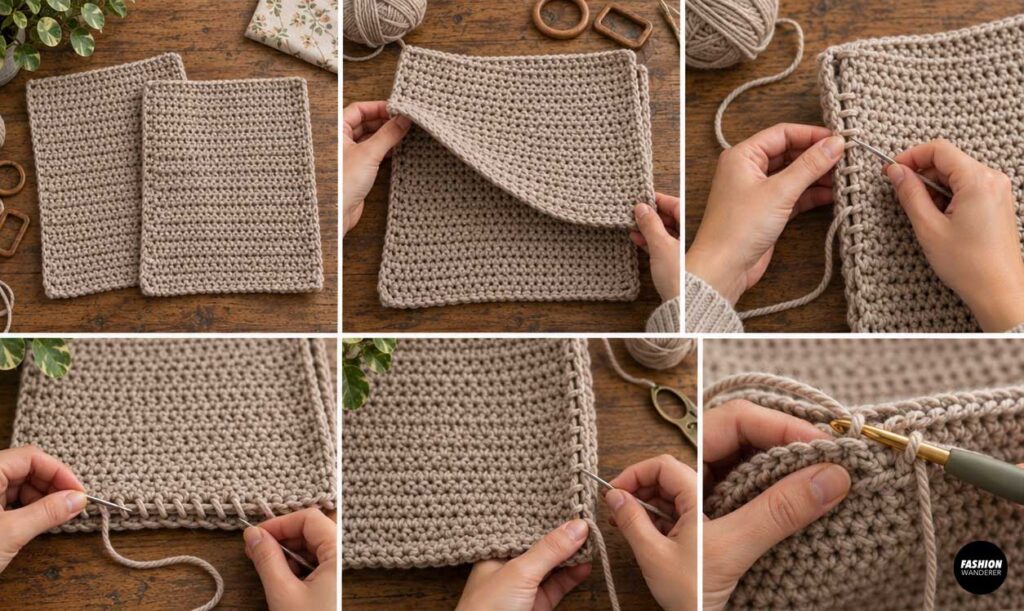
Place the panels with the right sides facing each other.
Using your yarn needle and a long piece of matching yarn, whipstitch or mattress stitch along:
- The left side
- Across the bottom
- The right side
Leave the top open.
You can also join the panels using single crochet.
If you use single crochet, work evenly through both layers around the sides and bottom.
Turn the bag right side out.
The body of your crochet shoulder bag should now have a relaxed pouch-like shape.
Step 5: Crochet a Top Border
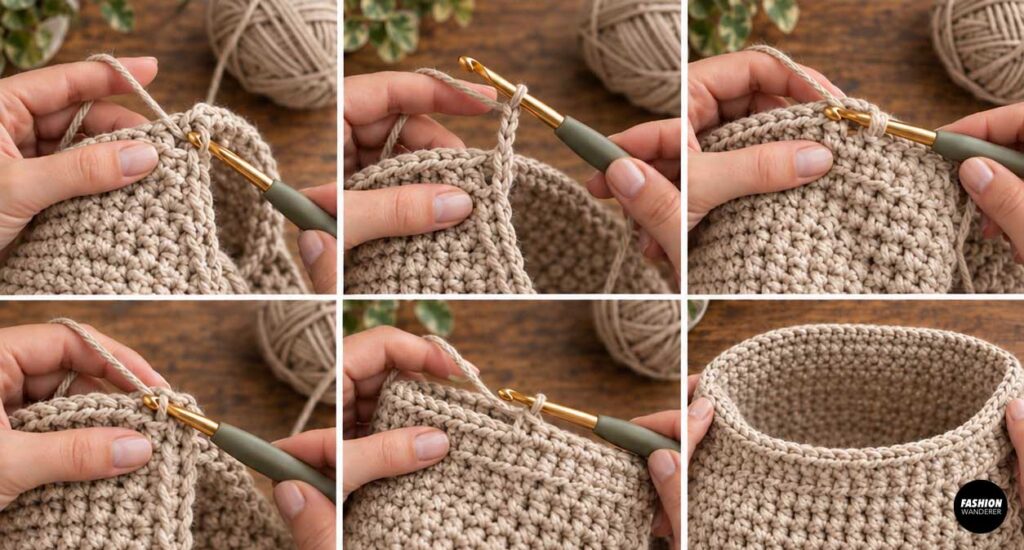
Attach yarn at one side seam near the opening.
Ch 1.
Work one single crochet evenly around the entire top opening.
Slip stitch into the first stitch to join.
Work two to three more rounds of single crochet.
This creates a stronger top edge and helps prevent the bag from stretching.
Fasten off.
Step 6: Crochet the Shoulder Strap
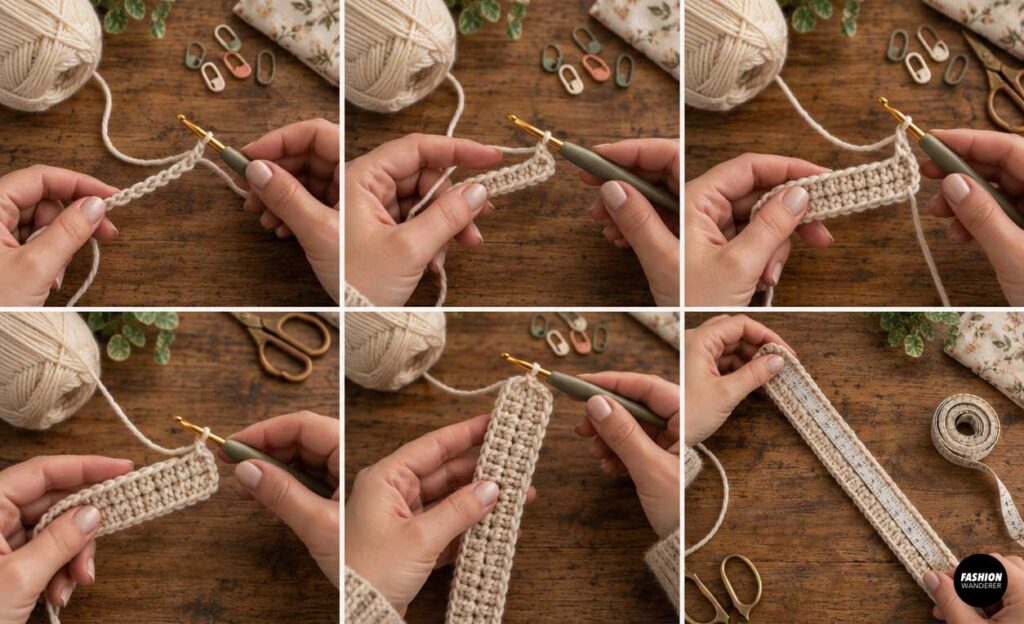
Now it is time to make the strap.
Ch 8.
Row 1: Hdc in the second chain from the hook and across.
Ch 1 and turn.
Continue working rows of half double crochet until the strap measures approximately 26 to 30 inches long.
If you prefer a crossbody bag, continue crocheting until the strap measures approximately 40 to 45 inches.
Fasten off, leaving a long yarn tail.
Step 7: Attach the Strap
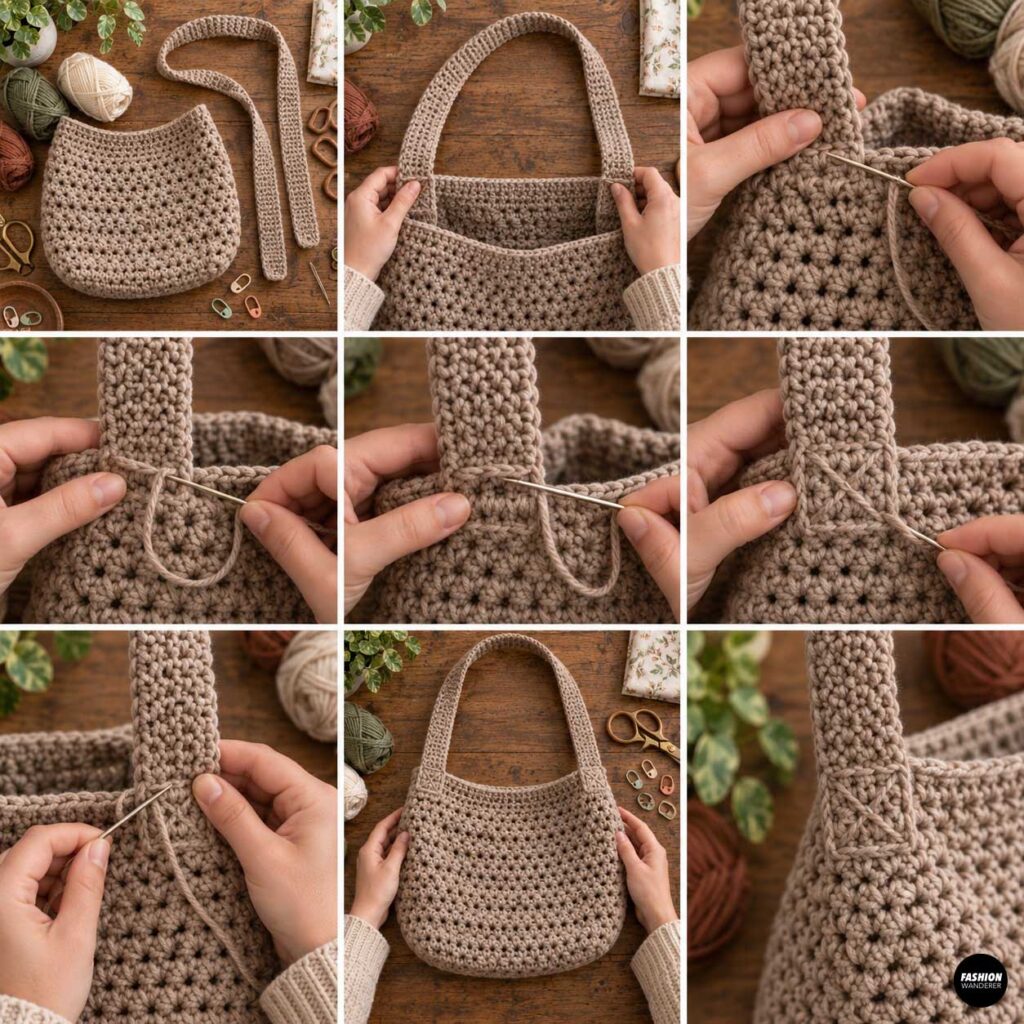
Position one end of the strap approximately 1½ inches inside the left side of the bag.
Position the opposite end on the right side.
Make sure the strap is not twisted.
Use a yarn needle and matching yarn to stitch each strap end securely to the bag.
Sew a square shape with an X through the center for extra strength.
Because bags carry weight, reinforce this area with several passes of yarn.
Step 8: Make the Oversized Tassels
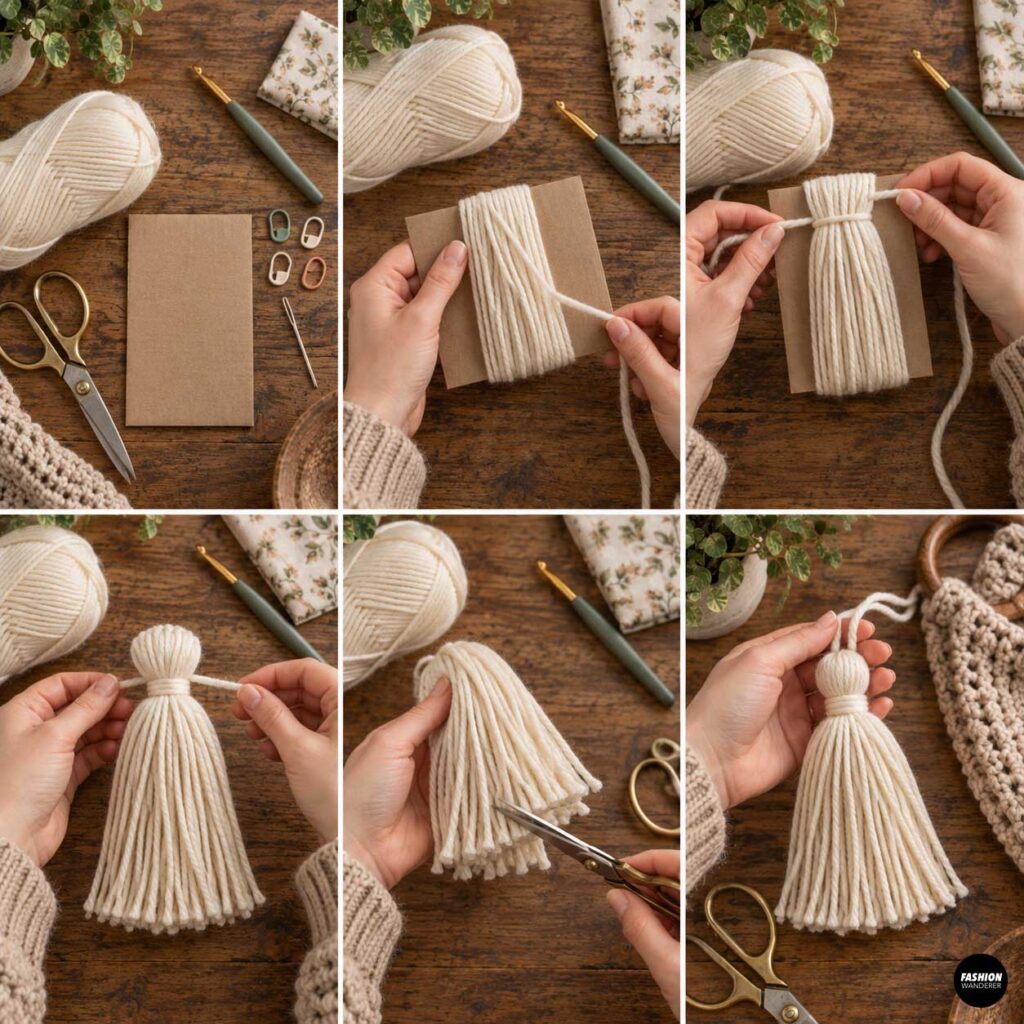
The oversized tassels are what give this bag its statement look.
Cut a piece of cardboard approximately:
6 inches long
Wrap yarn around the cardboard approximately 40 to 60 times.
The more yarn you use, the fuller your tassel will be.
Slide a separate piece of yarn under the wrapped yarn at the top and tie it tightly.
Remove the yarn bundle from the cardboard.
Cut through the loops along the opposite end.
Step 9: Shape the Tassels
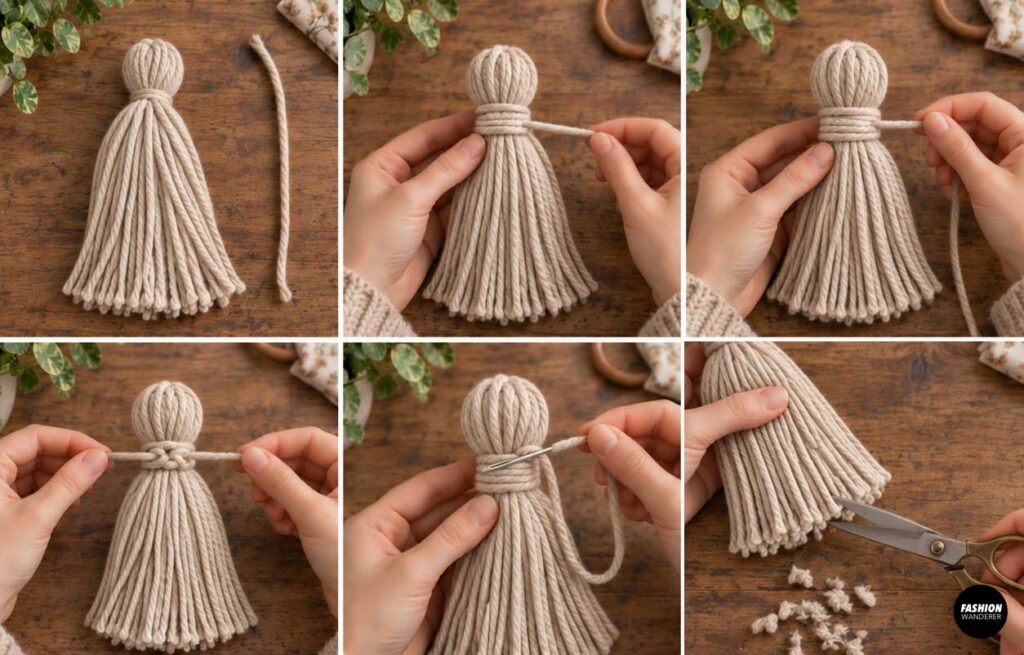
Cut another piece of yarn approximately 12 inches long.
Wrap this piece around the tassel approximately 1 inch below the top.
Wrap it several times and tie securely.
Thread the ends through the tassel with a yarn needle.
Trim the bottom ends so they are even.
Repeat the process to make a second oversized tassel.
Step 10: Attach the Tassels
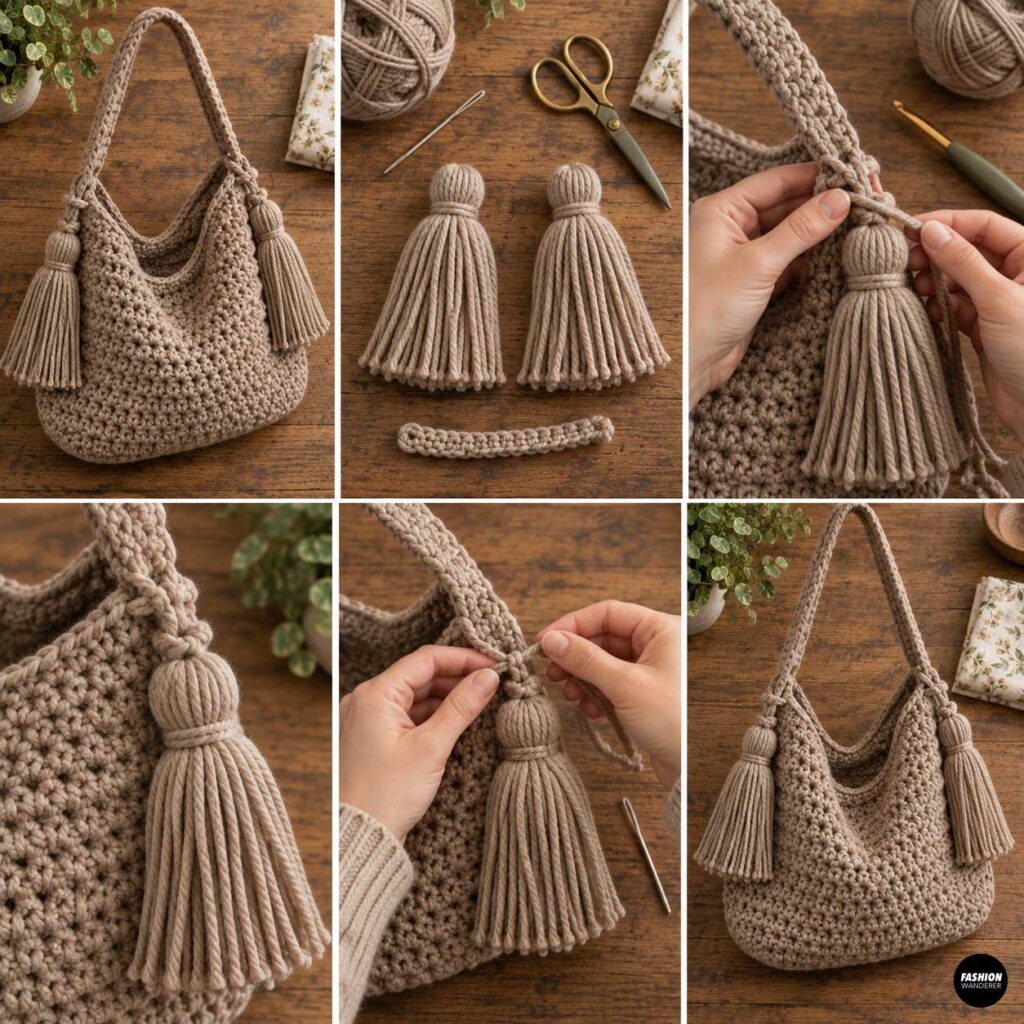
Attach one tassel near each side of the bag opening.
You can tie them directly onto the strap attachment points or attach them using crocheted cords.
For extra movement, make a short chain approximately 3 to 4 inches long and attach the tassel to the end.
This creates a fun swinging tassel detail when the bag is worn.
Step 11: Add an Optional Closure
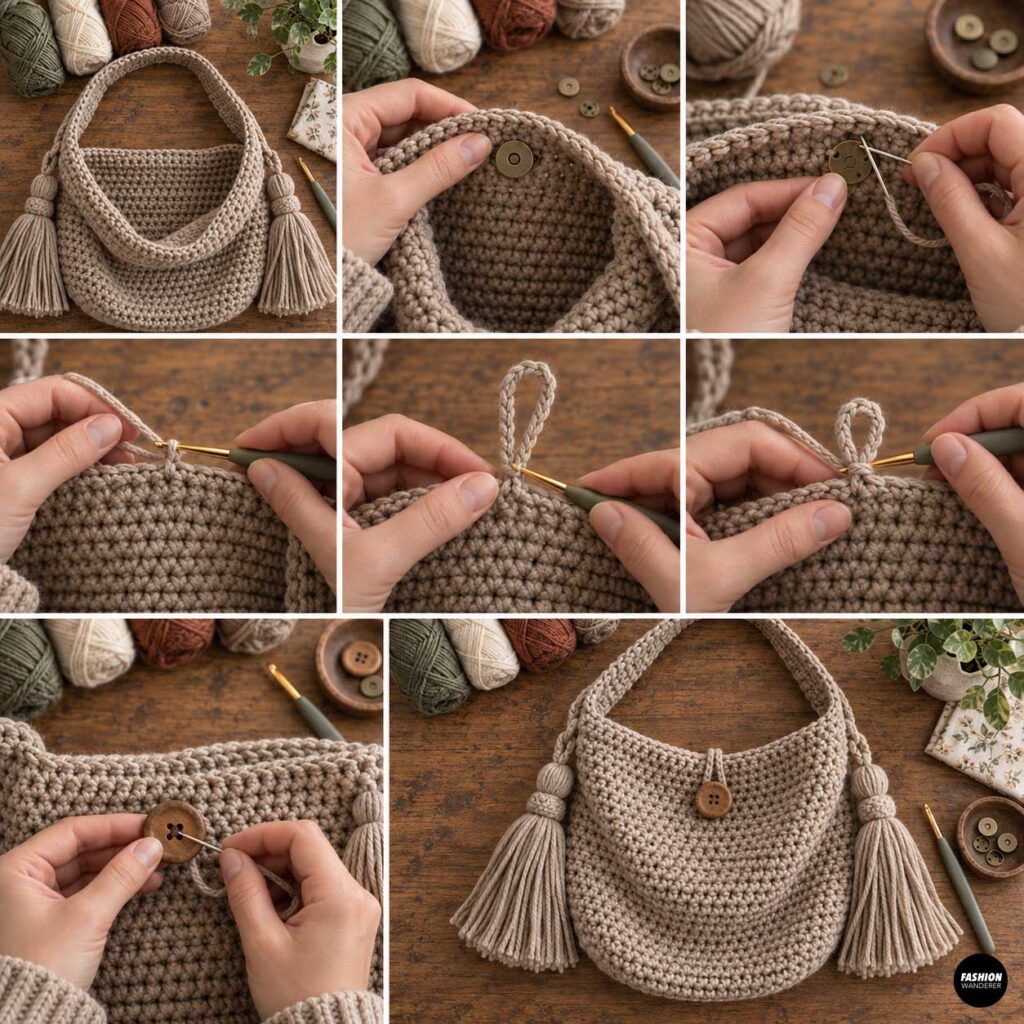
If you want the bag to close securely, add a magnetic snap.
Hand-sew the snap to the inside center of the bag opening.
You can also crochet a simple loop closure.
Attach yarn at the center back.
Chain approximately 10 to 12 stitches.
Slip stitch back into the same stitch to create a loop.
Sew a decorative button to the front of the bag.
Step 12: Add an Optional Fabric Lining
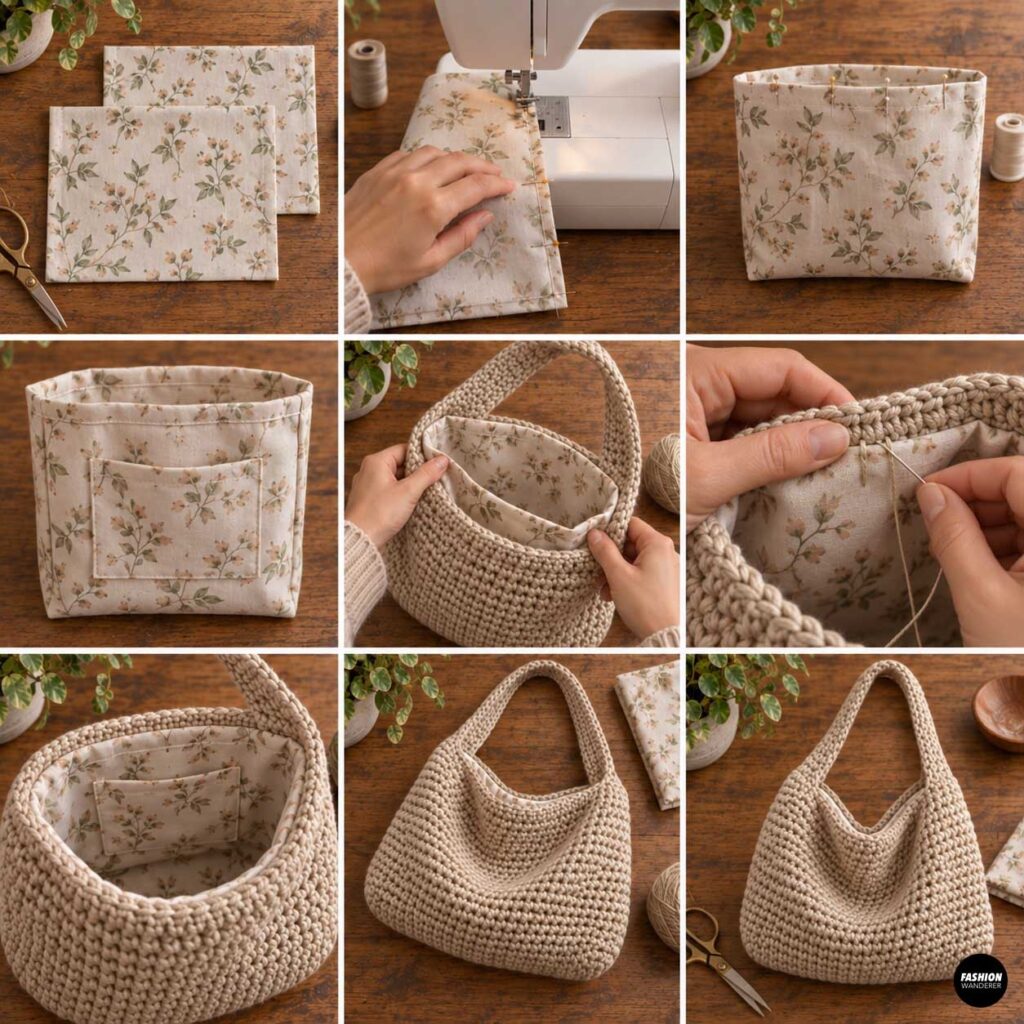
A fabric lining can make your crochet bag more durable.
Cut two fabric rectangles slightly smaller than the crocheted bag.
Sew the fabric pieces together along the sides and bottom.
Fold the upper edge inward approximately ½ inch.
Insert the lining into the bag.
Hand-sew the lining around the inside top edge using small stitches.
You can also add an interior pocket before attaching the lining.
How to Customize Your Crochet Shoulder Bag
Once you know the basic construction, there are many ways to personalize your bag.
Try adding:
- Two-tone color blocking
- Striped crochet panels
- Granny square pockets
- Wooden beads on the tassels
- Leather strap tabs
- Embroidered flowers
- Crochet flowers
- Fringe
- Decorative buttons
- Contrasting lining fabric
You can also make smaller tassels and attach several along the bottom edge.
Tips for a Professional Finish
Use a smaller hook if your stitches feel too loose.
Bags need a fairly dense crochet fabric so small items do not fall through the stitches.
Keep your tension consistent while crocheting both panels.
Count rows so the front and back pieces remain the same size.
Most importantly, reinforce your strap attachment points. These areas take the most stress when the bag is being used.
Final Thoughts
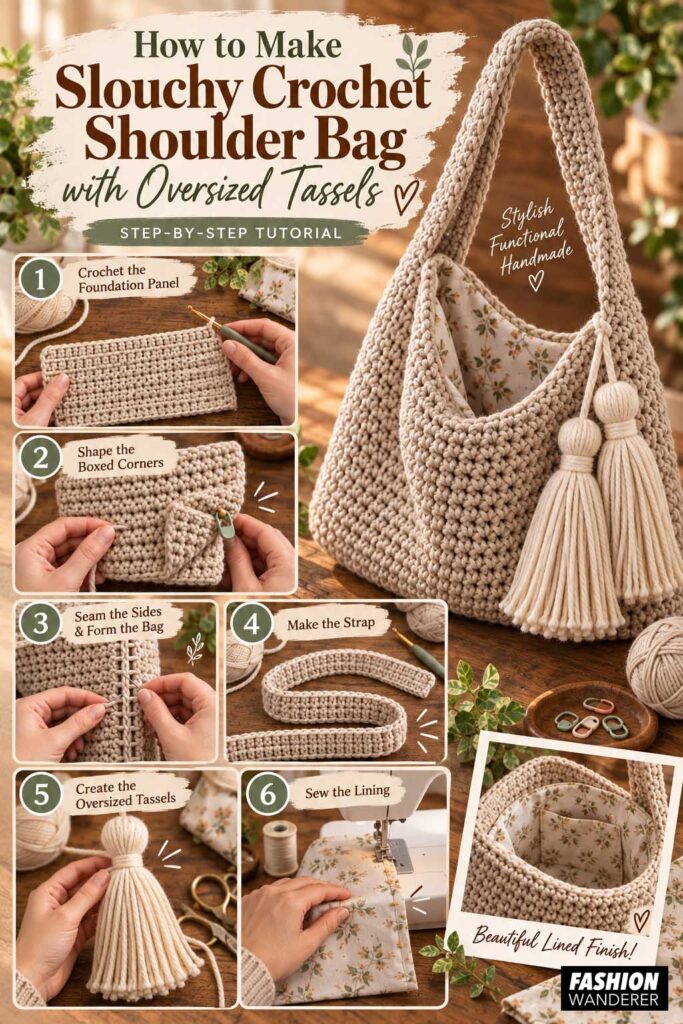
Making a slouchy crochet shoulder bag with oversized tassels is a fun way to create a trendy handmade accessory without complicated crochet shaping.
The simple rectangular construction makes this project approachable for beginners, while the oversized tassels, sturdy strap, and optional lining give the finished bag a polished handmade look.
Choose warm autumn colors for a cozy seasonal accessory or make one in cream, black, or tan for an everyday bag you can use throughout the year.
Once you make your first one, experiment with different yarn colors, strap lengths, tassel sizes, and embellishments to create a collection of unique crochet shoulder bags for yourself, handmade gifts, or even products to sell.