
A Baby Knot Hat and Mittens Set is one of the cutest and most practical sewing projects you can make for a newborn. The soft knot hat helps keep a baby’s head warm while allowing room to adjust the fit as they grow, and the matching no-scratch mittens help protect delicate skin from tiny fingernails. Together, they create an adorable handmade gift that’s perfect for baby showers, hospital coming-home outfits, or newborn photo sessions.
The best part? This project is beginner-friendly and requires only basic sewing skills. If you’ve never sewn with knit fabric before, don’t worry! This detailed tutorial will guide you through every step of making your own DIY Baby Knot Hat and Mittens Set using stretchy jersey knit fabric.
Handmade baby gifts are extra special because they’re made with love and can be customized for the little one receiving them. These beginner-friendly DIY baby gifts are simple to sew, practical for new parents, and perfect for using cute fabrics from your stash.
Why You’ll Love This Project
- Perfect beginner knit sewing project
- Makes a thoughtful baby shower gift
- Soft and comfortable for newborns
- Uses small amounts of knit fabric
- Quick to sew in under an hour
- Great for matching baby outfits
- Easy to customize with different prints and colors
Materials You’ll Need
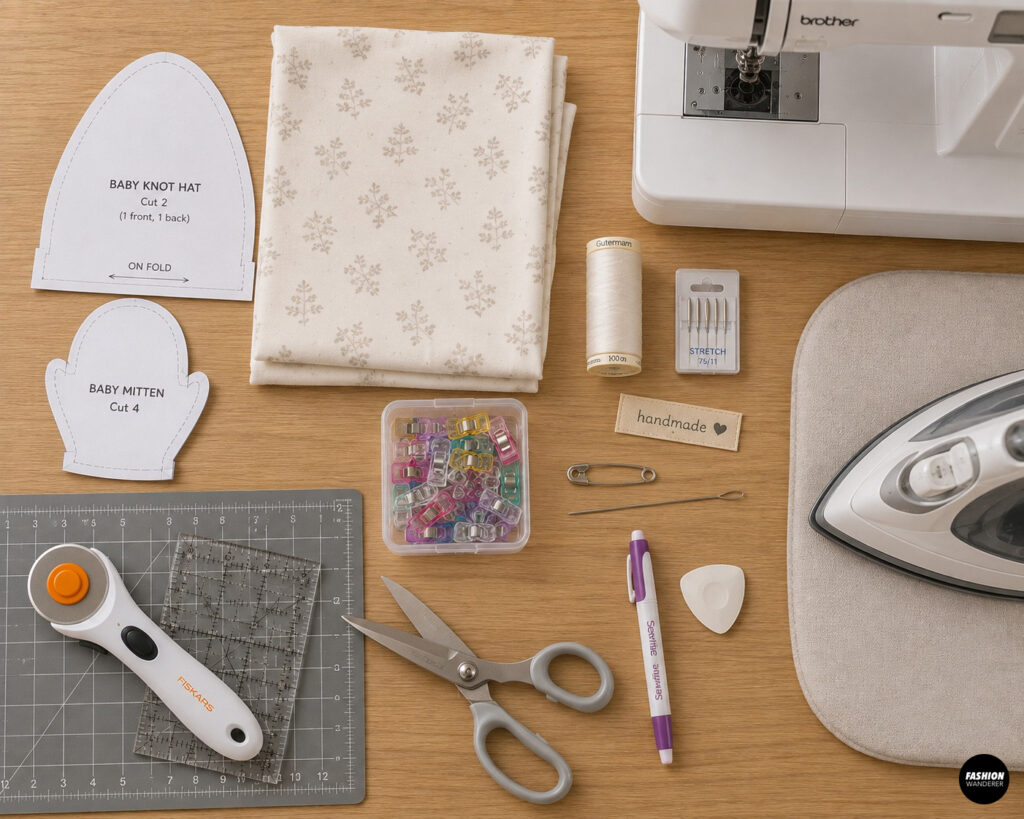
- Baby knot hat and mitten sewing pattern
- ½ yard cotton jersey knit or bamboo knit fabric
- Ballpoint or stretch sewing machine needle (75/11 or 80/12)
- Polyester thread
- Sewing machine or serger
- Fabric scissors or rotary cutter
- Cutting mat and ruler
- Sewing clips
- Fabric marker or tailor’s chalk
- Iron and ironing board
- Safety pin or bodkin (optional)
- Optional: Knit label or personalized tag
Finished Size
This tutorial fits newborn to approximately 3 months.
Approximate finished measurements:
Knot Hat
- Circumference: 13–14 inches (unstretched)
- Height before tying: 11–12 inches
Mittens
- Length: 4 inches
- Width: 3 inches
Because knit fabric stretches, the set provides a comfortable fit without feeling too tight.
Easy DIY Baby Knot Hat and Mittens Set
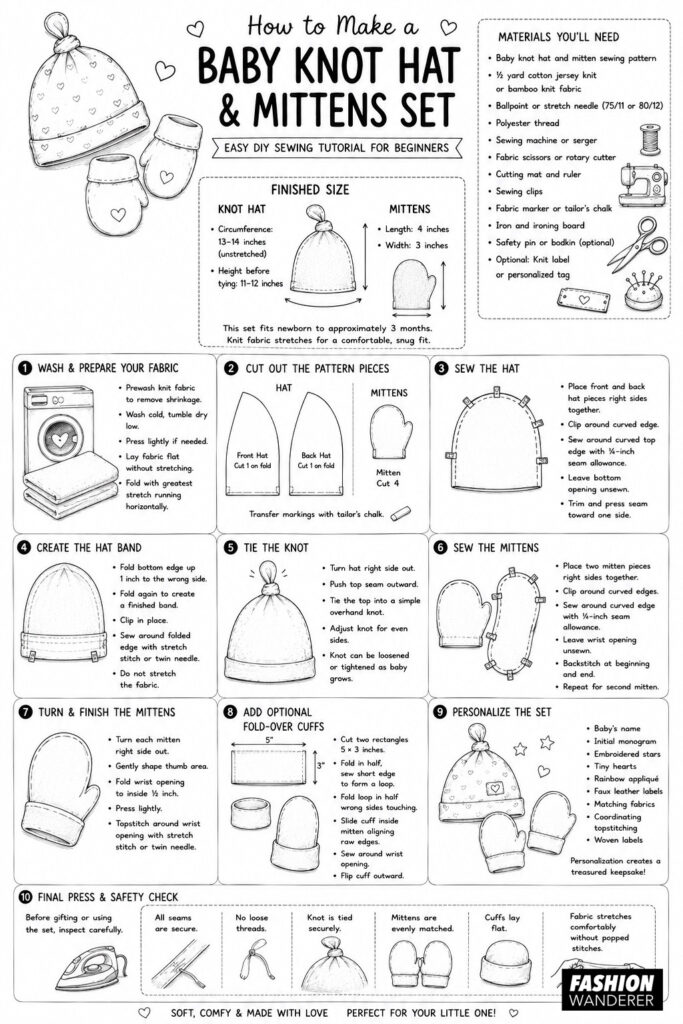
Step 1: Wash and Prepare Your Fabric
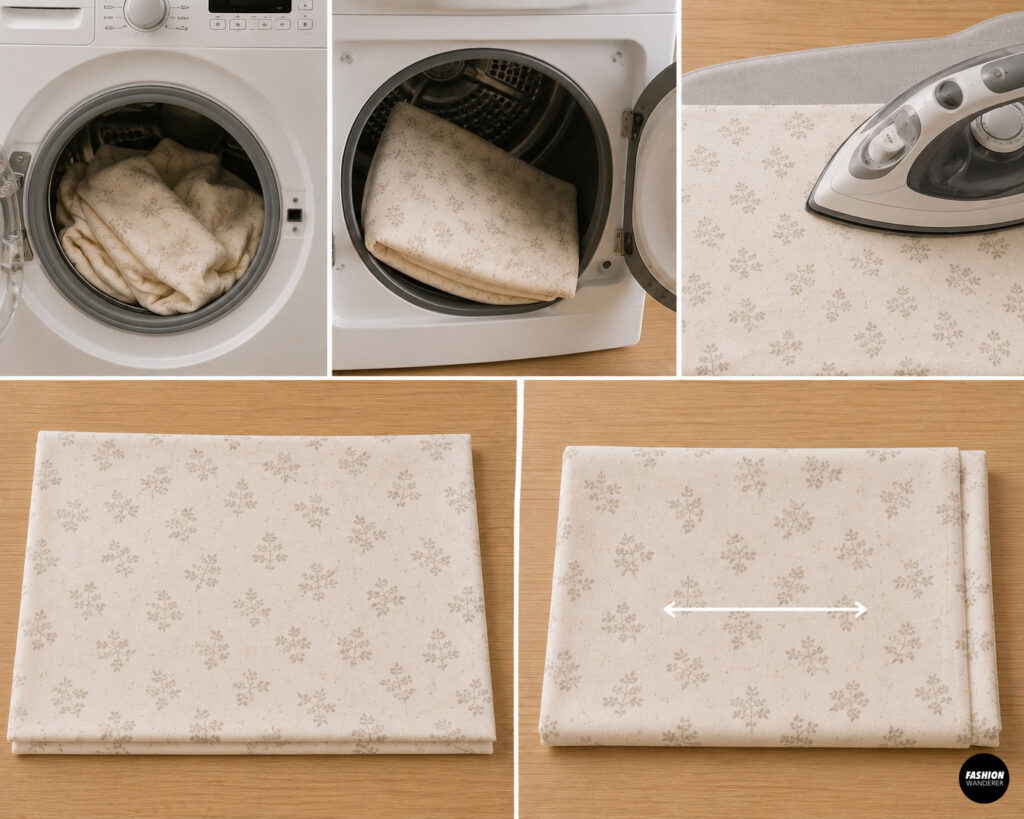
Always prewash knit fabric before sewing to remove any shrinkage.
Wash using cold water and tumble dry on low heat.
Press lightly using a warm iron if necessary.
Lay the fabric flat without stretching it.
Fold the fabric with the greatest stretch running horizontally across the hat and mitten pieces.
This ensures a snug yet comfortable fit.
Step 2: Cut Out the Pattern Pieces
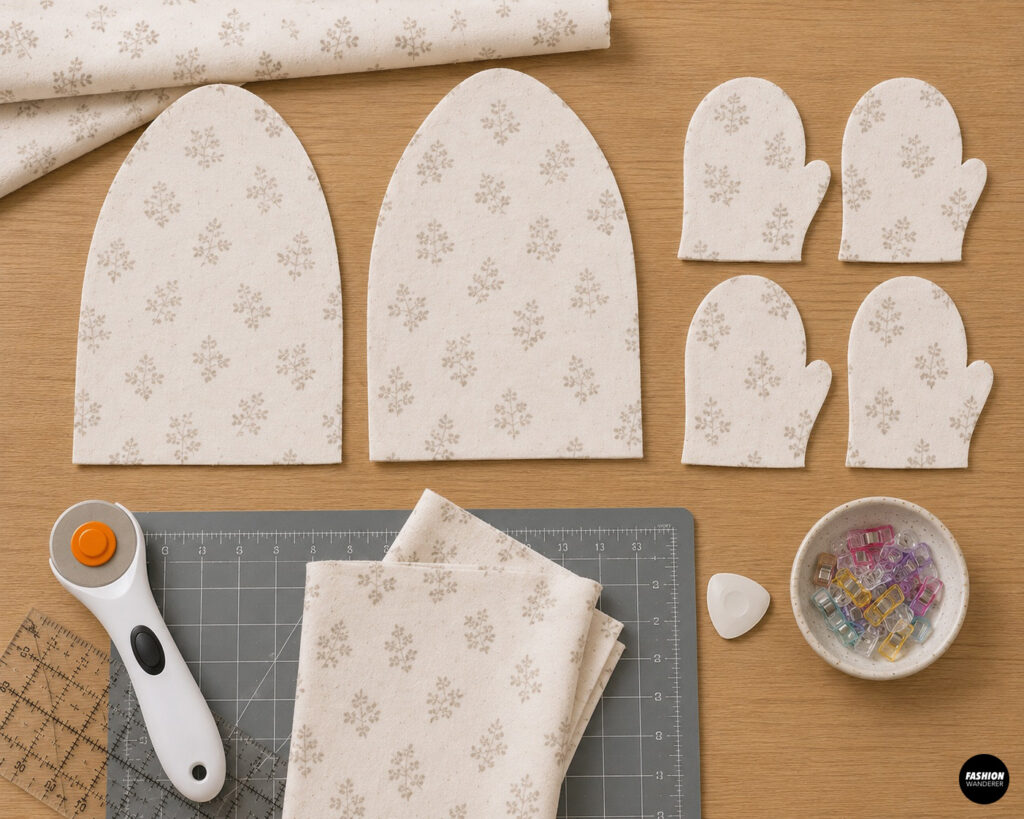
Using your sewing pattern, cut:
Hat
- Front Hat – Cut 1 on fold
- Back Hat – Cut 1 on fold
Mittens
- Mitten – Cut 4
Transfer any pattern markings using tailor’s chalk.
Keep the fabric flat while cutting to avoid distortion.
Step 3: Sew the Hat
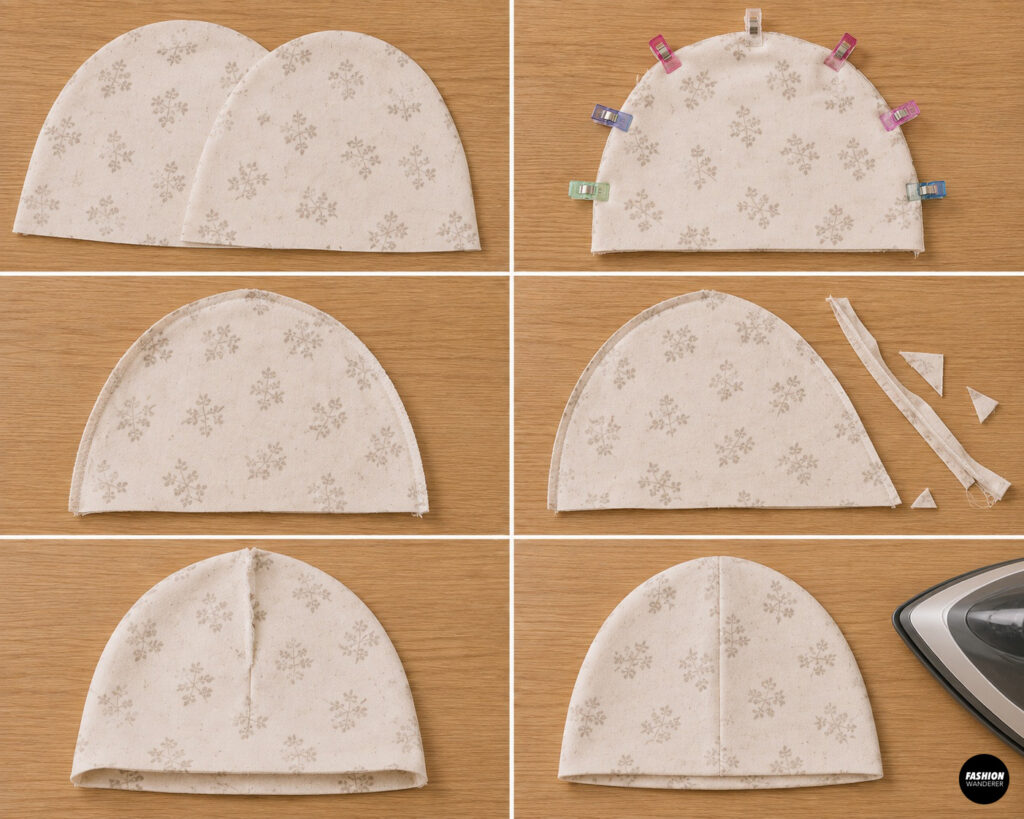
Place the front and back hat pieces right sides together.
Clip around the curved edge.
Using a stretch stitch, narrow zigzag stitch, or serger, sew around the curved top edge using a ¼-inch seam allowance.
Leave the bottom opening unsewn.
Trim any uneven seam allowance if needed.
Press the seam gently toward one side.
Step 4: Create the Hat Band
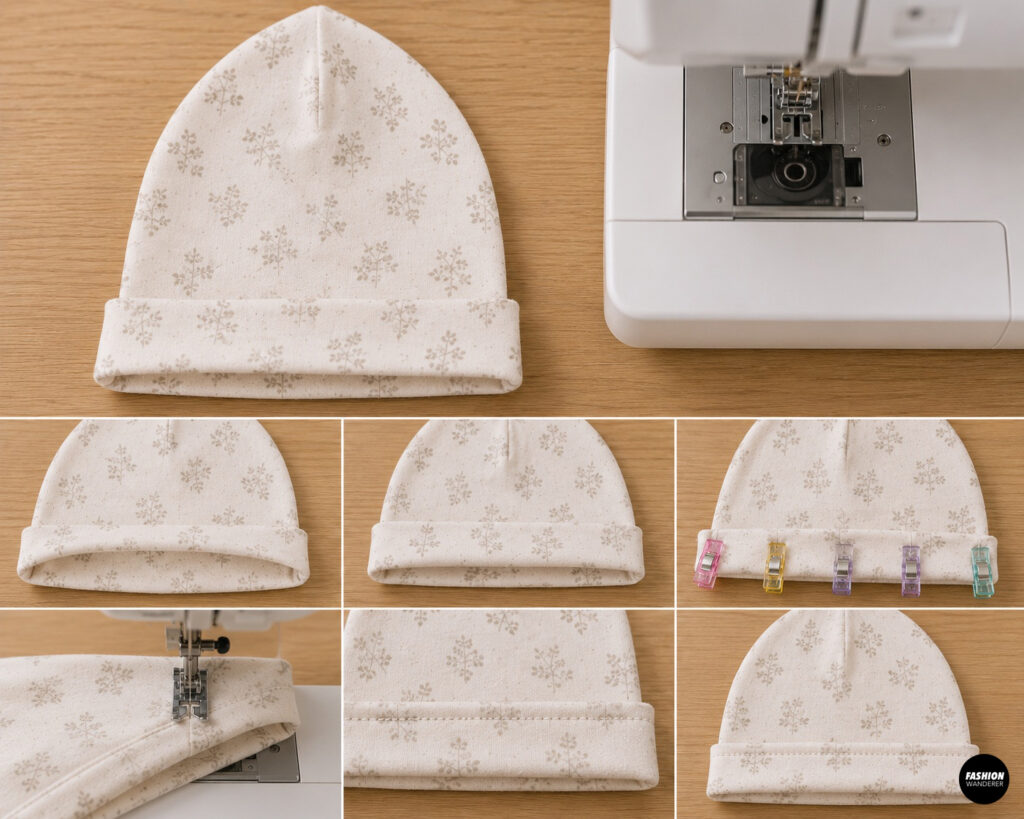
Fold the bottom edge of the hat up toward the wrong side by approximately 1 inch.
Fold once more to create a clean finished band.
Clip in place.
Using a stretch stitch or twin needle, sew around the folded edge.
Be careful not to stretch the fabric while sewing.
A smooth band helps the hat stay comfortably on the baby’s head.
Step 5: Tie the Knot
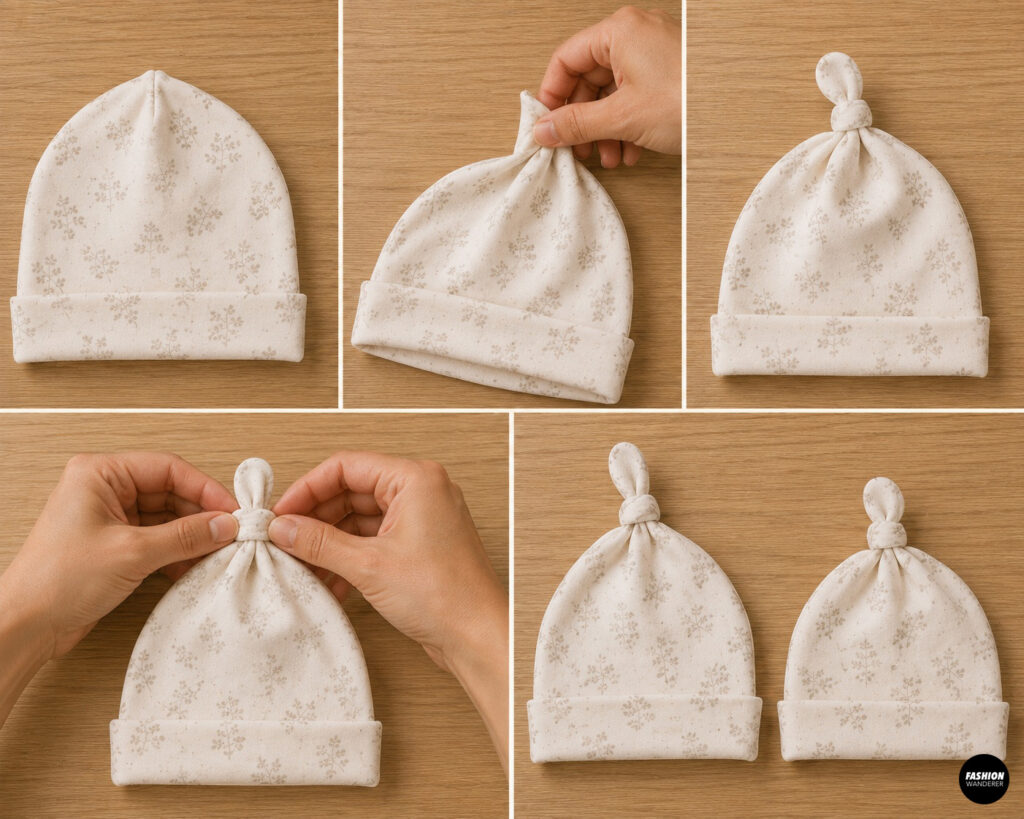
Turn the hat right side out.
Push the top seam outward with your fingers.
Tie the top into a simple overhand knot.
Adjust the knot until both sides look even.
The knot can be loosened or tightened later to slightly change the height of the hat as the baby grows.
Step 6: Sew the Mittens
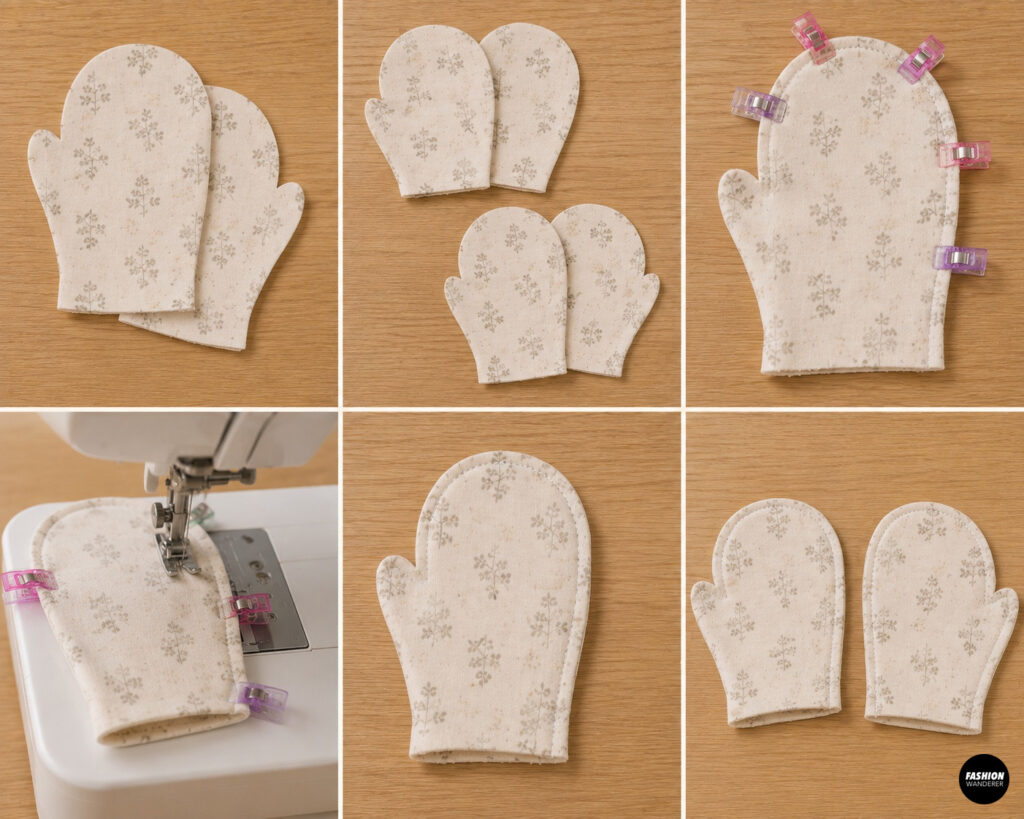
Place two mitten pieces right sides together.
Repeat with the remaining pair.
Clip around the curved edges.
Using a ¼-inch seam allowance, sew around the curved edge while leaving the wrist opening open.
Backstitch at the beginning and end.
Repeat for the second mitten.
Step 7: Turn and Finish the Mittens
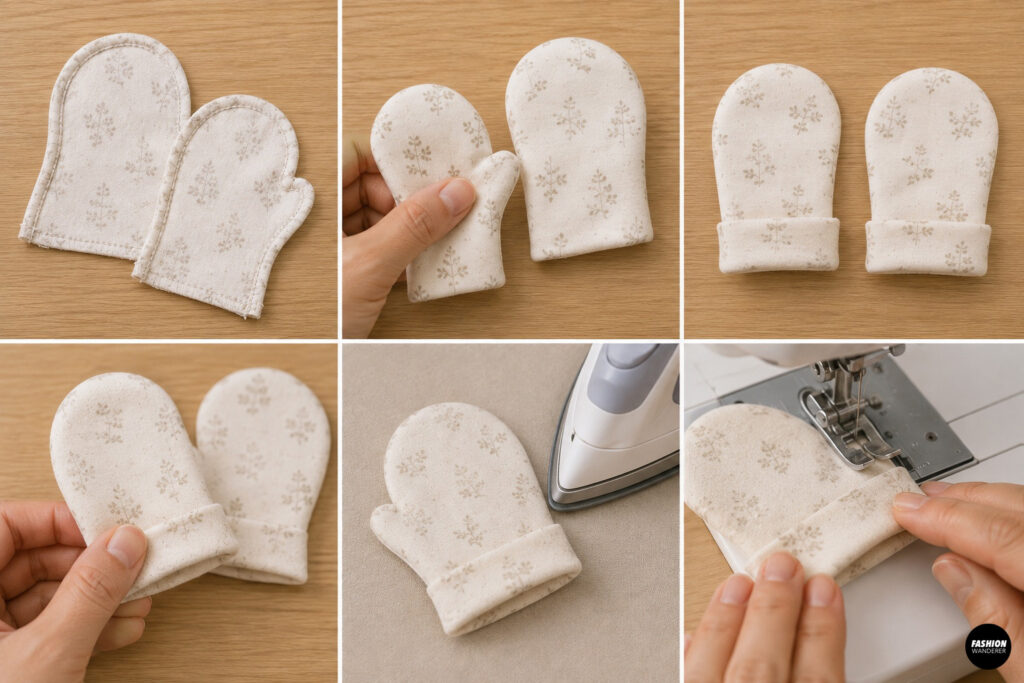
Turn each mitten right side out.
Use your fingers to gently shape the thumb area.
Fold the wrist opening toward the inside approximately ½ inch.
Press lightly.
Topstitch around the wrist opening using a stretch stitch or twin needle.
This creates a neat finish while helping the mitten stay comfortably on the baby’s wrist.
Step 8: Add Optional Fold-Over Cuffs
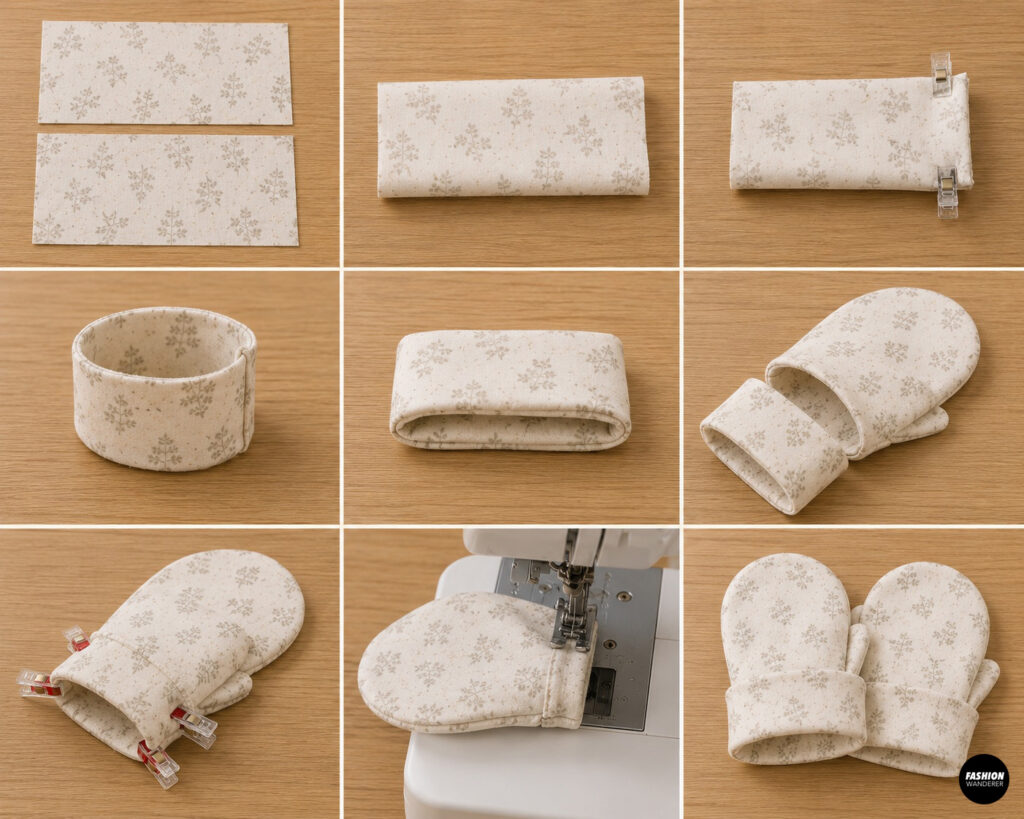
For extra warmth, create fold-over cuffs.
Cut:
- Two rectangles measuring 5 × 3 inches
Fold each rectangle in half with right sides together.
Sew the short edge to form a loop.
Fold the loop in half so the wrong sides touch.
Slide the cuff inside the mitten with raw edges aligned.
Sew around the wrist opening.
Flip the cuff outward.
The finished fold-over cuff keeps little hands warm while helping the mittens stay securely in place.
Step 9: Personalize the Set
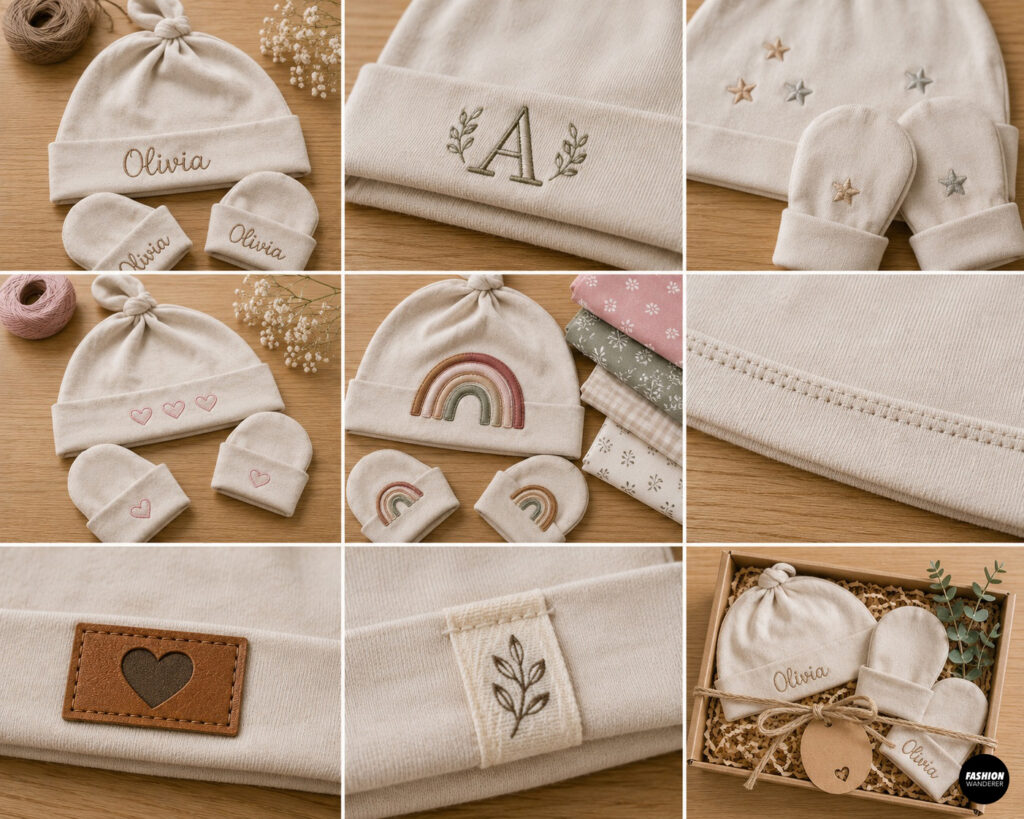
Add special details to make your handmade gift one of a kind.
Ideas include:
- Baby’s name
- Initial monogram
- Embroidered stars
- Tiny hearts
- Rainbow appliqué
- Faux leather labels
- Matching printed fabrics
- Coordinating topstitching
- Handmade woven labels
Personalization turns a simple sewing project into a treasured keepsake.
Step 10: Final Press and Safety Check
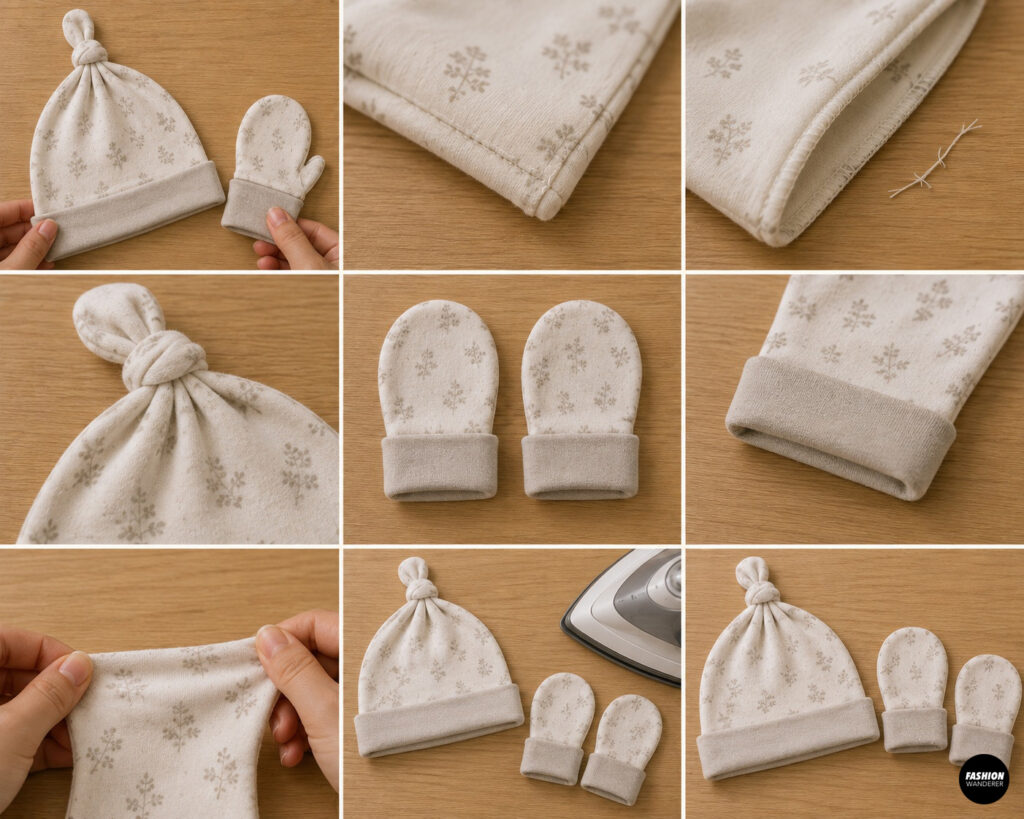
Before gifting or using the set, inspect your work carefully.
Check that:
- All seams are secure.
- There are no loose threads.
- The knot is tied securely.
- Mittens are evenly matched.
- Cuffs lay flat.
- The fabric stretches comfortably without popped stitches.
Give the hat and mittens one final press using low heat suitable for knit fabrics.
Tips for Sewing Knit Fabric
If you’re new to sewing knits, these tips will help you achieve professional-looking results:
- Use a ballpoint or stretch needle to prevent skipped stitches.
- Choose polyester thread for added flexibility.
- Sew with a narrow zigzag or stretch stitch instead of a straight stitch.
- Avoid pulling the fabric while sewing.
- Use sewing clips instead of pins to prevent stretching.
- Test your stitch settings on fabric scraps before beginning.
These simple techniques make sewing knit fabrics much easier for beginners.
Best Fabrics for Baby Hats and Mittens
Choose soft, breathable knit fabrics that are gentle on a baby’s delicate skin.
Excellent options include:
Lightweight Knits
- Cotton jersey
- Bamboo jersey
- Organic cotton knit
- Modal jersey
- Interlock knit
Cozy Knits
- Cotton rib knit
- Brushed jersey
- French terry (lightweight)
Avoid heavy sweatshirt fleece or stiff fabrics, which can feel bulky for newborns.
Caring for Your Handmade Set
Machine wash on a gentle cycle using mild baby detergent.
Wash in cold or warm water with similar colors.
Tumble dry on low heat or lay flat to dry.
Do not use bleach.
The knit fabric will become even softer after repeated washing while maintaining its stretch and shape.
Frequently Asked Questions
Is this a good beginner sewing project?
Yes! A baby knot hat and mittens set is one of the easiest knit sewing projects because it uses simple shapes, basic seams, and minimal pattern pieces.
What fabric works best?
Cotton jersey is the most popular choice because it is soft, breathable, stretchy, and easy to sew.
Can I make different sizes?
Absolutely. Most baby sewing patterns include multiple sizes ranging from preemie to 12 months. Simply cut the size that matches your pattern and follow the same construction steps.
Final Thoughts
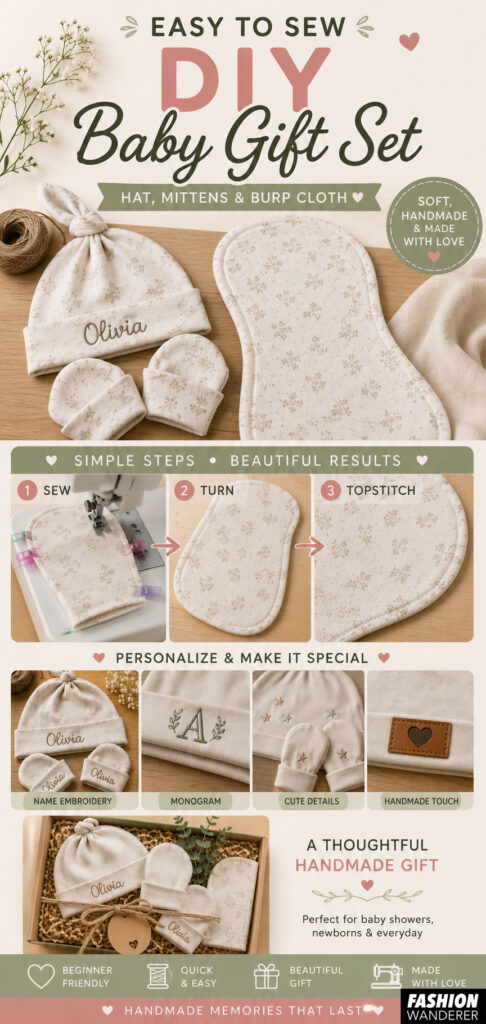
Learning how to make a Baby Knot Hat and Mittens Set is a fun and rewarding sewing project that results in a beautiful handmade gift for any newborn. With soft knit fabric, a few basic sewing supplies, and beginner-friendly techniques, you can create a cozy matching set that’s both practical and adorable.
Whether you’re sewing for your own baby, making a thoughtful baby shower gift, or adding handmade baby accessories to your shop, this easy DIY project is quick to sew, endlessly customizable, and sure to become a cherished keepsake.