
If you have a pile of pretty fabric scraps you cannot bring yourself to throw away, this DIY patchwork ruffle zipper pouch is the perfect sewing project. It combines colorful patchwork, a cute gathered ruffle, and a practical zippered pouch into one beginner-friendly project that looks much more complicated than it really is.
This handmade zipper pouch is great for storing makeup, sewing notions, pencils, small craft supplies, toiletries, or everyday essentials. It also makes a wonderful handmade gift or a stylish sewing project to sell at craft fairs and online.
Best of all, you can make the patchwork exterior almost entirely from leftover fabric scraps. These Beginner Sewing Projects to Sell are quick, practical, and perfect for turning basic sewing skills into extra income.
In this step-by-step tutorial, you will learn how to sew a patchwork zipper pouch with a ruffle, add lightweight batting for structure, install a zipper, and finish the pouch with a clean lining.
Finished Size
The finished pouch measures approximately:
9 inches wide x 6 inches tall
You can easily adjust the dimensions to make a larger cosmetic bag, pencil case, or small travel pouch.
Materials You Will Need
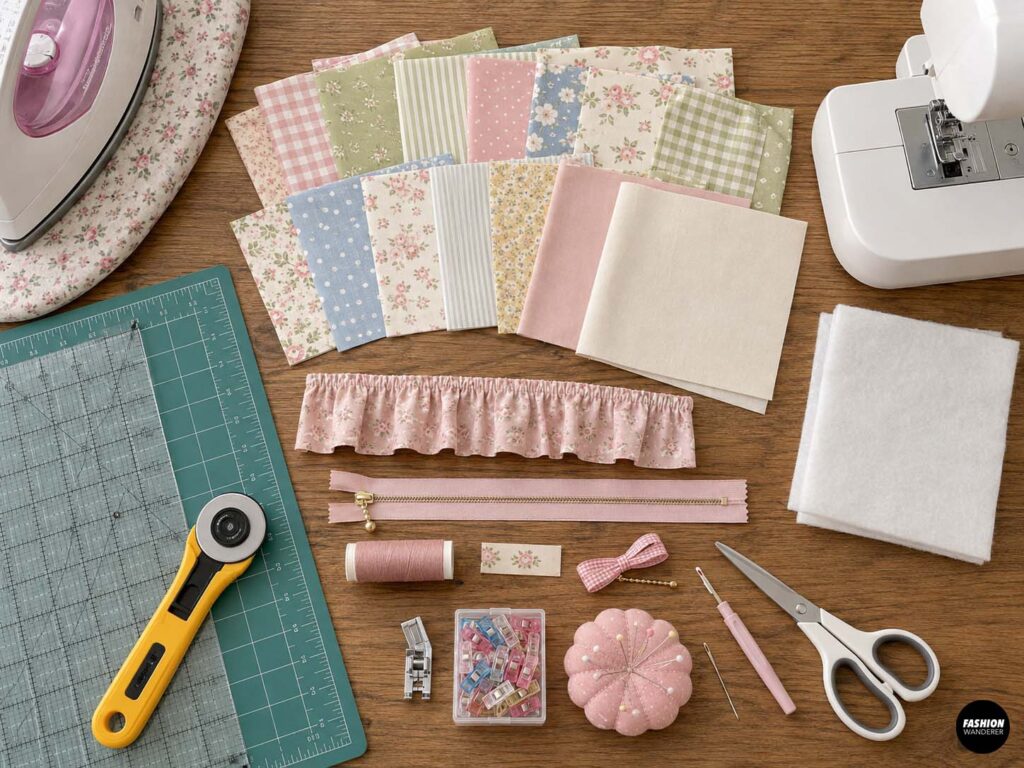
- Assorted cotton fabric scraps
- 2 lining fabric pieces
- Lightweight batting or fusible fleece
- 9-inch zipper
- Fabric for the ruffle
- Coordinating sewing thread
- Sewing machine
- Zipper foot
- Fabric scissors or rotary cutter
- Cutting mat
- Quilting ruler
- Pins or sewing clips
- Iron and ironing board
- Hand-sewing needle
- Seam ripper
- Optional fabric label
- Optional ribbon or fabric zipper pull
Use quilting cotton for an easy beginner project. Gingham, small florals, stripes, polka dots, and coordinating solids look especially cute when combined in patchwork.
Patchwork Ruffle Zipper Pouch Tutorial
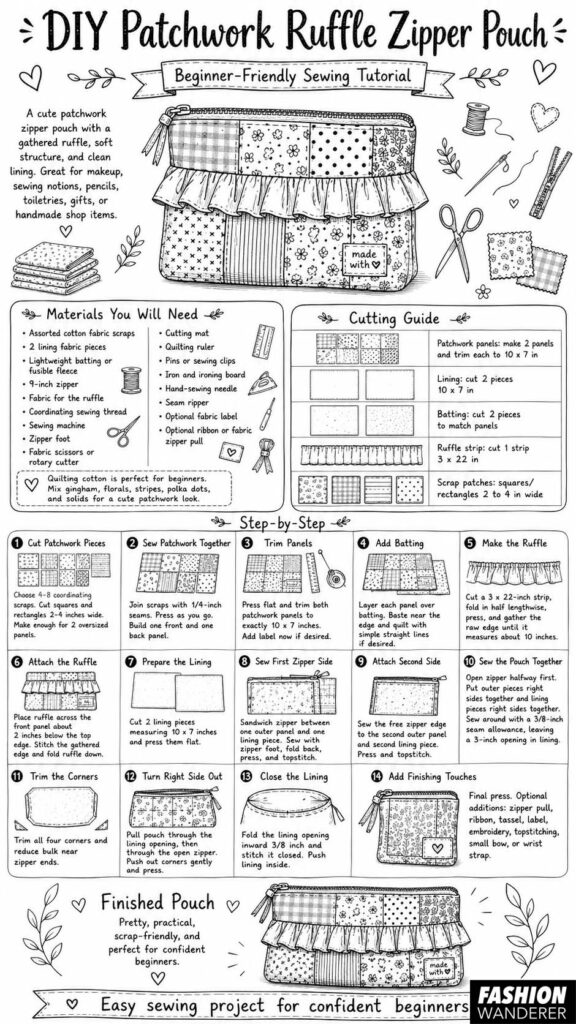
Step 1: Cut the Patchwork Fabric Pieces
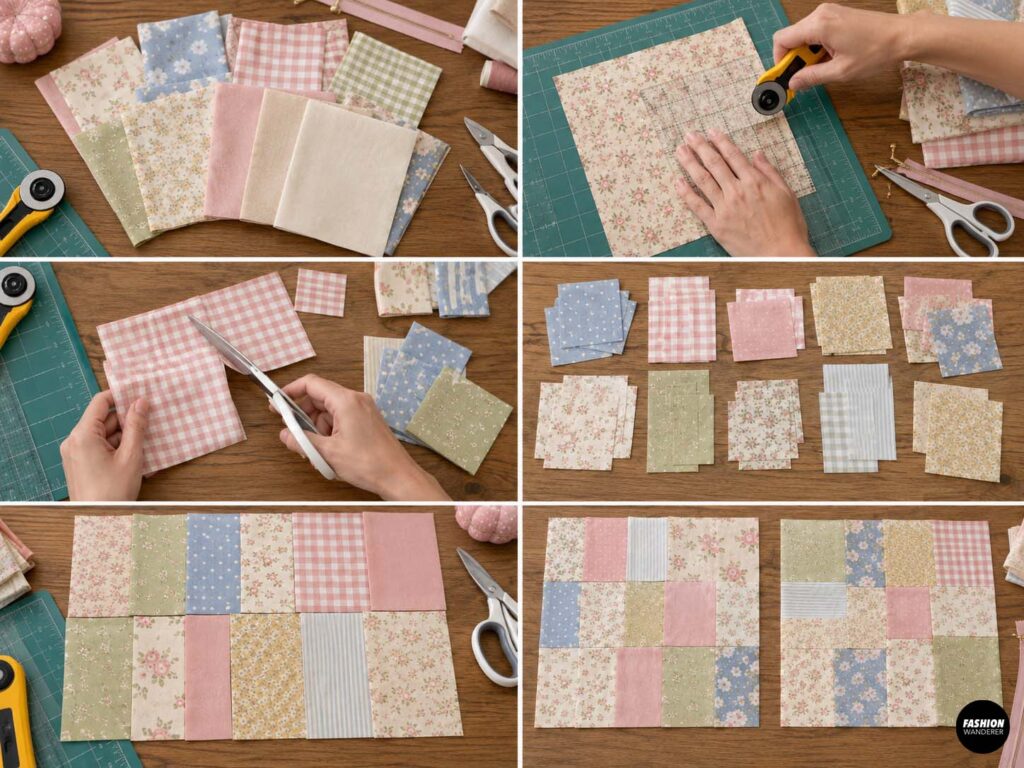
Begin by choosing four to eight coordinating fabric scraps.
Cut the scraps into simple squares and rectangles. Pieces between 2 and 4 inches wide work well for this project.
Do not worry about making every patch exactly the same size. Mixing rectangles and squares gives the pouch a fun handmade patchwork appearance.
You will need enough patchwork fabric to create two panels slightly larger than 10 x 7 inches.
Making the panels a little oversized allows you to trim them perfectly after quilting.
Step 2: Sew the Patchwork Pieces Together
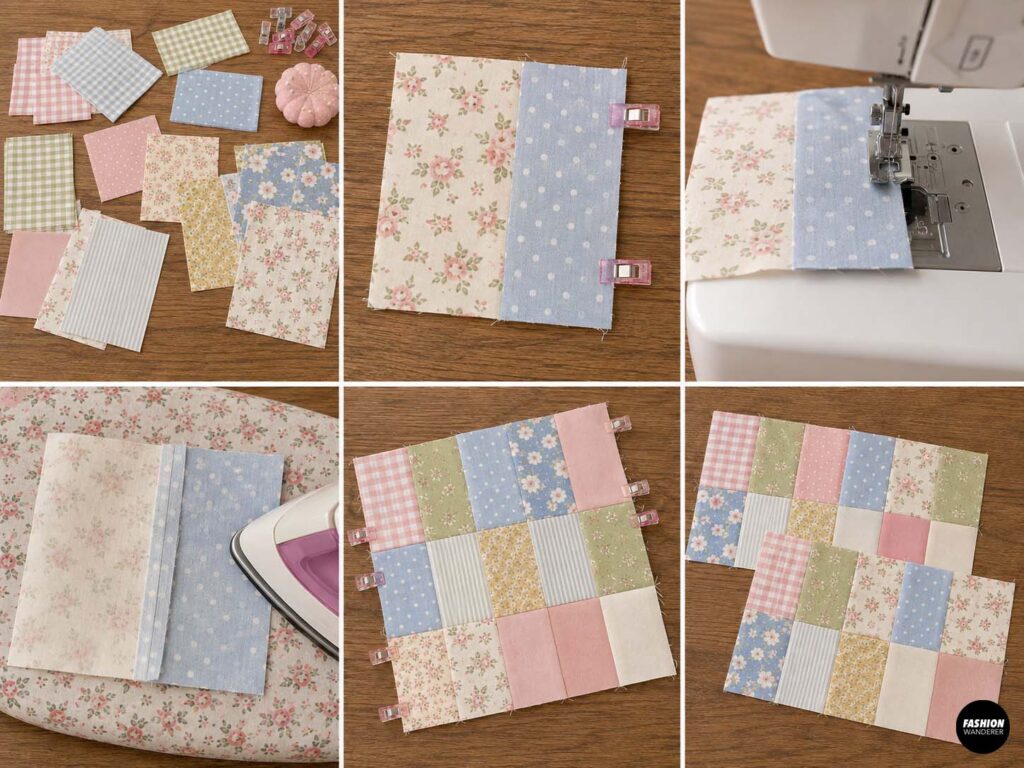
Arrange the fabric scraps on your table until you like the layout.
Start by sewing smaller pieces together using a ¼-inch seam allowance.
Place two fabric pieces right sides together and sew along one edge.
Press the seam allowance to one side.
Continue adding pieces until you create a larger patchwork section.
Make two patchwork panels—one for the front and one for the back of your zipper pouch.
Try not to place all the same colors together. Spreading prints and colors throughout the design creates a more balanced patchwork look.
Step 3: Trim the Patchwork Panels
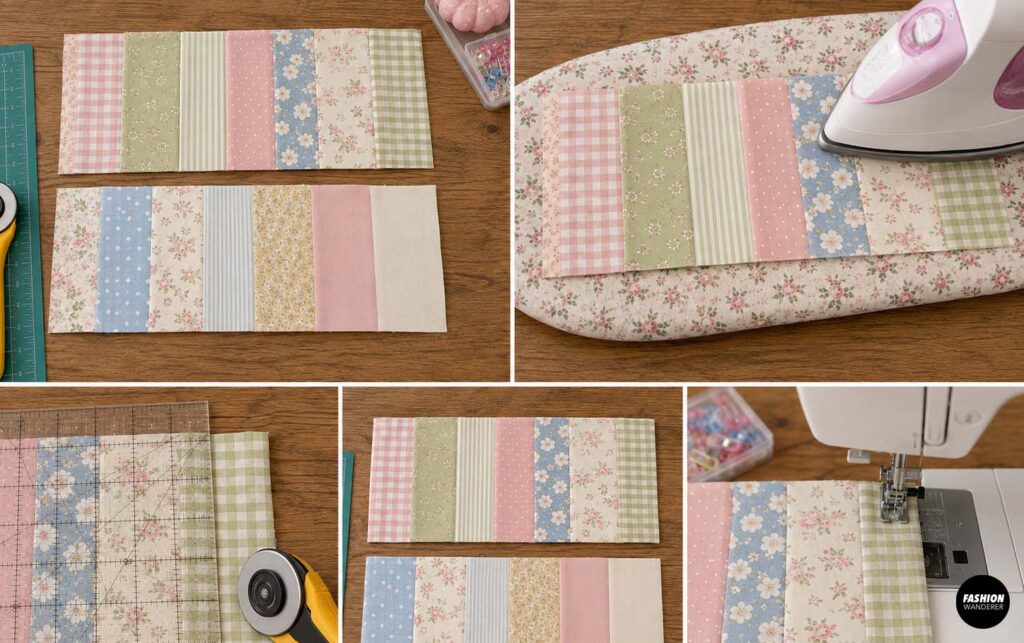
Press both completed patchwork panels flat.
Using a ruler and rotary cutter, trim each panel to:
10 inches wide x 7 inches tall
Make sure both panels are exactly the same size.
If you want to add a fabric label, sew it onto the front patchwork panel now.
Step 4: Add the Batting
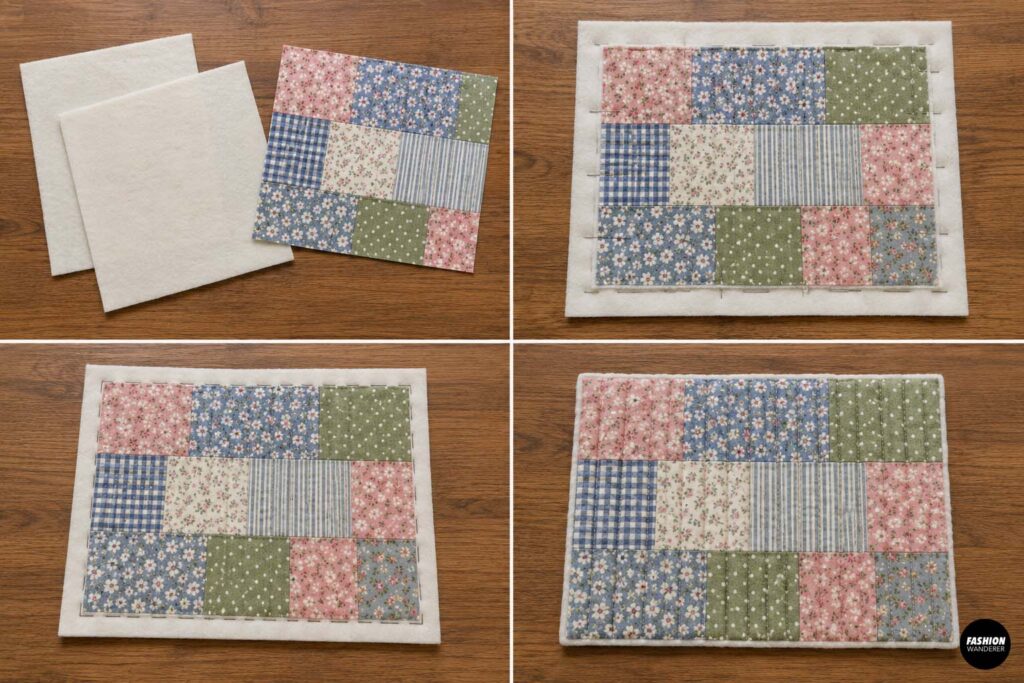
Cut two pieces of lightweight batting approximately the same size as the patchwork panels.
Place one patchwork panel right side up over each piece of batting.
Baste around the outside edge using a long stitch approximately ⅛ inch from the edge.
You can also quilt the patchwork panels for additional texture.
Simple straight-line quilting is perfect for beginners. Stitch approximately ½ to 1 inch apart or sew along some of the patchwork seam lines.
Repeat for the second panel.
Step 5: Make the Fabric Ruffle
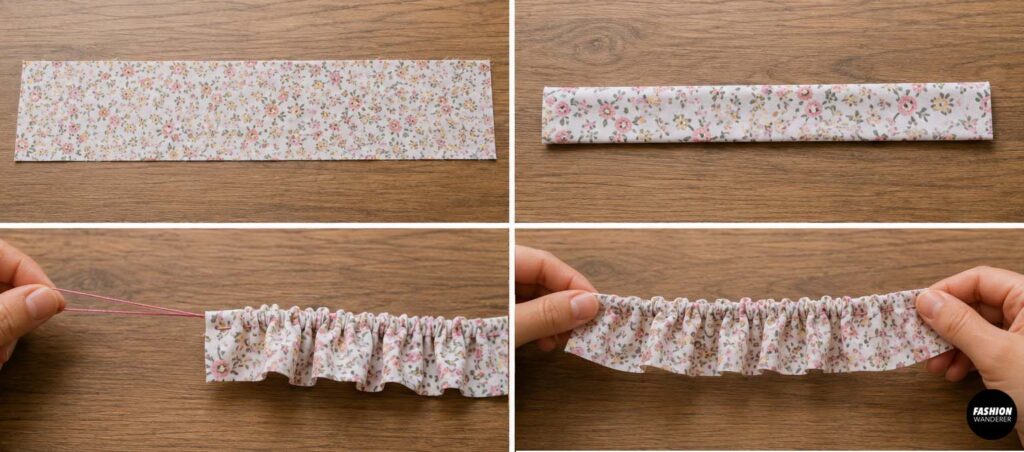
Cut one strip of fabric approximately:
3 inches wide x 22 inches long
Fold the strip in half lengthwise with wrong sides together and press.
Sew two rows of long gathering stitches along the raw edge. Do not backstitch at either end.
Gently pull the bobbin threads to gather the fabric.
Continue gathering until the ruffle measures approximately 10 inches long.
Distribute the gathers evenly.
Step 6: Attach the Ruffle
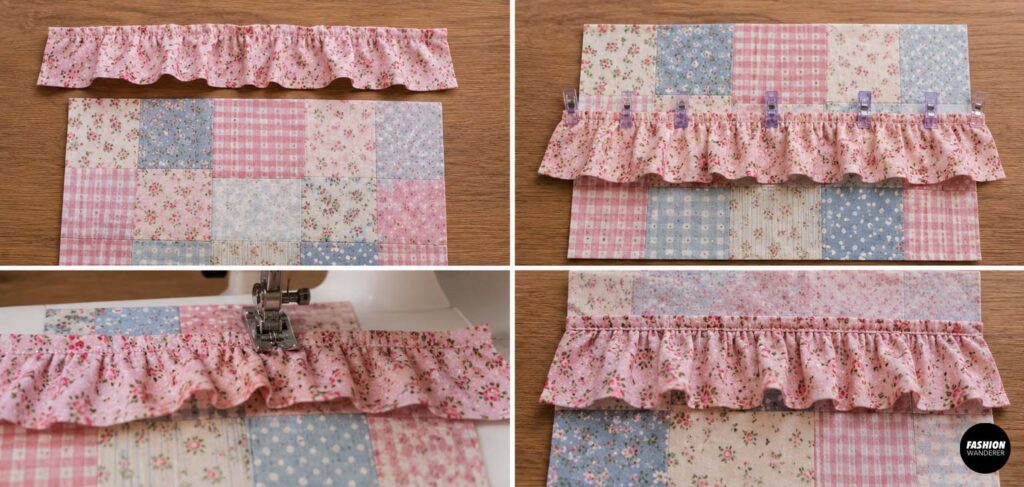
Place the ruffle across the front patchwork panel wherever you would like it.
A horizontal ruffle positioned about 2 inches below the top edge works especially well.
The folded edge of the ruffle should face downward while the raw gathered edge faces upward.
Pin or clip the ruffle in place.
Sew along the gathered edge using approximately a ¼-inch seam allowance.
Fold the ruffle downward and lightly press.
Topstitch close to the upper edge if you want the ruffle to stay especially neat.
Step 7: Prepare the Lining
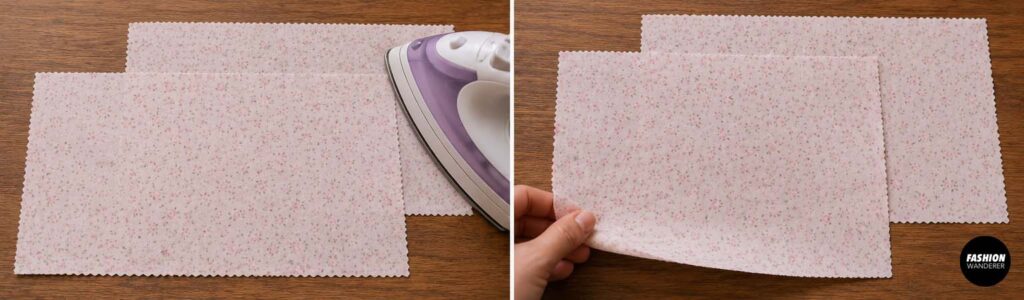
Cut two lining pieces measuring:
10 inches wide x 7 inches tall
Press the lining pieces flat.
Choose a light-colored lining if you want it to be easier to see items inside the finished pouch.
Step 8: Sew the First Side of the Zipper
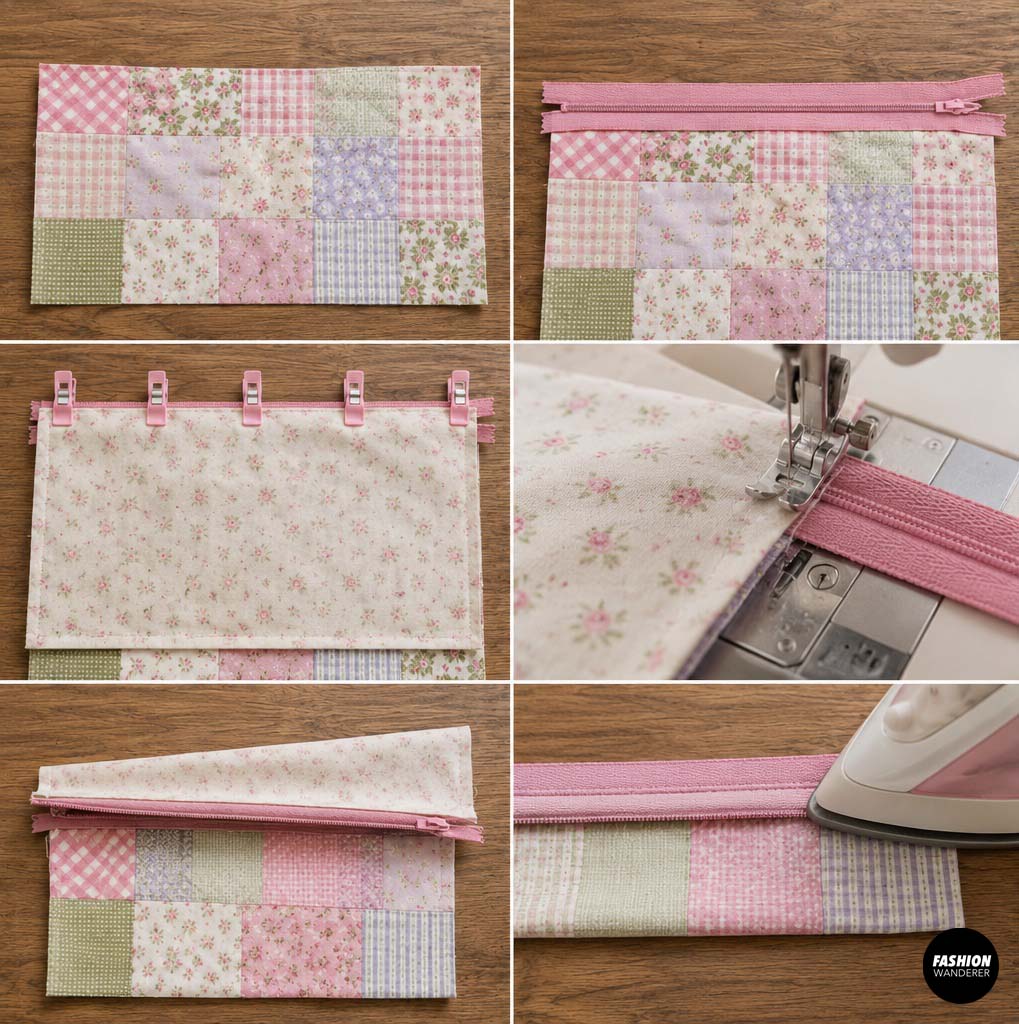
Place one patchwork panel right side up.
Position the zipper face down along the top edge. The zipper teeth should face toward the center of the fabric.
Place one lining piece right side down over the zipper.
The zipper is now sandwiched between the outer fabric and lining.
Clip all three layers together.
Attach a zipper foot to your sewing machine and sew close to the zipper teeth.
Fold both fabrics away from the zipper and press carefully.
Topstitch approximately ⅛ inch from the zipper.
Step 9: Attach the Second Side
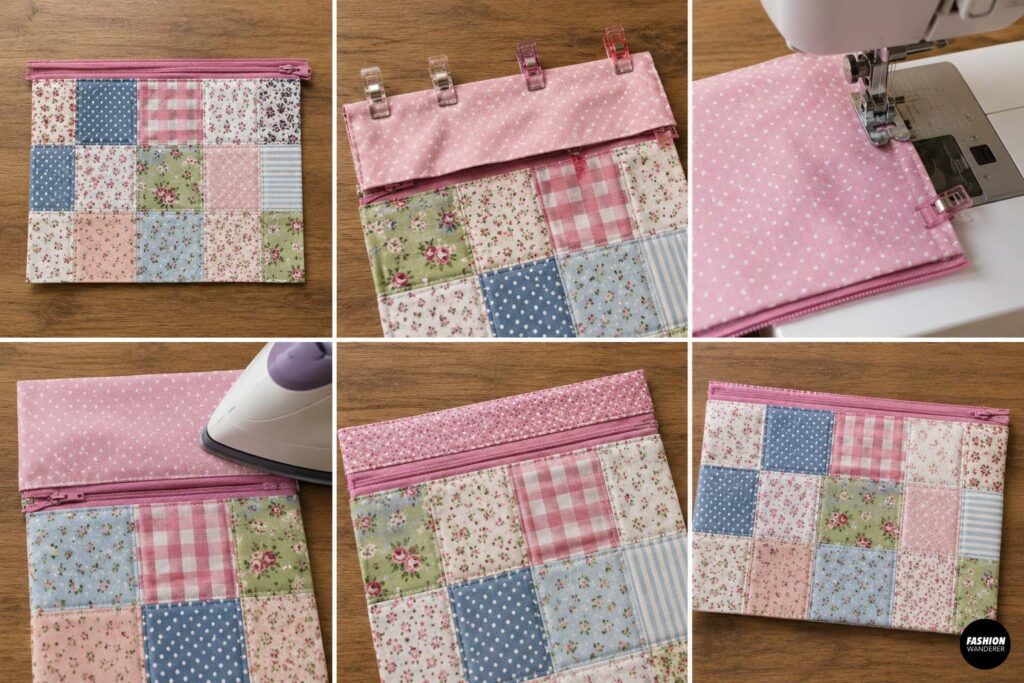
Place the second patchwork panel right side up.
Position the free edge of the zipper face down along its top edge.
Place the remaining lining piece right side down over everything.
Clip and sew using the zipper foot.
Fold the fabrics away from the zipper, press, and topstitch.
Your zipper should now sit neatly between the two patchwork panels.
Step 10: Sew the Pouch Together
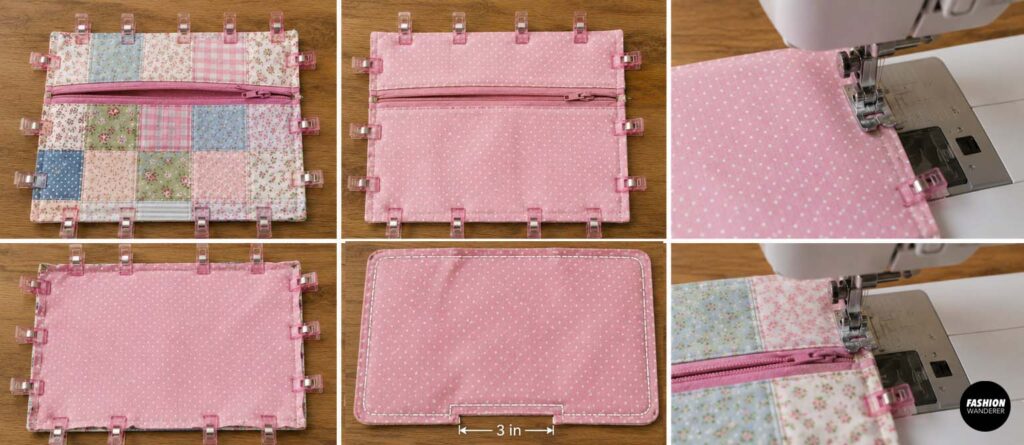
This step is important:
Open the zipper halfway before sewing the pouch closed.
Place the two patchwork outer pieces right sides together.
Place the lining pieces right sides together.
Match the zipper seams and side edges carefully.
Clip around the entire pouch.
Sew using a ⅜-inch seam allowance, leaving approximately a 3-inch opening in the bottom of the lining.
Backstitch at both sides of the opening.
Slow down when sewing across the zipper ends to prevent the layers from shifting.
Step 11: Trim the Corners
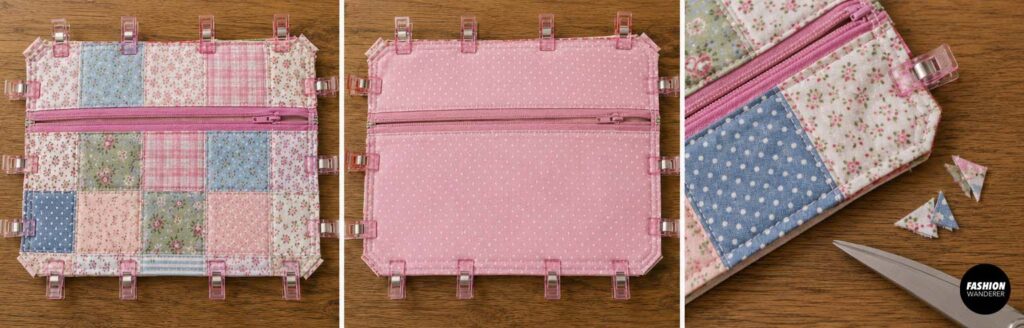
Trim excess fabric from the four corners without cutting through the stitching.
You can also trim bulky fabric around the zipper ends.
Reducing bulk helps create sharper corners when the pouch is turned right side out.
Step 12: Turn the Pouch Right Side Out
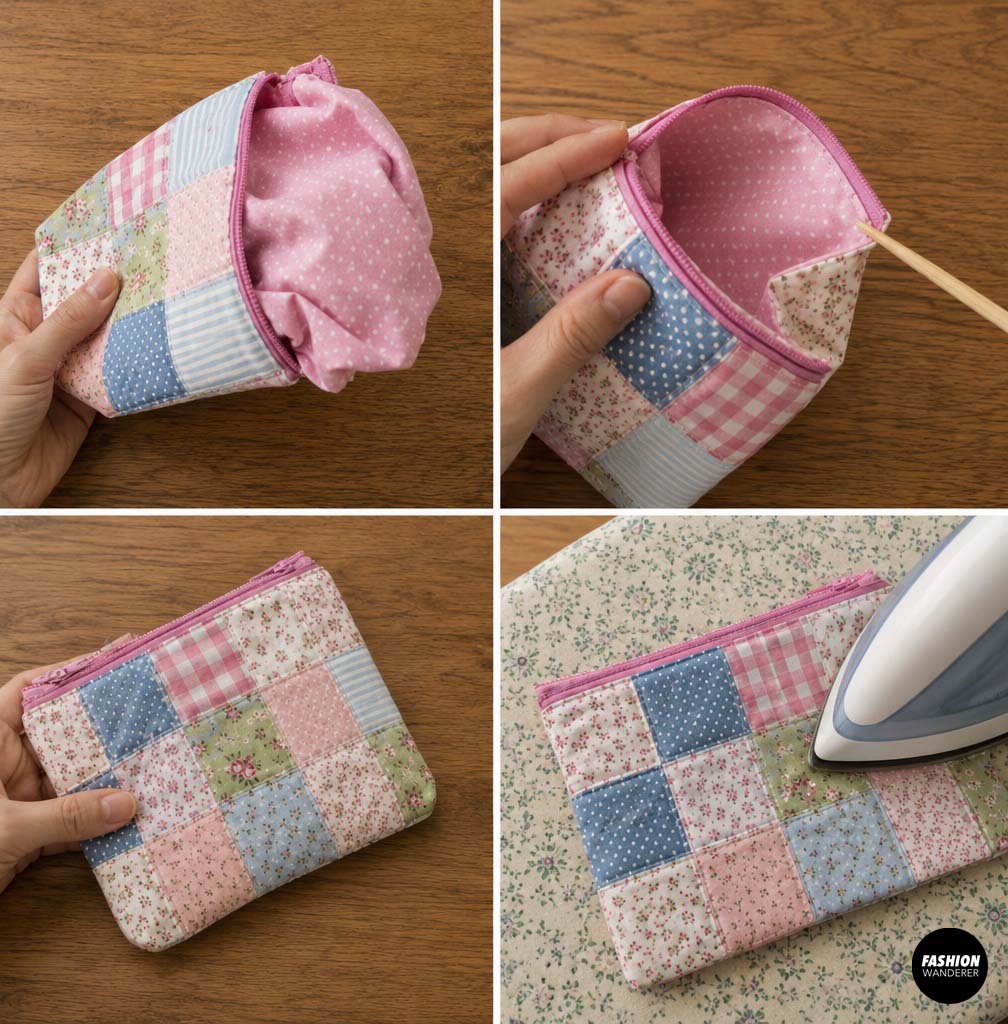
Reach through the opening in the lining and carefully pull the entire pouch right side out.
Then pull the outer pouch through the open zipper.
Use a point turner or blunt chopstick to gently push out the corners.
Avoid using scissors because they can accidentally poke through the fabric.
Press the pouch carefully.
Step 13: Close the Lining
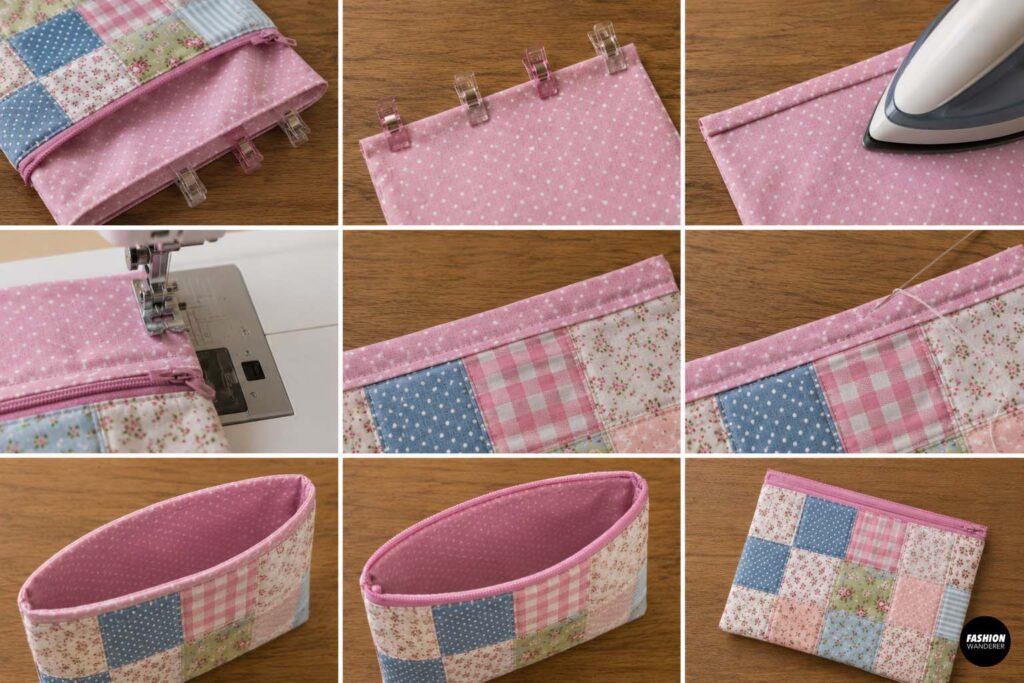
Fold the raw edges of the lining opening approximately ⅜ inch toward the inside.
Press.
Topstitch very close to the folded edge to close the opening.
For an invisible finish, you can hand sew the opening using a ladder stitch.
Push the lining inside the pouch.
Step 14: Add the Finishing Touches
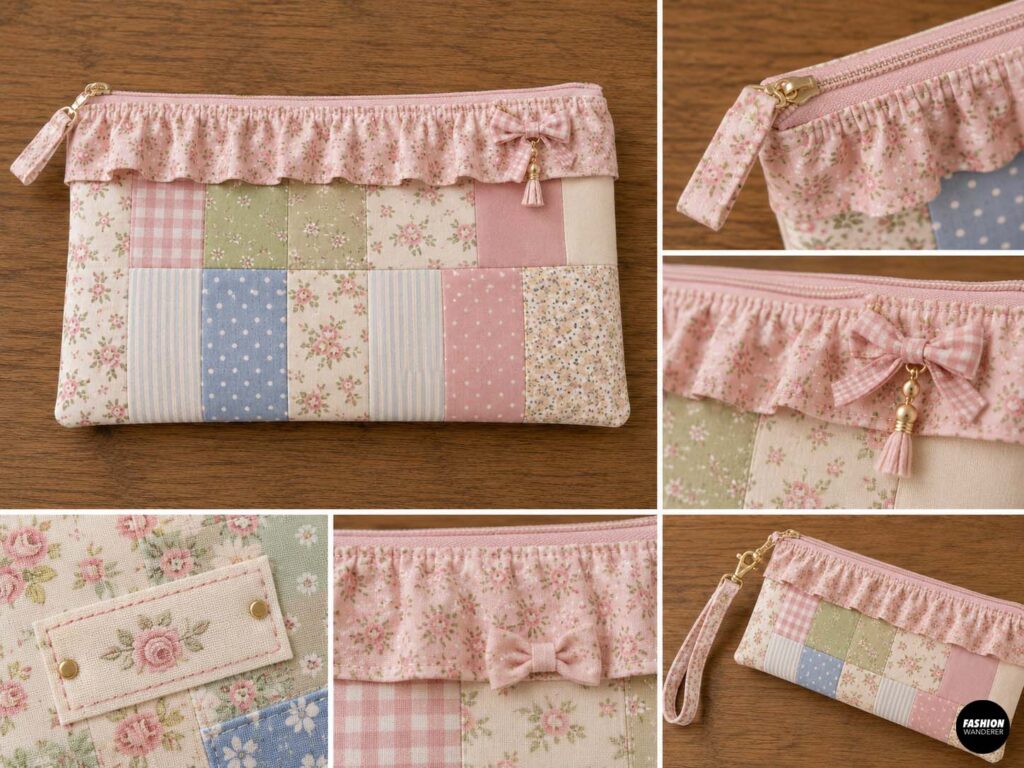
Give the finished pouch one final press.
You can customize your DIY patchwork zipper pouch by adding:
- A fabric zipper pull
- Ribbon
- Tassel
- Personalized label
- Embroidery
- Decorative topstitching
- Small fabric bow
- Wrist strap
These details are especially useful if you plan to make zipper pouches to sell.
Tips for Sewing the Perfect Patchwork Zipper Pouch
Press every patchwork seam as you sew. Flat seams make the finished pouch look much more professional.
Keep your patchwork scraps within a similar color palette for a coordinated boutique look.
If your fabrics are very lightweight, use fusible fleece instead of thin batting for extra structure.
Most importantly, remember to open your zipper before sewing around the pouch. Almost every sewist forgets this at least once!
What Can You Use Your Zipper Pouch For?
This versatile pouch can become a:
- Makeup bag
- Pencil pouch
- Sewing notions bag
- Crochet hook pouch
- Travel organizer
- Small toiletry bag
- Gift card holder
- Bridesmaid gift
- Teacher gift
- Craft fair product
You can also create matching collections using leftover scraps from larger sewing projects.
Final Thoughts
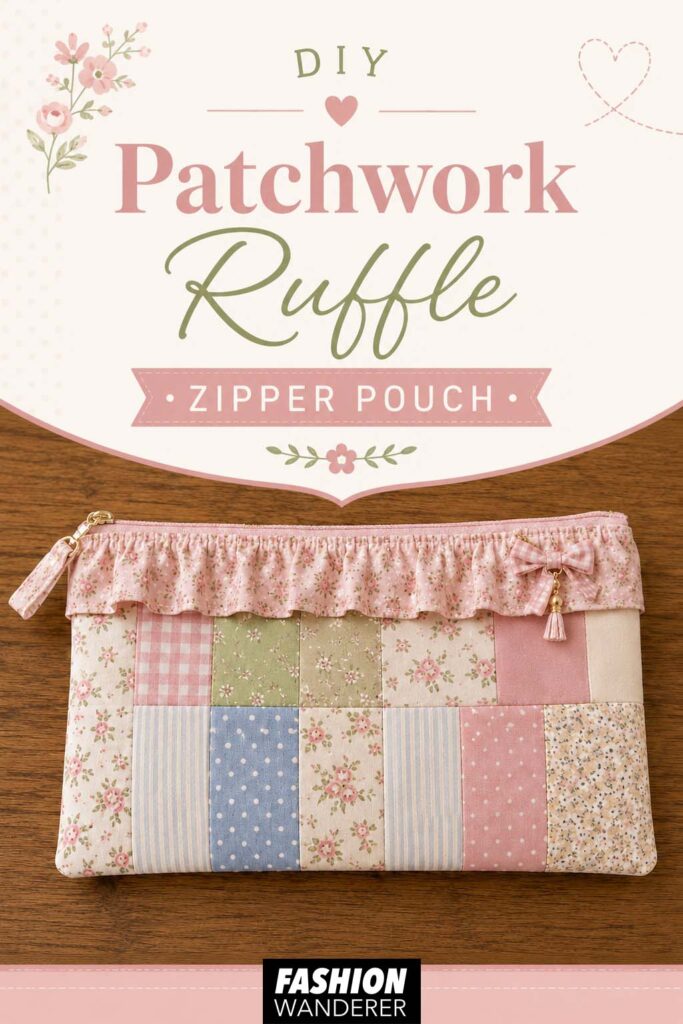
Making a DIY patchwork ruffle zipper pouch is an easy way to transform small fabric scraps into something useful, giftable, and stylish. The combination of patchwork fabric, soft quilting, and a gathered ruffle gives a basic zipper pouch a charming handmade finish.
Once you understand the basic construction, experiment with different patchwork layouts, ruffle sizes, zipper colors, and fabric combinations. Because each pouch uses such small pieces of fabric, no two need to look exactly alike.
Whether you are sewing one for yourself, making handmade gifts, or creating sewing projects to sell, this beginner-friendly patchwork zipper pouch is a fun project you can make again and again.


Trendy, Affordable Sewing Patterns for All Sizes


Tie Shoulder Jumpsuit Pattern


Palazzo Pants Sewing Pattern
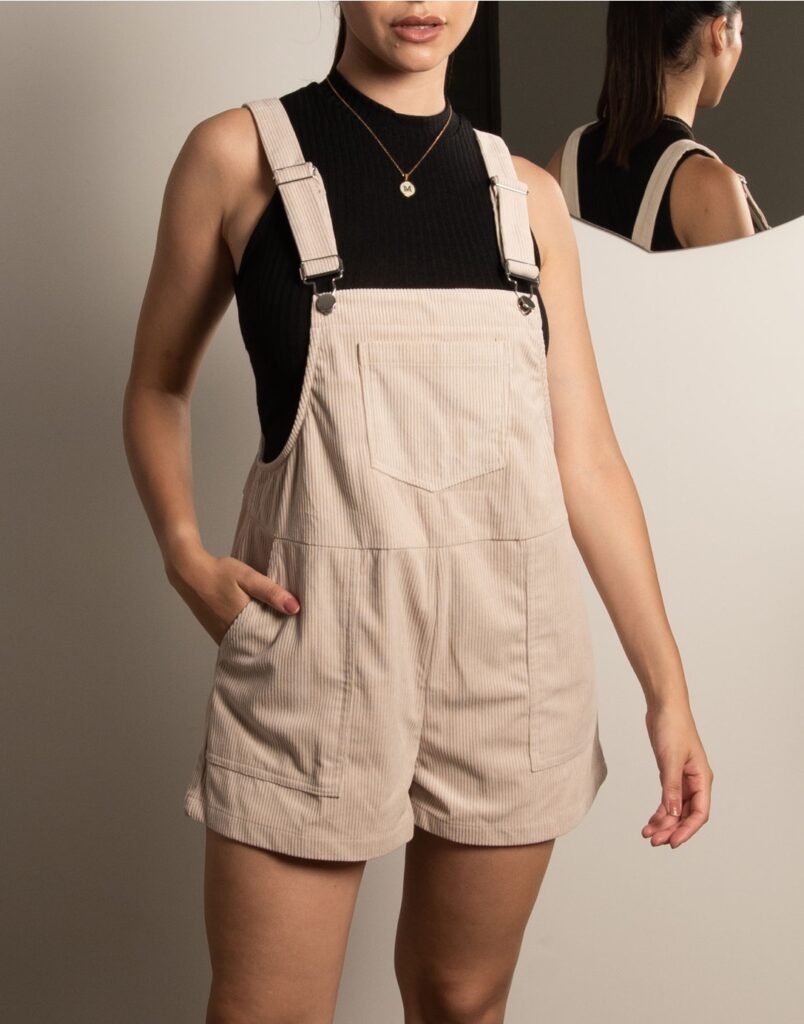
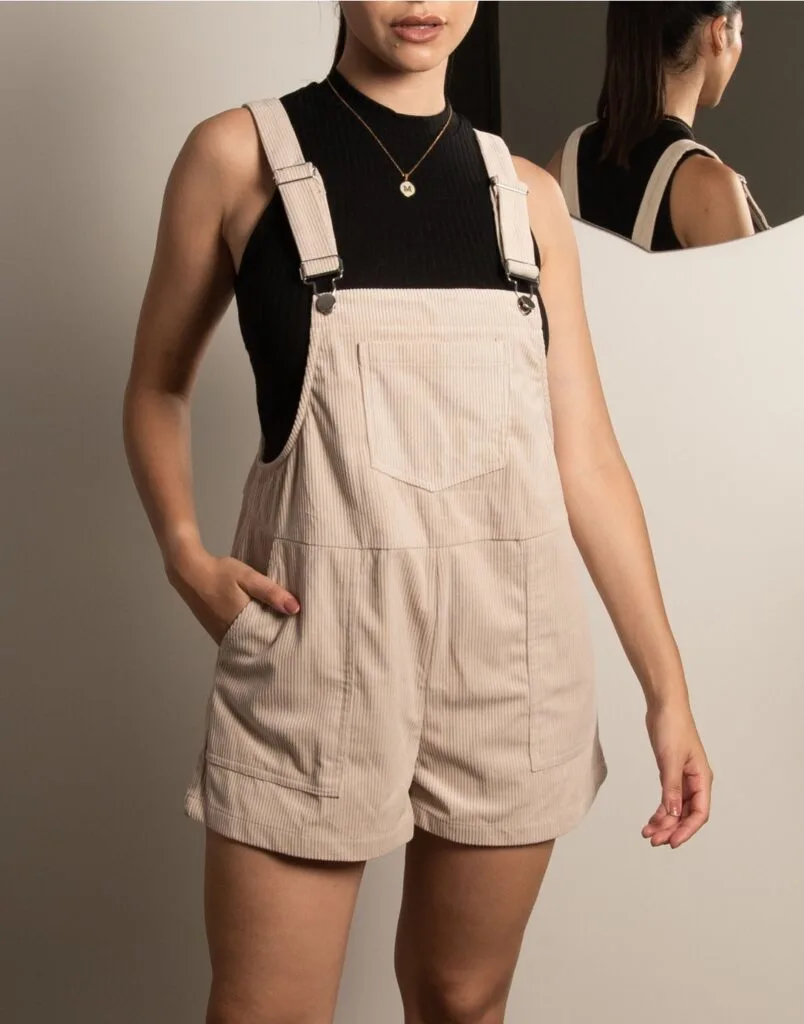
Pocket Overall Romper Pattern


Wrap Maxi Skirt Sewing Pattern


Tie Back Top Sewing Pattern