
A DIY quilted slouchy bow tote bag is the perfect sewing project if you love soft, feminine accessories with a handmade boutique look. The combination of quilted fabric, a relaxed slouchy shape, and oversized fabric bows turns a basic tote bag into something stylish enough for everyday errands, shopping, work, travel, or gifting.
This beginner-friendly sewing tutorial walks you through how to sew a quilted tote bag with bows from start to finish. You can customize the bag with floral cotton, gingham, linen blends, denim, patchwork scraps, or even repurposed fabric from another sewing project.
Because the design uses mostly straight seams, it is also a great project for confident sewing beginners. With the right products, pricing, and selling strategy, beginners can realistically work toward a goal to Make $1,000 a Month Sewing without needing a huge business.
Finished Size
The finished tote is approximately:
15 inches wide x 16 inches tall x 4 inches deep
You can easily make the tote larger or smaller by adjusting the rectangle measurements.
Materials You Will Need
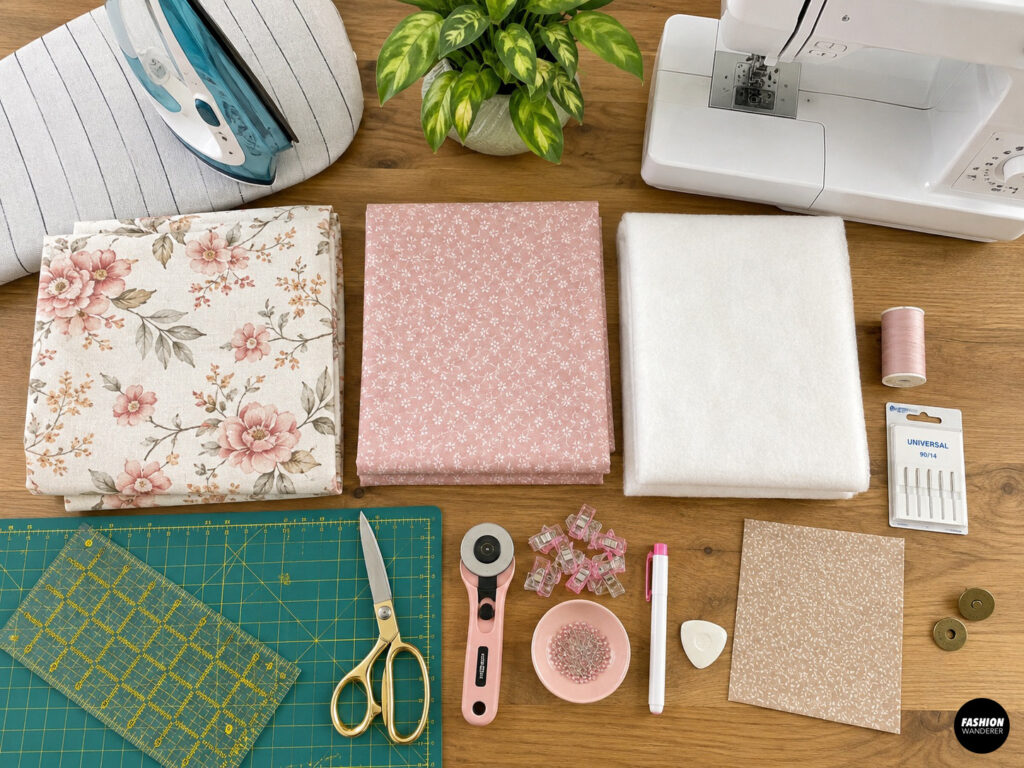
- 1 yard quilting cotton, linen blend, canvas, or lightweight denim for the exterior
- 1 yard cotton fabric for the lining
- 1 yard cotton batting or fusible fleece
- Matching polyester thread
- Sewing machine
- Universal sewing machine needle, size 80/12 or 90/14
- Fabric scissors or rotary cutter
- Cutting mat
- Quilting ruler
- Fabric clips or pins
- Iron and ironing board
- Fabric marking pen or chalk
- Optional magnetic snap
- Optional interior pocket fabric
Cut Your Fabric Pieces
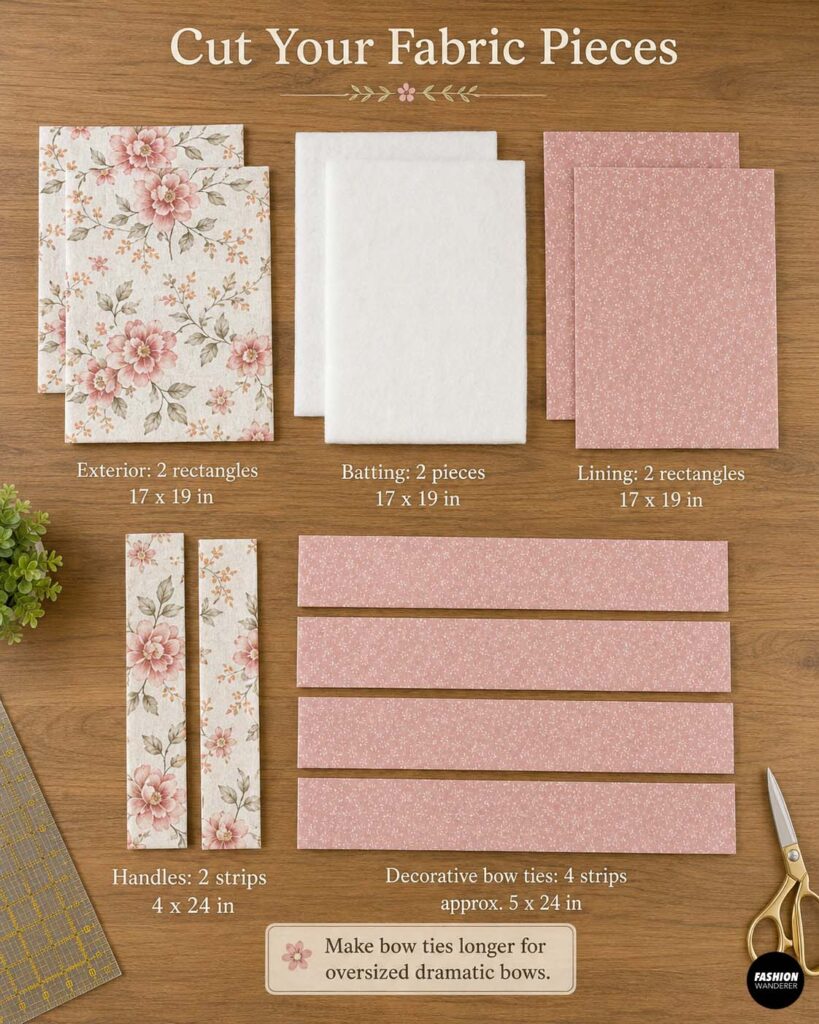
For the exterior, cut:
- Two rectangles measuring 17 x 19 inches
- Two batting pieces measuring 17 x 19 inches
For the lining, cut:
- Two rectangles measuring 17 x 19 inches
For the handles, cut:
- Two strips measuring 4 x 24 inches
For the decorative bow ties, cut:
- Four strips measuring approximately 5 x 24 inches
You can make the bow ties longer if you want oversized dramatic bows.
Quilted Slouchy Bow Tote Bag Tutorial
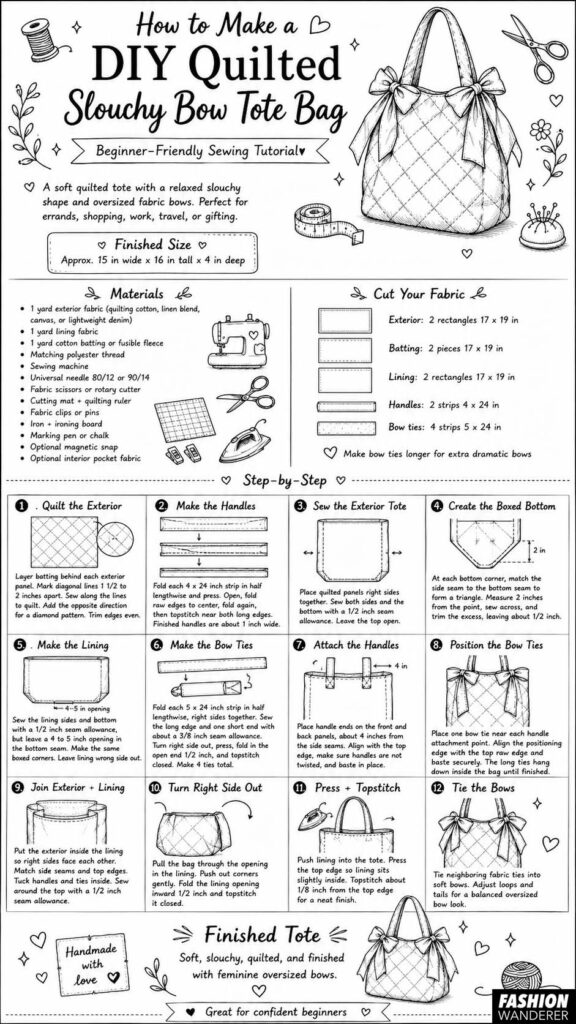
Step 1: Prepare the Quilted Exterior Panels
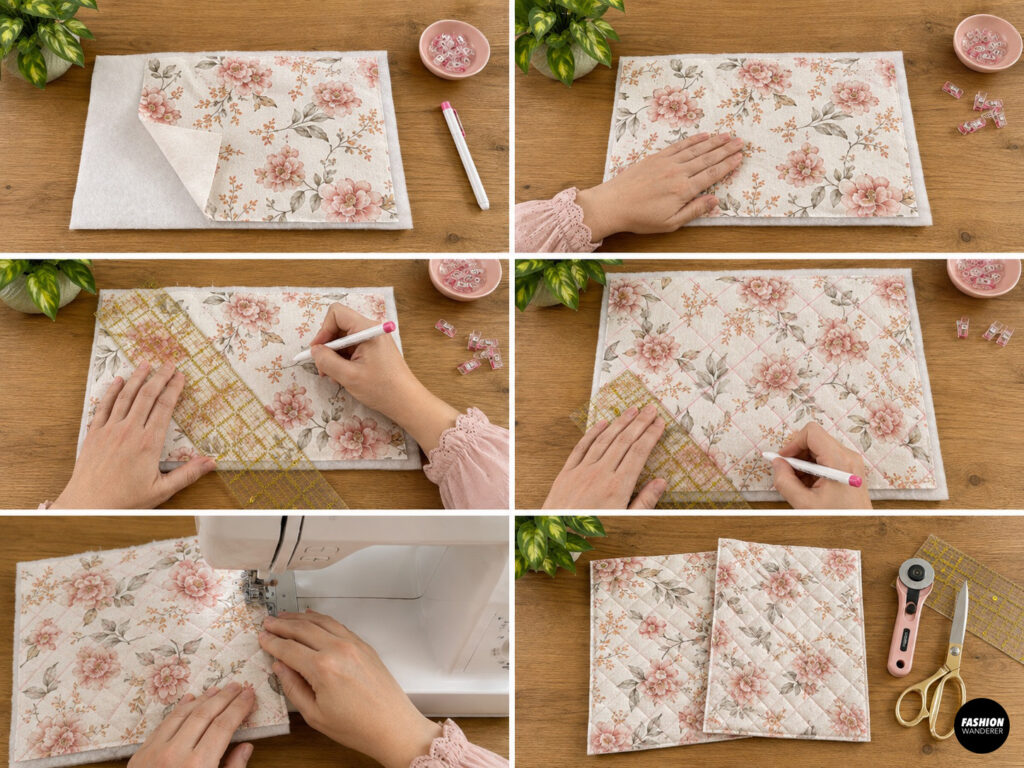
Place one batting piece behind each exterior fabric rectangle with the wrong side of the fabric against the batting.
Smooth the layers together.
Using a fabric marking pen and ruler, draw diagonal lines approximately 1½ to 2 inches apart across the fabric.
Draw a second set of diagonal lines in the opposite direction if you would like a diamond quilting pattern.
Starting near the center of the fabric, sew along each marked line.
Continue quilting until both exterior panels are completely quilted.
Trim the panels so the edges are even again.
Step 2: Make the Tote Handles
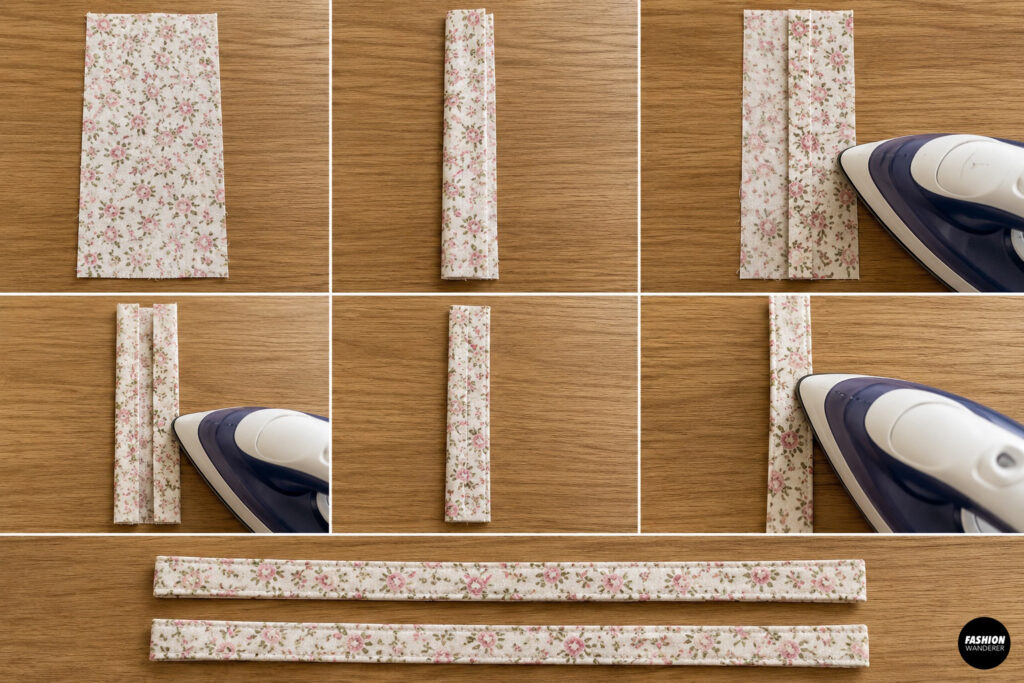
Take one 4 x 24-inch handle strip.
Fold it in half lengthwise with wrong sides together and press.
Open the strip.
Fold each long raw edge toward the center crease and press again.
Fold the strip in half once more so all raw edges are enclosed.
Topstitch approximately ⅛ inch from both long edges.
Repeat with the second handle.
You should now have two sturdy finished handles approximately 1 inch wide.
Step 3: Sew the Exterior Tote
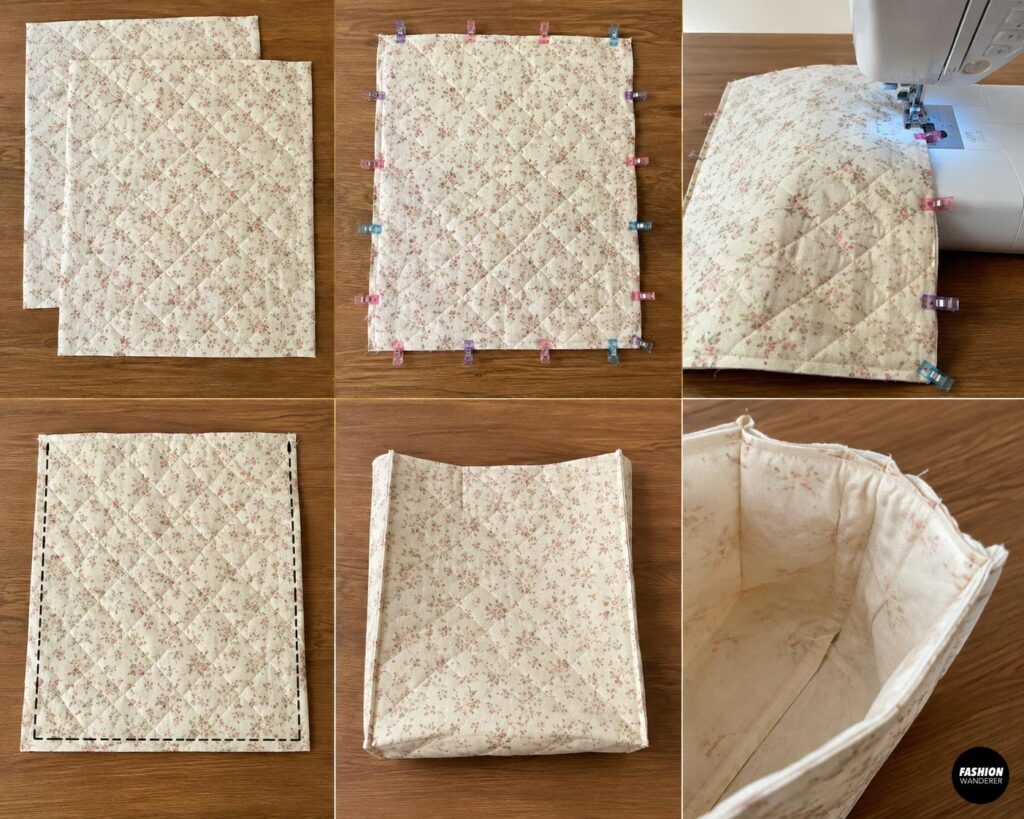
Place the two quilted exterior panels right sides together.
Pin or clip along both sides and the bottom edge.
Using a ½-inch seam allowance, sew down one side, across the bottom, and up the other side.
Leave the top completely open.
Backstitch at the beginning and end of each seam.
Press the seams open if possible.
Step 4: Create the Boxed Bottom
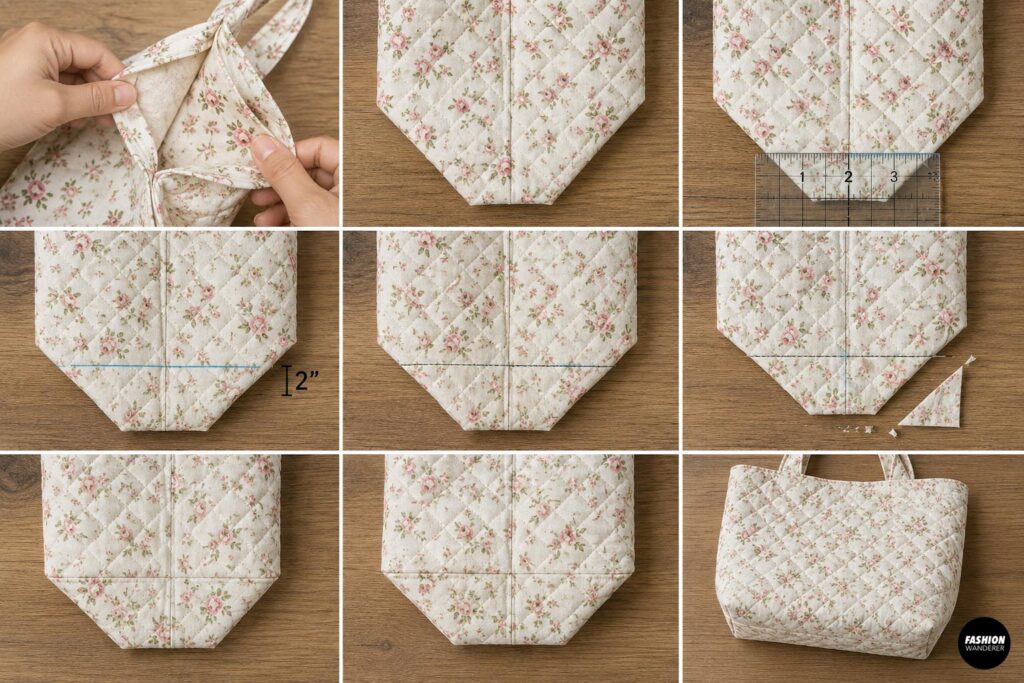
A boxed bottom gives the bag extra room while maintaining the soft slouchy shape.
At one bottom corner, pull the front and back layers apart so the side seam sits directly on top of the bottom seam.
Flatten the corner into a triangle.
Measure approximately 2 inches from the pointed corner and draw a straight line across.
Sew directly along this line.
Trim away the excess corner fabric, leaving approximately a ½-inch seam allowance.
Repeat on the other corner.
Turn the exterior right side out to check the shape.
Step 5: Make the Lining
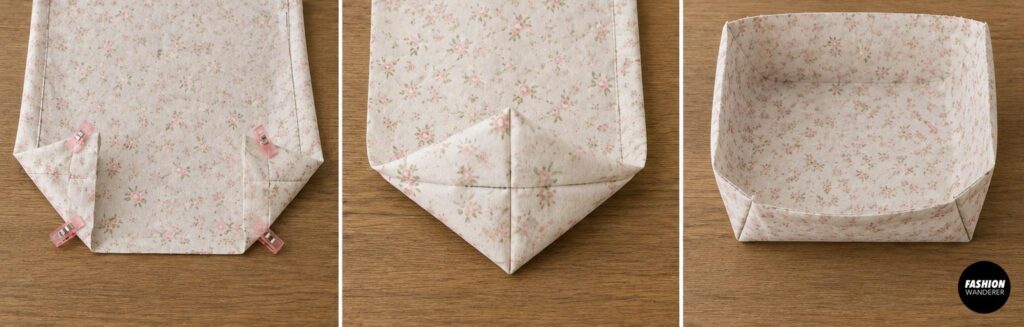
Place the two lining pieces right sides together.
Sew along the sides and bottom using a ½-inch seam allowance.
However, leave a 4 to 5-inch opening along the bottom seam.
This opening will allow you to turn the finished tote right side out later.
Create the same 2-inch boxed corners you made for the exterior.
Leave the lining wrong side out.
Step 6: Make the Fabric Bow Ties
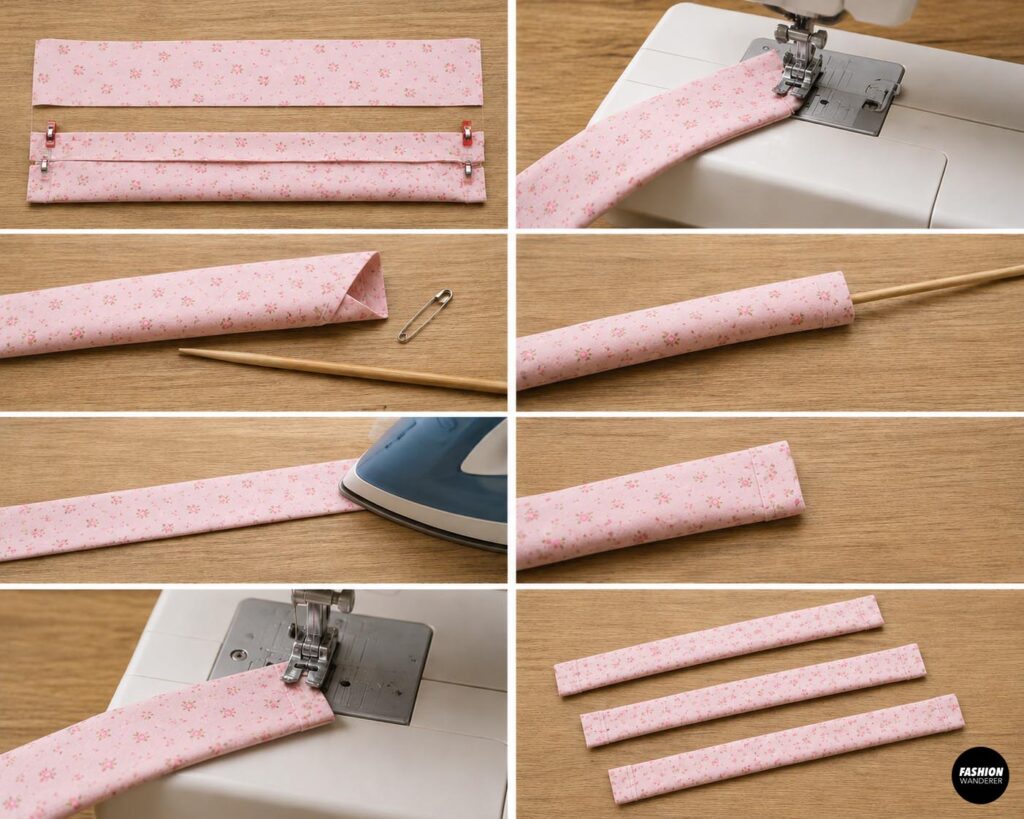
Fold one 5 x 24-inch bow strip in half lengthwise with right sides together.
Sew along the long edge and one short end using approximately a ⅜-inch seam allowance.
Leave the other short end open.
Turn the strip right side out using a turning tool, safety pin, or chopstick.
Press flat.
Fold the unfinished end approximately ½ inch inside and topstitch closed.
Repeat for the remaining three bow pieces.
You now have four finished fabric ties.
Step 7: Attach the Handles
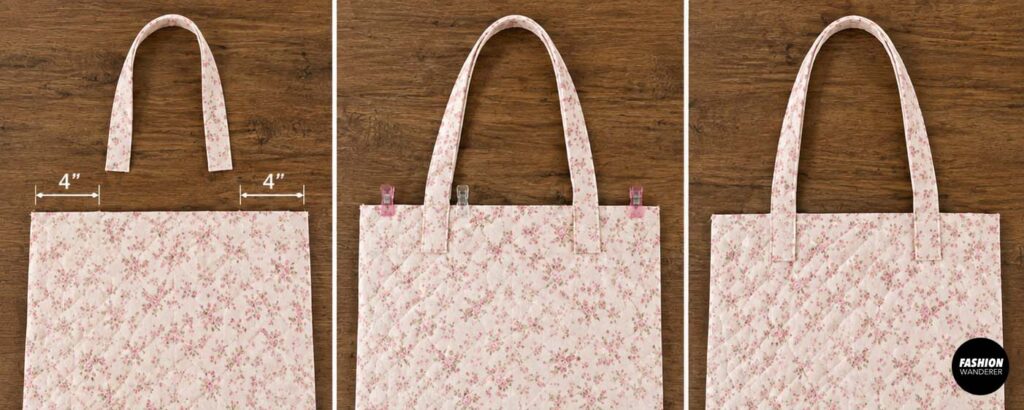
Position the first handle on the front exterior panel.
Place each handle end approximately 4 inches away from the side seams.
Make sure the handle is not twisted.
Align the raw handle ends with the raw top edge of the bag.
Baste them in place approximately ¼ inch from the edge.
Repeat with the second handle on the back panel.
Step 8: Position the Bow Ties
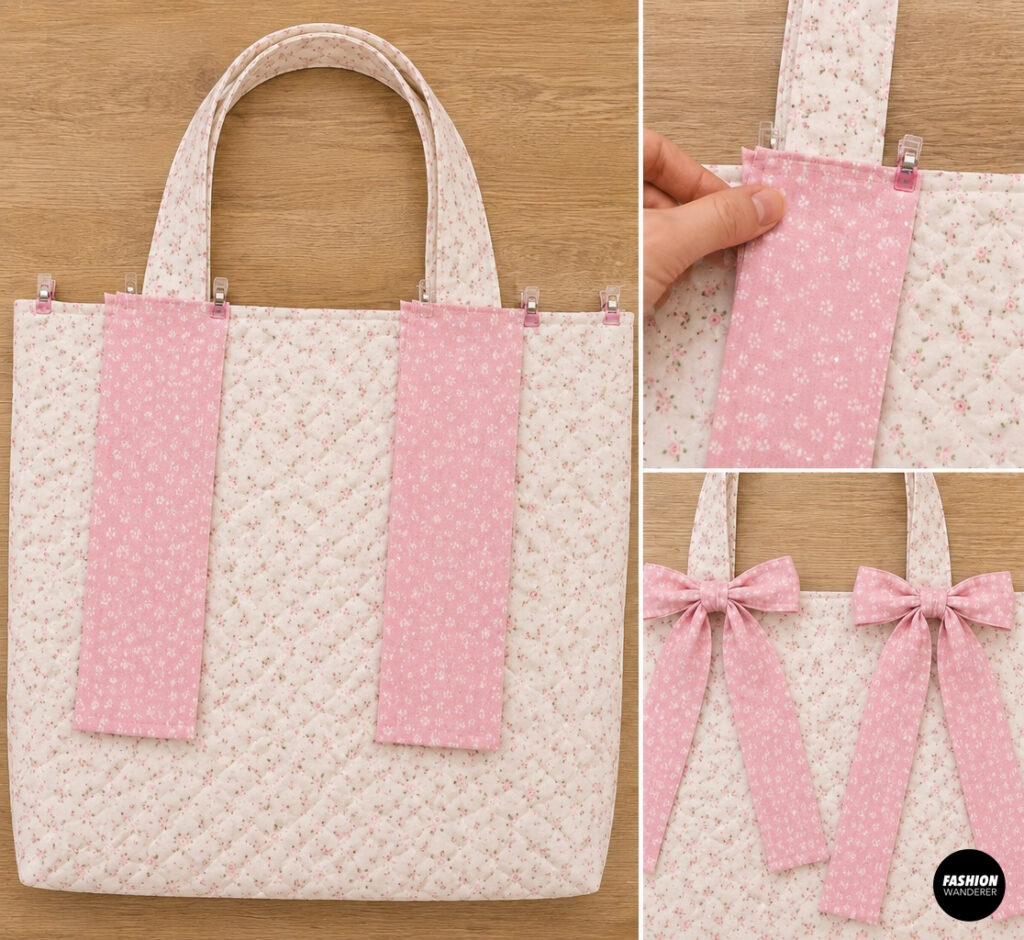
Place one bow tie near each handle attachment point.
The unfinished positioning edge should align with the top raw edge of the tote while the long portion hangs down inside the bag.
Baste each tie securely in place.
Once the tote is finished, two neighboring ties can be tied together into a decorative bow.
You can position the bows toward the center, near the handles, or closer to the side seams depending on your preferred look.
Step 9: Join the Exterior and Lining
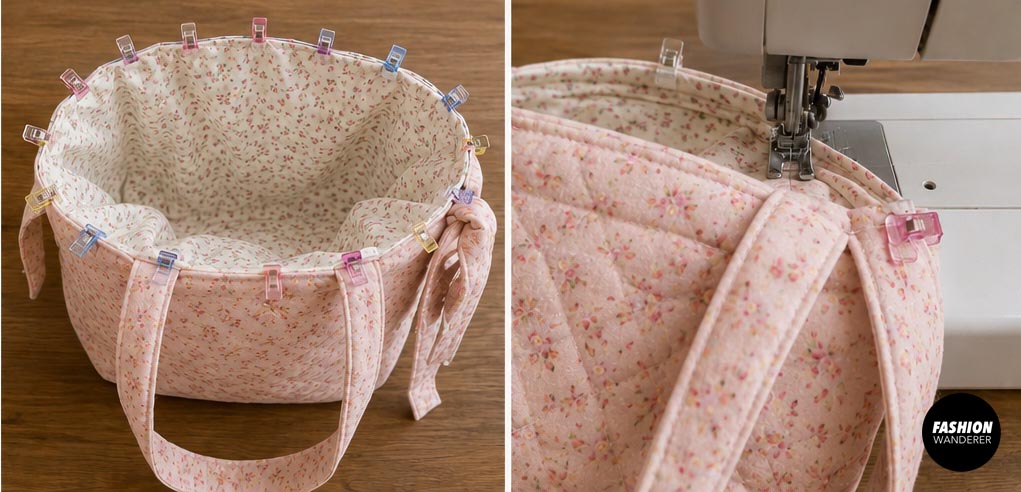
Place the exterior tote inside the lining so the right sides are facing each other.
Match the side seams and top raw edges.
Make sure the handles and bow ties are tucked safely between the two layers.
Pin or clip around the entire top opening.
Sew around the top using a ½-inch seam allowance.
Go slowly over the thicker handle areas.
Step 10: Turn the Tote Right Side Out
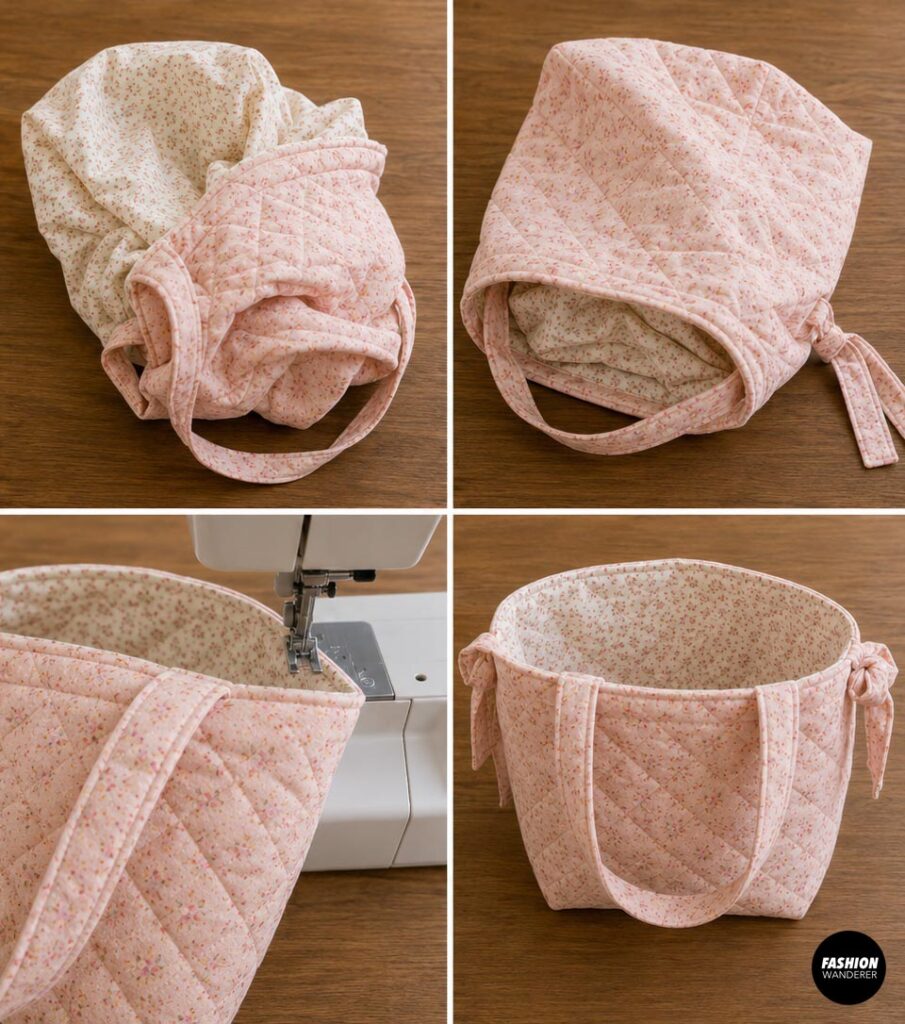
Reach through the opening you left in the bottom of the lining.
Carefully pull the exterior tote through the opening.
Continue pulling until the entire bag is right side out.
Push out the corners gently.
Turn the raw edges of the lining opening inward approximately ½ inch.
Topstitch the opening closed.
Push the lining inside the tote.
Step 11: Press and Topstitch the Bag
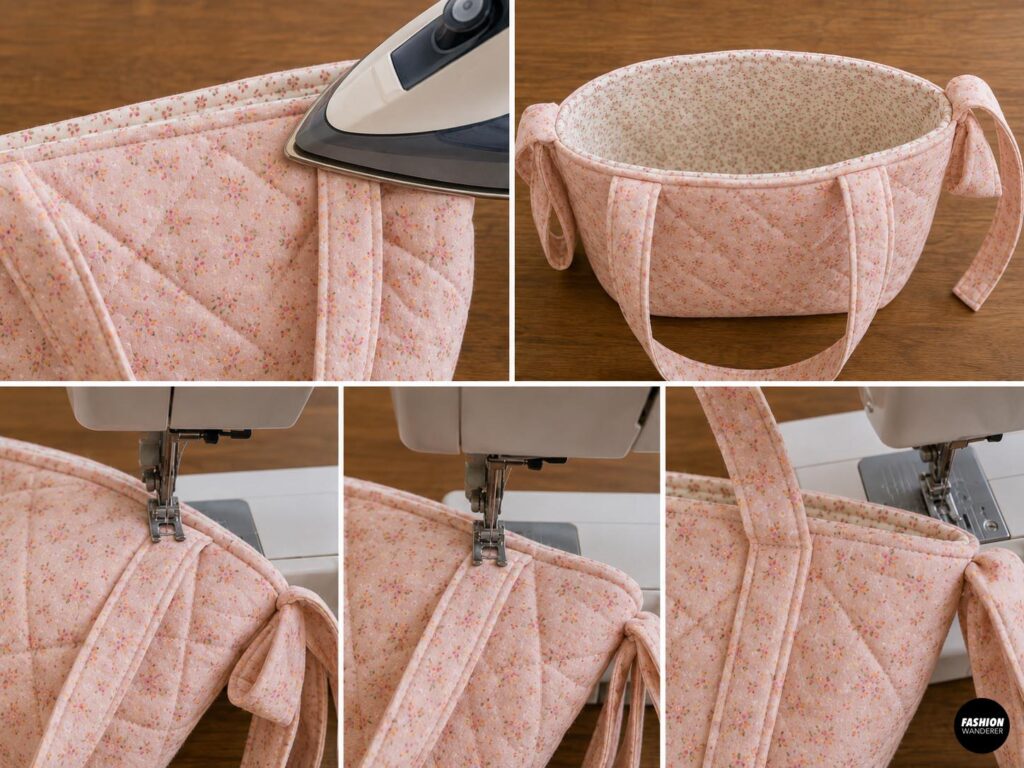
Press around the entire top edge of the tote.
Make sure the lining is sitting slightly inside so it does not show from the exterior.
Topstitch approximately ⅛ inch from the top edge.
This gives the tote a professional finish and also strengthens the handles and bow attachments.
Step 12: Tie the Decorative Bows
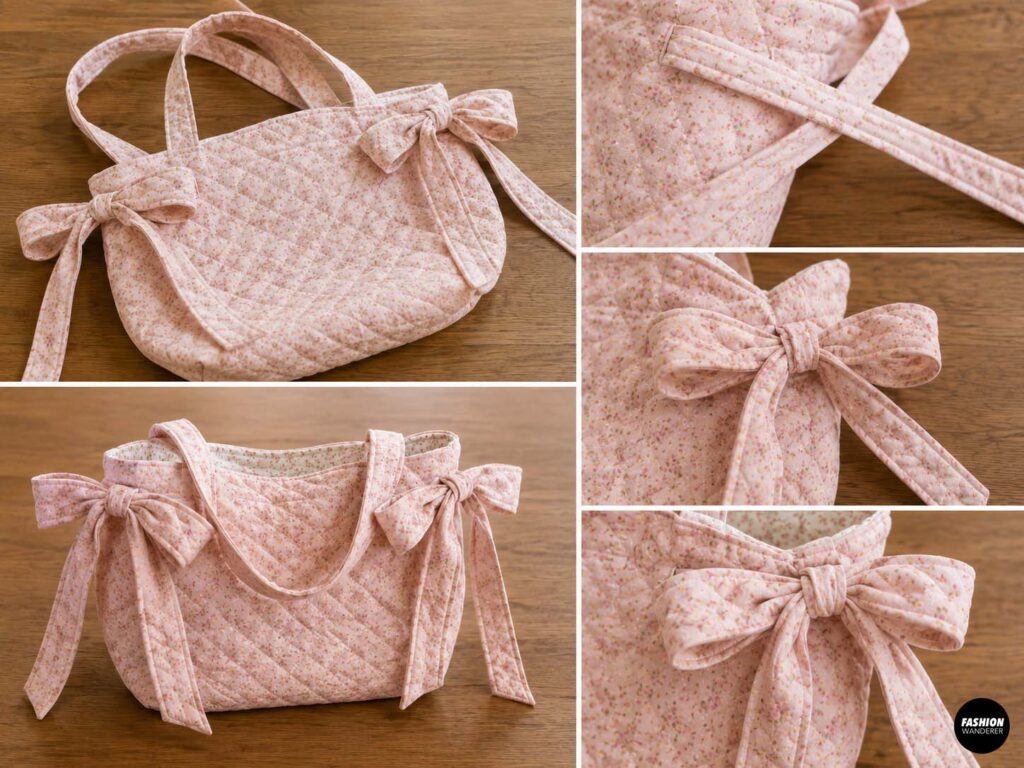
Tie two neighboring fabric straps together into soft bows.
Adjust the loops and tails until both sides look balanced.
For a trendy oversized look, keep the bow loops large and slightly relaxed rather than pulling them too tightly.
Your DIY quilted slouchy bow tote bag is finished!
Easy Ways to Customize Your Tote Bag
One of the best things about this handmade tote bag is how easy it is to personalize.
Try pastel gingham for a cottage-inspired look, tiny floral prints for a romantic style, or solid linen for something minimalist.
You can also add an interior slip pocket, magnetic snap closure, embroidered initials, fabric labels, patchwork quilting, contrasting bows, or longer shoulder straps.
For an even puffier quilted appearance, use thicker batting or fusible fleece.
Tips for Sewing a Professional-Looking Quilted Tote
Always press your fabric before cutting and press again after every major sewing step. Accurate cutting and consistent seam allowances will make even a beginner sewing project look polished.
When quilting, begin near the center of the panel and work outward to help prevent wrinkles.
If the quilted layers become bulky, increase your stitch length slightly to around 3.0 mm and sew slowly.
Final Thoughts
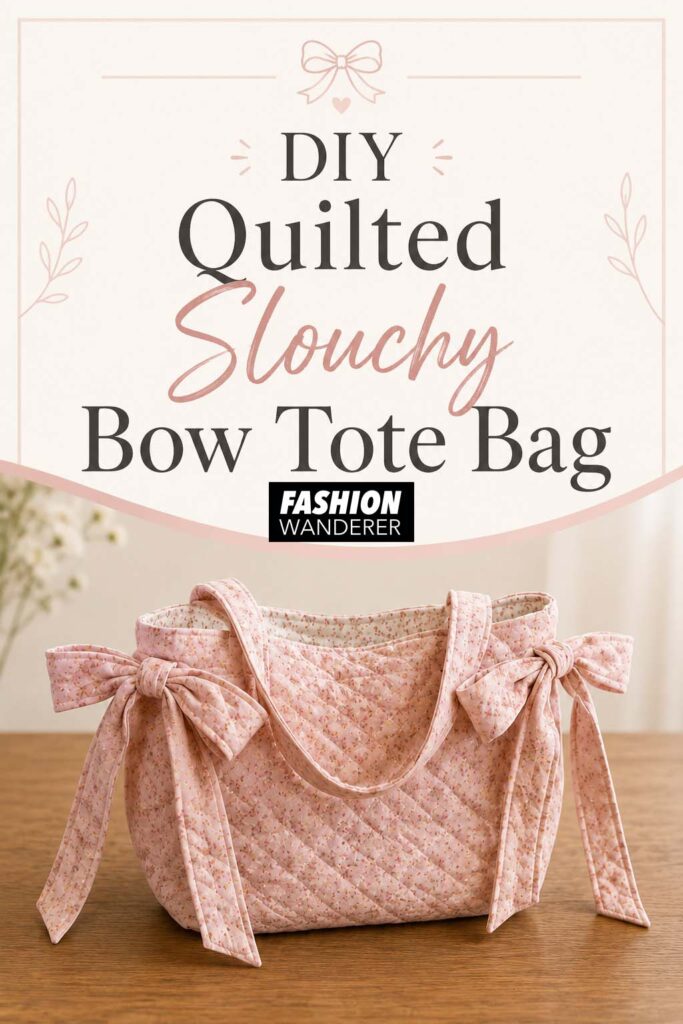
Learning how to make a quilted slouchy bow tote bag is a fun way to practice quilting, bag construction, boxed corners, lining, and handmade straps in one project.
The oversized bows make this simple tote feel much more special than an ordinary reusable bag, while the roomy slouchy shape keeps it practical for everyday use.
Make one in your favorite fabric, create matching versions as handmade gifts, or sew several different prints to sell at craft fairs or in your online shop. Once you understand the basic construction, this is the kind of sewing pattern you will want to make again and again.