
There’s nothing better than curling up with a good book—except curling up with a good book and a comfy pillow that actually supports your back. This DIY reading pillow with armrests combines a tall supportive back, padded arms, a cozy headrest, and an optional side pocket for keeping your book, glasses, or phone close by.
This project looks impressive, but it can be made using straightforward sewing techniques. Simple sewing projects using fabric scraps are perfect for making quick back-to-school items while reducing fabric waste.
If you’re comfortable sewing straight seams, clipping curves, and stuffing a pillow, you can tackle this project. It also makes a thoughtful handmade gift for book lovers, kids, teens, college students, or anyone who loves reading in bed.
DIY Reading Pillow with Armrests
Unlike a traditional square reading pillow, this design is shaped more like a small cushioned chair. The tall back supports your upper body while the two stuffed armrests give you somewhere comfortable to rest your elbows.
Add a rolled neck pillow, carrying handle, and book pocket, and you have a practical reading companion that can move from the bedroom to the sofa or floor.
Finished Size
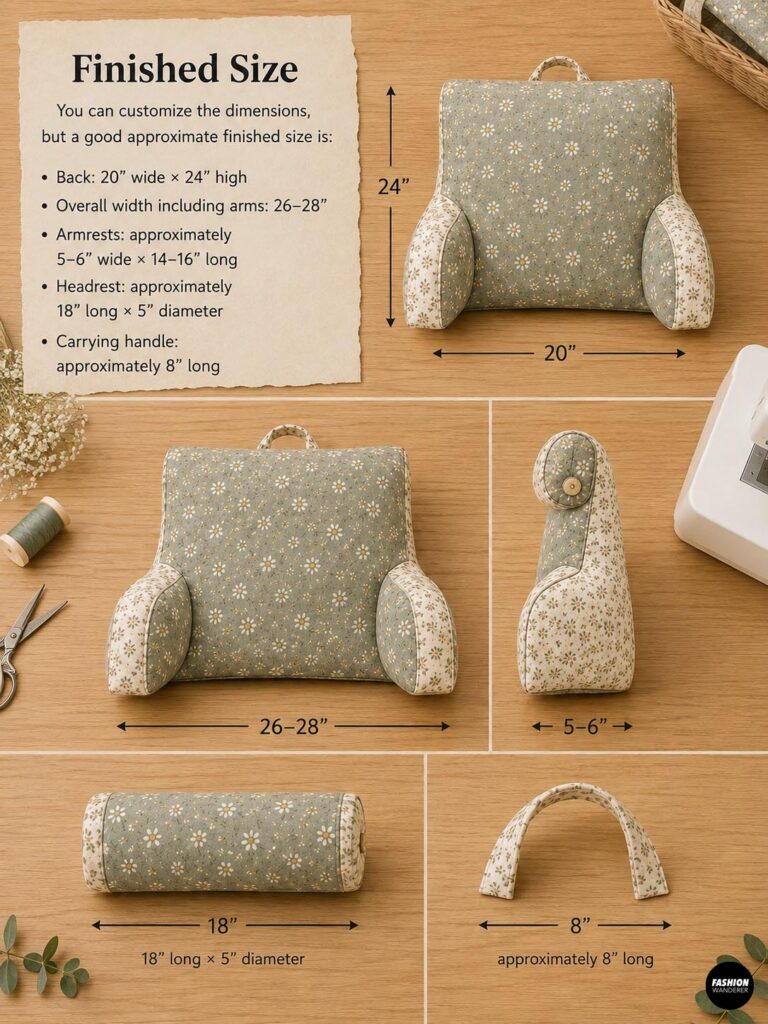
You can customize the dimensions, but a good approximate finished size is:
- Back: 20″ wide × 24″ high
- Overall width including arms: 26–28″
- Armrests: approximately 5–6″ wide × 14–16″ long
- Headrest: approximately 18″ long × 5″ diameter
- Carrying handle: approximately 8″ long
These measurements don’t need to be exact. Make the pillow larger for an adult or scale it down for a child.
Materials You’ll Need
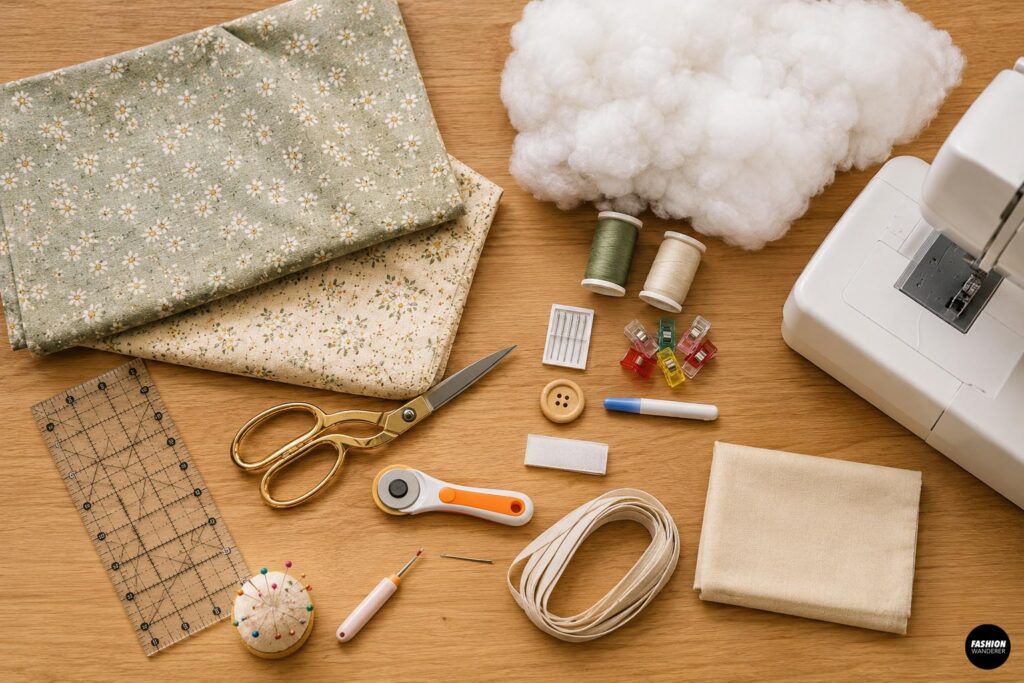
For your DIY reading pillow, gather approximately 2–2½ yards of medium-weight cotton, canvas, cotton-linen blend, or home décor fabric. Using two coordinating fabrics is a cute way to highlight the armrests and side panels.
You’ll also need polyester fiberfill, matching polyester thread, a sewing machine, universal 90/14 needle, fabric scissors or rotary cutter, ruler, fabric marker, pins or sewing clips, iron and ironing board, and a hand-sewing needle.
Optional supplies include piping, a large wooden button, hook-and-loop tape, fusible interfacing, and extra fabric for a side book pocket.
Tip: Prewash and press washable fabric before cutting. This prevents your finished reading pillow from shrinking later.
Step-by-Step Reading Pillow Tutorial
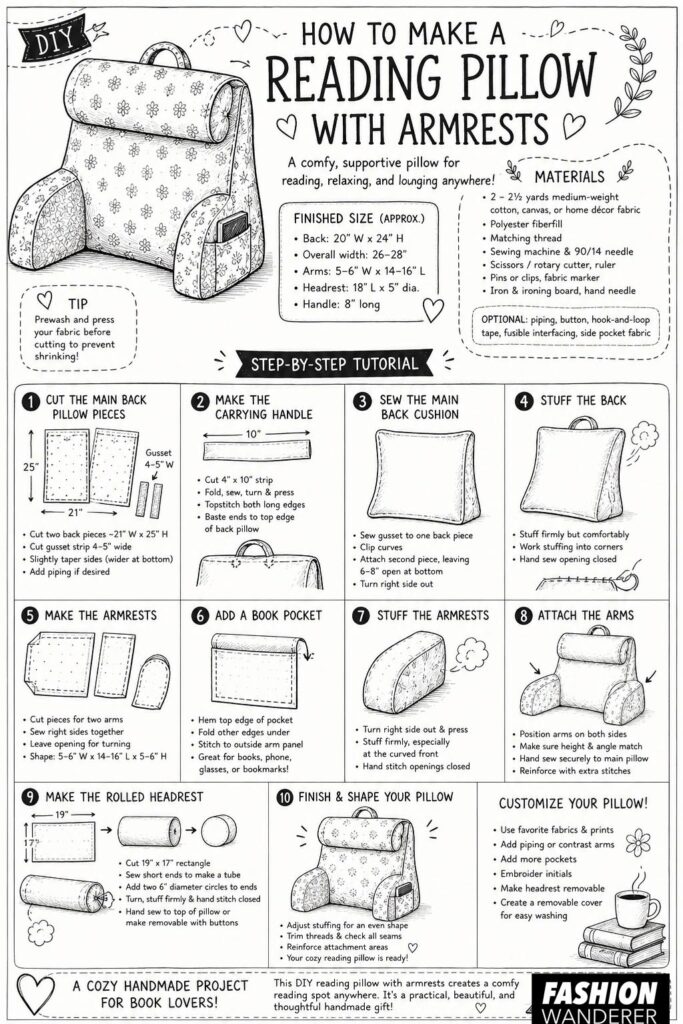
Step 1: Cut the Main Back Pillow Pieces
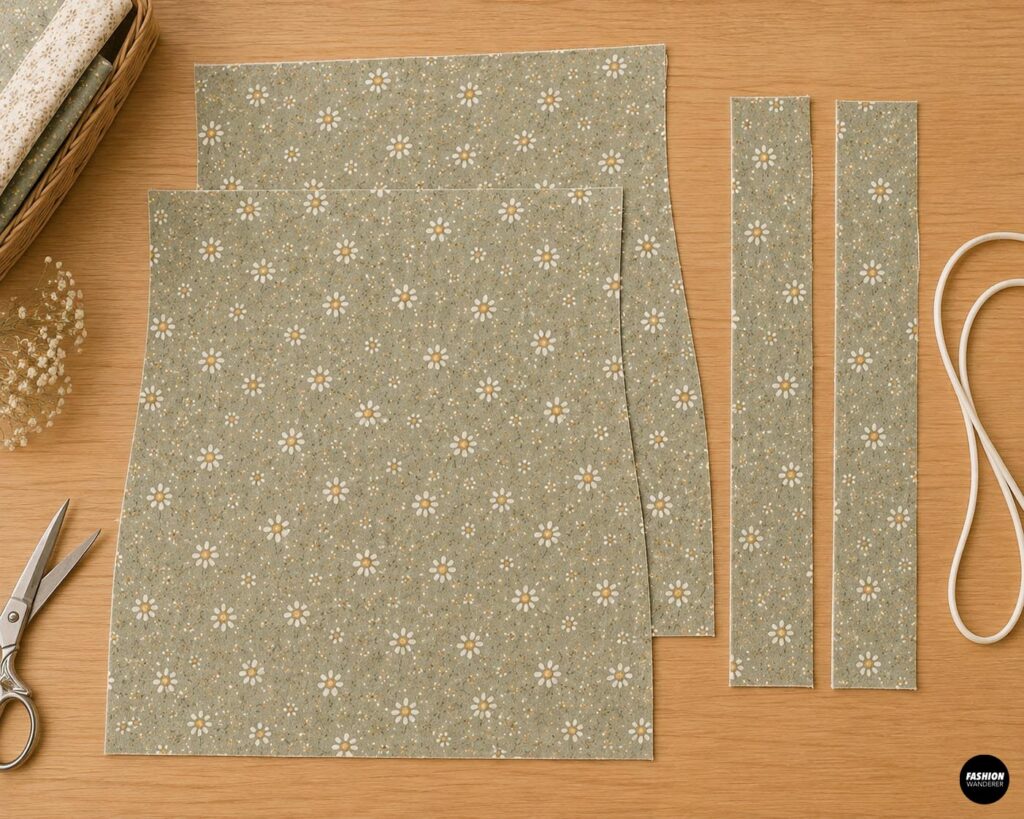
Begin by cutting two rectangles approximately 21″ wide × 25″ high for the main back cushion. This includes roughly a ½” seam allowance around the edges.
For a more chair-like silhouette, slightly taper the sides so the bottom is wider than the top.
Cut matching side gusset strips approximately 4–5″ wide. These create depth, making the pillow thick and supportive rather than flat.
If you’re using piping, prepare enough to go around the front edges.
Step 2: Make the Carrying Handle
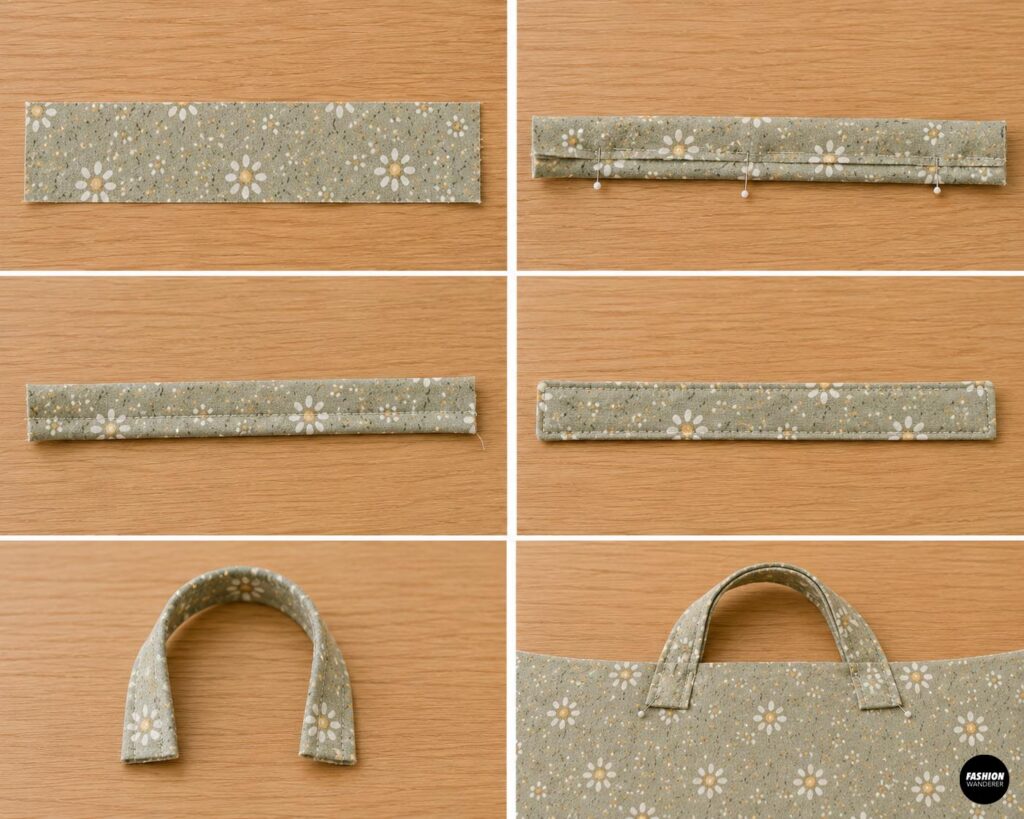
Cut a strip approximately 4″ × 10″.
Fold it in half lengthwise with right sides together and sew along the long edge. Turn it right side out and press it flat.
Topstitch approximately ⅛” from both long edges.
Curve the strip into a handle and baste its ends to the top edge of the back pillow, keeping the handle pointing downward toward the fabric while sewing.
Step 3: Sew the Main Back Cushion
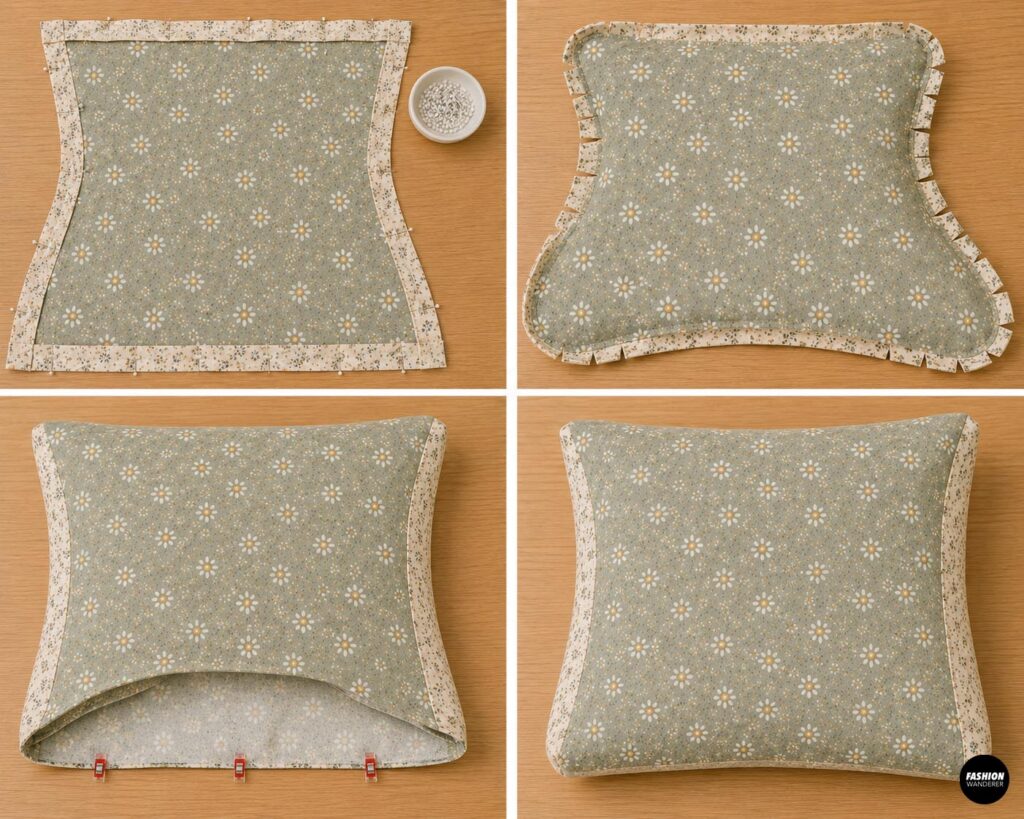
With right sides together, attach your gusset around one main back piece.
Clip into the seam allowance around curves and corners as necessary so the gusset sits smoothly.
Attach the second back piece to the remaining edge of the gusset, leaving approximately 6–8″ open along the bottom.
Turn everything right side out.
Step 4: Stuff the Back
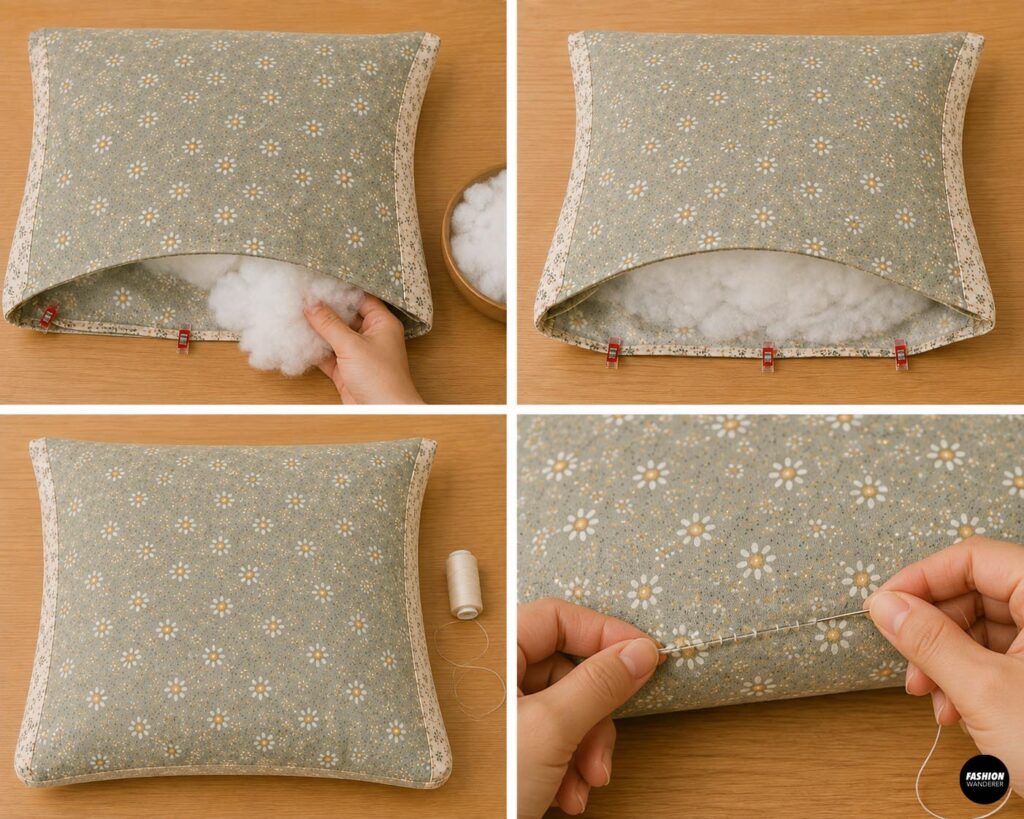
Begin adding polyester fiberfill through the opening.
Use small handfuls rather than pushing in huge clumps. Work the stuffing into the corners first before filling the center.
The reading pillow should feel firm and supportive but still comfortable. Overstuffing can make the seams look strained, while understuffing creates a floppy backrest.
Hand sew the opening closed with a ladder stitch.
Step 5: Make the Armrests
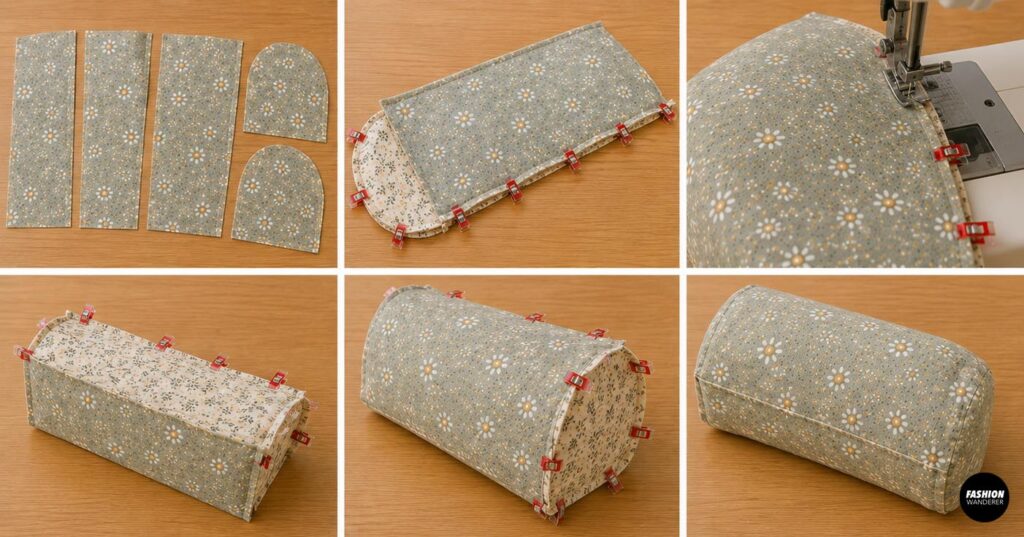
Cut pieces for two matching armrests. An easy beginner shape is a long rectangle with a curved front end.
Each finished arm can be approximately 5–6″ wide, 14–16″ long, and 5–6″ high.
You’ll essentially sew each arm as a small stuffed cushion with a top, bottom, inner side, outer side, and curved front panel.
Pin the pieces right sides together and sew using a ½” seam allowance, leaving an opening for turning.
Step 6: Add a Book Pocket
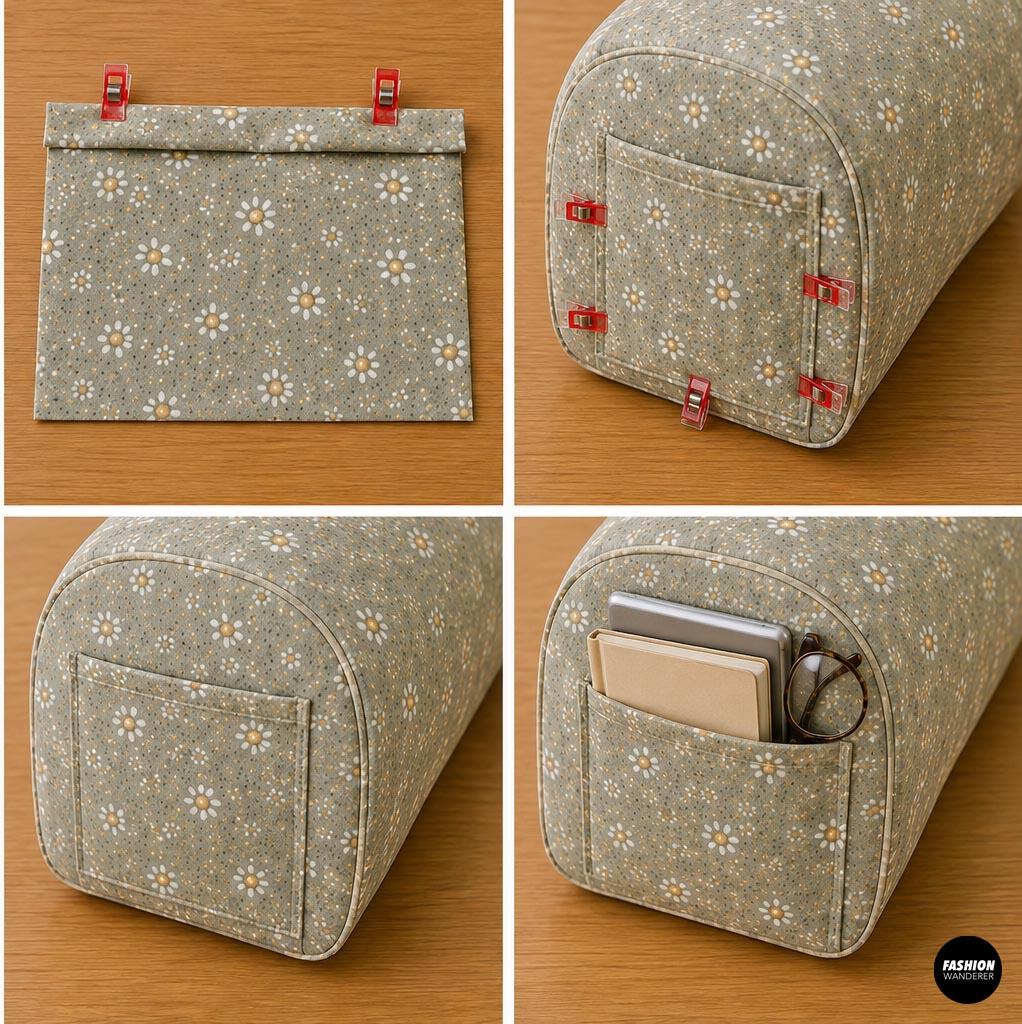
Before completely assembling one armrest, add an optional pocket to its outside panel.
Cut a rectangle slightly wider than your intended pocket. Fold the top edge under ¼”, then another ½”, press, and topstitch.
Fold the remaining raw edges under approximately ½” and press.
Position the pocket on the outside-facing arm panel, then stitch around both sides and bottom. Leave the top open.
Your pocket can hold a paperback, e-reader, phone, reading glasses, or bookmarks.
Step 7: Stuff the Armrests
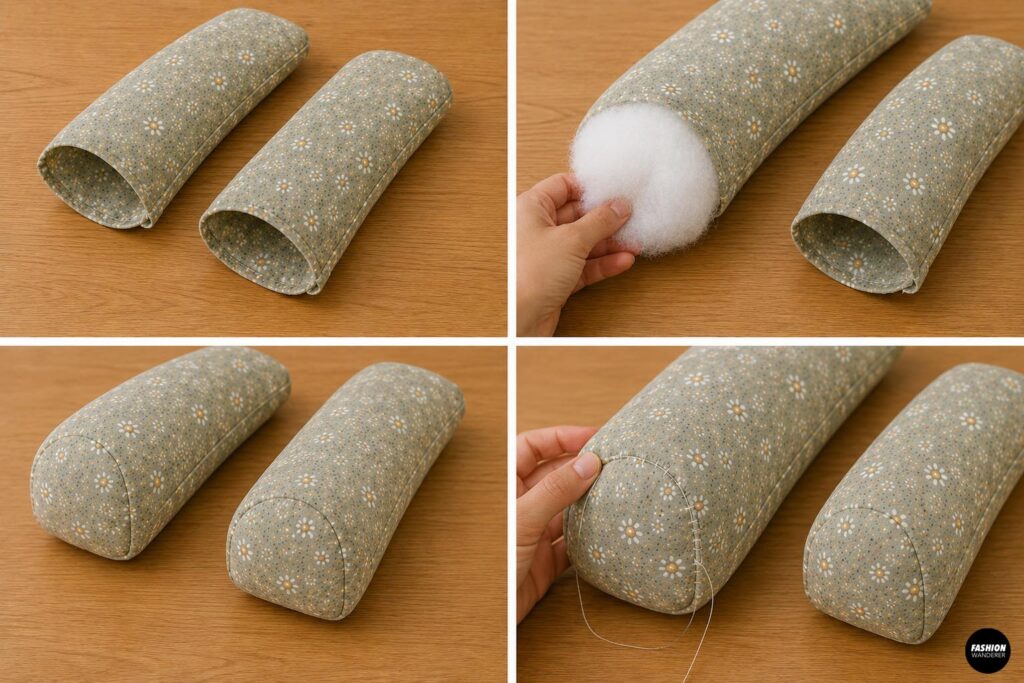
Turn both arms right side out and press the seams.
Stuff each arm firmly with polyester fiberfill, paying particular attention to the curved front.
Compare the two arms as you stuff them. You want approximately the same height, firmness, and shape on both sides.
Close the openings securely with ladder stitches.
Step 8: Attach the Arms
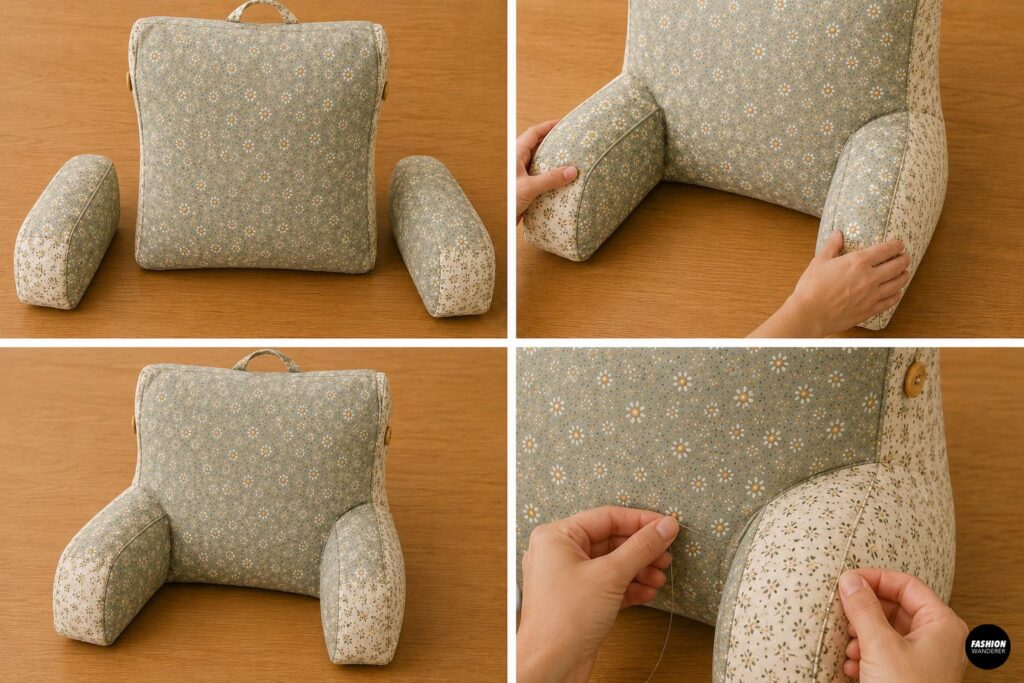
Position an armrest against each lower side of the main pillow.
Check the pillow from the front before permanently attaching anything. Both arms should sit at approximately the same height and angle.
Hand sew the arms securely to the main back cushion using strong doubled thread and small hidden stitches.
For extra durability, stitch around the attachment area twice.
Step 9: Make the Rolled Headrest
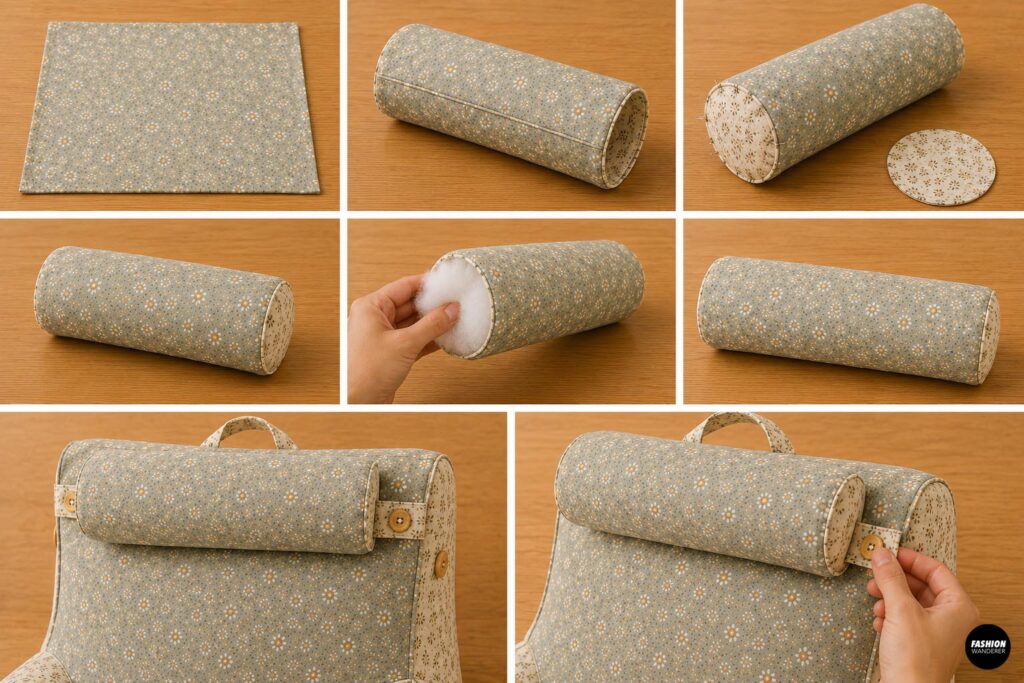
The optional headrest is what gives this DIY reading pillow its extra-cozy chair appearance.
Cut a rectangle approximately 19″ × 17″. Sew the short ends together to create a tube.
Cut two circles approximately 6″ in diameter and sew one onto each end, leaving an opening.
Turn, stuff firmly, and hand stitch the opening closed.
You can permanently hand sew the headrest across the upper portion of the back pillow or make it removable with buttons and fabric tabs.
Step 10: Finish and Shape Your Pillow
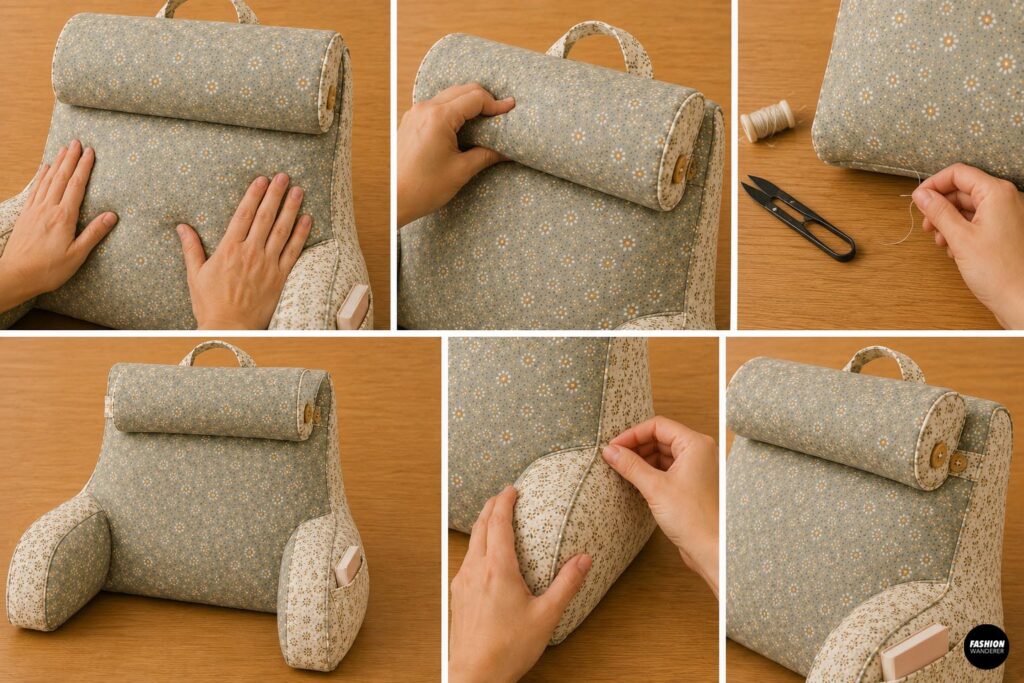
Give your finished pillow a little massage—yes, really.
Move the stuffing around until the back, arms, and headrest have smooth, even shapes. Trim loose threads and inspect all attachment points.
If you plan to use the pillow frequently, reinforce any areas where the arms and headrest connect to the main cushion.
Customize Your DIY Reading Pillow
Once you understand the basic construction, this project is wonderfully customizable. Try floral cotton for a cottage-inspired pillow, canvas for something durable and modern, or playful prints for a child’s reading nook.
You could also add piping around the edges, multiple book pockets, embroidered initials, a removable headrest, or contrasting armrests.
For an especially practical version, consider making an inner stuffed pillow and a separate removable outer cover. That takes more sewing, but makes regular washing much easier.
A Cozy Handmade Project for Book Lovers
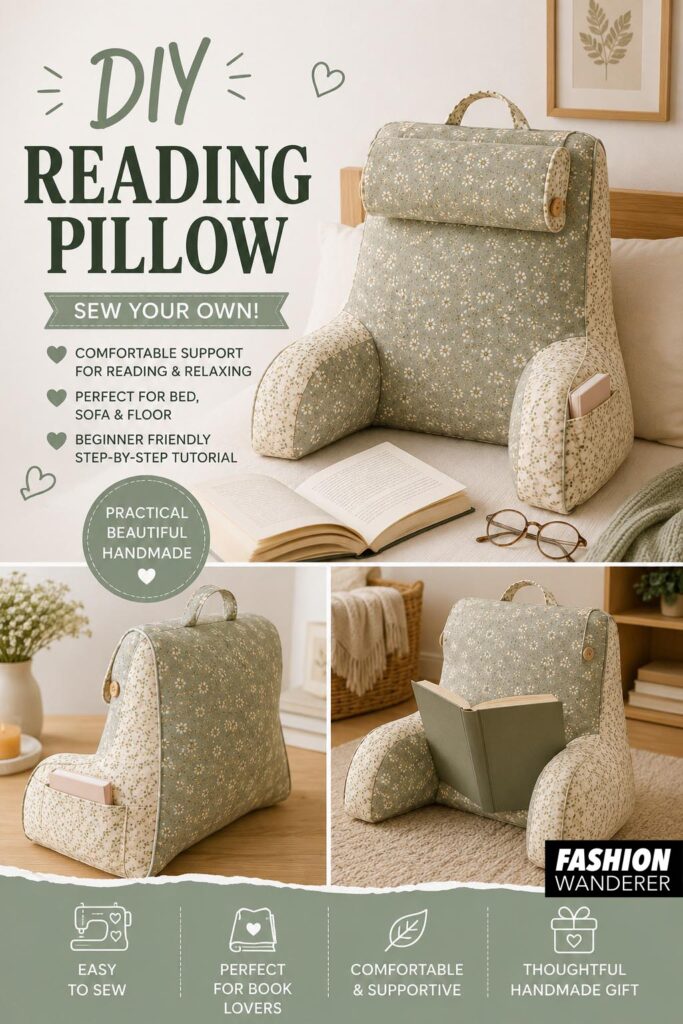
A DIY reading pillow with armrests is more than another decorative cushion. It creates a comfortable little reading spot almost anywhere—on a bed, sofa, carpet, or cozy reading nook.
And despite its impressive finished appearance, the construction is really a collection of manageable sewing tasks: make the back cushion, sew two arms, add a pocket, create the headrest, stuff everything, and assemble.
Choose two coordinating fabrics, add a favorite book to the pocket, and you’ve also got a pretty fantastic handmade gift. The hardest part may be convincing yourself to get up once you’re settled into it.