
A handmade DIY lunch bag and snack pouch set is one of those sewing projects that is both cute and genuinely useful. Whether you are sewing for back-to-school season, packing lunches for work, or making a practical handmade gift, this matching set is a great way to use cheerful fabric while practicing simple beginner sewing skills.
The lunch bag is roomy enough for a sandwich container, fruit, drink, and small snacks, while the reusable snack pouch is perfect for crackers, pretzels, cookies, or dry snacks. Make both pieces from coordinating cotton prints for a polished matching set, or mix leftover fabric scraps for a fun patchwork look.
These beginner sewing projects for back-to-school season make it easy to transform leftover fabric scraps into cute and functional everyday items. This tutorial walks you through how to sew a lunch bag and reusable snack pouch step by step, including cutting, adding lining, making boxed corners, and finishing the closures.
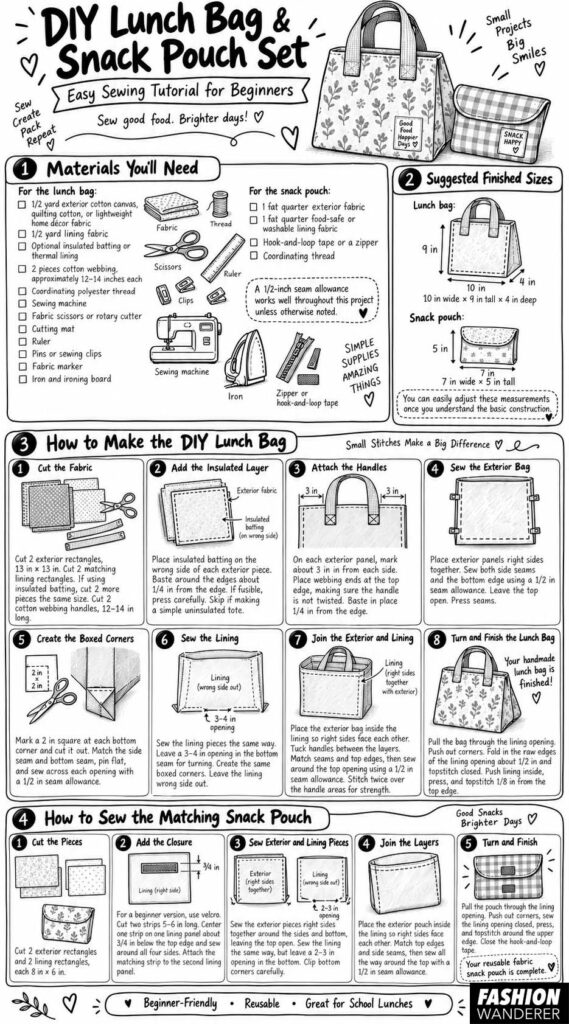
Materials You’ll Need
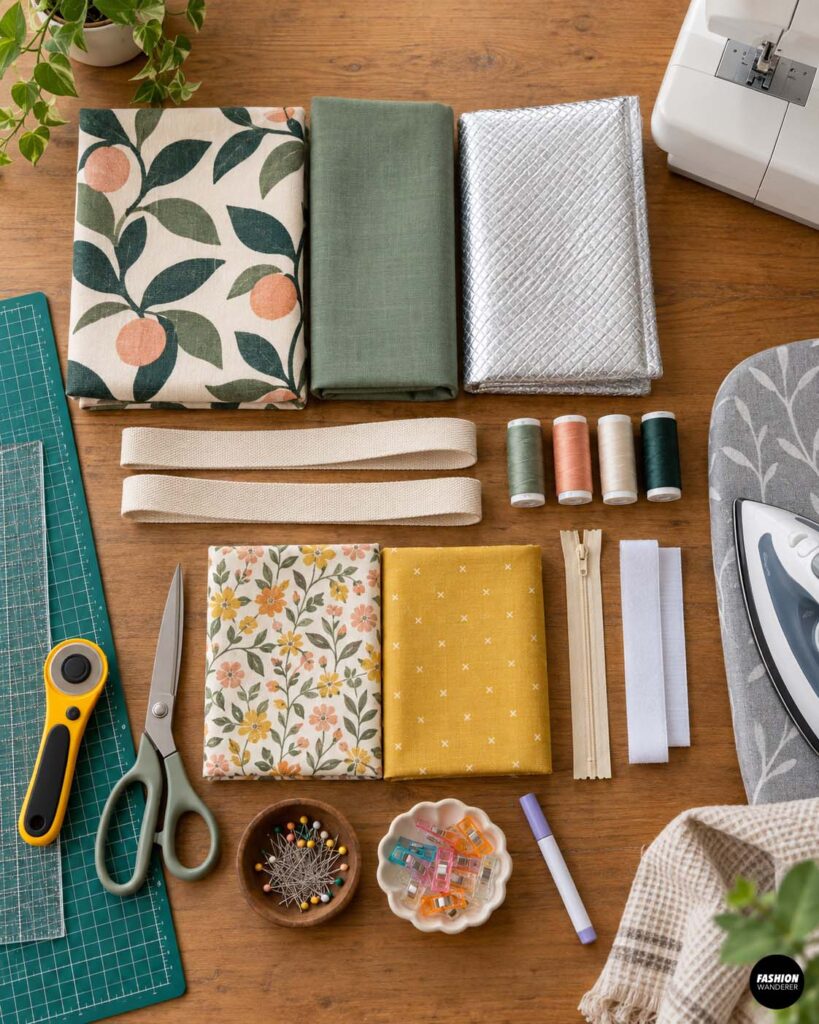
For the lunch bag:
- 1/2 yard exterior cotton canvas, quilting cotton, or lightweight home décor fabric
- 1/2 yard lining fabric
- Optional insulated batting or thermal lining
- 2 pieces cotton webbing, approximately 12–14 inches each
- Coordinating polyester thread
- Sewing machine
- Fabric scissors or rotary cutter
- Cutting mat
- Ruler
- Pins or sewing clips
- Fabric marker
- Iron and ironing board
For the snack pouch:
- 1 fat quarter exterior fabric
- 1 fat quarter food-safe or washable lining fabric
- Hook-and-loop tape or a zipper
- Coordinating thread
A 1/2-inch seam allowance works well throughout this project unless otherwise noted.
Suggested Finished Sizes
For a beginner-friendly lunch bag, aim for approximately:
Lunch bag:
10 inches wide × 9 inches tall × 4 inches deep
Snack pouch:
7 inches wide × 5 inches tall
You can easily adjust these measurements once you understand the basic construction.
How to Make the DIY Lunch Bag
Step 1: Cut the Fabric
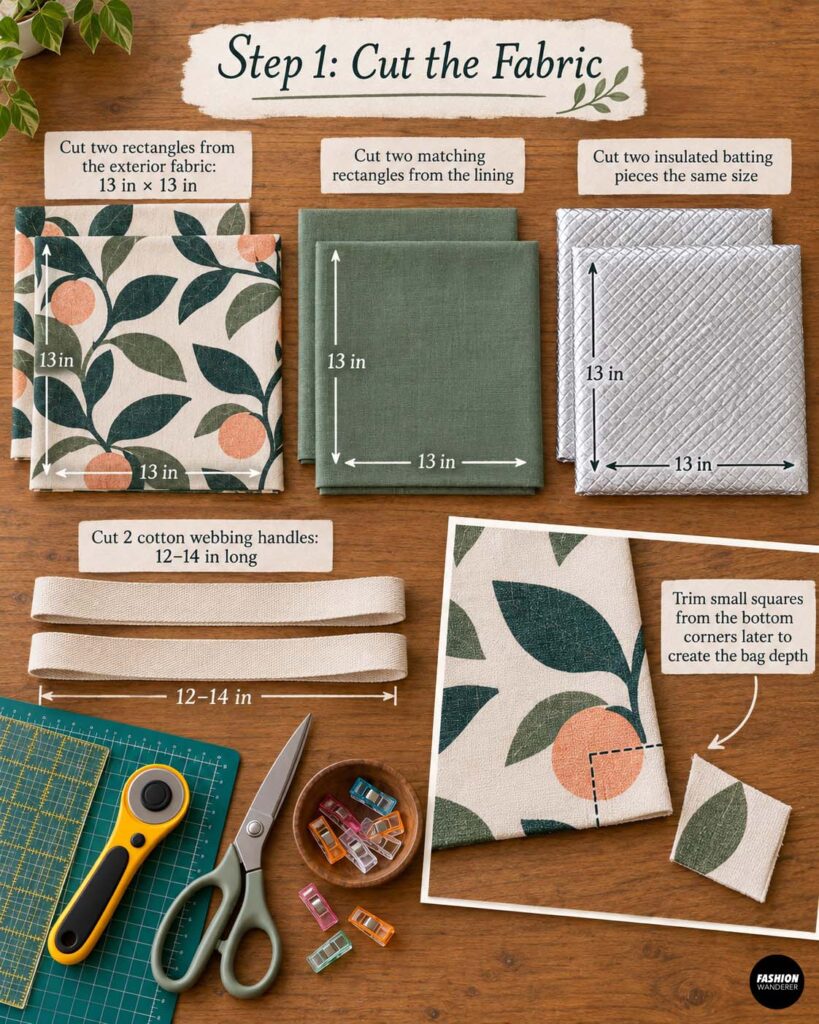
Cut two rectangles from the exterior fabric measuring approximately:
13 inches wide × 13 inches tall
Cut two matching rectangles from the lining.
If you are adding insulated batting, cut two pieces the same size.
You will trim away small squares from the bottom corners later to create the bag’s depth.
Cut two pieces of cotton webbing approximately 12–14 inches long for the handles.
Step 2: Add the Insulated Layer
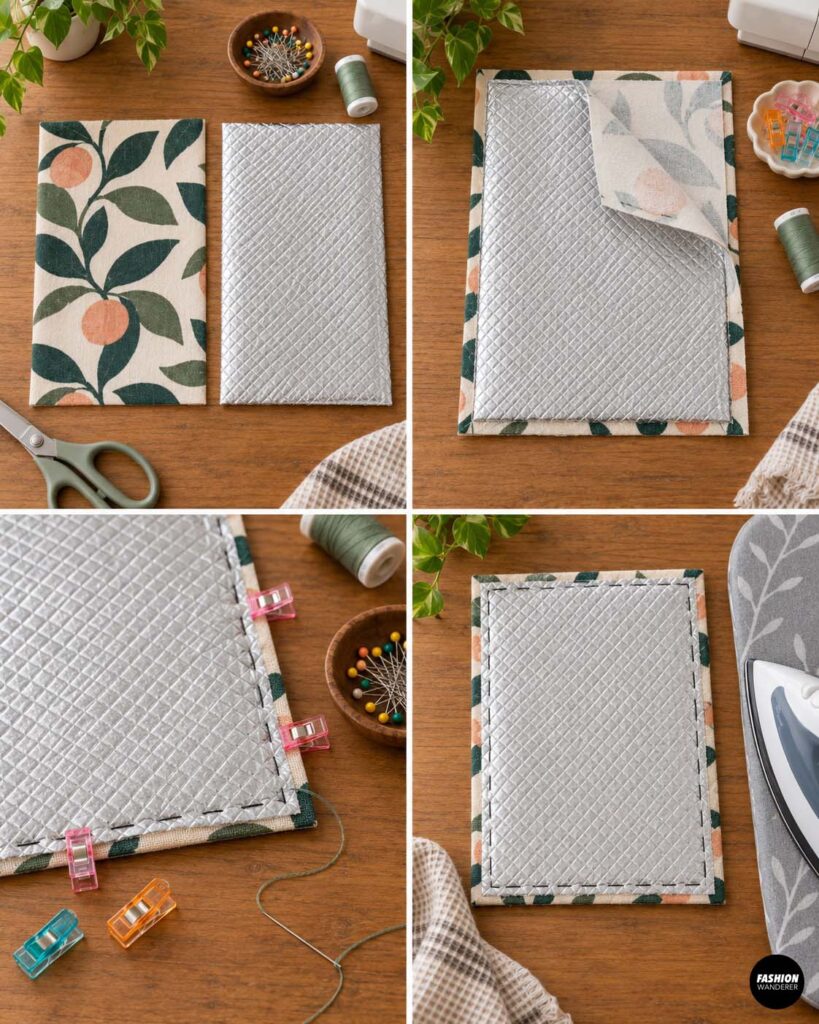
Place one piece of insulated batting against the wrong side of each exterior piece.
Baste around the outer edges using a long stitch approximately 1/4 inch from the edge.
This keeps the layers together while you sew.
If you are using fusible insulated batting, follow the manufacturer’s instructions and press carefully.
You can skip this step if you prefer a simple fabric lunch tote.
Step 3: Attach the Handles
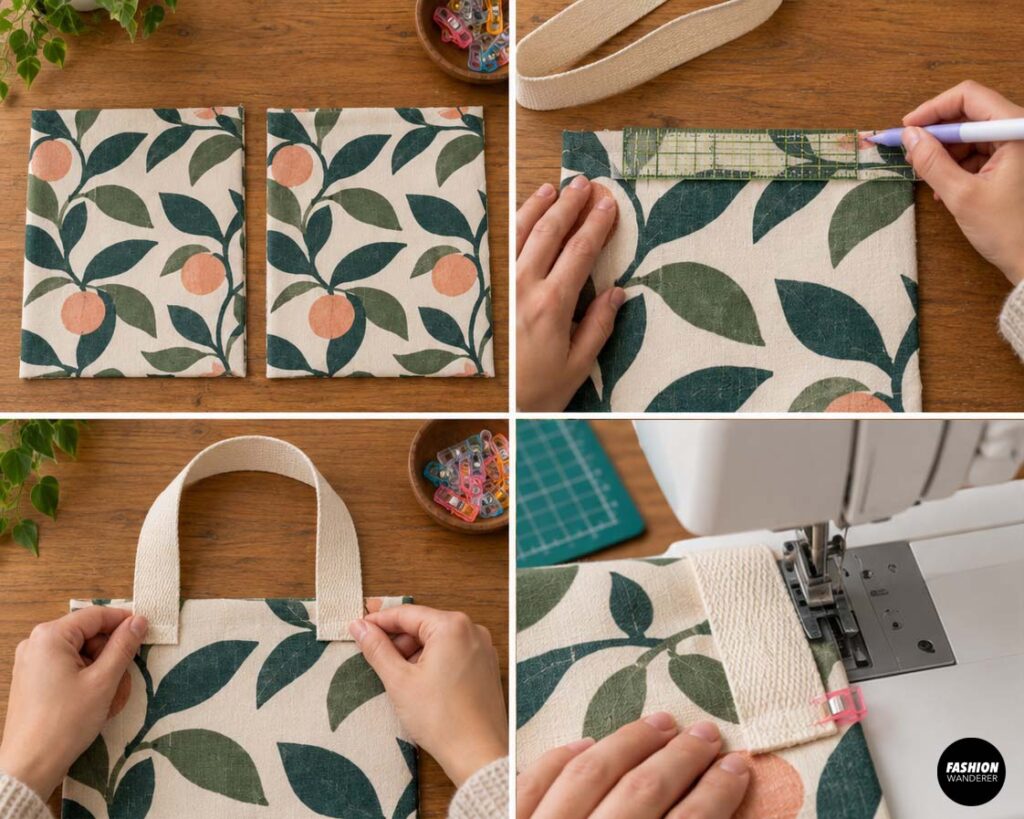
Place one exterior panel right side up.
Measure approximately 3 inches inward from each side edge and mark the handle placement.
Position one end of the webbing at each mark with the raw ends aligned with the top edge.
Make sure the handle is not twisted.
Baste the ends in place approximately 1/4 inch from the edge.
Repeat with the second handle on the other exterior panel.
Step 4: Sew the Exterior Bag
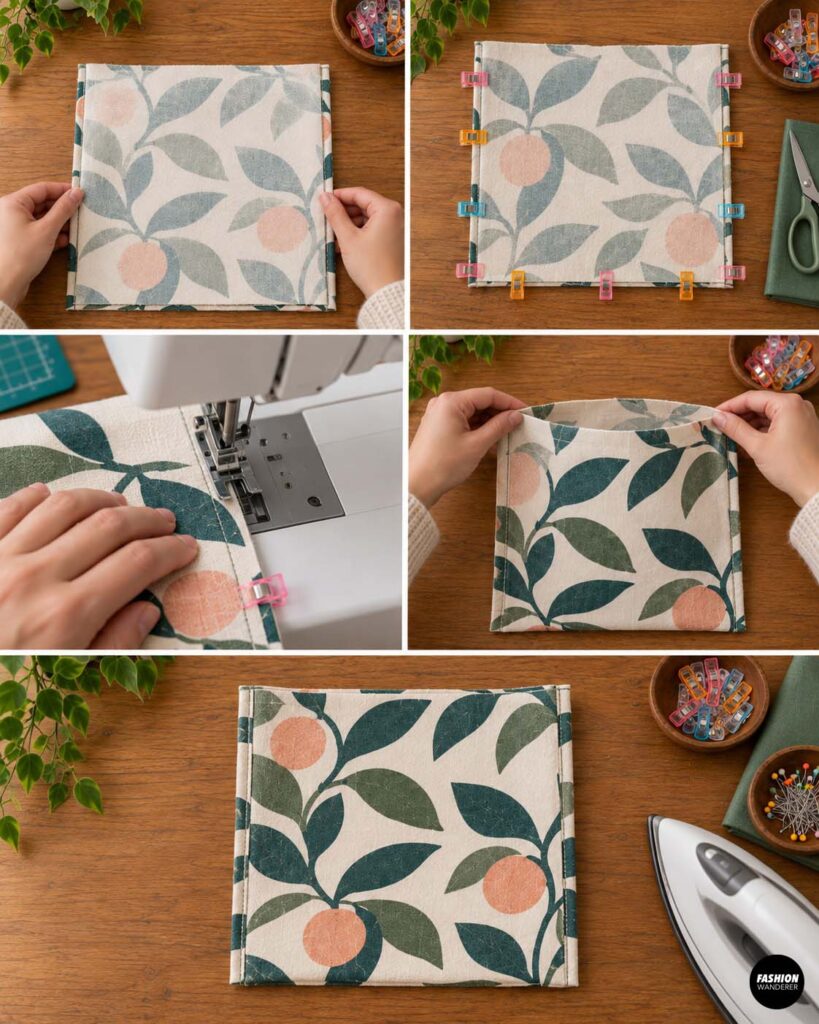
Place the two exterior panels right sides together.
Pin or clip along both side seams and the bottom edge.
Sew using a 1/2-inch seam allowance.
Do not sew across the top.
Press the seams open or toward one side.
Step 5: Create the Boxed Corners
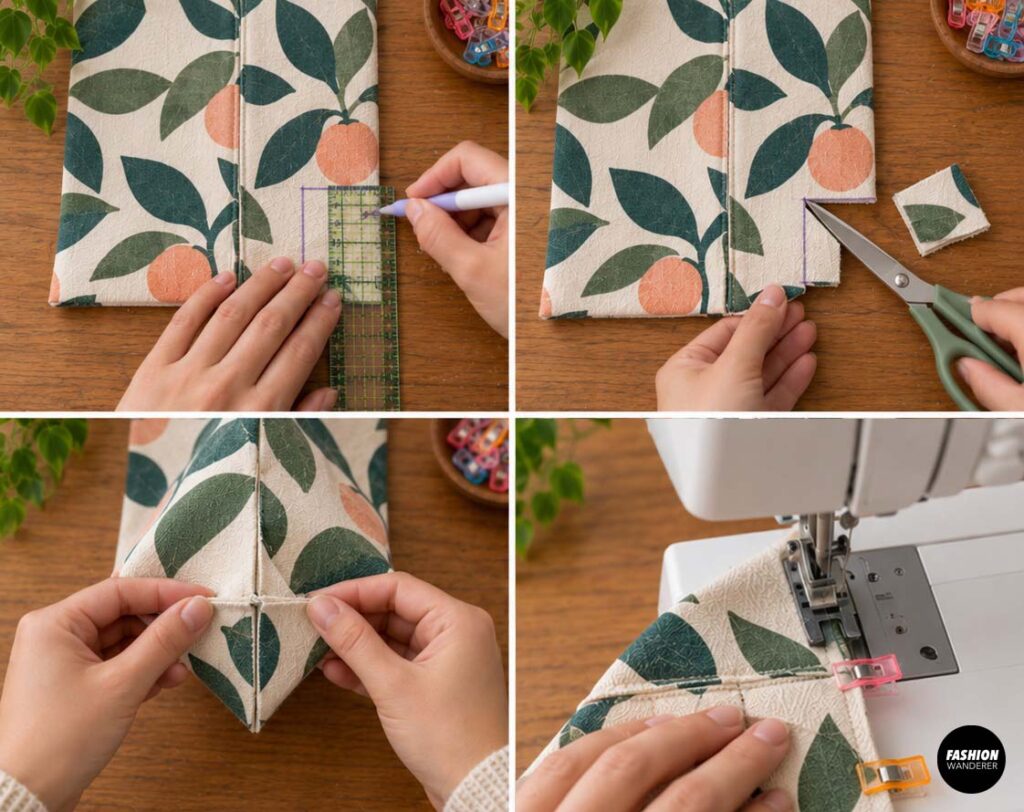
To give the lunch bag a flat bottom, create boxed corners.
At each bottom corner, measure and mark a 2-inch square.
Cut the square away.
Open one corner and bring the side seam and bottom seam together.
The raw edges should form a straight line.
Pin across the opening and sew with a 1/2-inch seam allowance.
Repeat on the second corner.
Turn the exterior right side out and you will see the bag beginning to take shape.
Step 6: Sew the Lining
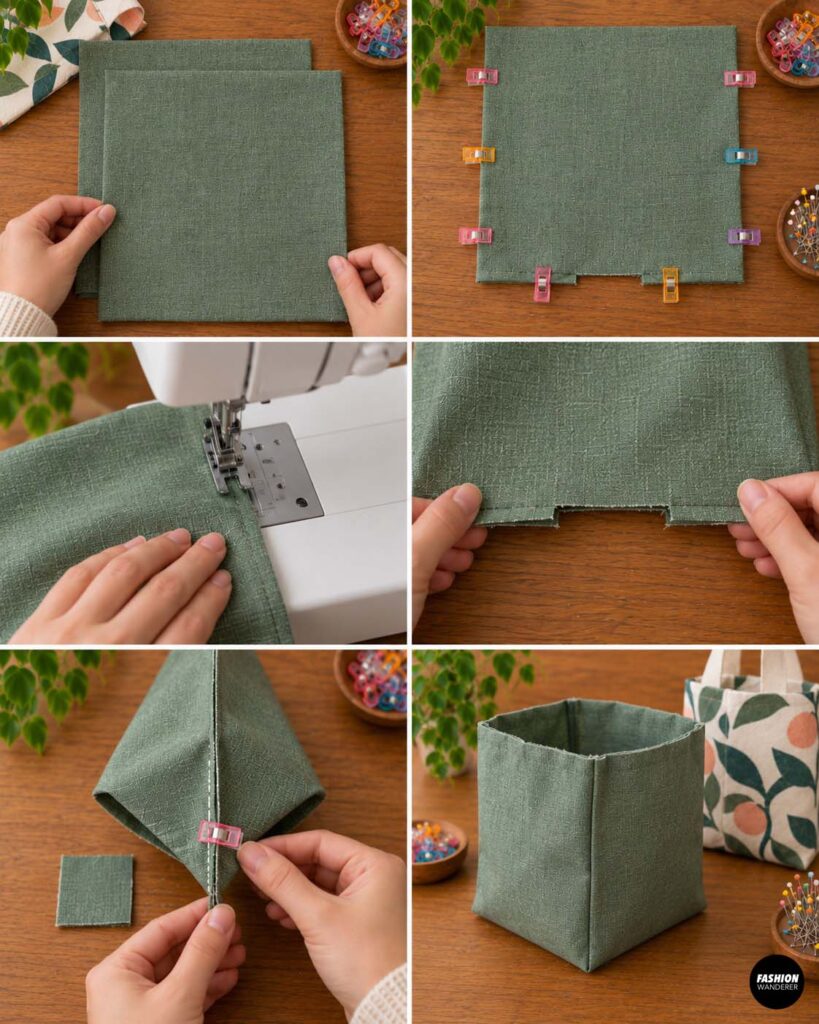
Place the two lining pieces right sides together.
Sew the side seams and bottom edge just as you did with the exterior.
However, leave a 3–4 inch opening along the bottom seam.
This opening will allow you to turn the finished bag right side out later.
Create the same 2-inch boxed corners on the lining.
Leave the lining wrong side out.
Step 7: Join the Exterior and Lining
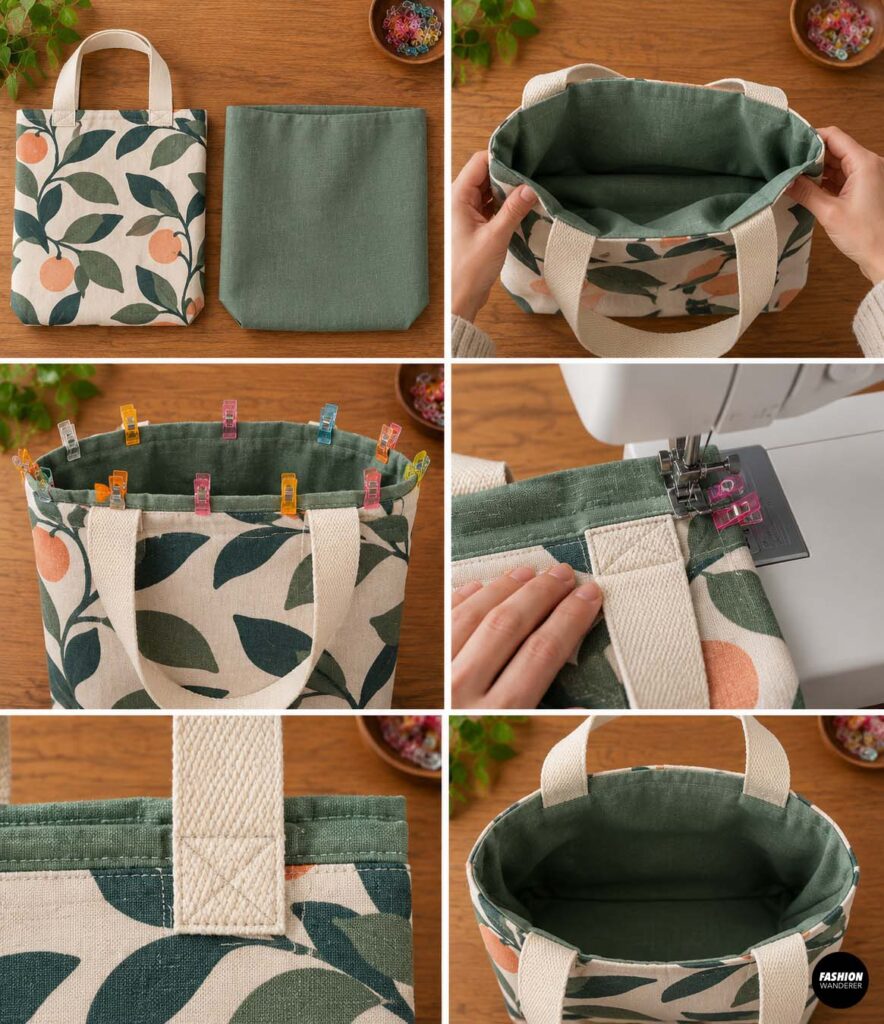
Place the exterior bag inside the lining so the right sides are facing each other.
The handles should be tucked between the two layers.
Match the side seams and top raw edges.
Pin or clip around the entire opening.
Sew around the top edge using a 1/2-inch seam allowance.
For extra strength, stitch across each handle area twice.
Step 8: Turn and Finish the Lunch Bag
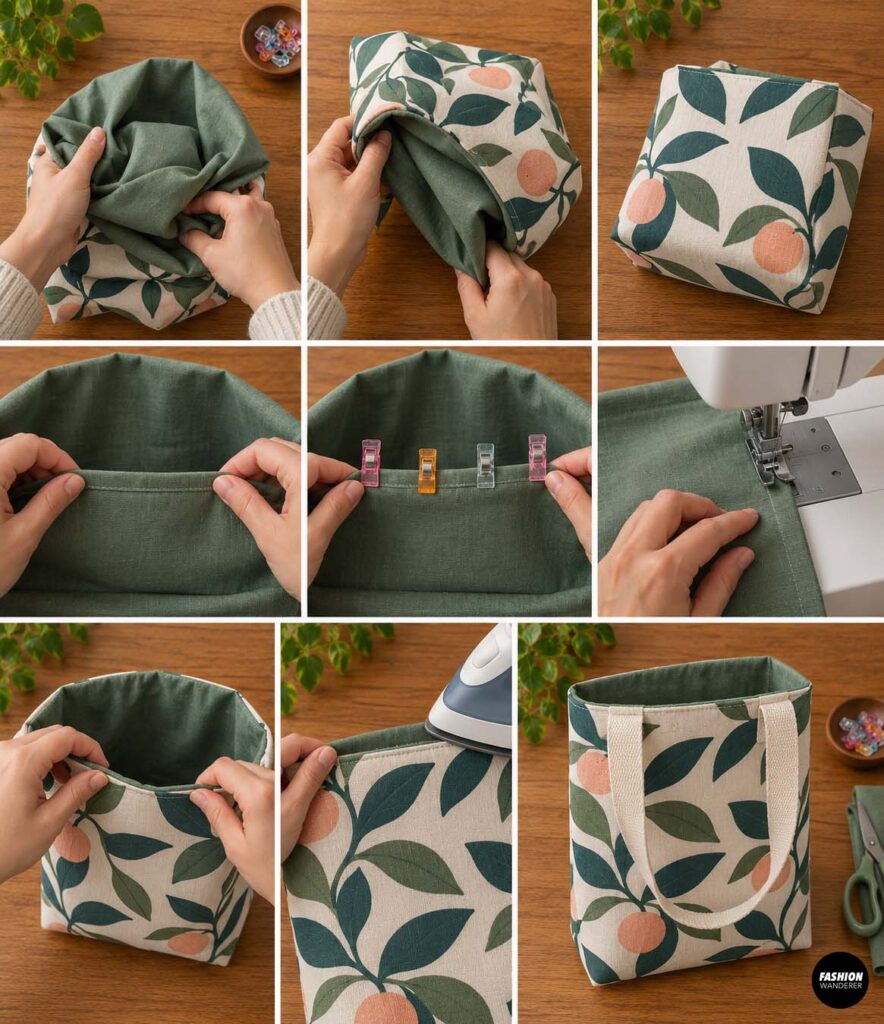
Reach through the opening left in the lining and gently pull the exterior bag through.
Push out all corners.
Turn the raw edges of the lining opening inward approximately 1/2 inch.
Topstitch the opening closed.
Push the lining inside the lunch bag.
Press the top edge carefully.
Topstitch approximately 1/8 inch from the upper edge for a crisp, professional finish.
Your handmade lunch bag is finished!
How to Sew the Matching Snack Pouch
Step 1: Cut the Pieces
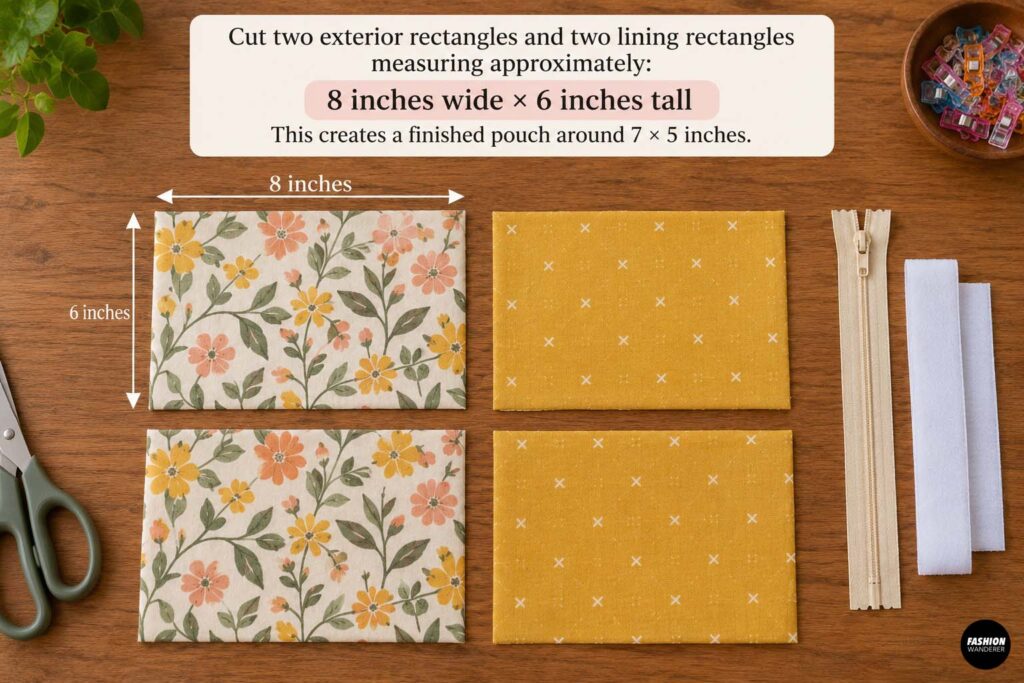
Cut two exterior rectangles and two lining rectangles measuring approximately:
8 inches wide × 6 inches tall
This creates a finished pouch around 7 × 5 inches.
Step 2: Add the Closure
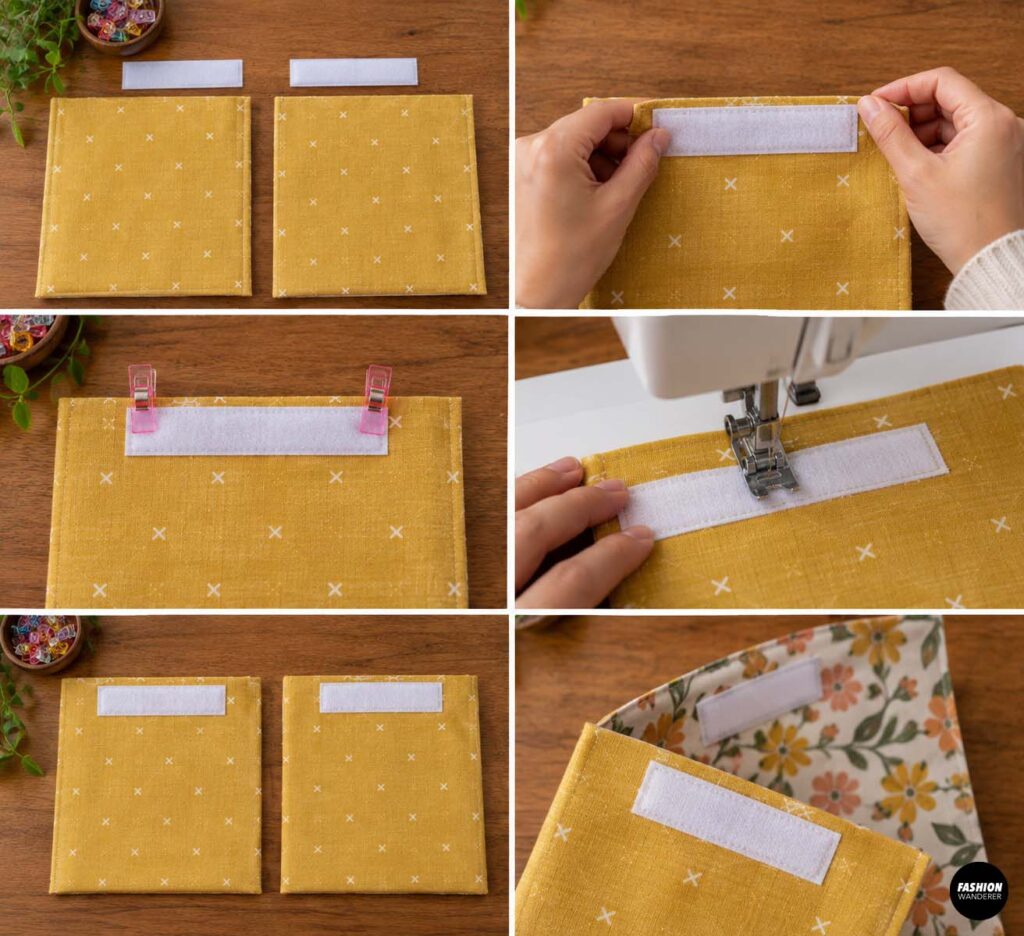
For an easy beginner version, use velcro tape.
Cut two pieces approximately 5–6 inches long.
Center one piece along the upper edge of one lining panel, approximately 3/4 inch below the raw edge.
Sew around all four sides.
Attach the matching strip to the second lining panel.
Step 3: Sew Exterior and Lining Pieces
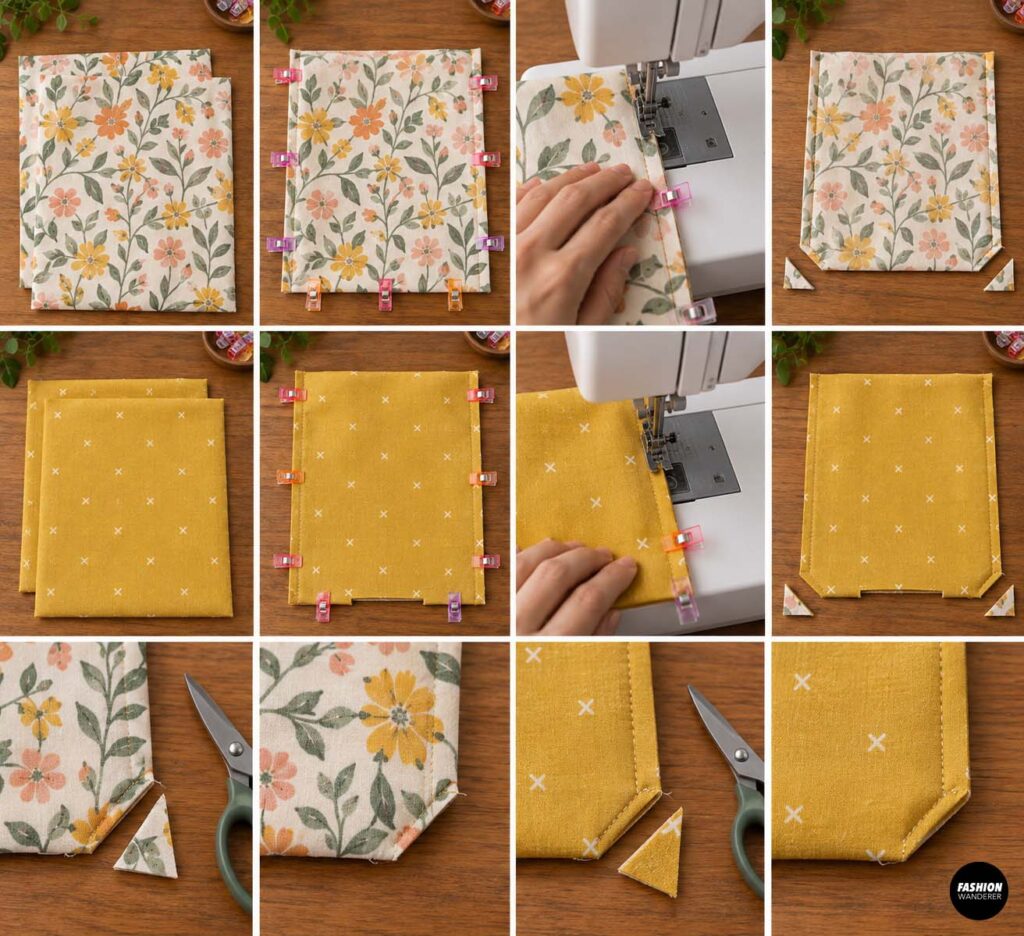
Place the two exterior pieces right sides together.
Sew around the sides and bottom, leaving the top open.
Repeat with the lining, but leave a 2–3 inch turning opening along the bottom.
Clip the bottom corners carefully without cutting through the stitching.
Step 4: Join the Layers
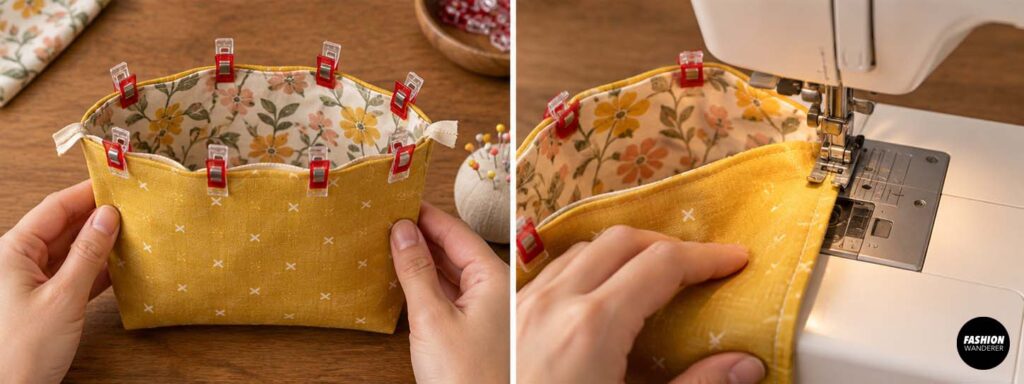
Turn the exterior pouch right side out.
Place it inside the lining so right sides face each other.
Match the top edges and side seams.
Pin around the opening.
Sew all the way around using a 1/2-inch seam allowance.
Step 5: Turn and Finish
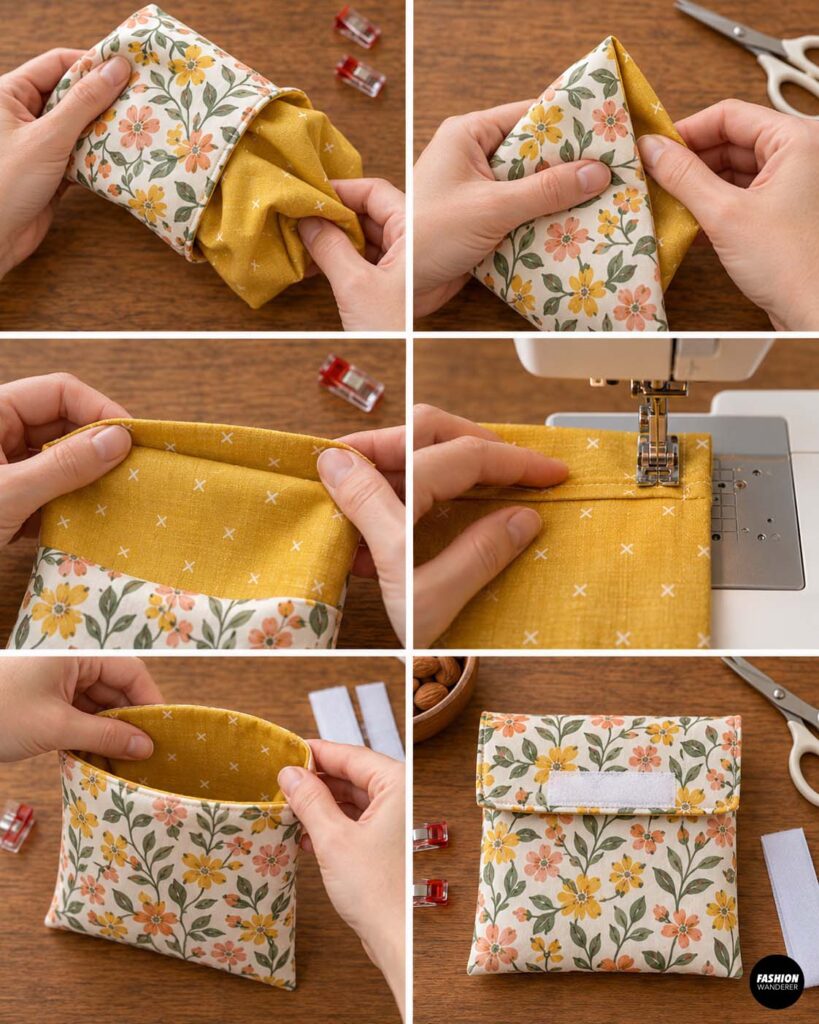
Pull the pouch through the opening in the lining.
Push out the corners.
Topstitch the lining opening closed.
Push the lining into the pouch and press the top edge.
Topstitch around the upper edge.
Close the hook-and-loop tape, and your reusable fabric snack pouch is complete.
Tips for the Best Results
Prewash cotton fabric before cutting to prevent shrinking later. Choose sturdy exterior fabric so the lunch bag keeps its shape, and consider washable or wipe-clean lining if the bag will be used frequently.
For a more structured lunch tote, add fusible fleece. You can also add a magnetic snap, zipper, drawstring, or flap closure depending on the style you prefer.
The snack pouch works best for dry snacks unless you use a suitable waterproof or food-safe lining.
Make a Matching Set
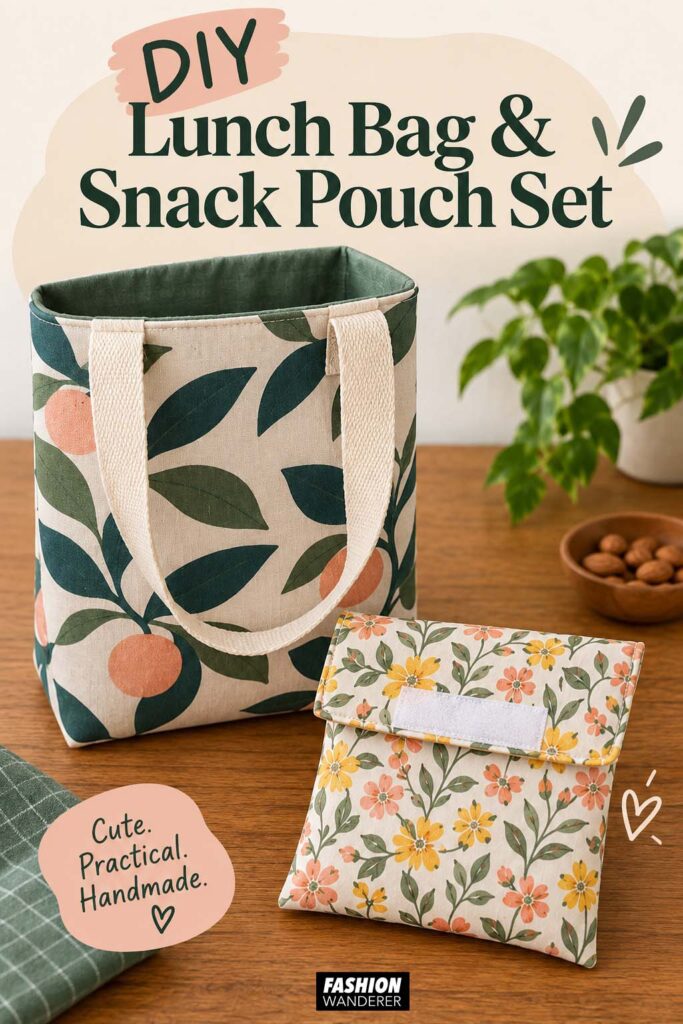
Once you have made one DIY lunch bag and snack pouch set, it is easy to create more in different colors and prints. Try gingham for a classic school look, fruit prints for kids, florals for adults, or bold color-blocking using leftover fabric.
This beginner-friendly project also makes a thoughtful back-to-school sewing project, teacher gift, handmade birthday gift, or reusable lunch accessory.
With simple rectangles, basic straight stitching, and easy boxed corners, this DIY lunch bag and snack pouch tutorial is a satisfying project that looks polished without requiring advanced sewing skills. Best of all, you end up with a practical handmade set you can use again and again.