
Looking for an easy homemade Halloween costume that does not require a sewing pattern? This DIY astronaut costume from a sweatshirt is a fun, beginner-friendly project you can make with a basic white or light gray sweatshirt, simple craft supplies, and a few space-inspired details.
Instead of constructing an entire jumpsuit from scratch, this tutorial transforms a ready-made sweatshirt into a cute astronaut top using patches, fabric, felt, and optional reflective trim. Pair it with matching sweatpants, white sneakers or boots, and a homemade helmet for a complete costume.
This is a great no-pattern sewing project for kids or adults, and you can easily customize it with a name patch, mission number, NASA-inspired graphics, planets, stars, or your own fictional space program.
These kids halloween costumes you can make from clothes you already own are perfect for creating an adorable last-minute look without spending a lot of money.
Materials You Will Need
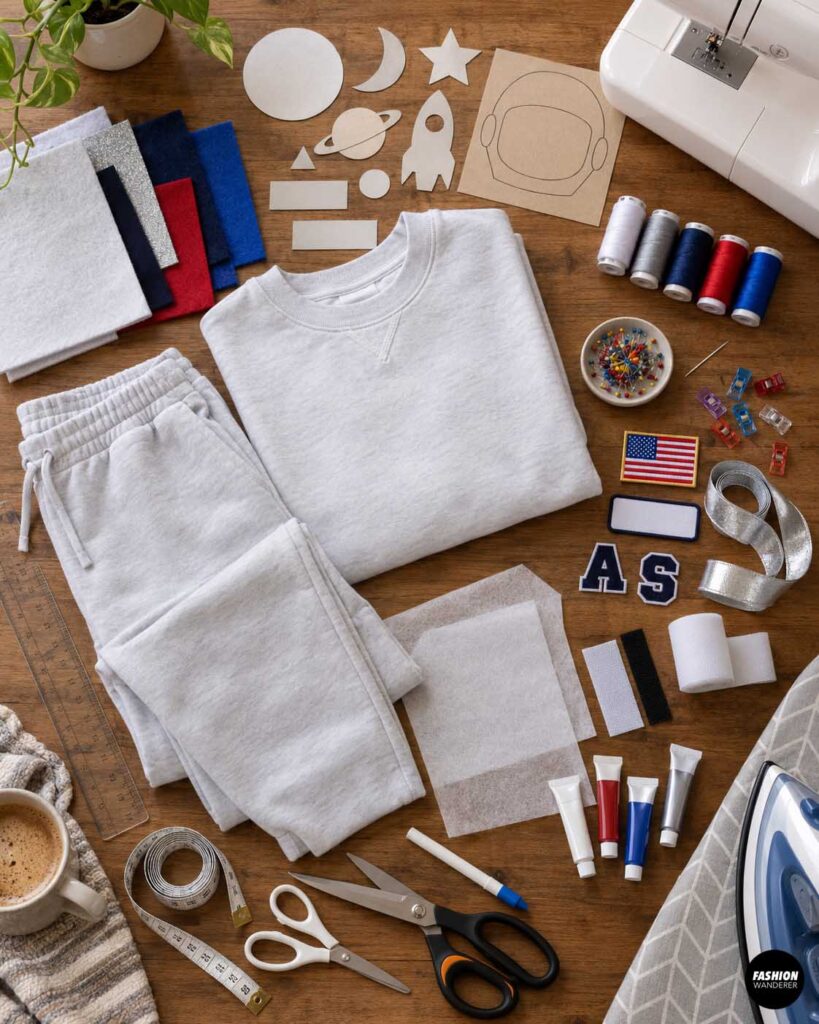
To make your DIY astronaut sweatshirt costume, gather:
- White, cream, silver, or light gray crewneck sweatshirt
- Matching sweatpants or joggers
- White, silver, navy, red, and blue felt or fabric scraps
- Printable astronaut or space-themed patch templates
- Fabric scissors
- Paper scissors
- Fabric marker or tailor’s chalk
- Measuring tape or ruler
- Pins or sewing clips
- Sewing machine
- Coordinating polyester thread
- Hand-sewing needle
- Iron and ironing board
- Fusible web or fabric adhesive
- Reflective ribbon or silver trim
- Hook-and-loop tape, optional
- American flag patch, optional
- Name patch, optional
- Letter patches, optional
- Fabric paint, optional
- Cardboard for templates
For the easiest beginner project, choose a sweatshirt with a smooth cotton or cotton-blend surface.
How to Make Astronaut Costume From a Sweatshirt
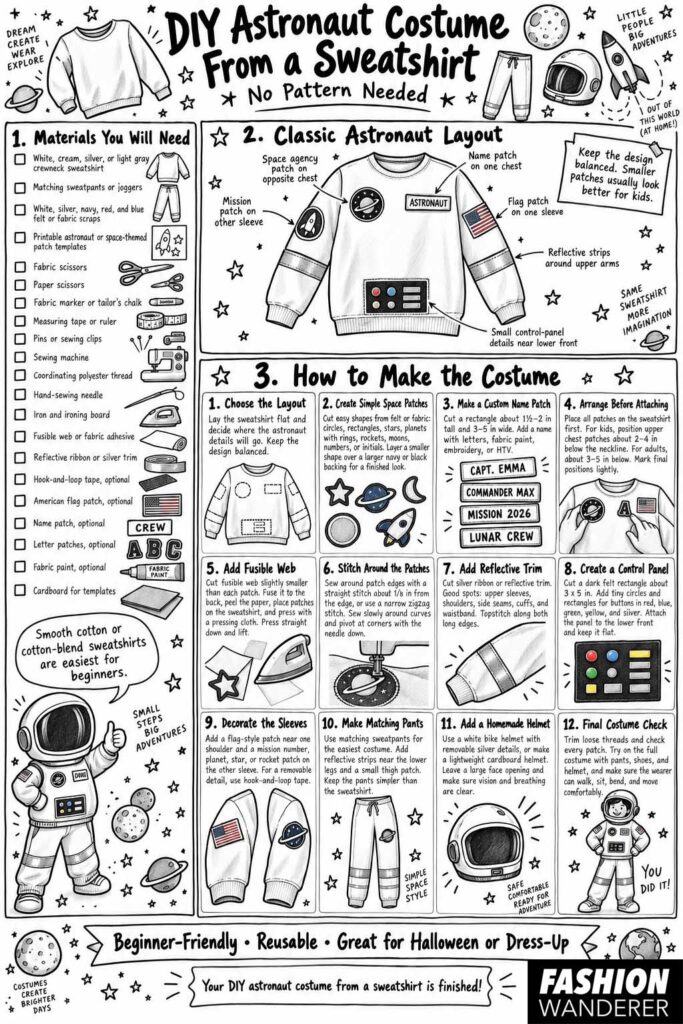
Step 1: Choose the Astronaut Costume Layout
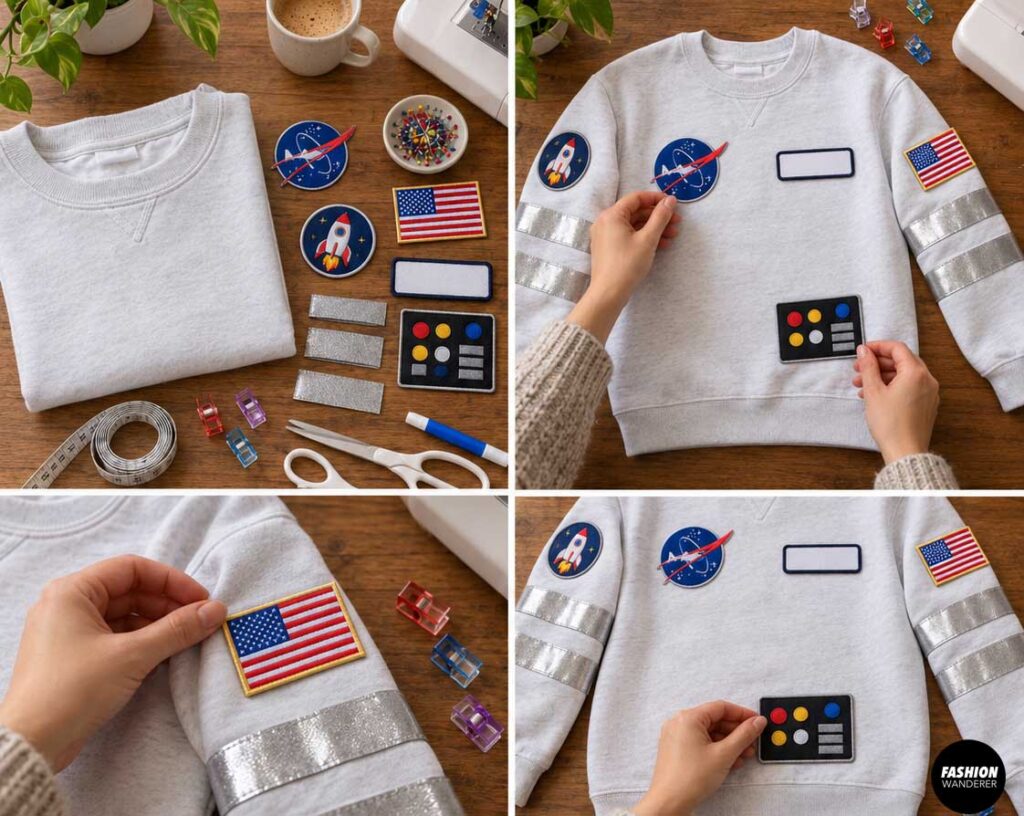
Lay the sweatshirt flat on your work surface.
Before attaching anything, decide where you want your astronaut details.
A classic arrangement might include:
- Name patch on one chest
- Space agency patch on the opposite chest
- Flag patch on one sleeve
- Mission patch on the other sleeve
- Reflective strips around the upper arms
- Small control-panel details near the lower front
Keep the design balanced rather than filling every inch.
If you are making the costume for a child, smaller patches usually look better.
Step 2: Create Simple Space Patches
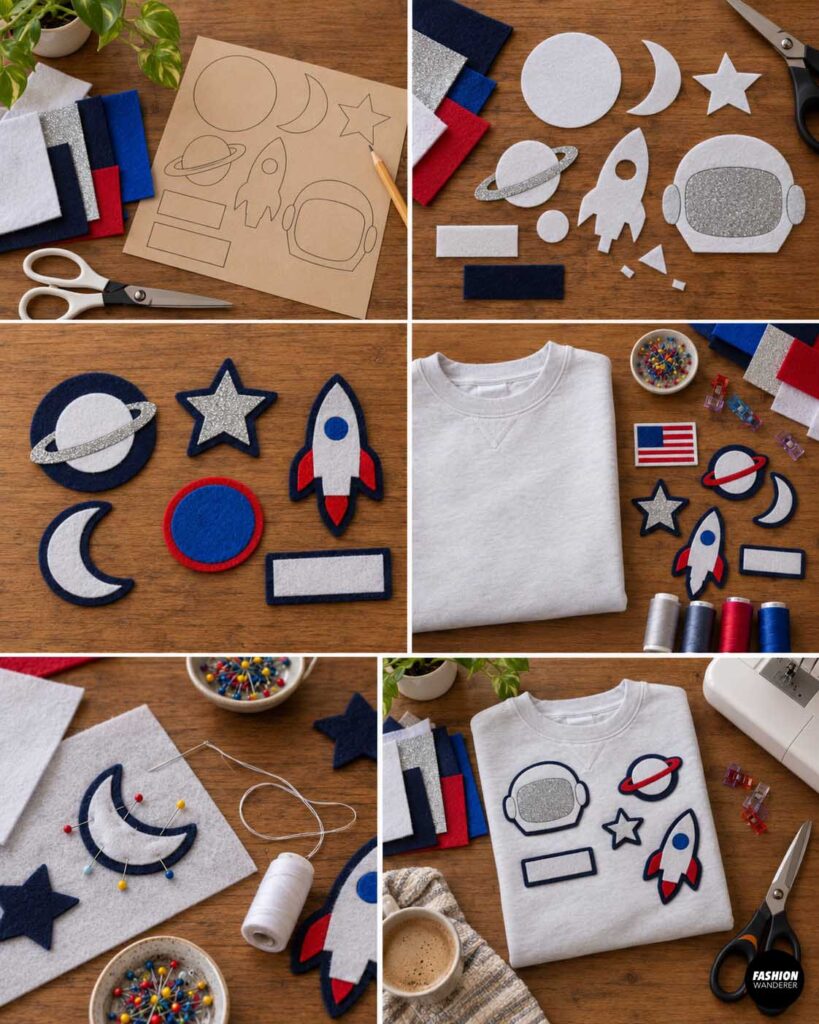
You do not need professional embroidered patches.
Cut basic patch shapes from felt or fabric.
Try:
- Circles for mission patches
- Rectangles for name tags
- Stars
- Planets with rings
- Rockets
- Moons
- Numbers
- Initials
For a layered patch, cut a slightly larger background shape in navy or black and place a smaller white, red, or blue shape on top.
This instantly creates a more finished look.
Step 3: Make a Custom Name Patch
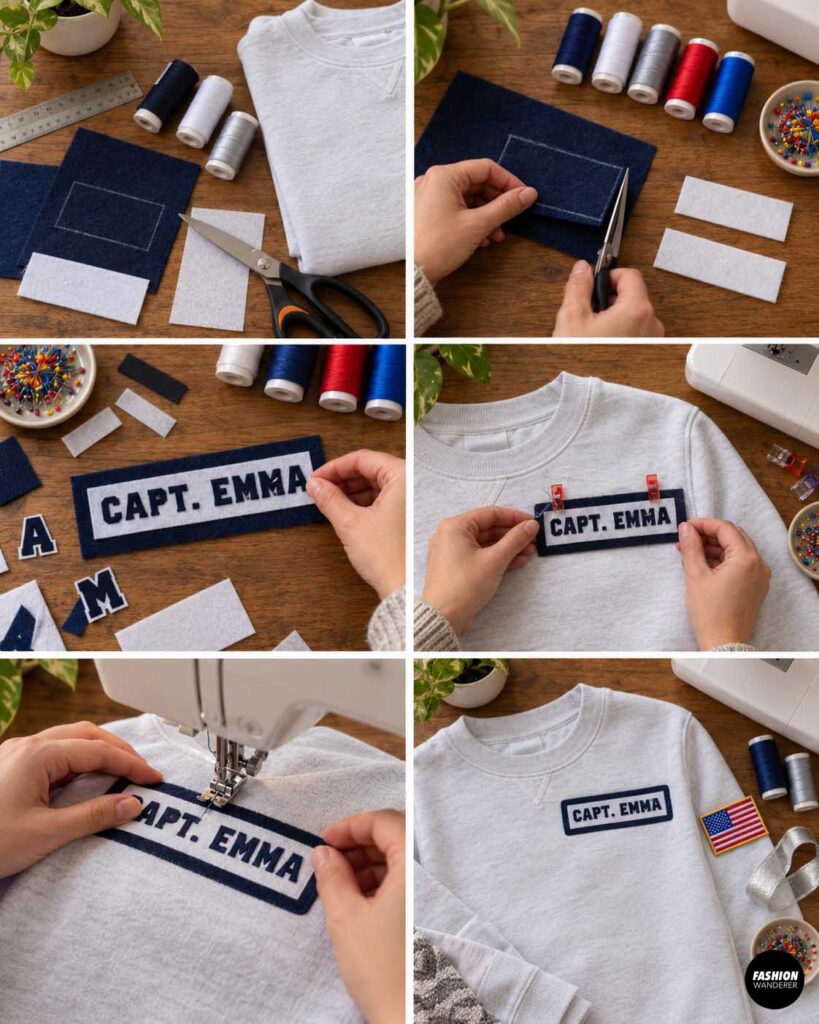
Cut a rectangle approximately 1½ to 2 inches tall and 3 to 5 inches wide, depending on the sweatshirt size.
Use fabric letters, embroidery, fabric paint, or heat-transfer vinyl to add a name.
Fun options include:
CAPT. EMMA
COMMANDER MAX
MISSION 2026
LUNAR CREW
You can also use the wearer’s last name for a more realistic astronaut-inspired look.
Step 4: Arrange Everything Before Attaching
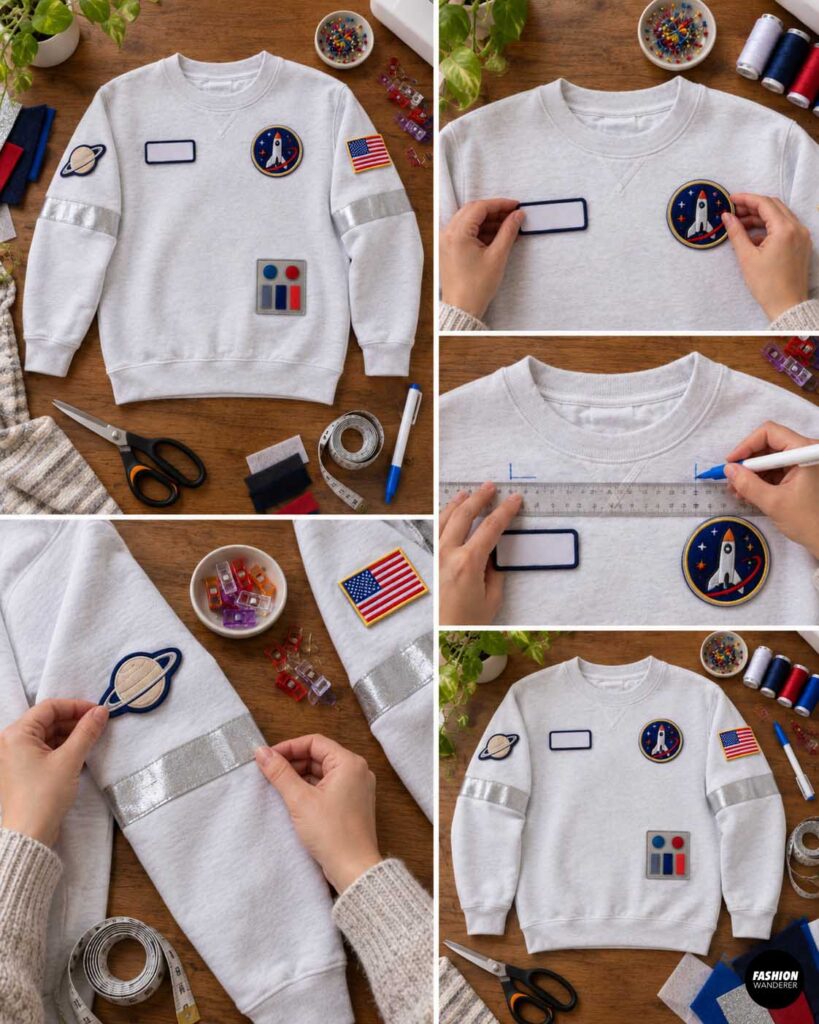
Place all patches on the sweatshirt while it is flat.
Try the sweatshirt on before sewing anything permanently.
Check that the chest patches sit comfortably and do not disappear into the underarm area.
For children, position the upper chest patches approximately 2 to 4 inches below the neckline.
For adults, about 3 to 5 inches below the neckline usually works well.
Mark the final positions lightly with a washable fabric marker.
Step 5: Add Fusible Web to the Patches
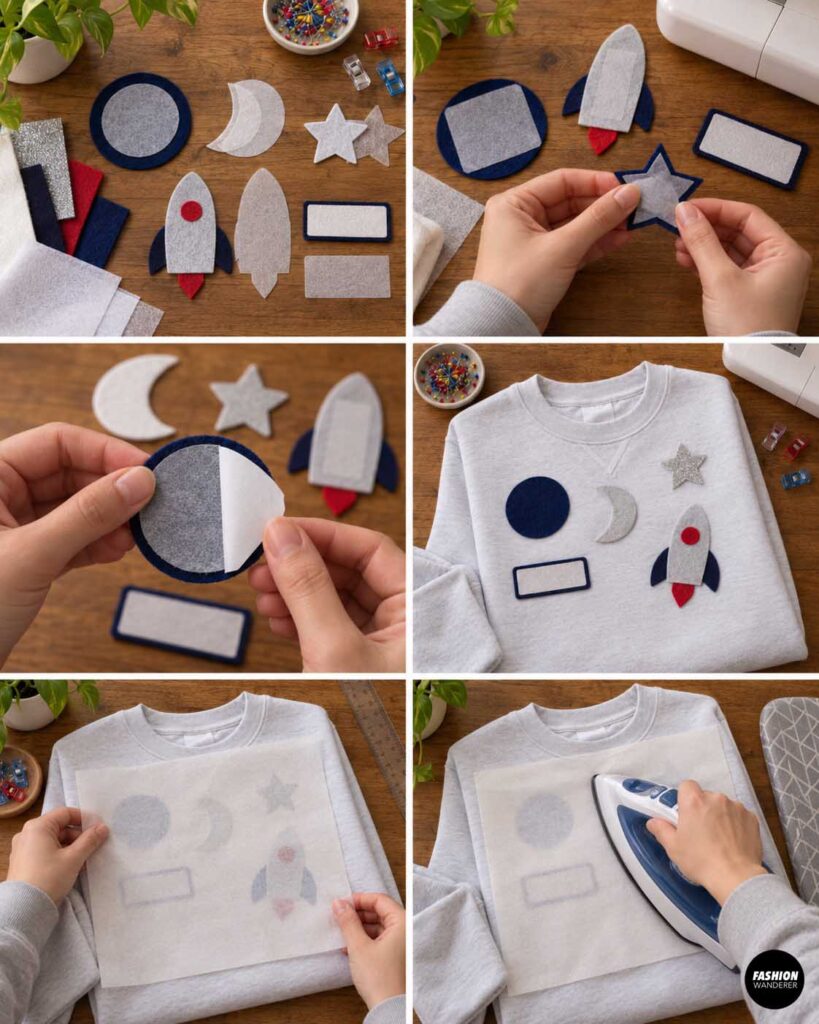
Fusible web helps keep the patches from shifting while you sew.
Cut fusible web slightly smaller than each felt or fabric patch.
Following the manufacturer’s directions, fuse it to the back of each patch.
Peel away the paper backing.
Place the patches back onto the sweatshirt and press them in position using a pressing cloth.
Avoid dragging the iron across the surface.
Press straight down and lift.
Step 6: Stitch Around the Patches
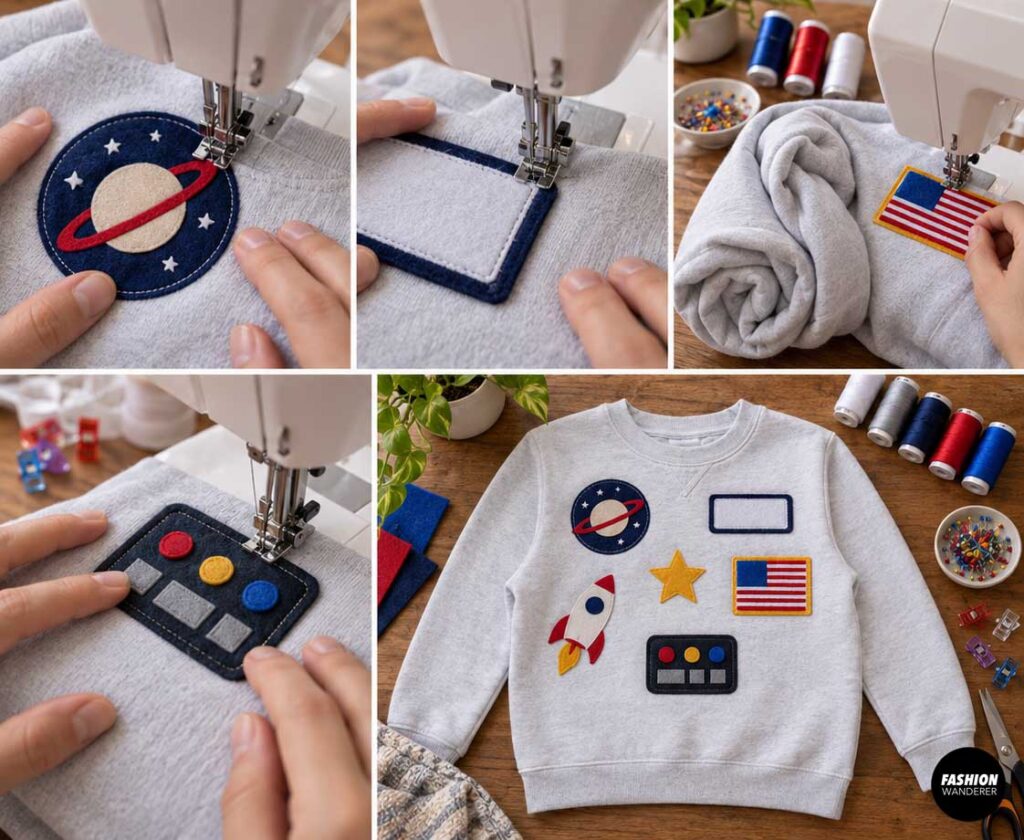
For a durable costume, sew around the edges of each patch.
Use a straight stitch approximately ⅛ inch from the edge.
You can also use a narrow zigzag stitch for a more appliqué-style finish.
Sew slowly around curved patches.
When turning a corner, stop with the needle down, raise the presser foot, rotate the sweatshirt, lower the foot, and continue sewing.
If the sweatshirt is bulky, work with one section at a time and keep the rest of the fabric rolled away from the needle.
Step 7: Add Reflective Space-Suit Trim
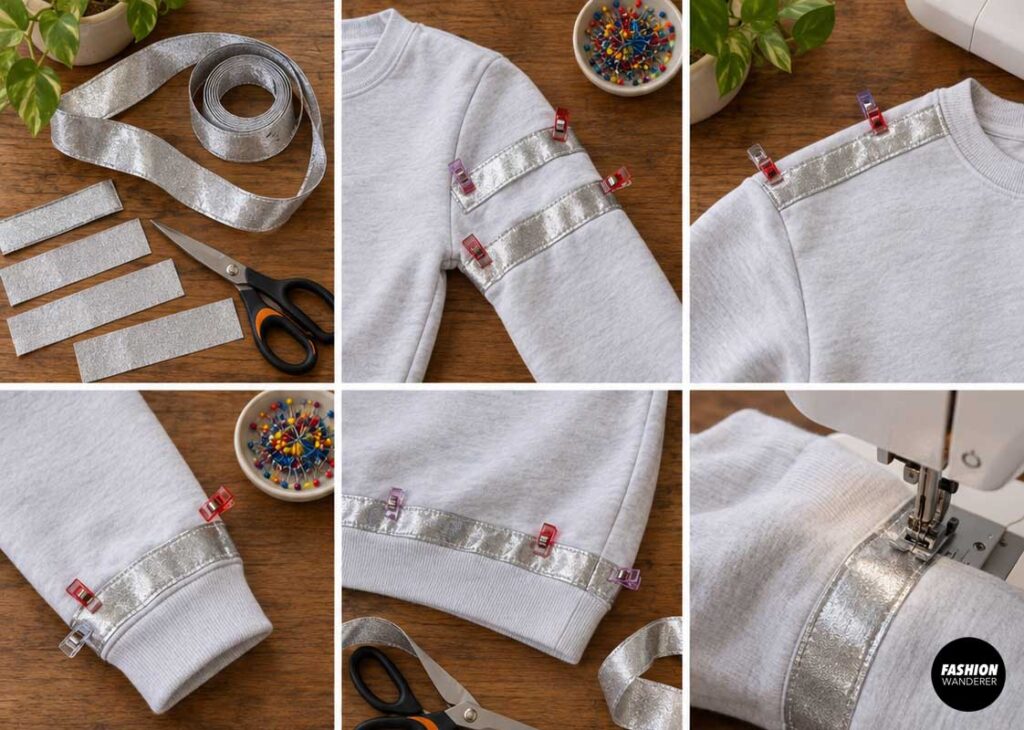
Reflective or metallic trim makes the costume feel much more like a real spacesuit.
Cut strips of silver ribbon, reflective tape, or metallic fabric trim.
Good placement options include:
- Around the upper sleeves
- Across the shoulders
- Along the side seams
- Around the cuffs
- Near the waistband
Pin the trim in place.
Topstitch along both long edges using matching thread.
If the trim is adhesive-backed, press or stick it in place first, then sew it for extra security.
Step 8: Create an Astronaut Control Panel
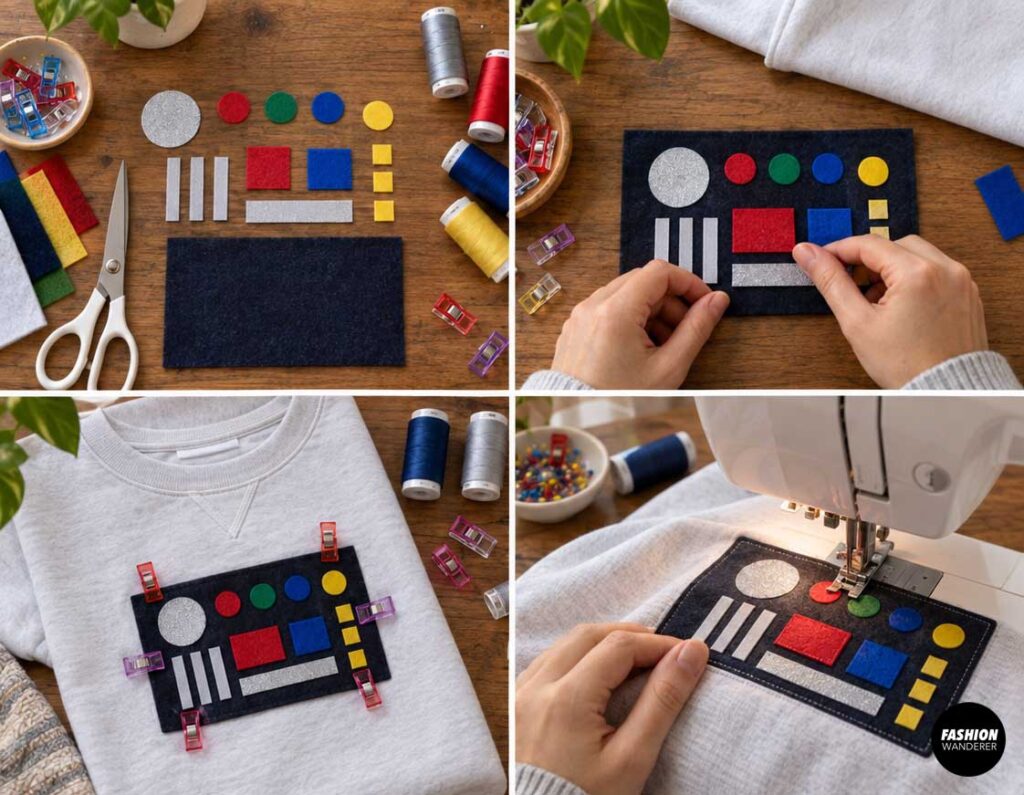
Cut a rectangle of dark felt approximately 3 x 5 inches.
Add small colored fabric shapes representing buttons and controls.
Use circles, rectangles, and tiny strips in red, green, blue, yellow, and silver.
Arrange them like a miniature control board.
Fuse or sew the small shapes to the panel.
Attach the finished panel to the lower chest or side of the sweatshirt.
Keep it fairly flat so the costume remains comfortable.
Step 9: Decorate the Sleeves
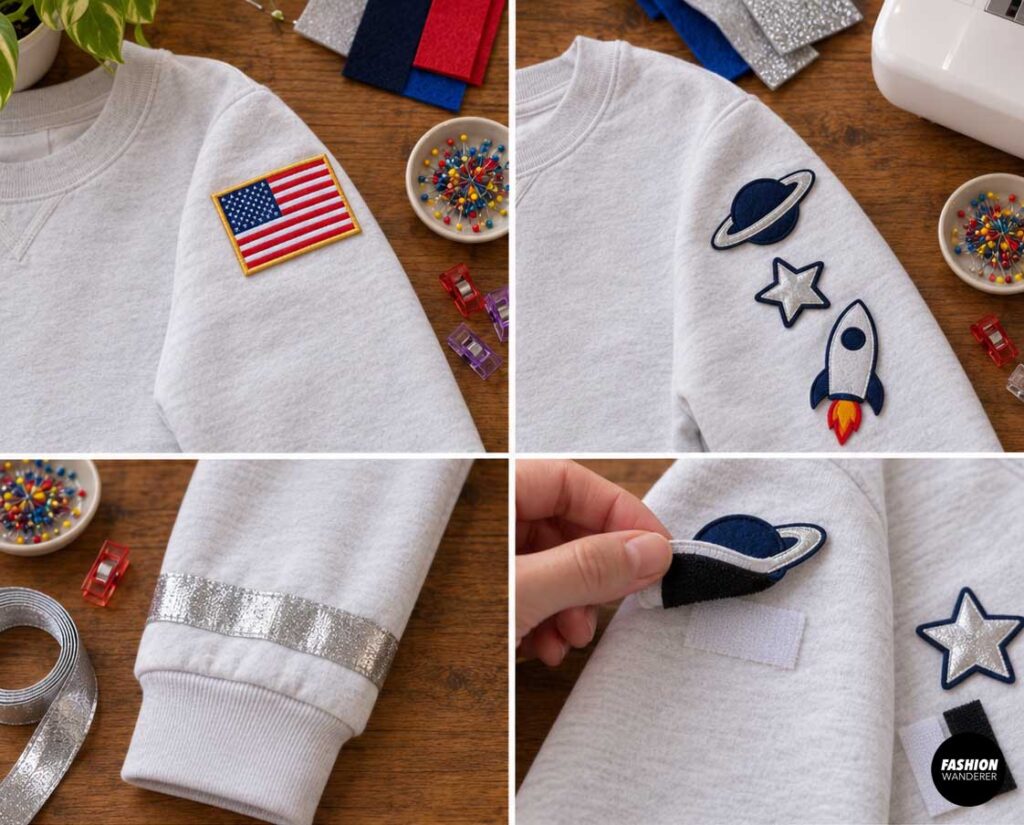
Sleeves are perfect for extra astronaut details.
Add a flag-style patch near one shoulder.
On the opposite sleeve, add a mission number, planet, star, or rocket patch.
You can also create a simple cuff detail by sewing a narrow band of silver trim approximately 1 to 2 inches above the wrist.
For a removable costume detail, attach sleeve patches using hook-and-loop tape.
Step 10: Make Matching Astronaut Pants
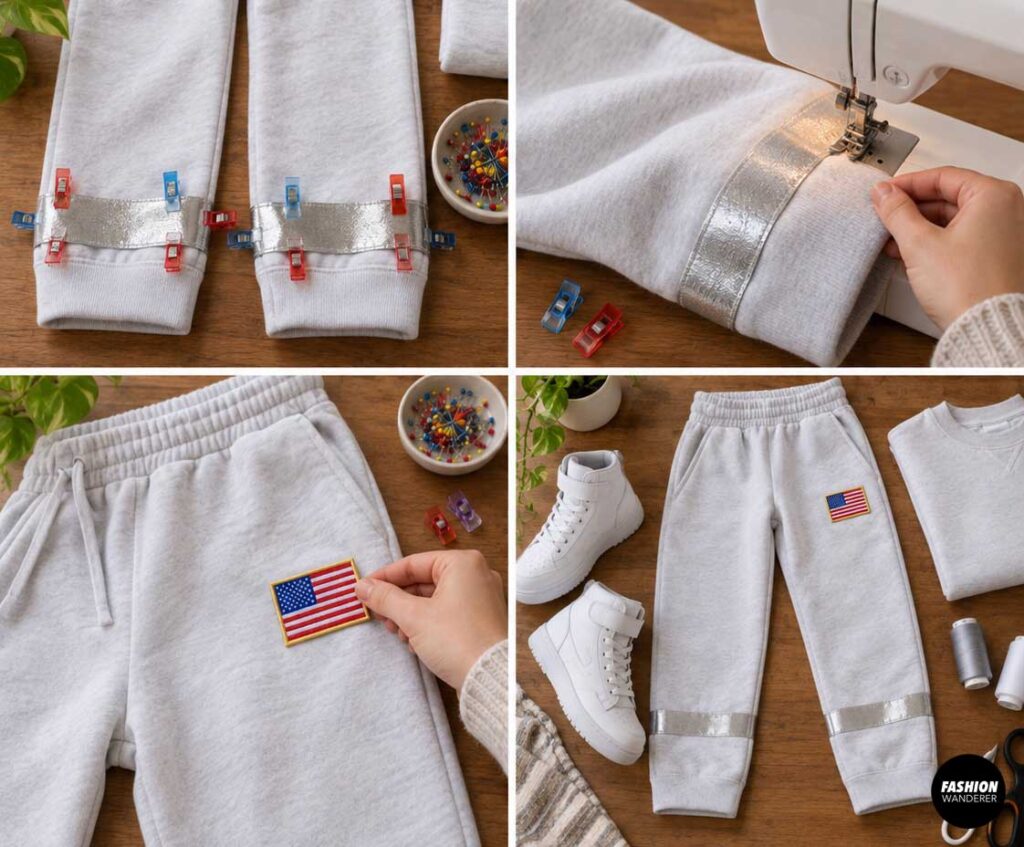
Use matching white or gray sweatpants for the easiest no-pattern costume.
Add silver or reflective strips around the lower legs.
You can also sew a small rectangular patch onto one thigh.
Keep the pants simpler than the sweatshirt so the costume does not look too busy.
For an extra futuristic look, wear white sneakers or boots.
Step 11: Add a Homemade Astronaut Helmet
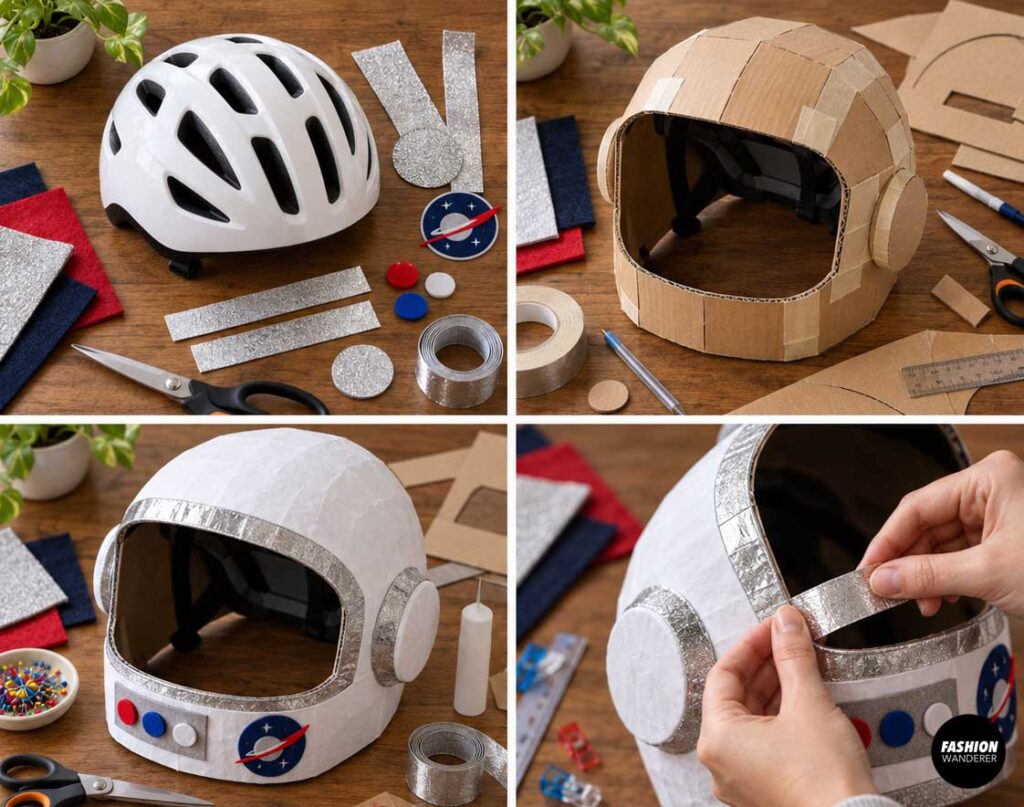
A helmet makes the costume instantly recognizable.
For an easy version, use a white bike helmet and add removable silver details.
Another option is a lightweight cardboard astronaut helmet.
Cut and tape curved cardboard sections into a helmet shape, leaving a large opening for the face.
Cover the outside with white paper or paint.
Add silver trim, fake buttons, and a space logo.
Make sure the helmet does not block vision or breathing.
Step 12: Final Costume Check
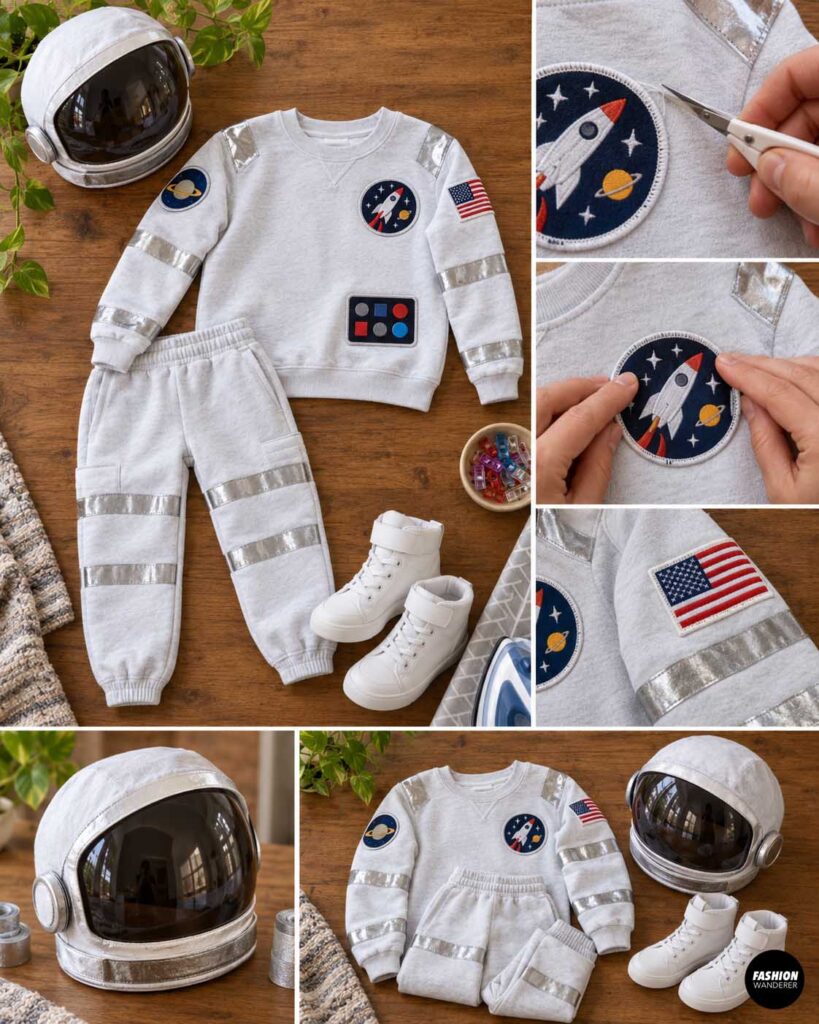
Trim all loose threads and inspect every patch.
Make sure there are no sharp pins, rough edges, or loose decorations.
Try on the complete astronaut costume with the sweatshirt, pants, shoes, and helmet.
Check that the wearer can comfortably walk, sit, bend their arms, and move freely.
Your DIY astronaut costume from a sweatshirt is finished!
Easy Astronaut Costume Customization Ideas
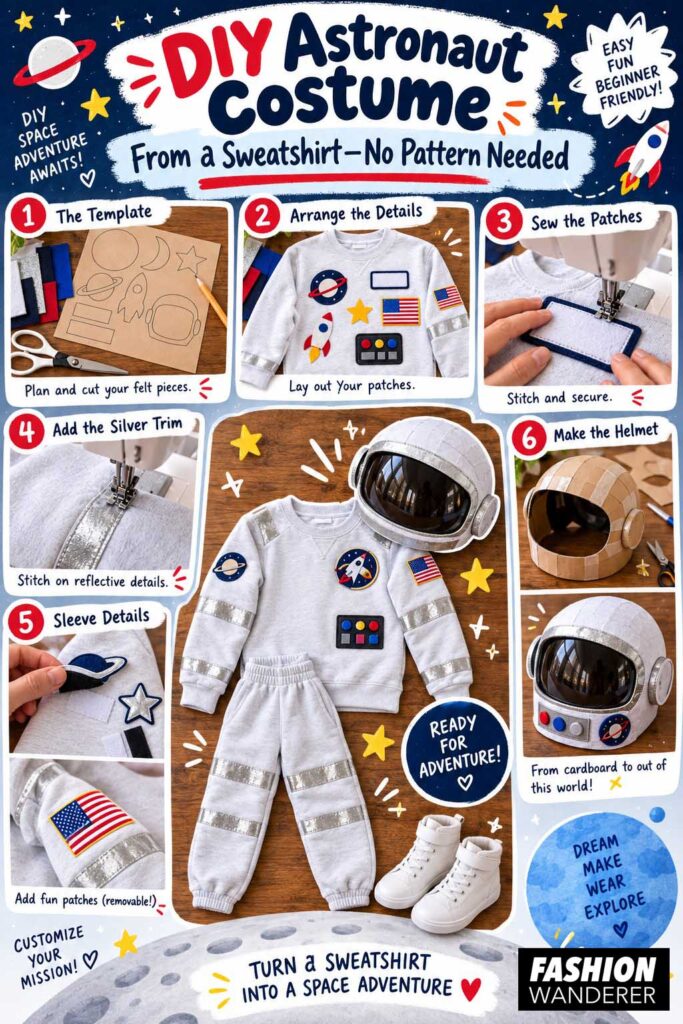
One of the best things about this project is how easy it is to personalize.
Create matching family astronaut costumes with different crew names. Make a sibling “space mission team.” Add glow-in-the-dark stars for nighttime trick-or-treating. Use a fictional logo like Moon Crew, Mars Mission, or Galaxy Explorer.
You can even turn the costume into a reusable dress-up outfit by attaching most decorations with hook-and-loop tape instead of permanently sewing them.
This no-pattern astronaut costume is proof that you do not need complicated sewing skills to create an impressive handmade Halloween look. With one sweatshirt and a few simple patches, you can make a comfortable, customizable astronaut costume that looks creative without requiring an entire weekend at the sewing machine.