
Halloween costumes do not have to mean spending a fortune on something your child may only wear once. Some of the cutest DIY kids Halloween costumes can start with clothes already sitting in a dresser, laundry basket, or donation pile.
A plain hoodie, old sweatshirt, pair of black pajamas, or thrifted zip-up can become a surprisingly fun costume with just a little felt, fabric scrap, cardboard, or hand stitching. These projects are especially useful for busy parents because they are inexpensive, beginner-friendly, and easy to customize.
Below are five easy DIY kids Halloween costumes from clothes you already own, including quick step-by-step tutorials for a bat, monster, skeleton, dinosaur, and astronaut costume.
1. Turn an Old Hoodie Into a Bat Costume in 30 Minutes
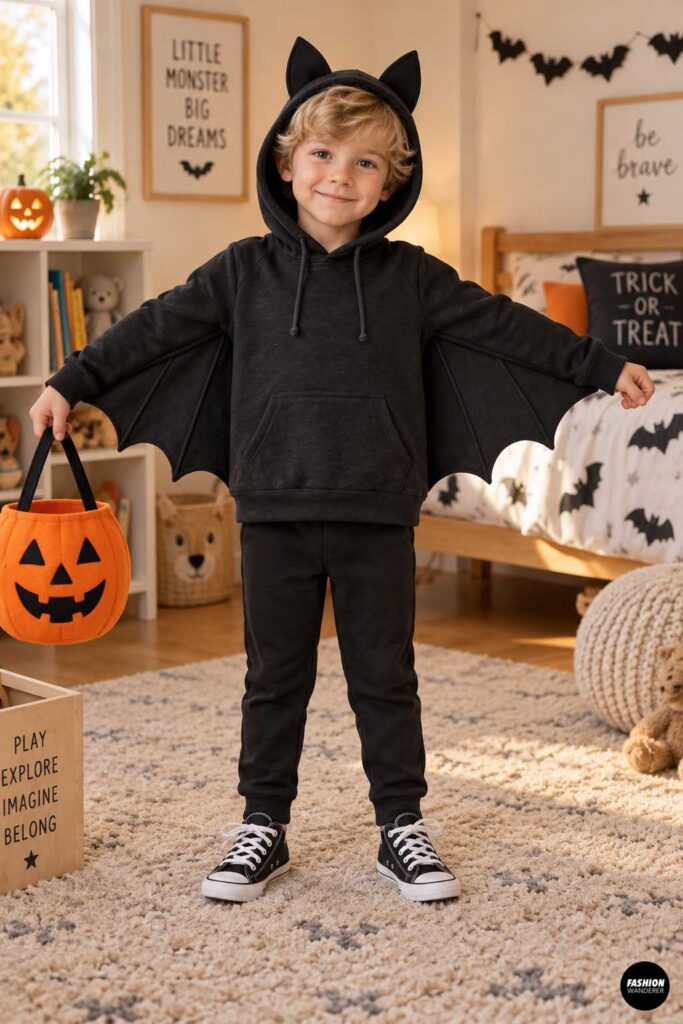
A black or dark gray hoodie makes the perfect base for an easy DIY bat costume. Add simple wings and ears, and your child is ready for Halloween.
You Will Need
- Black or charcoal hoodie
- Black felt, fleece, or an old black T-shirt
- Fabric scissors
- Pins or sewing clips
- Needle and thread or sewing machine
- Chalk or washable fabric marker
- Optional black leggings or pants
Step 1: Make the Bat Wings
Have your child stretch one arm out while wearing the hoodie.
Measure from the side seam near the waist to the sleeve cuff.
Cut two large triangular pieces of black fabric using this measurement.
Create a scalloped lower edge by cutting three or four shallow curves into each triangle.
Step 2: Attach the Wings
Lay one wing between the side of the hoodie and the underside of the sleeve.
Pin the top edge along the sleeve and the side edge along the hoodie body.
Hand sew or machine stitch the wing in place.
Repeat on the other side.
Keep the wings loose enough that your child can comfortably raise and lower their arms.
Step 3: Add Bat Ears
Cut four small pointed ear shapes from black felt.
Sew two pieces together around the edges to make each ear slightly sturdier.
Attach the ears to the top of the hood.
Pair the finished hoodie with black pants and sneakers for an easy 30-minute DIY bat costume.
2. DIY Monster Sweatshirt Costume Using Fabric Scraps
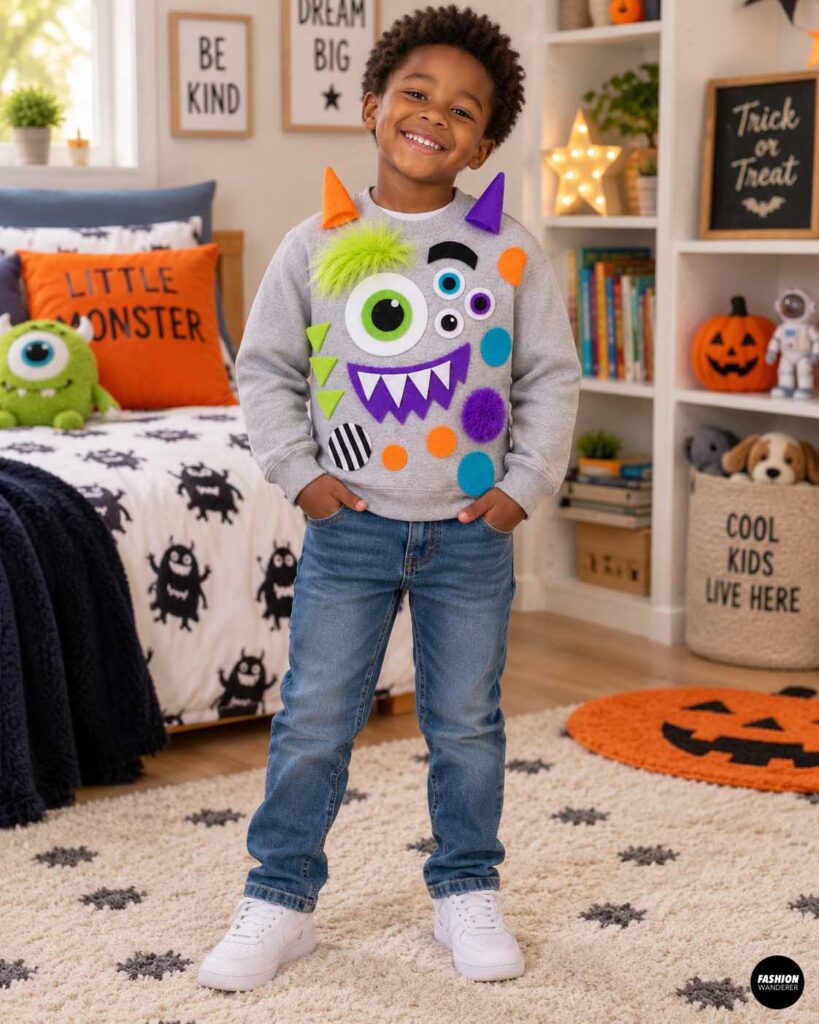
This colorful monster costume is perfect for using small leftover pieces of fleece, felt, quilting cotton, or faux fur.
The best part? Monsters do not have to look perfect. Uneven teeth, mismatched eyes, and funny patches make the costume even better.
You Will Need
- Old sweatshirt
- Assorted fabric scraps
- Felt
- Scissors
- Fabric glue or needle and thread
- Optional yarn
- Optional pom-poms
Step 1: Design the Monster Face
Lay the sweatshirt flat.
Cut two large circles for eyes and smaller circles for pupils.
Make each eye slightly different for a playful look.
Cut triangular felt teeth and a large mouth shape.
Step 2: Attach the Face
Arrange the eyes, mouth, and teeth across the front of the sweatshirt.
Once you like the layout, pin everything in place.
Sew around the pieces using a straight stitch or zigzag stitch.
For a very quick no-sew version, use washable fabric glue according to the manufacturer’s instructions.
Step 3: Add Monster Details
Cut colorful triangles, circles, and irregular patches from leftover fabric.
Scatter them across the sleeves and back.
You can also add pieces of yarn around the hood or shoulders to create fuzzy monster hair.
Step 4: Finish the Costume
Pair the sweatshirt with colorful leggings, sweatpants, or mismatched socks.
This DIY monster sweatshirt costume is especially fun because kids can help choose the colors and facial expression.
3. 30-Minute DIY Skeleton Costume From Kids’ Pajamas
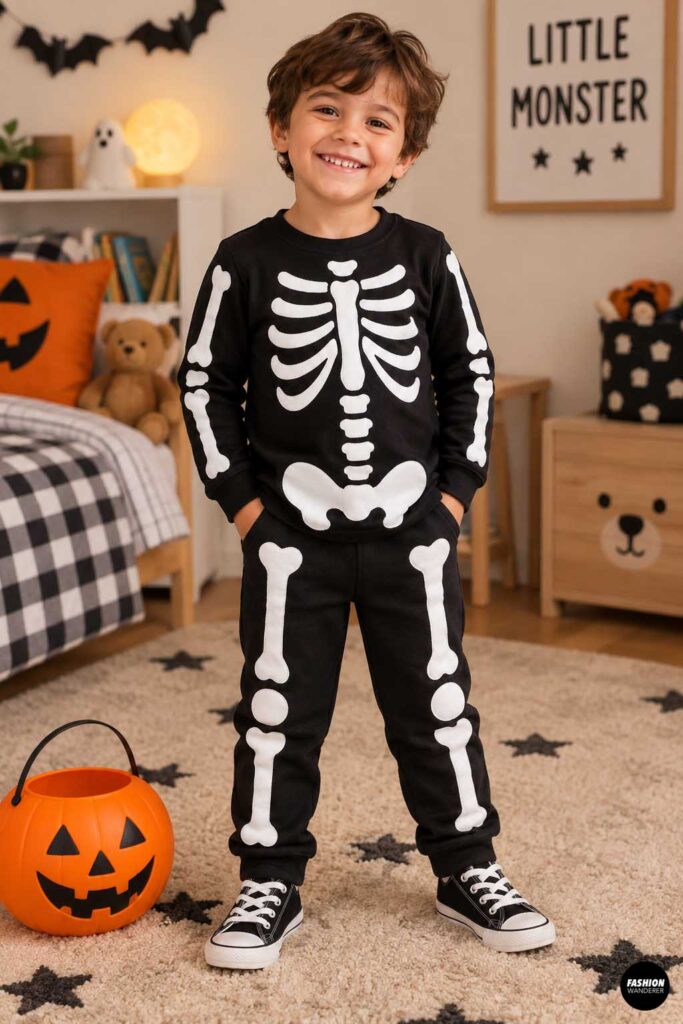
Black pajamas are one of the easiest bases for a homemade Halloween costume.
With white felt or fabric, they can quickly become a simple skeleton costume.
You Will Need
- Black long-sleeve pajama top
- Black pajama pants
- White felt or white scrap fabric
- Scissors
- Fabric chalk
- Needle and thread, fabric glue, or removable fashion tape
- Optional skeleton reference image
Step 1: Cut the Bones
Cut simple bone shapes from white felt.
You will need pieces for:
- Upper arms
- Forearms
- Rib cage
- Spine
- Thighs
- Lower legs
Do not worry about making anatomically perfect bones. Simple rounded rectangles work perfectly for a cartoon-style kids costume.
Step 2: Arrange the Bones
Lay the pajama shirt and pants flat.
Position the white pieces where the major bones would sit.
For the rib cage, cut several curved strips and arrange them around the center of the shirt.
Step 3: Attach the Pieces
Sew the bones in place with a long straight stitch.
If you want to reuse the pajamas later, loosely hand baste the pieces instead of permanently stitching them.
Another temporary option is removable fabric tape.
Step 4: Add Finishing Details
Add white gloves or sneakers if you have them.
Face paint can complete the skeleton look, but the costume works perfectly well without it.
This easy DIY skeleton costume from pajamas is ideal for last-minute Halloween parties or school events.
4. Turn a $5 Thrifted Hoodie Into a Dinosaur Costume
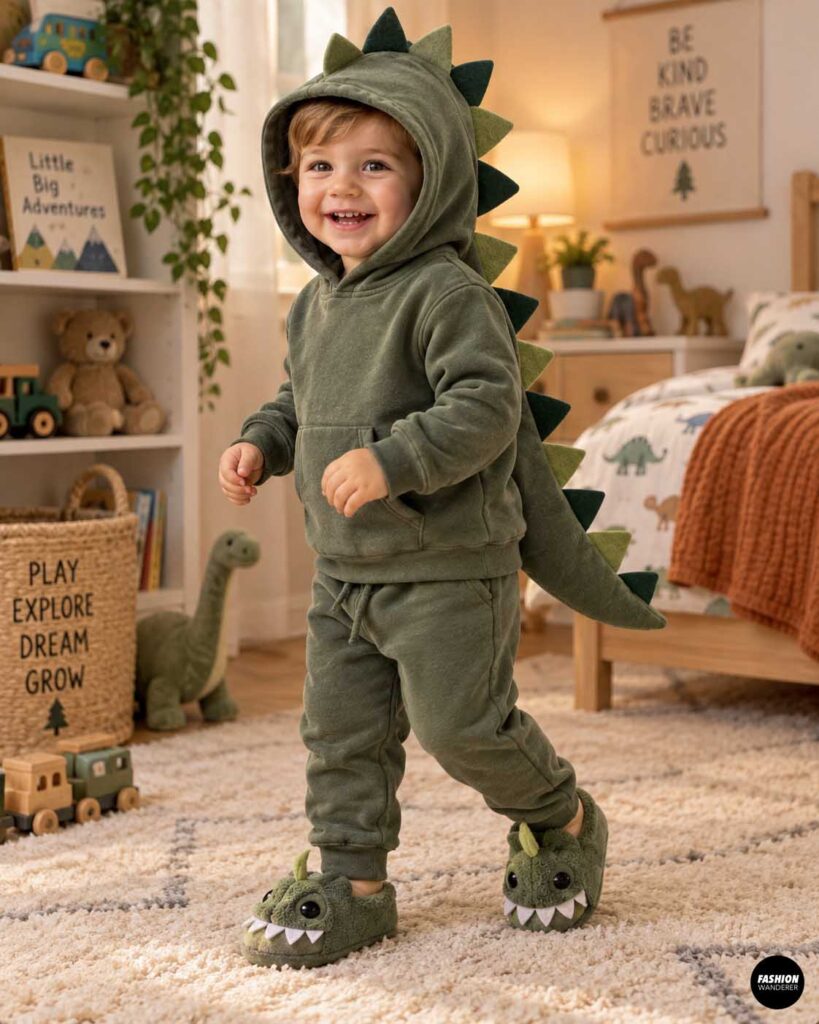
A green, brown, blue, or even purple hoodie can easily become a cute dinosaur costume by adding felt spikes down the hood and back.
You Will Need
- Thrifted hoodie
- Felt or fleece
- Scissors
- Pins
- Sewing machine or hand-sewing needle
- Matching thread
- Optional stuffed tail
Step 1: Cut the Dinosaur Spikes
Cut a strip of felt approximately 3 to 4 inches wide.
Fold it in half lengthwise.
Cut connected triangles along the folded edge, leaving the bottom edge intact.
When unfolded, the strip should look like a row of diamonds.
Step 2: Fold the Spikes
Fold each diamond in half so it becomes a triangular spike.
Pin the spike strip along the center of the hood and continue down the back of the sweatshirt.
Step 3: Stitch the Spikes
Sew through the base of each spike.
Work slowly around the hood so the fabric does not bunch.
Continue stitching the spikes down the center back.
Step 4: Make an Optional Tail
Cut two long tapered triangles from matching fabric.
Place them right sides together and sew around the edges, leaving the top open.
Turn right side out and lightly stuff.
Hand sew the tail to the lower back of the hoodie.
Pair with matching pants for an inexpensive DIY dinosaur Halloween costume.
5. DIY Astronaut Costume From a Sweatshirt—No Pattern Needed
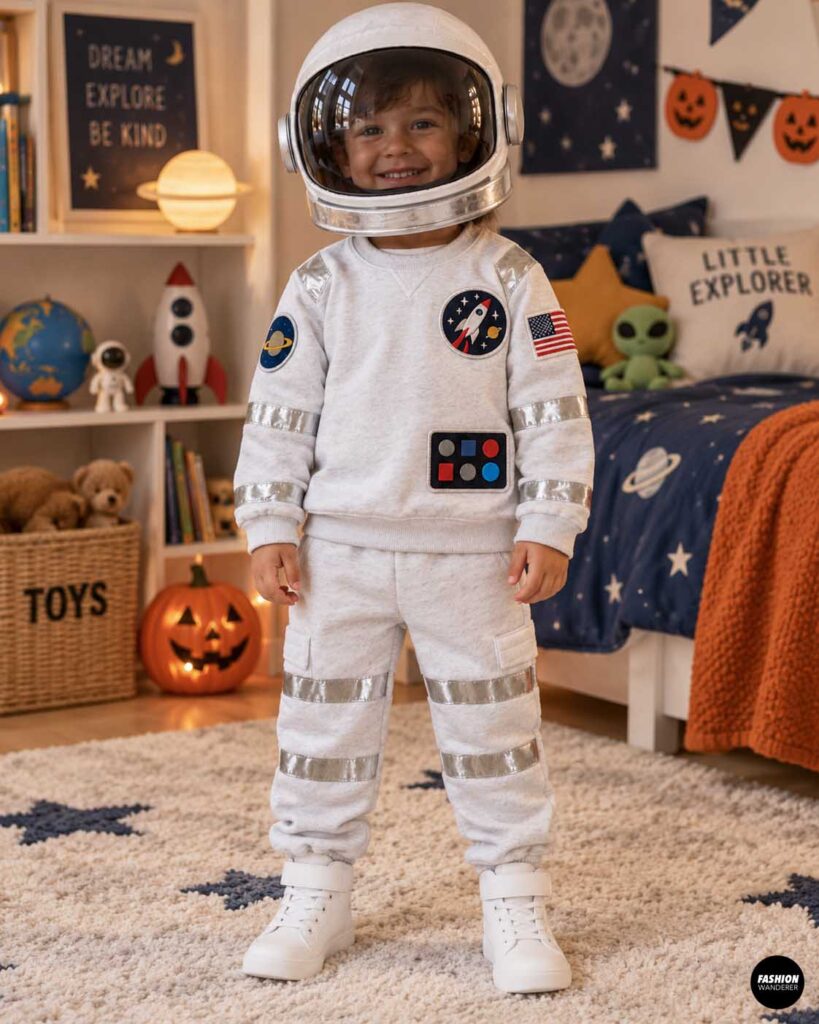
A white or light gray sweatshirt can become an astronaut costume with a few handmade patches and some metallic details.
You Will Need
- White or gray sweatshirt
- Matching sweatpants
- Felt scraps
- Silver duct tape or metallic fabric
- Fabric markers
- Cardboard
- Scissors
- Fabric glue or thread
Step 1: Create Astronaut Patches
Cut circles, rectangles, and shield shapes from felt.
Draw simple stars, planets, initials, or a pretend space agency logo.
Attach one patch to the chest and another to the sleeve.
Step 2: Add Metallic Details
Cut narrow strips of metallic fabric or silver tape.
Add them around the sleeve cuffs, chest, or knees.
Avoid placing stiff tape directly over areas that need a lot of movement.
Step 3: Make a Control Panel
Cut a small rectangle of dark felt.
Add tiny felt circles, buttons, and lines to resemble a spacecraft control panel.
Attach it to the front of the sweatshirt.
Step 4: Create an Optional Space Pack
Cut two small cardboard boxes or clean lightweight containers.
Cover them in silver paper or foil.
Attach them to a lightweight cardboard backing and add simple shoulder straps.
Keep the backpack very light and easy to remove.
Complete the look with white sneakers for an easy DIY astronaut costume with no sewing pattern.
Easy Homemade Halloween Costumes Can Look Better Than Store-Bought
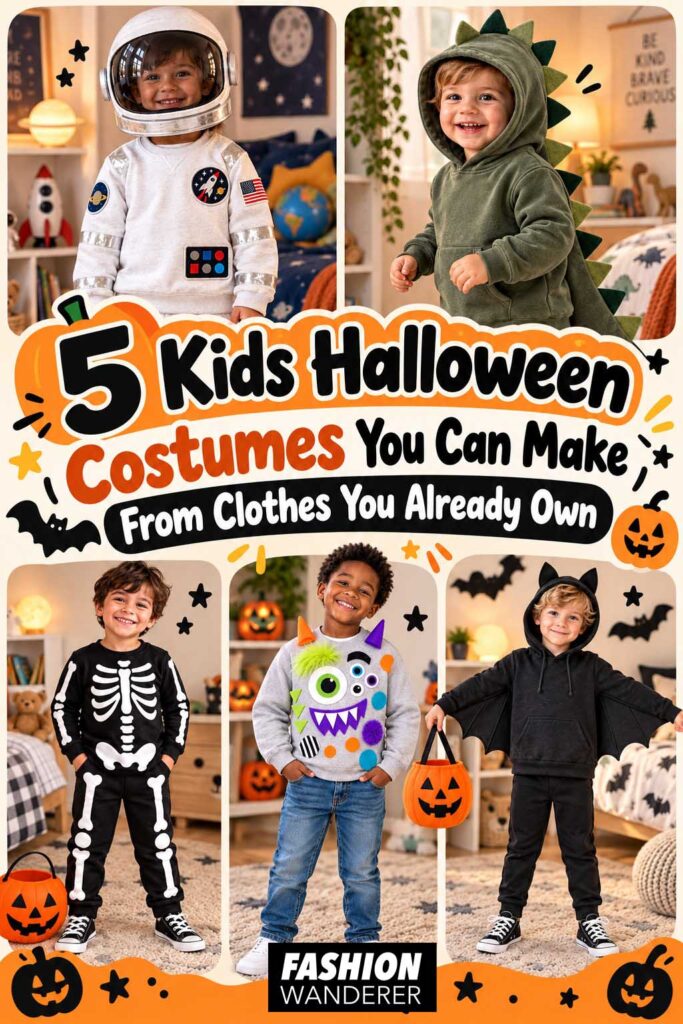
The secret to a great homemade Halloween costume is not complicated sewing. It is starting with a familiar piece of clothing and adding one or two recognizable details.
A hoodie becomes a bat with wings, a dinosaur with spikes, or a monster with funny eyes. Black pajamas instantly become a skeleton, while an ordinary sweatshirt can turn into a tiny astronaut uniform.
These kids Halloween costumes made from clothes you already own are budget-friendly, customizable, and perfect for beginner crafters. They are also easy to adapt for siblings, classroom costume days, Halloween parties, and trick-or-treating.
Before buying a brand-new costume this year, check the closet first. That forgotten hoodie might already be halfway to becoming the best costume on the block.