
Looking for an easy Halloween costume you can make without sewing an entire outfit from scratch? This DIY monster sweatshirt costume using fabric scraps is colorful, playful, budget-friendly, and perfect for beginners.
Instead of buying a costume that may only be worn once, you can transform a plain oversized sweatshirt into a cute monster using leftover fleece, felt, cotton, jersey, and other fabric scraps from your sewing stash. Add mismatched eyes, soft horns, teeth, spikes, patches, and funny monster details to create a completely unique design.
This project works especially well for kids, teens, or adults because you can customize the colors and features however you like. Best of all, most of the embellishments can be sewn with a basic sewing machine or attached by hand.
If you want a budget-friendly Halloween project, these beginner-friendly kids halloween costumes you can make from clothes you already own are simple and creative.
Materials You Will Need
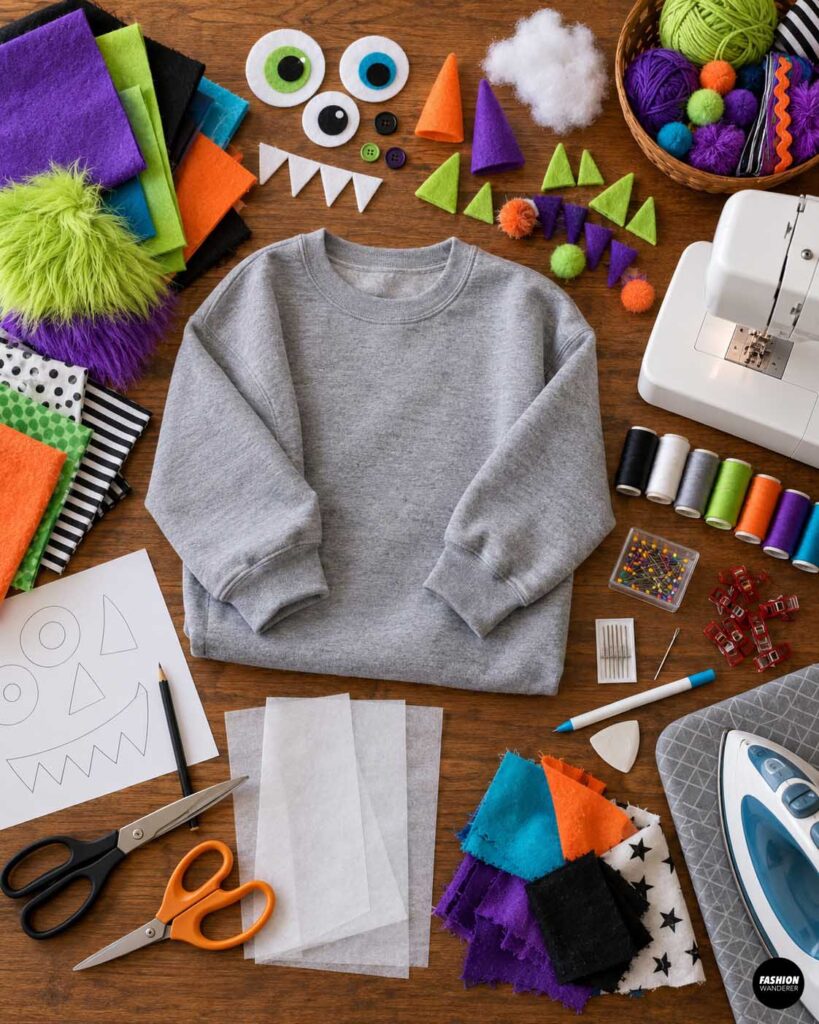
To make one DIY monster sweatshirt costume, gather:
- 1 plain oversized crewneck sweatshirt or hoodie
- Assorted fabric scraps
- Felt or fleece scraps for eyes, teeth, horns, and spikes
- Cotton or jersey scraps for decorative patches
- Small amount of polyester fiberfill
- Lightweight fusible interfacing, optional
- Coordinating or contrasting sewing thread
- Sewing machine
- Universal or ballpoint sewing machine needle
- Fabric scissors
- Paper scissors
- Pins or sewing clips
- Fabric marking pen or tailor’s chalk
- Hand-sewing needle
- Iron and ironing board
- Paper for creating templates
- Optional buttons for monster eyes
- Optional yarn, pom-poms, ribbon, or faux fur scraps
Fleece and felt are especially useful because the edges do not fray much, making them beginner friendly.
Monster Sweatshirt Costume Tutorial
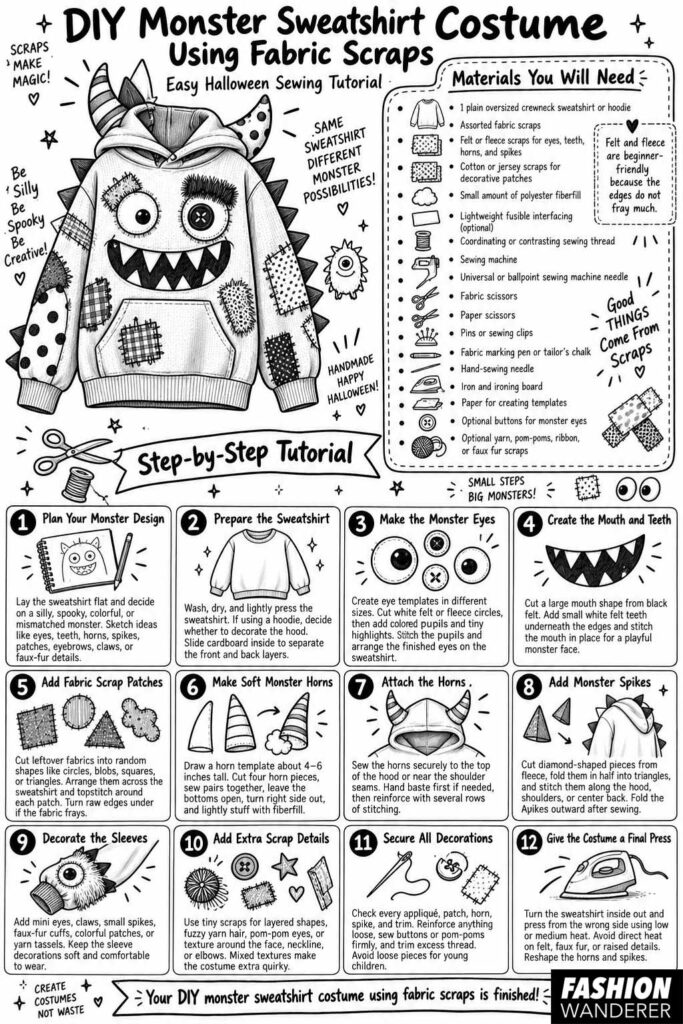
Step 1: Plan Your Monster Design
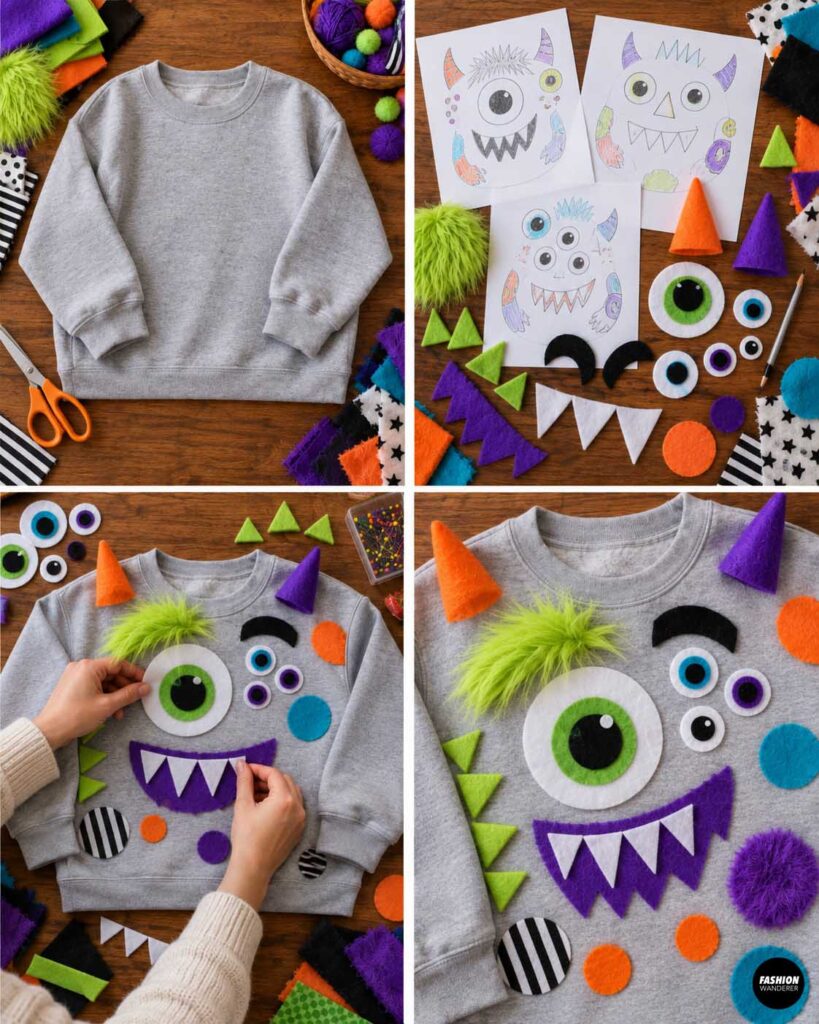
Before cutting anything, lay the sweatshirt flat with the front facing up.
Decide what kind of monster you want to create. Your monster can be silly, spooky, colorful, or intentionally mismatched.
Possible details include:
- One large eye and several tiny eyes
- Pointed teeth
- Soft horns
- Fabric spikes
- Patchwork spots
- A giant mouth
- Eyebrows
- Monster claws
- Faux-fur patches
Sketch the placement lightly on paper before arranging the pieces on the sweatshirt.
For a fun scrap-busting look, avoid making everything perfectly symmetrical.
Step 2: Prepare the Sweatshirt
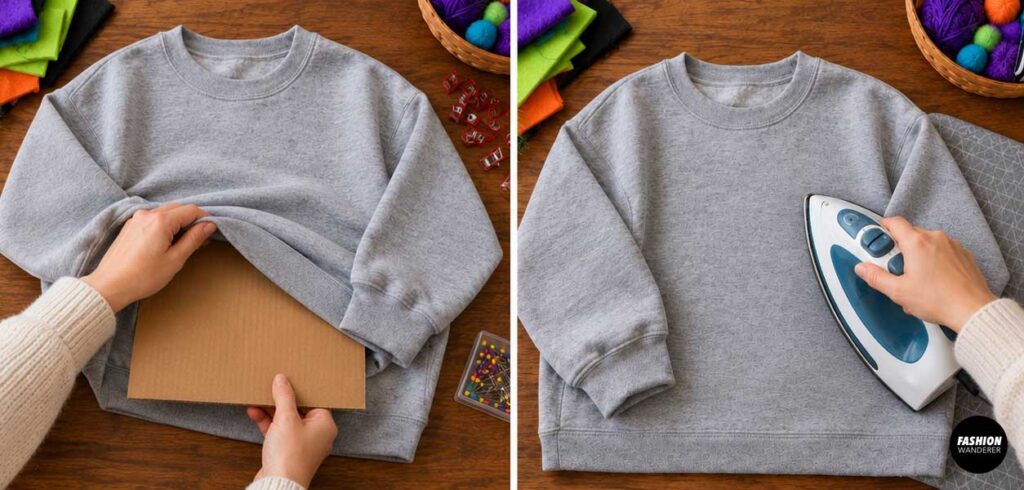
Wash and dry the sweatshirt before decorating it.
This helps prevent shrinkage after the costume is finished.
Press the sweatshirt lightly so the front, sleeves, and hood are smooth.
If you are using a hoodie, decide whether you want to decorate the hood with eyes, horns, ears, or spikes.
Slide a piece of cardboard inside the sweatshirt while planning your design. This keeps the front and back layers separated.
Step 3: Make the Monster Eyes
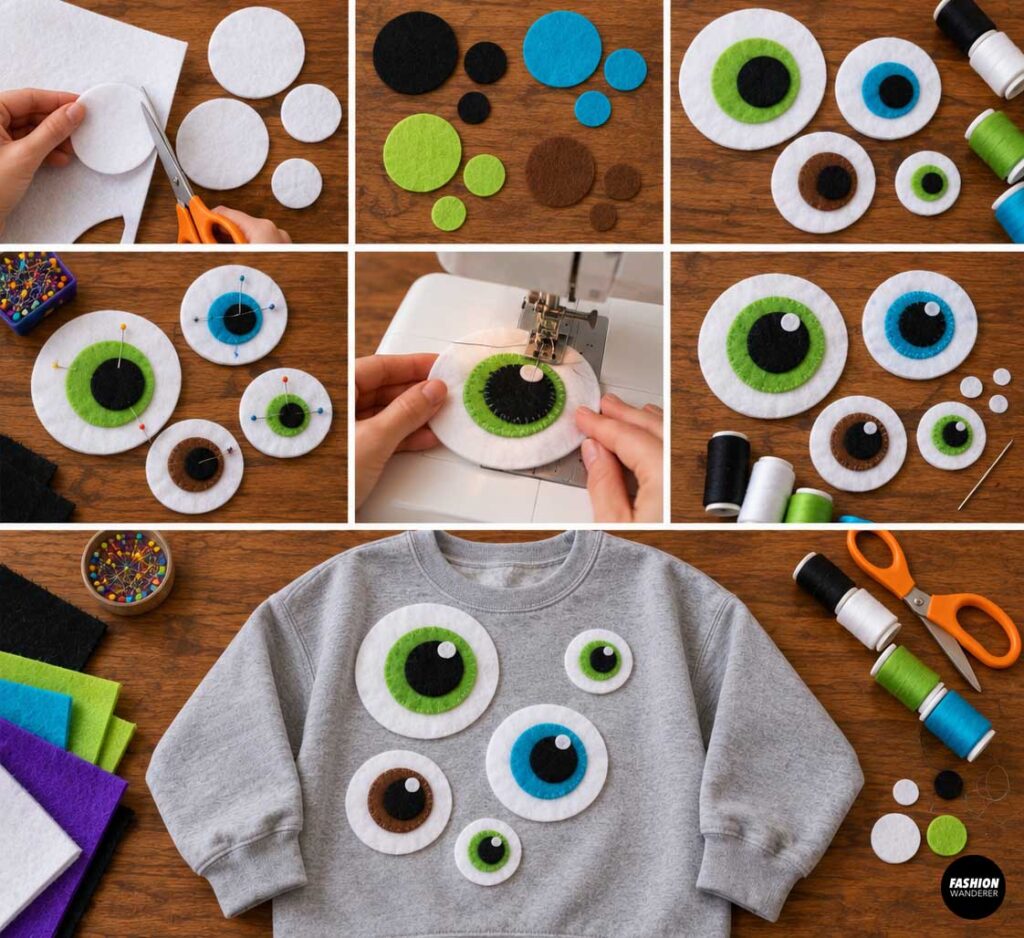
Draw several circles on paper to use as templates.
Try mixing different sizes, such as:
- 2-inch eye
- 3-inch eye
- 4-inch eye
Cut white circles from felt or fleece.
Cut smaller circles from black, blue, green, or brown fabric for the pupils.
Layer the pupil pieces over the eye pieces and pin them together.
Stitch around the pupils using a straight stitch or narrow zigzag stitch.
You can also add small white circles inside the pupils to create cartoon-style highlights.
Arrange the completed eyes across the sweatshirt.
Step 4: Create the Monster Mouth and Teeth
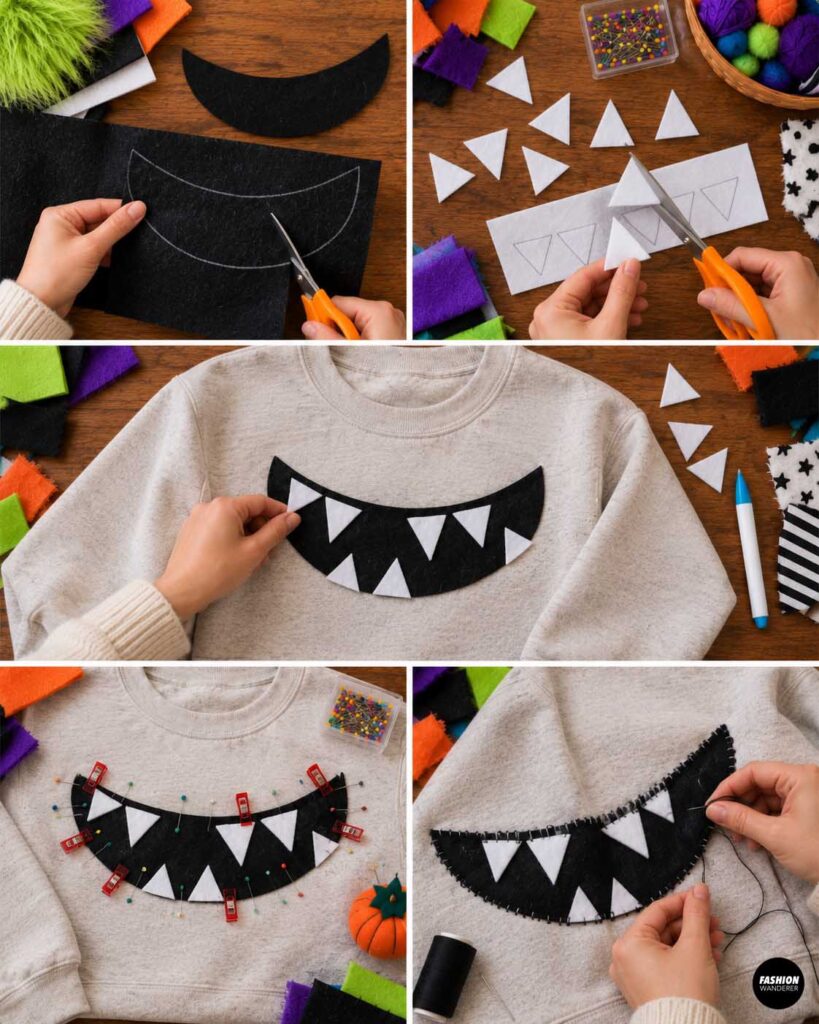
For a classic monster face, cut a large mouth shape from black felt.
A curved oval, crooked smile, or zigzag mouth all work well.
Next, cut small triangular teeth from white felt.
Position the teeth underneath the upper and lower edges of the mouth.
Pin everything in place.
Stitch around the outer edge of the black mouth, catching the teeth underneath as you sew.
For an extra playful look, make some teeth larger than others.
Step 5: Add Fabric Scrap Patches
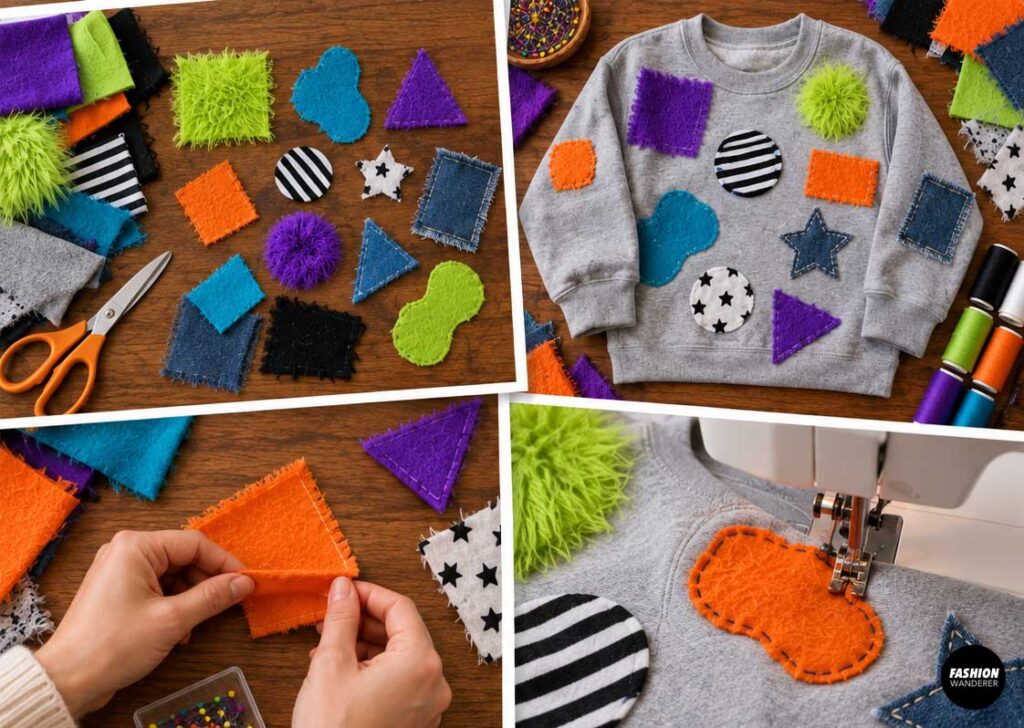
Cut leftover cotton, fleece, jersey, denim, or sweatshirt fabric into irregular shapes.
Squares, circles, triangles, and uneven blobs all work.
Arrange these patches randomly across the sweatshirt.
Try overlapping a few pieces to make the costume look more dimensional.
If your fabric frays easily, turn the raw edges under approximately ¼ inch before attaching it.
For felt and fleece, you can usually leave the edges raw.
Topstitch around each patch approximately ⅛ inch from the edge.
Contrasting thread can make the patchwork details stand out.
Step 6: Make Soft Monster Horns
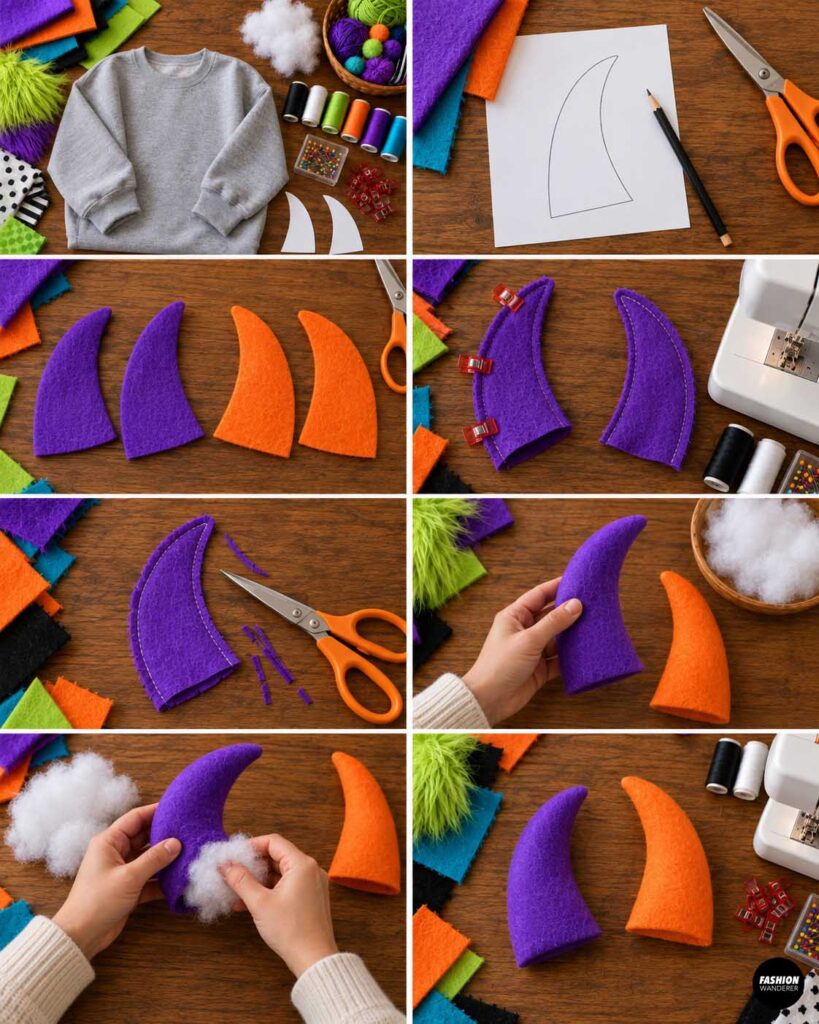
Draw a simple curved horn shape approximately 4 to 6 inches tall.
Cut four horn pieces from fleece or felt.
Place two horn pieces right sides together.
Sew around the curved edges using approximately a ¼-inch seam allowance, leaving the bottom open.
Trim the seam allowance if necessary.
Turn the horn right side out and lightly stuff it with polyester fiberfill.
Repeat for the second horn.
Avoid overstuffing because soft horns are more comfortable to wear.
Step 7: Attach the Horns
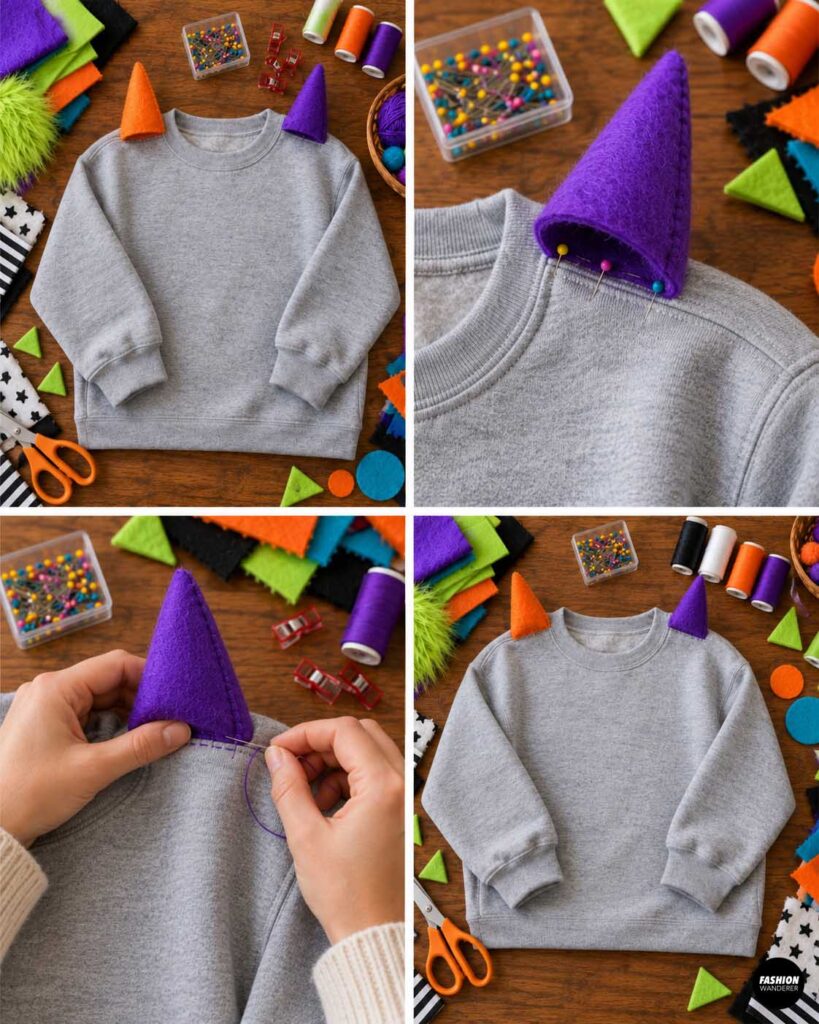
If you are using a hoodie, horns look especially cute along the top of the hood.
Turn the hood partially inside out.
Position the raw end of each horn against the hood seam.
Hand baste the horns in place first.
Then sew securely using several rows of stitching.
If you are decorating a crewneck sweatshirt instead, horns can be sewn near the shoulder seams.
Step 8: Add Monster Spikes
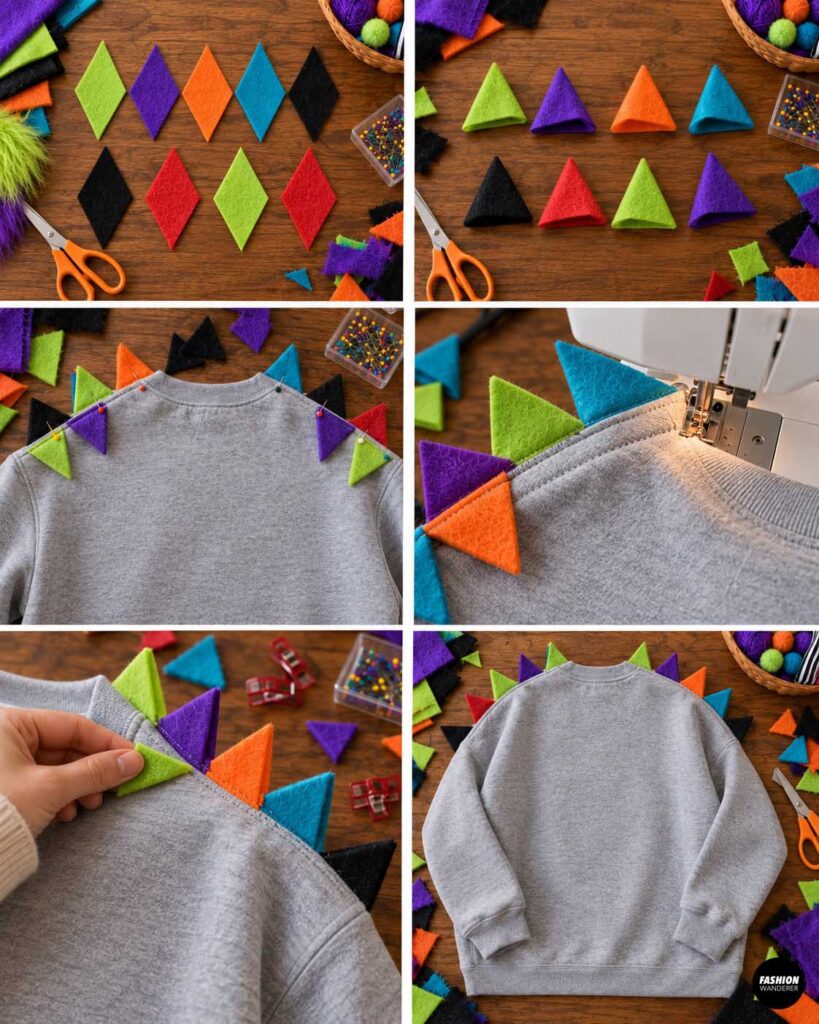
Cut several diamond-shaped pieces from fleece.
Fold each diamond in half to create a triangle.
Place the folded spikes along the center back, shoulders, or hood.
Pin them with the pointed ends facing inward while sewing.
Stitch across the raw bases using a ¼-inch seam allowance.
Fold the spikes outward and topstitch near the seam if needed.
Using different colored scraps makes the monster look even more playful.
Step 9: Decorate the Sleeves
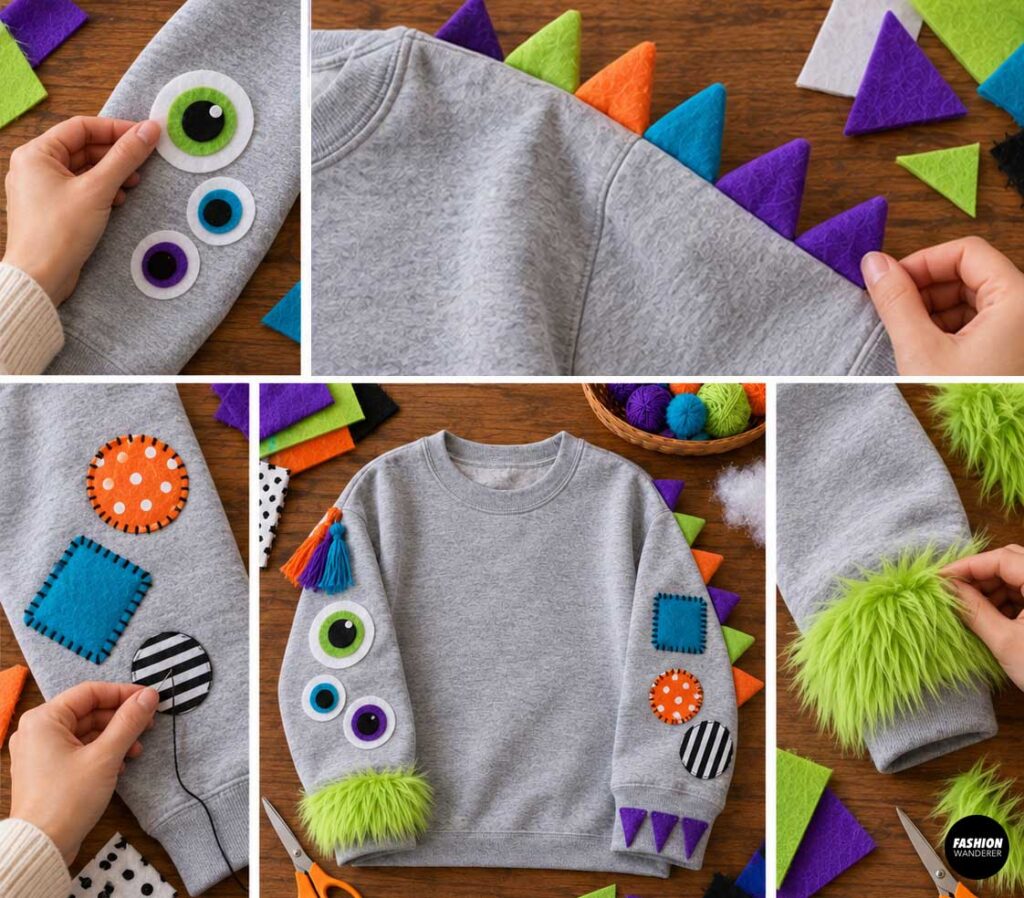
Do not forget the sleeves.
You can add:
- Mini eyes
- Fabric claws
- Colorful patches
- Faux-fur cuffs
- Small spikes
- Yarn tassels
For easy monster claws, cut triangular pieces of felt and stitch them near the cuffs.
Keep all decorations soft and flexible so the sleeves remain comfortable.
Step 10: Add Extra Scrap Details
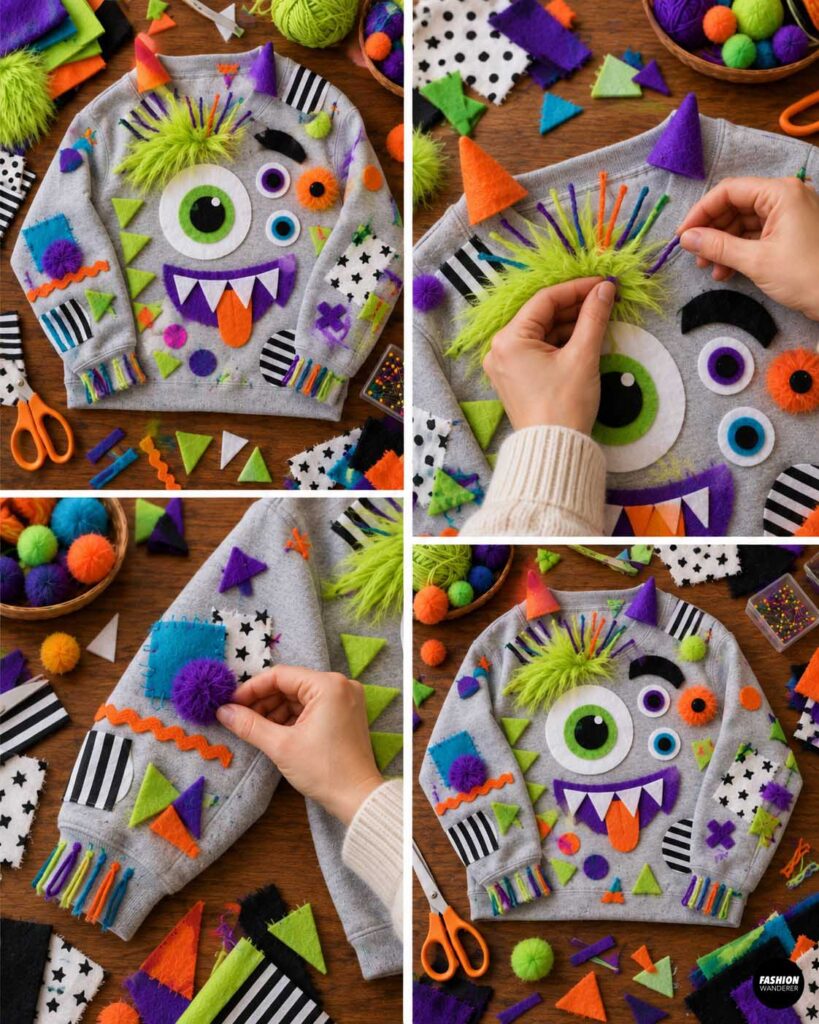
This is where you can use up very small scraps.
Layer tiny fabric shapes around the monster face or scatter them across the sweatshirt.
You could also add narrow strips of fabric around the neckline or elbows.
For a textured monster, sew short pieces of yarn into seams to create fuzzy hair.
Pom-poms can also become raised monster eyes.
The more mismatched the textures are, the more handmade and quirky the finished costume will look.
Step 11: Secure All Decorations
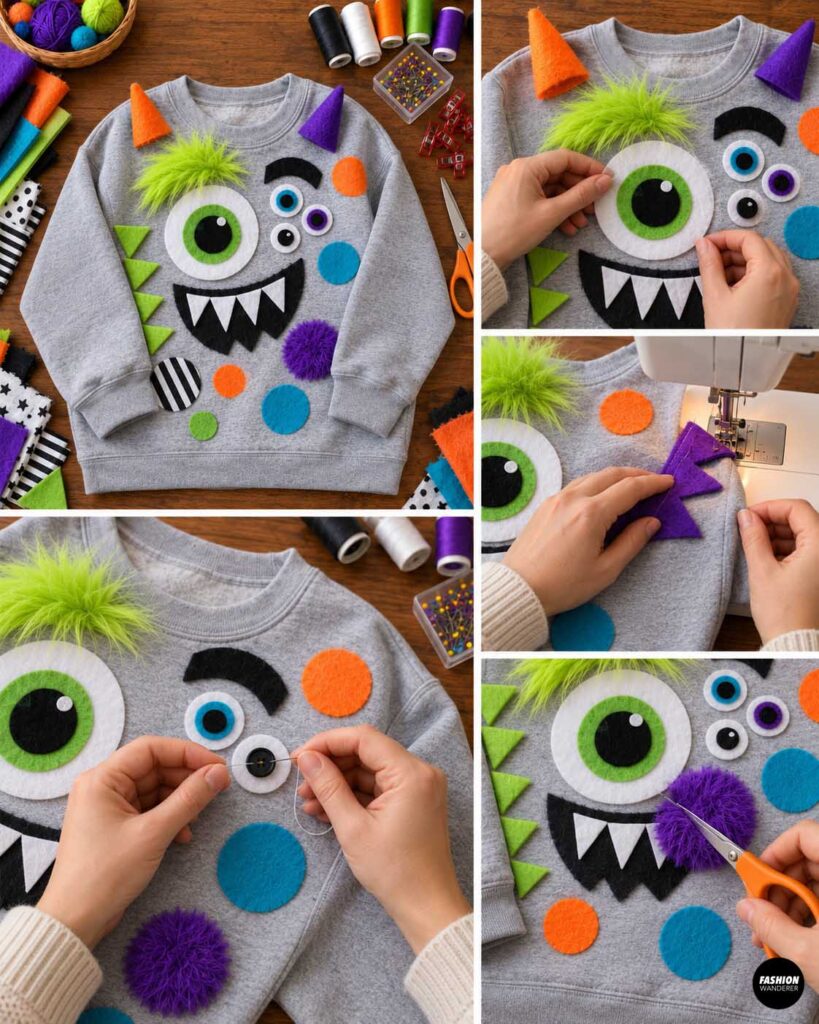
Check every appliqué, horn, spike, and decorative element.
Reinforce anything that feels loose.
If you used buttons, pom-poms, or other small decorations, sew them securely.
For children’s costumes, avoid loose pieces that could become choking hazards.
Trim excess thread.
Step 12: Give the Costume a Final Press
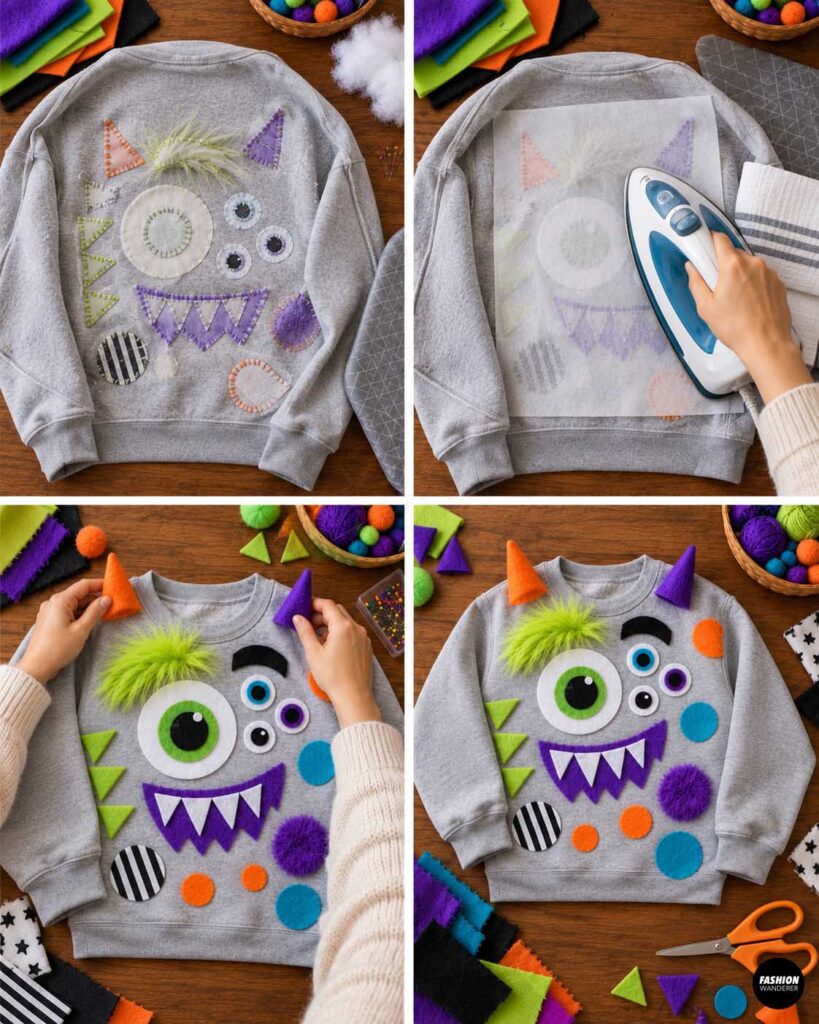
Turn the sweatshirt inside out.
Press from the wrong side using a low or medium heat setting appropriate for the fabrics.
Avoid pressing directly over polyester felt, faux fur, or dimensional decorations.
Turn the sweatshirt right side out and gently reshape the horns, spikes, and patches.
Your DIY monster sweatshirt costume using fabric scraps is finished!
Easy Monster Costume Styling Ideas
Pair the sweatshirt with leggings, sweatpants, jeans, or colorful tights for a simple complete costume.
For an even bigger monster effect, make matching fabric-scrap wrist cuffs, shoe covers, or a monster treat bag.
You can also coordinate the sweatshirt colors with fabric already in your scrap bin, making this one of the easiest zero-waste Halloween sewing projects to customize.
Why This Is a Great Beginner Halloween Sewing Project
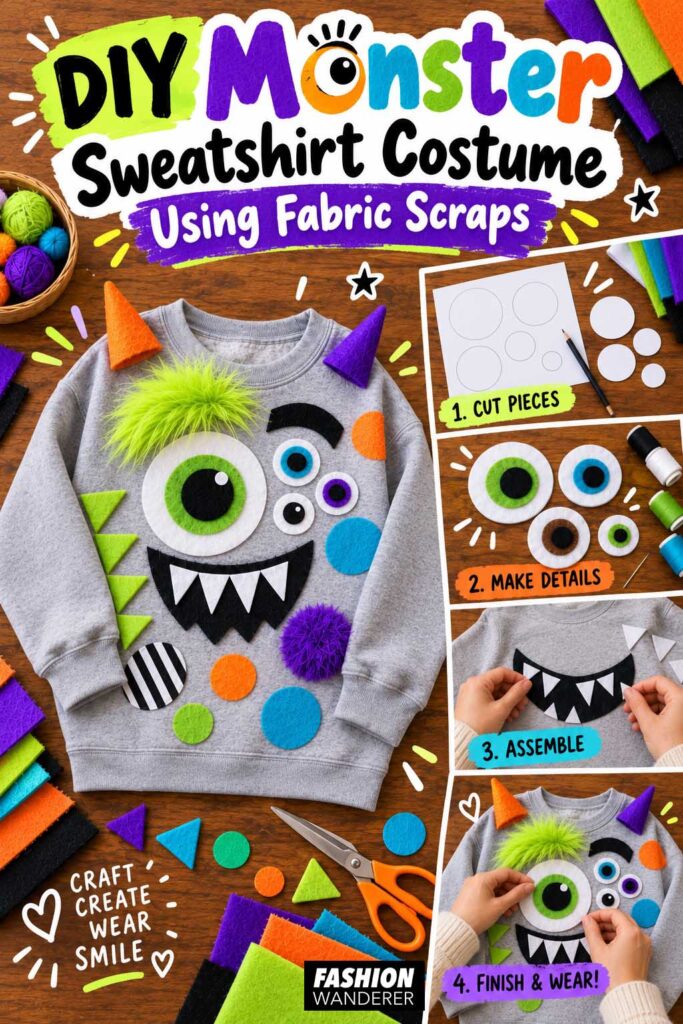
A DIY monster sweatshirt costume does not require complicated garment construction or precise fitting. You begin with a ready-made sweatshirt and simply add creative appliqué and dimensional details.
It is also a fantastic way to use small scraps that may otherwise be thrown away.
Whether you make a bright rainbow monster for a child or a quirky oversized version for an adult, this fabric scrap monster costume is inexpensive, comfortable, customizable, and easy to sew.
And because no two scrap piles are exactly alike, every finished monster sweatshirt becomes completely unique.