
Looking for an inexpensive Halloween costume that is cute, comfortable, and surprisingly easy to make? A thrifted hoodie can become the perfect base for a DIY dinosaur costume with just a little felt, fleece, stuffing, and beginner-friendly sewing.
This project is ideal for kids because a hoodie is soft, warm, and easy to move in. It is also a great way to reuse secondhand clothing instead of buying a costume that may only be worn once. With a little creativity, you can transform a basic $5 thrift-store hoodie into a playful dinosaur complete with spikes, a tail, claws, and optional teeth or eyes.
The best part? You do not need advanced sewing skills. This tutorial uses simple shapes and straightforward stitching, making it a fun weekend sewing project for beginners.
Skip the expensive store-bought outfits and try these upcycled kids halloween costumes you can make from clothes you already own using basic items from your child’s closet.
Materials You Will Need
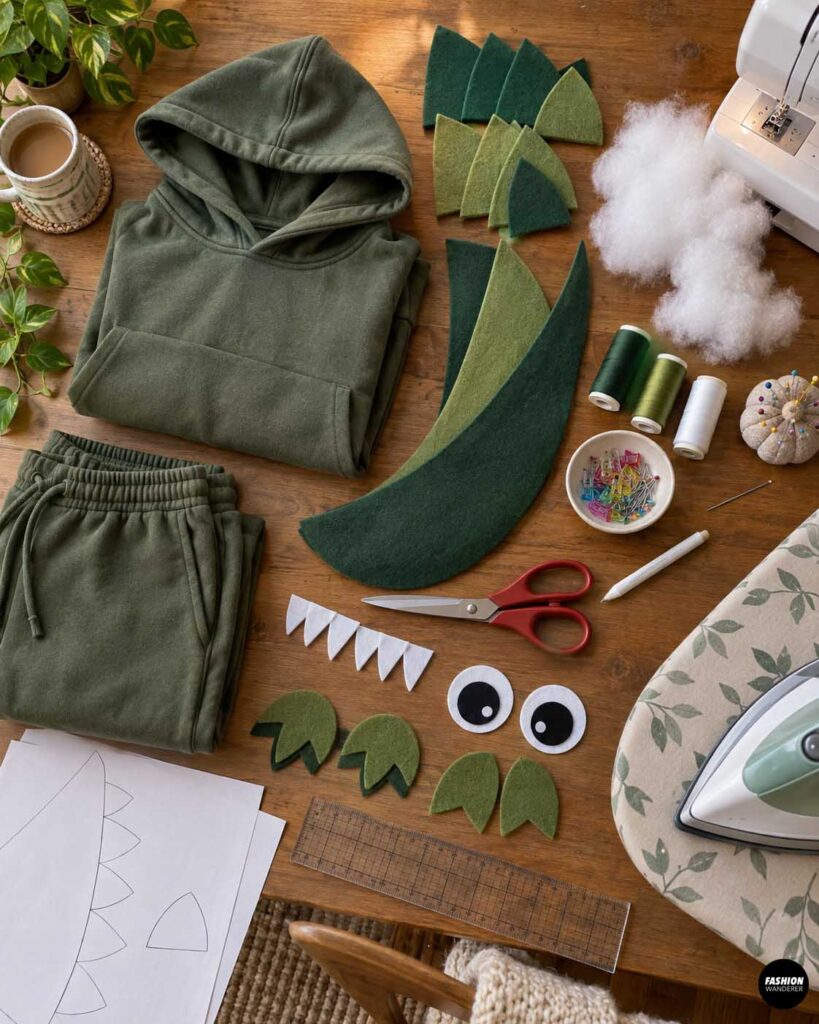
To make one thrifted hoodie dinosaur costume, gather:
- 1 thrifted hooded sweatshirt
- Felt or fleece for dinosaur spikes
- Coordinating felt or fleece for the tail
- Small amount of polyester fiberfill
- Fabric scissors
- Sewing machine
- Coordinating polyester thread
- Hand-sewing needle
- Pins or sewing clips
- Fabric marker or tailor’s chalk
- Measuring tape or ruler
- Paper for making templates
- Iron and ironing board
- Optional felt for claws
- Optional white felt for dinosaur teeth
- Optional black and white felt for eyes
- Optional matching sweatpants
Fleece and felt are especially beginner friendly because they do not fray much. If you are using a stretchy hoodie, a polyester thread and slightly longer stitch length can help prevent puckering.
DIY Dinosaur Costume From Old Hoodie
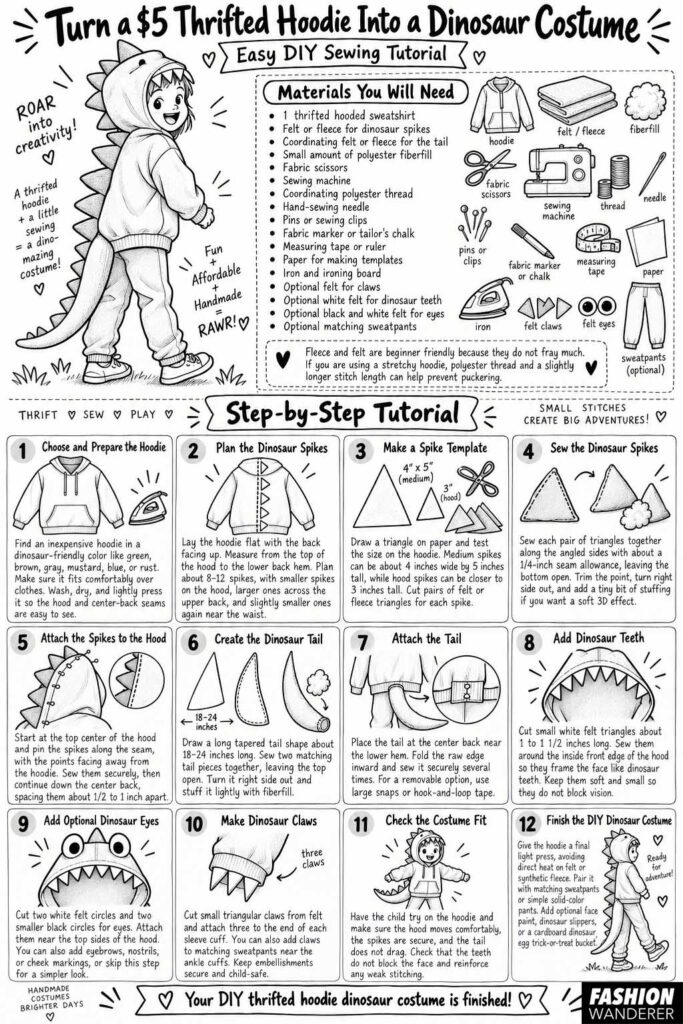
Step 1: Choose and Prepare the Hoodie
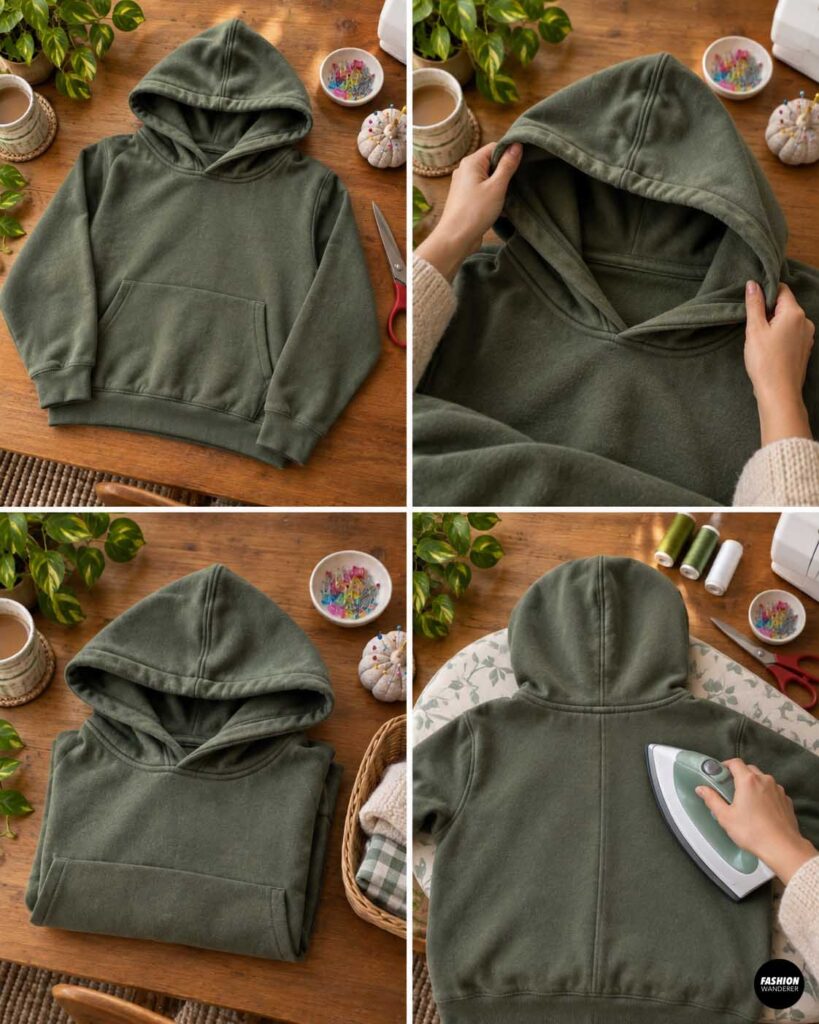
Start by finding an inexpensive hoodie at a thrift store. Green, brown, gray, mustard, blue, and rust all work well for dinosaur costumes.
Choose a hoodie that fits comfortably with enough room for a shirt underneath.
Before sewing, wash and dry the hoodie. This removes thrift-store odors and prevents unexpected shrinkage later.
Press the hoodie lightly so the center back and hood seams are easy to see.
Step 2: Plan the Dinosaur Spikes
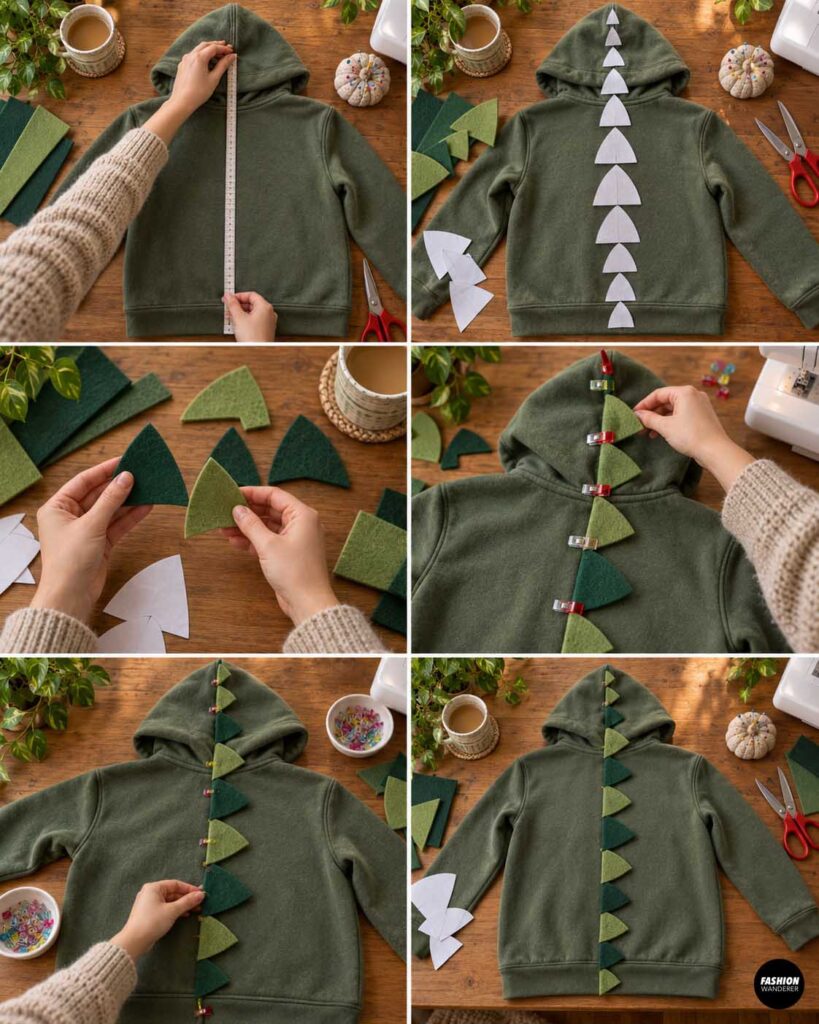
The most recognizable part of the costume is the row of dinosaur spikes running from the top of the hood down the back.
Lay the hoodie flat with the back facing upward.
Measure from the top center of the hood to the lower back hem.
Decide how many spikes you want. For a child-size hoodie, approximately 8 to 12 spikes usually looks good.
Make the spikes gradually change in size. Smaller spikes can sit on the hood, larger spikes can run across the upper back, and the spikes can become slightly smaller again near the waist.
Step 3: Make a Spike Template
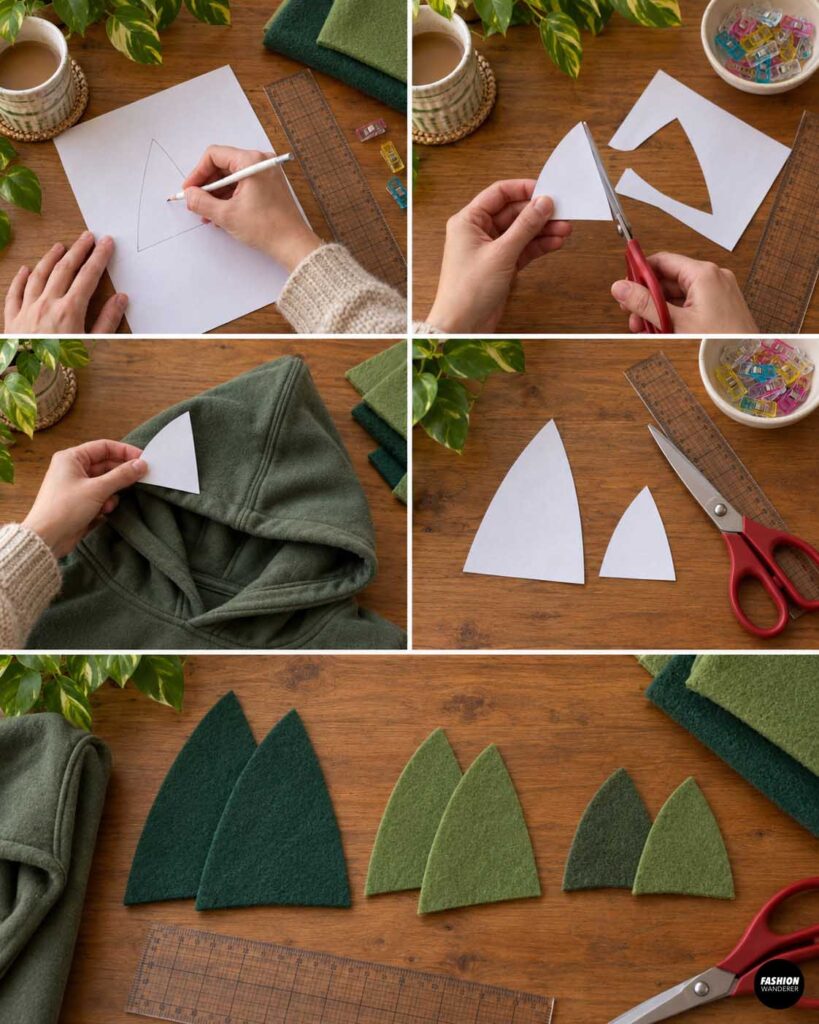
Draw a simple triangle on paper.
For medium spikes, try approximately:
4 inches wide x 5 inches tall
For smaller hood spikes, use triangles around 3 inches tall.
Cut out the paper template and test it against the hoodie.
Once you like the size, use the template to cut pairs of triangles from felt or fleece.
You will need two fabric triangles for each stuffed spike.
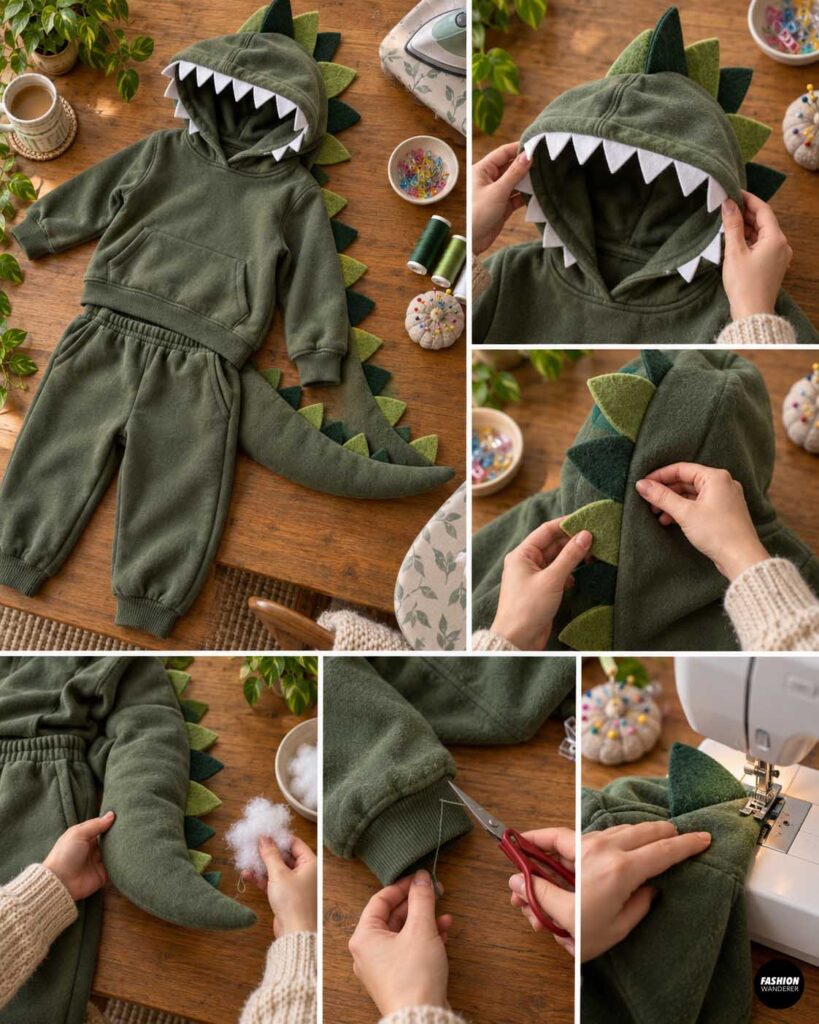
Step 4: Sew the Dinosaur Spikes
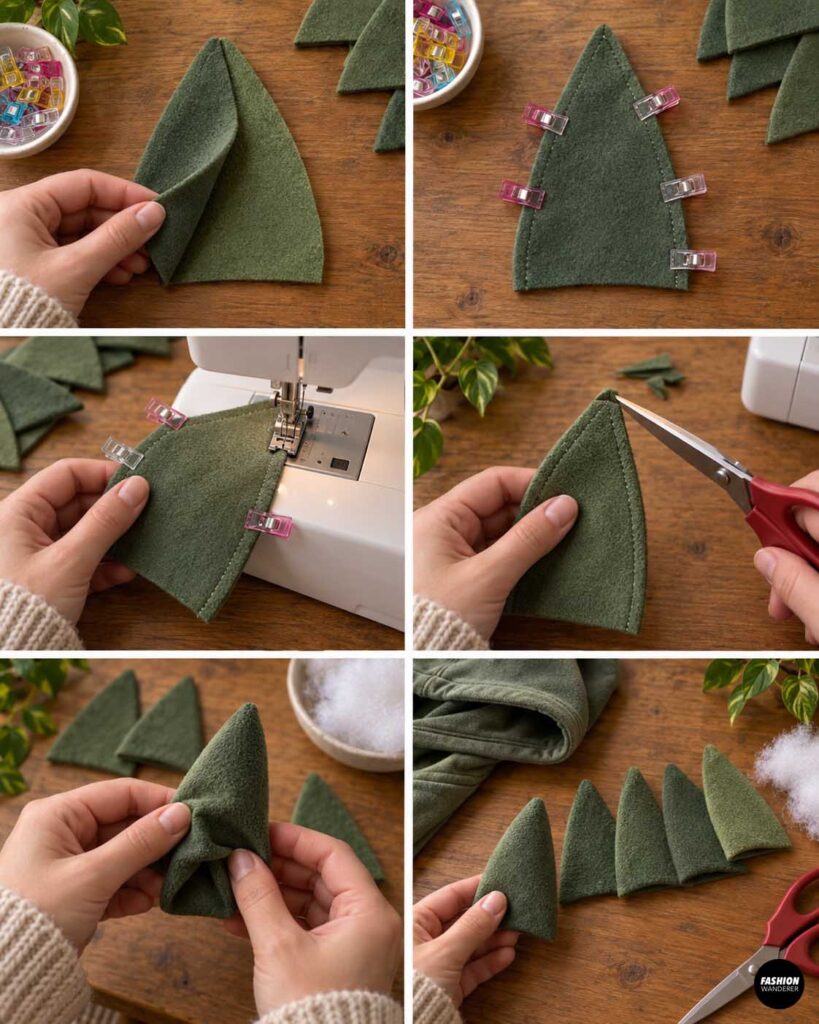
Place two spike pieces right sides together if your fabric has a right side.
Sew along the two angled edges using approximately a ¼-inch seam allowance.
Leave the bottom edge open.
Trim the top point slightly without cutting through the stitching.
Turn each spike right side out.
You can leave the spikes flat or add a tiny amount of polyester stuffing for a soft 3D effect.
Avoid overstuffing because the spikes should remain lightweight.
Step 5: Attach the Spikes to the Hood
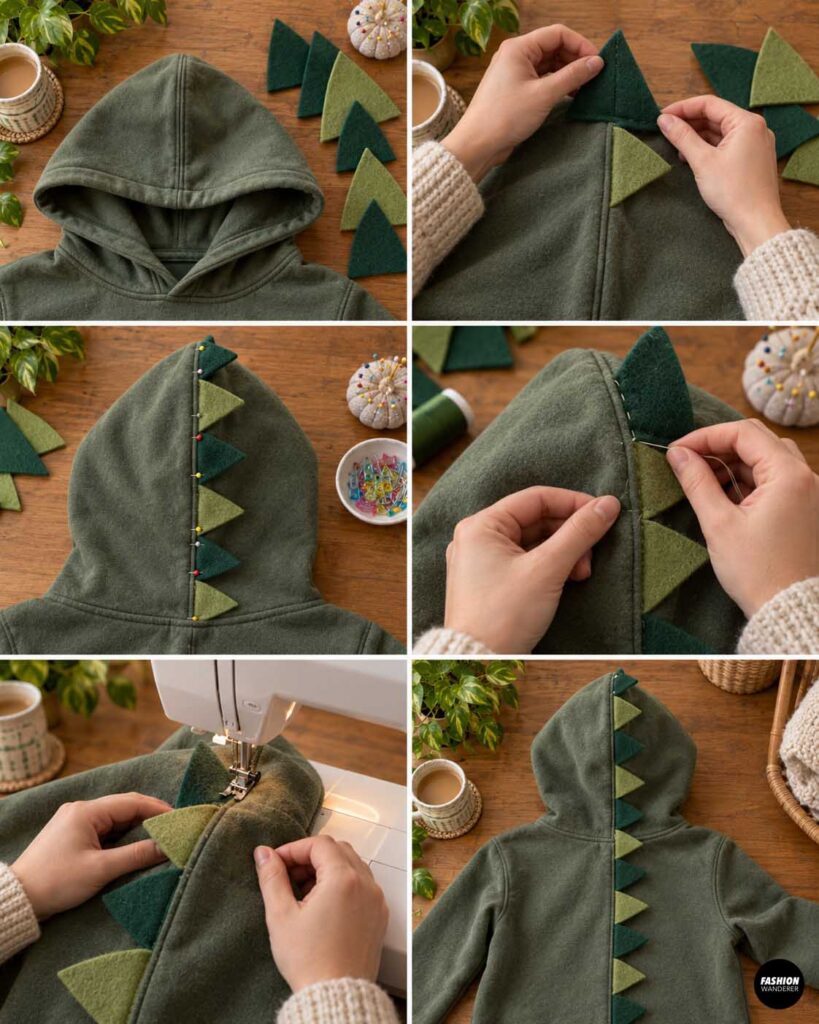
Start at the center top of the hood.
Pin the first few spikes along the hood seam with the raw edges aligned against the seam line.
The pointed ends should face away from the hoodie.
You can hand baste the spikes first to prevent them from shifting.
Sew each spike securely through the hood fabric using a straight stitch or narrow zigzag stitch.
Continue down the back of the hoodie, spacing the spikes approximately ½ to 1 inch apart.
If the hoodie already has a center-back seam, use it as your placement guide.
Step 6: Create the Dinosaur Tail
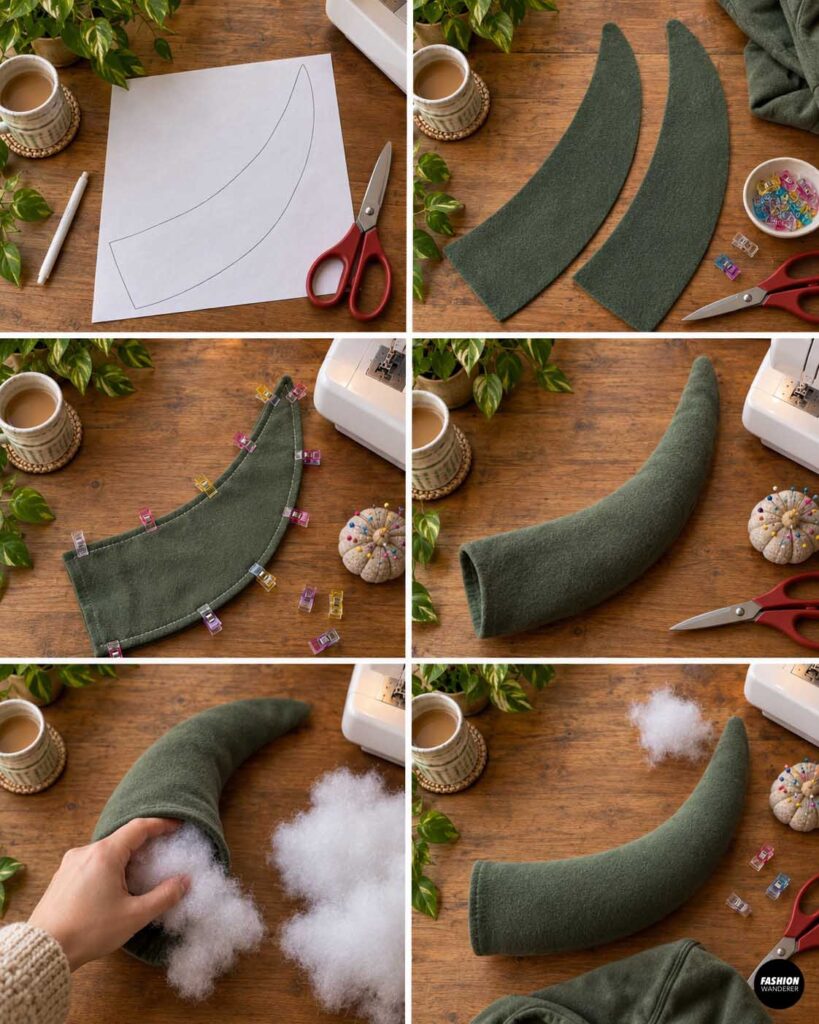
Draw a long tapered tail shape on paper.
For a child-size costume, a tail approximately 18 to 24 inches long works well.
Cut two matching tail pieces from fleece or felt.
Place them right sides together and sew around the tail using a ⅜-inch seam allowance, leaving the wide top edge open.
Turn the tail right side out.
Stuff it lightly with polyester fiberfill.
Keep the stuffing soft so the tail bends naturally while walking or sitting.
Step 7: Attach the Tail
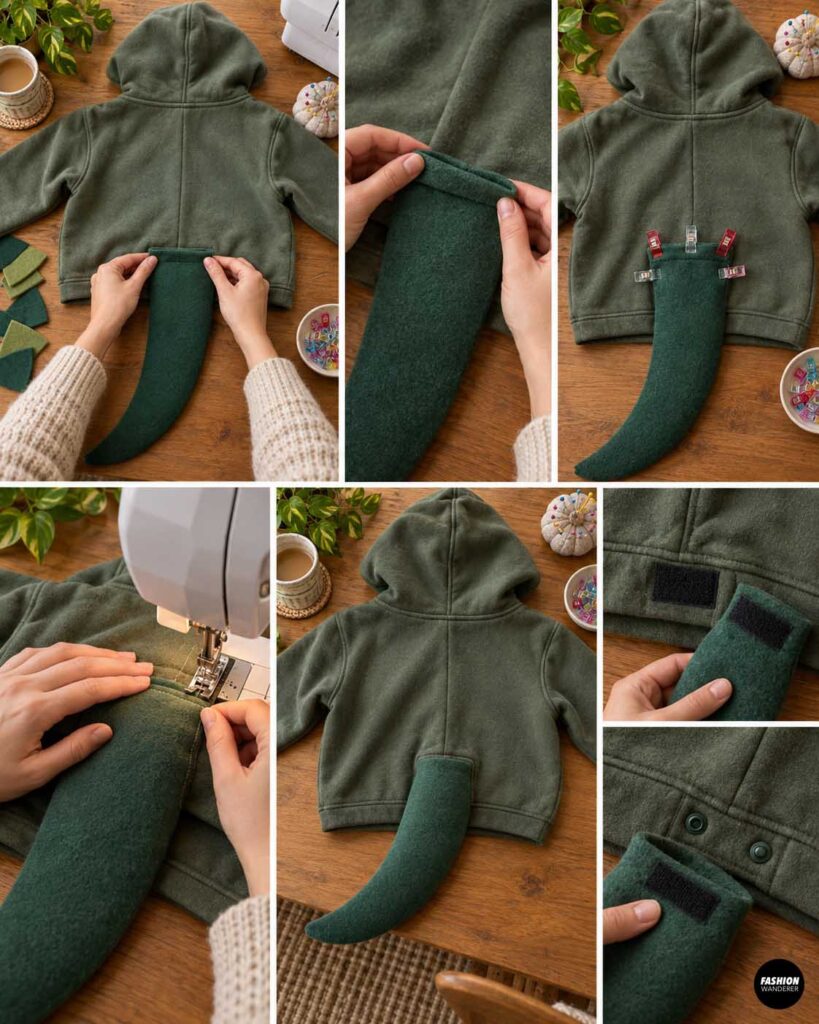
Position the wide end of the tail at the center back of the hoodie near the lower hem.
For extra strength, fold the raw edge of the tail inward.
Pin it securely.
Sew around the attachment area several times using a straight stitch.
For a removable costume, you can attach the tail with large snaps or hook-and-loop tape instead.
A removable tail also makes the hoodie easier to wash and store.
Step 8: Add Dinosaur Teeth
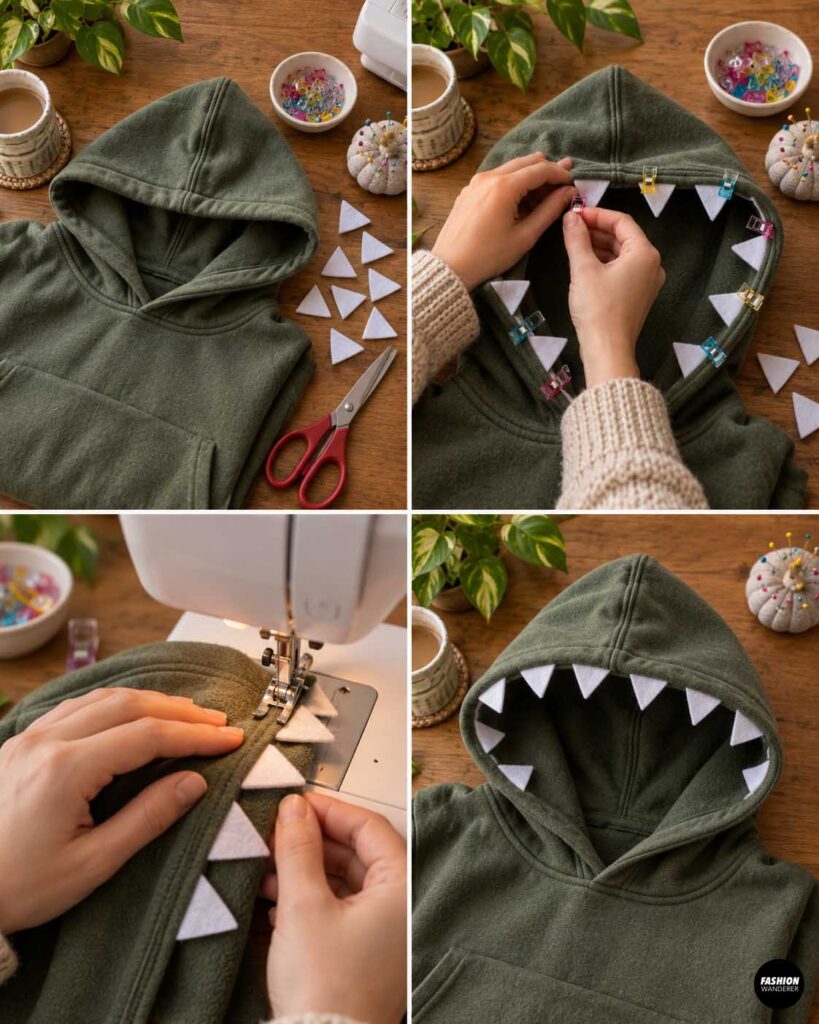
To make the hood look even more dinosaur-like, cut small white felt triangles for teeth.
Make each tooth approximately 1 to 1½ inches long.
Pin the teeth around the inside front edge of the hood with the pointed ends facing outward.
Sew them along the hood edge.
When the hood is worn, the teeth will frame the child’s face for a fun dinosaur-mouth effect.
Keep the teeth soft and relatively small so they do not interfere with vision.
Step 9: Add Optional Dinosaur Eyes
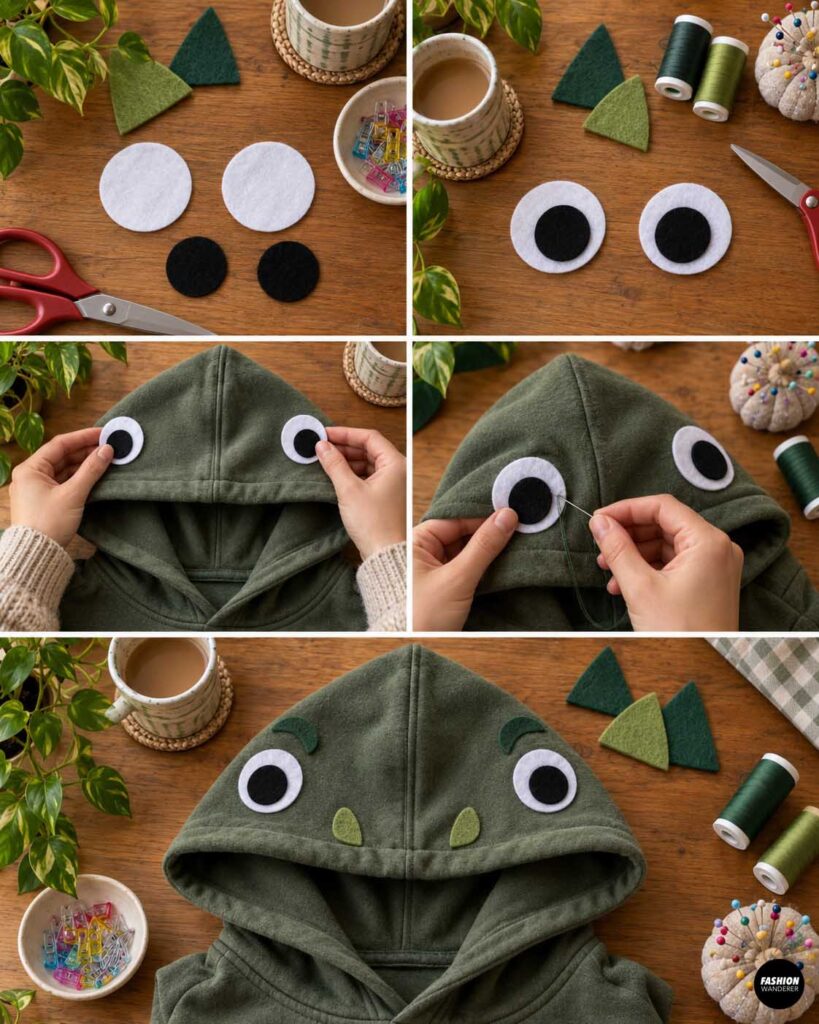
Cut two white felt circles and two smaller black circles.
Layer the black circles over the white circles.
Sew or fabric-glue them near the top sides of the hood.
For a more subtle costume, skip the eyes and let the spikes do all the work.
You can also add eyebrows, nostrils, or colorful cheek markings using felt scraps.
Step 10: Make Dinosaur Claws
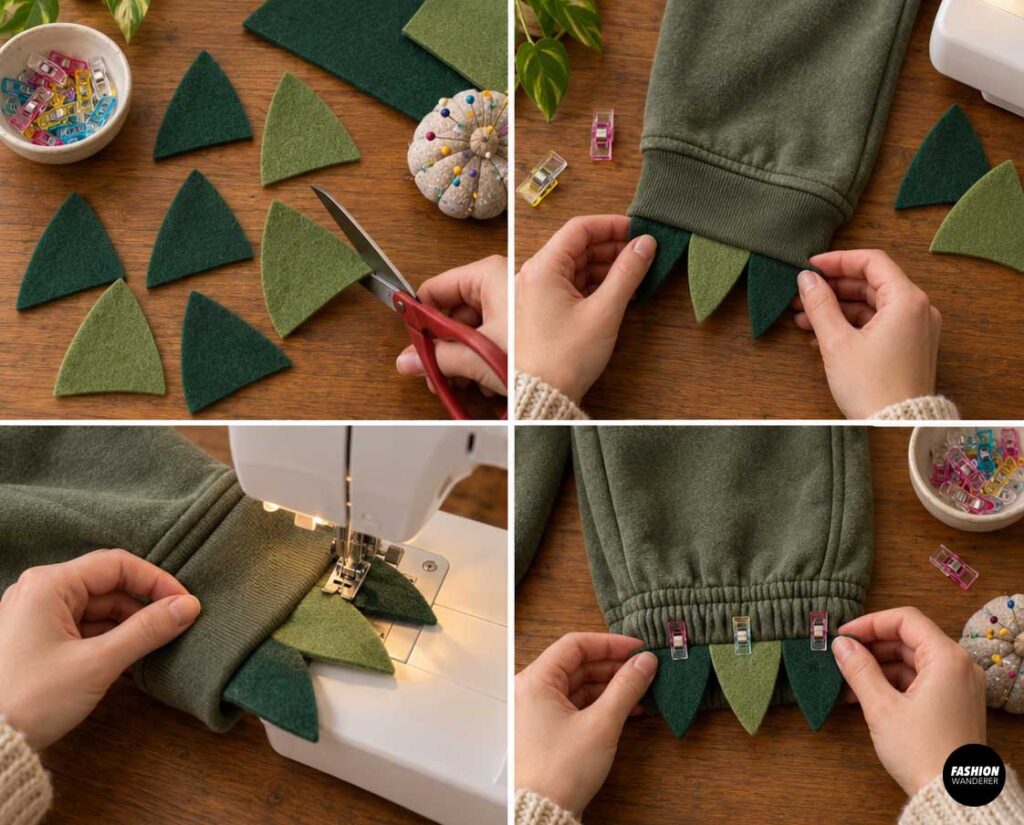
Cut small triangular claws from felt.
Attach three claws to the end of each sleeve cuff.
You can also add claws to coordinating sweatpants near the ankle cuffs.
Sew the claws securely so they cannot easily pull loose.
For toddlers, keep decorative pieces simple and avoid anything small enough to become a choking hazard.
Step 11: Check the Costume Fit
Have the wearer try on the hoodie.
Check that the hood moves comfortably, the spikes are secure, and the tail does not drag on the floor.
Make sure the dinosaur teeth do not block the face.
Trim loose threads and reinforce any areas that feel weak.
If the tail feels too heavy, remove some stuffing.
Step 12: Finish the DIY Dinosaur Costume
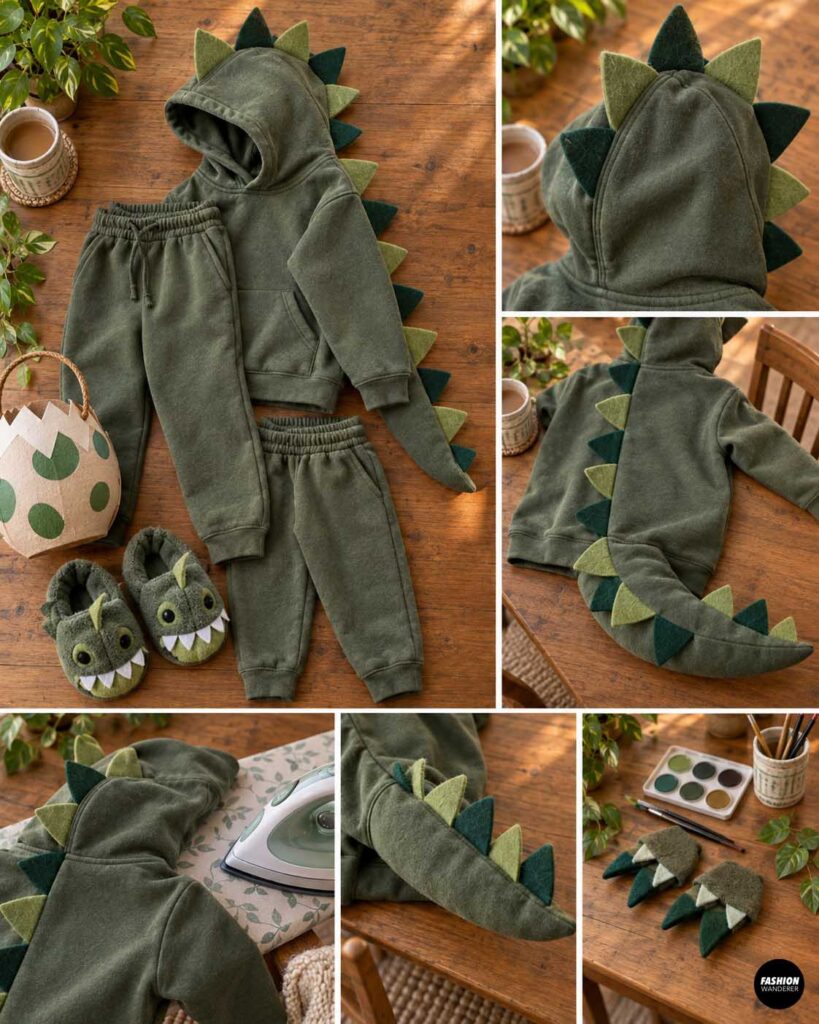
Give the hoodie a final light press, avoiding direct heat on felt or synthetic fleece.
Pair the finished hoodie with matching sweatpants, leggings, or simple solid-color pants.
You can also add face paint, dinosaur slippers, or a cardboard dinosaur egg trick-or-treat bucket.
Your DIY thrifted hoodie dinosaur costume is finished!
Why This $5 Hoodie Costume Is Worth Making
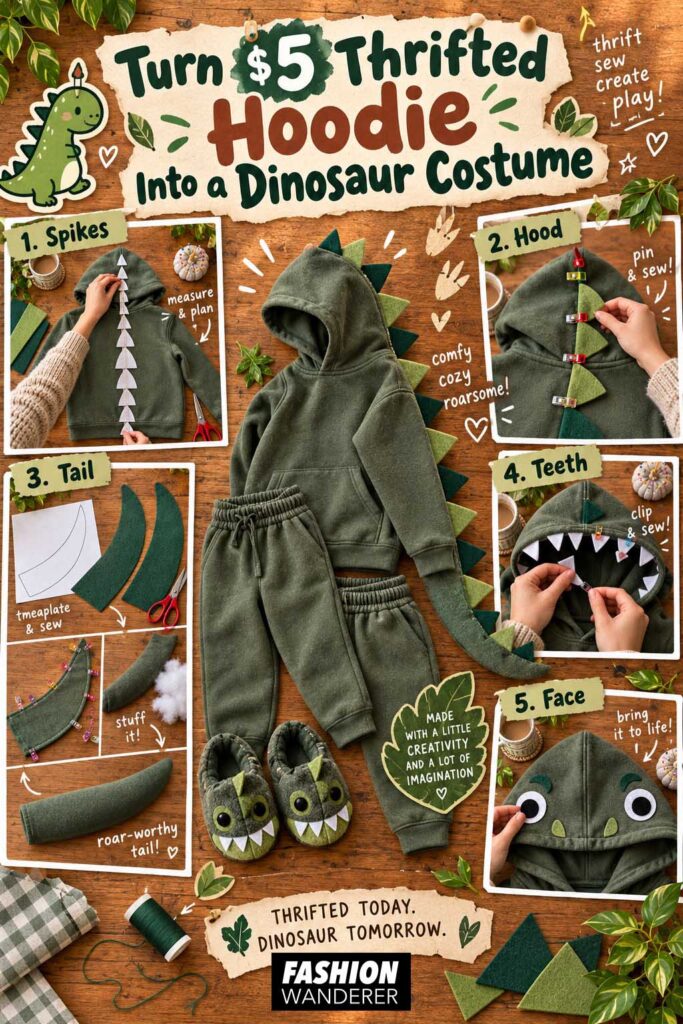
This project proves that a memorable costume does not need to be expensive. A basic thrifted hoodie gives you a ready-made neckline, hood, sleeves, cuffs, zipper or pullover opening, which eliminates most of the difficult garment construction.
That makes this project perfect for beginner sewists, busy parents, and anyone looking for an affordable handmade Halloween costume.
It is also easy to customize. Try purple spikes on a green hoodie, orange spikes on navy, rainbow spikes for a fantasy dinosaur, or muted earth tones for a more realistic look.
With a few simple sewing supplies and a little imagination, that $5 thrift-store hoodie can become a cozy costume your child may want to wear long after Halloween is over.