
Need a last-minute Halloween costume that is cute, comfortable, inexpensive, and surprisingly easy to make? This DIY bat hoodie costume is one of those projects that looks far more impressive than the time it takes to create.
With an old black hoodie, a little black fabric or felt, and a few basic sewing supplies, you can turn something already sitting in your closet into a wearable bat costume in about 30 minutes. It is perfect for kids, teens, adults, school costume days, Halloween parties, trick-or-treating, or anyone who wants a costume that can still be layered over regular clothes.
This tutorial will show you how to turn an old hoodie into a bat costume step by step, including how to create simple bat wings, attach them to the sleeves and sides, and add optional bat ears to the hood.
From cute animals to spooky characters, these kids halloween costumes you can make from clothes you already own make Halloween dressing easier, cheaper, and much more creative.
Materials You Will Need
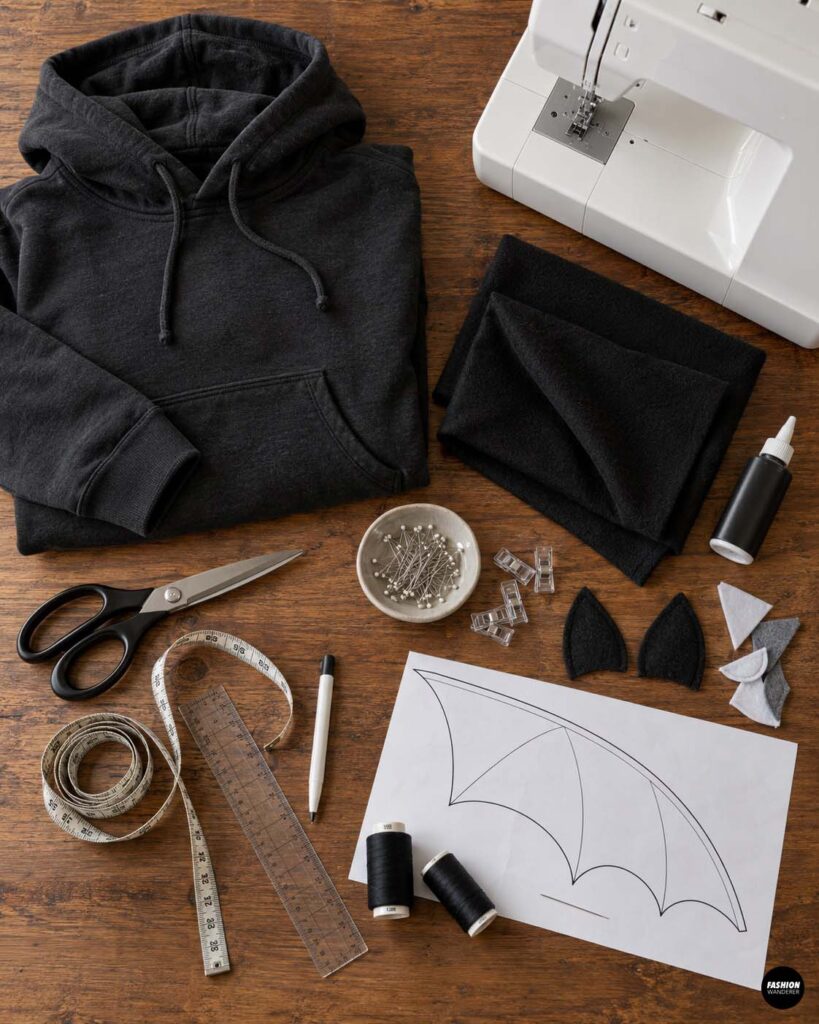
To make one DIY bat hoodie costume, gather:
- 1 old black or dark gray hoodie
- ½ to 1 yard black felt, fleece, jersey, or lightweight knit fabric
- Fabric scissors
- Measuring tape or ruler
- Fabric marking pen or tailor’s chalk
- Sewing machine
- Black polyester thread
- Pins or sewing clips
- Hand-sewing needle
- Paper for making a wing template
- Optional black felt for bat ears
- Optional fabric glue for a no-sew version
- Optional white or gray felt for small decorative details
A hoodie with long sleeves works best because the bat wings will stretch between the sleeve and the side of the hoodie.
For the easiest version, use felt or fleece because the raw edges do not need to be hemmed.
DIY Bat Costume From Old Hoodie
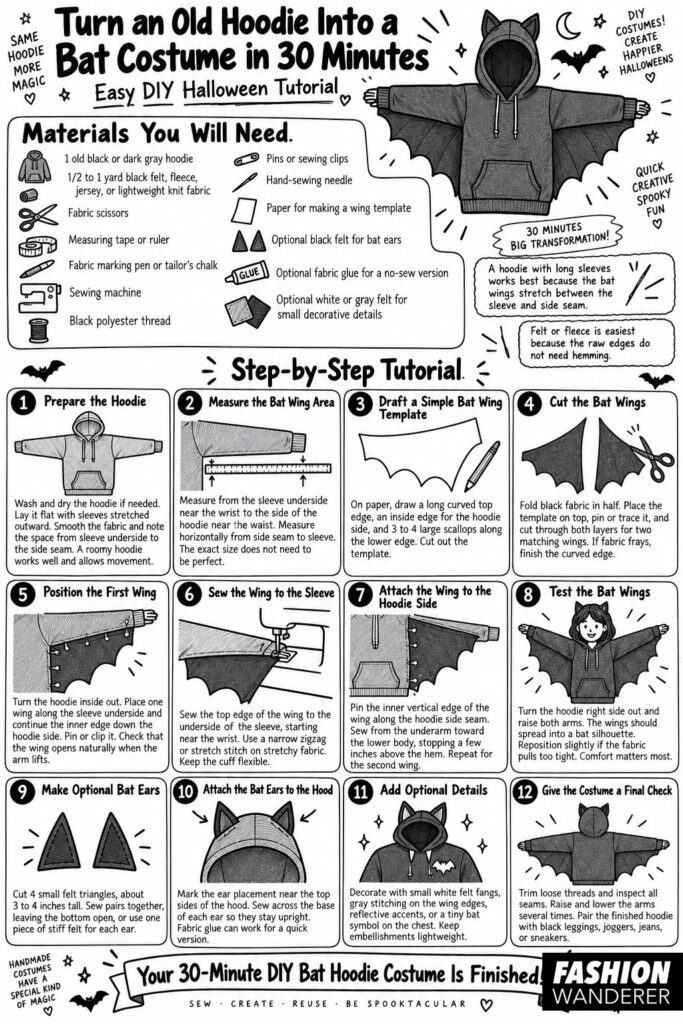
Step 1: Prepare the Hoodie
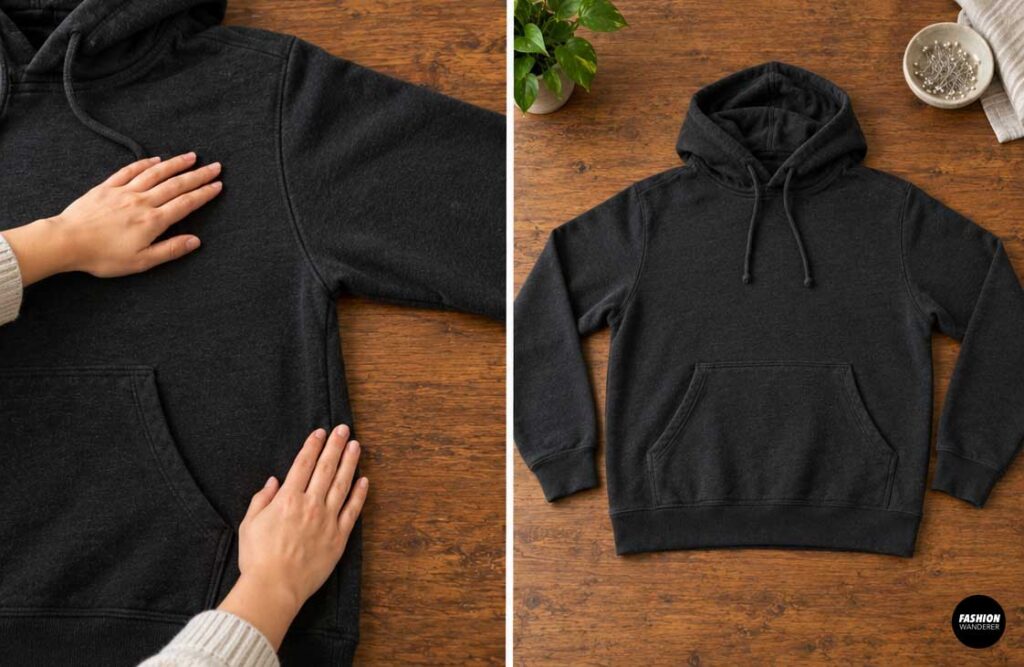
Wash and dry the hoodie before beginning if it has been sitting in storage.
Lay it flat on a table with the sleeves stretched outward.
Smooth the fabric so you can clearly see the distance from the underside of each sleeve to the side seam of the hoodie.
Do not worry if the hoodie is oversized. A slightly roomy hoodie actually works well for this costume because it allows plenty of movement.
Step 2: Measure the Bat Wing Area
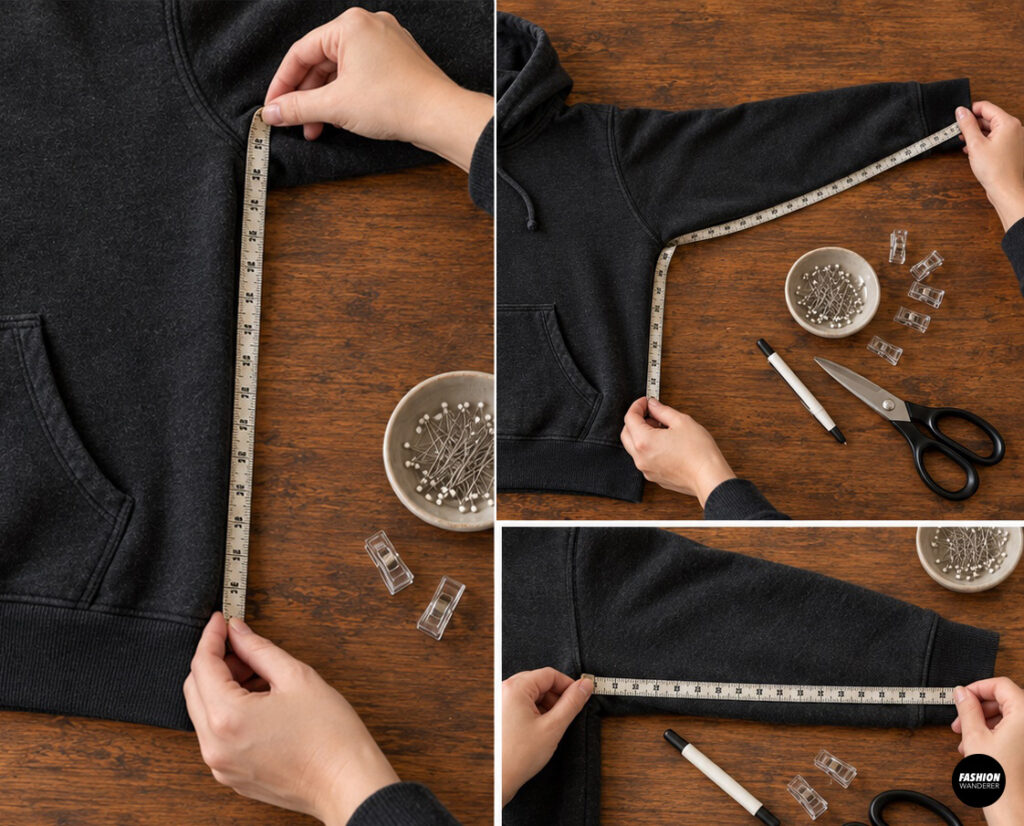
Measure from the underside of the sleeve near the wrist to the side of the hoodie near the waist or hem.
Next, measure horizontally from the side seam of the hoodie to the sleeve.
These measurements will help you determine the approximate size of your bat wings.
For an adult hoodie, each wing may be around 20 to 26 inches long. For children, the wings can be much smaller.
The exact measurements do not need to be perfect because bat wings naturally have an irregular shape.
Step 3: Draft a Simple Bat Wing Template
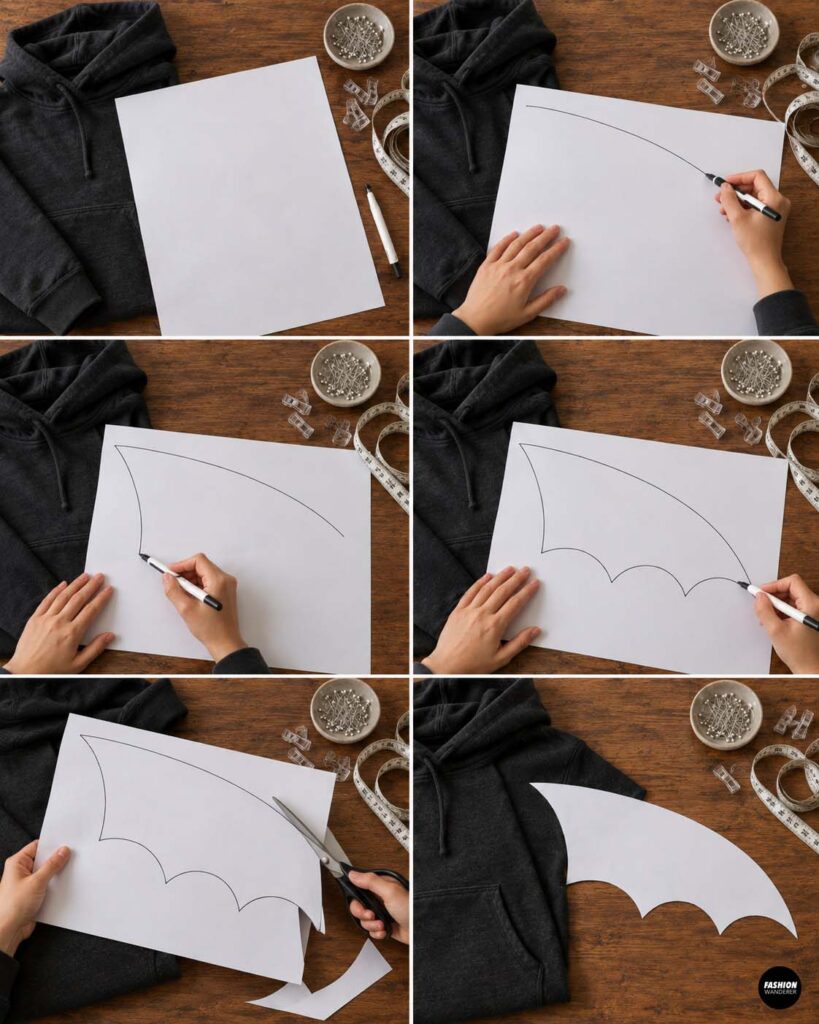
Place a large piece of paper on your work surface.
Draw a long slightly curved top edge.
This edge will attach beneath the hoodie sleeve.
Next, draw the inside edge that will attach along the side seam of the hoodie.
Now create three or four large scallops along the lower edge of the wing.
Think of these as wide downward-facing curves rather than tiny zigzags.
A simple shape works best and is much faster to sew.
Cut out the paper template.
Step 4: Cut the Bat Wings
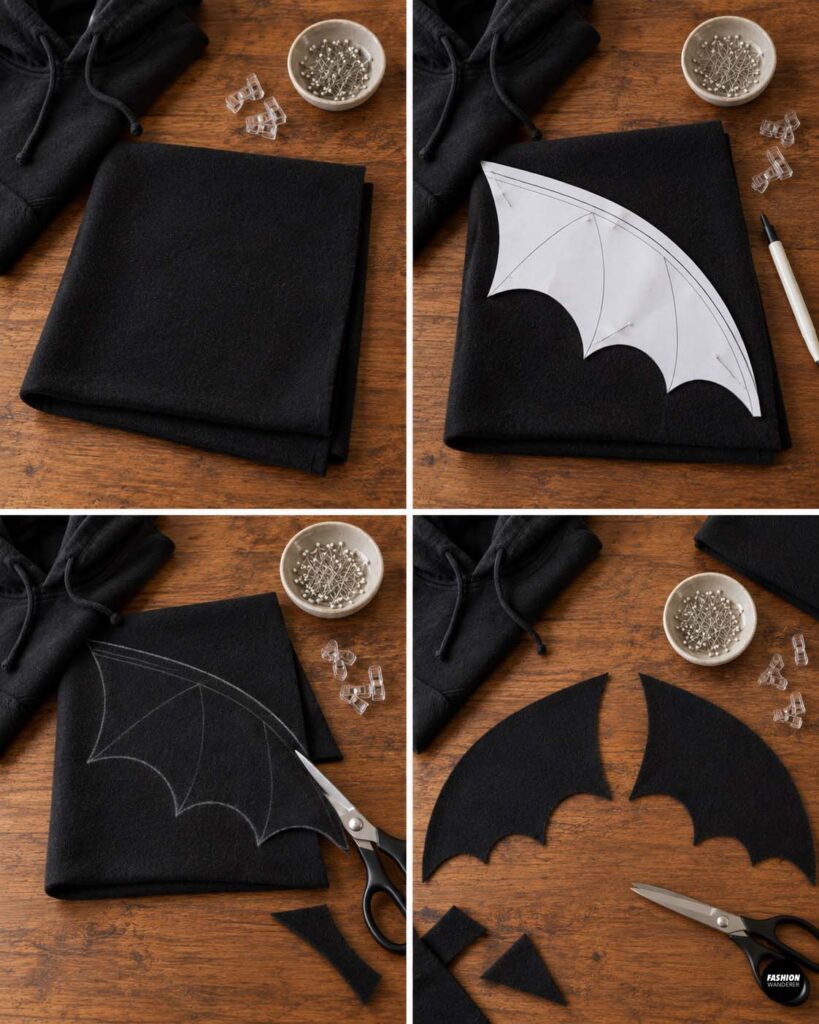
Fold your black fabric in half so you can cut both wings at the same time.
Place the wing template on top.
Pin it in place or trace around it with a fabric marker.
Cut carefully through both fabric layers.
You should now have two matching bat wings.
If you are using felt or fleece, you can leave the edges raw.
If you are using a fabric that frays, finish the curved edge with a narrow zigzag stitch or serger.
Step 5: Position the First Wing
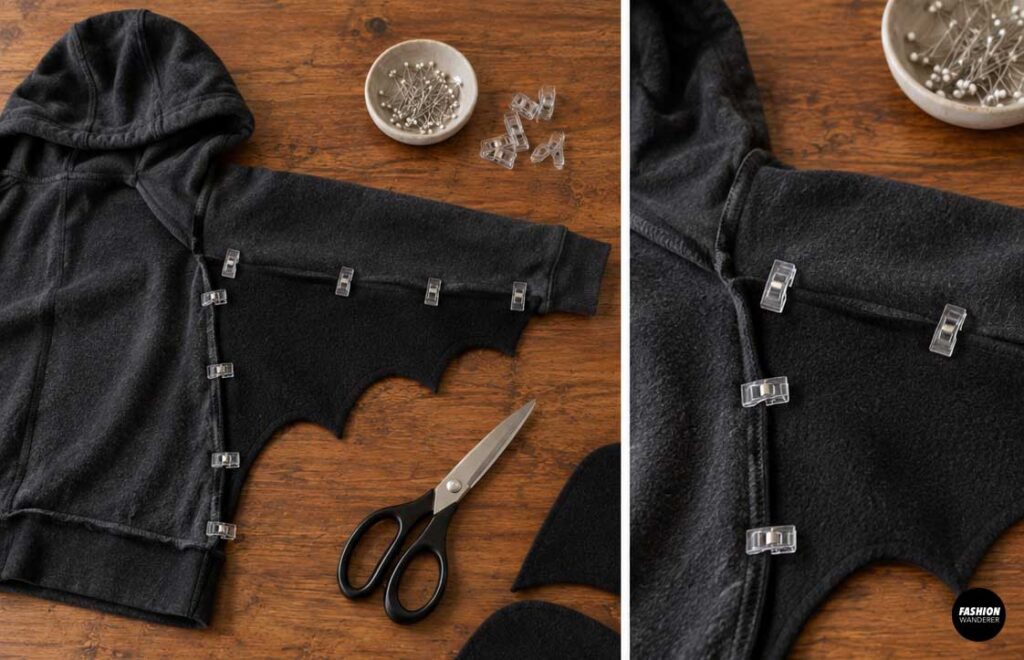
Turn the hoodie inside out.
Place one wing along the underside of the sleeve.
The long top edge of the wing should run from near the wrist toward the underarm.
The inner edge of the wing should continue down the side of the hoodie.
Pin or clip the wing securely.
Before sewing, turn the hoodie right side out and gently lift the sleeve.
The wing should open naturally when the arm is raised.
Adjust the placement if necessary.
Step 6: Sew the Wing to the Sleeve
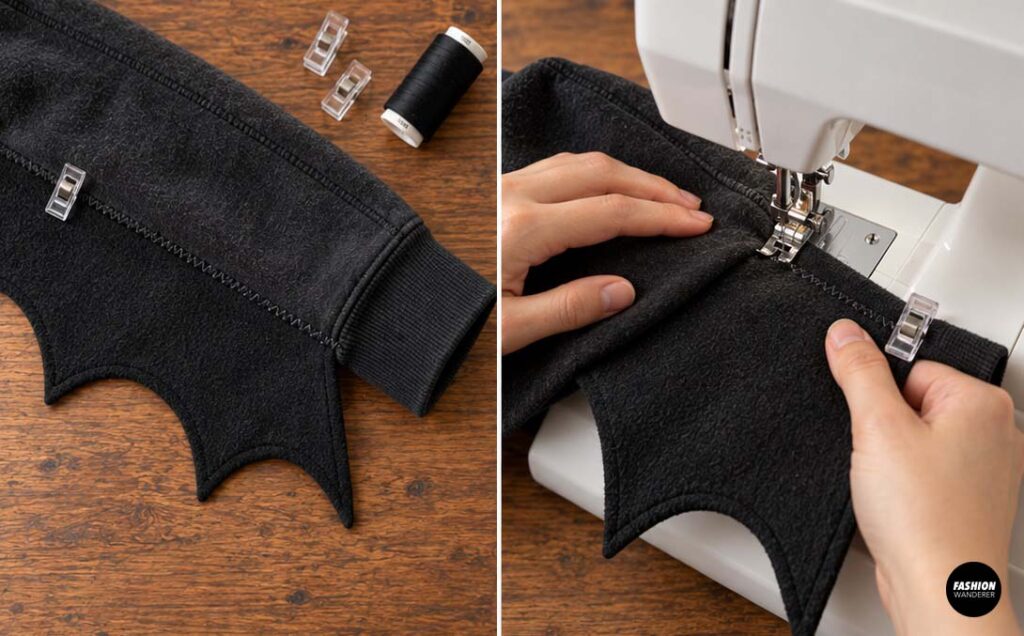
Turn the hoodie inside out again.
Starting near the wrist, sew the top edge of the wing to the underside of the sleeve.
Use a narrow zigzag stitch or stretch stitch if the hoodie is made from stretchy fabric.
Sew slowly and avoid stretching the sleeve as you stitch.
Stop before reaching the sleeve cuff so the cuff remains flexible and comfortable.
Backstitch securely at both ends.
Step 7: Attach the Wing to the Hoodie Side
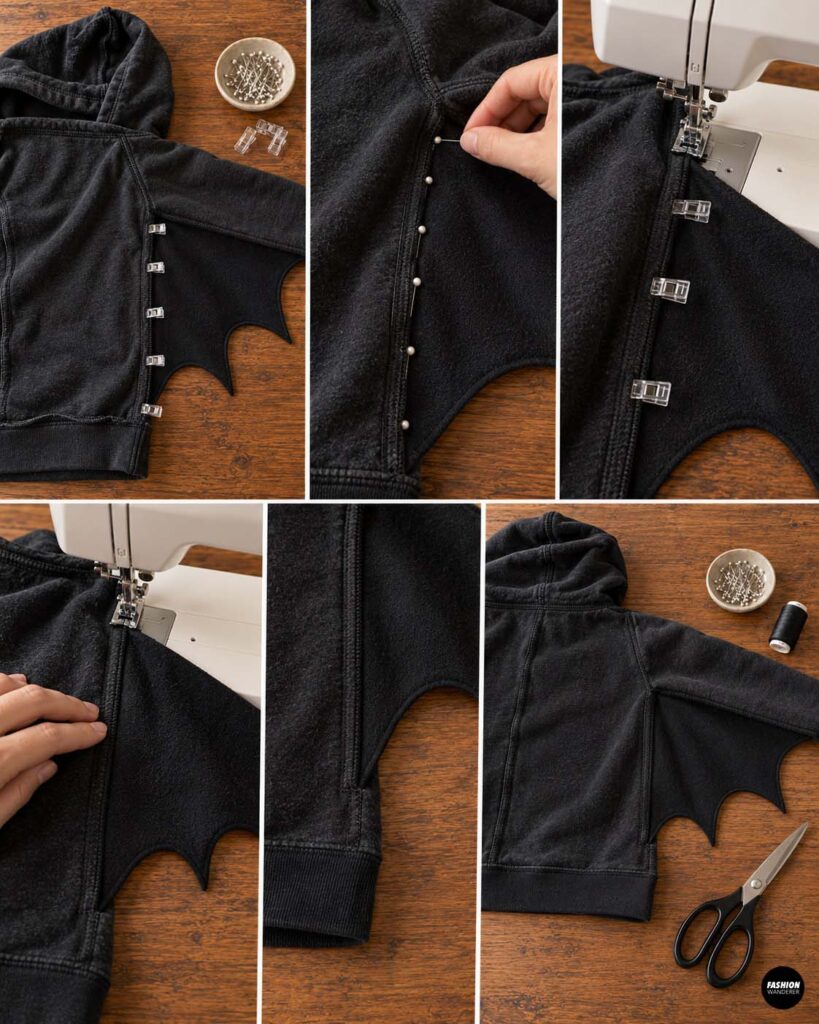
Next, pin the inner vertical edge of the wing along the side seam of the hoodie.
Sew the wing in place from the underarm area toward the bottom of the hoodie.
You do not need to sew all the way to the hem.
Stopping a few inches above the bottom helps the wing drape naturally.
Repeat Steps 5 through 7 for the second wing.
Step 8: Test the Bat Wings
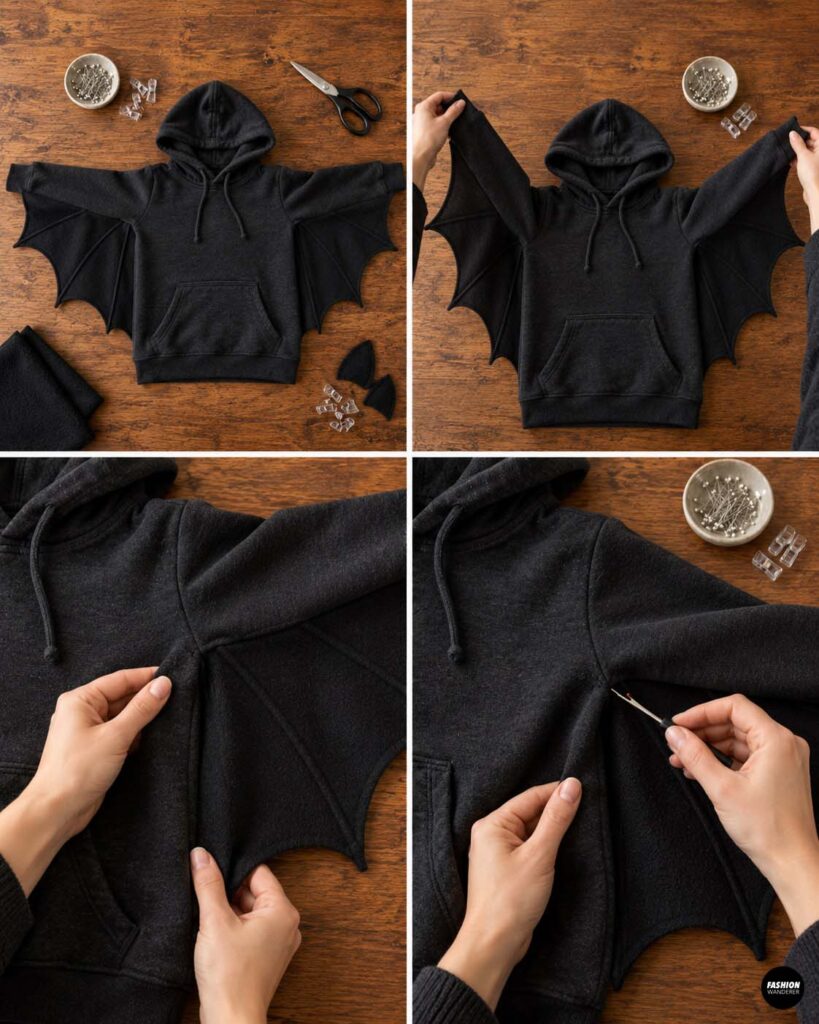
Turn the hoodie right side out and try it on.
Slowly raise both arms.
The wings should spread outward to create a dramatic bat silhouette.
Check that the wings do not pull too tightly across the sleeves or side seams.
If the fabric feels strained, remove a few stitches and reposition the wing slightly closer to the body.
Comfort is more important than making the wings perfectly stretched.
Step 9: Make Optional Bat Ears
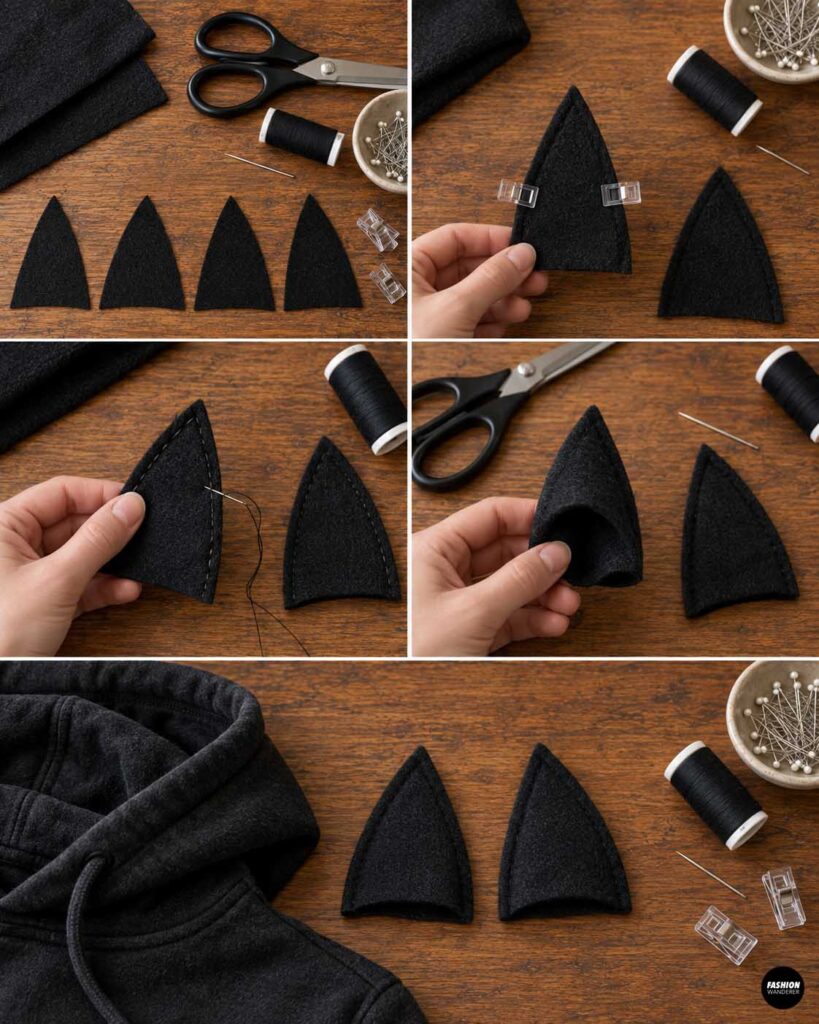
To make bat ears, cut four small triangle shapes from black felt.
Each triangle can be approximately 3 to 4 inches tall.
Place two triangles together and sew around the sides, leaving the bottom open.
Repeat for the second ear.
Turn them right side out if necessary.
You can also cut each ear from a single piece of stiff felt and skip sewing altogether.
Step 10: Attach the Bat Ears to the Hood
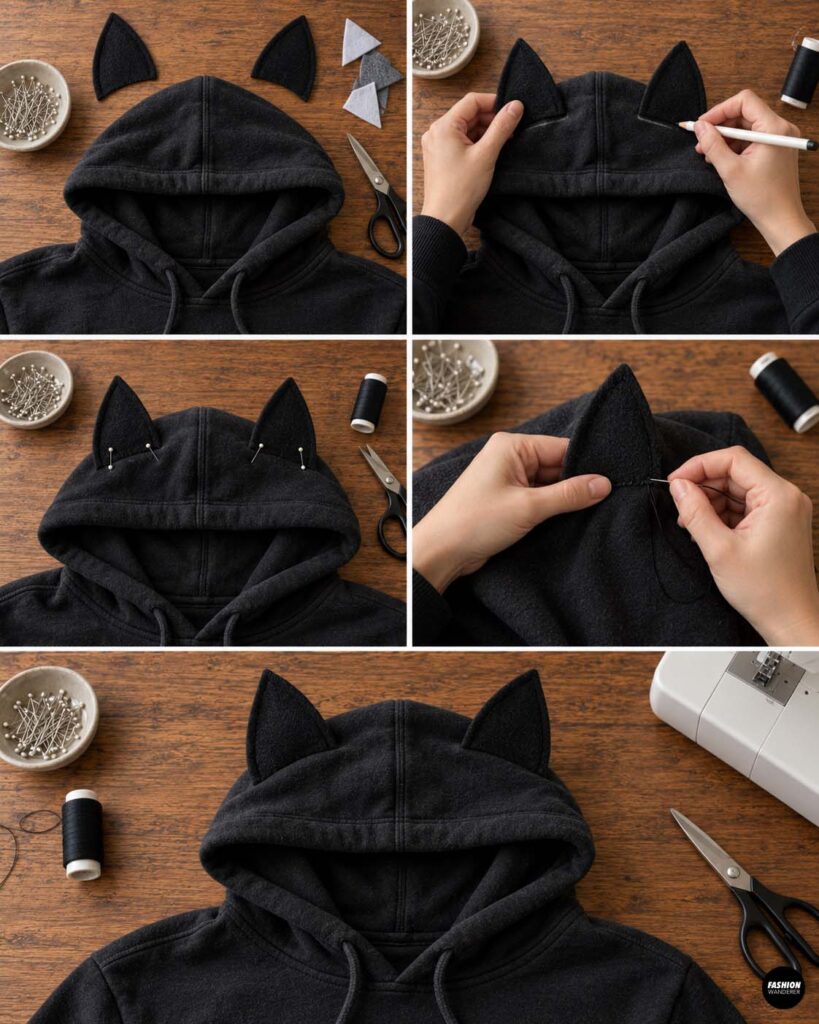
Put the hoodie on and lightly mark where you want the ears to sit.
Usually, they look best slightly toward the top sides of the hood rather than directly in the center.
Remove the hoodie.
Pin the ears in place and hand sew or machine stitch across the base of each ear.
Make several passes so they stay upright.
For an even quicker costume, fabric glue can be used, although stitching will usually be more durable.
Step 11: Add Optional Details
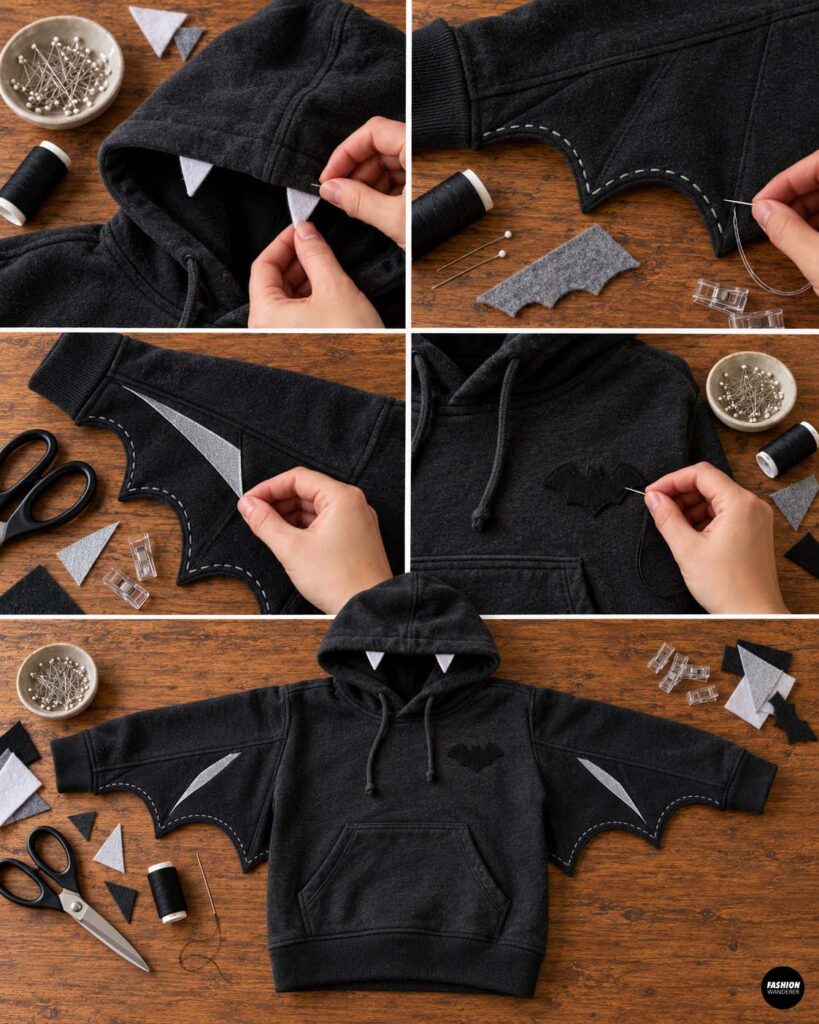
Your bat costume can be as simple or as detailed as you like.
Try adding small white felt fangs near the hood opening, gray stitching along the wing edges, reflective fabric accents, or a small felt bat symbol on the chest.
You can also add a few lines of topstitching from the sleeve toward the scalloped wing edge to imitate the structure of a real bat wing.
Keep embellishments lightweight so the hoodie remains comfortable.
Step 12: Give the Costume a Final Check
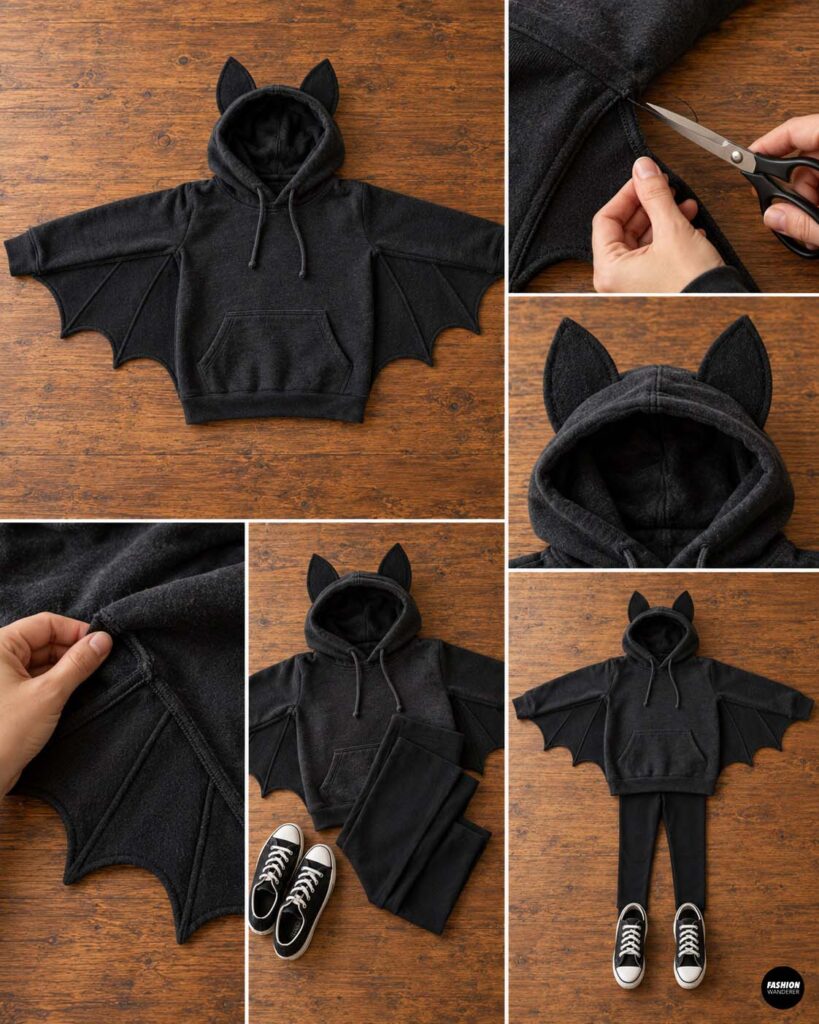
Trim loose threads and inspect the wing attachment points.
Raise and lower both arms several times to make sure the seams feel secure.
Check that the bat ears are firmly attached and that nothing scratches or pulls.
Pair the finished hoodie with black leggings, joggers, jeans, or sneakers.
Your 30-minute DIY bat hoodie costume is finished!
Easy No-Sew Bat Hoodie Option
If you do not have a sewing machine, you can still make this costume.
Cut the wings from felt and attach them using strong washable fabric glue. Apply a thin line of glue beneath the sleeve and along the side of the hoodie, then press the wing into place.
Allow the glue to dry completely before wearing the costume.
For a temporary version, safety pins can also work, but keep them positioned on the inside of the garment and away from areas that may rub against the skin.
Final Thoughts
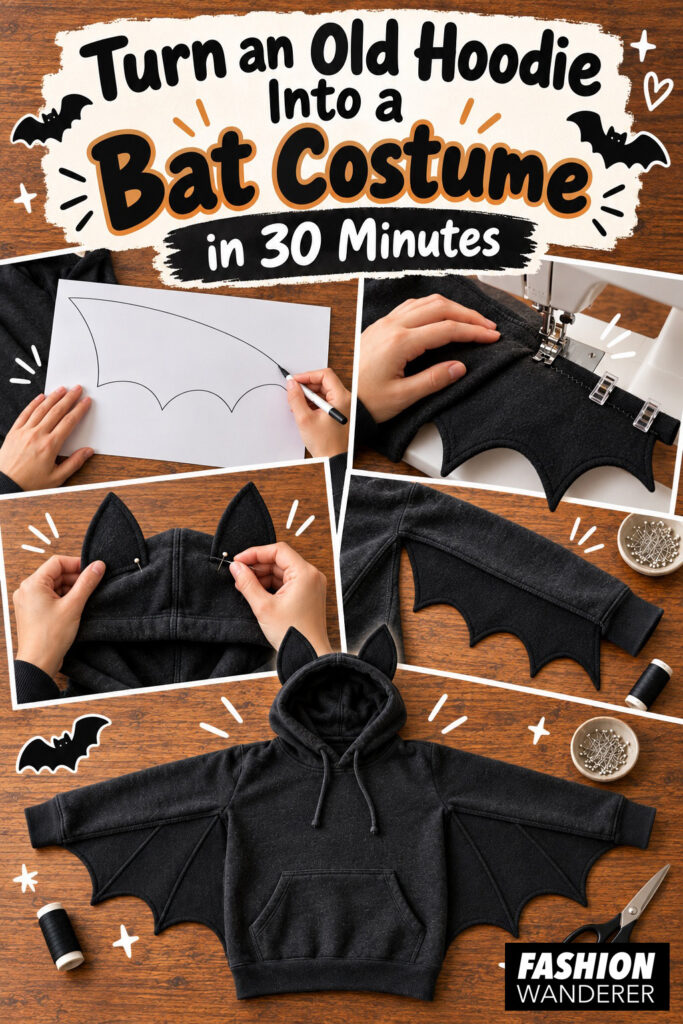
Turning an old hoodie into a bat costume is an easy way to create a budget-friendly DIY Halloween costume without buying an entirely new outfit. The simple wing construction makes this project beginner-friendly, and using felt or fleece eliminates much of the finishing work.
Once you understand the basic technique, you can use the same idea to create dragon wings, fairy wings, bird costumes, or other hooded character costumes.
Best of all, when Halloween is over, you have transformed a forgotten hoodie into something fun, reusable, and completely unique.