
Looking for a cozy crochet project that is quick, stylish, and beginner-friendly? These crochet fingerless gloves with ruffle cuffs are perfect for fall and winter. They keep your hands warm while leaving your fingers free for texting, typing, crafting, or holding a warm drink.
The soft ribbed texture gives the gloves a snug fit, while the ruffled wrist adds a feminine, romantic detail that makes the finished pair feel extra special.
This project is also a great stash-buster because you only need a small amount of yarn. Make these beginner October crochet projects in classic neutrals, soft pastels, rich autumn shades, or bold colors for a handmade accessory that works beautifully as a gift or craft-fair item.
In this step-by-step tutorial, you will learn how to crochet fingerless gloves, create a thumb opening, seam the glove, and add an easy crochet ruffle cuff.
Finished Size
This pattern makes an average adult women’s size.
Approximate finished measurements:
- Hand circumference: 7–8 inches
- Glove length before ruffle: 7 inches
- Ruffle depth: approximately 1½ inches
You can easily make the gloves larger or smaller by adding or removing rows before seaming.
Materials You Will Need
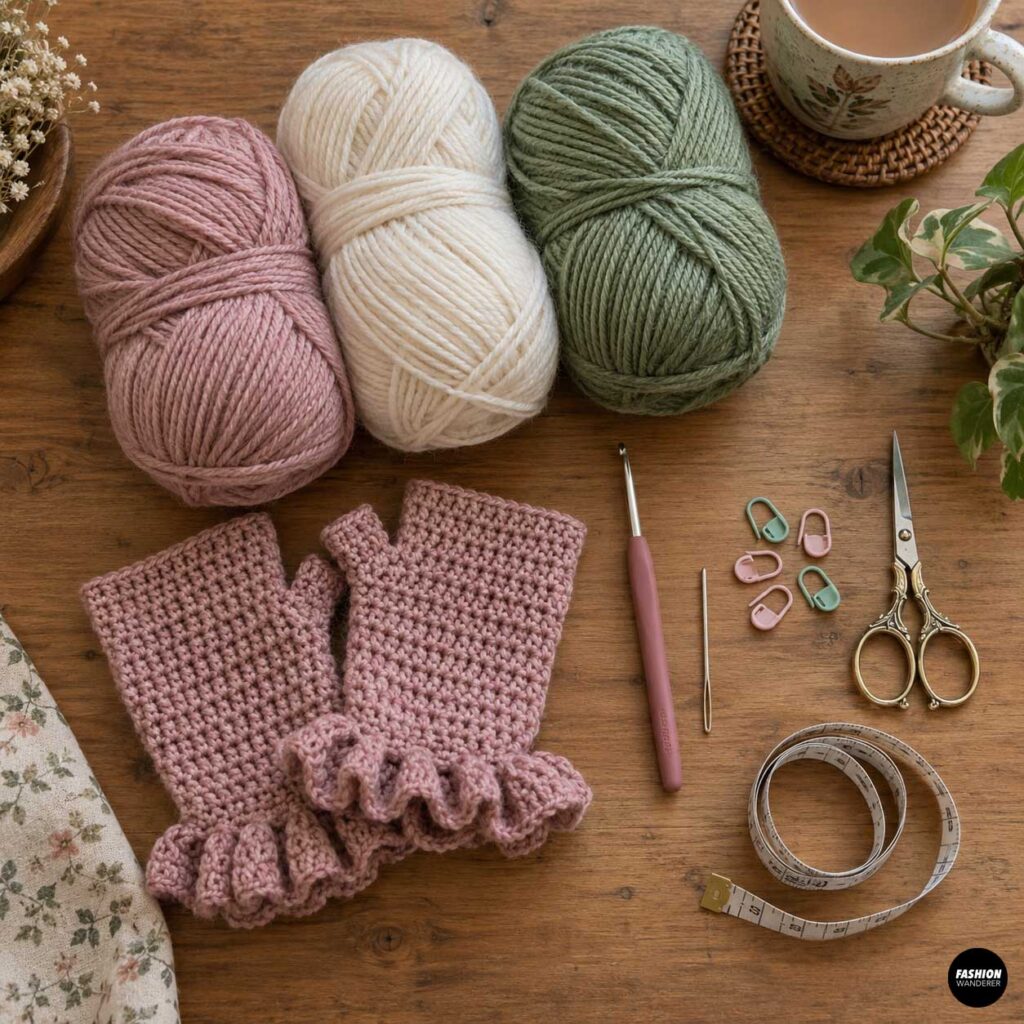
- 100–130 yards Category 4 worsted-weight yarn
- 4.5 mm crochet hook
- Yarn needle
- Scissors
- Stitch markers
- Measuring tape
Soft acrylic, wool blend, or merino yarn works well.
Avoid yarn that is extremely stiff because a softer yarn will create a more comfortable glove and a prettier ruffle.
Crochet Abbreviations
- ch = chain
- sc = single crochet
- hdc = half double crochet
- dc = double crochet
- sl st = slip stitch
- BLO = back loop only
- st = stitch
- sts = stitches
The turning chain does not count as a stitch unless otherwise noted.
Gauge
Approximately:
15 half double crochet stitches x 11 rows = 4 inches
Gauge does not need to be absolutely perfect for this project, but checking your measurement will help ensure the gloves fit comfortably.
DIY Fingerless Gloves with Ruffle Cuffs – Free Crochet Pattern
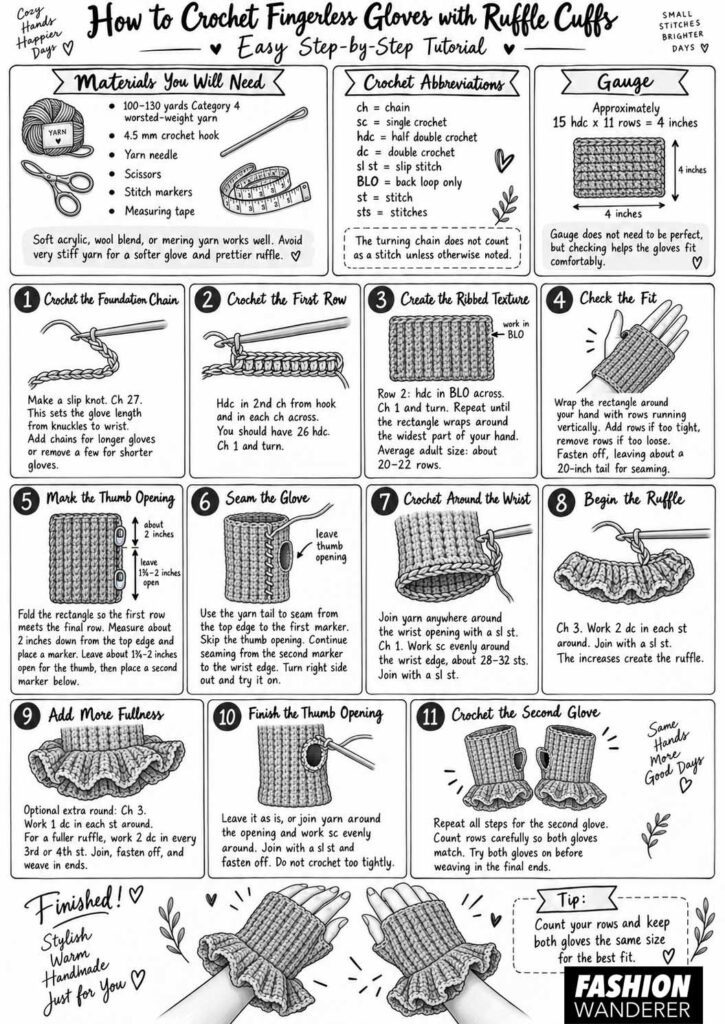
Step 1: Crochet the Foundation Chain
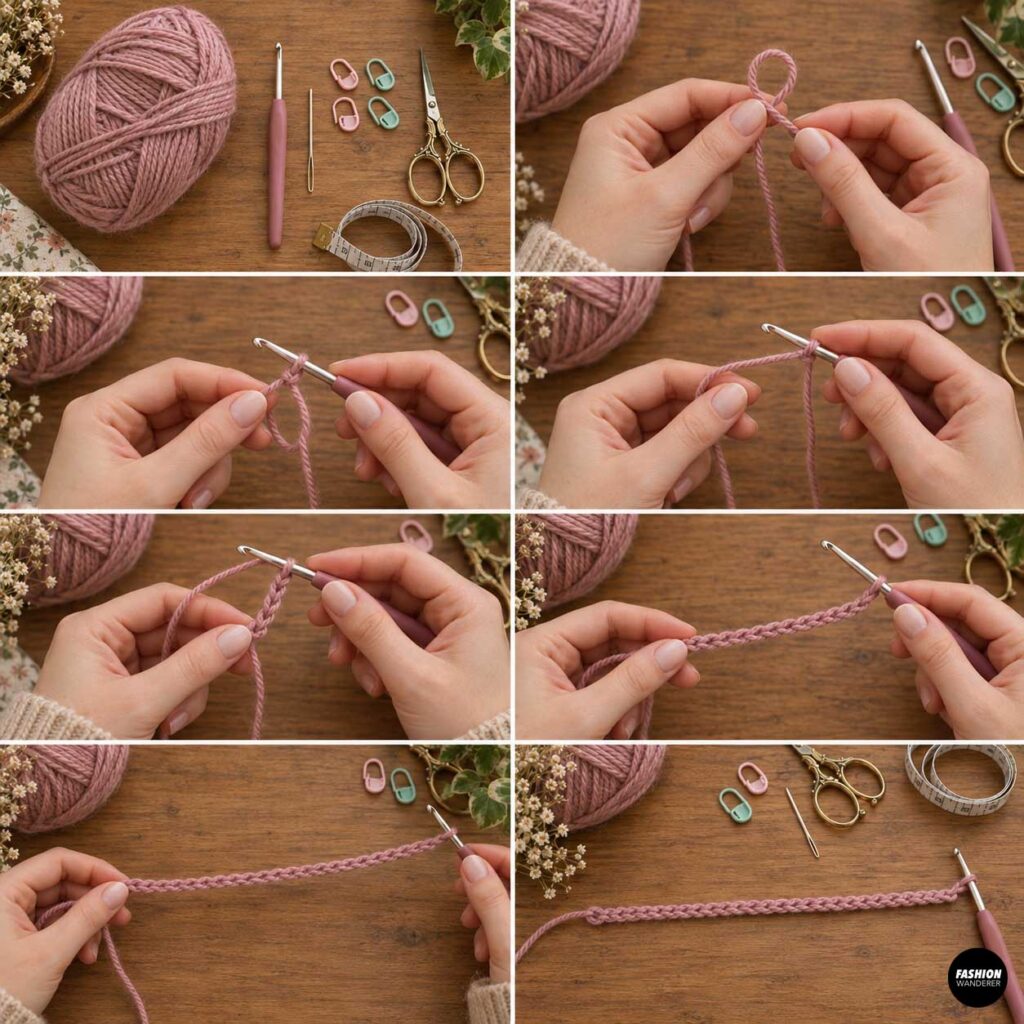
Start by making a slip knot.
Chain 27.
This chain determines the length of the glove from the knuckles down toward the wrist.
If you want longer gloves, add more chains.
For shorter gloves, remove a few chains.
Step 2: Crochet the First Row
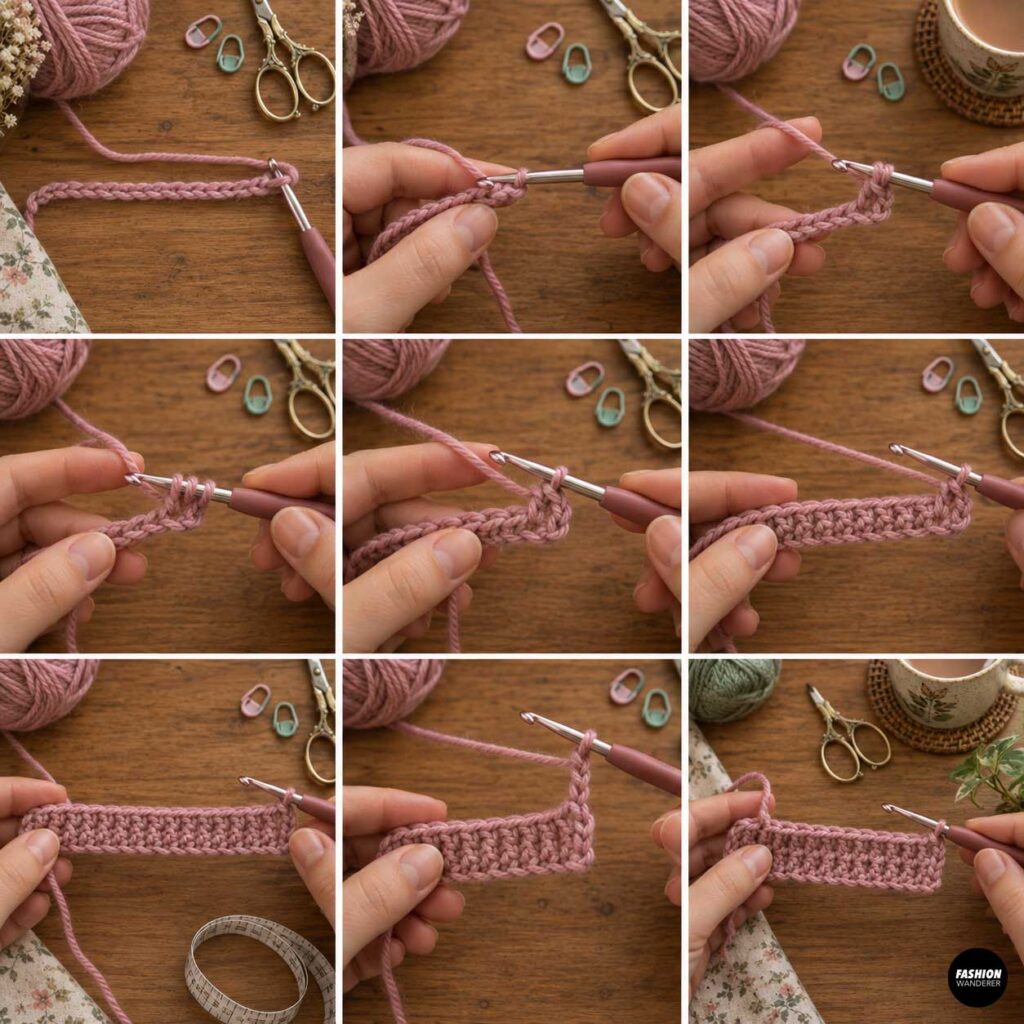
Half double crochet into the second chain from the hook.
Continue working one half double crochet into each chain across.
You should have:
26 hdc
Chain 1 and turn.
Step 3: Create the Ribbed Texture
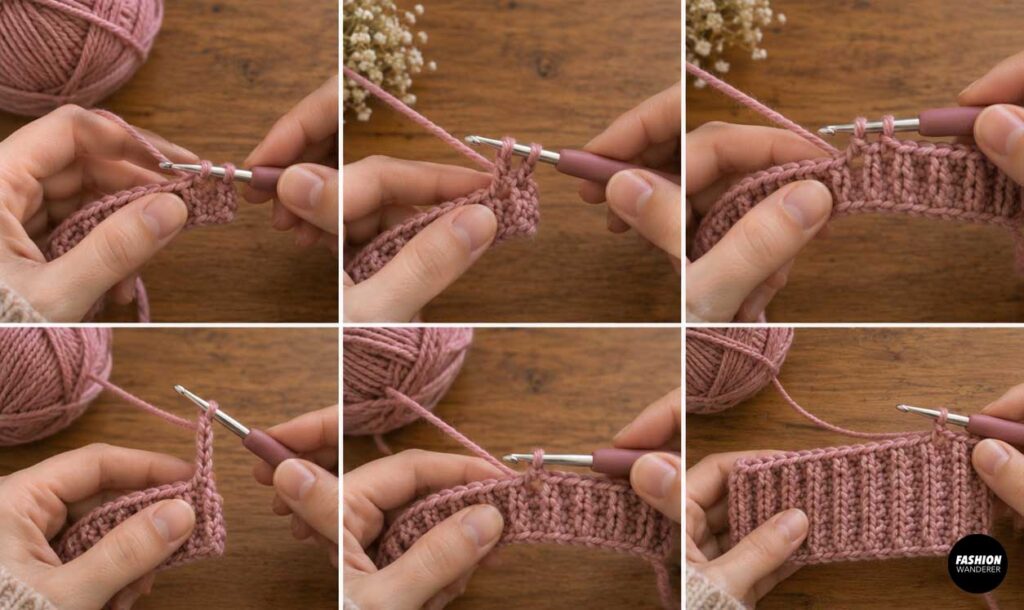
For Row 2, work one half double crochet into the back loop only of each stitch across.
Working into the back loop creates a soft ribbed texture that stretches comfortably around the hand.
Chain 1 and turn.
Repeat this row until your rectangle wraps comfortably around the widest part of your hand.
For an average adult size, crochet approximately 20–22 rows.
Do not make the rectangle too loose. The ribbing will stretch slightly when worn.
Step 4: Check the Fit
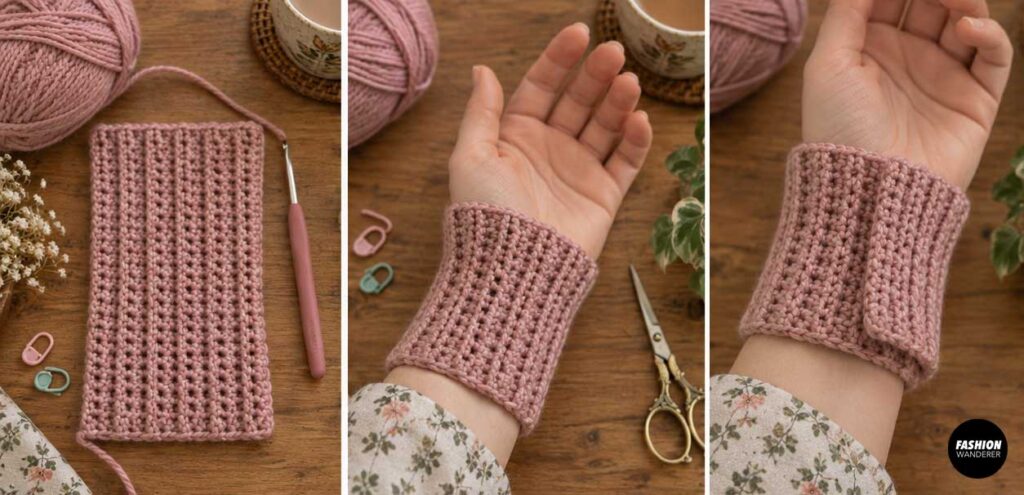
Wrap the crochet rectangle around your hand with the rows running vertically.
The two long edges should meet comfortably without needing to stretch excessively.
If the glove feels too tight, add one or two more rows.
If it feels too loose, remove a row or two.
Once you are happy with the fit, fasten off, leaving approximately a 20-inch yarn tail for seaming.
Step 5: Mark the Thumb Opening
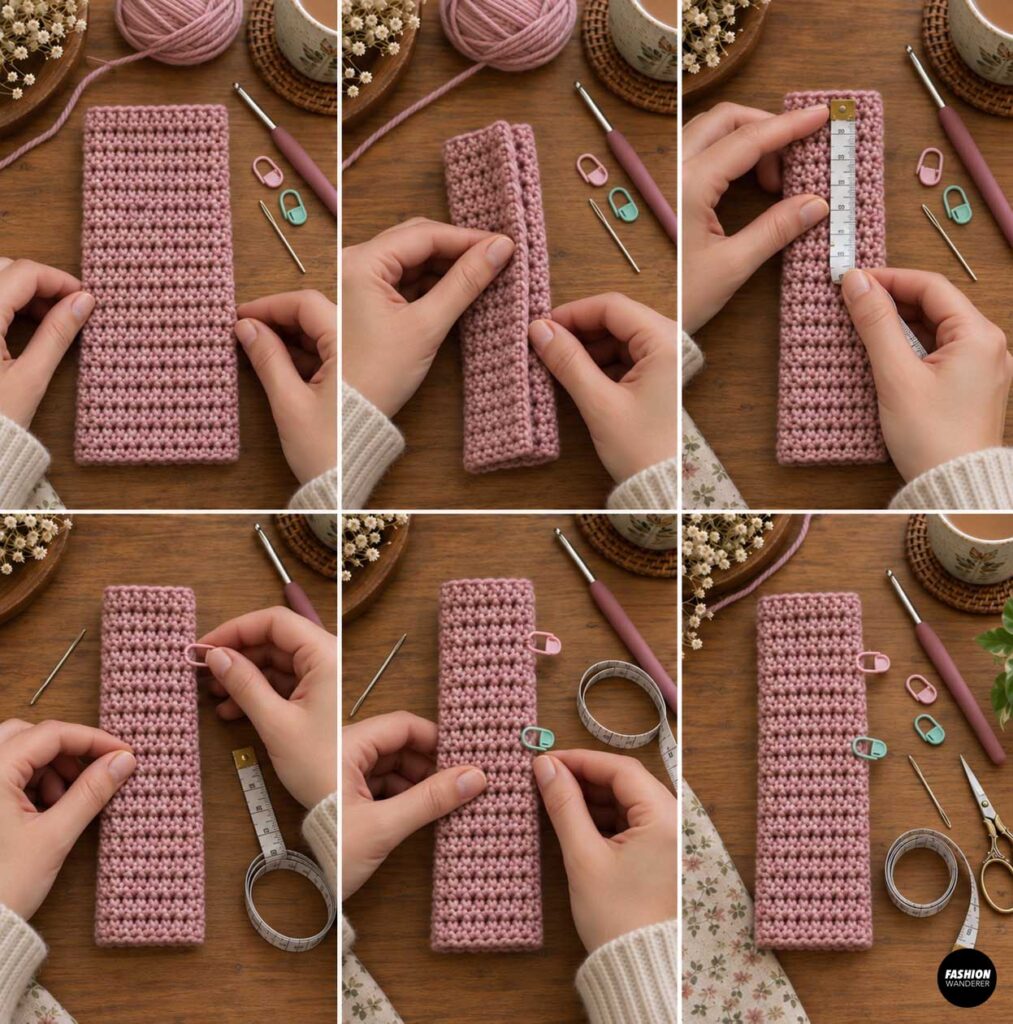
Fold the rectangle in half so the first row meets the final row.
The fold should run along the long edge of the glove.
Starting at the top edge, measure approximately 2 inches downward and place a stitch marker.
Leave approximately 1¾–2 inches open for the thumb.
Place another marker below the thumb opening.
The exact position can be adjusted depending on your hand size.
Step 6: Seam the Glove
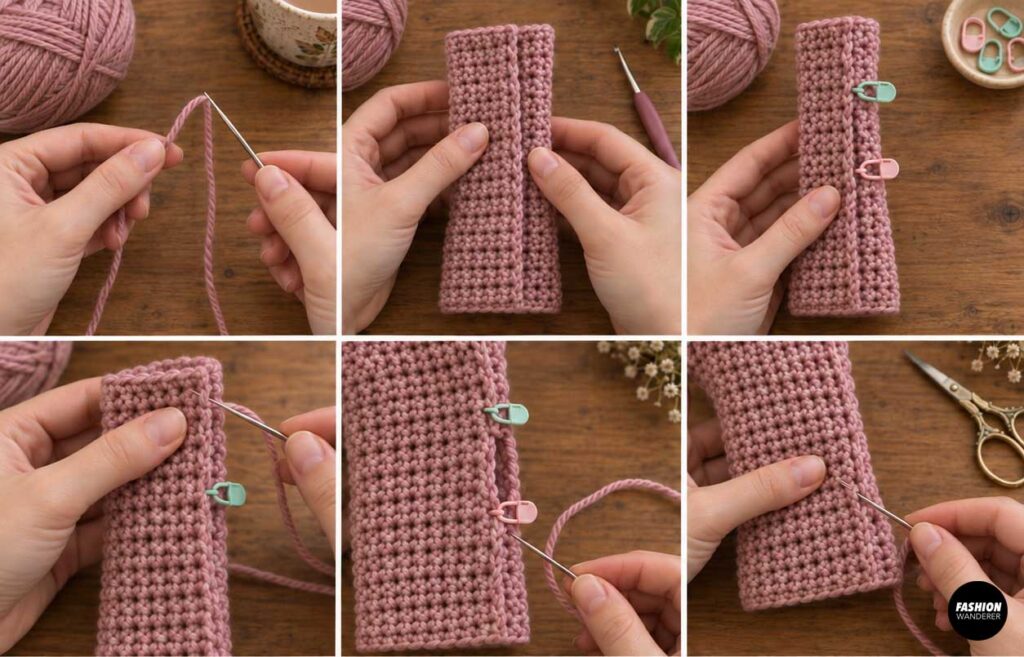
Thread the long yarn tail onto a yarn needle.
Starting at the top edge, whipstitch or mattress stitch the two edges together until you reach the first thumb marker.
Secure the yarn.
Skip the section between the two markers to create the thumb opening.
Continue seaming from the second marker down to the wrist edge.
Fasten securely and weave in the end.
Turn the glove right side out.
Try it on to make sure the thumb opening feels comfortable.
Step 7: Crochet Around the Wrist
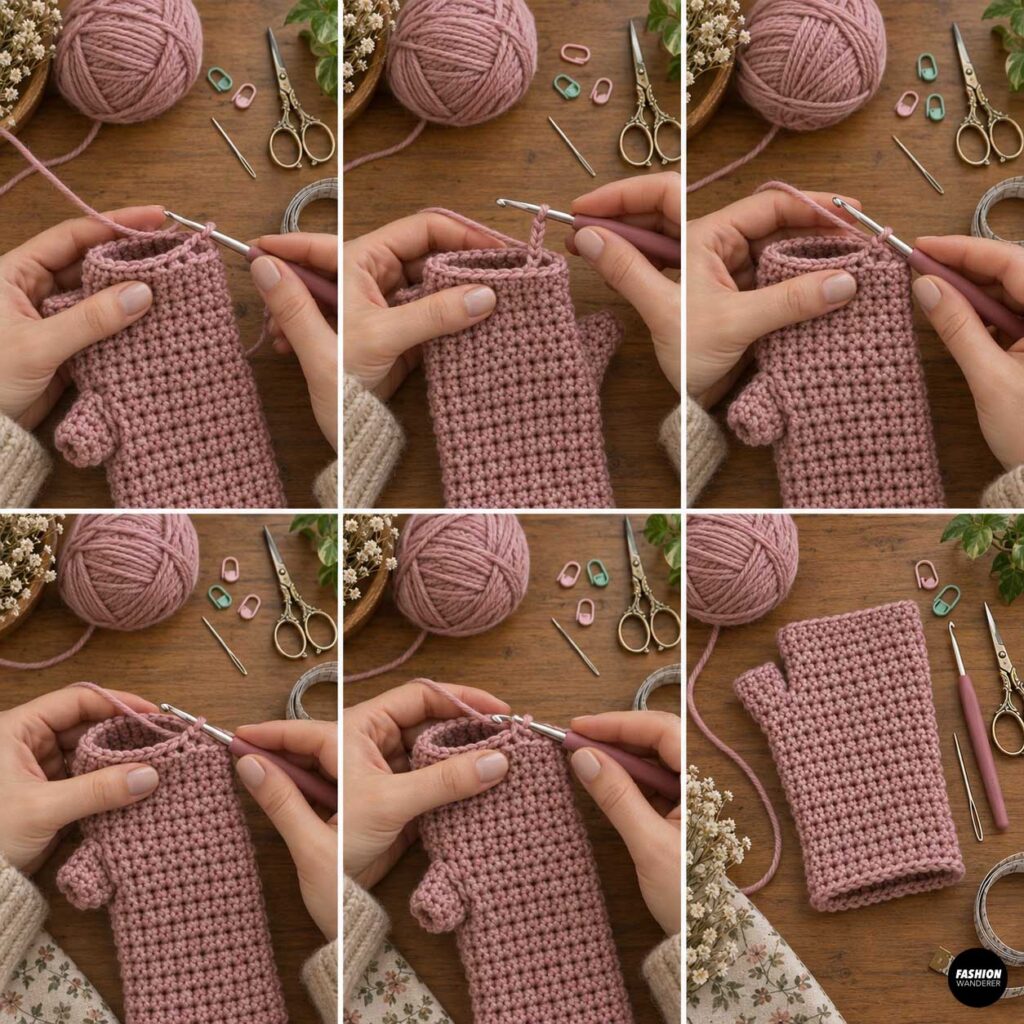
Now it is time to create the decorative ruffle cuff.
Join your yarn with a slip stitch anywhere around the wrist opening.
Chain 1.
Work single crochet evenly around the entire wrist edge.
Aim for approximately 28–32 stitches, depending on your glove size.
Join to the first single crochet with a slip stitch.
This row creates a neat foundation for the ruffle.
Step 8: Begin the Ruffle
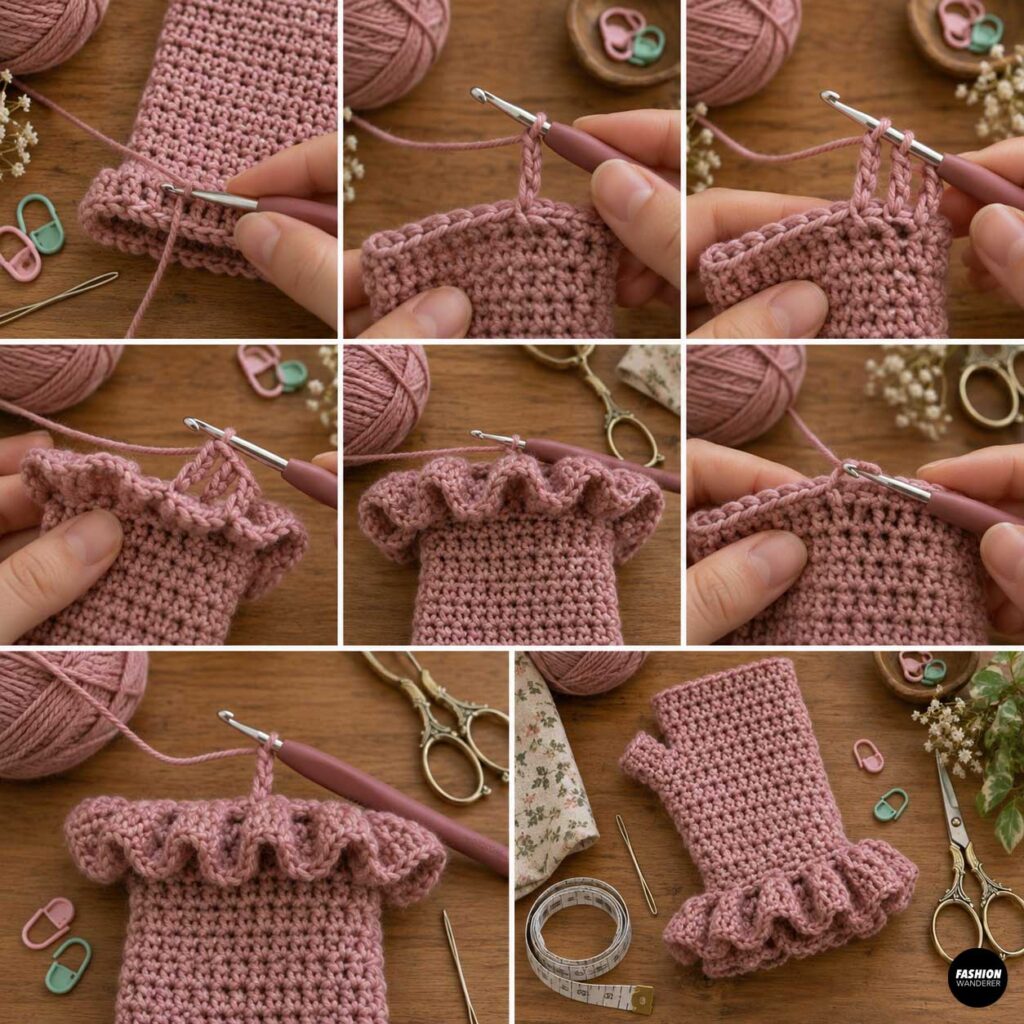
Chain 3.
Work 2 double crochet stitches into each stitch around.
Increasing in every stitch causes the fabric to flare outward and creates the ruffle.
Continue around the entire cuff.
Join to the beginning chain with a slip stitch.
You should already see the ruffle beginning to form.
Step 9: Add More Fullness
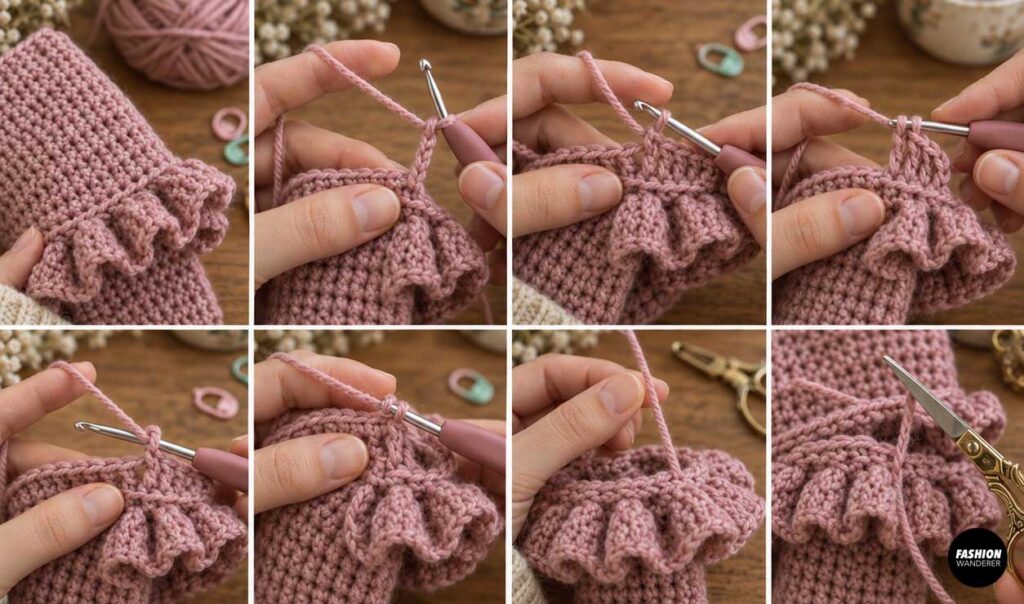
For an even softer, fuller ruffle, crochet one additional round.
Chain 3.
Work one double crochet into each stitch around.
For a dramatic ruffle, work 2 double crochets into every third or fourth stitch.
Join with a slip stitch.
Fasten off and weave in the yarn ends.
If you prefer a smaller ruffle, simply stop after the first ruffle round.
Step 10: Finish the Thumb Opening
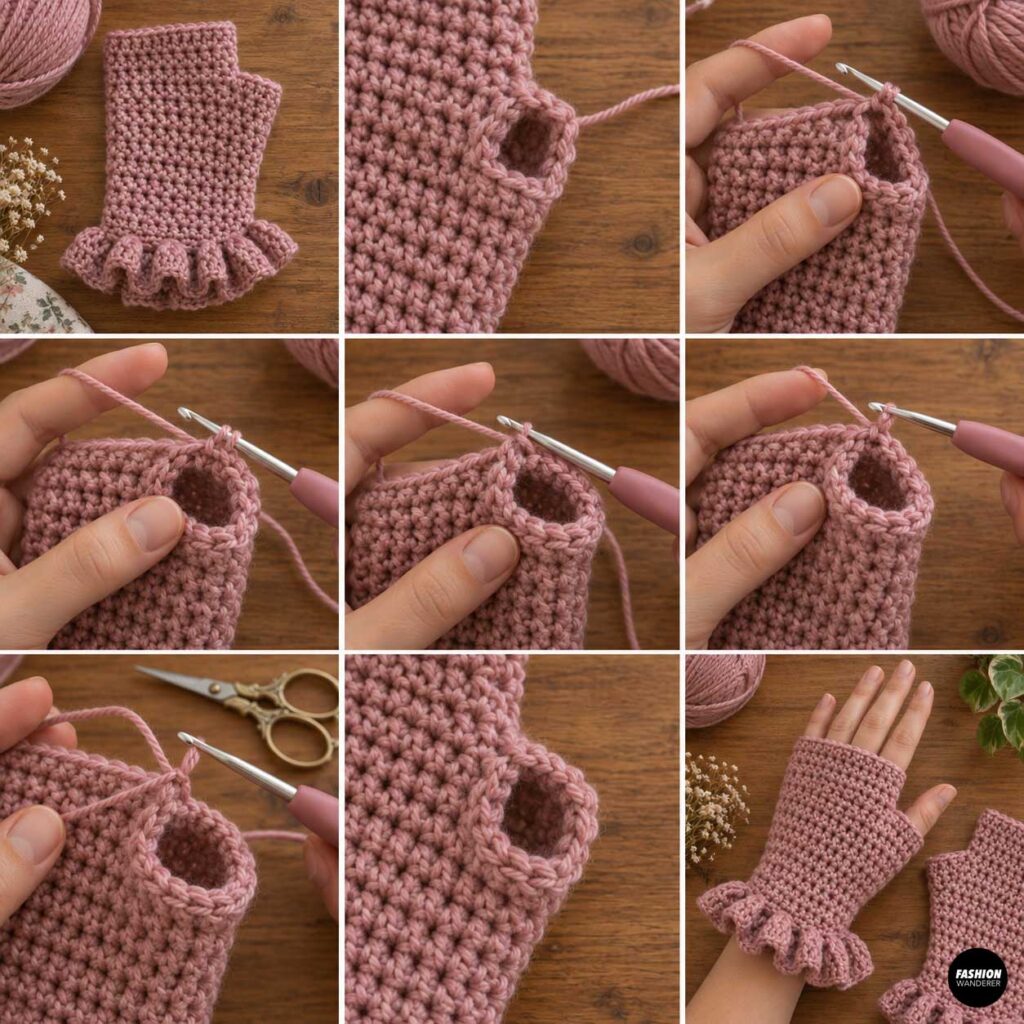
You can leave the thumb opening unfinished, especially if the stitches already look neat.
For a more polished edge, join the yarn around the thumb opening.
Work single crochet evenly around.
Join with a slip stitch and fasten off.
Be careful not to crochet too tightly because the thumb opening still needs to stretch comfortably.
Step 11: Crochet the Second Glove
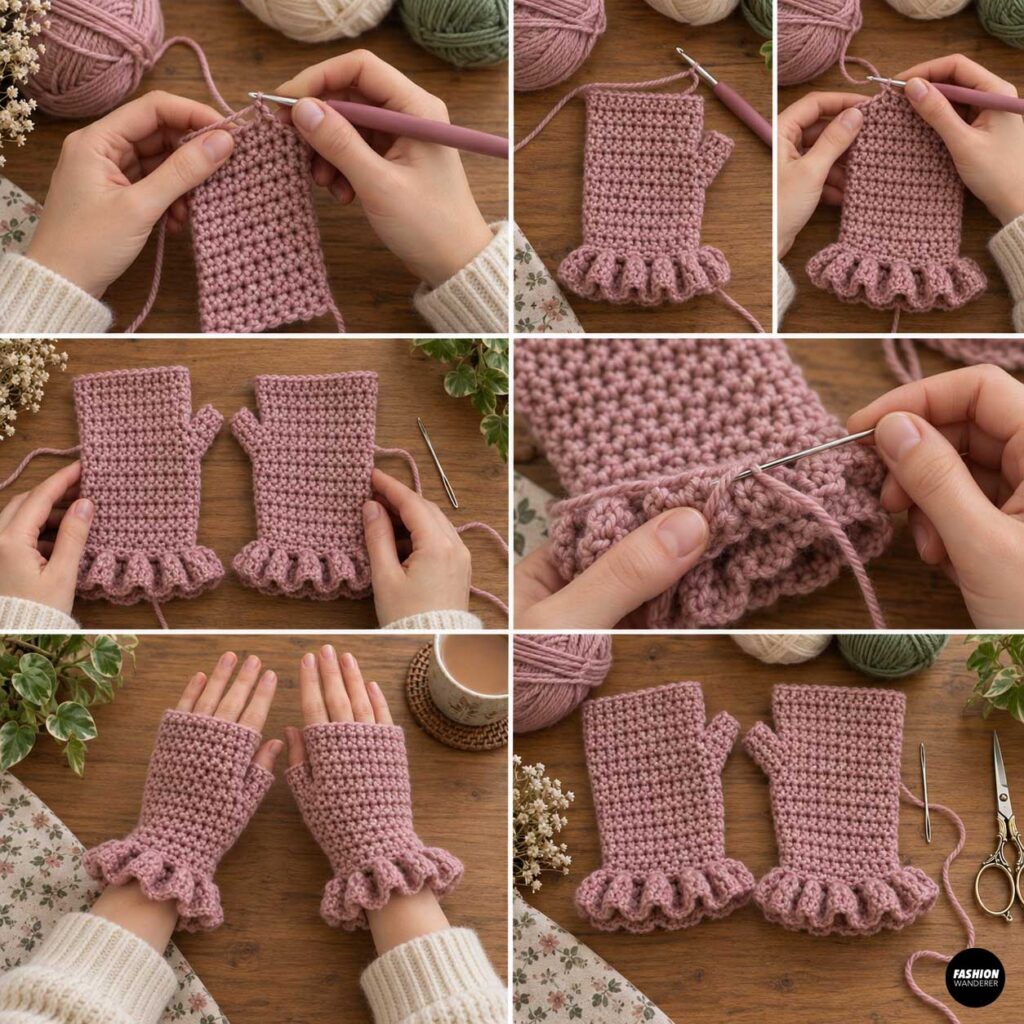
Repeat all the previous steps to make the second glove.
Count your rows carefully so both gloves are the same width.
Try both gloves on before weaving in the final ends to make sure they fit consistently.
How to Customize Your Crochet Fingerless Gloves
Once you understand the basic pattern, there are lots of ways to make these gloves your own.
Try adding:
- A contrasting-color ruffle
- Tiny crochet bows
- Pearl or wooden buttons
- Small embroidered flowers
- Scalloped edging
- Crochet picots
- Striped yarn
- Hand-dyed yarn
- Metallic thread accents
For a romantic cottagecore look, try cream, dusty pink, sage green, burgundy, or soft brown.
For a more modern style, use charcoal, black, oatmeal, or deep navy.
How to Adjust the Size
To make smaller gloves, crochet fewer rows before seaming.
For larger gloves, simply add more rows.
To make the gloves longer, add more stitches to the starting chain.
For shorter wrist warmers, reduce the starting chain.
Always wrap the crochet rectangle around your hand before seaming. This is the easiest way to customize the fit.
Tips for Better Ruffle Cuffs
If your ruffle looks too flat, add more increases.
If it looks extremely wavy or bulky, use fewer increases.
Keep your tension relaxed while working the ruffle. Tight stitches can prevent the cuff from draping properly.
You can also switch to a hook that is 0.5 mm larger when crocheting the ruffle for an even softer finish.
Final Thoughts
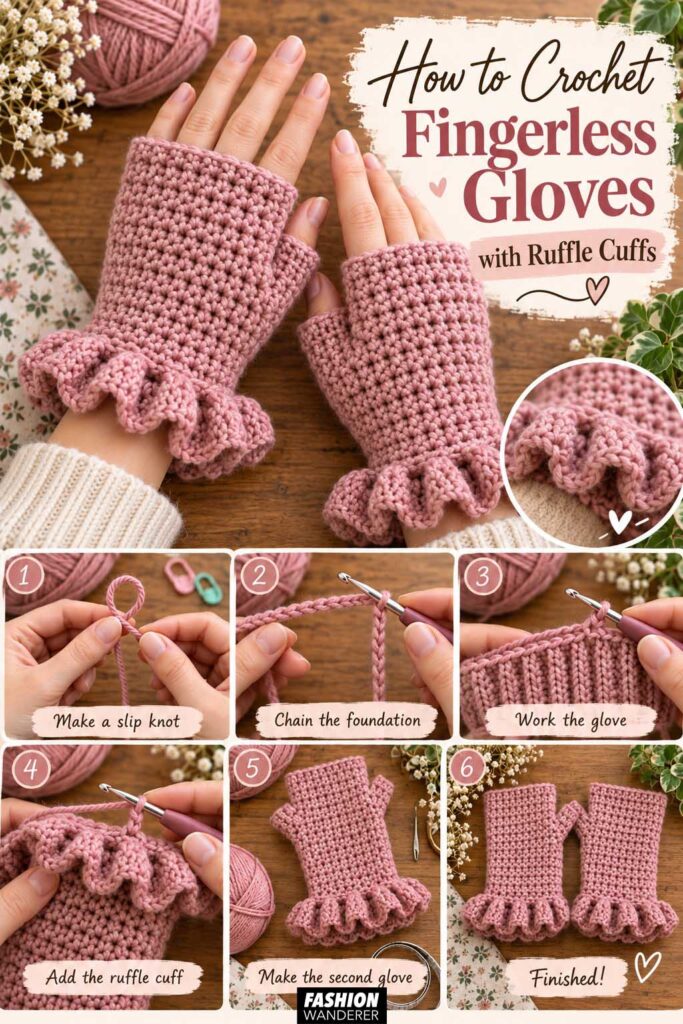
Learning how to crochet fingerless gloves with ruffle cuffs is a fun way to create a practical accessory with a handmade, feminine detail.
The simple ribbed rectangle construction makes this project approachable for beginners, while the thumb opening and ruffled wrist give you a chance to practice a few useful crochet techniques.
Once you have made one pair, experiment with different yarn colors, cuff sizes, embellishments, and glove lengths.
These easy crochet fingerless gloves make wonderful fall accessories, handmade holiday gifts, craft-fair products, or quick weekend projects when you want something cozy without committing to a large crochet pattern.
Make a pair for yourself, then use your leftover yarn to make another set for someone special.