
Looking for a fun crochet accessory to make this fall? This crochet cow print shoulder bag is a cute, trendy project that combines a simple bag shape with bold black-and-white colorwork. It is practical enough for everyday use but playful enough to make a statement with sweaters, denim, boots, and other cozy fall outfits.
The best part is that this easy fall crochet pattern uses mostly basic stitches, making it approachable for confident beginners who are ready to practice changing yarn colors.
Instead of following a complicated cow-print chart, you will create irregular black patches as you crochet. Because real cow spots are uneven, the design is very forgiving—there is no need for every row or patch to look perfect.
This tutorial creates a medium-sized shoulder bag with a rectangular body and a comfortable crocheted strap.
Finished Size
Approximately:
11 inches wide x 8 inches tall
Strap:
Approximately 24 to 28 inches long, depending on your preferred fit.
You can easily make the bag larger or smaller by changing the number of starting chains and rows.
Materials You Will Need
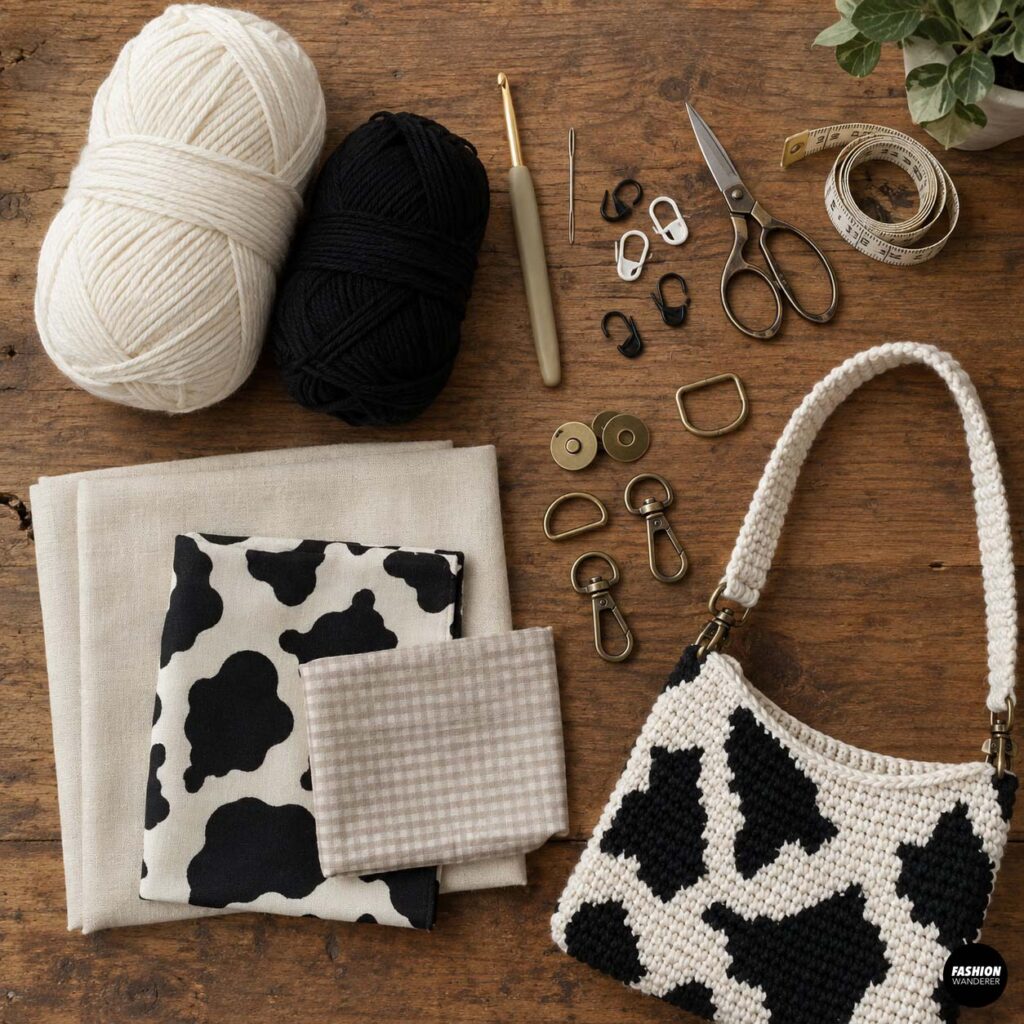
- Category 4 worsted-weight cotton or cotton-blend yarn
- Approximately 250 yards white or cream yarn
- Approximately 75 yards black yarn
- 5 mm crochet hook
- Yarn needle
- Scissors
- Stitch markers
- Measuring tape
- Optional magnetic snap
- Optional fabric lining
- Optional small inner pocket
- Optional removable bag strap hardware
Cotton yarn works especially well because it creates a sturdy bag with good stitch definition and less stretch than many acrylic yarns.
Crochet Abbreviations
This pattern uses US crochet terminology.
- ch – chain
- sc – single crochet
- sl st – slip stitch
- st – stitch
- sts – stitches
- RS – right side
- WS – wrong side
Gauge
Approximately:
14 single crochet stitches x 15 rows = 4 inches
Gauge does not need to be exact for this project, but keeping your tension consistent will help both bag panels match.
DIY Cow Print Shoulder Bag – Free Crochet Pattern
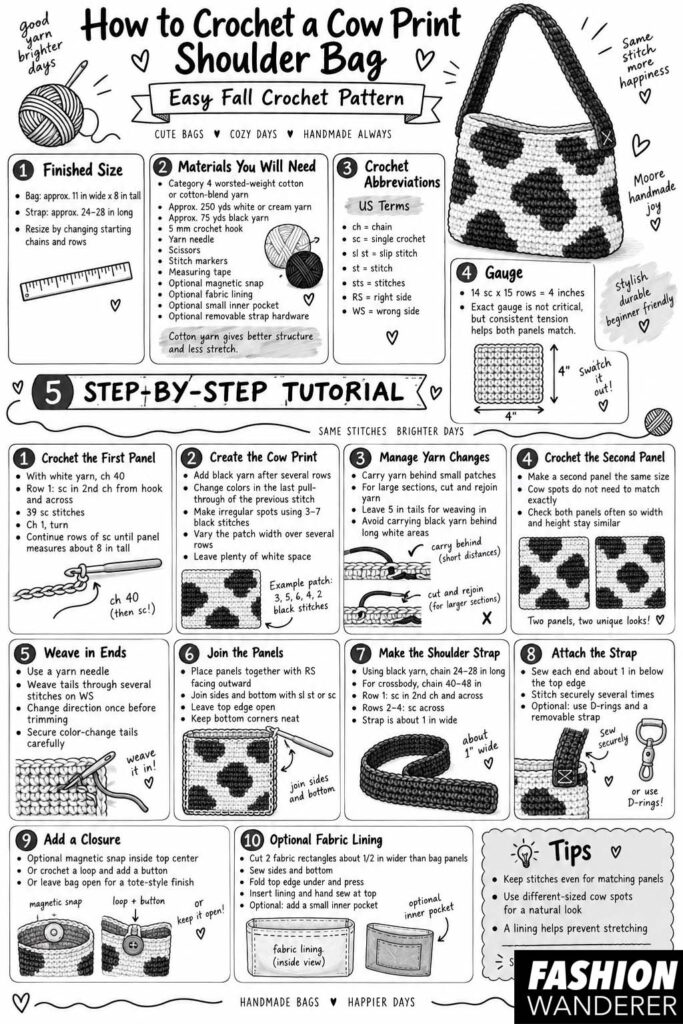
Step 1: Crochet the First Bag Panel
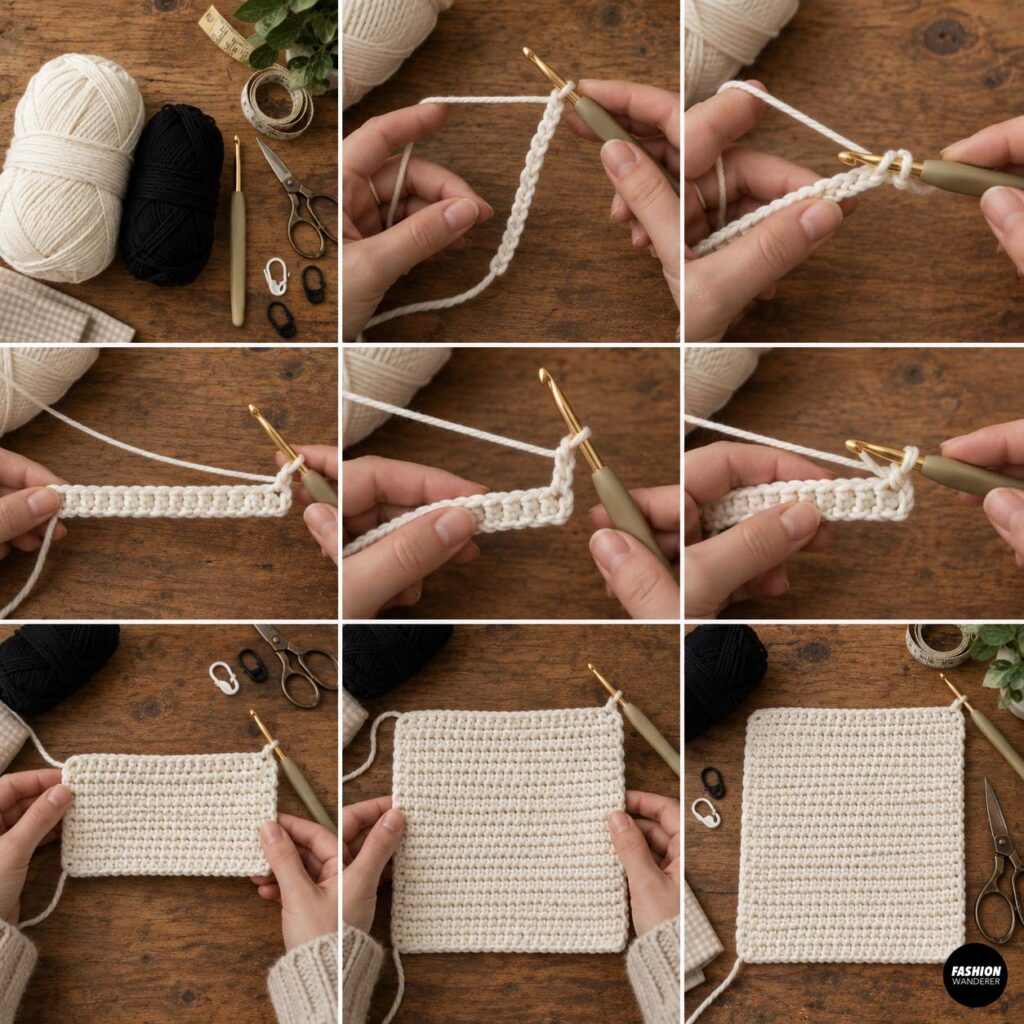
Using white or cream yarn, chain 40.
Row 1: Single crochet into the second chain from the hook and in every chain across.
You should have 39 single crochet stitches.
Chain 1 and turn.
Continue working one single crochet into each stitch across.
Keep crocheting in rows until the panel measures approximately 8 inches tall.
Do not worry about adding the cow print yet if you want to practice the basic bag shape first. However, for the finished design, begin introducing black yarn after several rows.
Step 2: Create the Cow Print Pattern
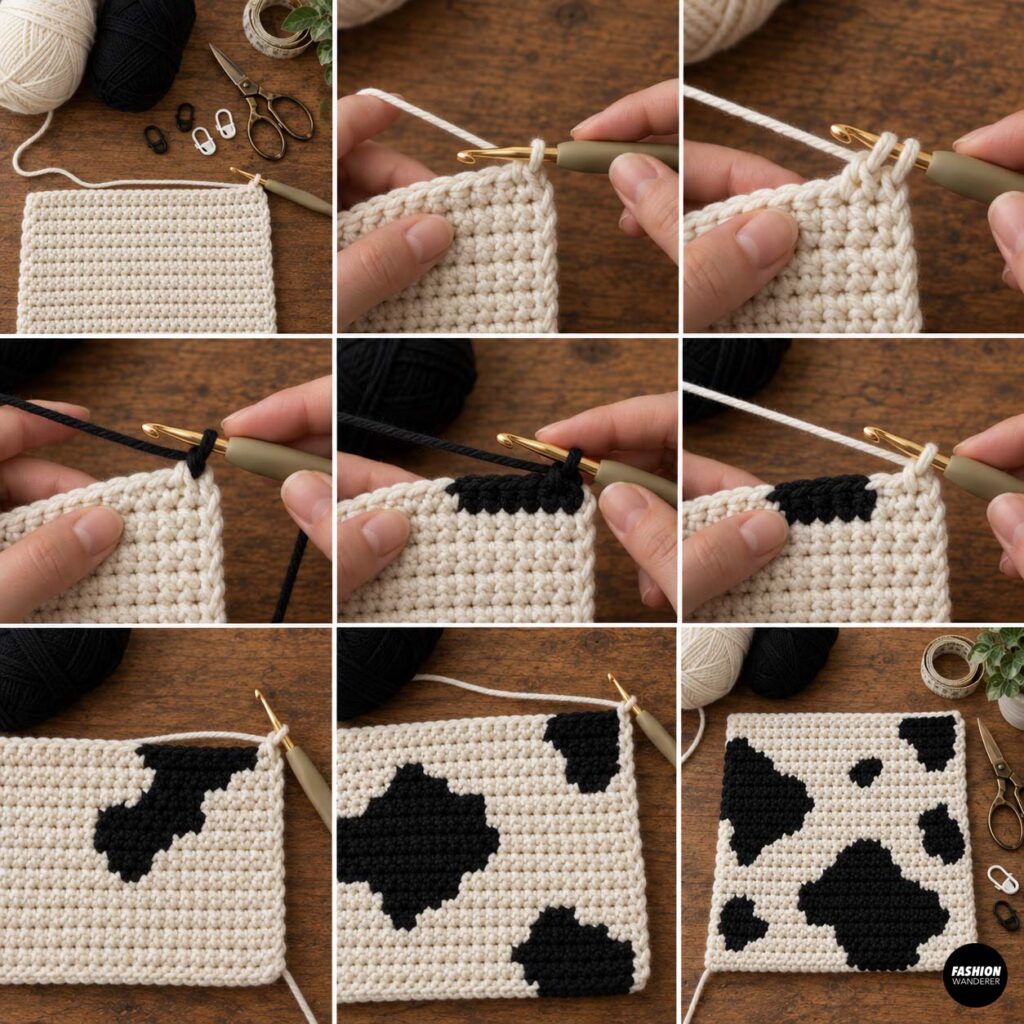
The easiest way to crochet cow spots is by using simple color changes rather than following a strict chart.
Begin a row with white yarn.
Crochet several white stitches, then change to black yarn.
To change colors cleanly, begin the final white stitch as usual but stop before pulling through the last two loops. Drop the white yarn, pick up the black yarn, and pull the black yarn through the remaining loops.
Continue crocheting with black for approximately 3 to 7 stitches.
Switch back to white using the same method.
On the next row, make the black patch slightly wider or narrower.
For example:
- Row 1 of patch: 3 black stitches
- Row 2: 5 black stitches
- Row 3: 6 black stitches
- Row 4: 4 black stitches
- Row 5: 2 black stitches
This creates an irregular organic-looking spot.
Add several black patches across the panel, leaving plenty of white space between them.
Avoid making every patch the same size. Cow print looks best when some spots are small and others are larger.
Step 3: Manage the Yarn During Color Changes
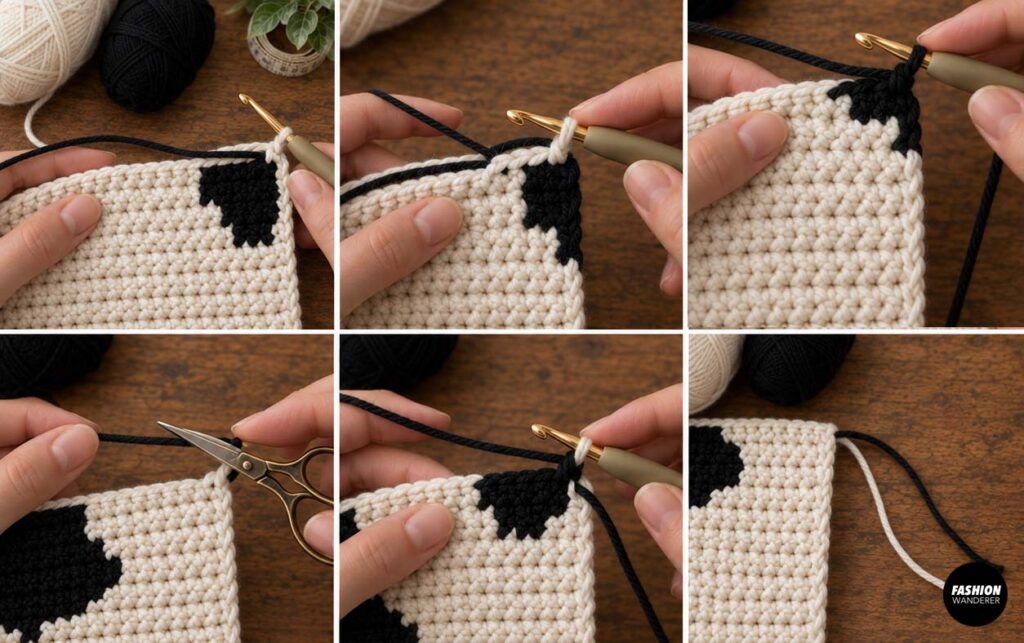
For small patches, you can carry the unused yarn along the back of the work.
Crochet over the unused strand so it stays hidden inside the stitches.
For larger sections, cut the yarn and join a new strand when needed.
If you carry black yarn behind a large white area, it may show through, so cutting and rejoining can produce a cleaner finish.
Leave yarn tails approximately 5 inches long so they are easy to weave in later.
Step 4: Crochet the Second Panel
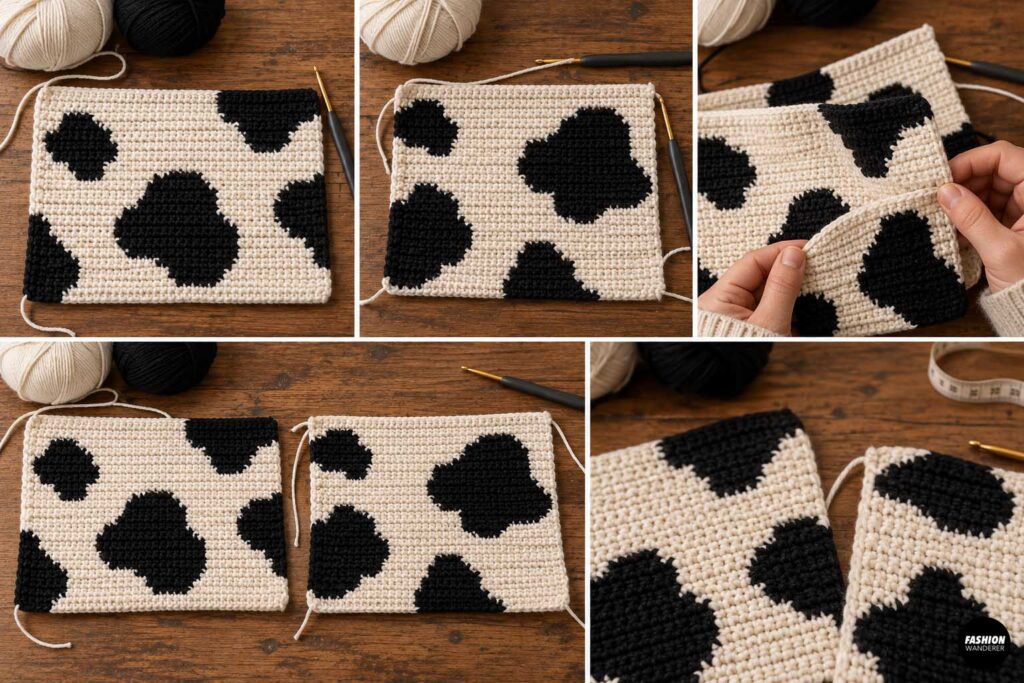
Make a second panel exactly the same size.
You can create a completely different cow-print layout rather than matching the first side.
In fact, slightly different front and back designs make the finished bag look more natural and handmade.
Place the finished panels next to each other occasionally to make sure they remain approximately the same width and height.
Step 5: Weave in the Yarn Ends
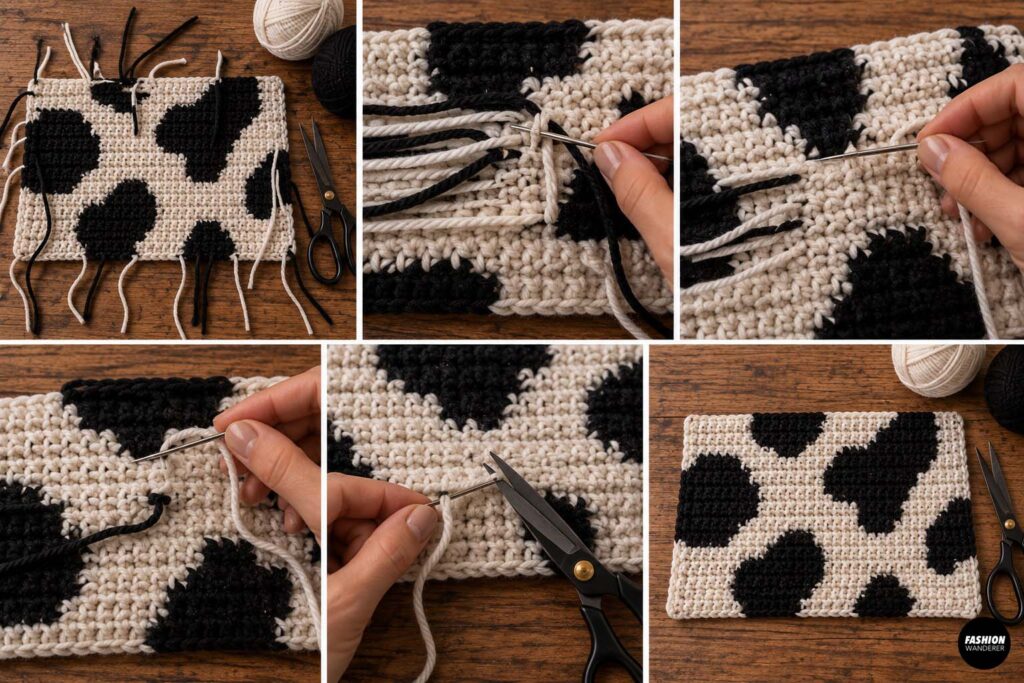
Before assembling the bag, weave in all yarn tails.
Thread each tail onto a yarn needle and weave it back and forth through several stitches on the wrong side.
Change direction at least once before trimming the excess yarn.
Taking time to secure your color-change tails is especially important on a bag because it will receive more handling than a decorative crochet project.
Step 6: Join the Bag Panels
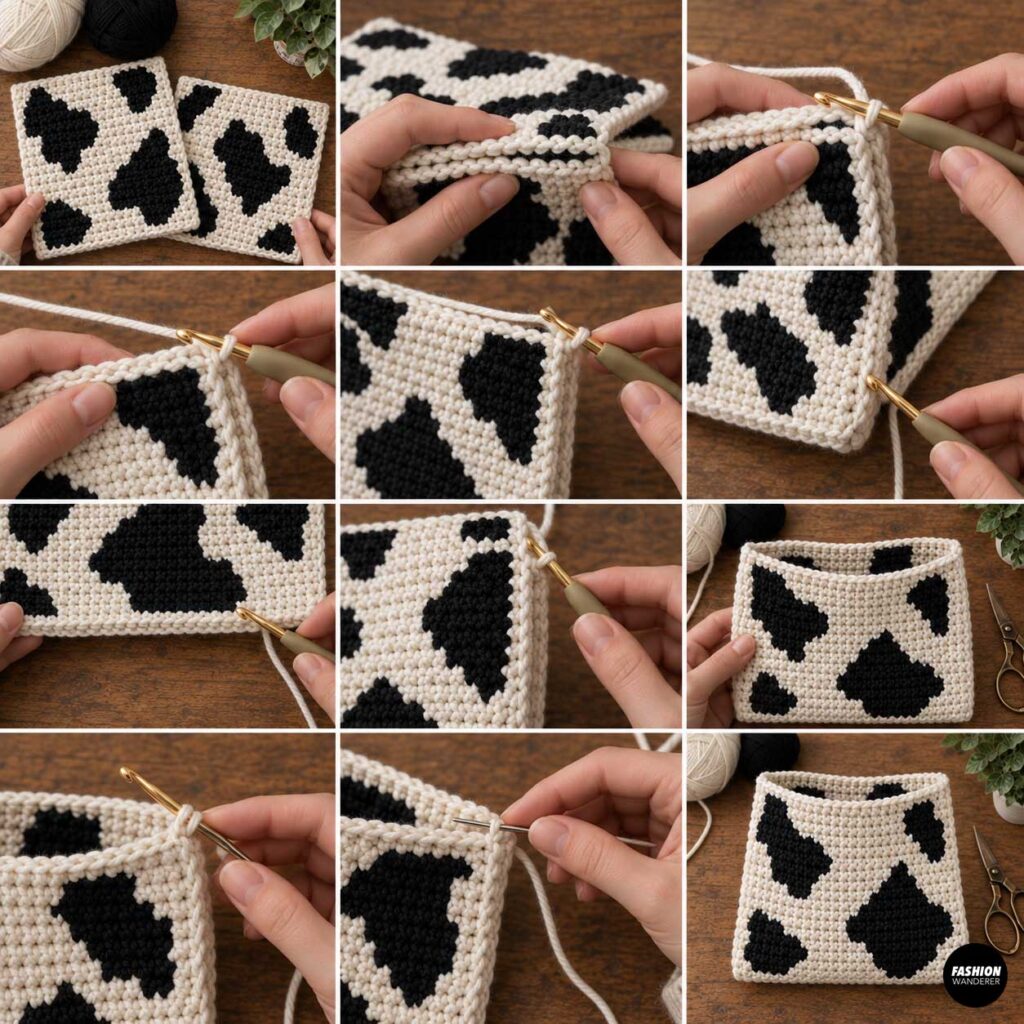
Place the two panels together with the right sides facing outward.
You can join the bag with either slip stitches or single crochet.
For a decorative edge, single crochet through both layers along the first side, across the bottom, and up the opposite side.
Leave the top completely open.
Work carefully around the bottom corners so they stay neat.
Fasten off and weave in the yarn tail.
Step 7: Make the Crochet Shoulder Strap
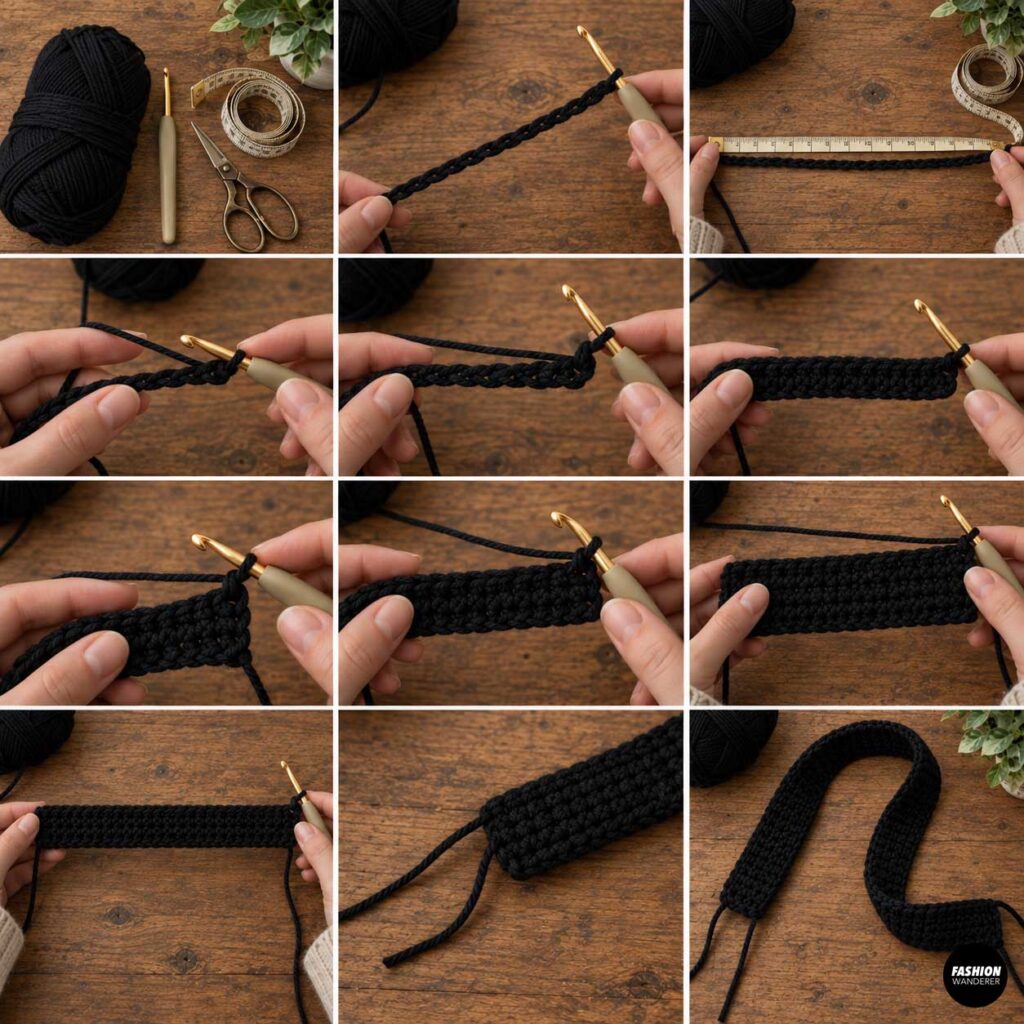
Using black yarn, chain enough stitches to measure approximately 24 to 28 inches.
For a longer crossbody-style bag, make the chain approximately 40 to 48 inches long.
Row 1: Single crochet into the second chain from the hook and across.
Chain 1 and turn.
Rows 2–4: Single crochet in every stitch across.
Four rows create a sturdy strap approximately 1 inch wide.
For an even stronger strap, use a smaller hook or add one additional row.
Fasten off, leaving long yarn tails for attaching the strap.
Step 8: Attach the Strap
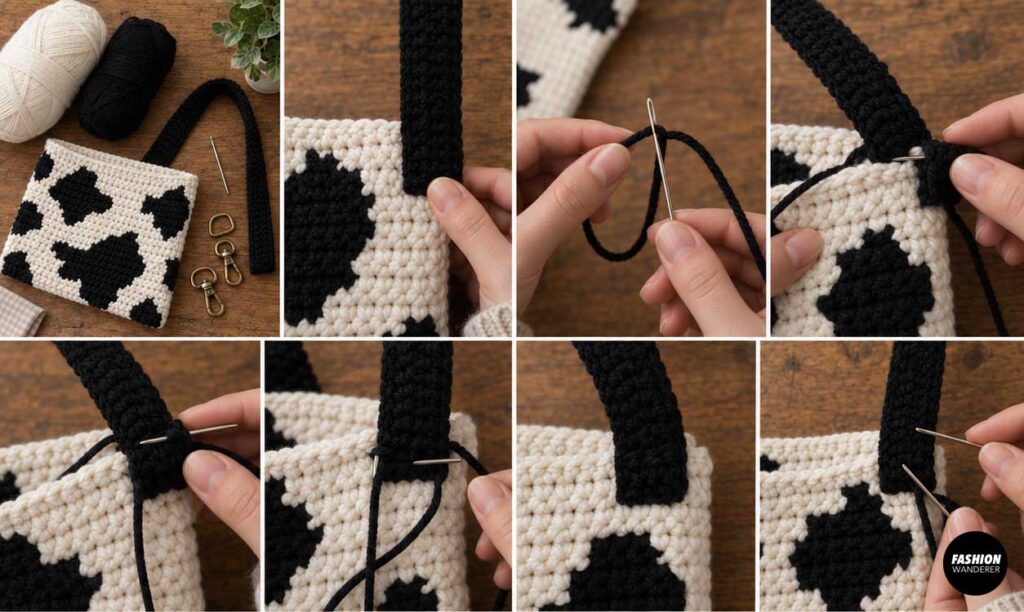
Position one end of the strap approximately 1 inch below the top edge on one side of the bag.
Use a yarn needle and matching yarn to stitch the strap securely into place.
Repeat on the opposite side.
Sew through the strap and bag several times because the attachment points will carry most of the bag’s weight.
For a more professional finish, you can attach metal D-rings to the sides and clip on a removable strap.
Step 9: Add a Closure
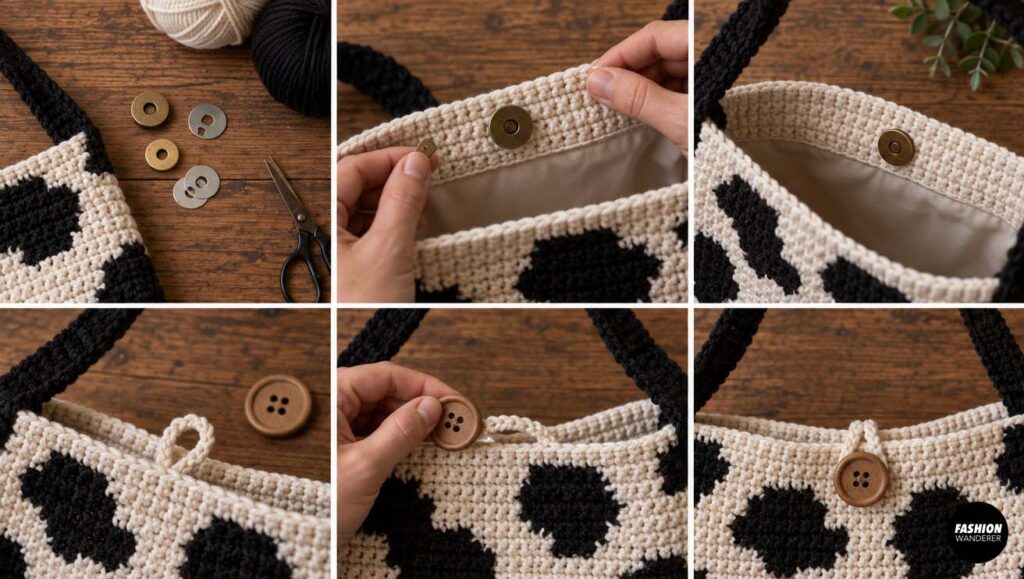
A closure is optional, but it can make the bag more practical.
You can add a magnetic snap to the inside top center of the bag.
Another simple option is to crochet a small loop on one side and sew a decorative button onto the opposite side.
For a casual tote-style version, leave the top completely open.
Step 10: Add an Optional Fabric Lining
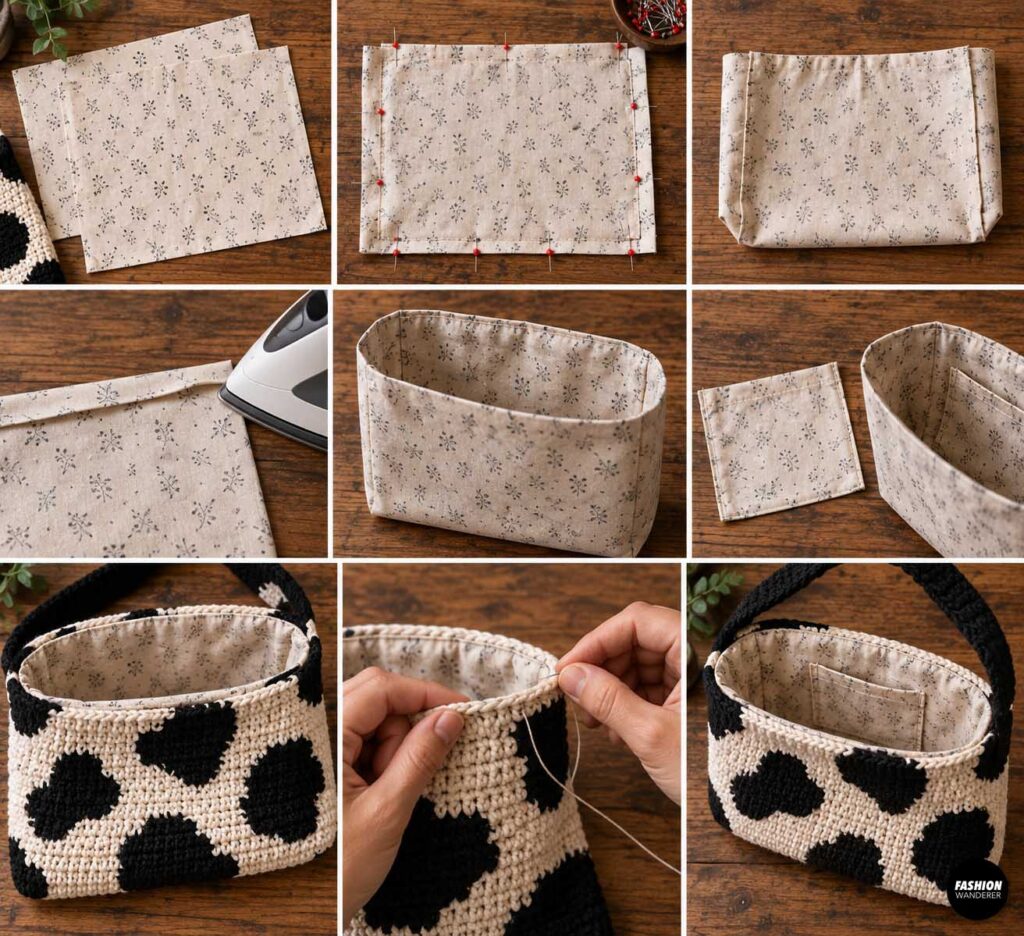
A lining helps prevent smaller items from poking through crochet stitches and can reduce stretching.
Cut two fabric rectangles approximately ½ inch wider than the finished bag panels.
Place the fabric pieces right sides together and sew around the sides and bottom.
Fold the top raw edge toward the wrong side and press.
Insert the lining into the crochet bag and hand sew it around the upper edge using small stitches.
You can also add a small slip pocket to the lining before sewing it into the bag.
How to Customize Your Cow Print Crochet Bag
One of the best things about this pattern is how easy it is to personalize.
Try a classic black and cream cow print, or experiment with:
- Brown and cream
- Pink and white
- Chocolate brown and tan
- Sage green and cream
- Burgundy and blush
- Black and camel
- Sky blue and clouds
You can also add a crocheted bow, tassel, charm, flower, or small metal tag.
For an extra fall-inspired look, pair warm brown cow spots with cream yarn and a dark chocolate strap.
Tips for Cleaner Crochet Color Changes
Always change colors during the final pull-through of the stitch before the new color begins.
Keep both yarn colors at a similar tension. Pulling the new color too tightly can cause the fabric to pucker.
Make irregular patches instead of trying to create perfect circles.
Most importantly, step back occasionally and look at the entire panel. If several black areas are clustered together, add more white space before beginning the next patch.
Final Thoughts
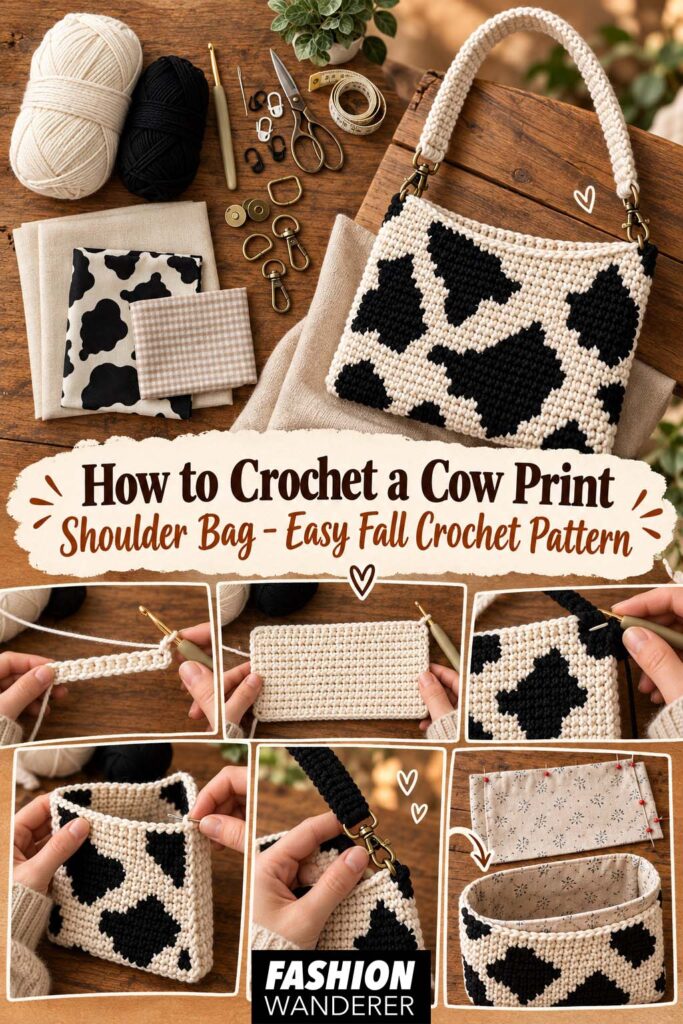
This crochet cow print shoulder bag is a fun way to practice basic colorwork while making an accessory you can actually wear.
With a simple rectangular construction, beginner-friendly single crochet stitches, and randomly shaped cow spots, you do not need advanced crochet skills or a complicated chart to create a polished result.
Make one in traditional black and white, experiment with warm fall colors, or crochet several different versions as handmade gifts.
Once you understand the basic construction, you can also use this pattern to create larger totes, mini purses, crossbody bags, or matching zipper pouches.
If you are looking for an easy crochet project for fall, this playful cow print shoulder bag is the perfect combination of practical, trendy, and fun.