
A chunky crochet hooded scarf is one of the coziest accessories you can make for fall and winter. It combines the warmth of a scarf with the comfort of a hood, making it perfect for chilly walks, outdoor markets, school drop-offs, travel, or simply layering over your favorite sweater.
Best of all, this project looks impressive while using very simple crochet techniques.
If you can make a chain and work basic crochet stitches, you can create this beginner-friendly hooded scarf in a weekend. The chunky yarn also works up quickly, so find a satisfying October crochet project when you want something warm without spending weeks crocheting.
In this tutorial, you will learn how to crochet a long chunky scarf, add a roomy hood, seam everything together, and customize the finished accessory with fringe or tassels.
Finished Size
This pattern creates an adult-size hooded scarf approximately:
- Scarf width: 9–10 inches
- Total scarf length: 70–76 inches
- Hood height: about 14 inches
- Hood depth: about 12 inches
The sizing is flexible, so you can easily make the scarf longer, shorter, wider, or narrower.
Materials You Will Need
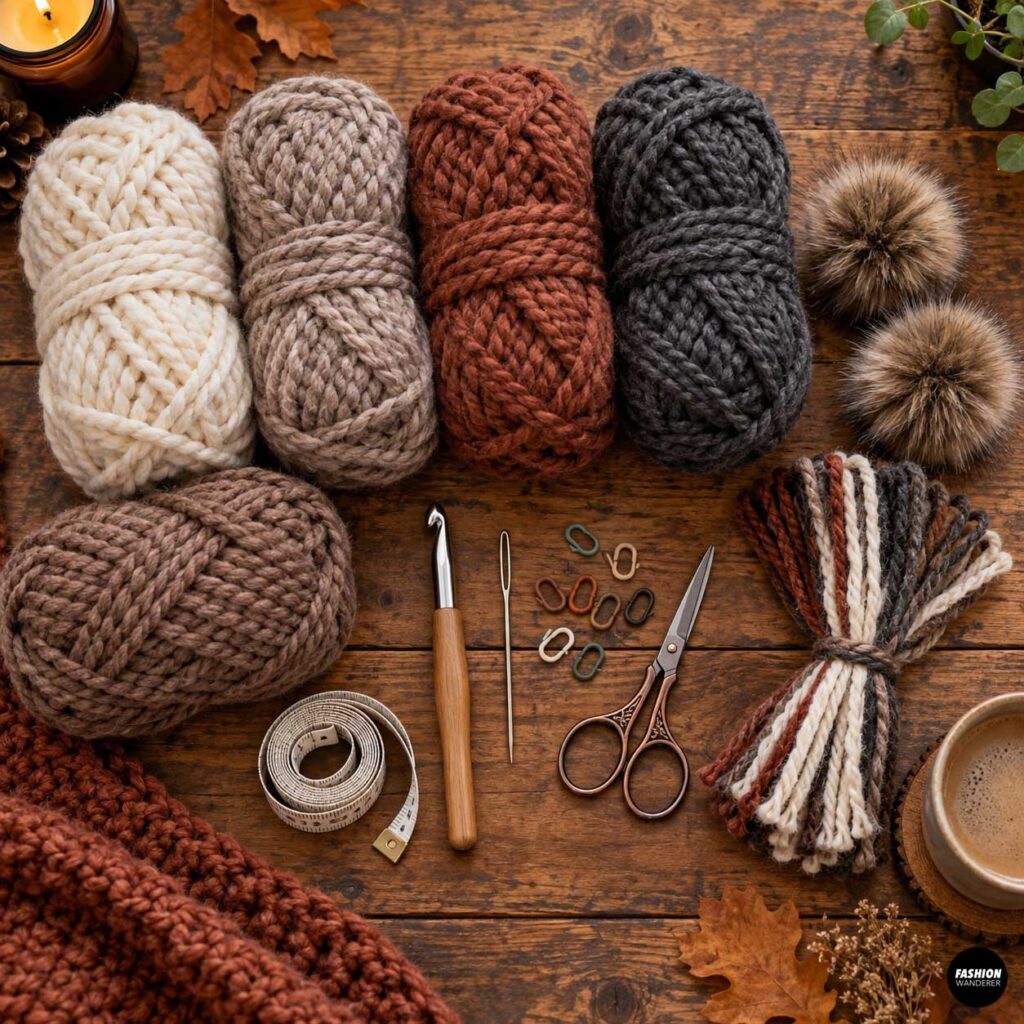
- 500–650 yards Category 6 super bulky yarn
- 9 mm or 10 mm crochet hook
- Yarn needle
- Scissors
- Measuring tape
- Stitch markers
- Optional faux fur pom-poms
- Optional extra yarn for fringe
A soft acrylic, wool blend, or chenille-style chunky yarn works well.
For beginners, choose a yarn with visible stitch definition rather than an extremely fuzzy yarn. It will be much easier to see where to insert your crochet hook.
Recommended Crochet Stitches
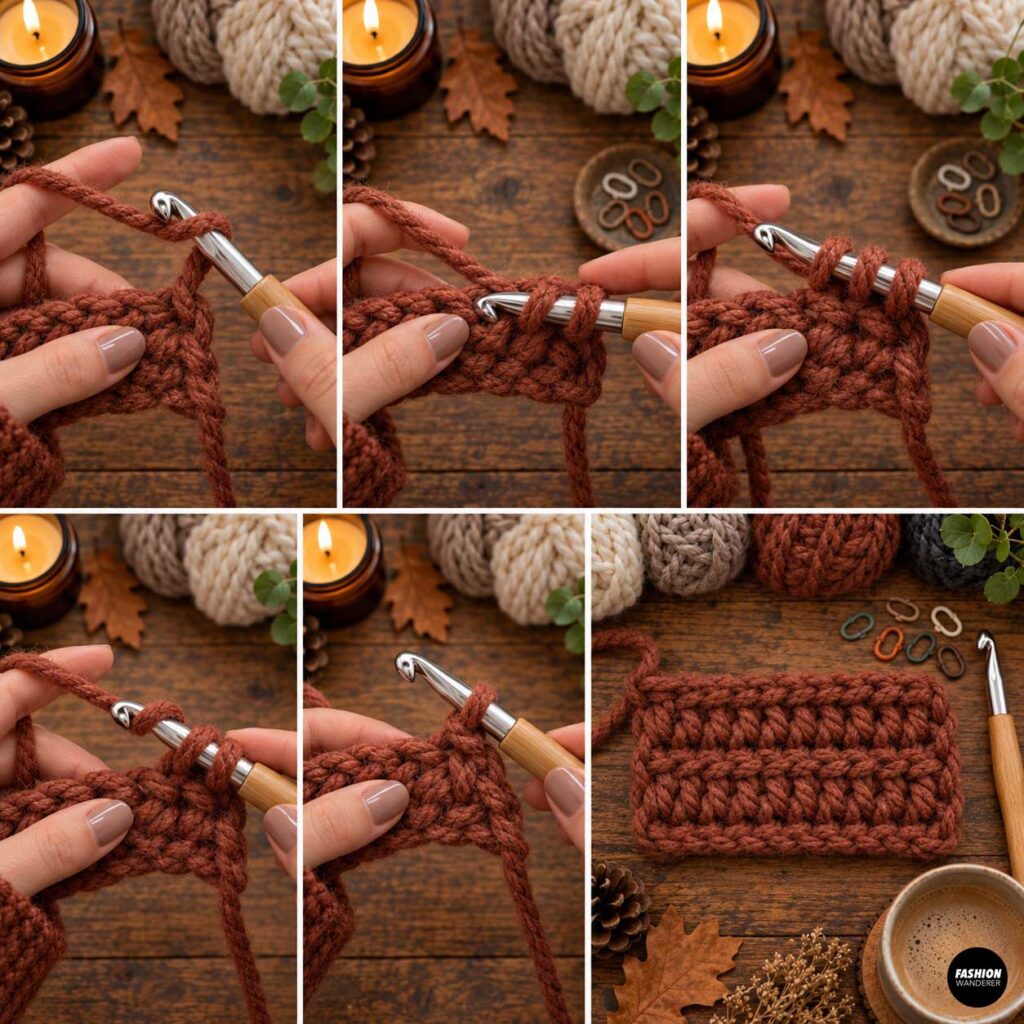
This hooded scarf can be made with several basic stitches, but half double crochet creates a nice balance between warmth, texture, and speed.
You will mainly use:
- Chain stitch
- Half double crochet
- Slip stitch
- Basic seaming
Half Double Crochet
Yarn over, insert your hook into the stitch, yarn over and pull up a loop.
You should have three loops on your hook.
Yarn over again and pull through all three loops.
That is one half double crochet stitch.
DIY Chunky Crochet Hooded Scarf
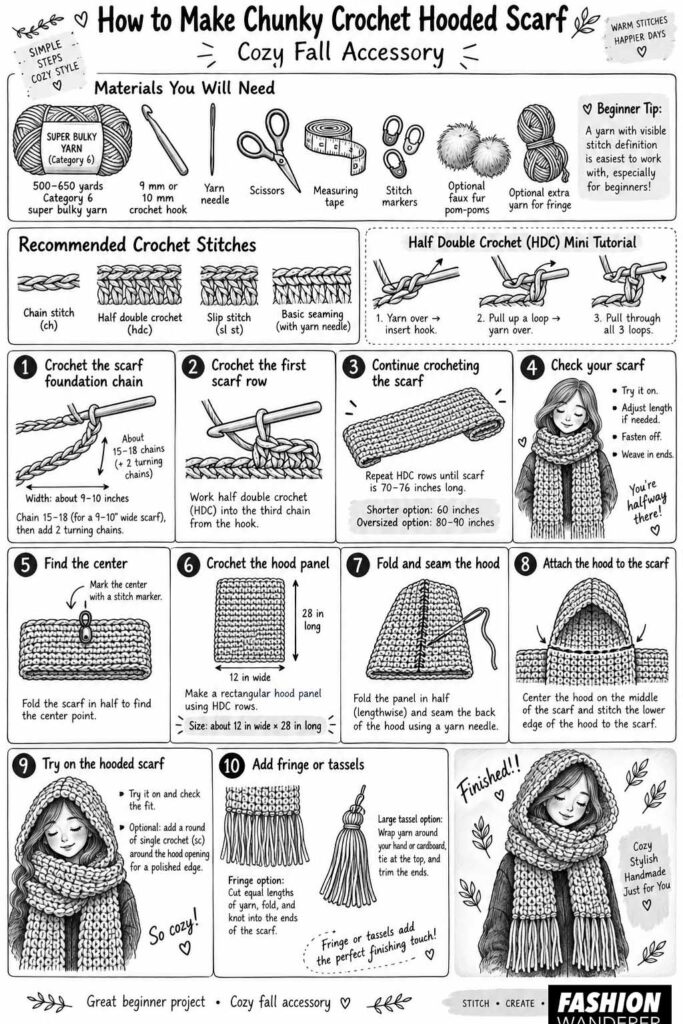
Step 1: Crochet the Scarf Foundation Chain
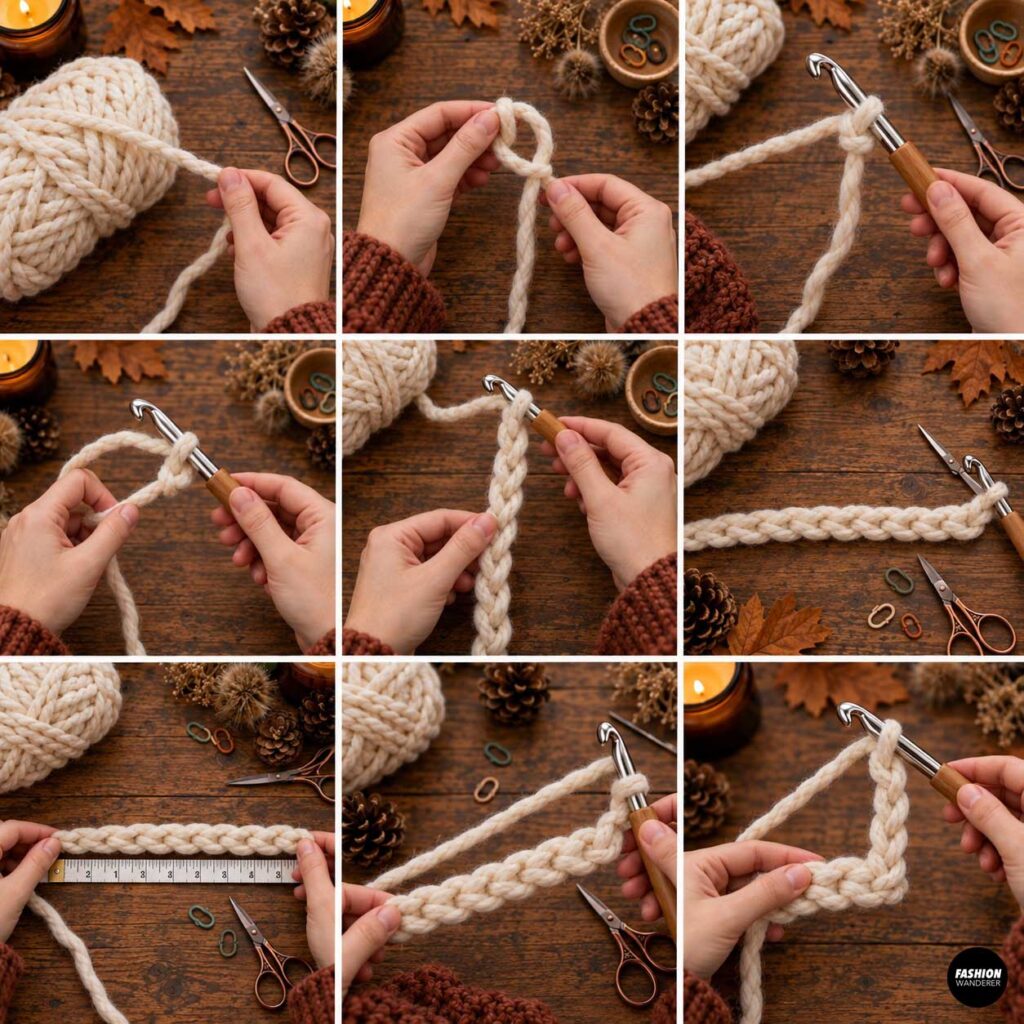
Begin by making a slip knot.
Chain enough stitches to create a width of approximately 9 to 10 inches.
With Category 6 yarn and a 10 mm hook, this may be around 15 to 18 chains depending on your tension.
Do not worry too much about the exact stitch count.
The most important thing is that the scarf feels wide enough to keep your neck warm without becoming too bulky.
Add two additional chains for turning.
Step 2: Crochet the First Scarf Row
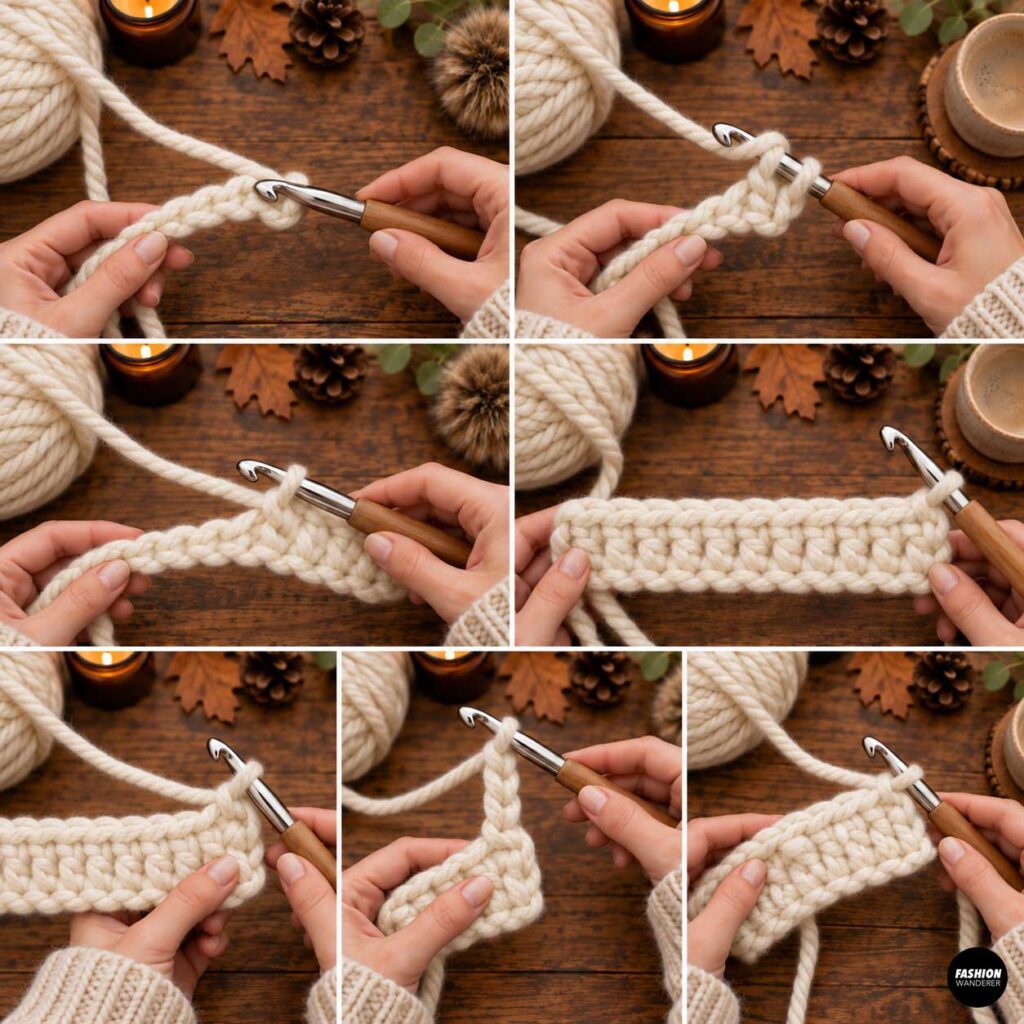
Work one half double crochet into the third chain from your hook.
Continue making one half double crochet into each chain across the row.
When you reach the end, chain two and turn your work.
The turning chain does not need to count as a stitch.
Step 3: Continue Crocheting the Scarf
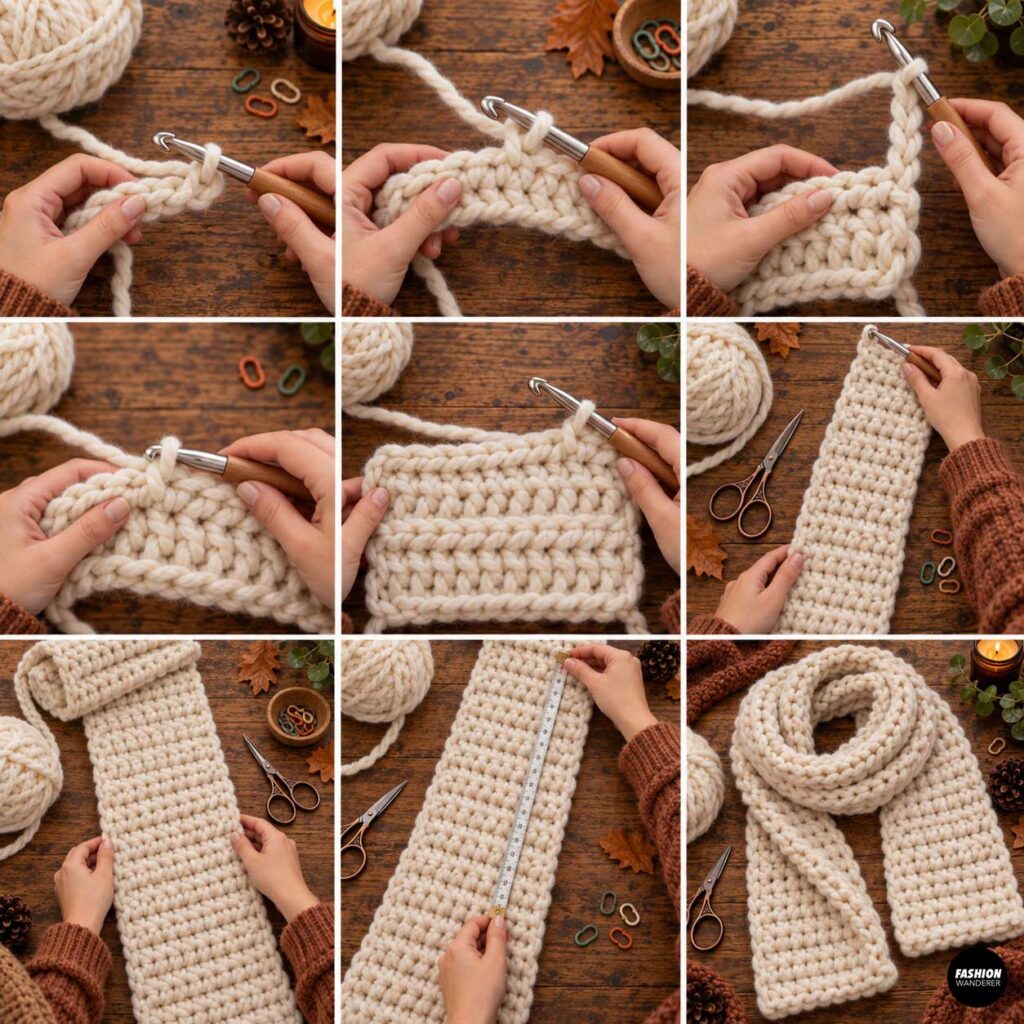
Work one half double crochet into every stitch across.
Chain two and turn.
Repeat this row until the scarf measures approximately 70 to 76 inches long.
For a shorter scarf, stop around 60 to 65 inches.
For an oversized dramatic scarf, continue to 80 inches or longer.
Because you are working with chunky yarn, check the scarf length regularly instead of relying only on a specific number of rows.
Step 4: Check Your Scarf Before Adding the Hood
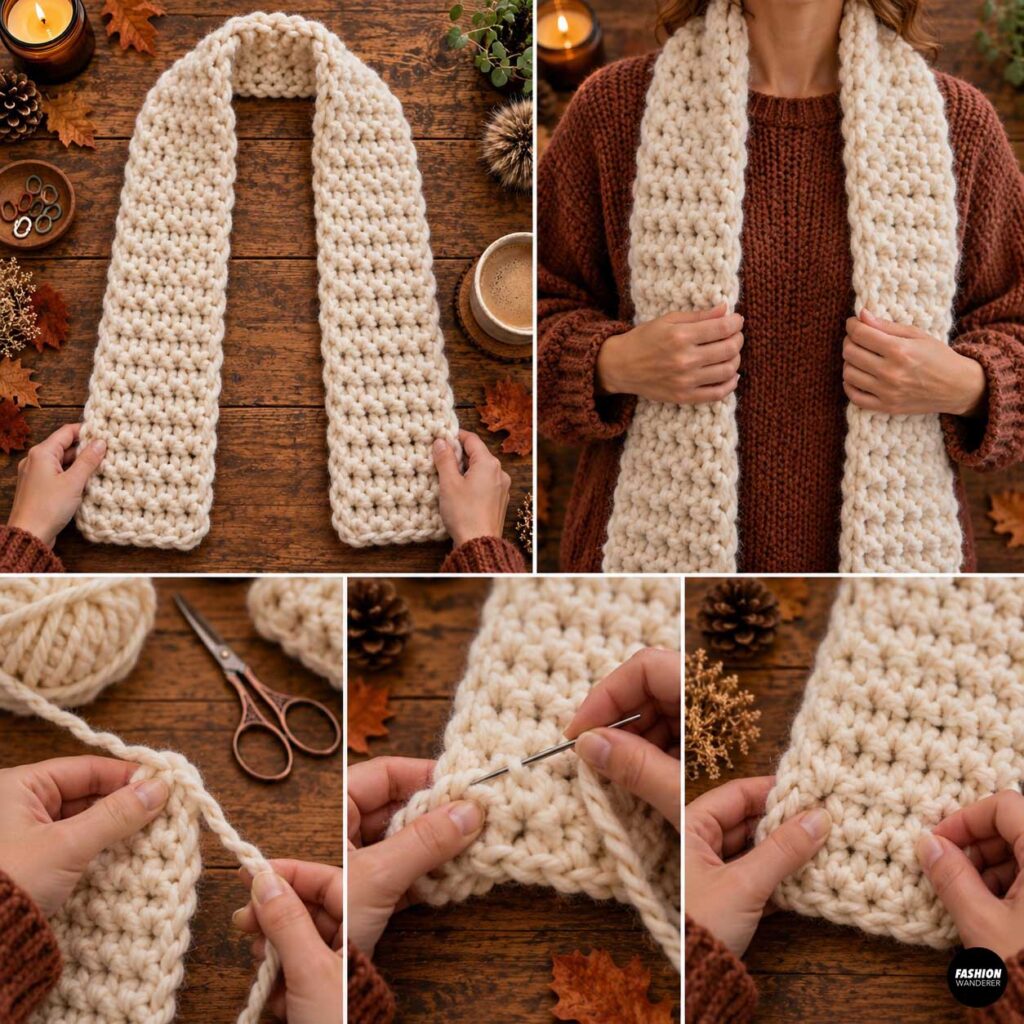
Drape the scarf around your neck.
The center portion should sit comfortably behind your neck while both ends hang down the front of your body.
Adjust the length now if necessary.
Once you are happy with the scarf, fasten off the yarn and weave in the ends.
Step 5: Find the Center of the Scarf
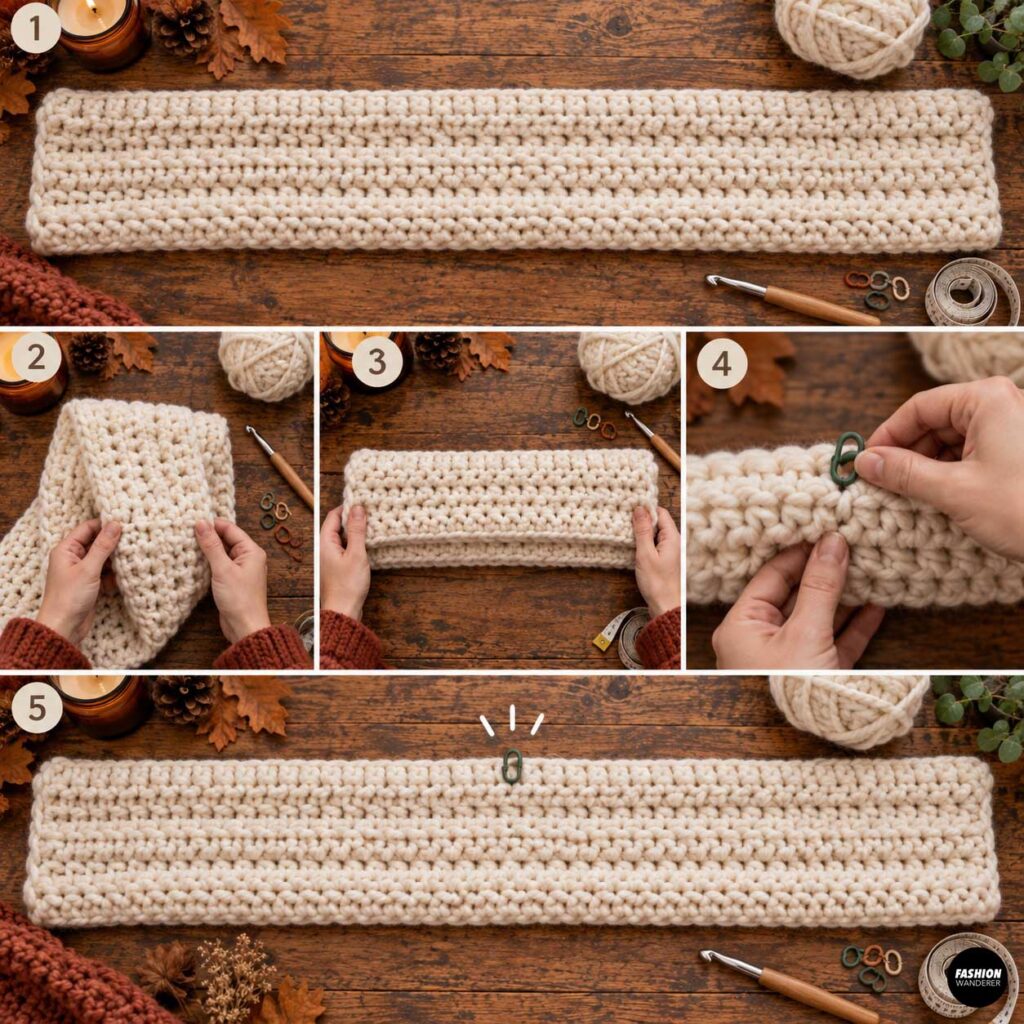
Fold the scarf in half lengthwise by matching the two short ends.
Place a stitch marker at the center point.
This is where the middle of the hood will sit.
Lay the scarf flat on your work surface.
The hood will be attached along the upper edge of the scarf around this center point.
Step 6: Crochet the Hood Panel
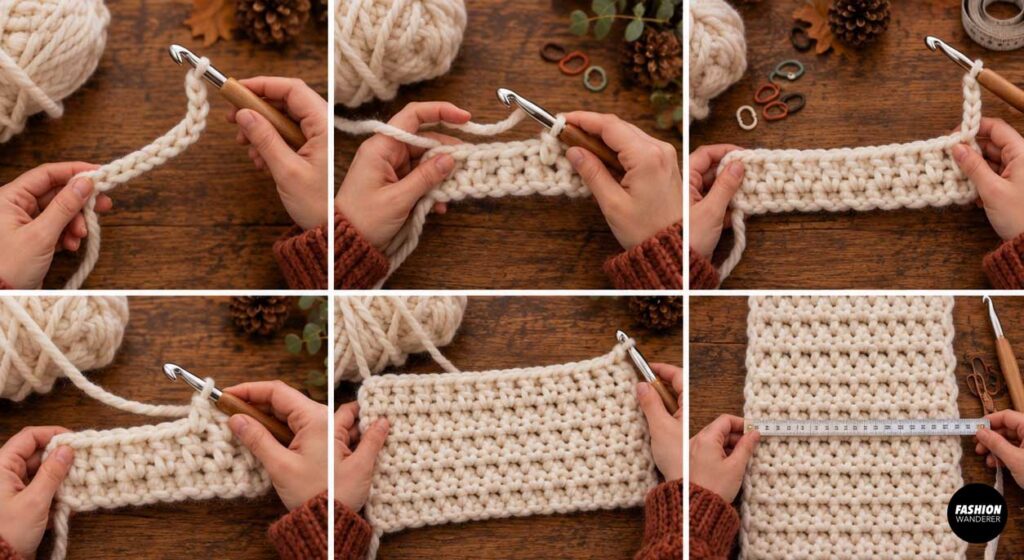
The easiest beginner hood is made as a rectangle and folded in half.
Chain enough stitches to measure approximately 12 inches.
Add two chains for turning.
Beginning in the third chain from your hook, half double crochet across.
Chain two and turn.
Continue working rows until the rectangle measures approximately 28 inches long.
Your hood panel should now measure roughly:
12 inches wide x 28 inches long
The 28-inch measurement becomes the height around your head once the piece is folded.
Before fastening off, hold the rectangle around your head to check the size.
If you want a deeper oversized hood, make the rectangle 13 to 14 inches wide.
Step 7: Fold and Seam the Hood
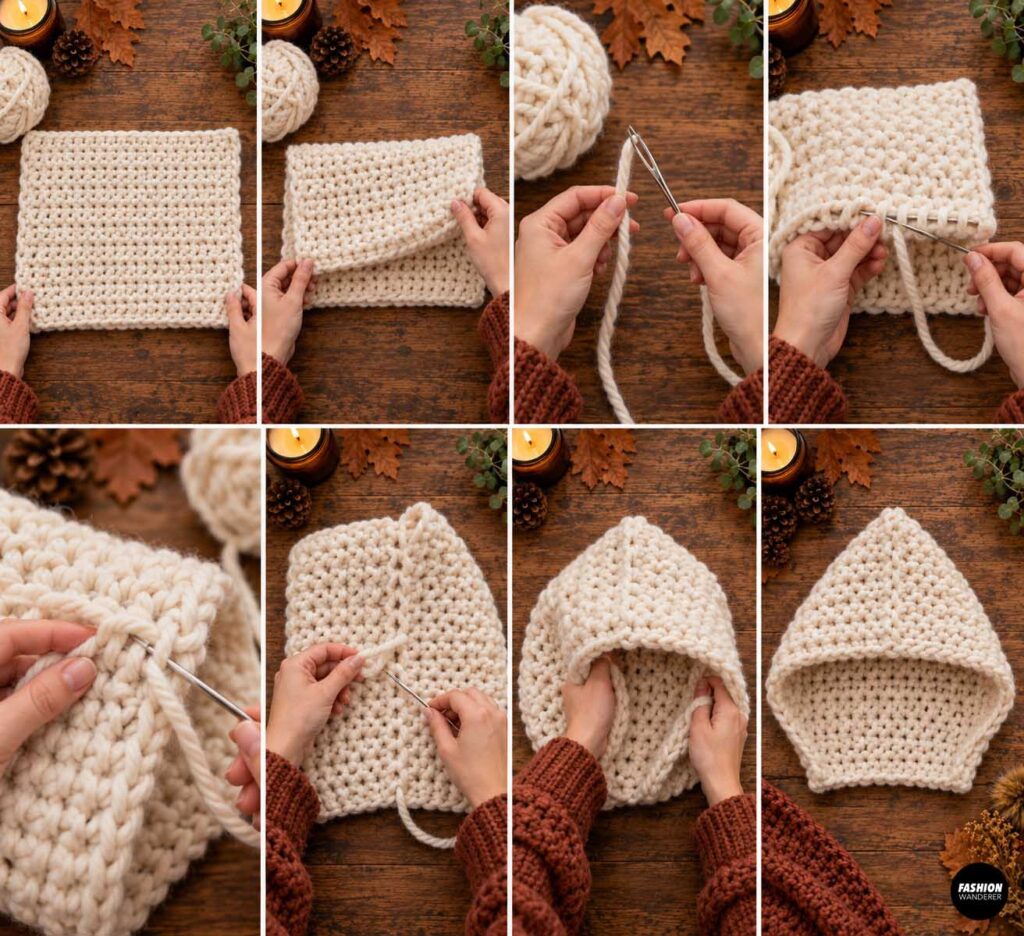
Fold the hood rectangle in half so the two short edges meet.
The folded edge will become the front opening of the hood.
The opposite long edge needs to be seamed together at the back.
Thread a yarn needle with a long piece of matching yarn.
Whipstitch or mattress stitch the back edge together.
Keep the seam secure without pulling too tightly.
Fasten off and weave in the yarn tails.
Turn the hood right side out.
You should now have a simple hood shape.
Step 8: Attach the Hood to the Scarf
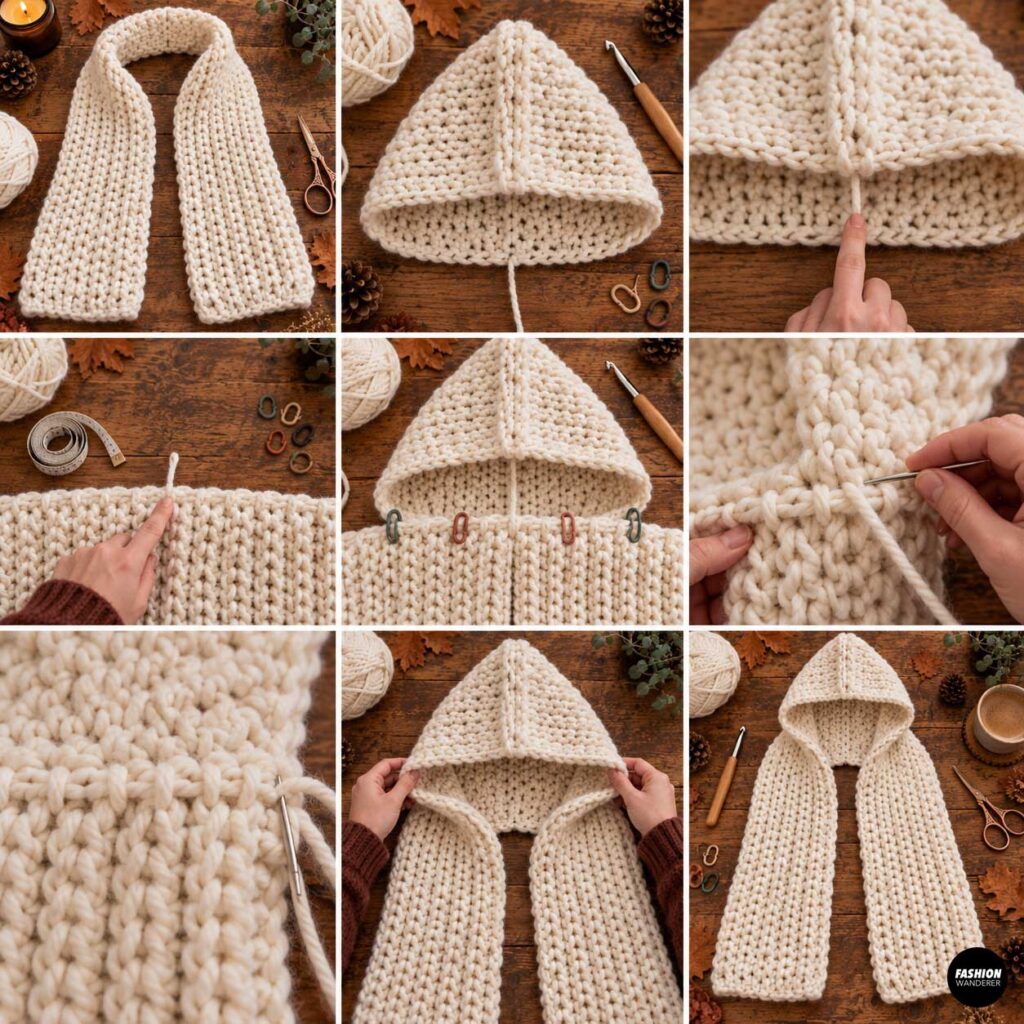
Find the center point along the lower edge of the hood.
Match it with the center stitch marker on the scarf.
Pin or use stitch markers to secure the hood along the scarf edge.
The hood should extend evenly on both sides of the scarf center.
Using matching yarn and a yarn needle, sew the bottom edge of the hood securely to the scarf.
A simple whipstitch works perfectly.
Try to keep your stitches evenly spaced.
Check that both sides of the hood are positioned symmetrically before finishing the seam.
Step 9: Try on the Hooded Scarf
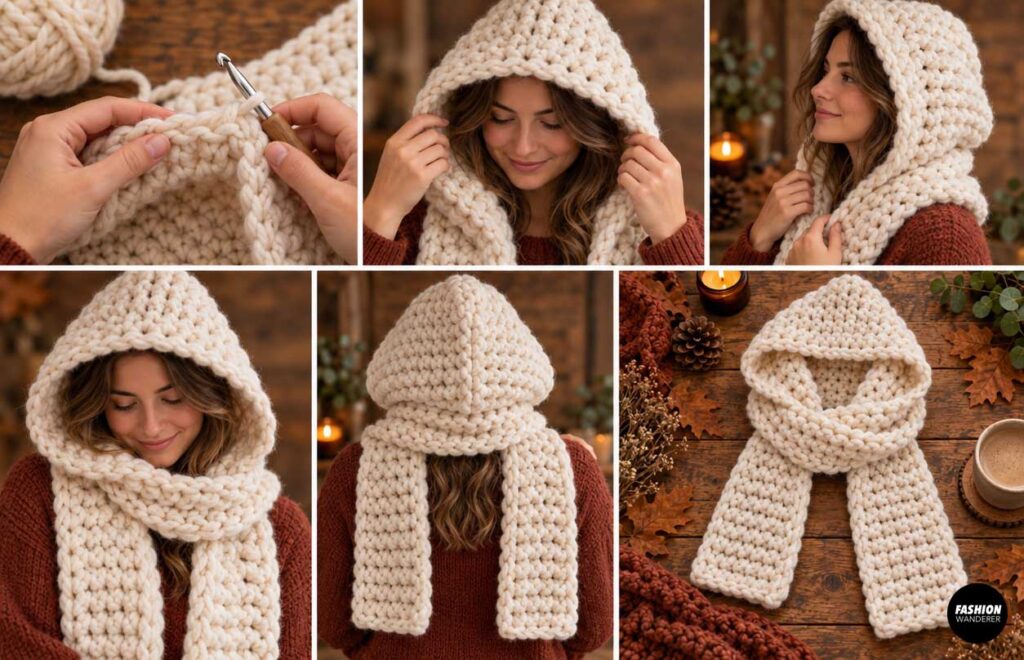
Put the finished scarf around your shoulders and pull the hood over your head.
Check the fit.
The hood should have enough depth to cover your head comfortably without pulling the scarf upward.
If the hood feels too loose around the face, you can crochet one row of single crochet around the front opening.
This creates a slightly firmer edge and gives the hood a polished finish.
Step 10: Add Fringe
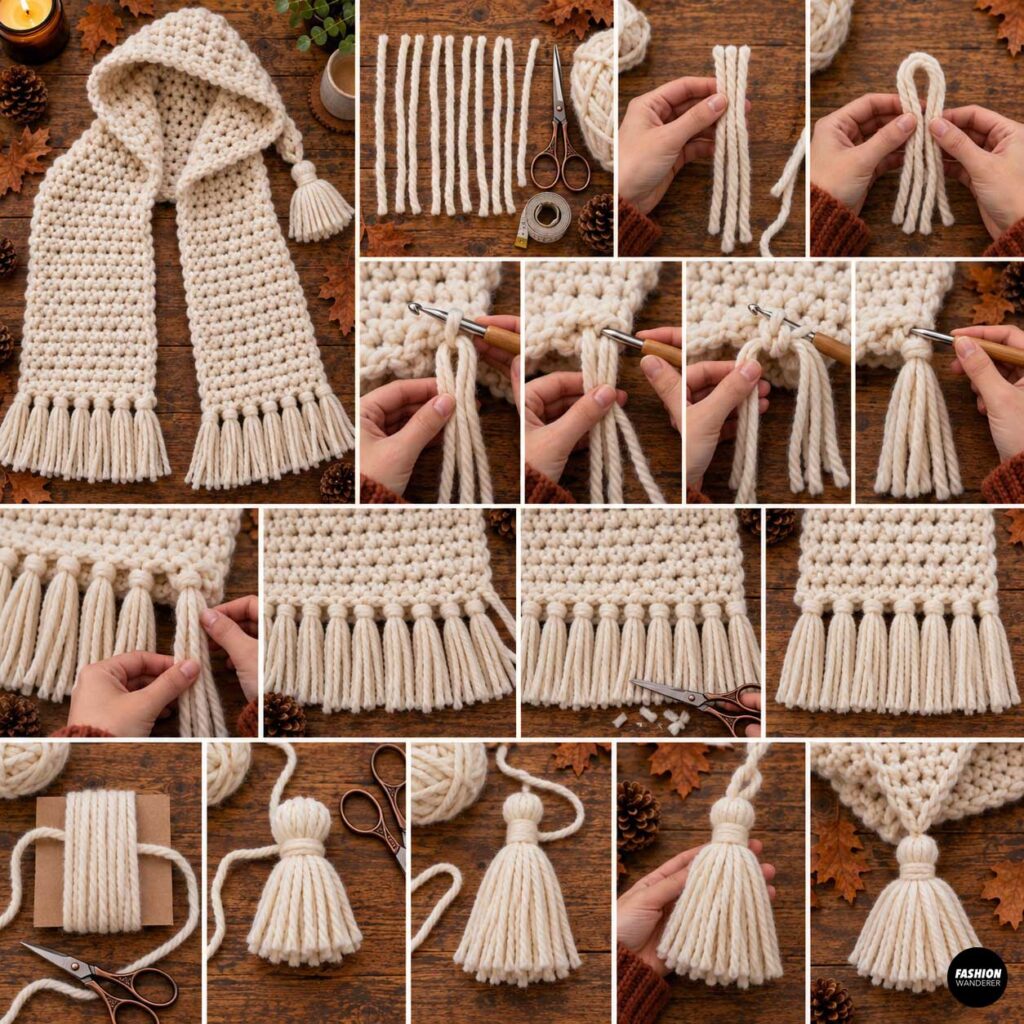
Fringe gives a chunky crochet hooded scarf a cozy handmade look.
Cut pieces of yarn approximately 12 to 14 inches long.
Use three or four strands for each section of fringe.
Fold the strands in half.
Insert your crochet hook through the scarf edge, pull the folded loop partially through, then feed the yarn ends through the loop.
Pull gently to tighten.
Continue spacing fringe evenly across both scarf ends.
Trim the fringe so everything is approximately the same length.
Optional: Add Large Tassels
Instead of fringe, you can add one large tassel to each lower corner.
Wrap chunky yarn around a piece of cardboard approximately 20 to 25 times.
Tie the loops securely at the top.
Cut through the loops at the opposite end and wrap another strand around the bundle to form the tassel head.
Attach one tassel to each scarf corner.
How to Customize Your Chunky Hooded Scarf
Once you understand the basic construction, it is easy to create different versions.
Try a neutral cream or oatmeal yarn for a minimalist look.
Use deep burgundy, forest green, rust, mustard, or chocolate brown for a cozy fall color palette.
You could also alternate colors every few rows to create bold stripes.
For extra texture, replace half double crochet with:
- Moss stitch
- Lemon peel stitch
- Ribbed back-loop crochet
- Double crochet
- Extended single crochet
You can even add pockets to the scarf ends.
Simply crochet two small rectangles and sew them onto the front of each scarf end.
Final Thoughts
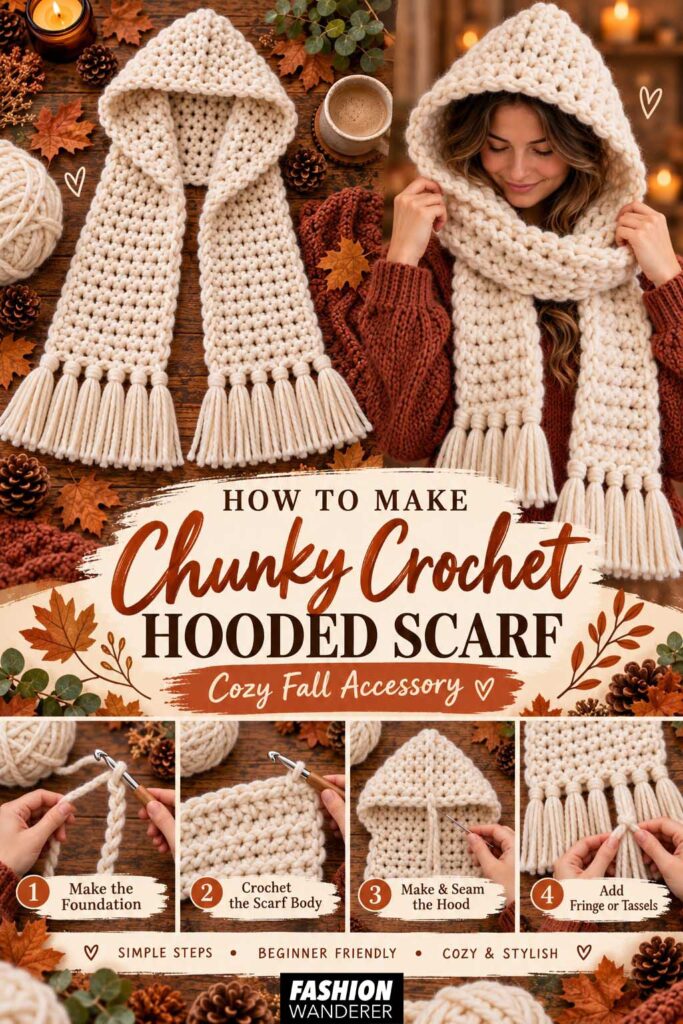
This chunky crochet hooded scarf is a simple project that creates a warm, practical, and stylish fall accessory without requiring complicated crochet techniques.
By making one long scarf and one basic rectangular hood, you can create a cozy handmade piece that looks much more advanced than it actually is.
It is also easy to customize with fringe, tassels, pockets, different stitches, or seasonal colors.
Whether you are making one for yourself, creating handmade gifts, or looking for crochet accessories to sell, this cozy hooded scarf is a beginner-friendly project you can make again and again throughout the fall and winter seasons.