
A granny-square cropped cardigan is one of those crochet projects that feels both nostalgic and completely wearable. The classic granny square gives the cardigan a cozy handmade look, while the cropped length keeps it modern and easy to style with high-waisted jeans, skirts, dresses, and fall boots.
Cozy October crochet projects are also a great way to play with autumn color combinations. Think burnt orange, mustard yellow, deep olive, cream, rust, burgundy, chocolate brown, and muted pumpkin tones.
In this step-by-step tutorial, you will learn how to crochet a granny-square cropped cardigan, join the squares, shape the body and sleeves, and add a simple border for a clean finished look.
This pattern is best for confident beginners who already know how to make basic crochet stitches such as chains, slip stitches, and double crochet.
Materials You Will Need
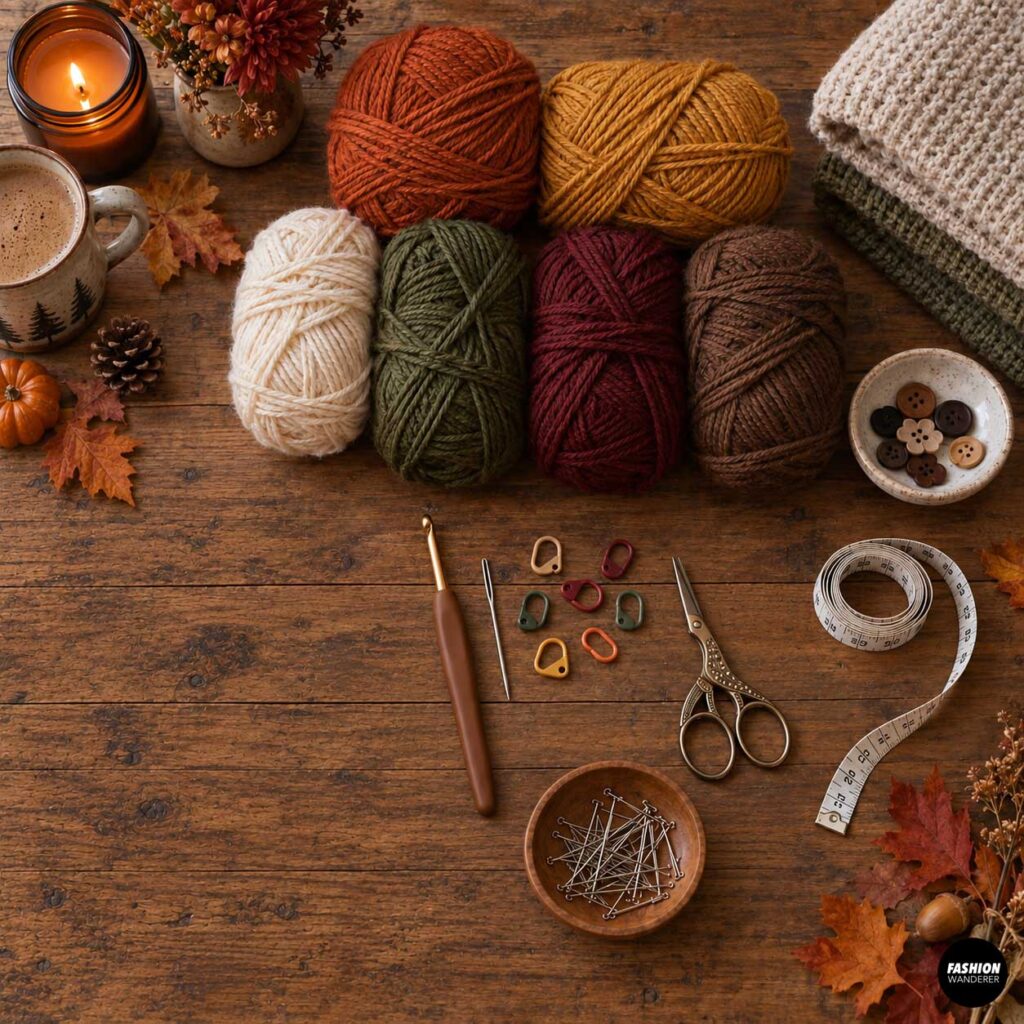
- Category 4 worsted-weight yarn in 4 to 6 fall colors
- Approximately 900 to 1,300 yards total, depending on size
- 5 mm crochet hook
- Yarn needle
- Scissors
- Stitch markers
- Measuring tape
- Blocking mats or towels
- Rust-proof pins
- Optional buttons
Choose yarns with similar fiber content and thickness so all of your granny squares finish at approximately the same size.
For a classic autumn palette, try:
- Burnt orange
- Mustard
- Cream
- Olive green
- Burgundy
- Warm brown
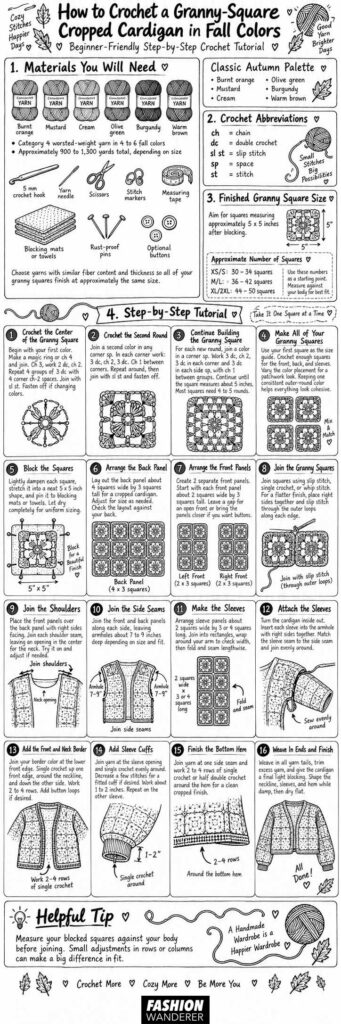
Crochet Abbreviations
ch – chain
dc – double crochet
sl st – slip stitch
sp – space
st – stitch
Finished Granny Square Size
For this cardigan, aim for granny squares measuring approximately:
5 x 5 inches after blocking
The exact number of squares you need will depend on your body measurements and preferred fit.
For a relaxed cropped cardigan, you may need approximately:
- XS/S: 30–34 squares
- M/L: 36–42 squares
- XL/2XL: 44–50 squares
Use these numbers as a starting point rather than a strict rule. Measuring your squares against your body will give you the best fit.
Here is a Free Granny-Square Cropped Cardigan Crochet Pattern for sizes XS-3XL
DIY Crochet Granny-Square Cropped Cardigan
Step 1: Crochet the Center of the Granny Square
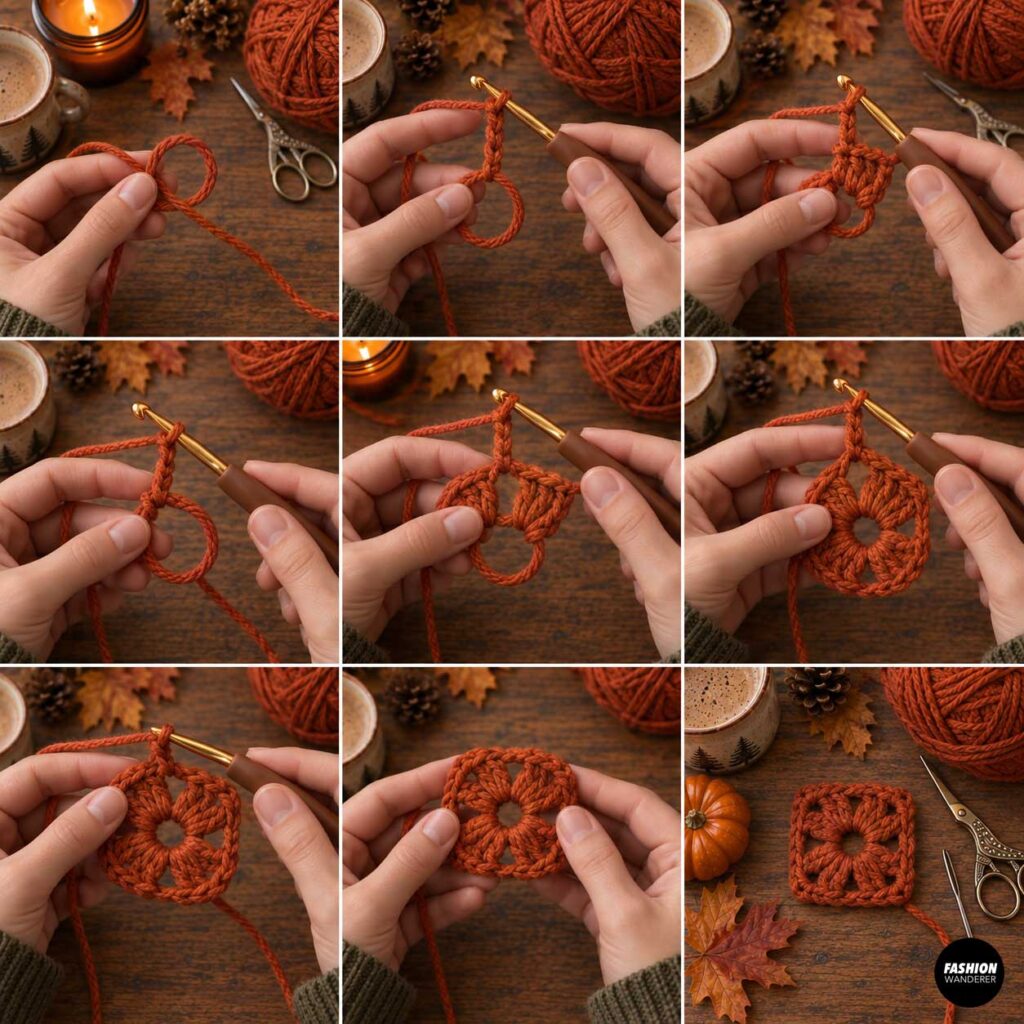
Begin with your first fall color.
Create a magic ring, or chain 4 and join with a slip stitch to form a small ring.
Chain 3. This counts as your first double crochet.
Work 2 double crochet into the ring.
Chain 2.
Work 3 double crochet into the ring, then chain 2.
Repeat until you have four groups of 3 double crochet separated by four chain-2 spaces.
Join with a slip stitch to the top of the beginning chain 3.
Fasten off if you want to change colors.
Step 2: Crochet the Second Round
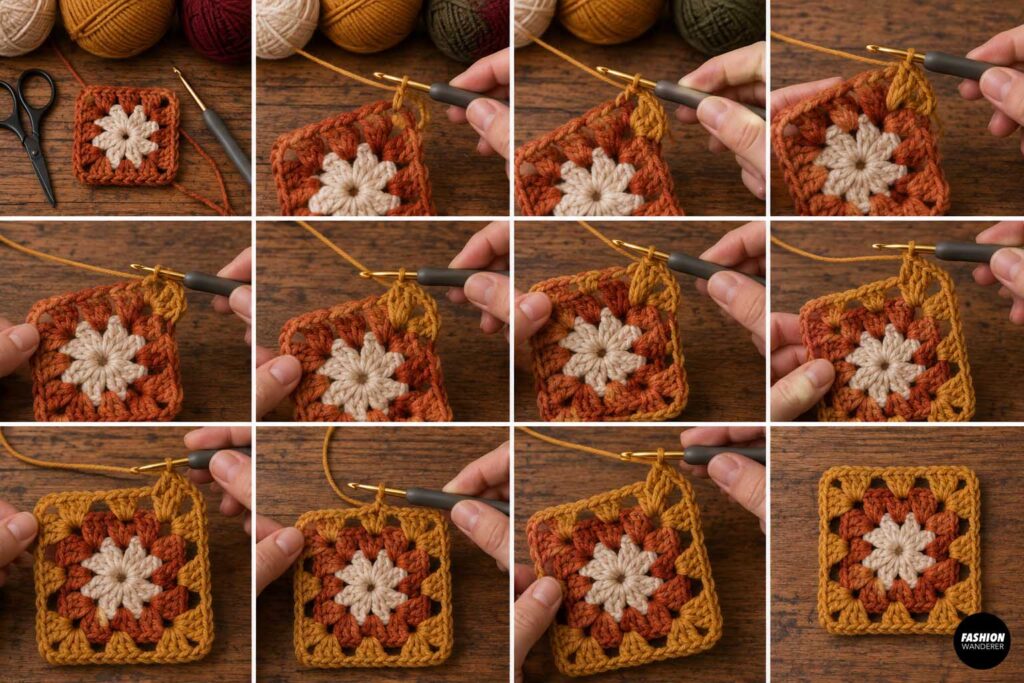
Join your second yarn color into any corner chain-2 space.
Chain 3, then work 2 double crochet into the same corner.
Chain 2.
Work 3 more double crochet into that same corner.
You have now created the first corner.
Chain 1.
Move to the next corner space.
Work:
3 double crochet, chain 2, 3 double crochet.
Chain 1.
Repeat around all four corners.
Join with a slip stitch.
Fasten off.
Step 3: Continue Building the Granny Square
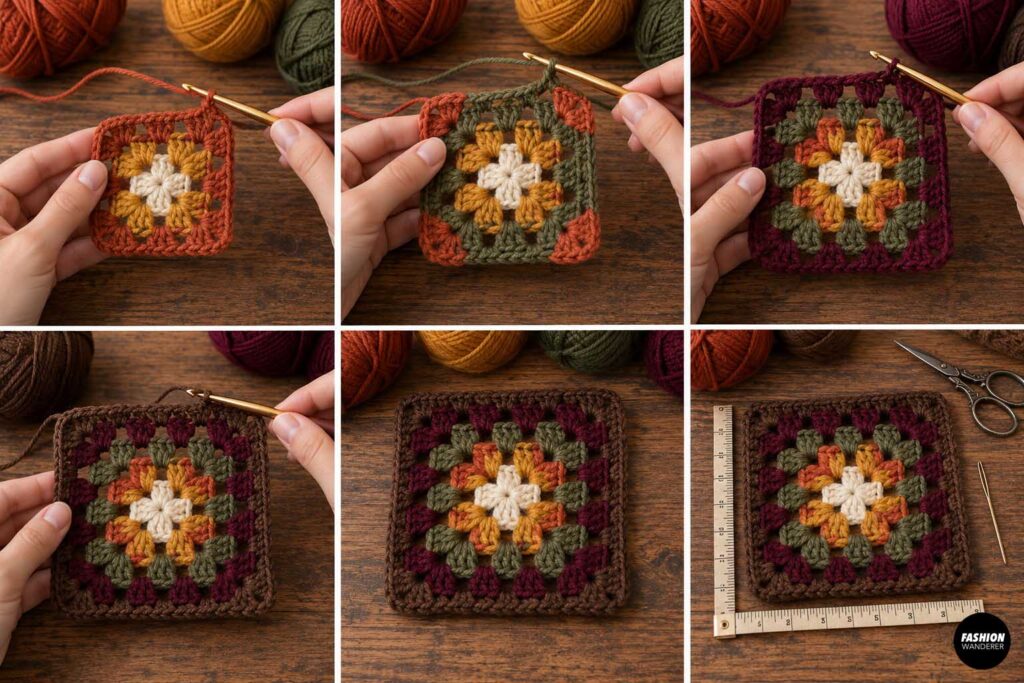
For each new round, join another fall color into a corner space.
In every corner, work:
3 double crochet, chain 2, 3 double crochet
In each chain-1 space along the sides, work:
3 double crochet
Chain 1 between each group.
Continue until your square measures approximately 5 inches across.
Most squares will need around 4 to 5 rounds, depending on your yarn and tension.
Step 4: Make All of Your Granny Squares
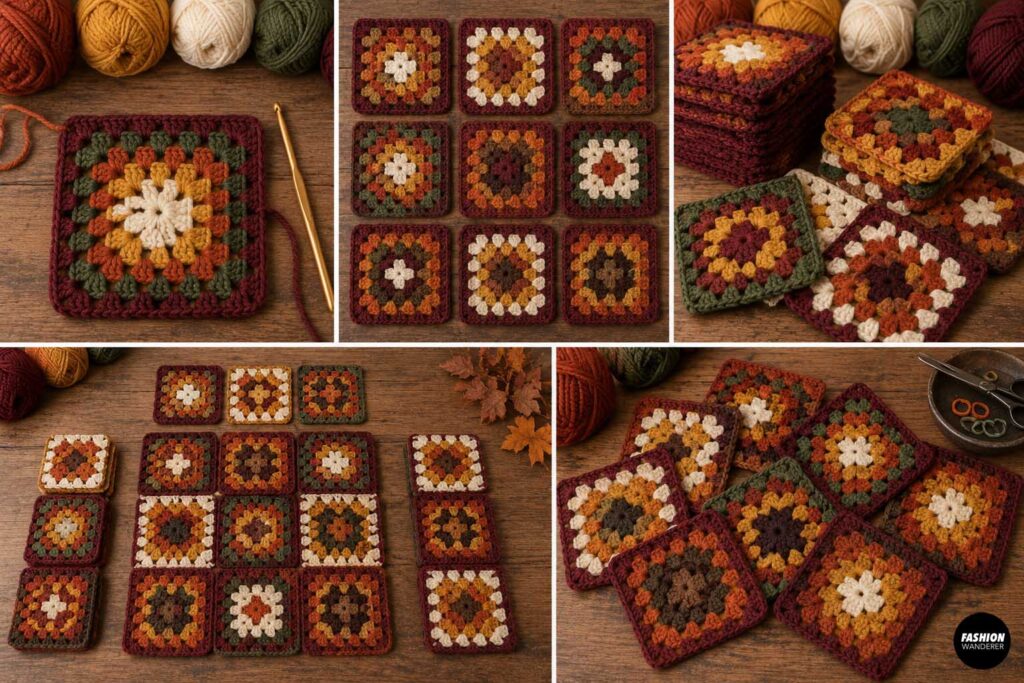
Once you are happy with your first square, use it as your size guide.
Crochet enough matching squares for the front, back, and sleeves.
You do not need every square to have the same color placement.
In fact, slightly changing the color order creates a more relaxed patchwork look.
Try keeping one color consistent around the outer round of every square. This helps the cardigan look more cohesive when joined.
Step 5: Block the Squares
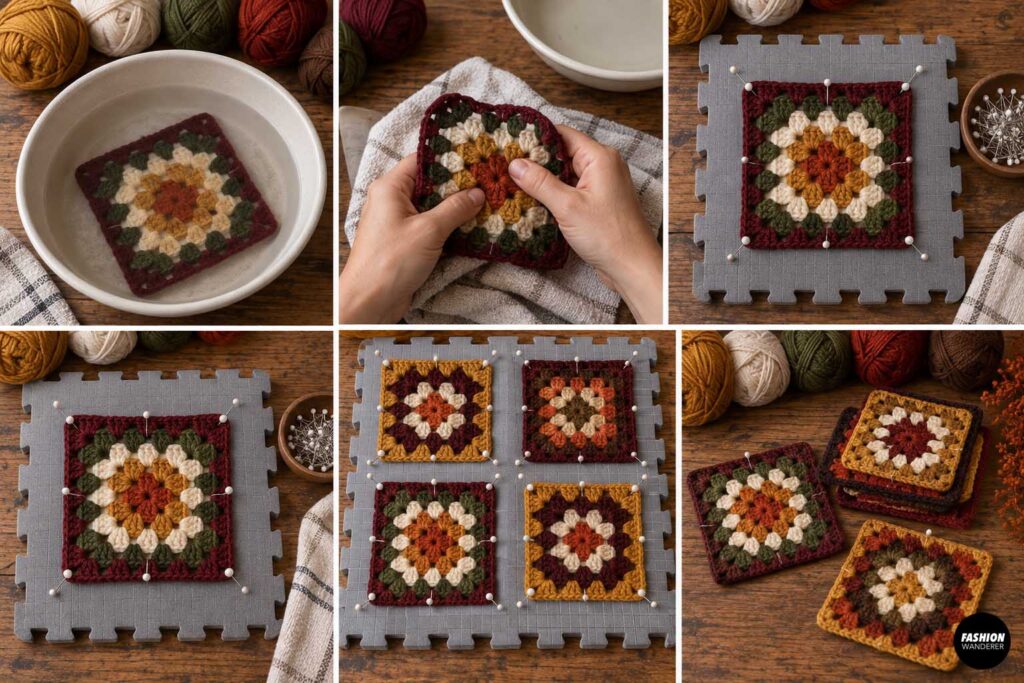
Blocking makes a huge difference when making granny-square garments.
Lightly dampen each square.
Stretch it gently into a neat square shape and pin it to approximately 5 x 5 inches.
Allow the squares to dry completely.
Blocking ensures that all the squares are uniform and makes joining much easier.
Step 6: Arrange the Back Panel
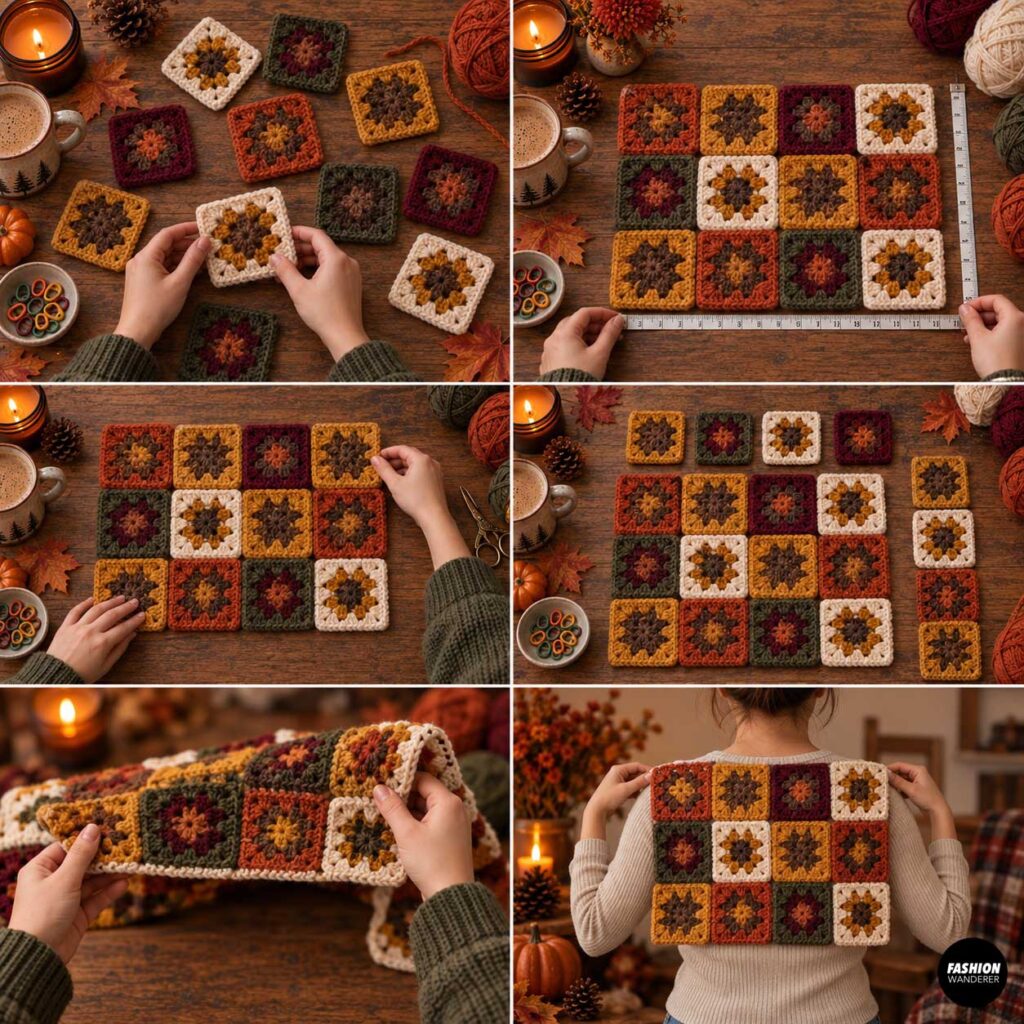
Lay your granny squares on a flat surface.
For a cropped cardigan, begin with a back panel approximately:
4 squares wide x 3 squares tall
This creates a panel around 20 inches wide and 15 inches tall when using 5-inch squares.
For larger sizes, add another column or row as necessary.
Hold the layout against your back to check the width and length.
Remember that you will add a border later.
Step 7: Arrange the Front Panels
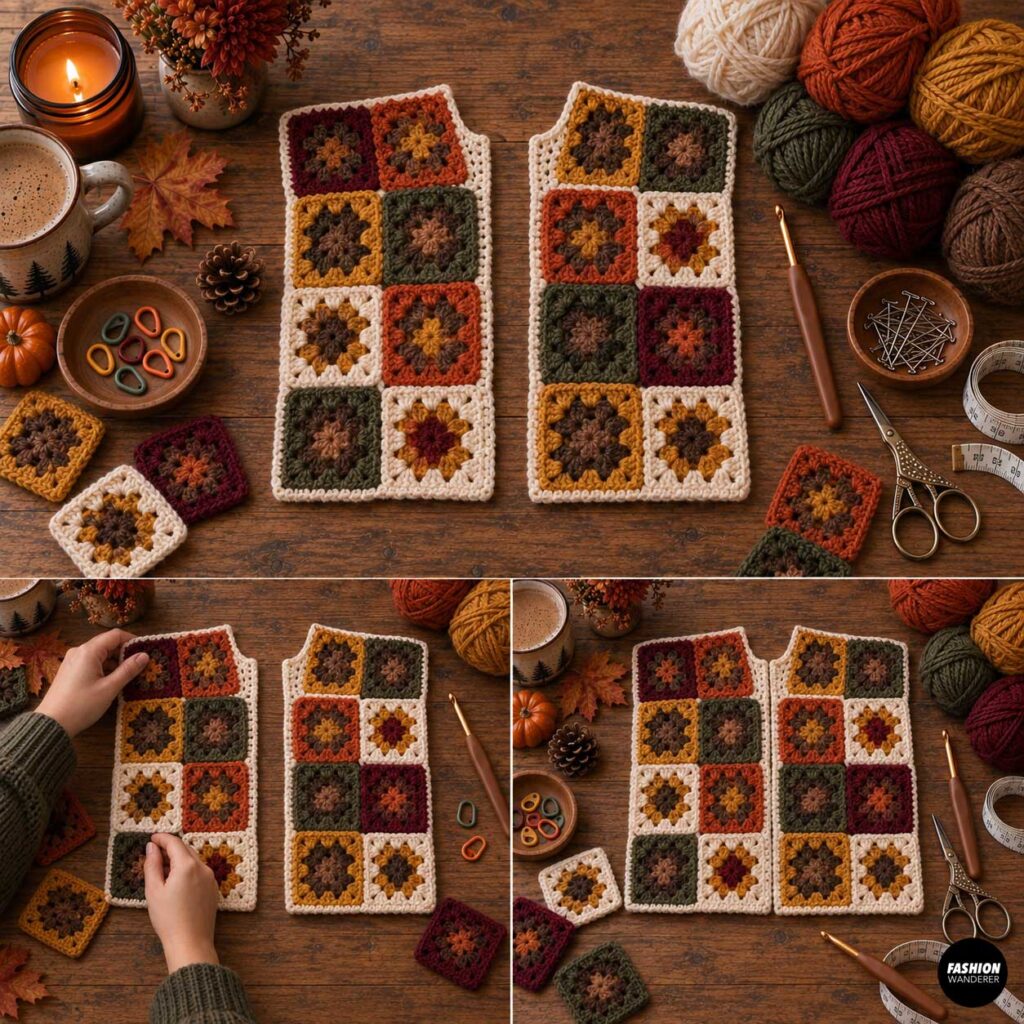
Create two separate front panels.
For each side, begin with:
2 squares wide x 3 squares tall
The two panels will meet toward the center front.
You can leave a small gap between them if you prefer an open-front cardigan.
For a more fitted cardigan with buttons, make sure the panels reach closer toward the center of your chest.
Step 8: Join the Granny Squares
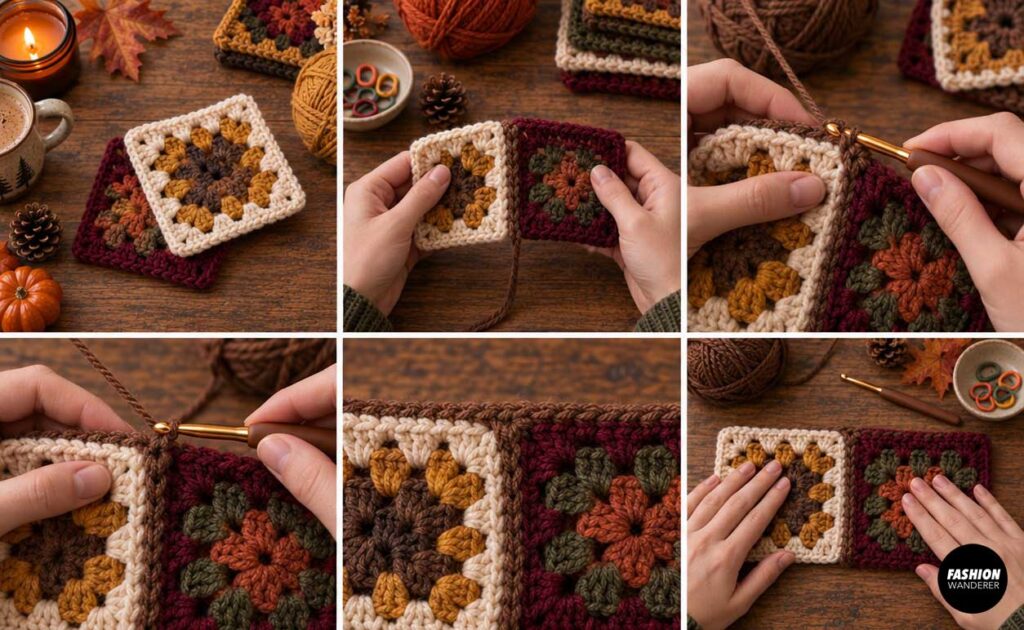
You can join the squares with a slip-stitch seam, single crochet seam, or whip stitch.
For a flatter finish, place two squares right sides together.
Using matching yarn, slip stitch through the outer loops along one edge.
Continue until the entire seam is joined.
Repeat until the back and front panels are assembled.
Press the seams gently with your hands as you work.
Step 9: Join the Shoulders
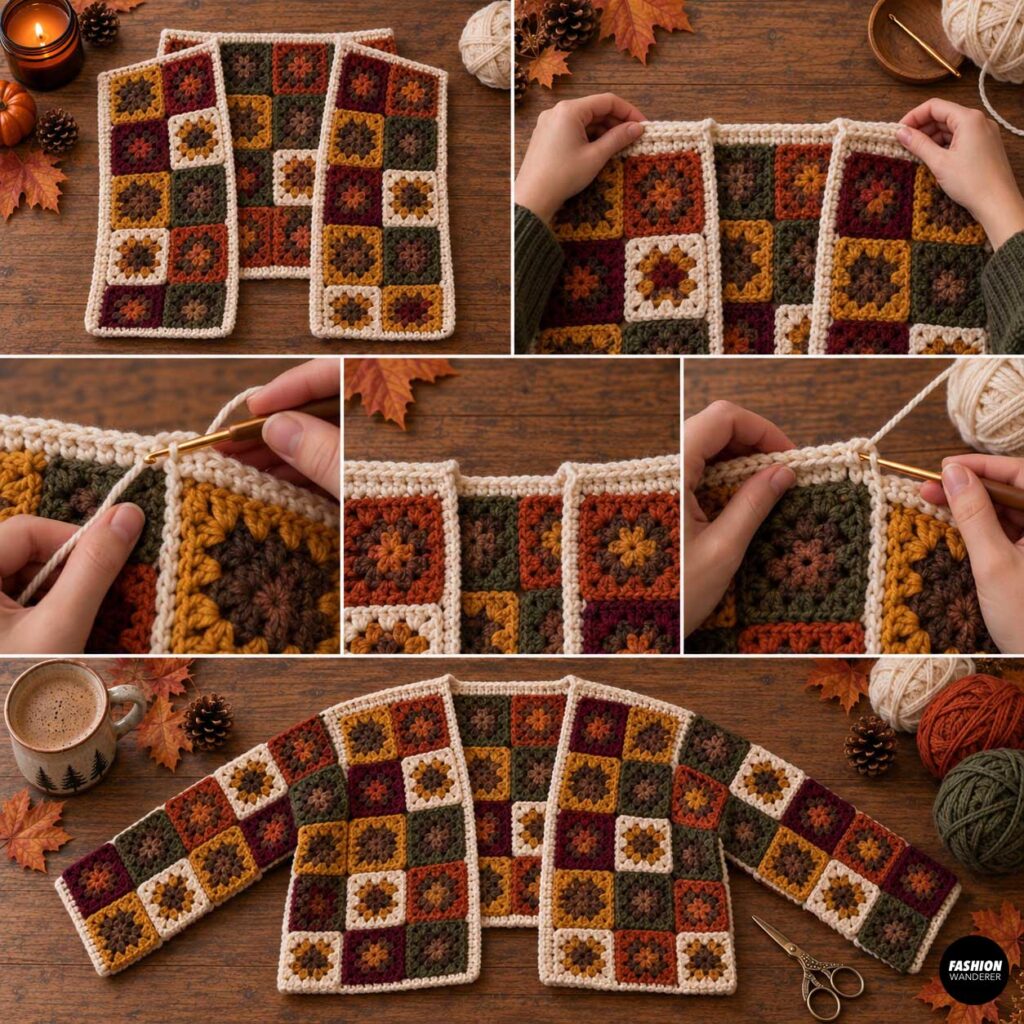
Place the front panels over the back panel with right sides facing.
Align the top edges.
Join each shoulder seam, leaving an opening in the center for your neck.
Try the cardigan on before continuing.
Adjust the neckline width if necessary.
Step 10: Join the Side Seams
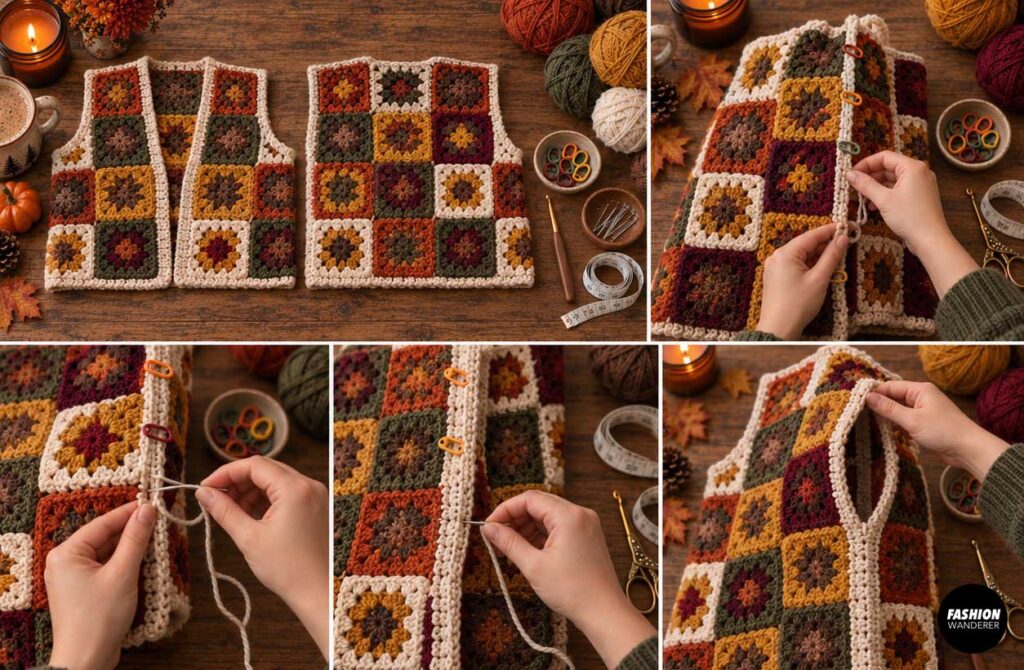
With right sides together, join the front and back panels along each side.
Leave enough space at the upper sides for your armholes.
A comfortable armhole is usually around 7 to 9 inches deep, depending on size and desired fit.
Do not make the armholes too tight because the sleeves will be attached here.
Step 11: Make the Sleeves
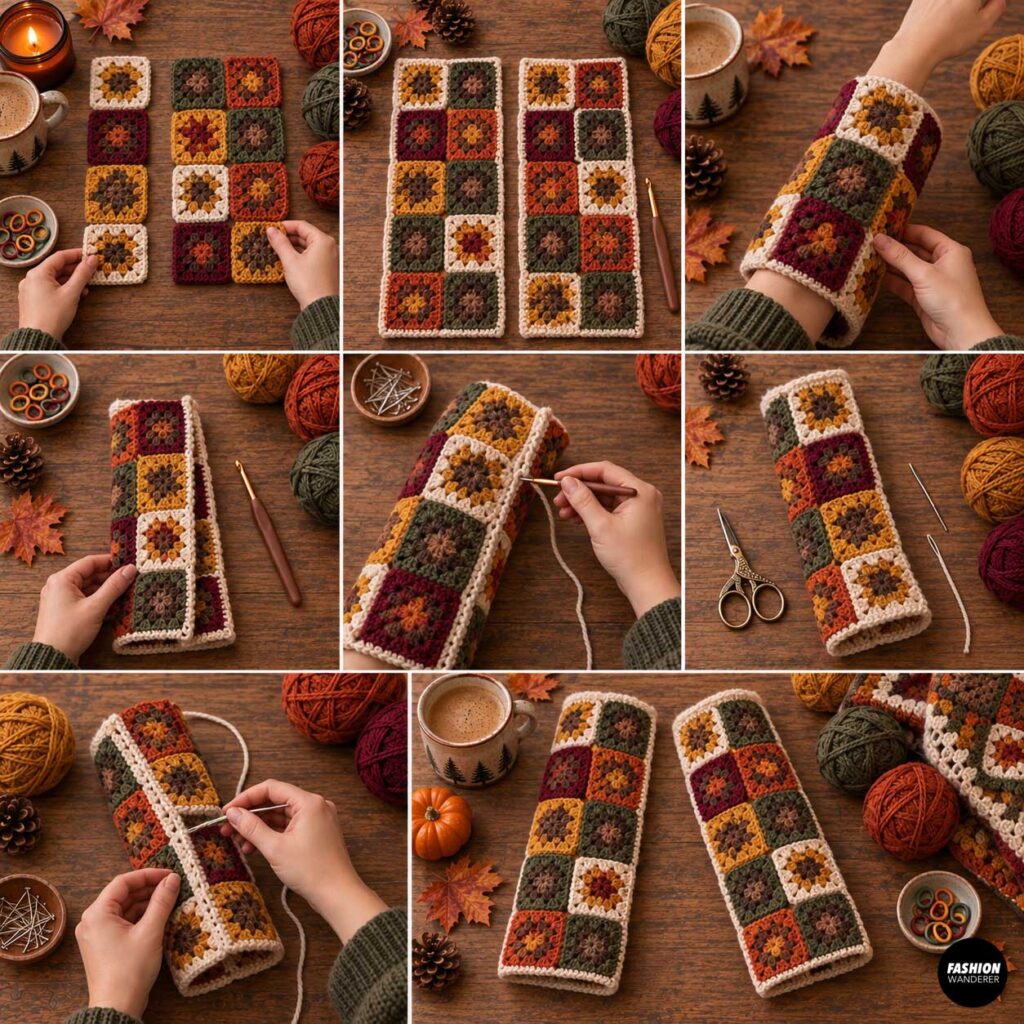
Arrange granny squares into two long sleeve panels.
A beginner-friendly layout might be:
2 squares wide x 3 or 4 squares long
Join the squares into rectangles.
Wrap one panel loosely around your arm to check the width.
Fold the sleeve panel in half lengthwise and join the long seam.
Repeat for the second sleeve.
Step 12: Attach the Sleeves
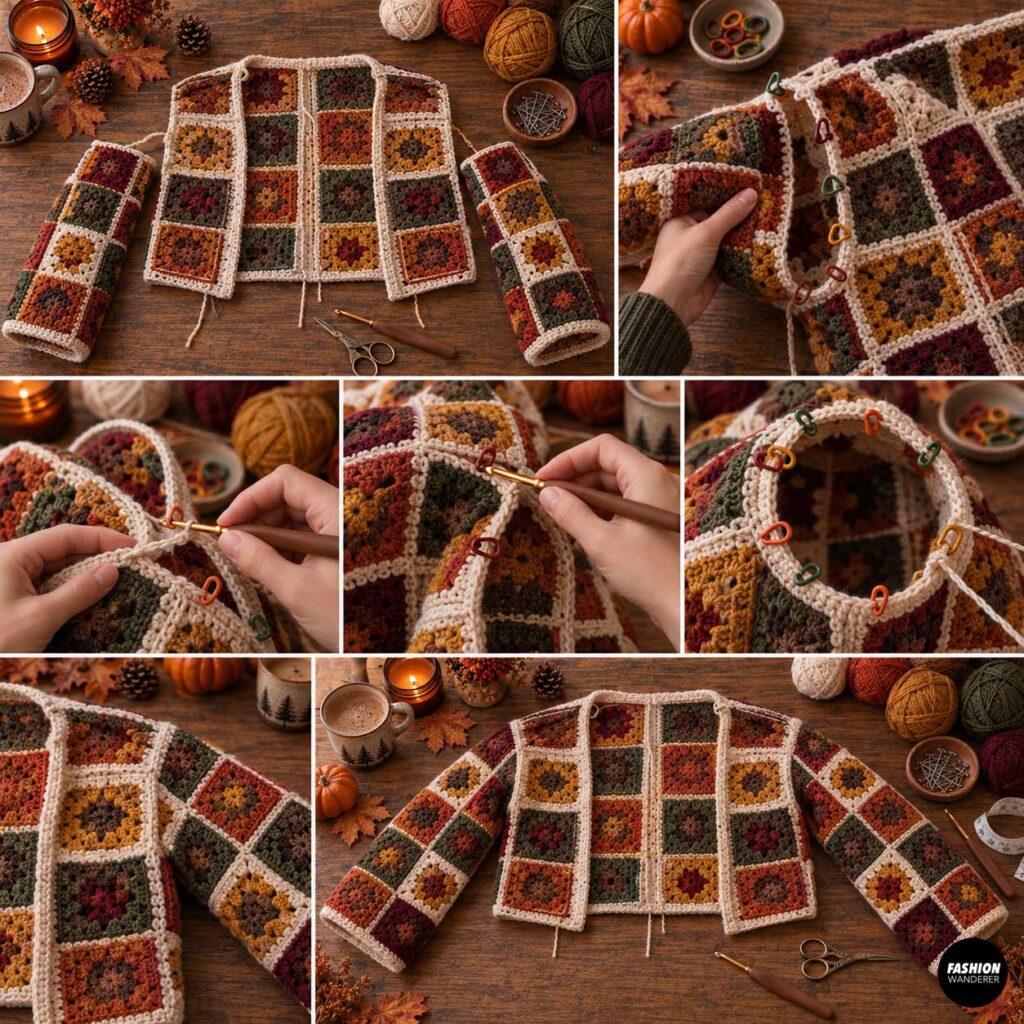
Turn the cardigan inside out.
Place each sleeve into an armhole with right sides together.
Match the sleeve seam with the cardigan side seam.
Pin or use stitch markers around the opening.
Slip stitch or single crochet the sleeve evenly into place.
Repeat for the second sleeve.
Step 13: Add the Front and Neck Border
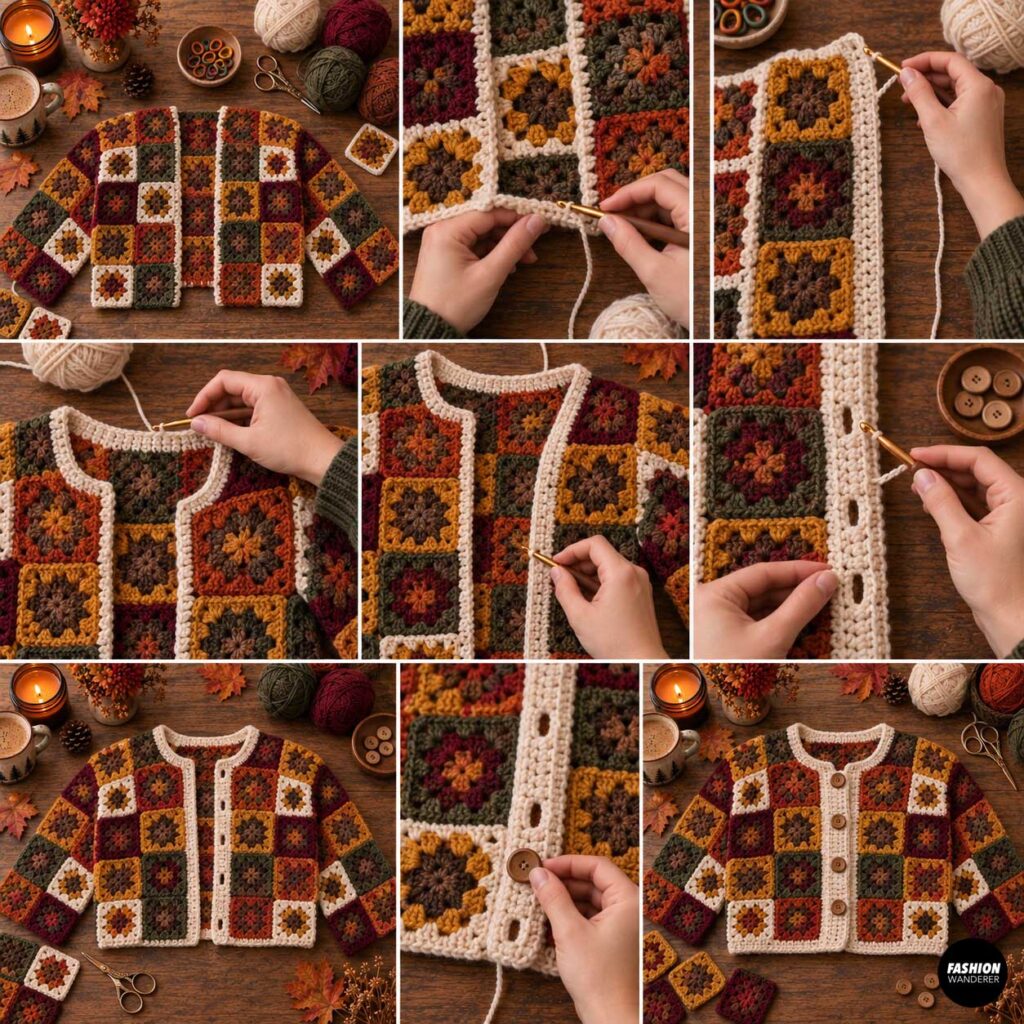
Join your main border color at the lower front edge.
Single crochet evenly up one front edge, around the neckline, and down the opposite front edge.
Work 2 to 4 additional rows of single crochet or half double crochet.
This border helps stabilize the cardigan and gives the opening a professional finish.
If you want buttons, create small chain loops along one side while crocheting the border.
Step 14: Add Sleeve Cuffs
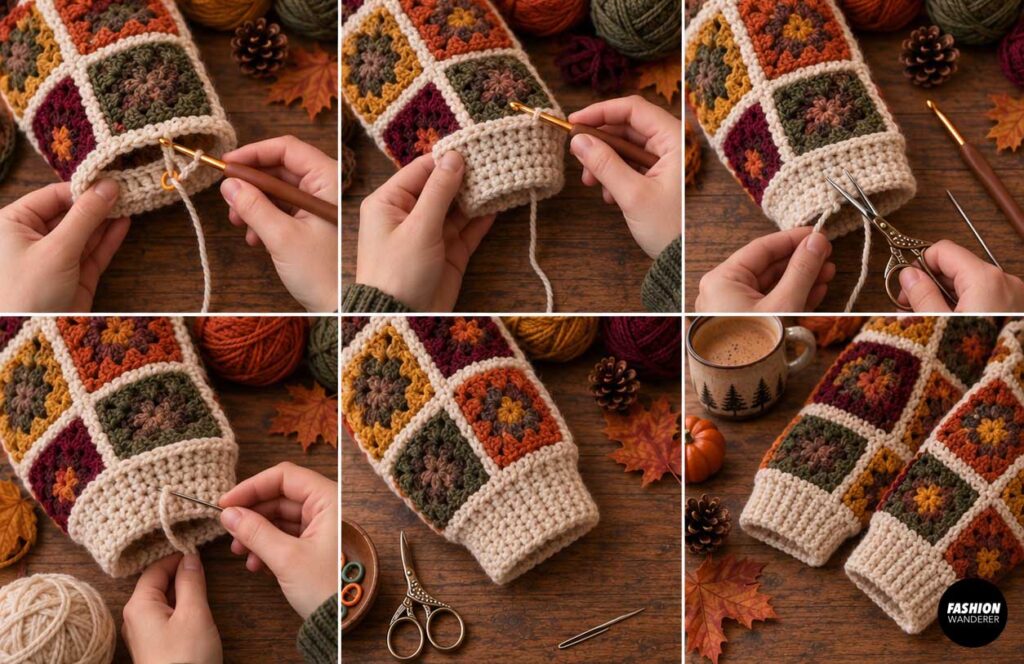
Join yarn around the lower sleeve opening.
Single crochet evenly around.
For a slightly fitted cuff, decrease a few stitches on the first round.
Continue for approximately 1 to 2 inches.
Fasten off and repeat on the other sleeve.
Step 15: Finish the Bottom Hem
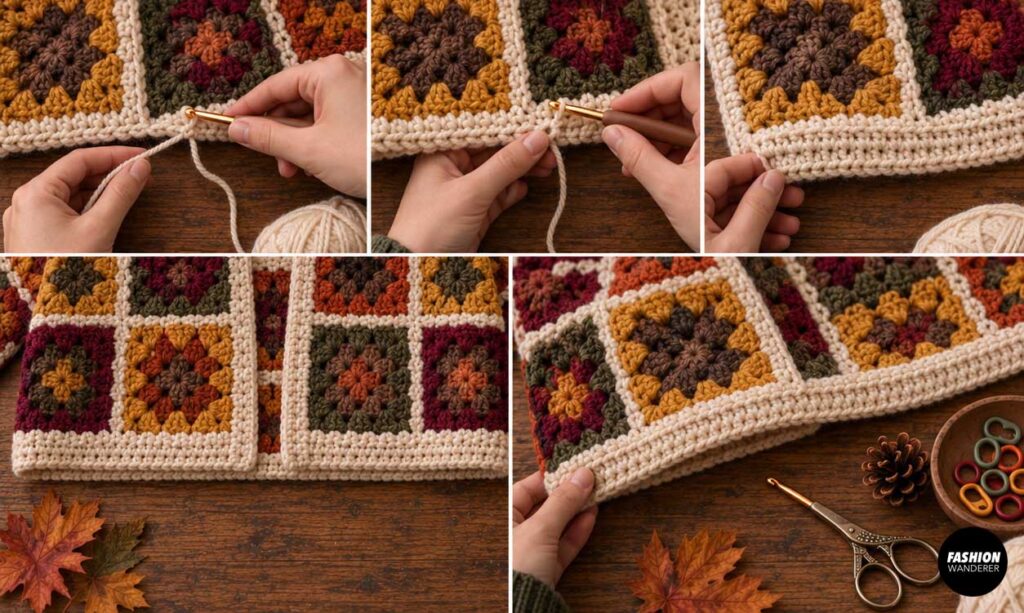
Join yarn at one side seam along the cardigan hem.
Work 2 to 4 rows of single crochet or half double crochet around the bottom edge.
This creates a cleaner cropped silhouette and helps prevent the granny squares from stretching.
Step 16: Weave In Ends and Finish
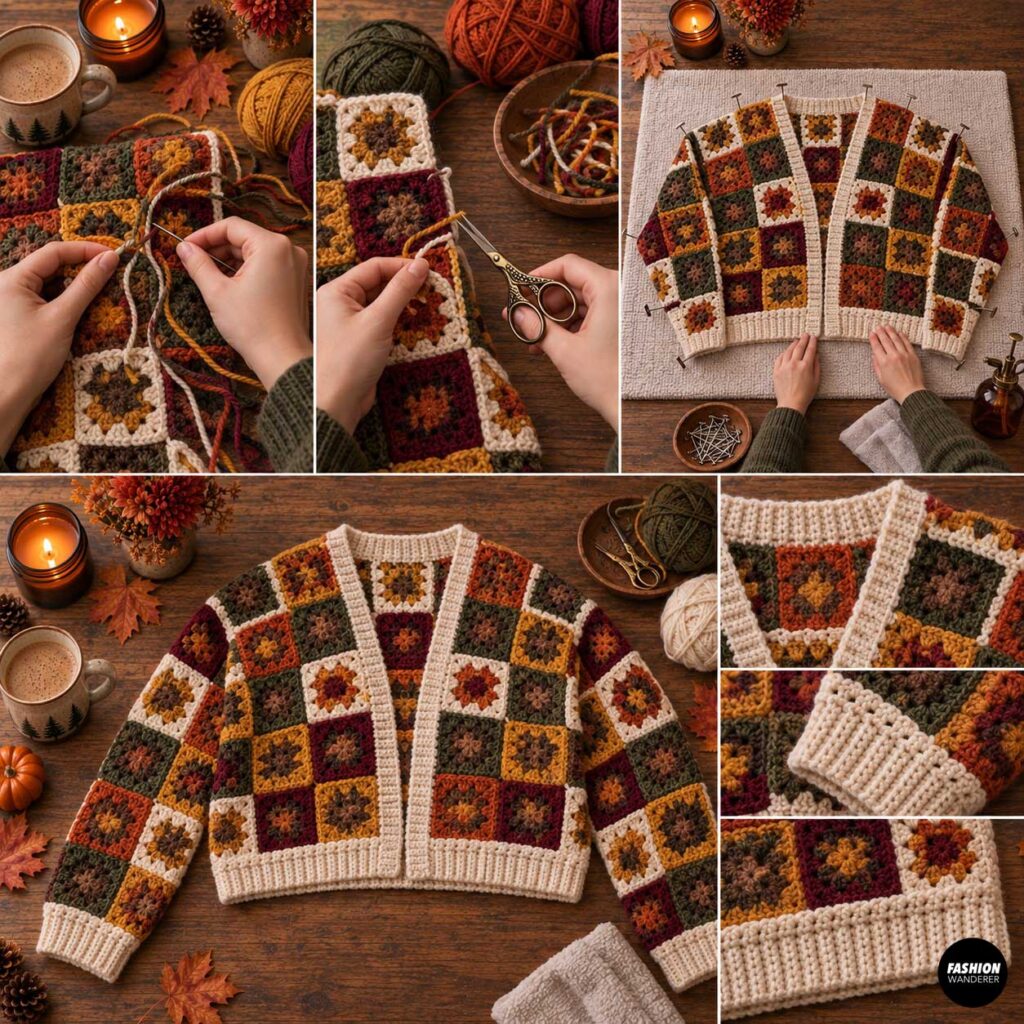
Use a yarn needle to securely weave in every yarn tail.
Trim excess yarn.
Give the completed cardigan one final light blocking.
Shape the neckline, sleeves, and hem while damp, then allow the cardigan to dry flat.
Styling Your Fall Granny-Square Cardigan
A handmade crochet cropped cardigan is easy to wear throughout fall.
Pair it with high-waisted jeans and ankle boots for an everyday look, layer it over a simple dress, or wear it with a fitted turtleneck when temperatures start to drop.
For an especially autumnal look, use pumpkin orange, mustard, olive, burgundy, and cream throughout the granny squares.
Final Thoughts
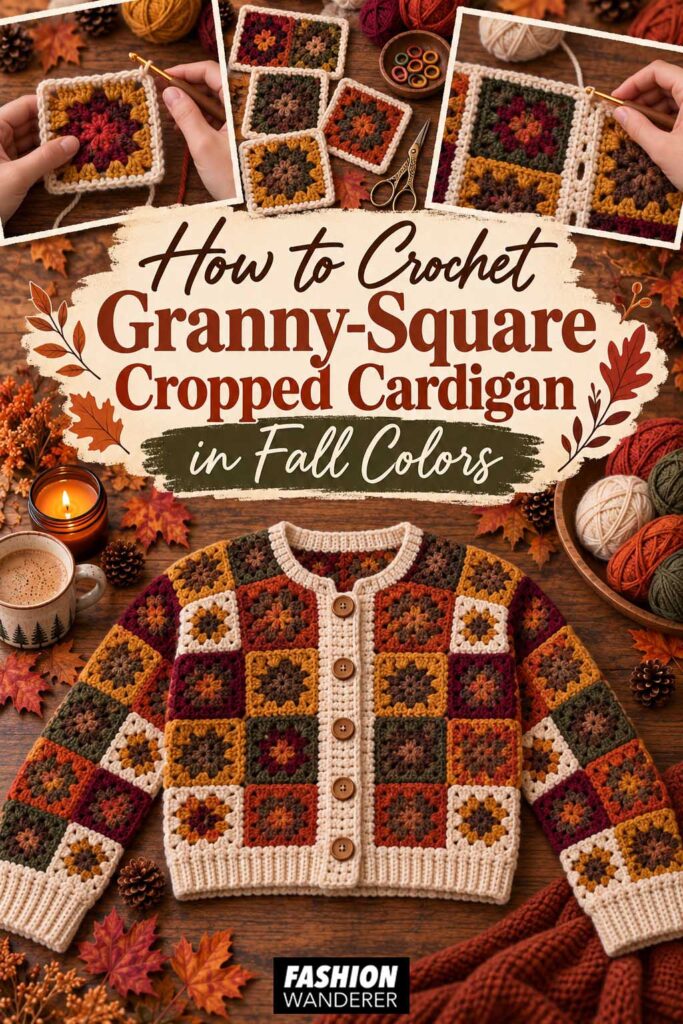
Learning how to crochet a granny-square cropped cardigan is a fun way to turn simple crochet squares into a completely wearable handmade garment. For more detail instruction on sizes XS-3XL, check out this Free Crochet Pattern Granny-Square Cropped Cardigan.
The project is easy to customize because you can change the number of squares, adjust the sleeve length, experiment with color placement, and make the cardigan as cropped or oversized as you like.
Once you have mastered the basic granny square, most of the project is simply repeating, arranging, and joining.
Choose your favorite fall yarn colors, make a stack of cozy granny squares, and transform them into a cardigan you can wear all season long.