
Looking for a cute way to upgrade your dog’s walking gear? This DIY mini dog backpack with detachable pockets is a fun sewing project that turns an ordinary dog harness into an adventure-ready accessory. The two miniature saddlebags can hold lightweight essentials such as empty waste bags or a few treats, and because they’re removable, you can take them off whenever your dog doesn’t need them.
Better yet, you don’t need an advanced sewing pattern to make one. This beginner-friendly DIY dog backpack sewing tutorial starts with an existing, properly fitted harness, so you only need to sew the two little storage pockets and their attachment tabs.
A finished DIY dog backpack is adorable for walks, camping trips, photos, and outdoor adventures. Grab some fabric scraps and let’s sew!
Materials You’ll Need
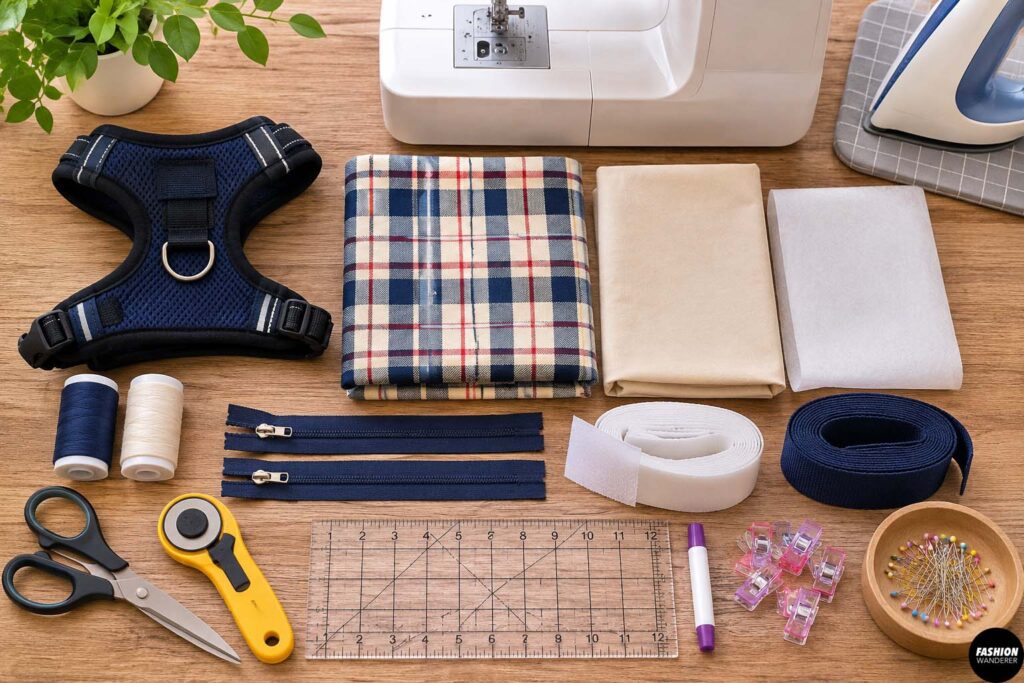
For this DIY mini dog backpack, you will need:
- A comfortable, properly fitted dog harness
- 1/4 yard canvas, denim, ripstop nylon, or other durable fabric
- 1/4 yard lightweight lining fabric
- Lightweight fusible interfacing, optional
- Two small zippers
- 1-inch hook-and-loop tape
- 1-inch nylon or polyester webbing
- Polyester thread
- Sewing machine
- Fabric scissors or rotary cutter
- Ruler
- Fabric marker
- Sewing clips or pins
- Iron and ironing board
For outdoor use, lightweight ripstop or water-resistant fabric is a practical choice. For a fashionable everyday backpack, try canvas, colorful cotton duck, or upcycled denim.
DIY Mini Dog Backpack with Detachable Pockets
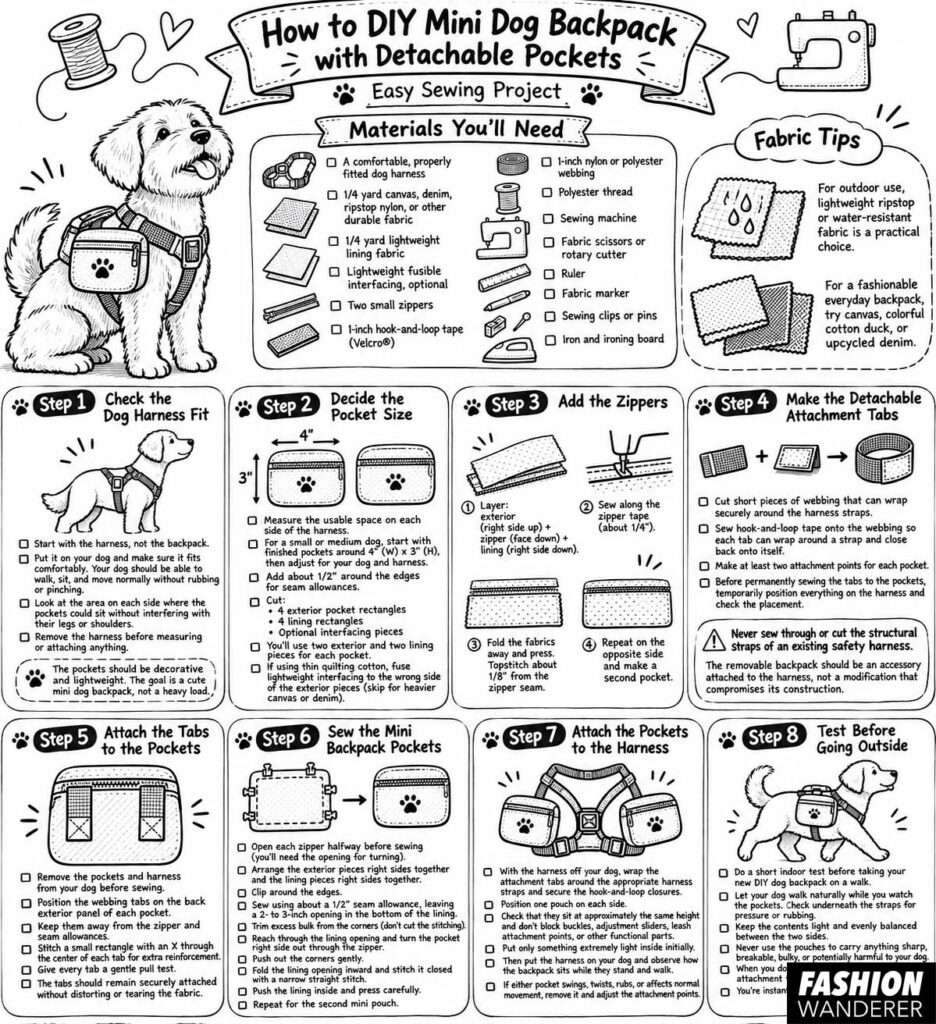
Step 1: Check the Dog Harness Fit
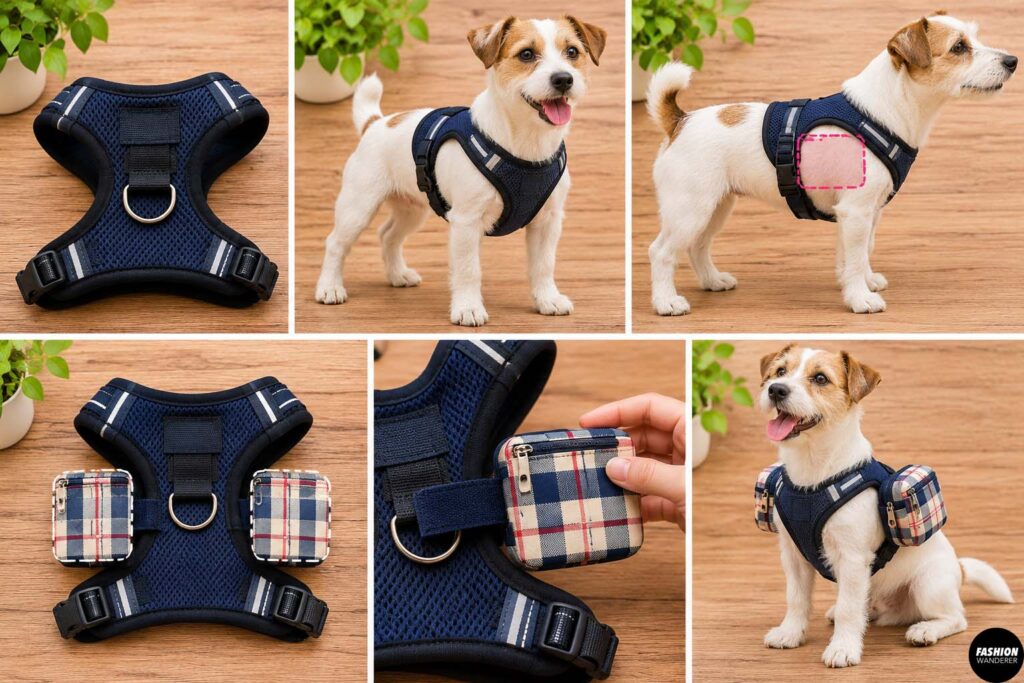
Start with the harness rather than the backpack.
Put the harness on your dog and make sure it fits comfortably according to the manufacturer’s directions. Your dog should be able to walk, sit, and move normally without rubbing or pinching.
Look at the area on either side of the harness where the detachable pockets could sit without interfering with the dog’s legs or shoulder movement.
Remove the harness before measuring, marking, or attaching anything.
The pockets should be decorative and lightweight rather than large cargo bags. The goal is a cute mini dog backpack, not a way to make your dog carry a heavy load.
Step 2: Decide the Pocket Size
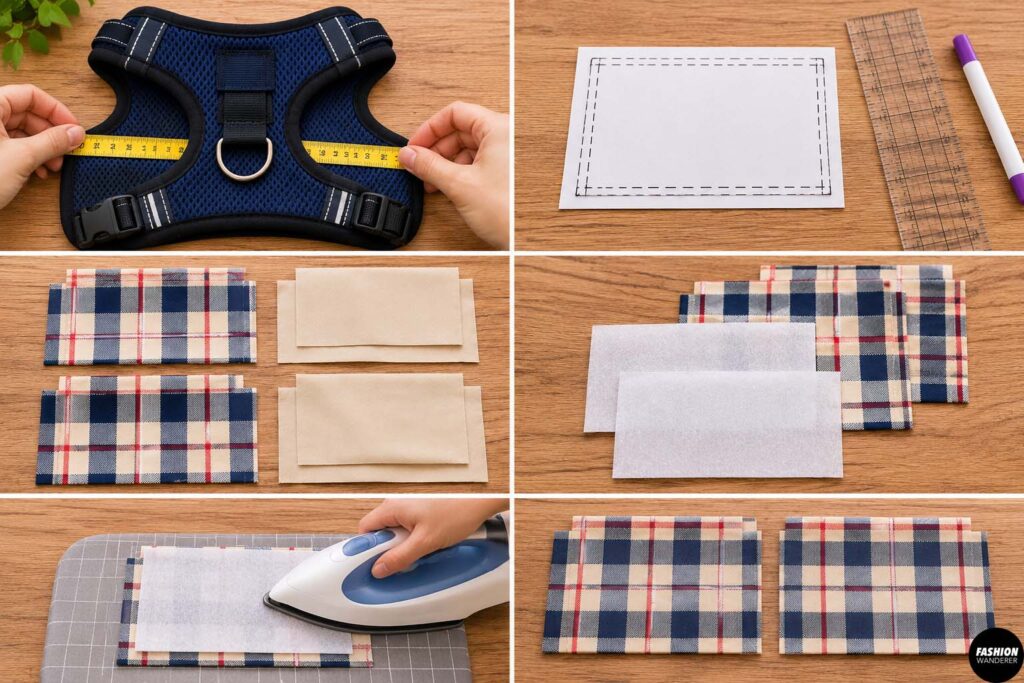
Measure the usable space on each side of the harness.
For a small or medium dog, you might start with finished pockets around 4 inches wide by 3 inches tall, then adjust the dimensions for your dog and harness.
Add approximately 1/2 inch around the edges for seam allowances.
Cut:
- 4 exterior pocket rectangles
- 4 lining rectangles
- Optional interfacing pieces for the exterior
You will use two exterior and two lining pieces for each detachable pocket.
If you are using thin quilting cotton, fuse lightweight interfacing to the wrong side of the exterior pieces. Skip this step with heavier canvas or denim if the fabric already has enough structure.
Step 3: Add the Zippers
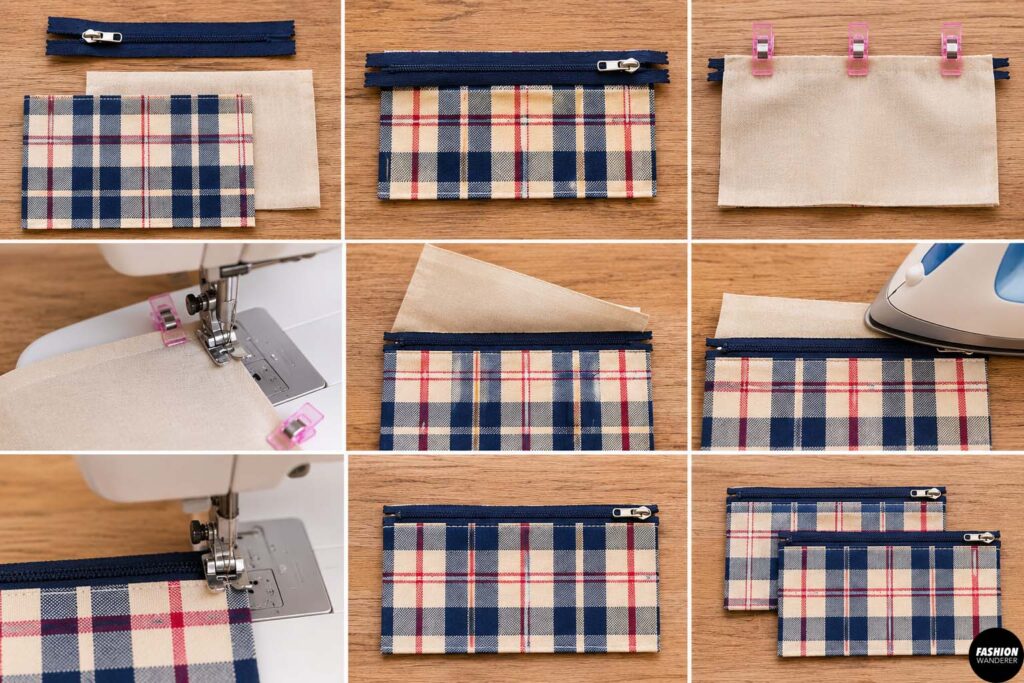
Place one exterior rectangle right side up.
Position the zipper face down along its upper edge. Place one lining piece right side down over the zipper, creating a sandwich.
Clip everything together.
Using a zipper foot, sew along the zipper tape approximately 1/4 inch from the edge.
Fold the exterior and lining away from the zipper and press carefully. Topstitch approximately 1/8 inch from the zipper seam for a neat finish.
Repeat on the opposite side of the zipper with the remaining exterior and lining pieces.
You should now have a zipper running across the top of your little dog backpack pocket.
Repeat for the second pocket.
Step 4: Make the Detachable Attachment Tabs
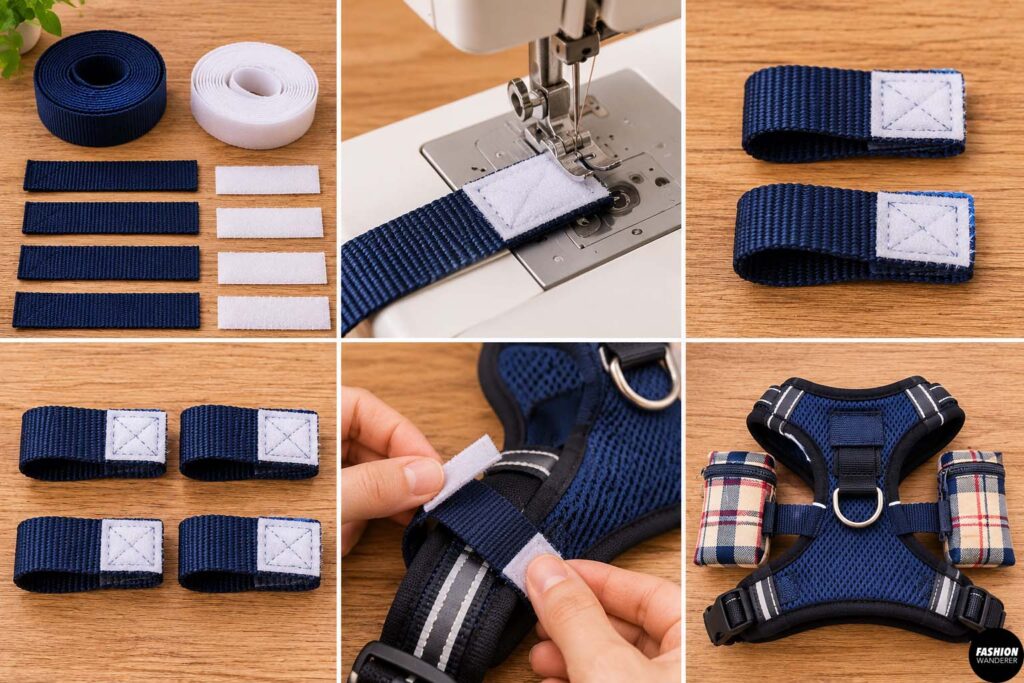
The secret to this project is making the pockets removable.
Cut short pieces of webbing that can wrap securely around the appropriate straps of your existing harness. The exact length will depend on your harness.
Sew hook-and-loop tape onto the webbing so each tab can wrap around the harness strap and close back onto itself.
Make at least two attachment points for each pocket to help prevent the pouch from swinging.
Before permanently sewing the tabs to the pockets, temporarily position everything on the harness and check the placement.
Never sew through or cut the structural straps of an existing safety harness. The removable backpack should be an accessory attached to the harness, not a modification that compromises its construction.
Step 5: Attach the Tabs to the Pockets
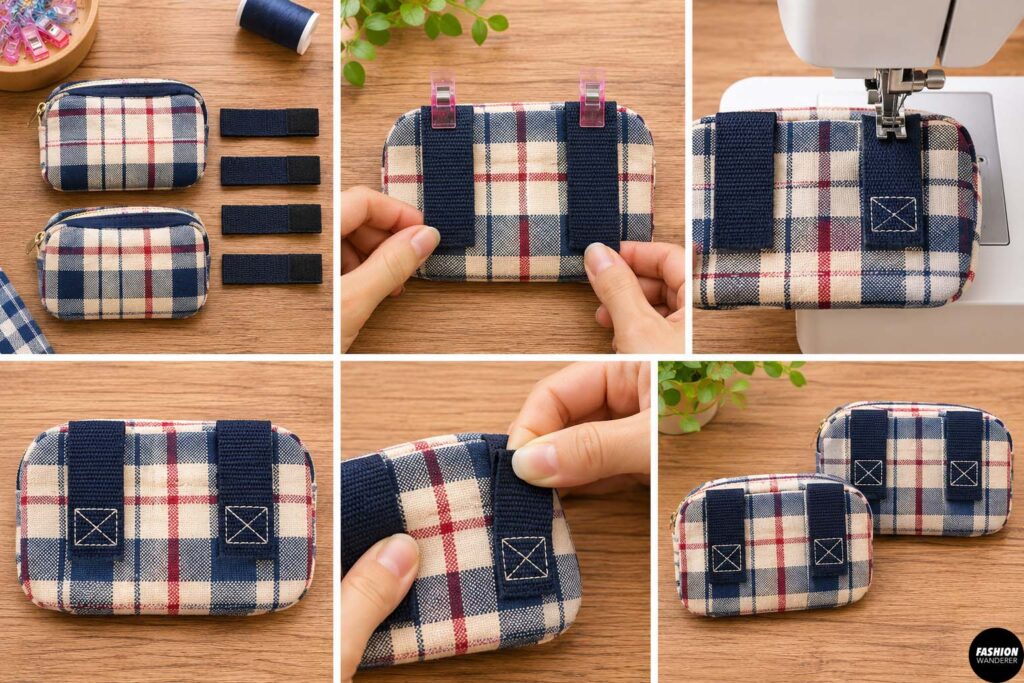
Remove the pockets and harness from your dog before sewing.
Position the webbing tabs on the back exterior panel of each pocket.
Keep them away from the zipper and seam allowances.
Stitch a small rectangle with an X through the center of each webbing attachment area for additional reinforcement.
Give every tab a gentle pull test.
The tabs should remain securely attached without distorting or tearing the pocket fabric.
Step 6: Sew the Mini Backpack Pockets
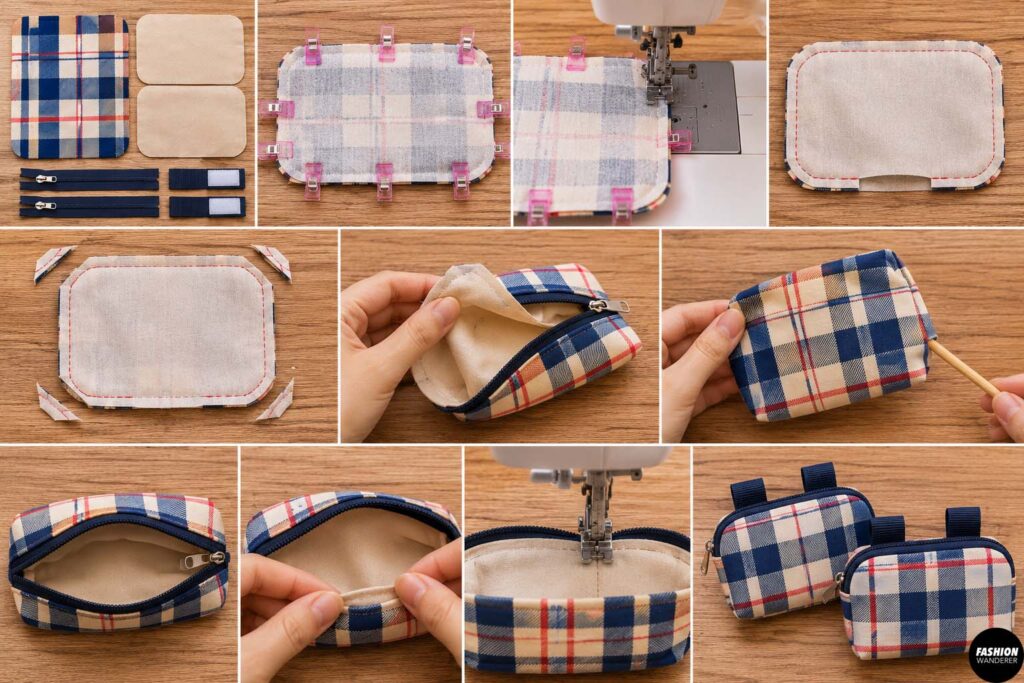
Open each zipper halfway before sewing the pocket closed. This is important because you’ll need the opening for turning.
Arrange the exterior pieces right sides together and the lining pieces right sides together.
Clip around the edges.
Sew using approximately a 1/2-inch seam allowance, leaving a 2- to 3-inch opening in the bottom of the lining.
Trim excess bulk from the corners without cutting through the stitching.
Reach through the lining opening and carefully turn the pocket right side out through the zipper.
Push out the corners gently.
Fold the lining opening inward and stitch it closed with a narrow straight stitch. Push the lining inside the pocket and press carefully.
Repeat for the second mini pouch.
Step 7: Attach the Pockets to the Harness
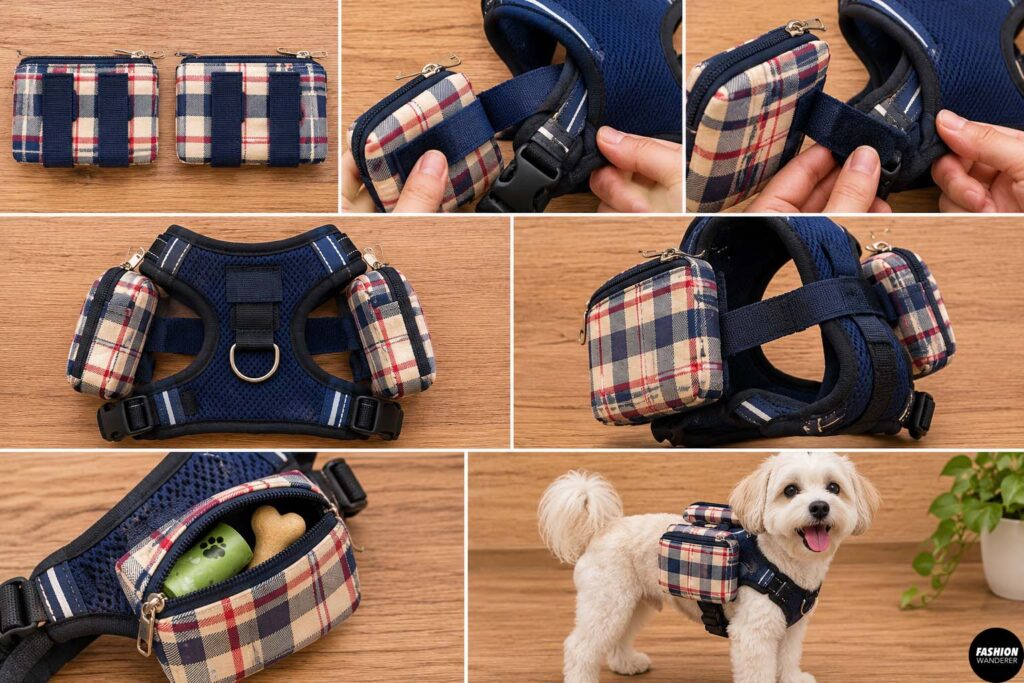
With the harness off your dog, wrap the attachment tabs around the appropriate harness straps and secure the hook-and-loop closures.
Position one pouch on each side.
Check that they sit at approximately the same height and that neither pocket blocks buckles, adjustment sliders, leash attachment points, or other functional parts of the harness.
Put only something extremely light inside initially.
Then put the harness on your dog and observe how the backpack sits while your dog stands and walks.
If either pocket swings, twists, rubs, or affects normal movement, remove it and adjust the attachment points.
Step 8: Test Before Going Outside
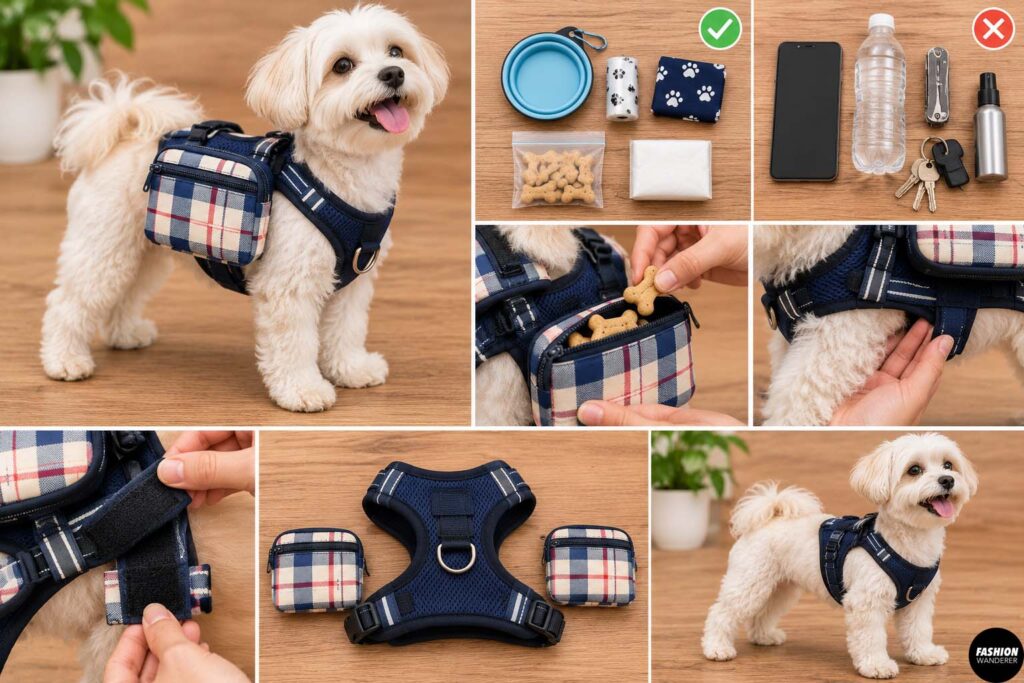
Do a short indoor test before taking your new DIY dog backpack on a walk.
Let your dog walk naturally while you watch the pockets. Check underneath the straps for pressure or rubbing.
Keep the contents light and evenly balanced between the two sides. Never use the pouches to carry anything sharp, breakable, bulky, or potentially harmful to your dog.
When you don’t need storage, simply undo the attachment tabs and remove both pockets.
You’re instantly back to the original harness.
Fun Ways to Customize Your Dog Backpack
Once you understand the basic construction, this project is incredibly easy to personalize.
Try making an upcycled denim dog backpack from an old pair of jeans. Add reflective trim for evening walks, embroider your dog’s name onto the pockets, use contrasting zippers, or create seasonal versions with fun fabric prints.
You could even make several interchangeable pocket sets—one for everyday walks, a waterproof version for outdoor adventures, and a colorful printed set just for cute photos.
Final Thoughts
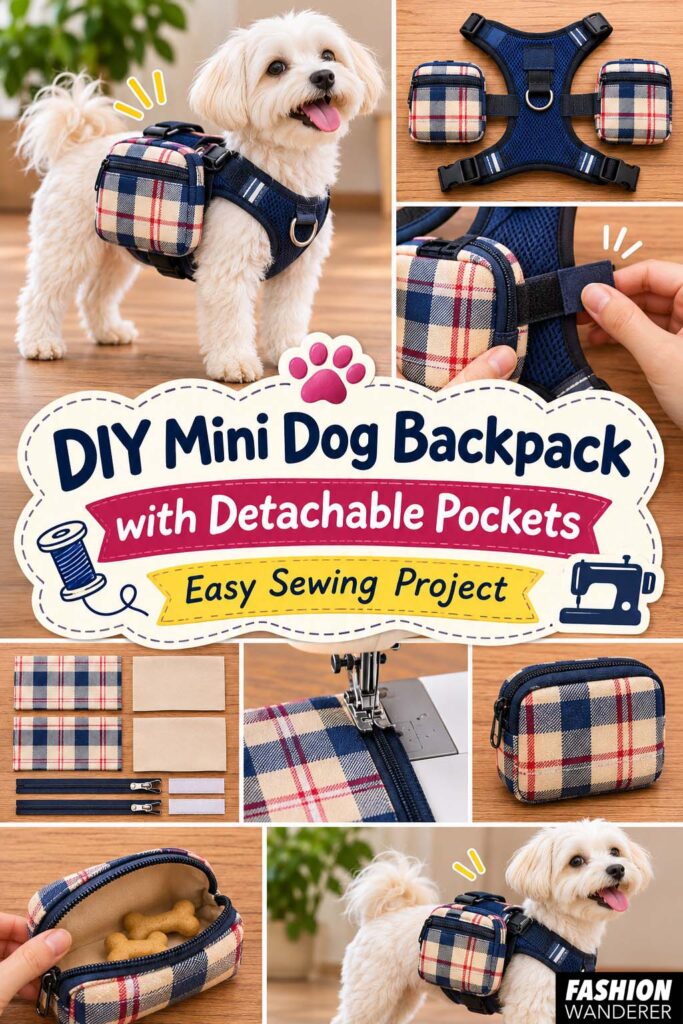
Making a DIY mini dog backpack with detachable pockets is an easy way to combine sewing, upcycling, and practical pet accessories in one beginner-friendly project.
The detachable design is what makes this project especially useful. Instead of permanently altering your dog’s harness, you can add the mini pockets when you want them and remove them in seconds when you don’t.
Keep the pouches small, the contents very light, and your dog’s comfort and freedom of movement as the priority.
With two tiny zippered pockets, a few pieces of webbing, and some fabric from your stash, an ordinary harness can become an adorable handmade dog backpack ready for your next walk or adventure.