
Have two old sweaters sitting in your closet that you never wear? Instead of donating or throwing them away, turn them into a trendy DIY color-block patchwork cardigan! This beginner-friendly fall upcycle transforms two outdated knits into one cozy, stylish cardigan with a unique, designer-inspired look.
Color-block cardigans are perfect for layering over jeans, dresses, and basic T-shirts. The best part? You don’t need to knit an entirely new sweater or purchase expensive fabric.
In this step-by-step tutorial, you’ll learn how to turn two old sweaters into a patchwork cardigan, including cutting, mixing sweater panels, sewing knit fabrics, creating a front opening, and finishing the edges.
Why You’ll Love This DIY Sweater Upcycle
- Budget-friendly: Repurpose sweaters you already own.
- Sustainable fashion: Give unwanted clothing a second life.
- Beginner-friendly: Basic sewing skills are enough.
- Customizable: Mix contrasting colors, textures, and knit patterns.
- Trendy style: Create an oversized, vintage-inspired patchwork cardigan.
Skill Level: Confident beginner
Estimated Time: 2–4 hours
Best Fabrics: Cotton knit, acrylic knit, sweater jersey, or stable wool-blend sweaters.
Materials You’ll Need
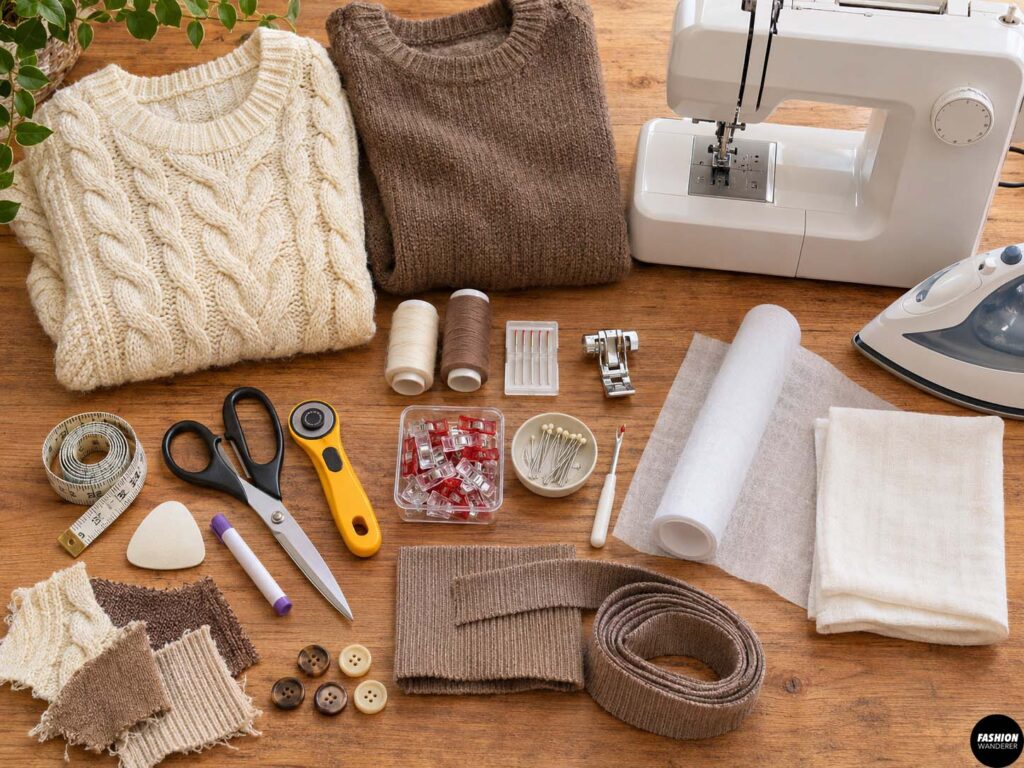
Gather these supplies before starting:
- Two old sweaters in contrasting or coordinating colors
- Sewing machine
- Ballpoint or stretch sewing machine needle
- Polyester thread
- Fabric scissors or rotary cutter
- Measuring tape
- Fabric chalk or washable marker
- Sewing clips or pins
- Seam ripper
- Lightweight knit fusible interfacing
- Matching or contrasting buttons, optional
- Coordinating knit binding or ribbed fabric
- Iron and pressing cloth
- Optional walking foot
- Optional fabric scraps for extra patchwork details
Beginner Tip: Choose sweaters with similar thickness and stretch. For example, combine a cream cable-knit sweater with a brown or beige plain-knit sweater for a modern neutral color-block look.
Avoid combining a very stretchy, lightweight sweater with a heavy, stiff knit because the finished cardigan may hang unevenly.
Easy Sweater Upcycle
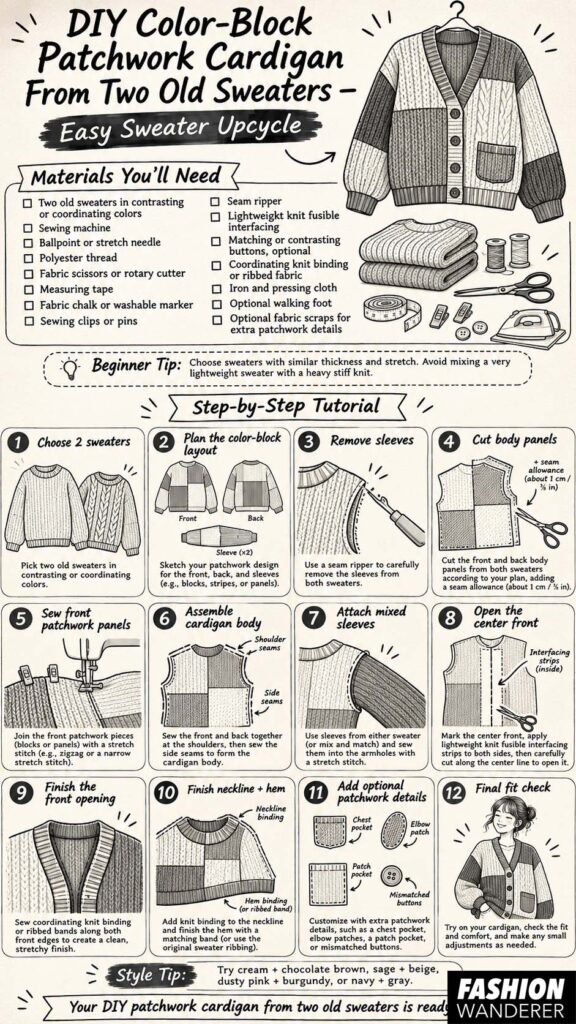
Step 1: Choose Your Two Sweaters
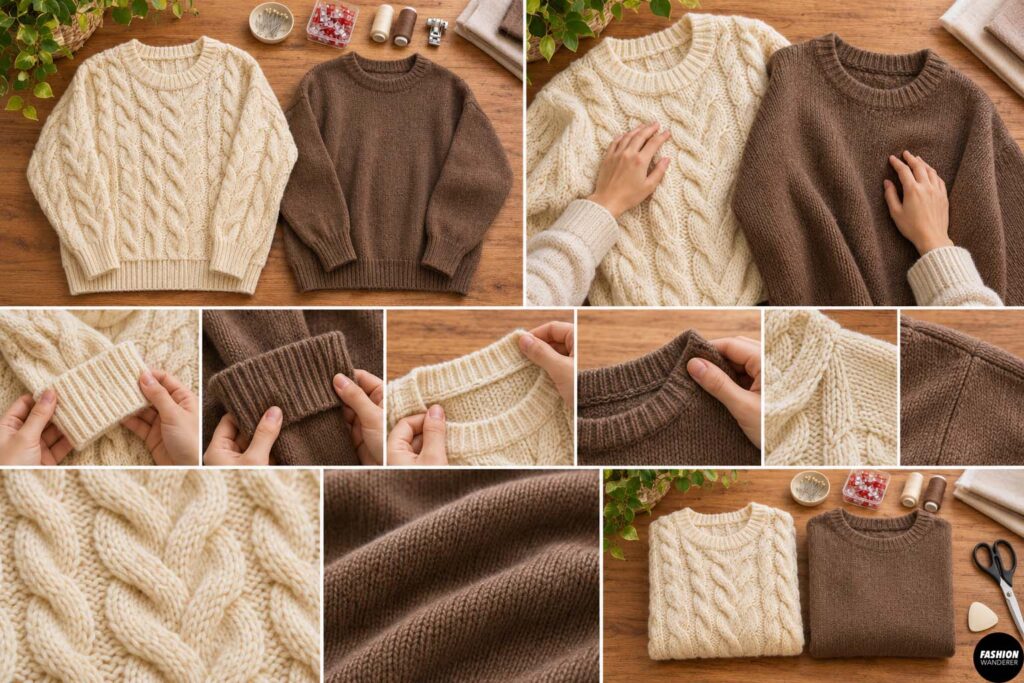
Start by selecting two sweaters that work well together.
For a modern patchwork cardigan, try combining cream and chocolate brown, sage green and beige, dusty pink and burgundy, or navy and gray.
Choose sweaters that are approximately the same size, preferably oversized.
Lay both sweaters flat and inspect their condition.
Check for holes, stretched-out cuffs, damaged seams, and worn fabric.
Decide which sweater will become the main cardigan base and which one will provide contrasting color-block panels.
Style Tip: A sweater with an interesting cable-knit texture can make a beautiful statement sleeve or front panel.
Step 2: Plan Your Color-Block Design
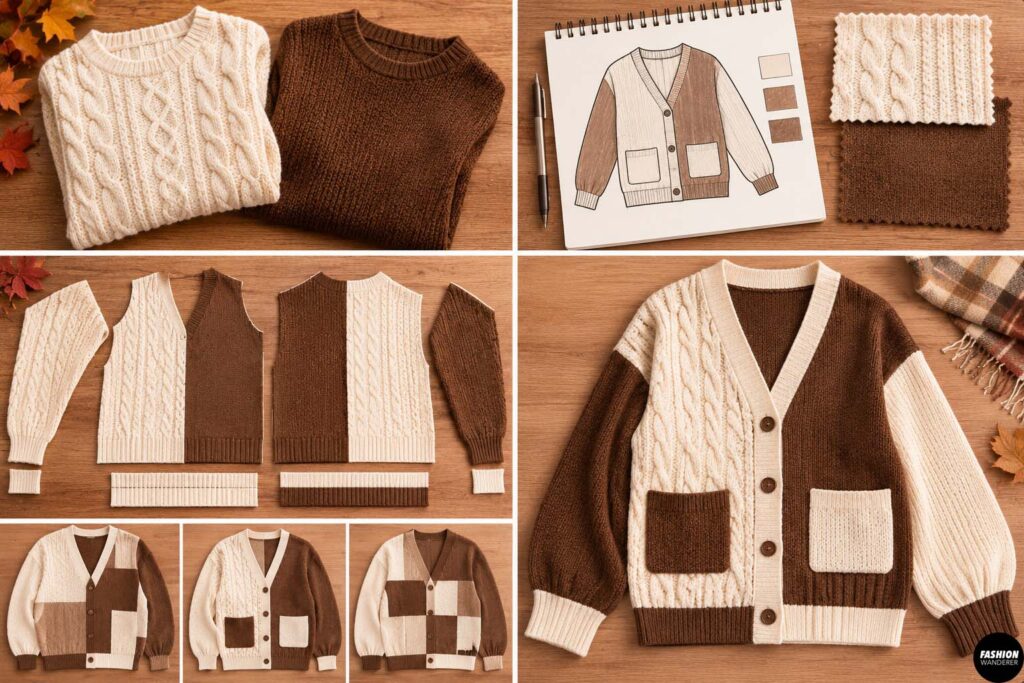
Lay both sweaters side by side on a large table.
Decide where you want the contrasting colors to appear.
A simple design could include:
- Left front panel in one color
- Right front panel in the second color
- Contrasting sleeves
- Two-tone back panel
- Mixed cuffs and hem bands
For a more playful patchwork effect, combine smaller rectangular panels across the front.
Take a quick photo of your layout before cutting.
This will help you remember where each piece belongs during sewing.
Step 3: Remove the Sleeves
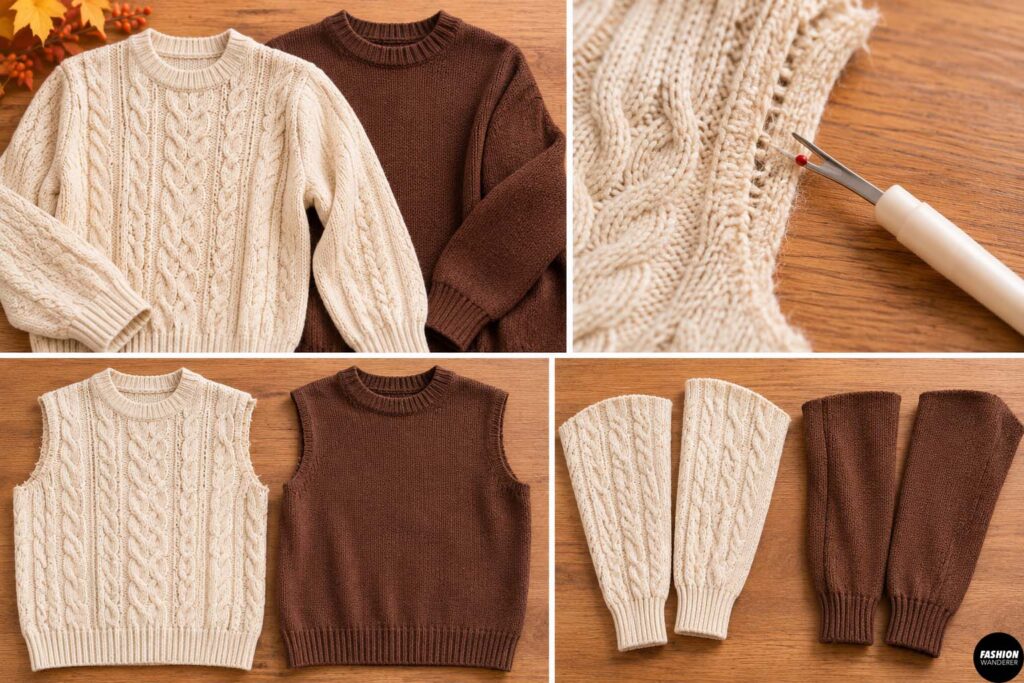
Turn both sweaters inside out.
Using a seam ripper, carefully remove the sleeves along the armhole seams.
If the original seams are too difficult to unpick, cut just outside the stitching, keeping the armhole shape intact.
Set all four sleeves aside.
Try to preserve the original sleeve cuffs whenever possible.
Using existing ribbed cuffs saves time and gives the finished cardigan a professional appearance.
Important: Some sweaters can unravel when cut. Stabilize cutting lines with narrow zigzag stitching before cutting if the knit is loosely constructed.
Step 4: Cut the Sweater Body Panels
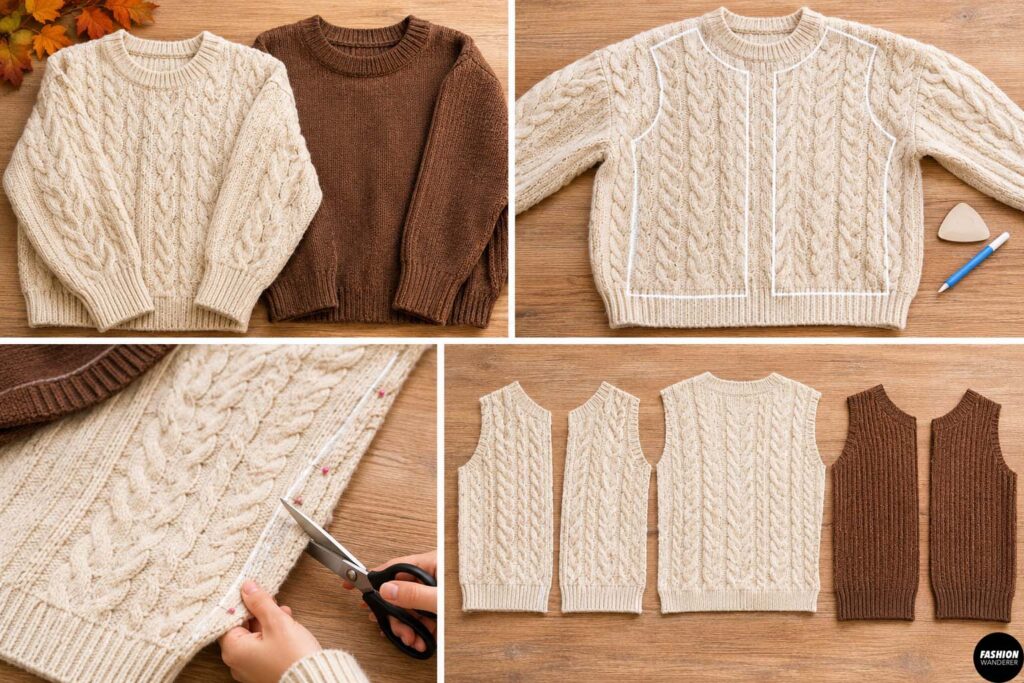
Lay your sweaters flat, smoothing out wrinkles without stretching the knit.
For a simple two-tone design, use one sweater’s body as the cardigan base and replace one front or side section with fabric from the second sweater.
For a more dramatic patchwork design, separate both sweaters into front and back sections.
Mark the desired panel shapes using fabric chalk.
Add approximately ⅜ inch seam allowance around newly cut edges.
Cut slowly with sharp scissors or a rotary cutter.
Keep each panel labeled so you can identify its position.
Avoid cutting through the original neckline or hem bands unless you plan to replace them.
Step 5: Create the Patchwork Front Panels
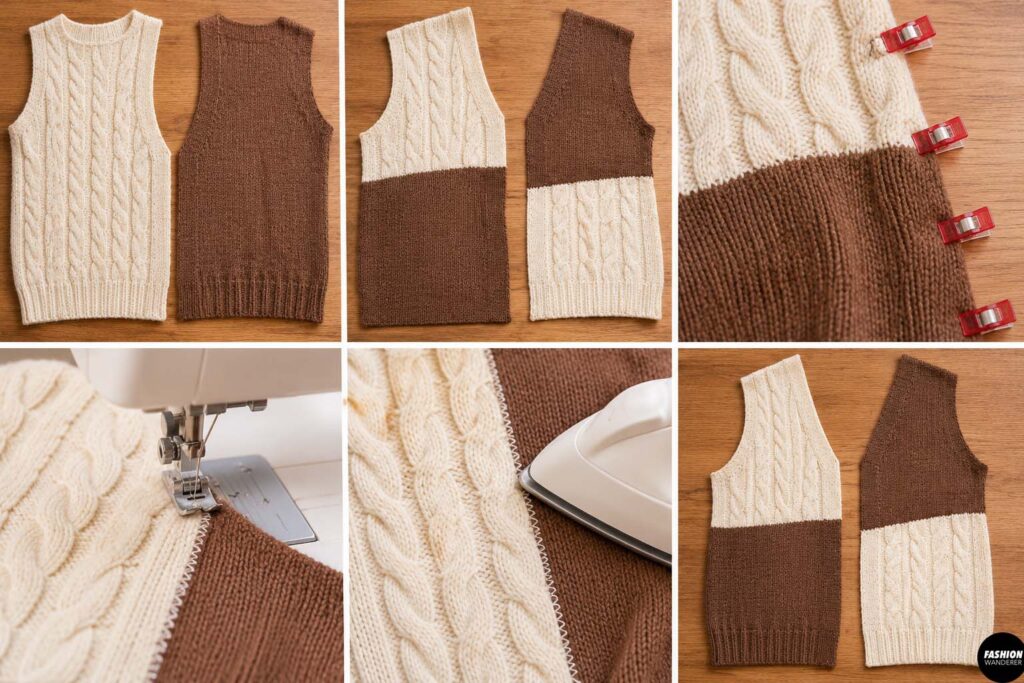
Arrange your contrasting sweater pieces into the desired cardigan front design.
Place adjacent pieces right sides together.
Pin or clip along the joining edges.
Using a narrow zigzag stitch or stretch stitch, sew the panels together with a ⅜-inch seam allowance.
A serger can also be used if available.
Press the seams gently with a pressing cloth.
Avoid stretching the fabric while pressing.
Continue joining the pieces until you have completed both front panels.
Beginner Tip: Use larger color-block sections instead of tiny patches. Bigger panels are easier to sew and create a cleaner, minimalist appearance.
Step 6: Assemble the Cardigan Body
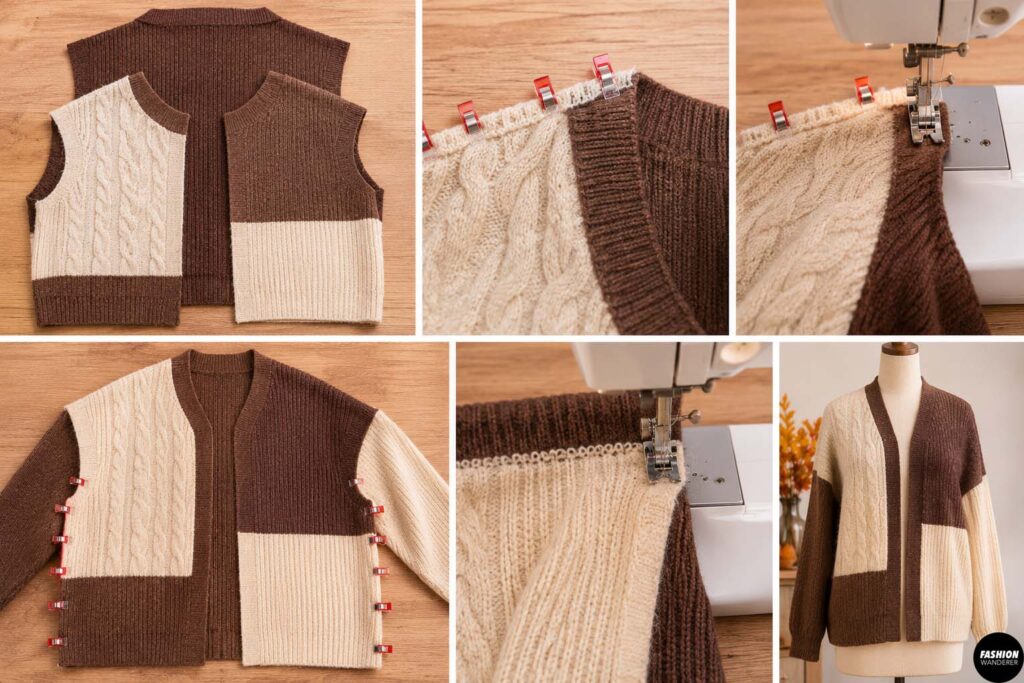
Place the completed front sections against the back panel with right sides together.
Match the shoulder seams first.
Sew both shoulder seams using a stretch stitch.
Next, align the side seams.
Sew from the underarm toward the bottom hem.
If you want an oversized fit, avoid taking in too much fabric.
Try the cardigan body on before attaching the sleeves.
Check the shoulder placement, overall width, and length.
Make adjustments if necessary.
Step 7: Mix and Attach the Sleeves
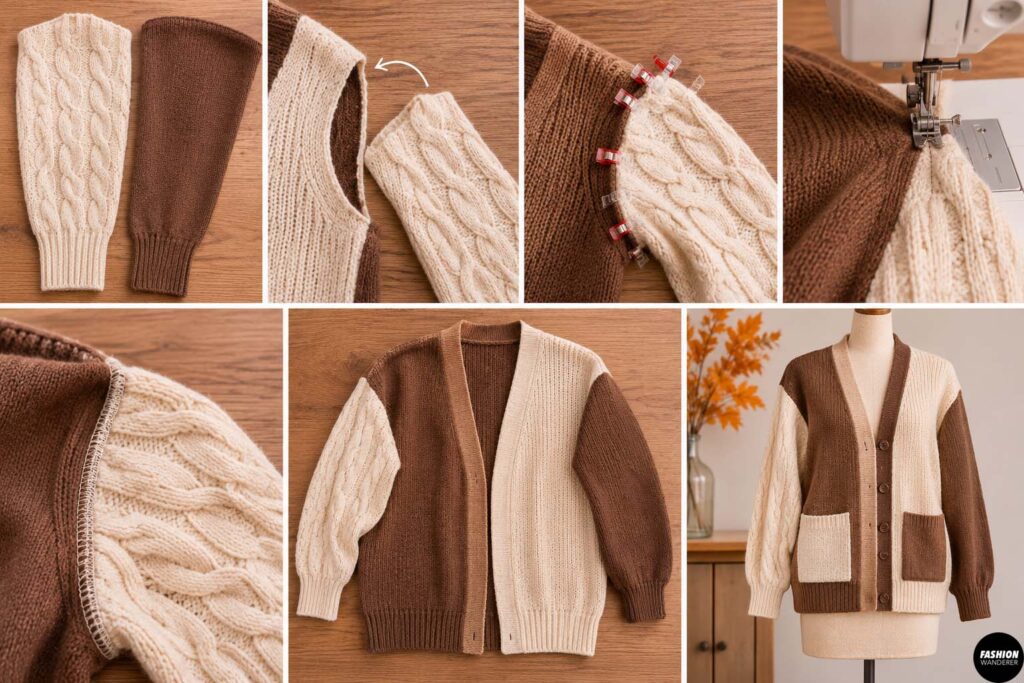
Now comes one of the most noticeable design details: the contrasting sleeves!
Choose one sleeve from each sweater for a mismatched color-block appearance.
Alternatively, create patchwork sleeves by combining sections from different sweaters.
If combining sleeves, cut the sections at matching positions, add seam allowances, and sew them together before attaching.
Turn the sleeves right side out.
With the cardigan body inside out, insert each sleeve into its armhole so the right sides face.
Match the underarm seams and shoulder points.
Clip evenly around the armhole.
Sew using a narrow zigzag or stretch stitch.
Repeat for the second sleeve.
Turn the cardigan right side out and check the fit.
Step 8: Turn the Sweater Into a Cardigan
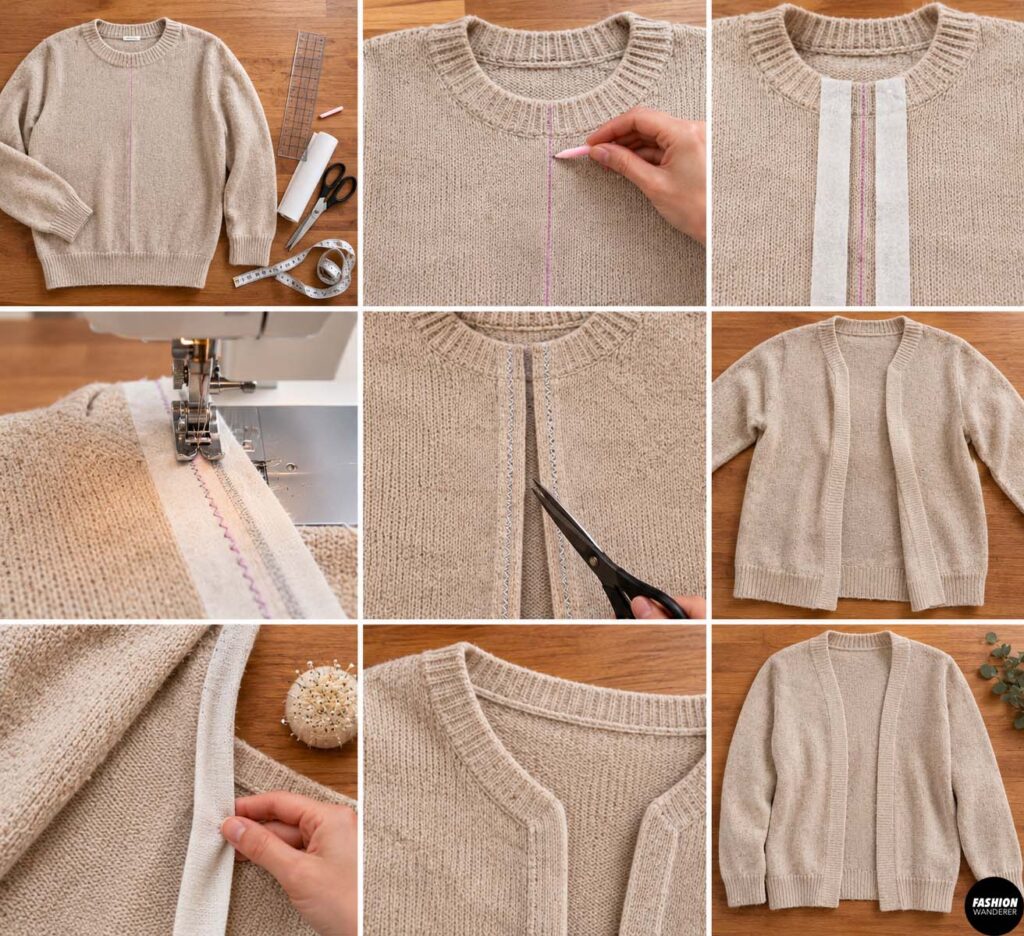
If your sweater base originally had a closed front, mark a straight vertical line down the center front.
Measure carefully to ensure the opening is centered.
Apply narrow strips of lightweight knit interfacing along both sides of the marked line.
This helps stabilize the knit before cutting.
Sew a narrow zigzag line along each side of the center marking, then carefully cut between the stitched lines.
Keep the scissors away from the surrounding fabric.
You now have an open-front cardigan!
If you’ve already constructed separate front panels, simply finish their center-front edges instead of cutting again.
Step 9: Finish the Front Opening
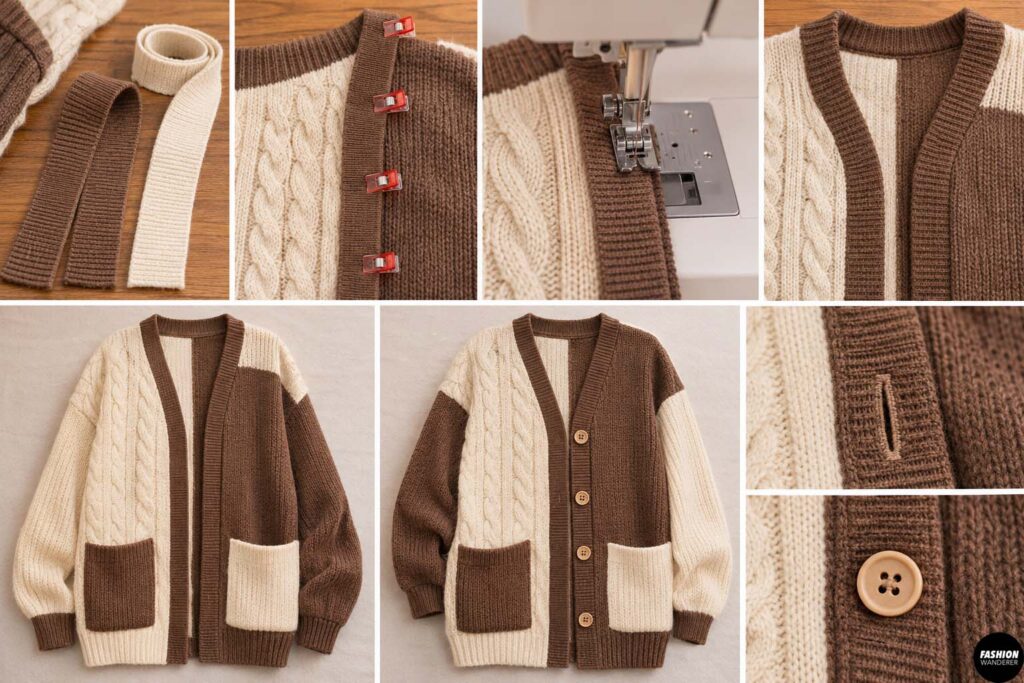
A clean front opening makes your DIY cardigan look polished.
Cut two strips of coordinating knit binding or reuse ribbed fabric from the original sweaters.
Make each strip long enough to cover one front opening edge.
Fold the binding over the raw edge and clip in place.
Sew using a stretch stitch.
Repeat on the opposite side.
For a button-front design, create a wider reinforced button band.
Add buttonholes to one side and matching buttons to the other.
For beginners, an open-front cardigan without buttons is the easiest option.
Step 10: Finish the Neckline and Hem
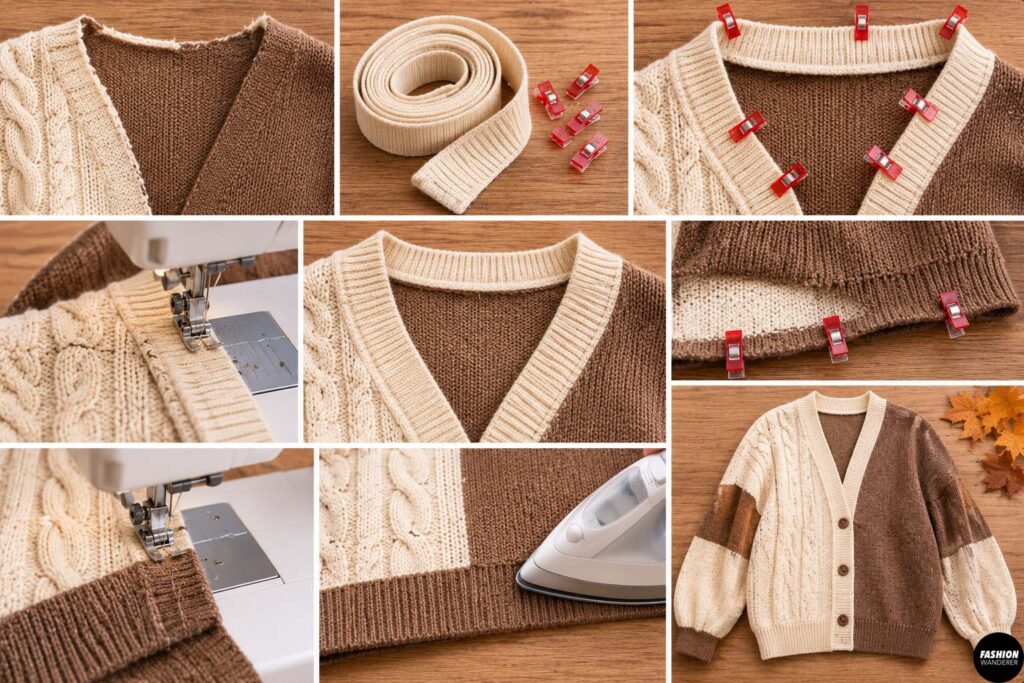
Inspect the neckline for exposed knit edges.
If needed, attach coordinating ribbed binding around the neckline.
Stretch the binding slightly while sewing, but avoid stretching the cardigan itself.
Next, check the bottom hem.
If the original ribbed hem is intact, keep it for a ready-made professional finish.
Otherwise, fold the hem approximately ½ inch toward the wrong side.
Secure it with clips and sew using a narrow zigzag stitch.
Press gently using low heat appropriate for your sweater fibers.
Step 11: Add Optional Patchwork Details
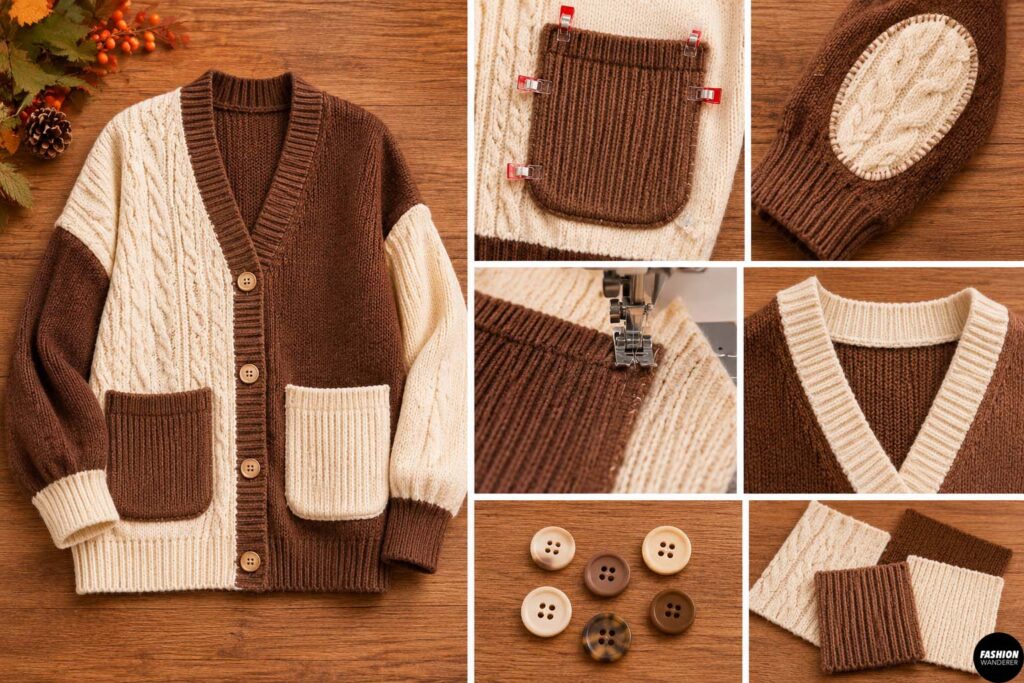
Want your cardigan to look even more unique?
Use leftover sweater scraps to create decorative details.
You can add a small contrasting chest pocket, patchwork elbow accents, mismatched buttons, or a color-block neckline.
For a trendy oversized style, attach two large front patch pockets made from contrasting knit fabric.
Stabilize the pocket edges before sewing and topstitch them carefully onto the cardigan fronts.
Avoid adding too many decorations if you prefer a minimalist, expensive-looking finish.
Step 12: Final Fit Check and Styling
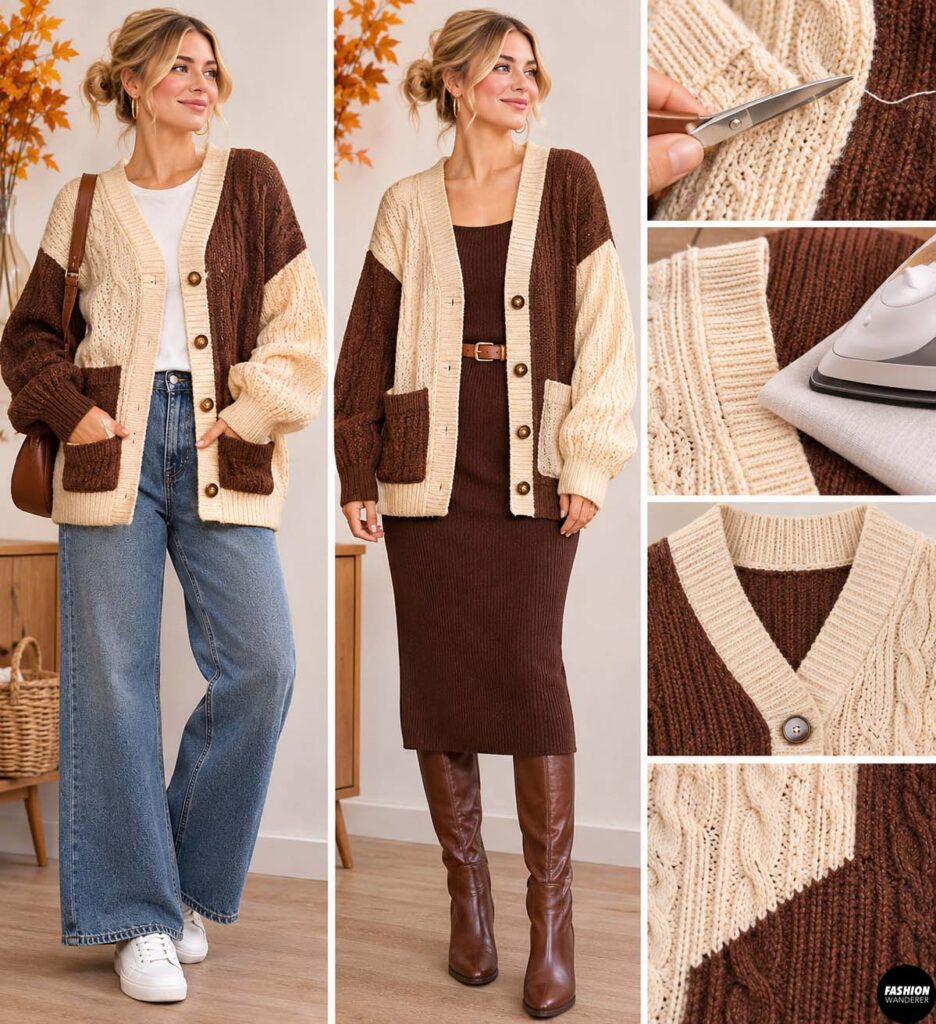
Try on your finished color-block cardigan.
Check that the shoulder seams sit comfortably, the sleeves move freely, and the front opening hangs evenly.
Trim any loose threads.
Inspect every cut edge to ensure the knitted fabric is securely finished and won’t unravel.
If the seams feel bulky, gently press them with a pressing cloth.
Style your handmade cardigan with wide-leg jeans and sneakers for a casual outfit, or layer it over a fitted dress with ankle boots.
Your DIY patchwork cardigan from two old sweaters is ready to wear!
Tips for a Professional-Looking Patchwork Cardigan
For the best results, keep these simple sewing tips in mind:
- Match fabric weights: Similar knit thicknesses create a more balanced fit.
- Use stretch-friendly stitches: Narrow zigzag stitching helps prevent popped seams.
- Stabilize cut edges: Knit interfacing or staystitching reduces stretching and unraveling.
- Preserve original details: Reusing cuffs, ribbed hems, and neckbands saves time.
- Avoid pulling the fabric: Let your sewing machine feed the knit naturally.
Final Thoughts
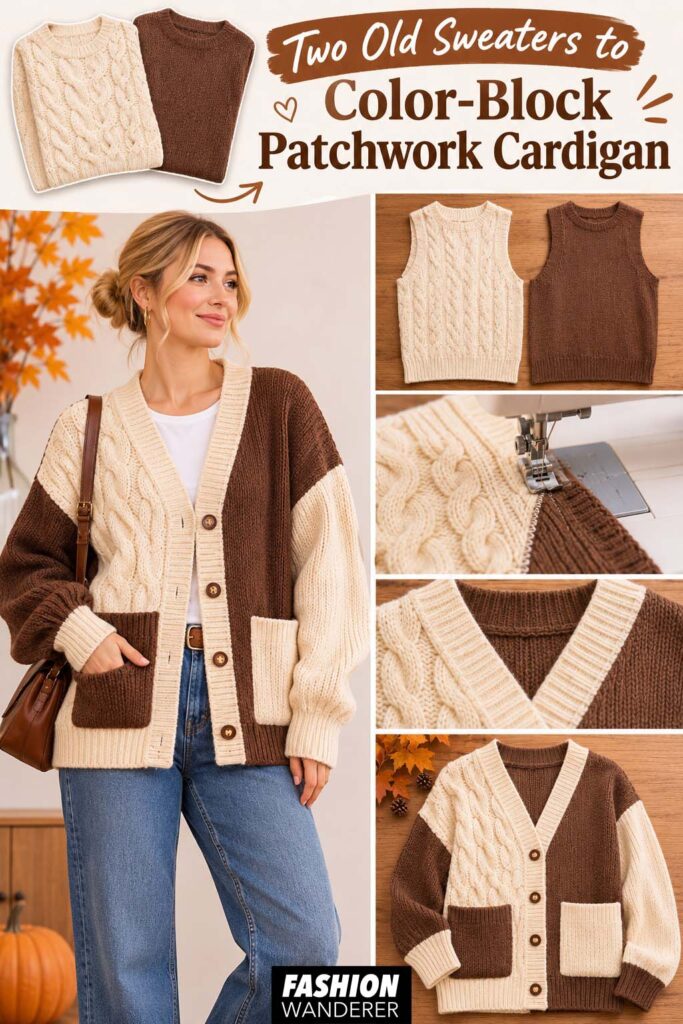
Turning two old sweaters into a color-block patchwork cardigan is a creative way to refresh your wardrobe without spending much money.
With a few simple cuts, basic sewing techniques, and some contrasting knit panels, you can transform forgotten sweaters into a cozy, fashionable statement piece.
Whether you prefer neutral color blocking, colorful patchwork, or an oversized vintage-inspired design, this easy DIY sweater upcycle lets you create something completely unique.
Before buying another cardigan, check your closet or local thrift store. Your next favorite fall outfit might already be waiting to be transformed!