
Have an old plaid skirt sitting in your closet that feels a little outdated? Instead of donating it, transform it into a stylish DIY wrap midi skirt with a flattering silhouette, adjustable waist, and modern asymmetrical front.
This easy plaid skirt upcycle is a creative way to refresh thrifted clothing without buying expensive new fabric. Whether you’re working with a vintage pleated skirt, an oversized plaid skirt, or a forgotten piece from your wardrobe, you can give it a completely new look with a few simple sewing techniques.
The finished wrap skirt pairs beautifully with fitted sweaters, basic T-shirts, oversized blazers, and ankle boots. It’s a versatile upcycle outfit for fall, winter, and transitional outfits.
In this beginner-friendly tutorial, you’ll learn how to turn an old plaid skirt into a modern wrap midi skirt, from deconstructing the original garment to creating the wrap front, attaching a waistband, and finishing the hem.
Why You’ll Love This DIY Plaid Skirt Upcycle
- Budget-friendly: Repurpose an existing skirt instead of purchasing new fabric.
- Beginner-friendly: Uses basic cutting, hemming, and straight-stitch sewing techniques.
- Adjustable fit: Waist ties allow you to customize the fit.
- Modern style: The overlapping wrap front creates a flattering, slightly asymmetrical silhouette.
- Sustainable fashion: Give an outdated garment a second life.
Skill Level: Confident beginner
Estimated Time: 2–3 hours
Finished Style: High-waisted plaid wrap midi skirt with overlapping front panels and side waist ties.
Materials You’ll Need
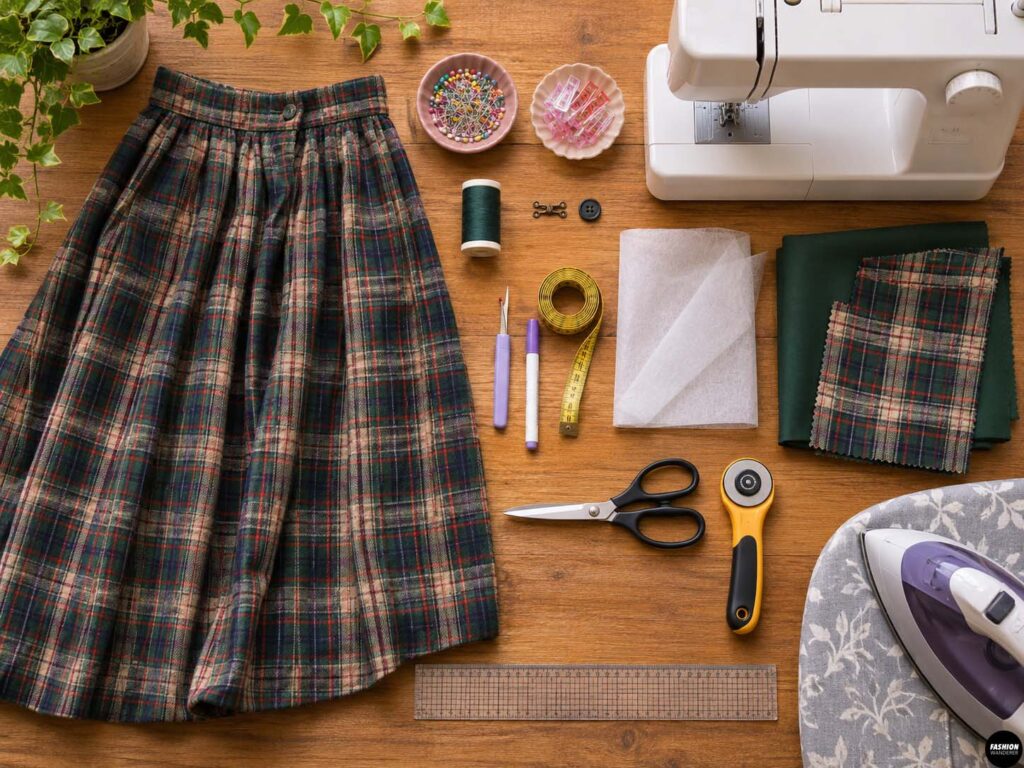
Gather the following supplies before starting:
- One old plaid skirt, preferably oversized or full
- Matching polyester thread
- Fabric scissors or rotary cutter
- Seam ripper
- Measuring tape
- Fabric chalk or washable marker
- Sewing machine
- Sewing pins or clips
- Iron and ironing board
- Ruler or straightedge
- Lightweight fusible interfacing, optional
- One small button or hook-and-bar closure, optional
- Extra coordinating fabric if the original skirt is too small
Fabric Tip: Medium-weight cotton, wool-blend, flannel, and polyester plaid skirts work especially well. Choose a skirt with enough fabric to create two overlapping front panels.
If you’re using a pleated skirt, pressing out the pleats can give the fabric a cleaner, more contemporary appearance.
Upcycle Old Plaid Skirt into Modern Wrap Skirt
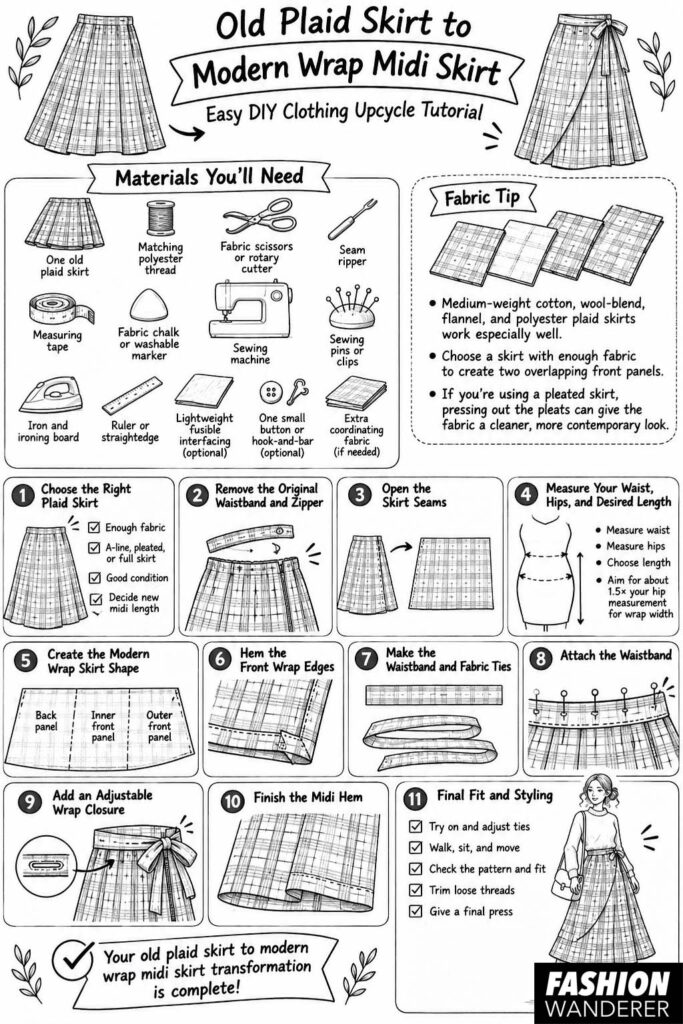
Step 1: Choose the Right Plaid Skirt
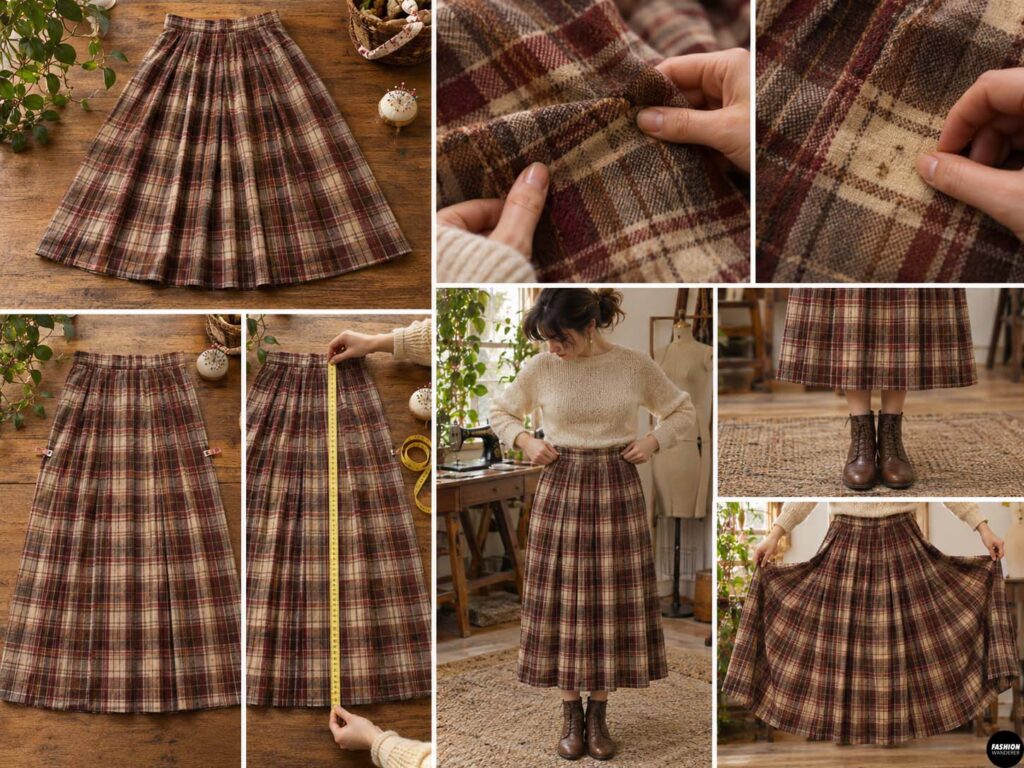
Start by examining your old skirt.
Look for a garment with enough fabric to create a comfortable wrap around your hips.
An oversized A-line skirt, vintage pleated skirt, or full midi skirt is ideal.
Check the fabric for stains, holes, worn areas, or discoloration.
Make sure the plaid pattern is still in good condition.
Try on the original skirt and decide how long you want your finished wrap skirt.
For a modern midi silhouette, aim for a hemline that falls somewhere between your knees and ankles.
Beginner Tip: An oversized skirt is easier to upcycle because you have more fabric available for the overlapping front.
Step 2: Remove the Original Waistband and Zipper
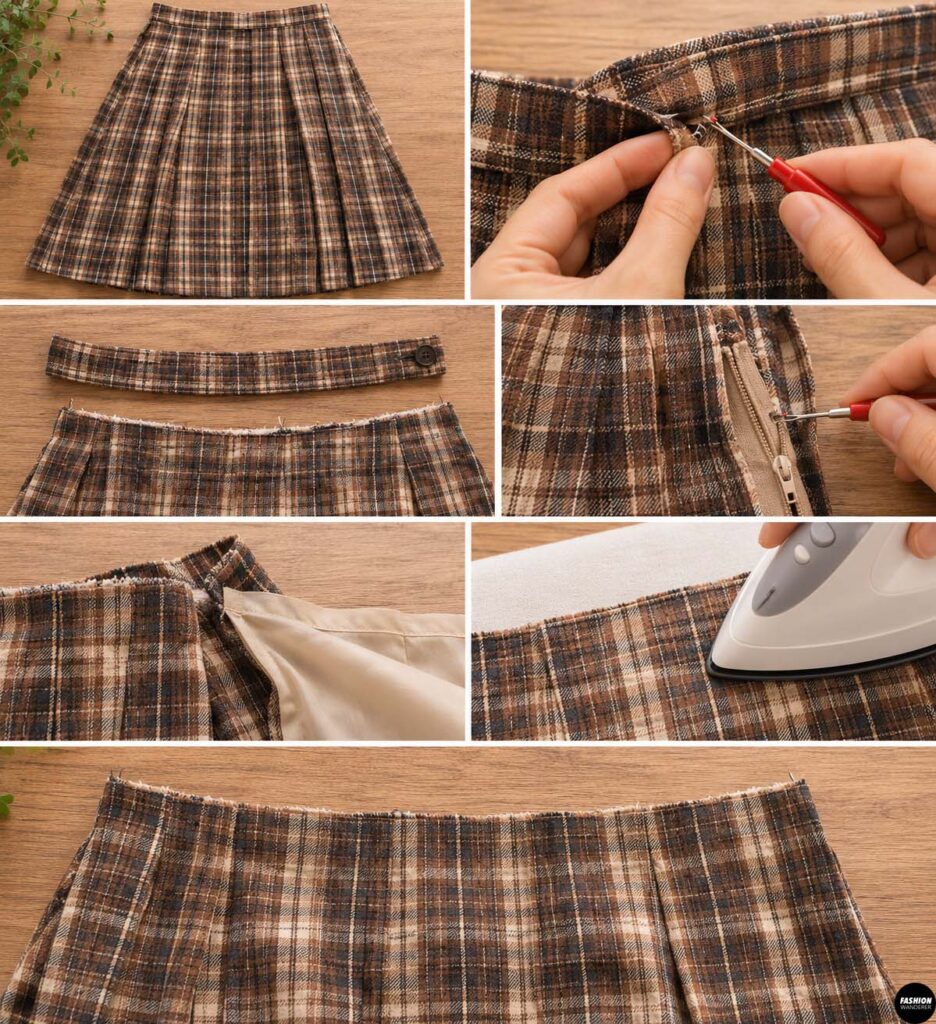
Lay your plaid skirt flat on a large worktable.
Using a seam ripper, carefully remove the waistband.
If the skirt has a side or center-back zipper, remove it without damaging the surrounding fabric.
Take out any buttons, belt loops, or unnecessary closures.
If your skirt has a lining, separate it from the outer fabric and set it aside.
Avoid cutting through the fabric during this process.
Press the opened seams flat with an iron.
You should now have a cleaner fabric surface to work with.
Step 3: Open the Skirt Seams
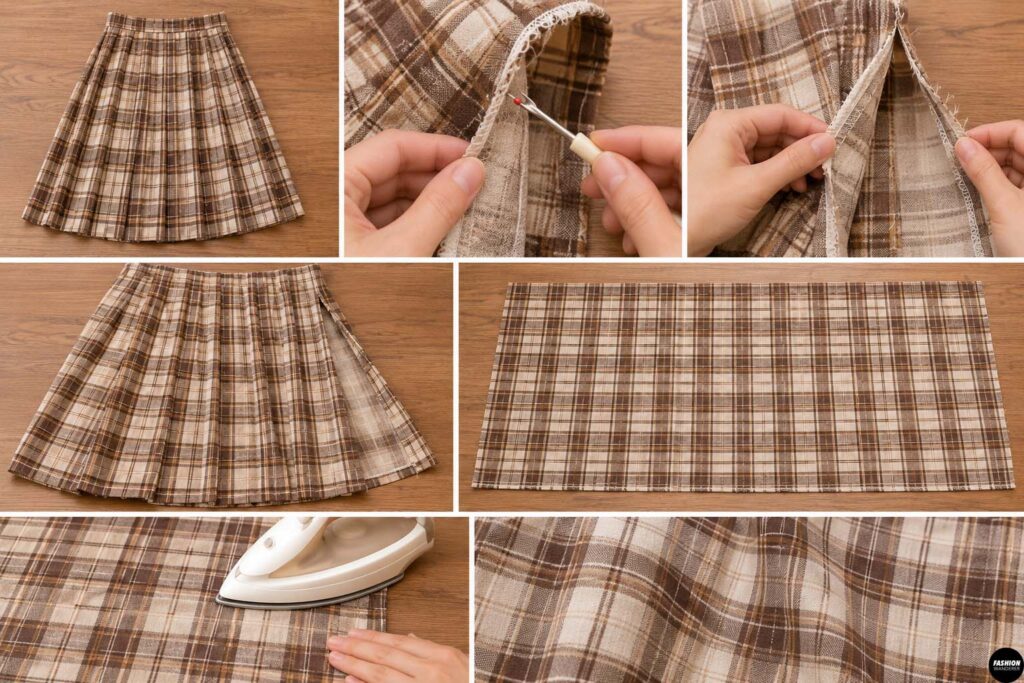
Turn the skirt inside out.
Locate the side seams.
Use your seam ripper to open one side seam completely, creating a large flat piece.
If the original skirt is constructed from multiple panels, you may need to separate additional seams.
Preserve as much fabric as possible.
Lay the opened skirt flat and smooth out wrinkles.
If the garment has pleats, gently press them open according to the fabric’s care instructions.
You’ll use this fabric to form the main body of your DIY wrap skirt.
Step 4: Measure Your Waist, Hips, and Desired Length
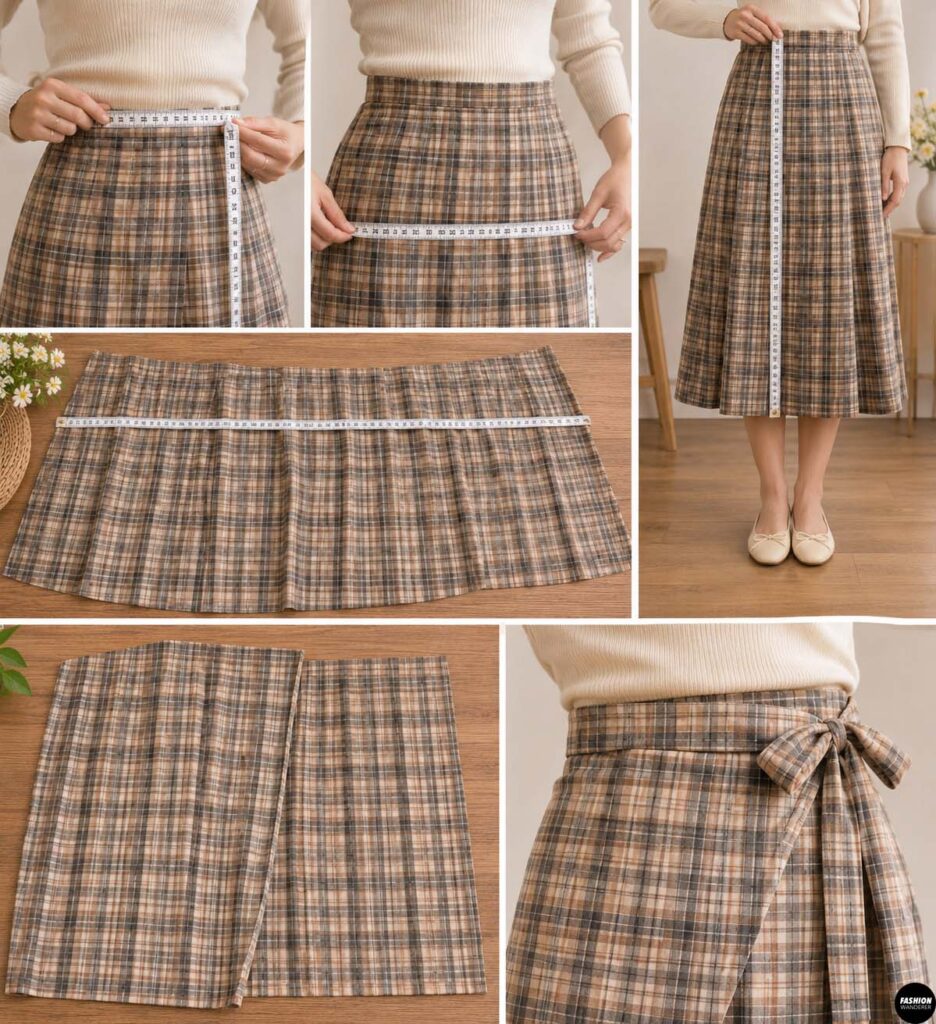
Take three measurements:
- Natural waist circumference
- Fullest hip circumference
- Desired skirt length from waist to hem
Next, measure the usable width of your opened skirt.
For comfortable wrap coverage, aim for a total finished fabric width of approximately 1.5 times your hip measurement, adjusting for the original skirt shape and desired overlap.
For example, a 40-inch hip measurement may require approximately 60 inches of finished wrap width.
Add seam allowances wherever you need to create new seams.
The actual amount of overlap depends on how the skirt is shaped and how securely you want the front to stay closed.
Important: Check the overlap while sitting and walking, not just standing.
If the original skirt doesn’t provide enough fabric, add matching or coordinating panels.
Step 5: Create the Modern Wrap Skirt Shape
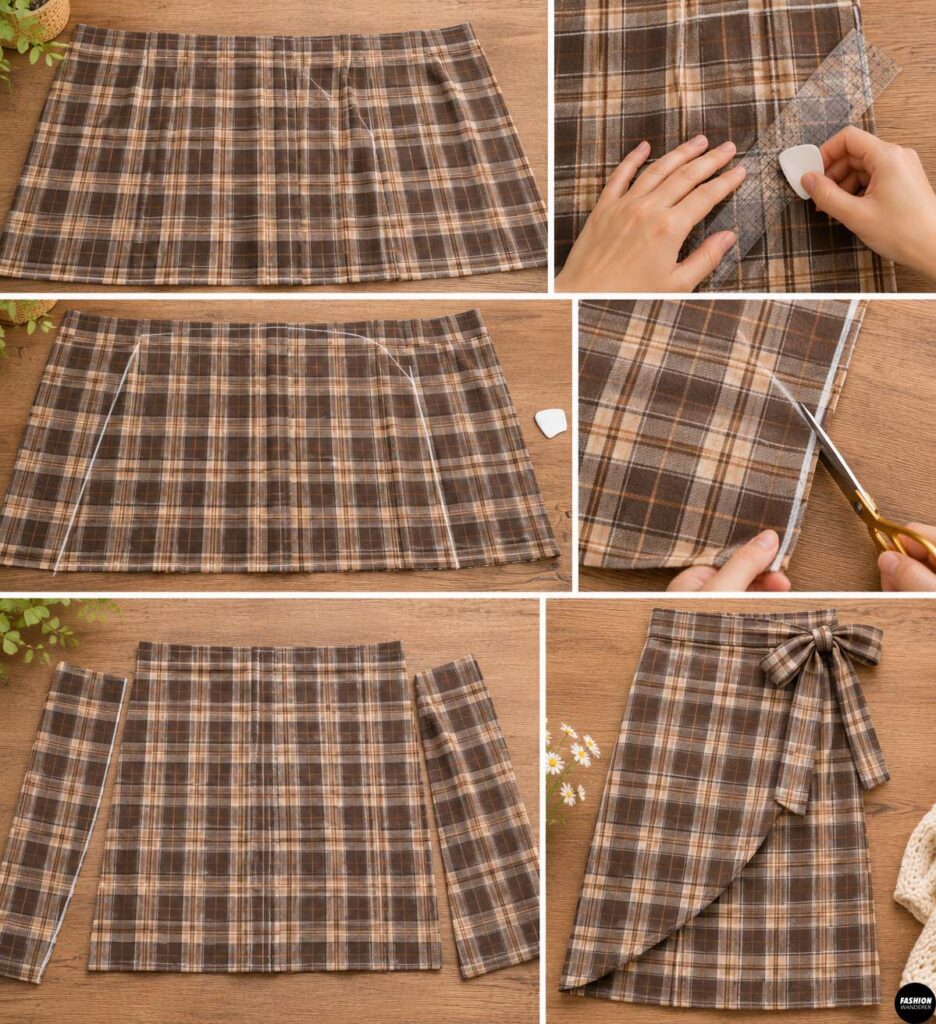
Spread the fabric right side up.
Identify the center-back area and two front wrap ends.
The back should provide comfortable hip coverage, while the front ends overlap across your body.
For a modern look, create a slightly angled outer front edge.
You can make one front panel longer or more diagonal than the other.
Mark your cutting lines with fabric chalk.
Use a ruler to keep the lines smooth.
Cut carefully, leaving approximately ½ inch for new hems.
Style Idea: An asymmetrical wrap front creates a fashionable boutique-inspired finish, especially with bold plaid fabric.
Step 6: Hem the Front Wrap Edges
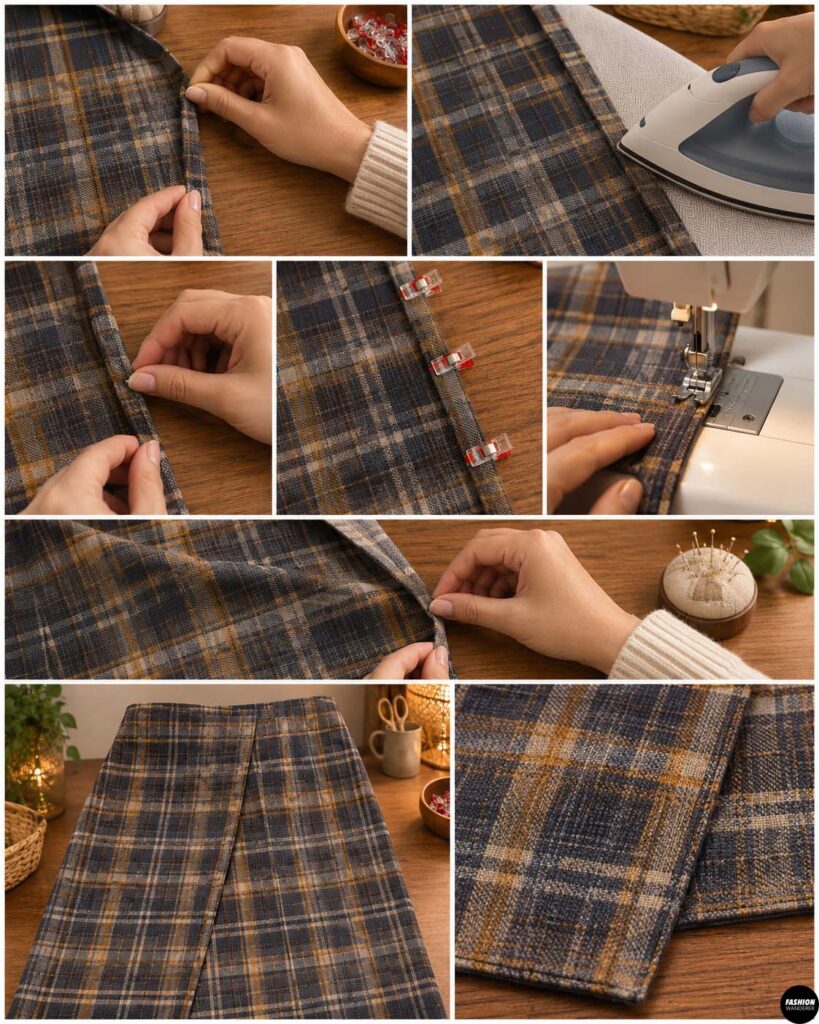
Fold each vertical or angled front edge approximately ¼ inch toward the wrong side.
Press.
Fold again another ¼ inch to enclose the raw edge.
Pin or clip in place.
Using a straight stitch, sew close to the inner fold.
Repeat for both wrap edges.
Press the finished edges flat.
If you’re working with thick wool plaid, consider using a single-fold hem with a serged edge to reduce bulk.
Take your time around angled corners for a smooth finish.
Step 7: Make the Waistband and Fabric Ties
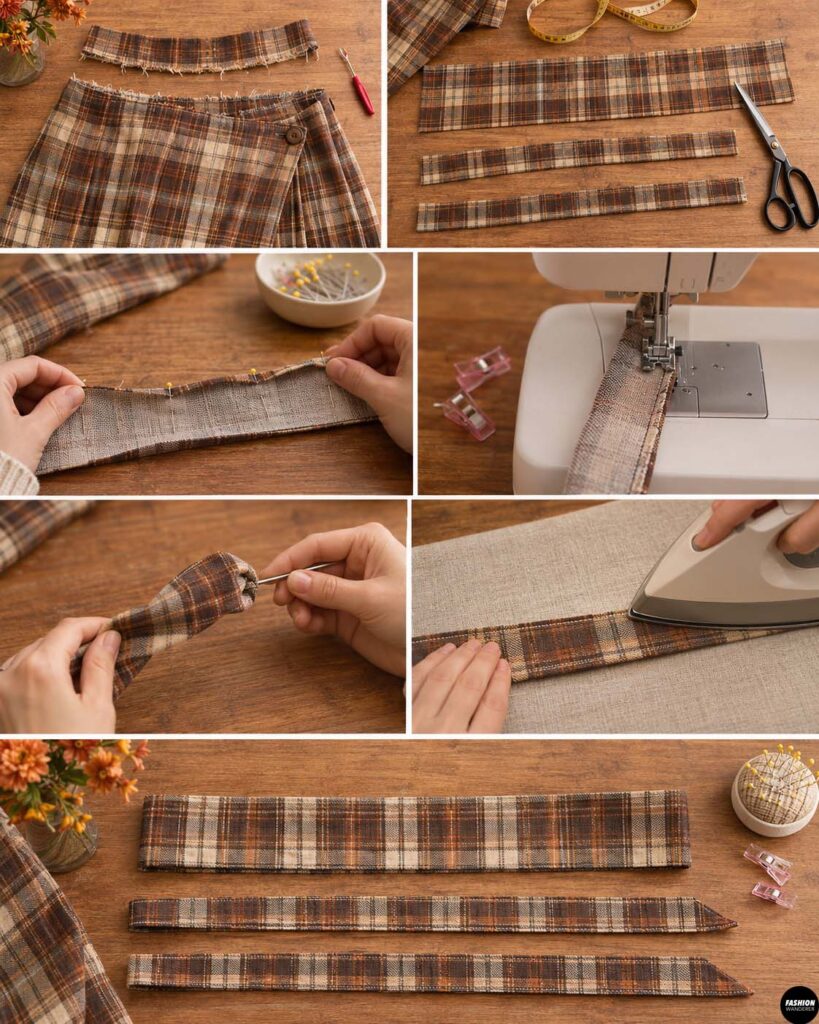
Use the fabric removed from the original waistband if it’s long enough.
Otherwise, cut new waistband strips from leftover plaid fabric.
Create enough waistband length to fit the upper edge of the skirt and provide attachment points for the ties.
For each waist tie, cut a strip approximately 3 inches wide. Make the ties long enough to fasten securely, typically around 20–30 inches each, depending on your waist and preferred bow.
Fold each tie lengthwise with right sides together.
Sew along the long edge and one short end using a ½-inch seam allowance.
Turn right side out.
Press and topstitch if desired.
Repeat for the second tie.
Step 8: Attach the Waistband
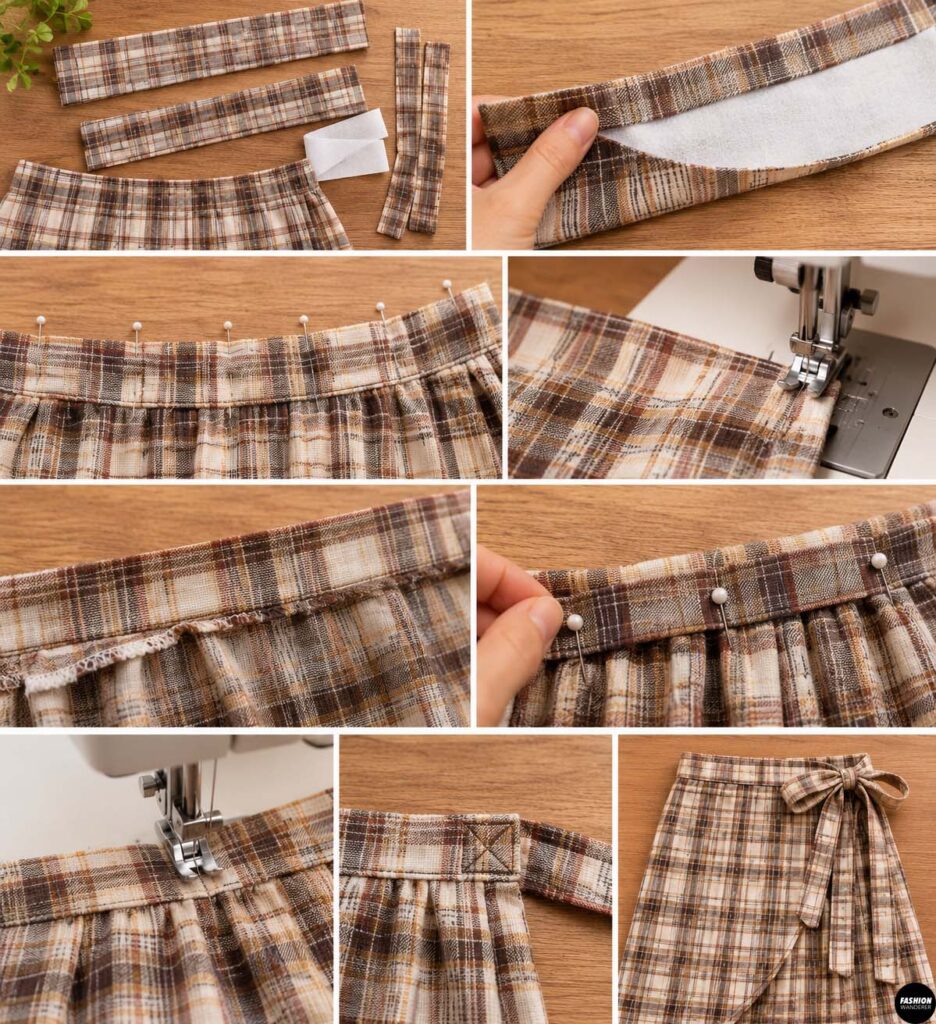
With right sides facing, align the waistband with the upper edge of the skirt.
Pin evenly around the waist.
If desired, apply lightweight interfacing to the waistband first for additional structure.
Sew using a ½-inch seam allowance.
Press the seam allowance toward the waistband.
Fold the remaining waistband edge toward the inside.
Tuck the raw edge under and pin.
Stitch in the ditch from the right side or topstitch close to the folded edge to secure the waistband.
Attach one waist tie to the outer wrap end and another to the appropriate inner wrap end, reinforcing each attachment securely.
Step 9: Add an Adjustable Wrap Closure
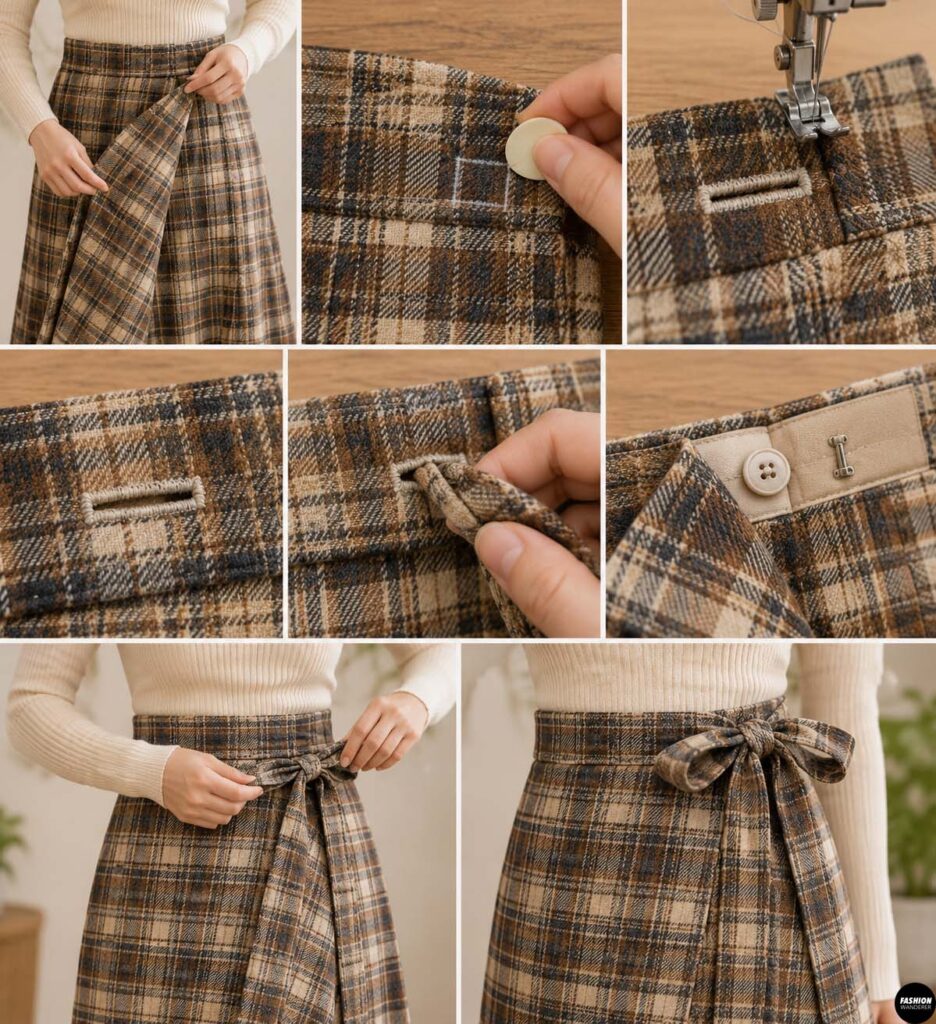
Try the skirt on with the outer panel overlapping the inner panel.
Position the wrap so the front provides enough coverage when you sit and move.
Mark where the inner tie needs to pass through the waistband or side seam.
Create a small reinforced buttonhole at that point if your design requires the inner tie to pass through to the outside.
Thread the inner tie through the opening.
Wrap the outer tie around your waist and fasten the ties at the side.
For extra security, add a small concealed button or hook-and-bar closure at the inner waist.
Fit Tip: Make sure the closure holds securely without pulling or distorting the plaid fabric.
Step 10: Finish the Midi Hem
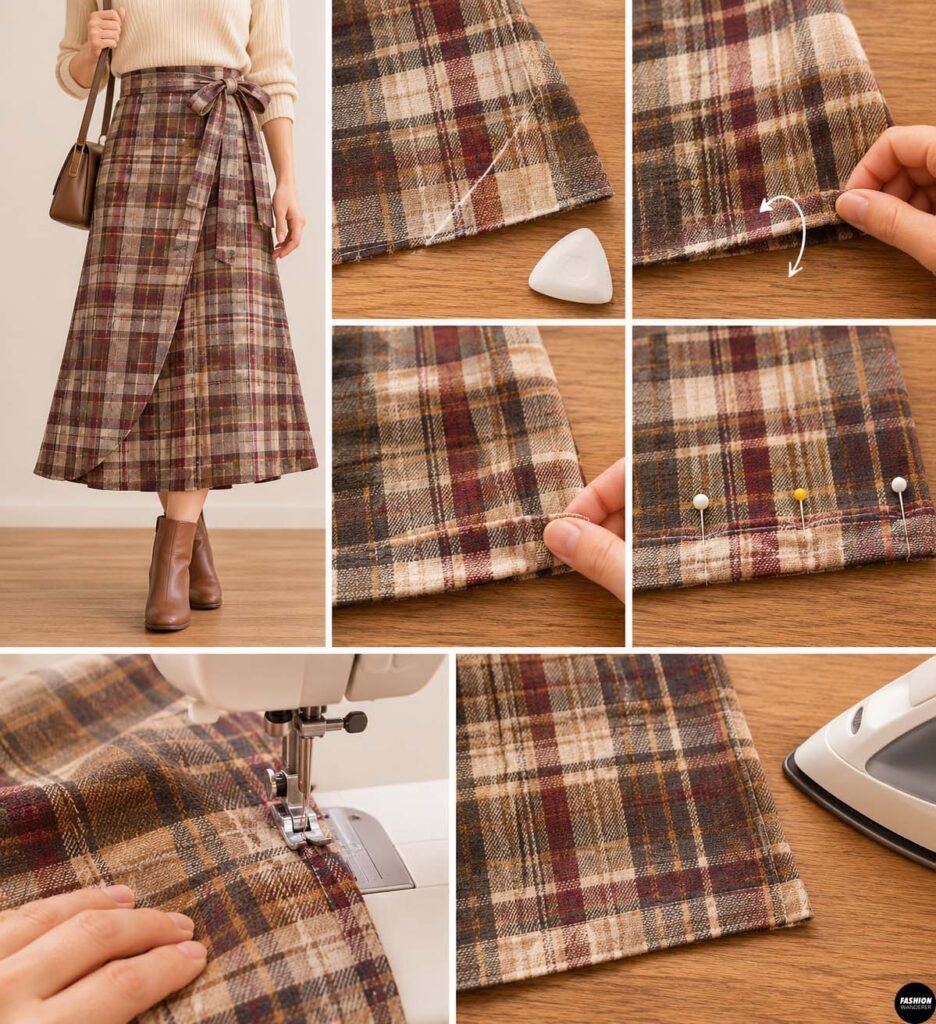
Try on the skirt with your intended shoes.
Check the finished length and the angle of the overlapping front panels.
Mark the hem evenly, allowing for any intentional asymmetry.
Fold the lower edge approximately ½ inch toward the wrong side.
Press.
Fold again another ½ inch.
Pin securely.
Sew around the hem using a straight stitch.
If the original hem is already neat and matches your desired length, you may be able to preserve it.
Press the entire skirt for a crisp finish.
Step 11: Final Fit and Styling
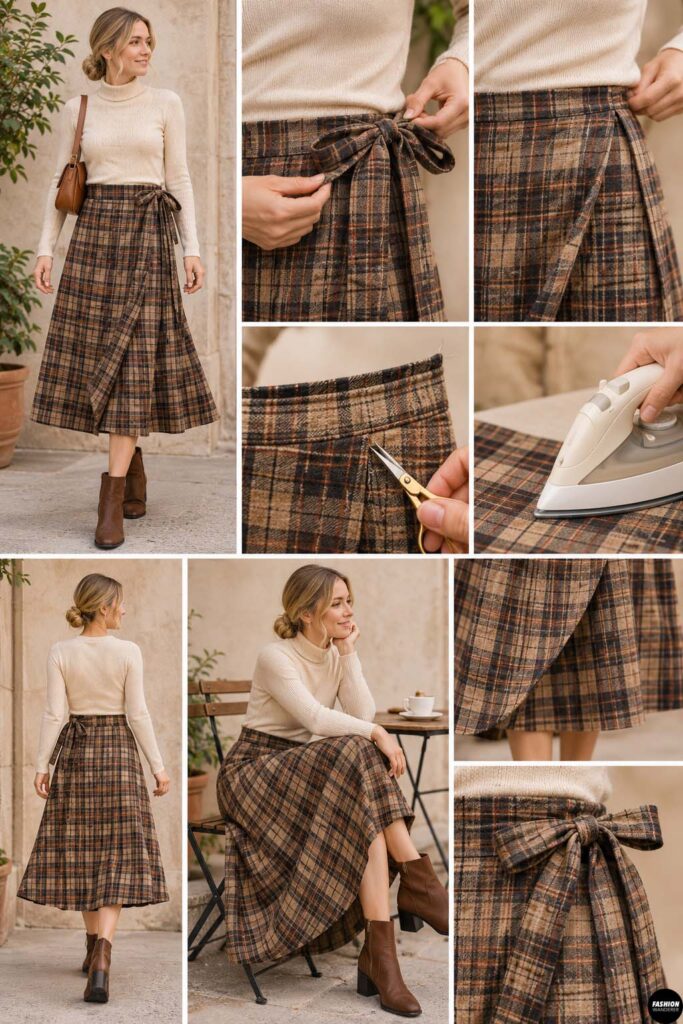
Put on your finished wrap skirt and adjust the waist ties.
Walk, sit, and move around to make sure the overlap stays secure.
Check that the plaid pattern looks balanced and the waistband lies flat.
Trim any loose threads and give the skirt one final press.
Your old plaid skirt to modern wrap midi skirt transformation is complete!
How to Style Your DIY Plaid Wrap Midi Skirt
For a cozy fall look, pair your new skirt with a fitted cream turtleneck, knee-high boots, and a structured shoulder bag.
For a casual everyday outfit, style it with a tucked-in white T-shirt, sneakers, and a cropped cardigan.
Want something more polished? Add a black bodysuit, oversized blazer, and ankle boots.
The wrap silhouette looks especially stylish with classic tartan, brown plaid, gray checks, or muted neutral patterns.
Final Thoughts
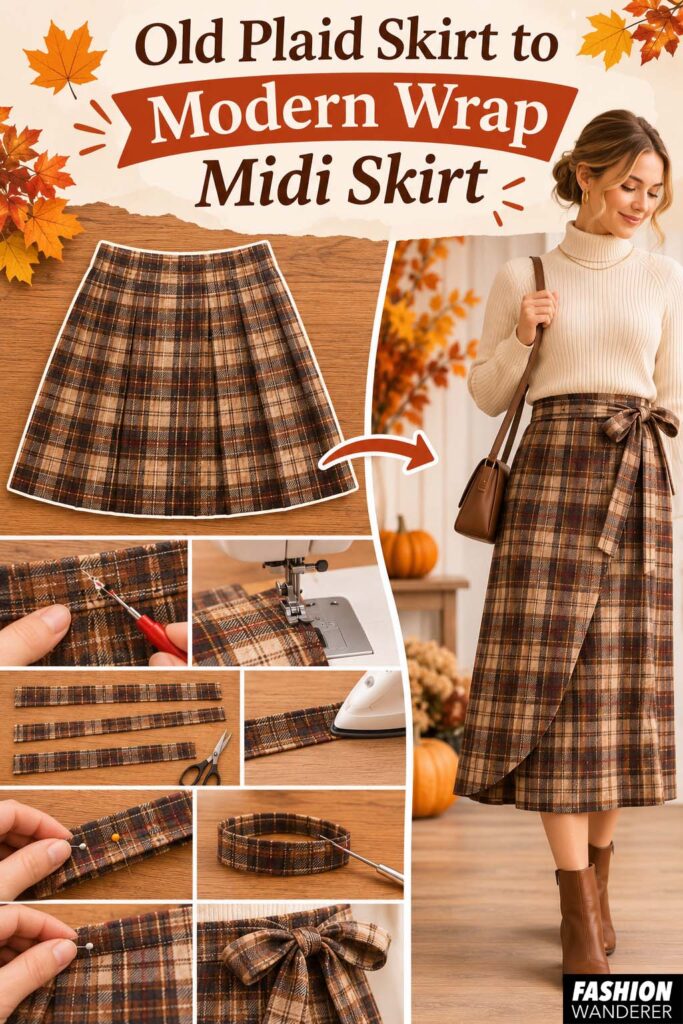
Transforming an old plaid skirt into a modern wrap midi skirt is a practical and creative way to update your wardrobe.
With thoughtful cutting, a comfortable adjustable waistband, and carefully finished edges, you can create a stylish piece that looks completely different from the original garment.
This easy clothing upcycle sewing project is also a great starting point for experimenting with vintage fashion, thrift flips, and sustainable DIY wardrobe ideas.
Before throwing away your next outdated skirt, consider turning it into something you’ll actually love wearing!