
Have an old fleece jacket hiding in the back of the closet? Before you donate it, turn that cozy fabric into an adorable teddy bear hooded cape for kids!
This easy old fleece jacket upcycle is a fun way to reuse warm fabric while creating something your little one can actually wear. With a roomy hood, rounded bear ears, and a simple cape silhouette, it makes a cute extra layer for chilly fall walks, school mornings, woodland-themed outfits, or even a last-minute costume.
Better yet, fleece is wonderfully forgiving for beginners. It doesn’t fray easily, feels soft and cozy, and you can often reuse parts of the original jacket to save yourself some sewing.
Let’s turn that forgotten fleece into a DIY kids cape that is unbearably cute.
Supplies You’ll Need
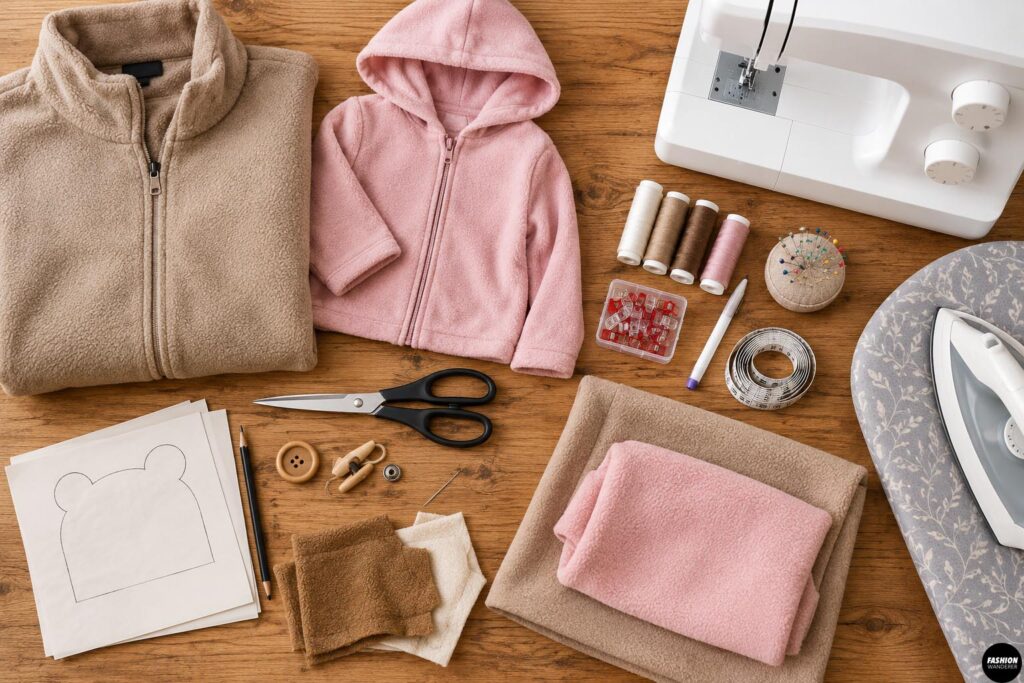
For this DIY kids teddy bear cape, gather:
- 1 old adult-size fleece jacket
- A child’s hoodie, jacket, or cape for sizing
- Fabric scissors
- Coordinating thread
- Sewing machine
- Pins or sewing clips
- Fabric marker or tailor’s chalk
- Measuring tape
- 1 large button, toggle, or snap
- Hand-sewing needle
- Paper for making the bear ear template
- Optional: scrap fleece in a contrasting color for the inner ears
Beginner tip: An oversized adult fleece jacket works especially well because it gives you plenty of fabric for creating a full cape.
DIY Kids Teddy Bear Hooded Cape
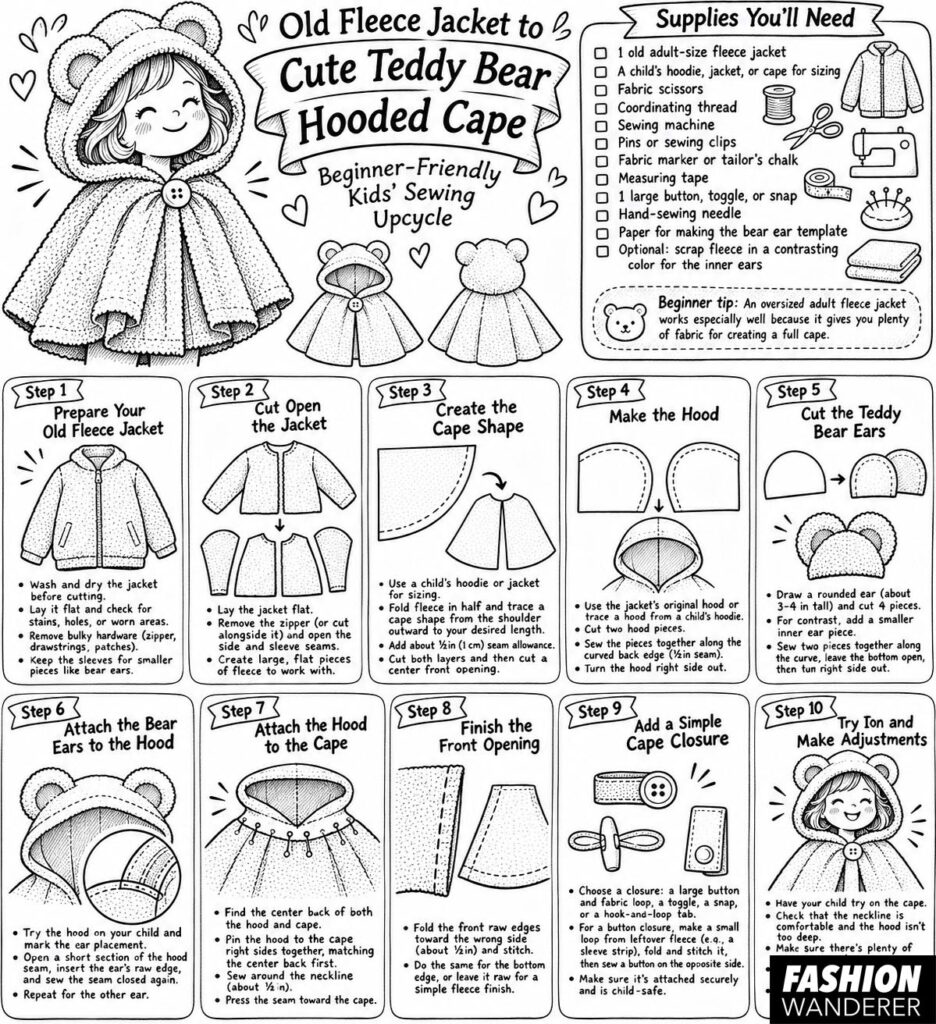
Step 1: Prepare Your Old Fleece Jacket
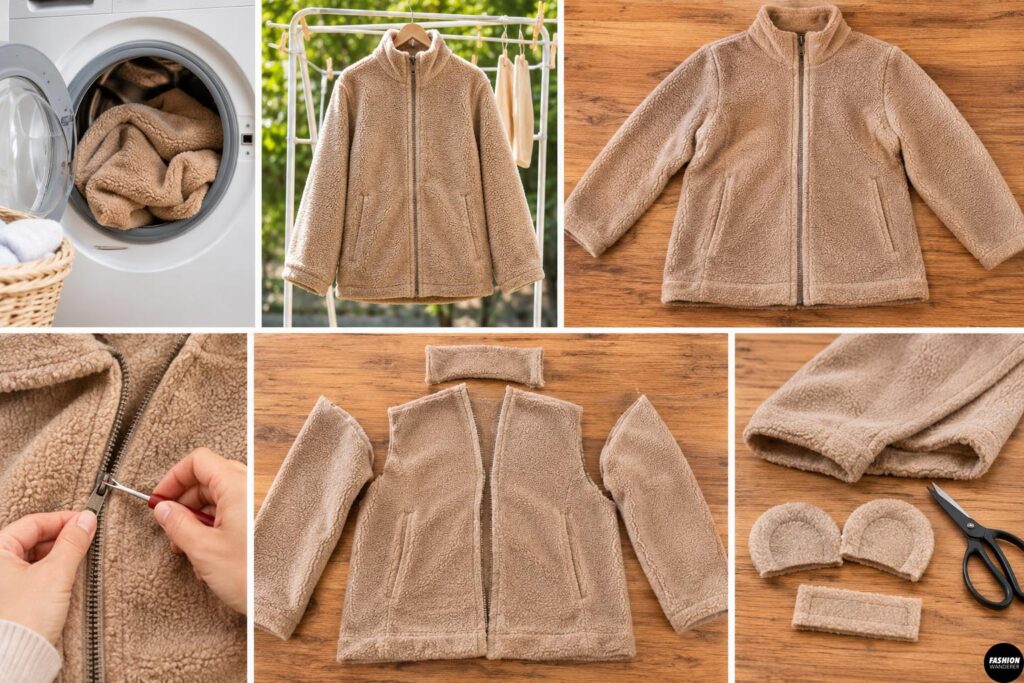
Wash and dry the jacket before cutting it apart, especially if it has been sitting in storage.
Lay the jacket flat and inspect it for stains, holes, stretched areas, or worn patches. Decide which sections are in the best condition.
Remove any bulky hardware or details you don’t want to use, such as zippers, drawstrings, or decorative patches.
Don’t automatically throw away the leftovers. The sleeves are perfect for cutting smaller pieces such as teddy bear ears and closure tabs.
Step 2: Cut Open the Jacket
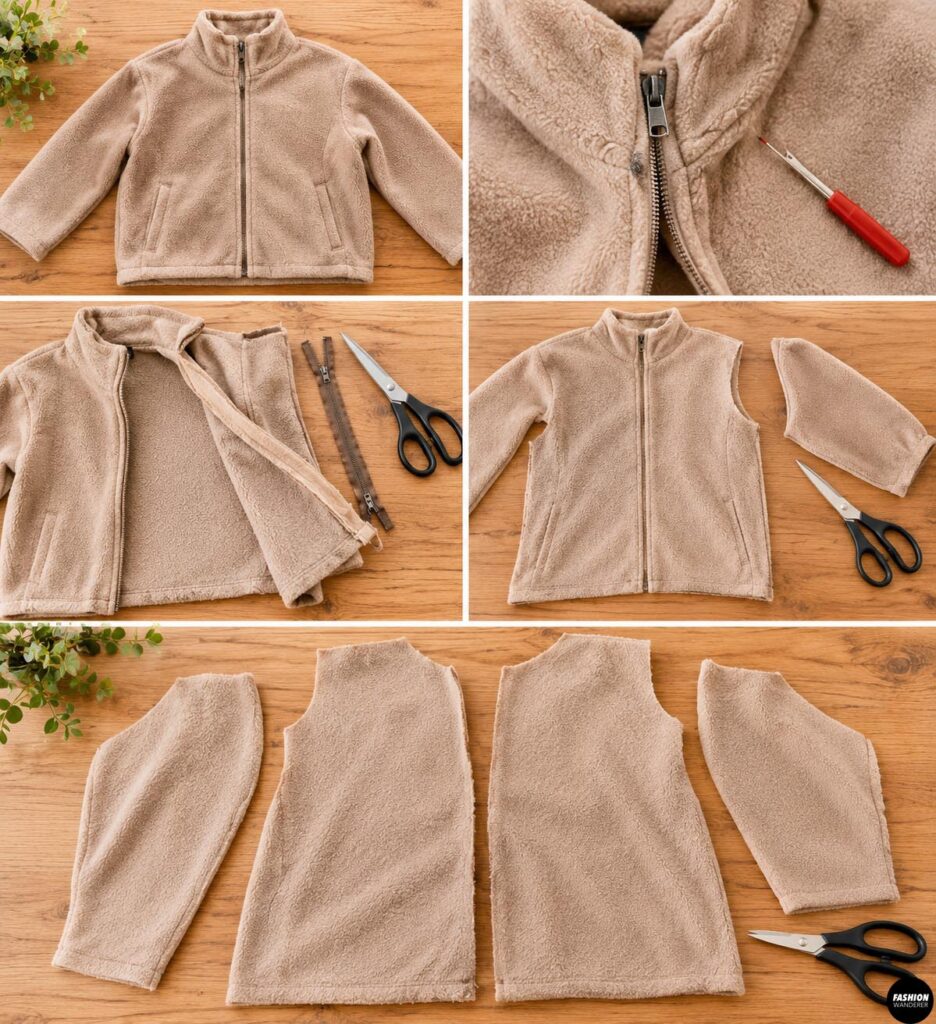
Lay the fleece jacket flat on your work surface.
If it has a zipper, carefully cut alongside the zipper or use a seam ripper to remove it. Cut along the side and sleeve seams as necessary so you can open the jacket into larger, flatter pieces of fleece.
Try to preserve as much usable fabric as possible.
You don’t need perfectly rectangular pieces. One of the nice things about an upcycled fleece sewing project is that you can work around the original seams and shapes.
Step 3: Create the Cape Shape
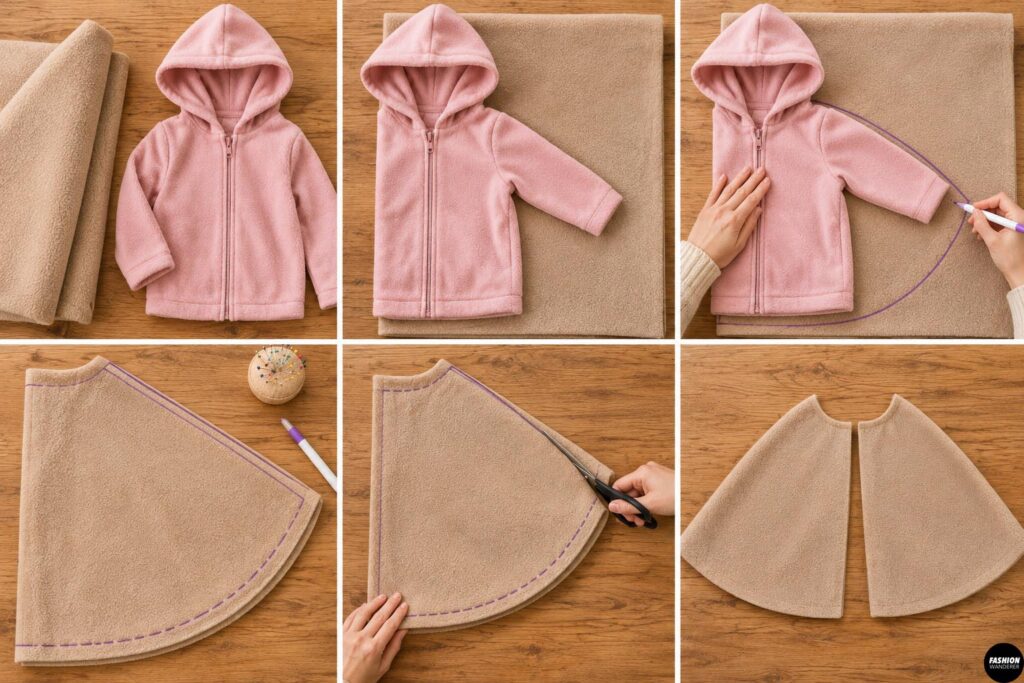
Grab a hoodie or jacket that currently fits your child.
Fold the fleece fabric in half and place the child’s garment on top. Use the shoulder and neckline as your basic sizing guide.
For the cape, draw a gentle curved line from the shoulder area outward toward your desired finished length.
A hip-length cape is practical for everyday wear, while a slightly longer version gives you more of that storybook teddy bear look.
Add approximately 1/2 inch seam allowance around areas that will be sewn.
Cut through both layers so the two sides remain symmetrical.
For a front-opening cape, cut straight up the center of the front layer only.
Step 4: Make the Hood
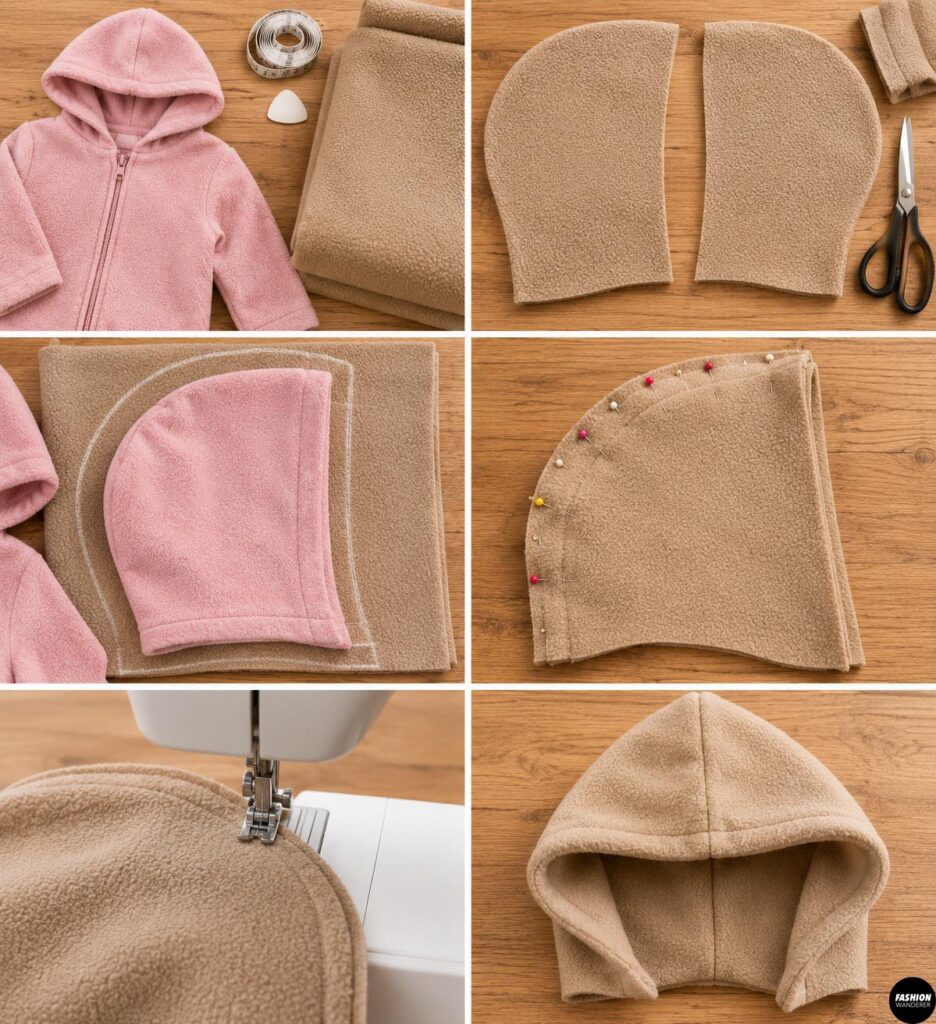
If the original fleece jacket already has a hood that’s close to the right size, congratulations—you’ve just saved yourself some work!
Simply remove the hood carefully with a seam ripper and resize it if necessary.
If you’re making a new hood, use your child’s hoodie as a template.
Fold your fleece right sides together. Lay the hood flat on top and trace around its curved shape, adding about 1/2 inch seam allowance.
Cut two mirrored hood pieces.
Place them right sides together and pin around the back curved edge.
Straight stitch approximately 1/2 inch from the raw edge.
Turn the hood right side out.
Step 5: Cut the Teddy Bear Ears
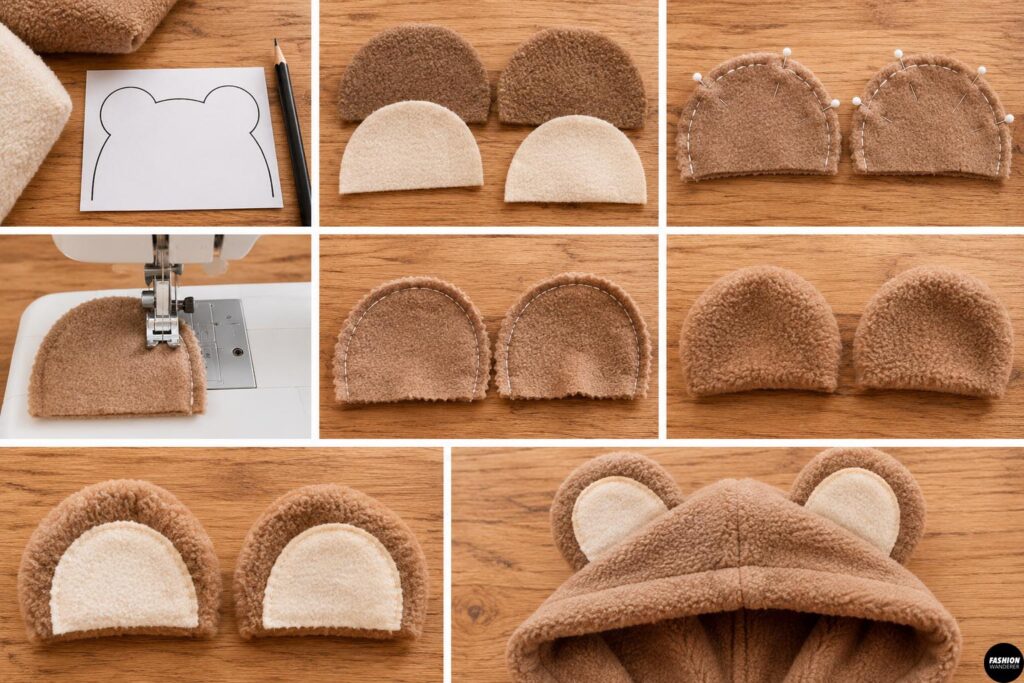
Now for the part that turns a basic fleece cape into an adorable teddy bear hooded cape.
Draw a rounded bear ear approximately 3 to 4 inches tall on paper. Cut it out to create your template.
Use the template to cut four ear pieces from your fleece.
Place two pieces right sides together and sew around the curved edge, leaving the straight bottom edge open.
Repeat with the second ear.
Turn both ears right side out.
For extra-cute ears, cut two slightly smaller semicircles from contrasting fleece and sew them onto two ear pieces before assembling the ears.
Step 6: Attach the Bear Ears to the Hood
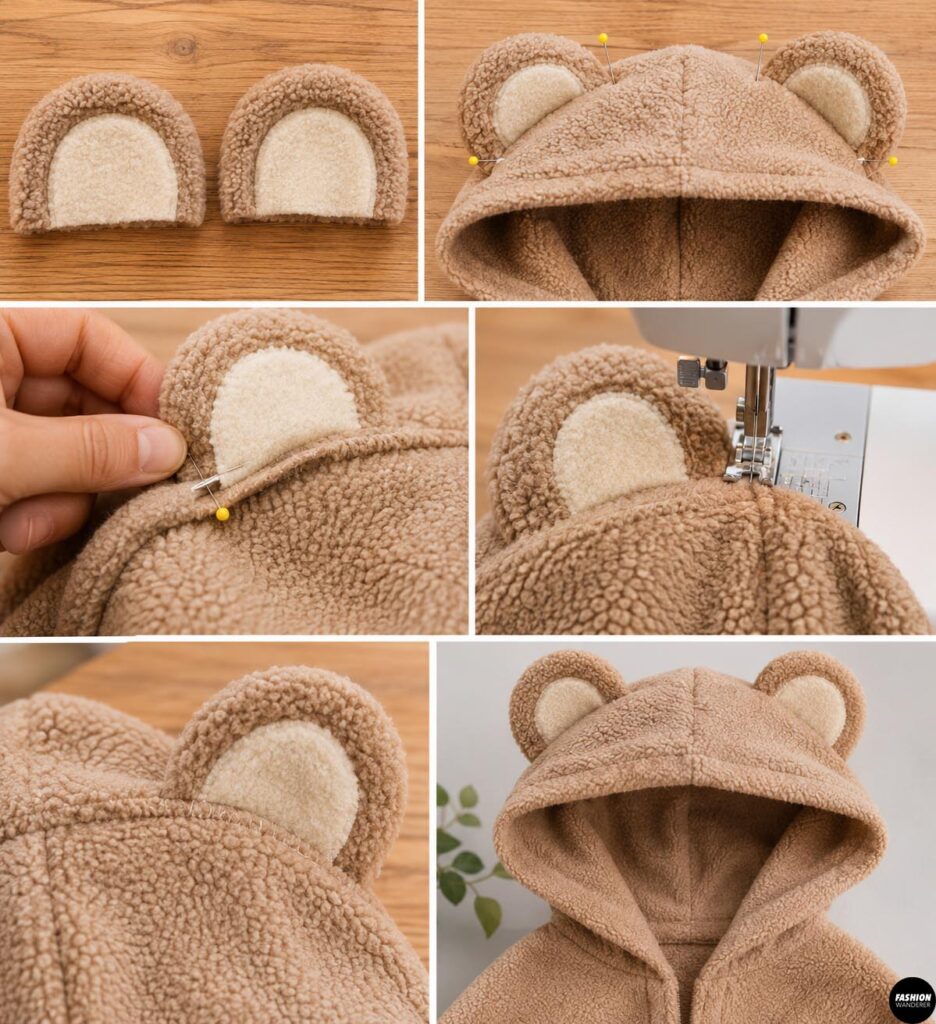
Put the hood on your child briefly or place it over the hoodie you used for sizing.
Mark where you’d like the ears to sit. They usually look cutest toward the upper sides of the hood rather than directly on top.
Pin each ear in position.
For the cleanest finish, carefully open a short section of the hood seam where each ear will go. Insert the raw bottom edge of the ear into the opening and sew the seam closed again.
When the hood is turned right side out, the little ears should stand up from the seam.
Suddenly, that old jacket is looking suspiciously like a teddy bear.
Step 7: Attach the Hood to the Cape
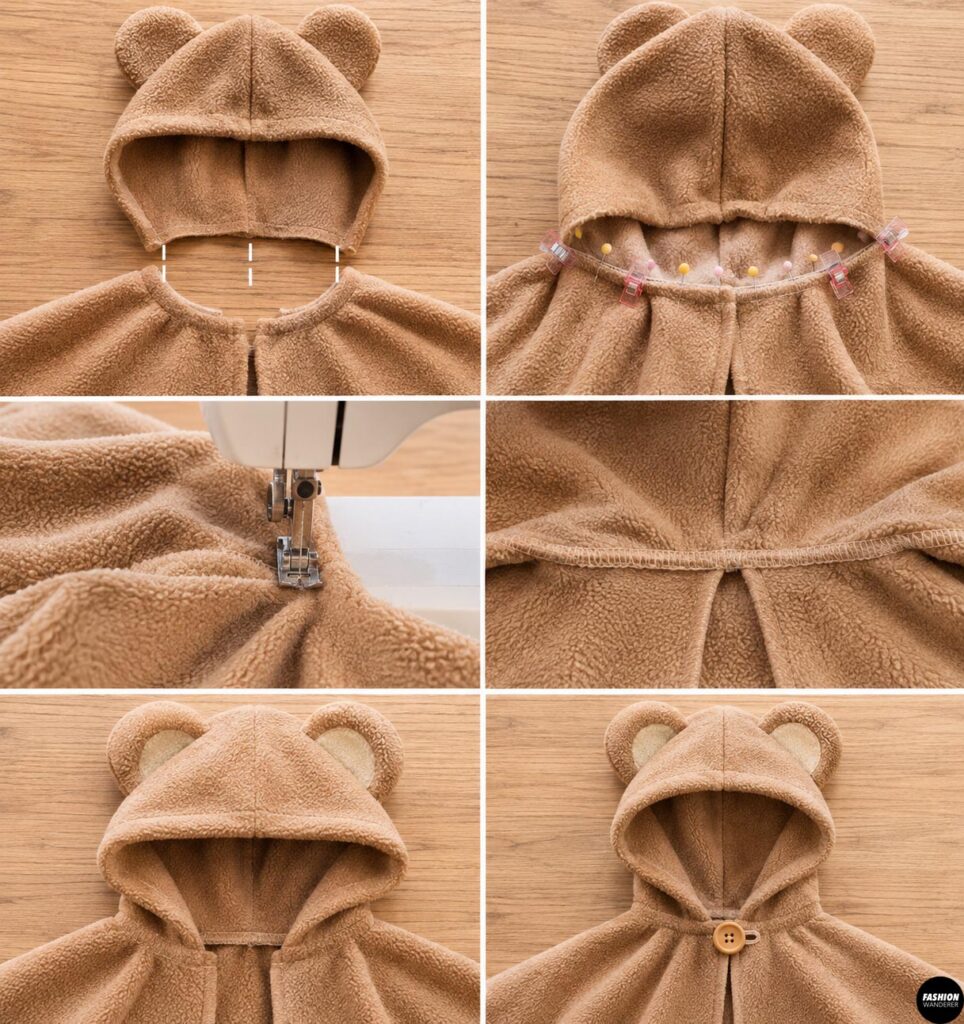
Find the center back of both the hood and cape neckline.
Place the hood and cape right sides together, matching those center-back points first.
Continue pinning or clipping around the neckline.
Make sure the hood’s front edges finish evenly at either side of the cape’s front opening.
Sew around the neckline using approximately a 1/2 inch seam allowance.
Go slowly around the curves and avoid stretching the fleece as you sew.
Step 8: Finish the Front Opening
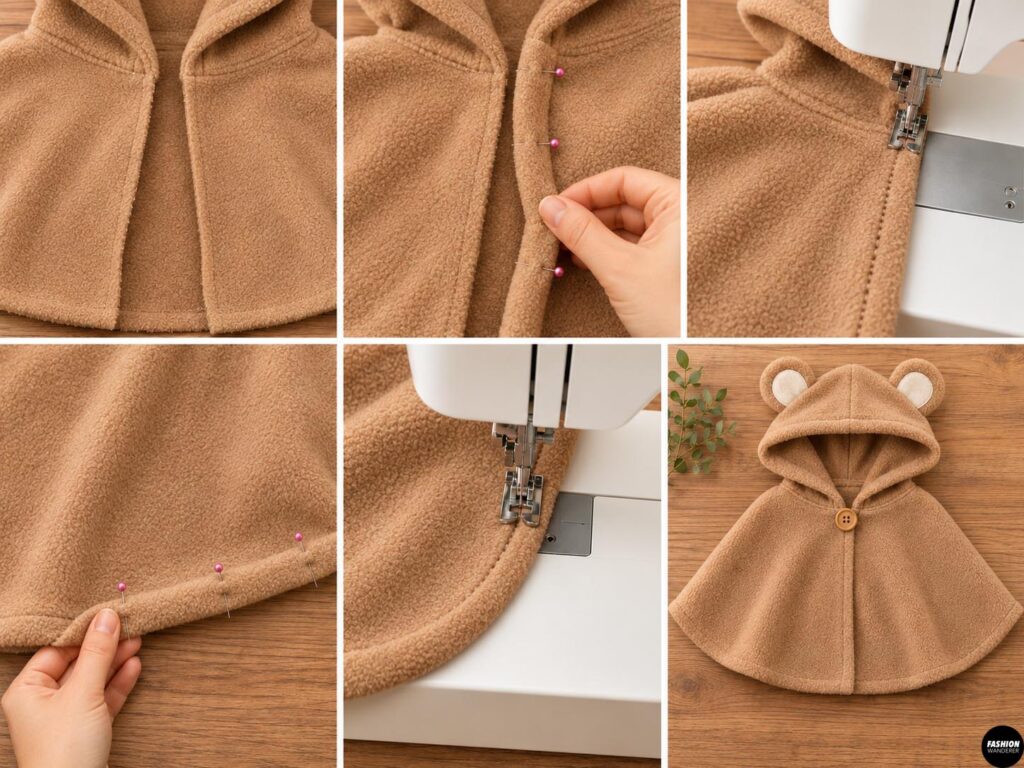
Fleece generally doesn’t unravel, so this step can be wonderfully simple.
For a quick beginner finish, fold the front raw edges toward the wrong side by about 1/2 inch and stitch them down.
You can do the same around the bottom edge of the cape.
If your fleece is particularly thick, you may even choose to leave the bottom edge raw for a clean, minimalist finish.
Step 9: Add a Simple Cape Closure
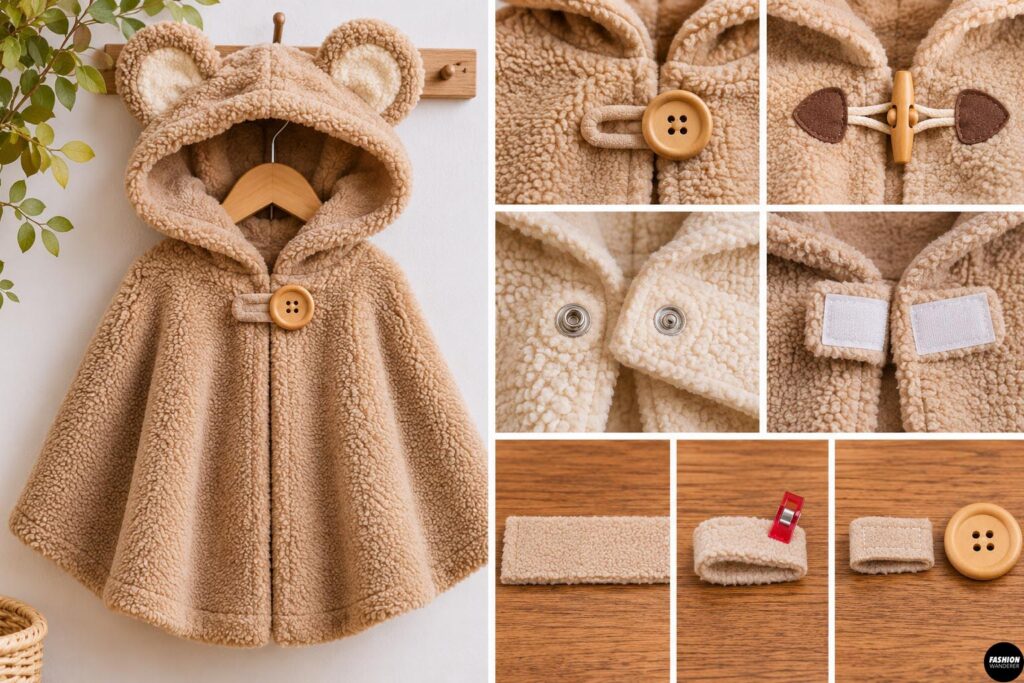
A closure at the neckline helps keep the cape securely on your child.
You can use:
- A large button and fabric loop
- A toggle closure
- A large snap
- A short hook-and-loop tab
For an easy upcycled option, cut a small strip from one of the leftover fleece sleeves.
Fold the strip lengthwise, stitch it, and use it as a loop on one side of the neckline. Sew a large button securely to the opposite side.
For younger children, avoid loose ties or long cords around the neckline. Make sure buttons and other small components are attached very securely.
Step 10: Try It On and Make Adjustments
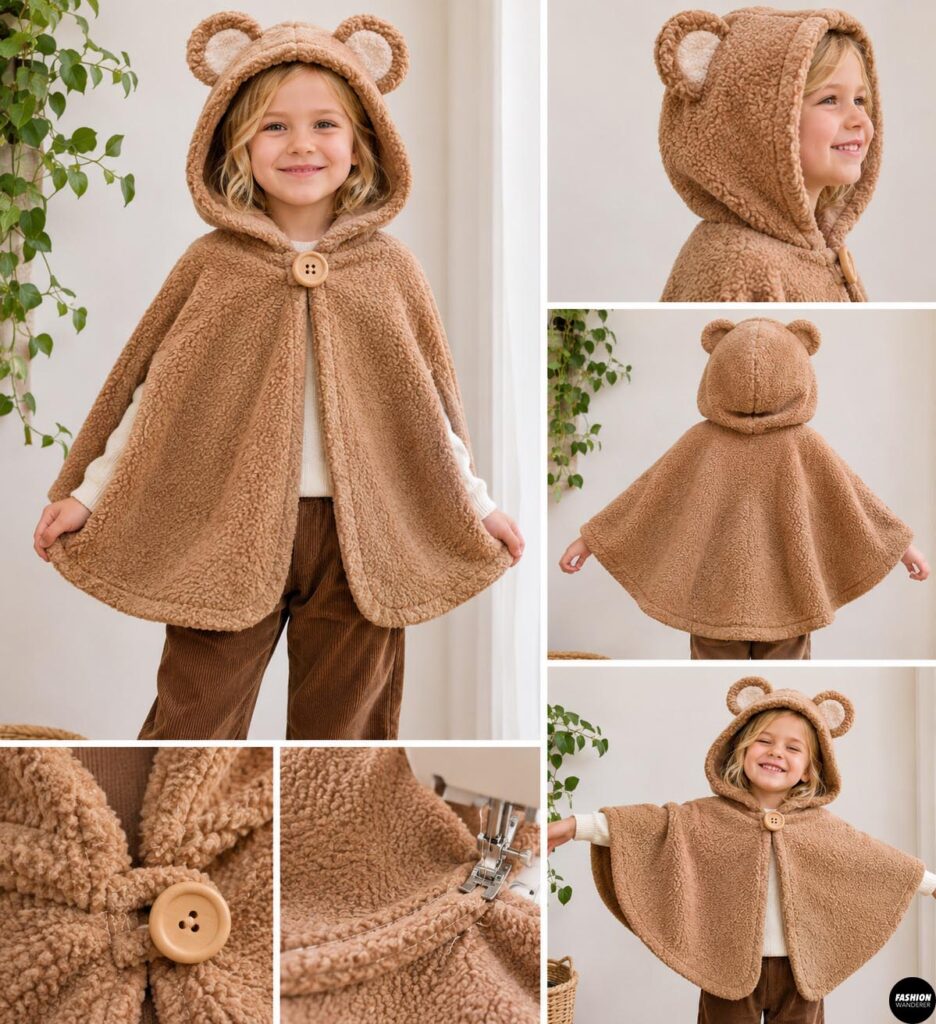
Have your child try on the finished cape.
Check that the neckline sits comfortably without pulling and that the hood isn’t too deep over the face.
Make sure the cape allows plenty of arm movement.
Trim uneven areas if needed and reinforce the neckline closure with a second line of stitching.
Then fluff up those tiny teddy ears.
Your upcycled fleece teddy bear cape is finished!
Tips for Sewing Fleece
Fleece is beginner-friendly, but a few tricks can make sewing it even easier.
Use a slightly longer stitch length, around 3 to 3.5 mm, because very short stitches can become buried in thick fleece.
A universal needle may work with lightweight fleece, while a ballpoint or stretch needle can be helpful if your fleece has significant stretch.
Most importantly, don’t pull the fabric while sewing. Let your machine’s feed dogs move the fleece naturally to prevent wavy seams.
If the layers keep shifting, sewing clips can be easier to use than pins on bulky fleece.
Why This Kids’ Upcycle Is Worth Trying
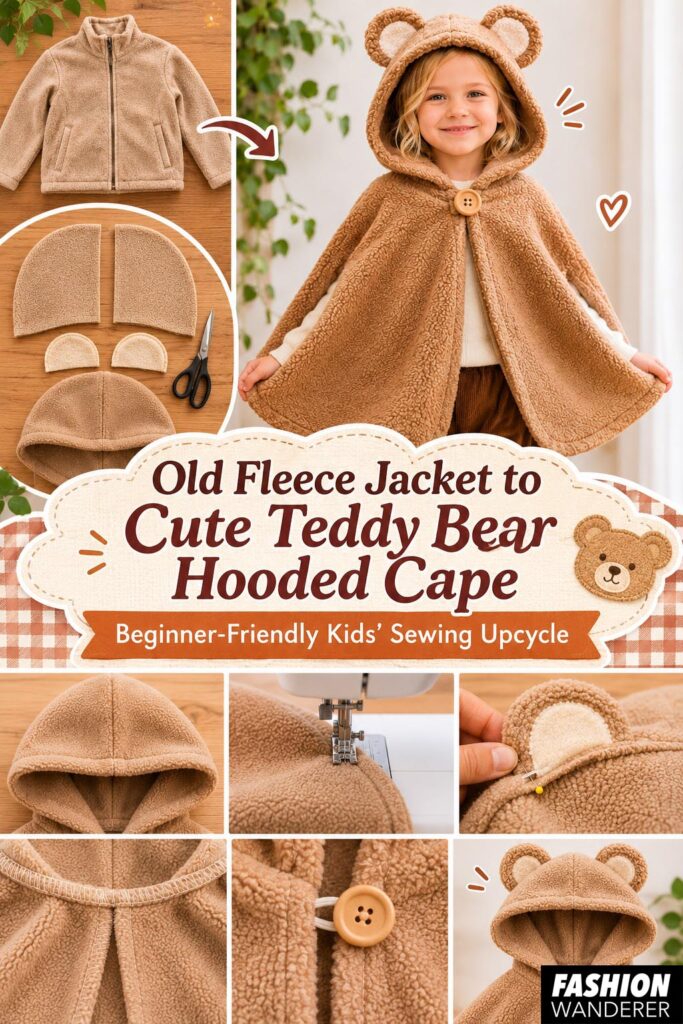
This project is a lovely example of how an old piece of clothing can become something completely different.
Instead of purchasing new fleece, you’re reusing fabric that’s already available—and the original jacket can provide almost everything you need for the cape, hood, ears, and closure.
It’s also an approachable project for anyone beginning to explore sewing clothes for kids. There are no complicated sleeves to insert, no fitted waistline, and fleece hides plenty of beginner sewing imperfections.
Pair the finished teddy bear cape with leggings, boots, and a cozy sweater for an adorable fall outfit, or use it as part of a woodland animal costume.
Either way, don’t toss that old fleece jacket just yet.
With a little cutting, a few simple seams, and two ridiculously cute ears, it can have a whole new life as a DIY teddy bear hooded cape your child will love wearing.