
Have an old plaid blanket hiding in the back of a closet? Instead of throwing it away, turn it into an adorable kids’ hooded cape! This easy sewing project transforms a thrifted or forgotten blanket into a cozy cottagecore cape that kids can wear throughout fall and winter.
The warm plaid fabric, oversized hood, and simple tie-front closure give the DIY kids cape a charming storybook look. Add a little ruffle, vintage button, lace trim, or patch pockets, and it becomes even cuter.
Best of all, this old blanket upcycle sewing project is surprisingly beginner-friendly. Because blankets already have finished edges, you can reuse some of the existing hems and dramatically reduce your sewing time.
Whether you need a cozy fall layer, handmade Halloween costume, woodland-inspired outfit, or inexpensive DIY Christmas gift, this kids’ cape is a fun way to give old fabric a completely new life.
Why You’ll Love This Kids’ Cape Upcycle
This project is perfect for using plaid wool, fleece, flannel, or other medium-weight blankets that are still in good condition.
You can customize the cape to fit your child and use almost every part of the original blanket. Even smaller leftover pieces can become pockets, ties, appliqués, or a decorative ruffle.
The finished cape looks especially cute layered over dresses, sweaters, leggings, jeans, and boots for an easy cottagecore-inspired fall outfit.
Materials You’ll Need
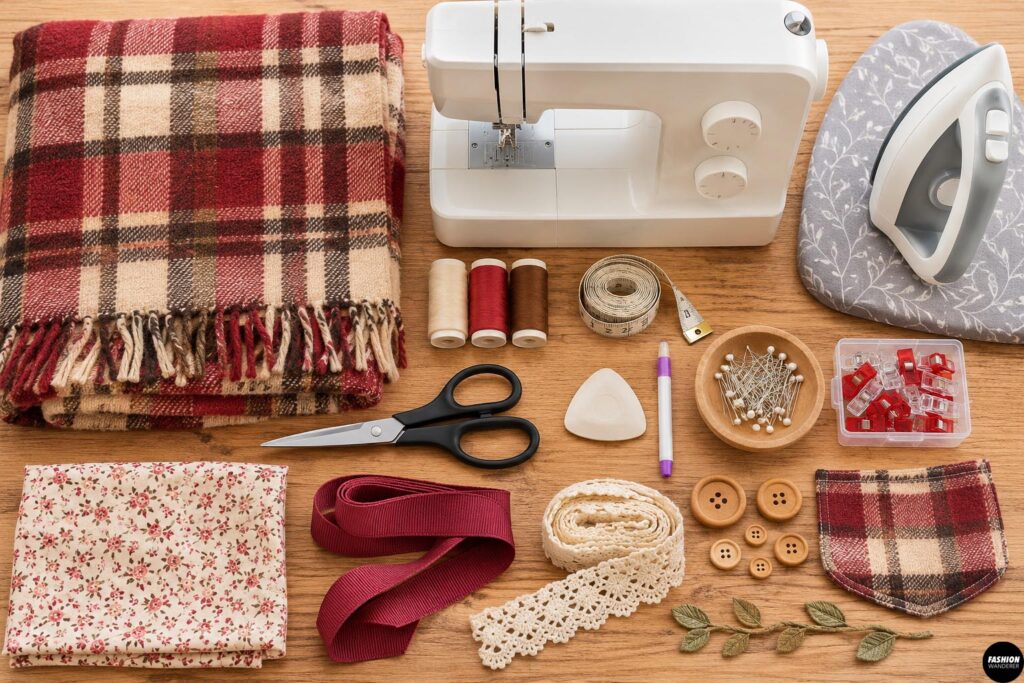
- 1 old plaid blanket
- Coordinating sewing thread
- Fabric scissors
- Measuring tape
- Fabric chalk or washable marker
- Sewing pins or clips
- Sewing machine
- Iron and ironing board
- Ribbon, twill tape, or fabric for the front ties
- Optional matching or contrasting fabric for a ruffle
- Optional buttons, lace, pockets, or decorative trim
A blanket approximately 50 x 60 inches or larger gives you plenty of fabric for most children’s sizes.
Upcycled Kids’ Cottagecore Hooded Cape
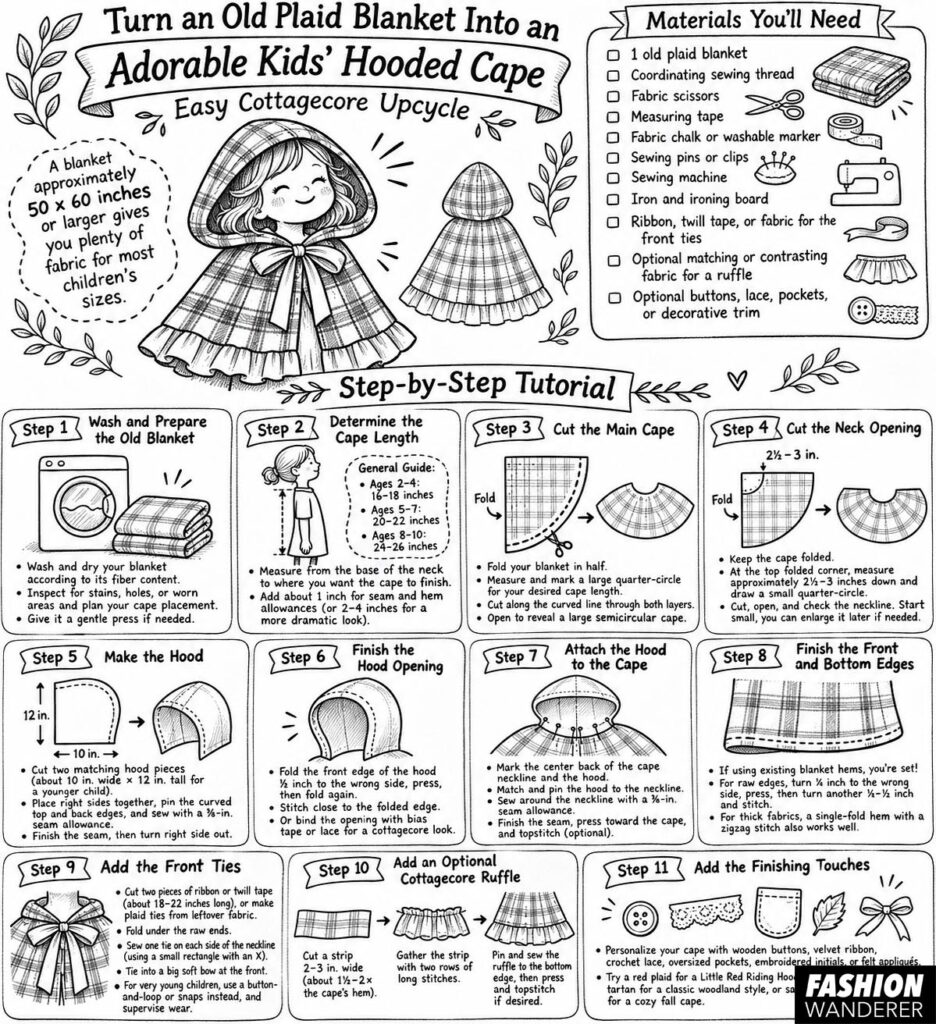
Step 1: Wash and Prepare the Old Blanket
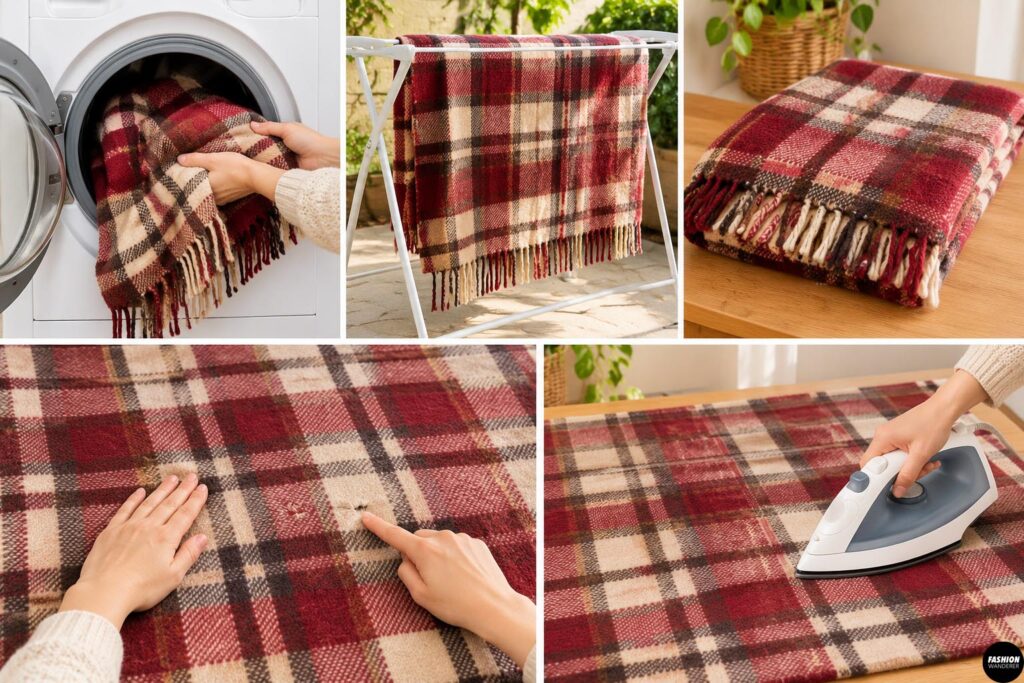
Start by washing and drying your blanket according to its fiber content.
This is especially important when working with a thrifted blanket because it cleans the fabric and allows any shrinkage to happen before you sew.
Spread the blanket flat and inspect it for stains, holes, or excessively worn areas.
Plan your cape placement around any damaged sections.
Give the blanket a gentle press if necessary. Plaid fabric is particularly convenient because the horizontal and vertical lines can help you keep your pieces straight while cutting.
Step 2: Determine the Cape Length
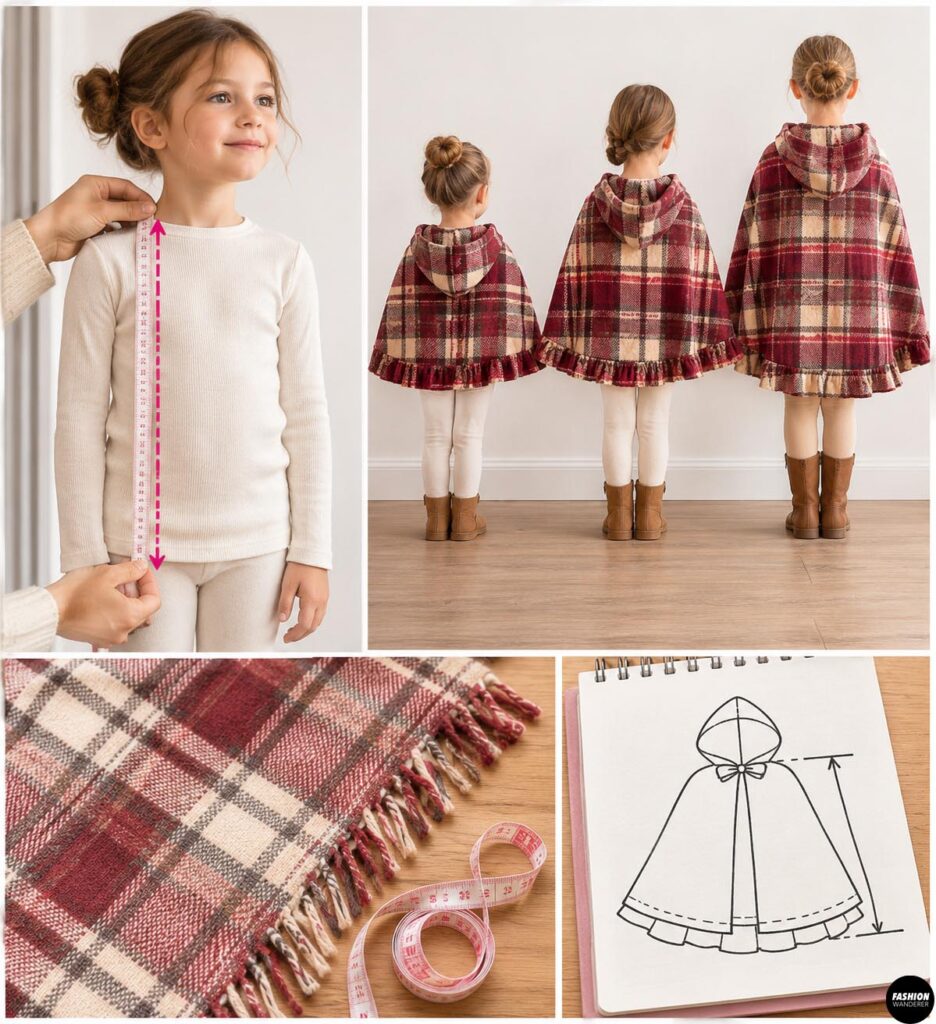
Measure your child from the base of the neck down to where you’d like the cape to finish.
For a general guide:
- Ages 2–4: approximately 16–18 inches
- Ages 5–7: approximately 20–22 inches
- Ages 8–10: approximately 24–26 inches
Add about 1 inch for seam and hem allowances unless you plan to use the blanket’s original finished edge as the bottom hem.
Want an extra-dramatic storybook cape? Add another 2–4 inches.
Step 3: Cut the Main Cape
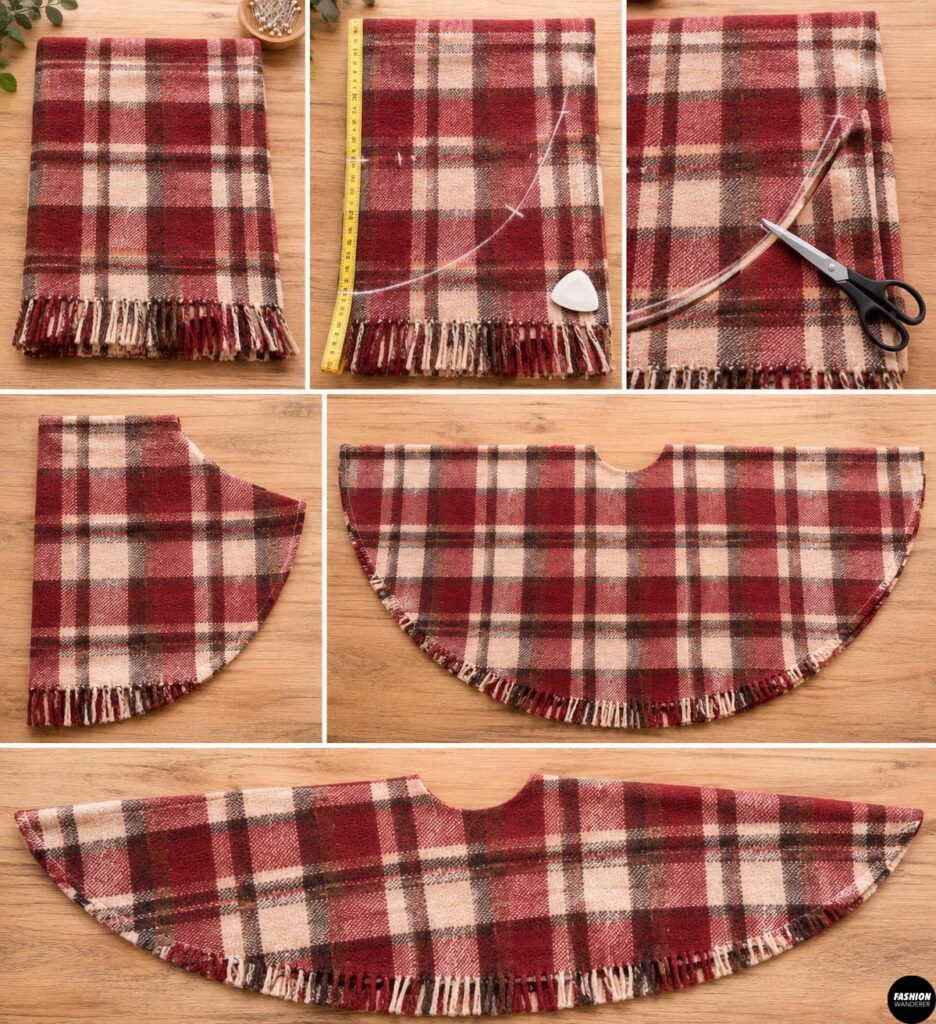
Fold your blanket in half.
Measure your desired cape length from the top folded corner and mark several points in an arc.
Connect the marks to create a large quarter-circle shape.
Cut along the curved line through both layers.
When you unfold the fabric, you’ll have a large semicircular cape.
Using the blanket’s existing finished edge along the bottom can save you from hemming a large curved edge.
Step 4: Cut the Neck Opening
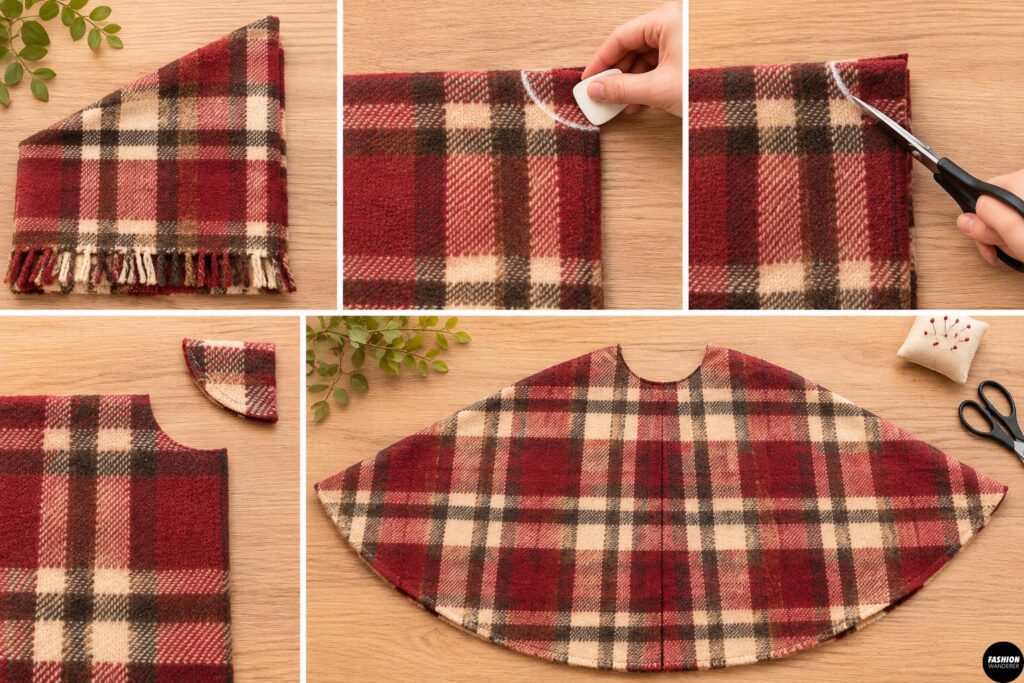
Keep the cape folded.
At the top folded corner, measure approximately 2½–3 inches down and draw a small quarter-circle.
Cut along this line.
Open the cape and check the neckline.
It’s better to start small. You can always enlarge the neckline later, but you can’t put the fabric back once you’ve cut too much!
The neckline should sit comfortably around the child’s shoulders without slipping too far backward.
Step 5: Make the Hood
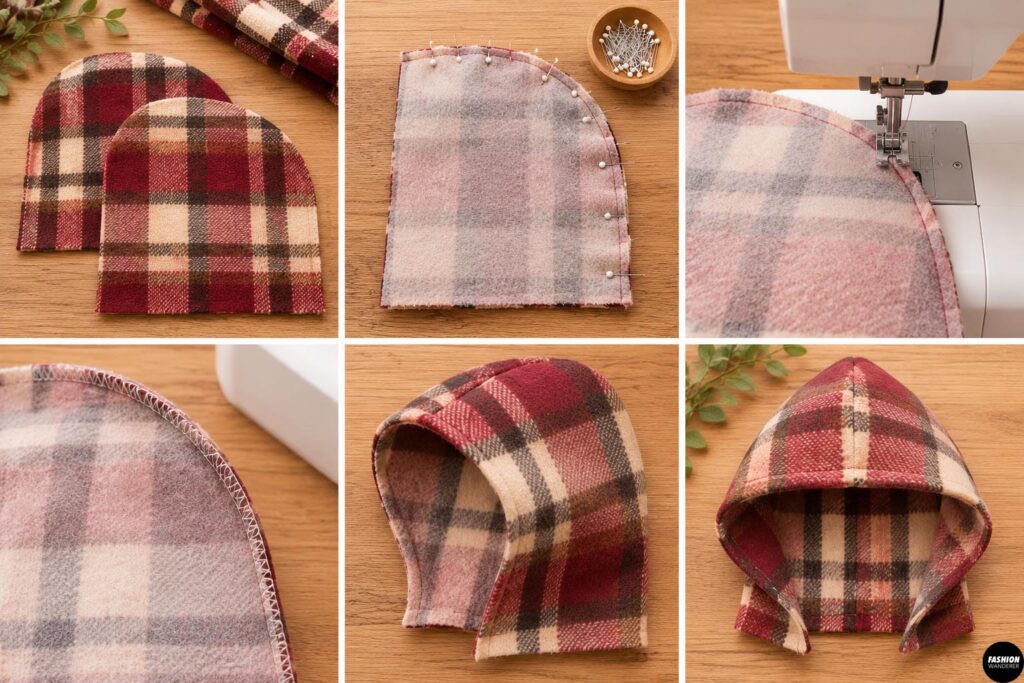
Use leftover blanket fabric to cut two matching hood pieces.
For a younger child, try starting with pieces approximately 10 inches wide by 12 inches tall. Increase the dimensions for older children.
Draw a gently rounded curve from the top of each piece toward the back edge.
Place the two hood pieces with right sides together.
Pin around the curved top and back edges, leaving the front and neckline edges open.
Sew using approximately a ⅜-inch seam allowance.
Finish the raw seam with a zigzag stitch or serger if your blanket frays easily.
Turn the hood right side out.
Step 6: Finish the Hood Opening
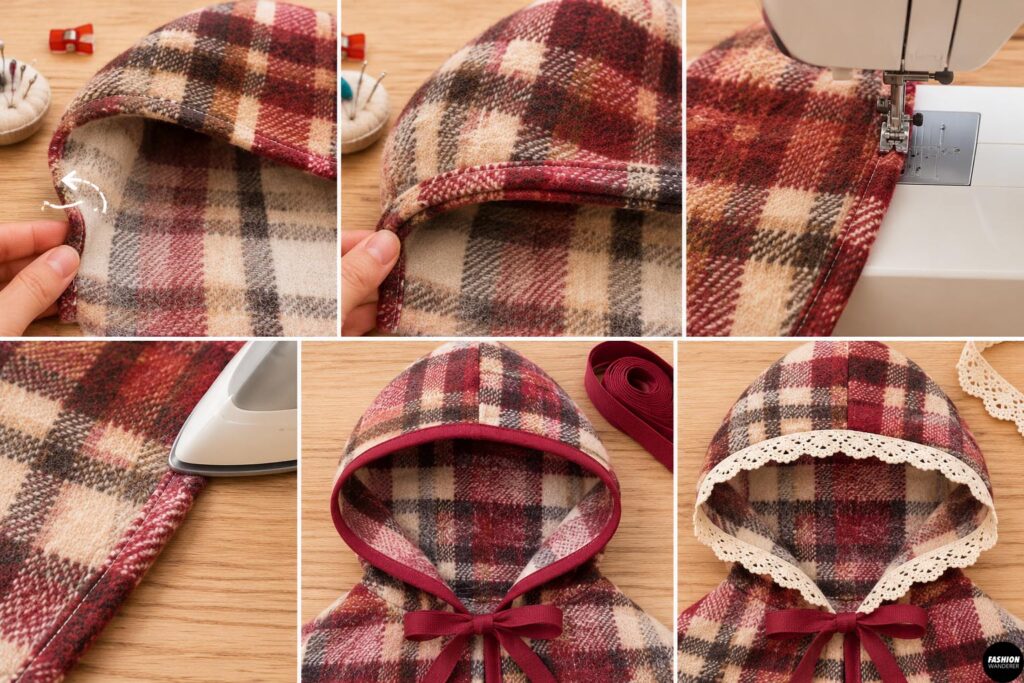
Fold the front edge of the hood approximately ½ inch toward the wrong side.
Press carefully and fold it over once more.
Stitch close to the folded edge.
Another cute option is to bind the hood opening with bias tape or add a narrow lace trim for an extra cottagecore touch.
Step 7: Attach the Hood to the Cape
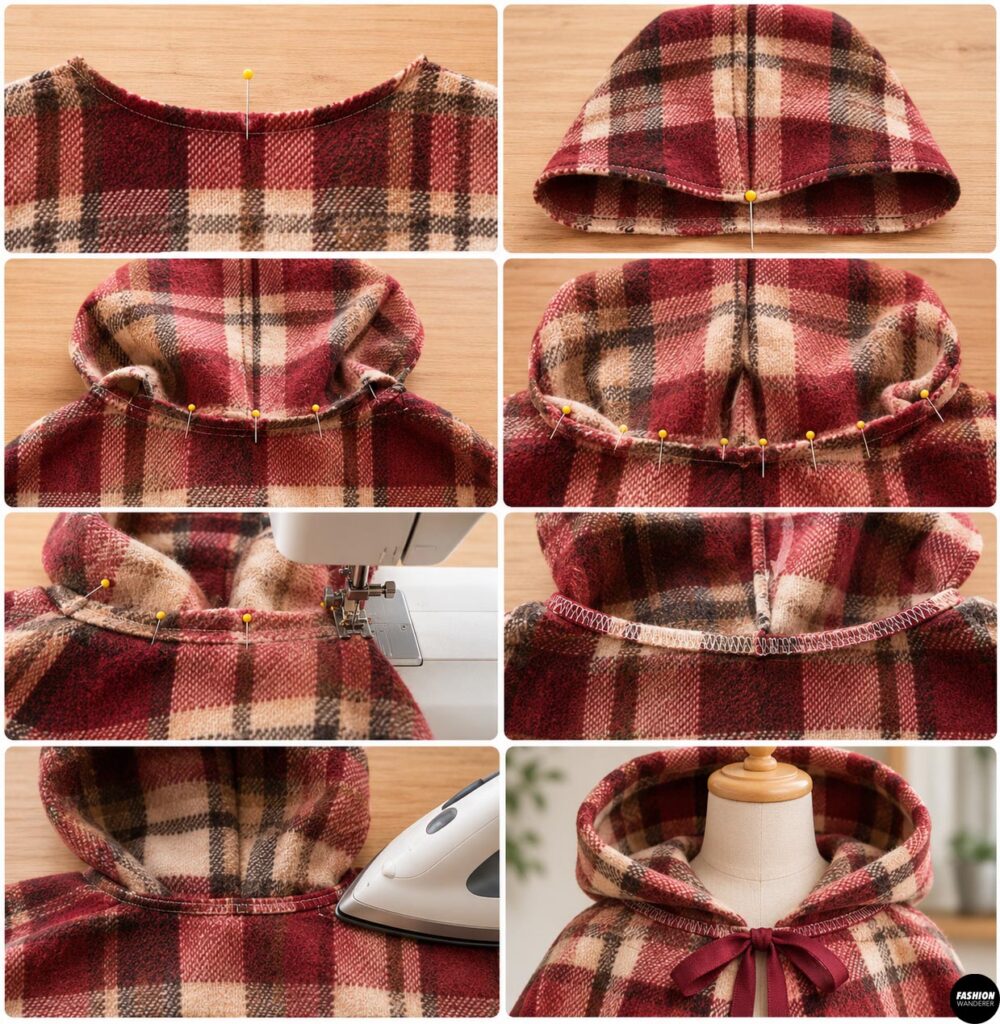
Find the center back of the cape neckline and mark it with a pin.
Find the center back seam of your hood.
Match these two points with right sides together.
Continue pinning the bottom hood edge around the neckline.
If the hood is slightly larger than the neckline, create one or two tiny pleats at the back rather than stretching the cape.
Sew around the neckline using a ⅜-inch seam allowance.
Finish the raw seam and press it toward the cape.
Topstitching around the neckline is optional but gives the cape a polished finish.
Step 8: Finish the Front and Bottom Edges
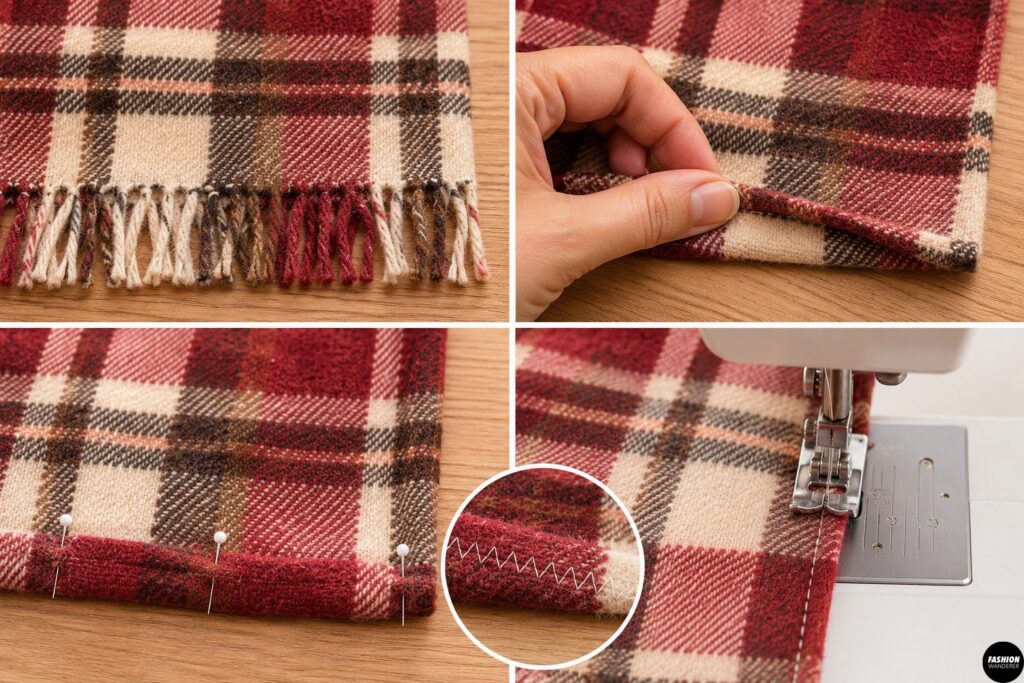
If you’re using existing blanket hems, congratulations—much of this work is already finished!
For raw edges, turn the fabric approximately ¼ inch toward the wrong side and press.
Turn it another ¼–½ inch and stitch.
For thick wool or fleece, you may prefer a single-fold hem finished first with a zigzag stitch or serger.
Step 9: Add the Front Ties
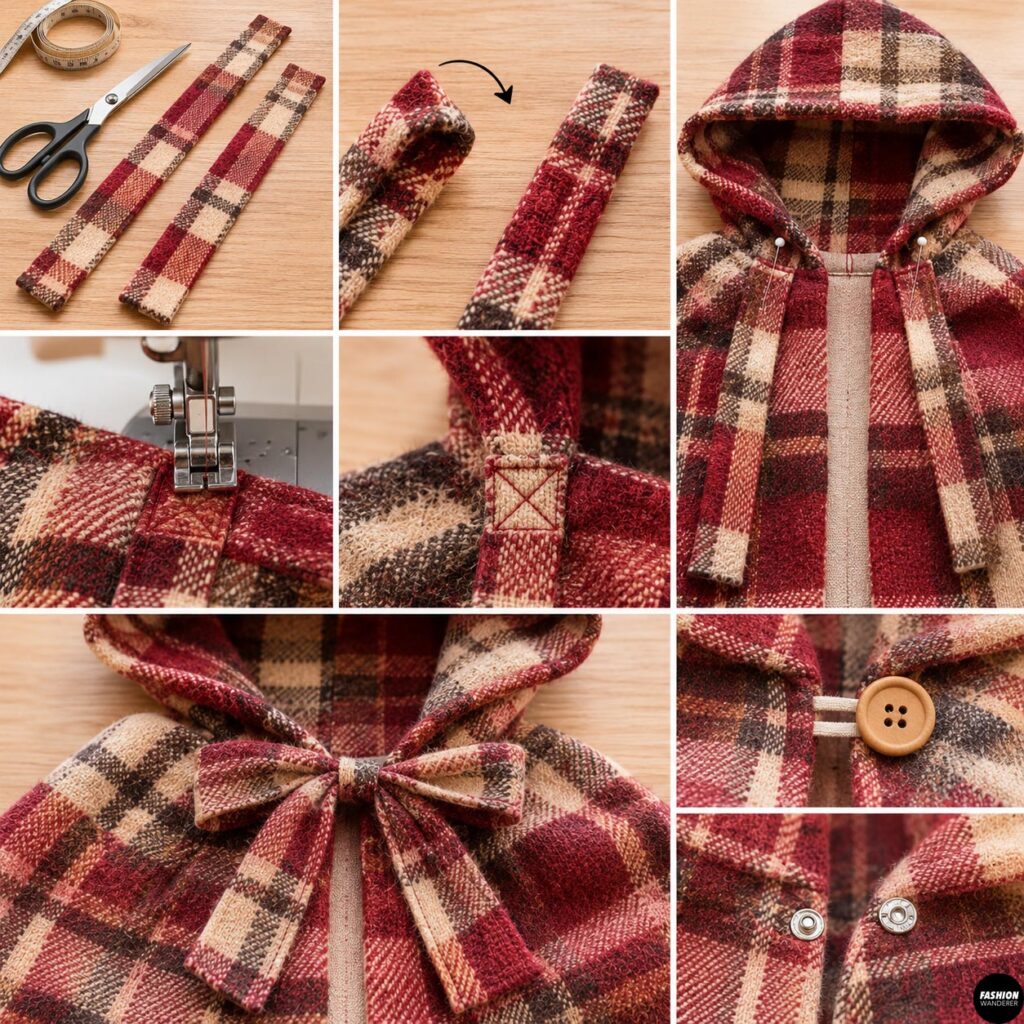
Cut two pieces of sturdy ribbon or twill tape approximately 18–22 inches long.
Alternatively, make matching plaid ties from leftover blanket fabric.
Fold under the raw end of each tie.
Position one tie on either side of the neckline and stitch securely using a small rectangle with an X through the center.
Tie them into a big soft bow at the front.
For very young children, consider using a large button-and-loop or snap closure instead of long ties, and supervise wear.
Step 10: Add an Optional Cottagecore Ruffle
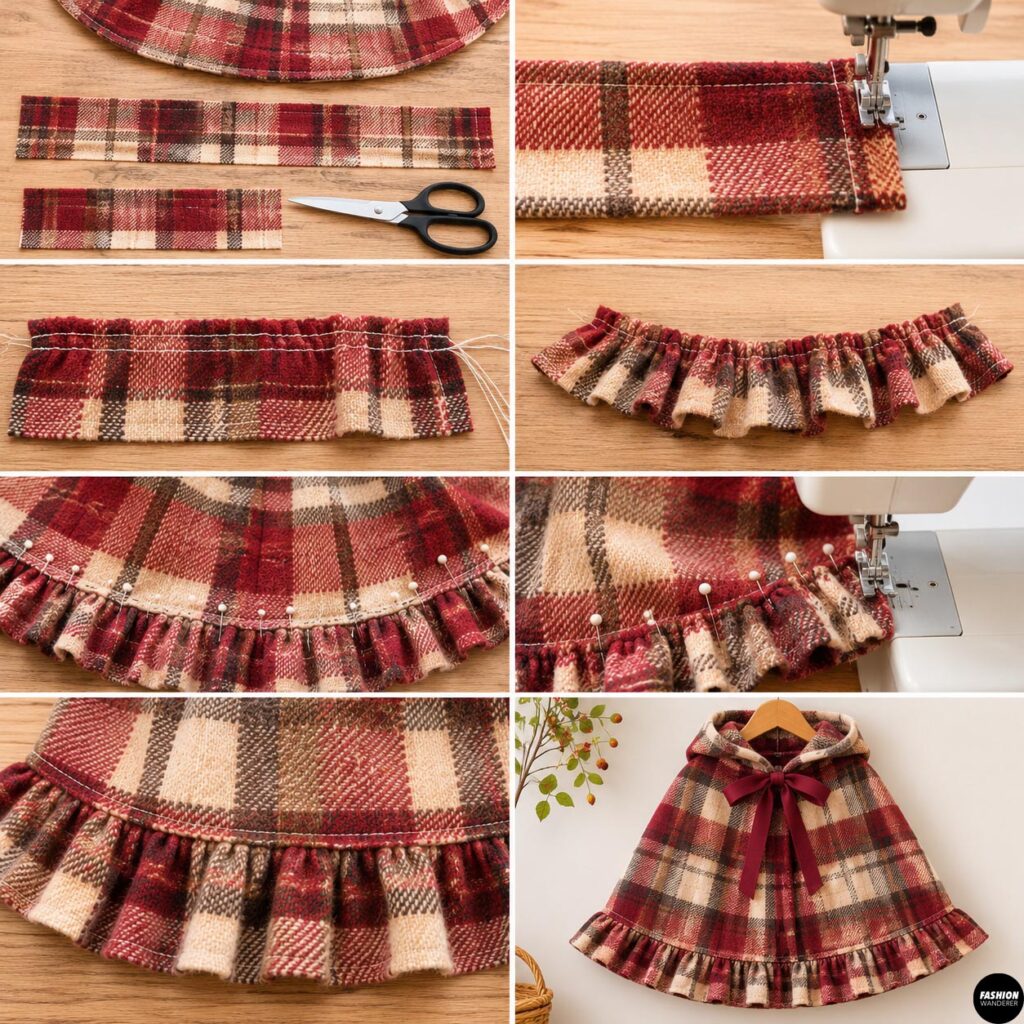
Here’s where this simple cape gets ridiculously cute.
Cut a long strip from leftover blanket fabric approximately 2–3 inches wide.
The strip should be about 1½–2 times the length of the cape’s bottom edge.
Finish one long edge.
Sew two rows of long gathering stitches along the opposite edge and gently pull the bobbin threads until the ruffle matches the cape.
Pin it around the bottom and sew it in place.
Press the seam upward and topstitch if desired.
Step 11: Add the Finishing Touches
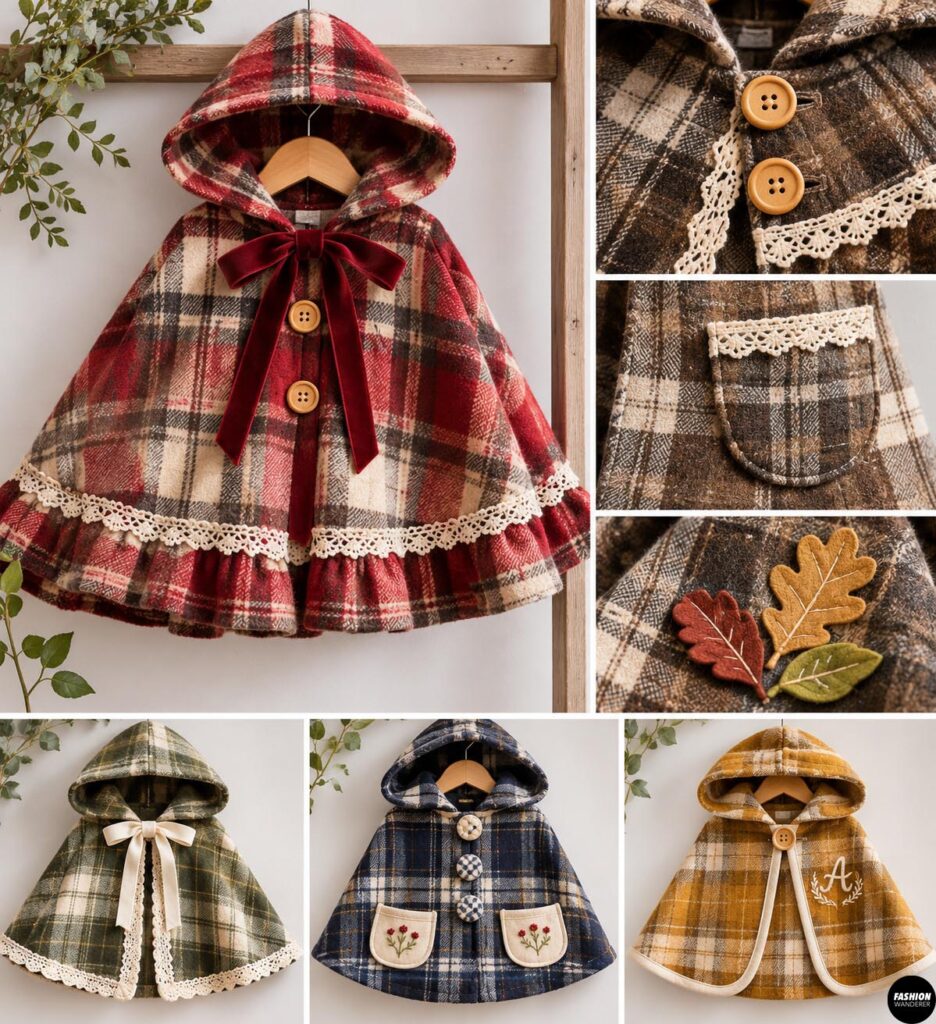
Personalize your DIY kids’ hooded cape with details that match your child’s style.
Try vintage-style wooden buttons, velvet ribbon, crochet lace, oversized patch pockets, embroidered initials, fabric-covered buttons, or tiny felt leaf appliqués.
For a Little Red Riding Hood-inspired version, use a red plaid blanket. Brown and cream tartan creates a classic woodland look, while sage, navy, or mustard plaid feels especially cozy for fall.
A Cozy New Life for an Old Blanket
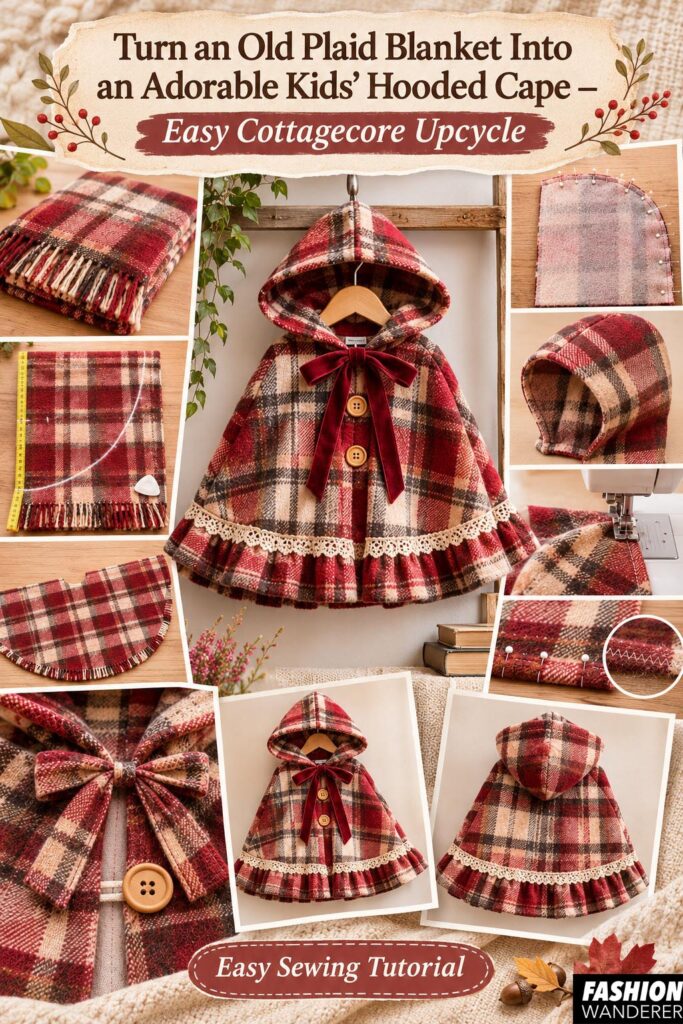
This old plaid blanket to kids’ hooded cape upcycle proves that beautiful children’s clothing doesn’t have to start with brand-new fabric.
With a few strategic cuts and simple seams, an unused blanket can become a cozy handmade cape that looks straight out of a cottagecore storybook.
Pair the finished cape with a chunky sweater and boots for everyday fall adventures, layer it over a dress for Thanksgiving, or use it as the starting point for a woodland Halloween costume.
And don’t throw away those remaining plaid scraps—you’ve already got the perfect fabric for matching mittens, a mini scarf, doll clothes, or a tiny crossbody bag for your next upcycle!