
Looking for a cute and creative way to reuse an old sweatshirt? This DIY woodland deer cape transforms a cozy, oversized sweatshirt into an adorable fall outfit for kids, complete with sweet little deer ears, soft antlers, and charming woodland-inspired details!
Perfect for autumn adventures, woodland-themed birthday parties, Halloween costumes, or everyday dress-up, this upcycled sweatshirt sewing project is budget-friendly, beginner-friendly, and surprisingly easy to make.
Instead of buying expensive costume fabric, you’ll use the soft sweatshirt material you already have at home. With a few simple cuts, basic sewing techniques, and adorable embellishments, you can create a cozy DIY deer hooded cape for kids that looks straight out of a woodland fairy tale.
Why You’ll Love This DIY Woodland Deer Cape
This easy kids’ sewing project combines comfort, creativity, and sustainable fashion.
- Beginner-friendly: Simple seams and easy-to-follow sewing instructions.
- Budget-friendly: Repurpose an old sweatshirt instead of purchasing new fabric.
- Adorable woodland style: Add deer ears, antlers, and little white spots.
- Comfortable for fall: Soft sweatshirt fabric provides lightweight warmth.
- Perfect for multiple occasions: Great for Halloween, fall photoshoots, and imaginative play.
Best of all, the DIY kids’ cape sewing tutorials can be customized with different colors and woodland animal details.
Materials You’ll Need
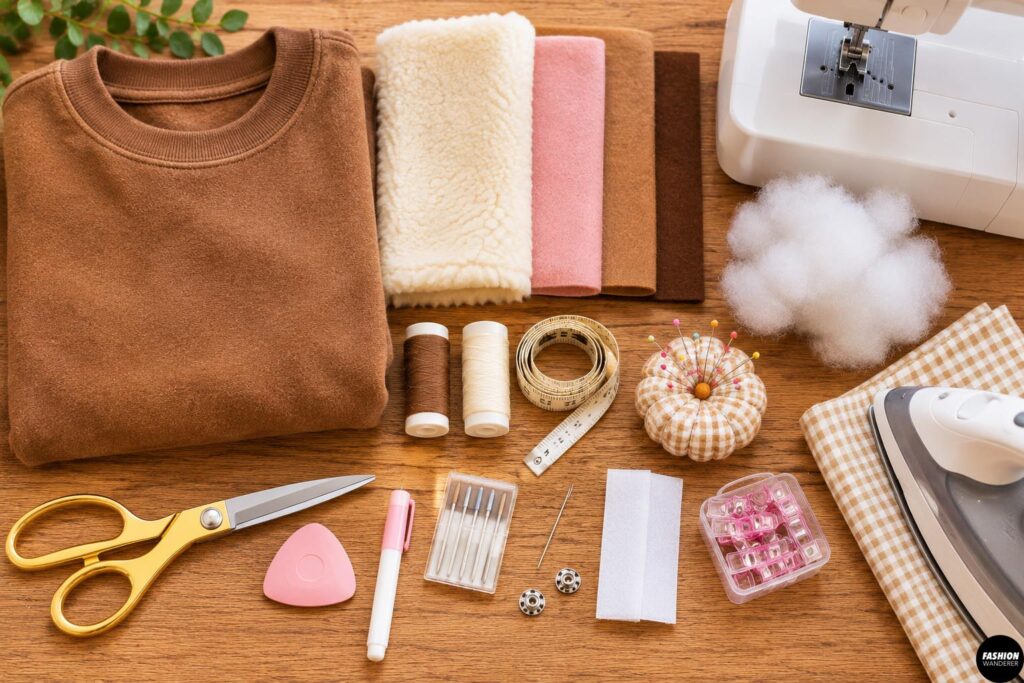
Gather these supplies before starting your woodland deer cape.
- 1 oversized brown, tan, or beige sweatshirt (preferably adult-sized)
- Small scraps of cream or white fleece
- Small scraps of pink or light brown felt
- Brown felt or fleece for antlers
- Lightweight polyester stuffing
- Matching sewing thread
- Fabric scissors
- Sewing machine
- Measuring tape
- Fabric chalk or washable marker
- Sewing pins or clips
- Hand-sewing needle
- Iron and pressing cloth
- Optional: Hook-and-loop tape or a large sew-on snap
Skill Level: Beginner
Estimated Time: 2–3 hours
Seam Allowance: ⅜” (1 cm), unless otherwise stated.
Step-by-Step Tutorial: How to Turn an Old Sweatshirt Into a Deer Cape
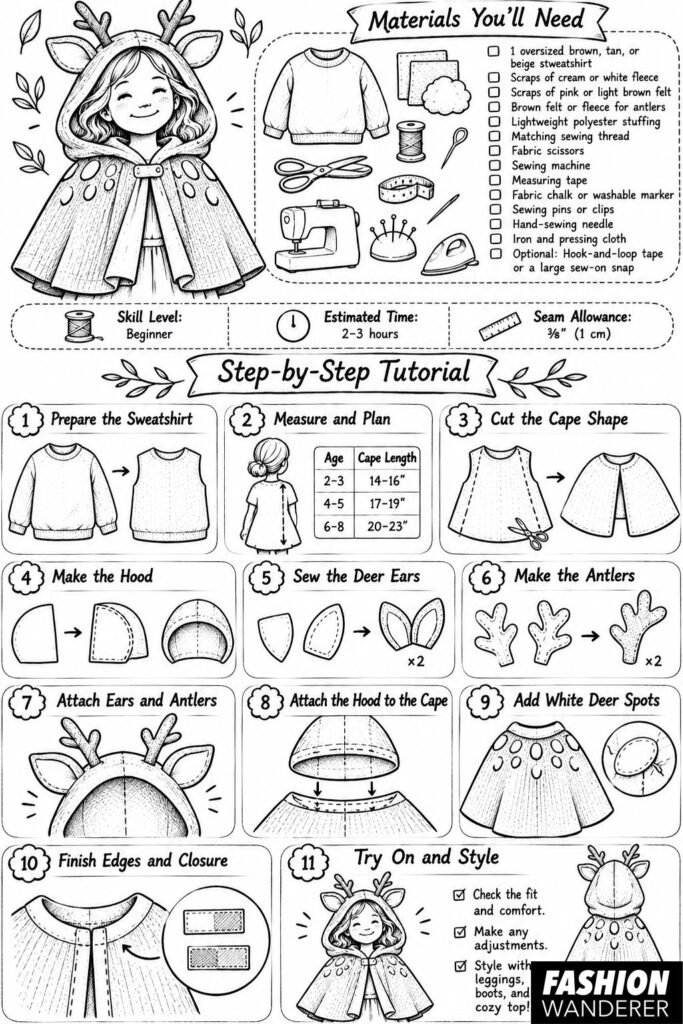
Step 1: Prepare Your Old Sweatshirt
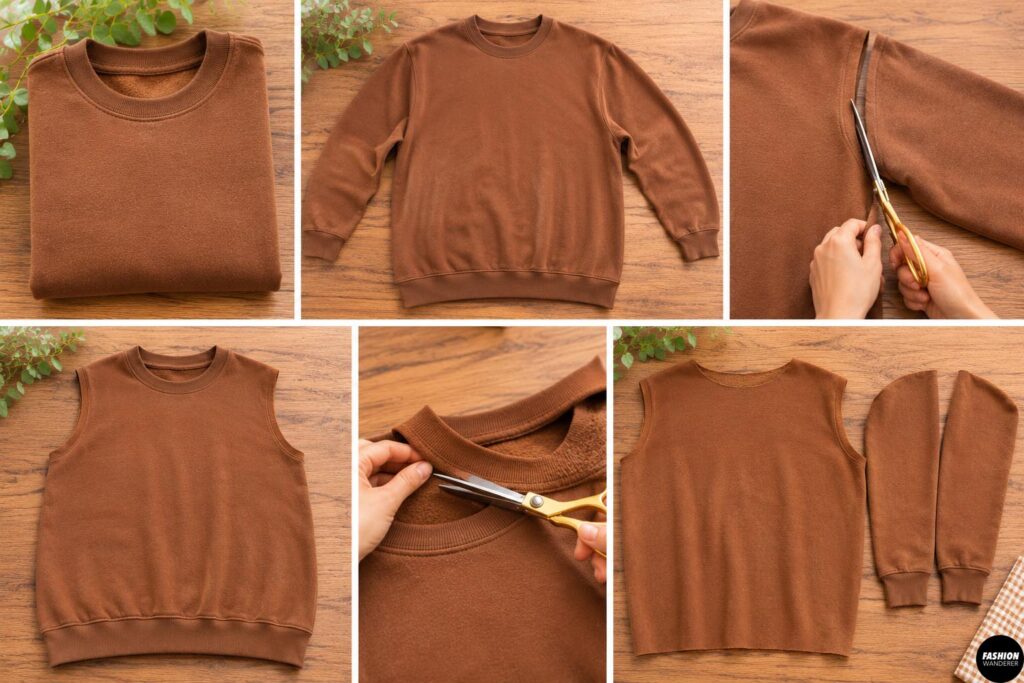
Start with a clean, oversized sweatshirt in a warm woodland color.
Lay it flat on your worktable and smooth out any wrinkles.
Remove the sleeves by carefully cutting along the armhole seams. Save the sleeves because you’ll use this fabric to create the hood, deer ears, and antlers.
Cut away the original neckline ribbing and waistband if they interfere with your cape design.
Beginner Tip: Choose a sweatshirt at least two sizes larger than your child’s regular size to provide enough fabric for a flowing cape.
Step 2: Measure Your Child and Plan the Cape
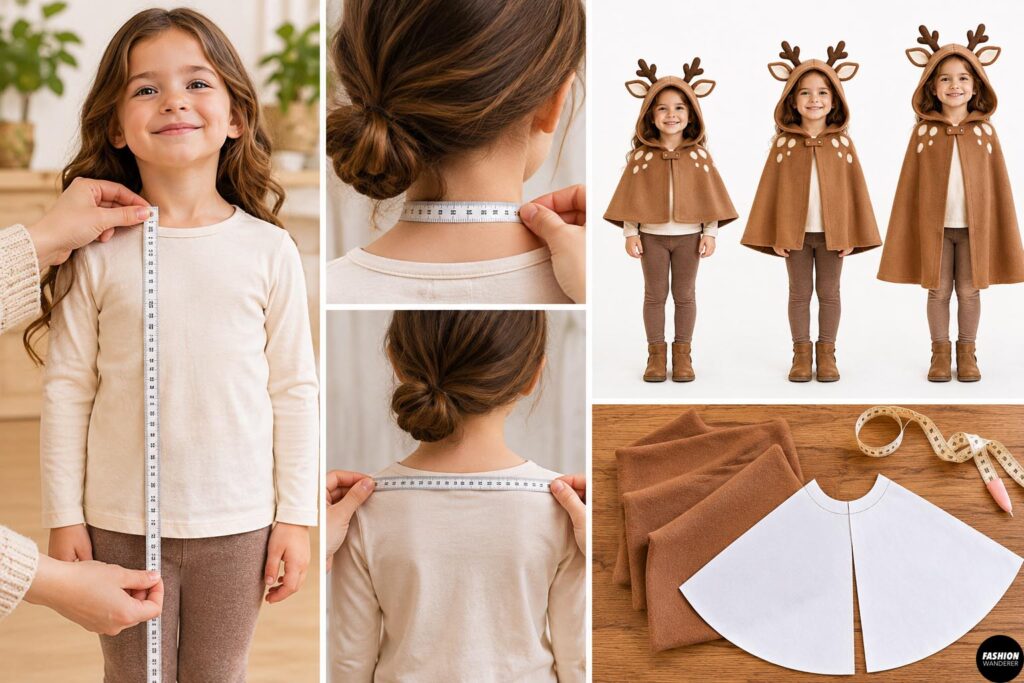
Measure from the base of your child’s neck to the desired cape length.
For reference:
| Age | Suggested Cape Length |
| 2–3 years | 14–16 inches |
| 4–5 years | 17–19 inches |
| 6–8 years | 20–23 inches |
These are approximate lengths. Always check the measurement against your child.
Measure loosely around the shoulders to determine the required neckline opening.
The finished cape should sit comfortably without pulling or restricting movement.
Step 3: Cut the Sweatshirt Into a Cape Shape
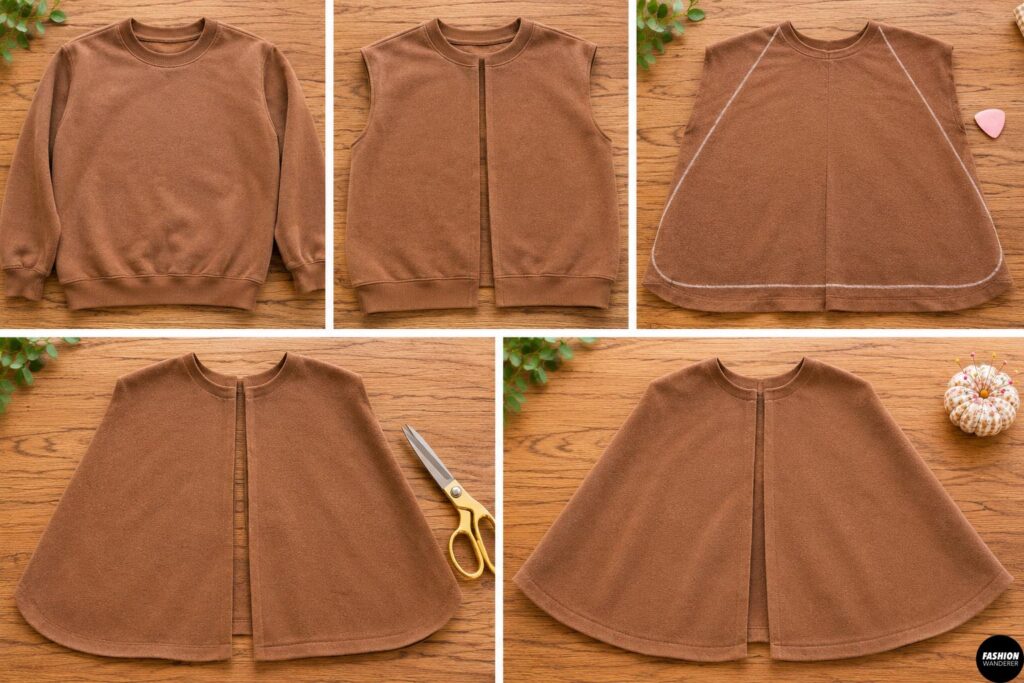
Lay the sweatshirt flat with the front facing upward.
Cut straight down the center front to create the cape opening.
Keep the shoulder seams intact.
Using fabric chalk, draw gently curved lines from the neckline toward the lower outer edges, creating a flared cape silhouette.
Trim away excess fabric while maintaining enough width to drape comfortably around the shoulders.
Round the bottom corners for a softer woodland-inspired appearance.
Sewing Tip: Cut both sides symmetrically by folding the cape in half along the center back before trimming the hem.
Step 4: Create the Hood From Sweatshirt Sleeves
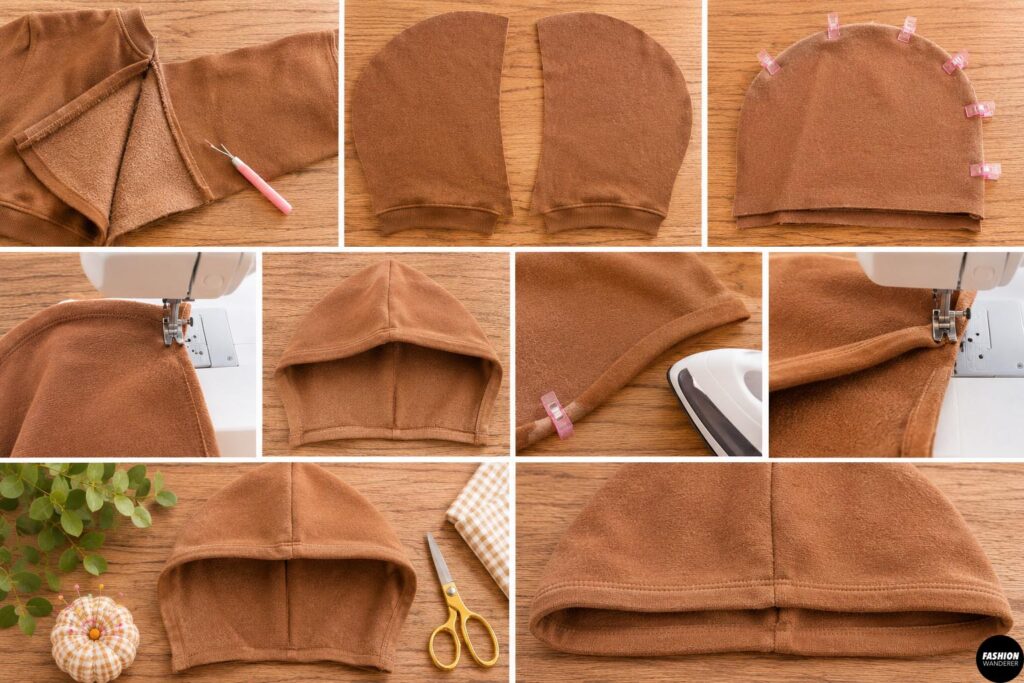
Open the saved sweatshirt sleeves along their seams.
Lay the fabric flat and cut two matching hood pieces using a well-fitting child’s hoodie as a template.
Include a ⅜” seam allowance around the edges.
Place the hood pieces right sides together.
Pin along the curved back and top edges, then sew using a straight stitch or narrow zigzag stitch.
Turn the hood right side out.
Fold the front opening edge inward by ⅜” and stitch to create a neat finish.
You now have a soft, cozy hood ready for your adorable deer details!
Step 5: Sew the Cute Deer Ears
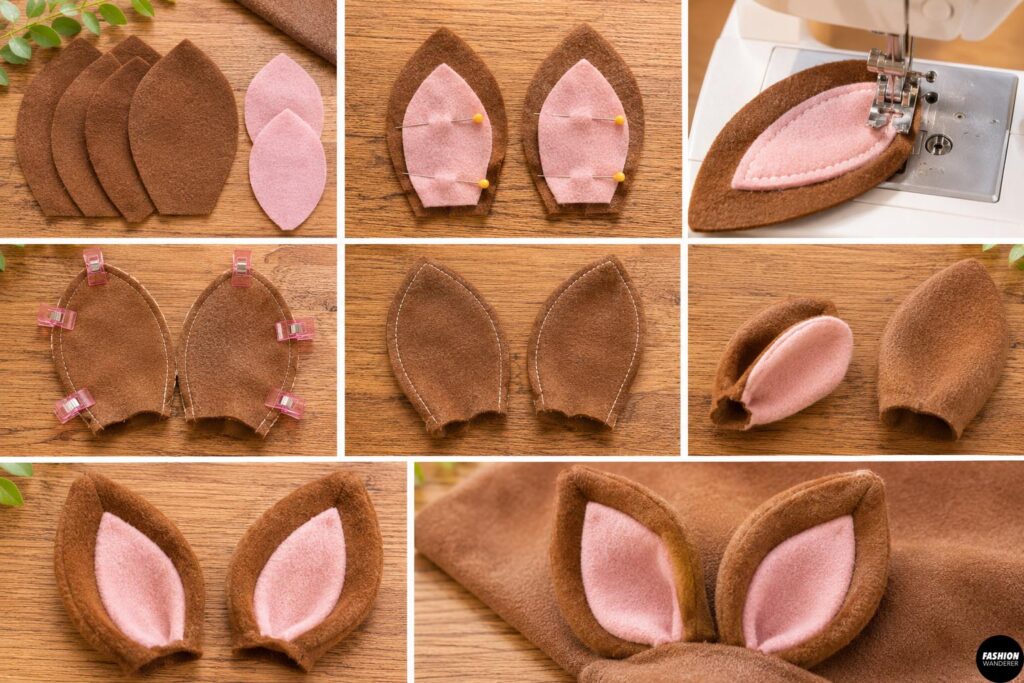
The deer ears are what make this woodland animal cape sewing project extra adorable.
Cut four oval or leaf-shaped ear pieces from brown sweatshirt fabric, approximately 4″ long and 2½” wide.
Cut two slightly smaller inner-ear shapes from pink or cream felt.
Sew the inner-ear pieces onto two outer-ear pieces.
Place each decorated ear right sides together with a plain ear piece.
Stitch around the edges, leaving the bottom open.
Turn right side out and lightly press.
Fold the bottom edges inward slightly to give each ear a natural, dimensional shape.
Step 6: Make Soft Woodland Deer Antlers
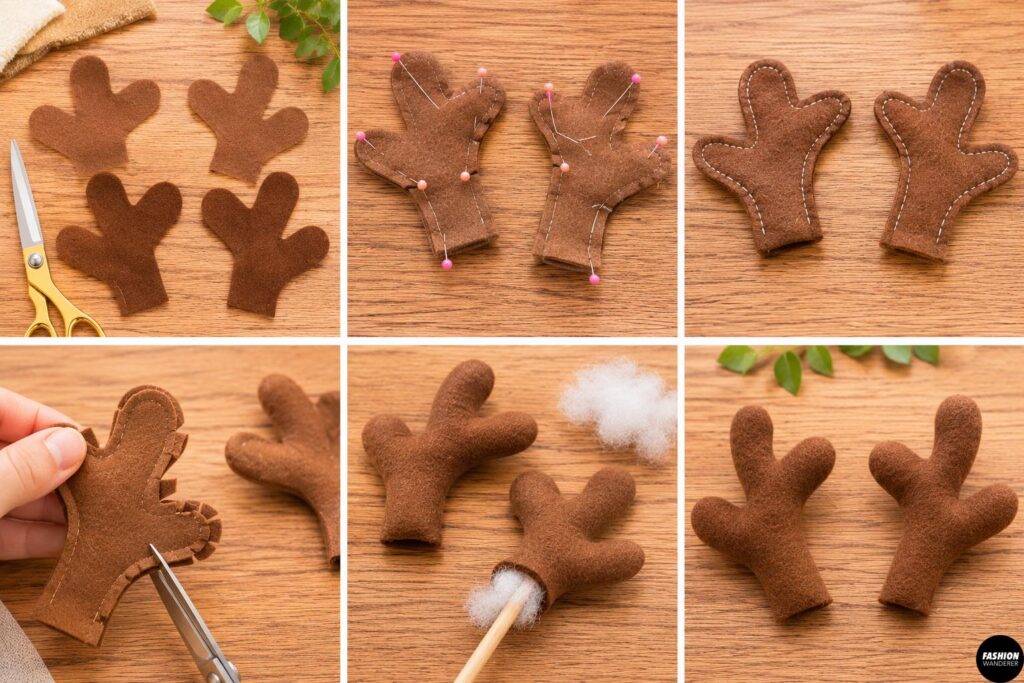
Cut four small branching antler shapes from brown felt or fleece.
Make two matching pairs, approximately 3–4″ tall.
Place each pair right sides together and sew around the outer edges, leaving the bottom open.
Carefully clip the seam allowances around the curves.
Turn right side out and add a small amount of polyester stuffing.
Avoid overstuffing—the antlers should remain soft and lightweight.
Beginner Tip: Use simple, rounded antler shapes rather than complicated branches to make sewing and turning easier.
Step 7: Attach the Ears and Antlers to the Hood
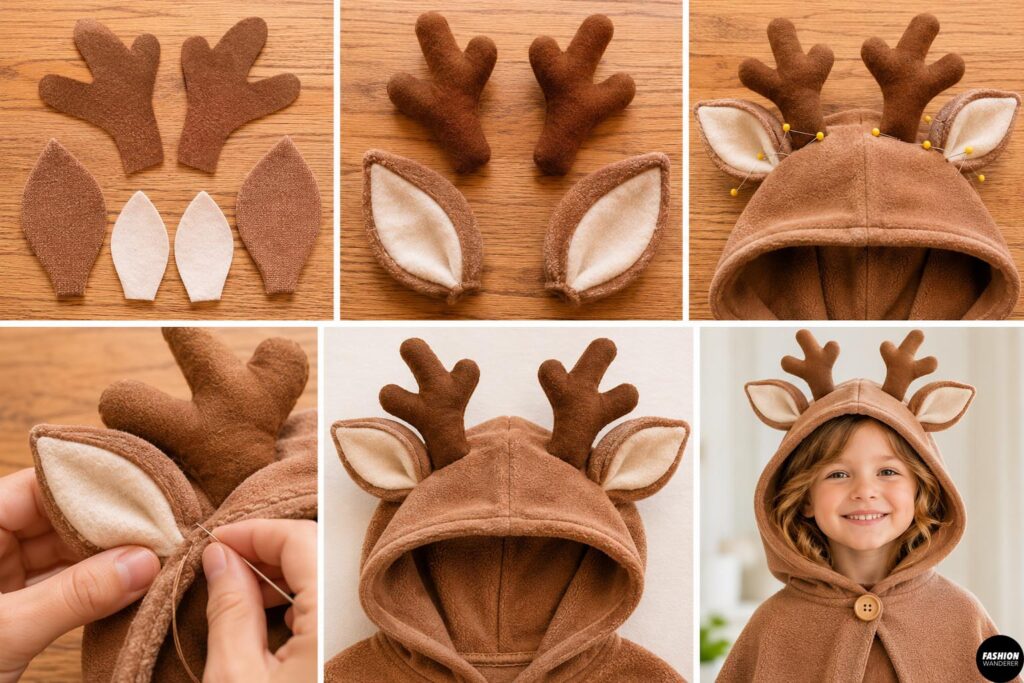
Position the deer ears on either side of the hood’s upper section.
Place the antlers slightly inward from the ears.
Try the hood on your child before permanently attaching the decorations to check placement.
Hand-sew the ears and antlers securely to the hood using several rows of strong stitches.
Make sure all decorations remain flexible and comfortable.
Avoid wire supports or sharp materials.
Step 8: Attach the Hood to the Cape
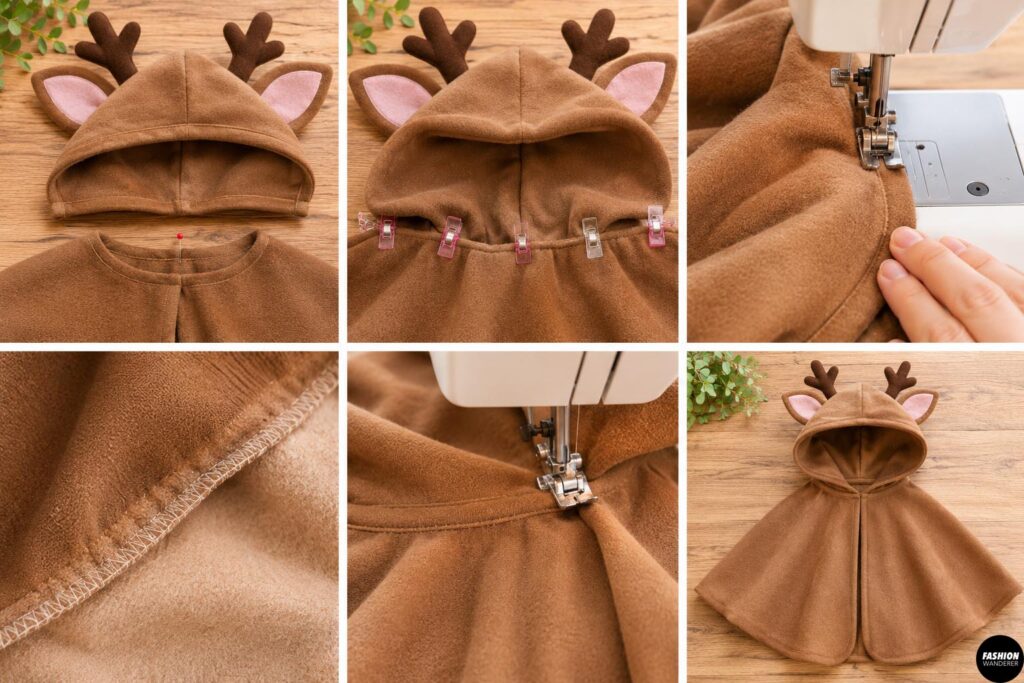
Find the center back of the cape neckline and mark it with a pin.
Match the center back of the hood to this marking.
With right sides together, pin the hood along the neckline, distributing the fabric evenly.
Sew using a ⅜” seam allowance.
Finish the seam allowance with a zigzag stitch to prevent fraying.
For extra durability, topstitch along the neckline seam.
Your DIY hooded deer cape is starting to take shape!
Step 9: Add Adorable White Deer Spots
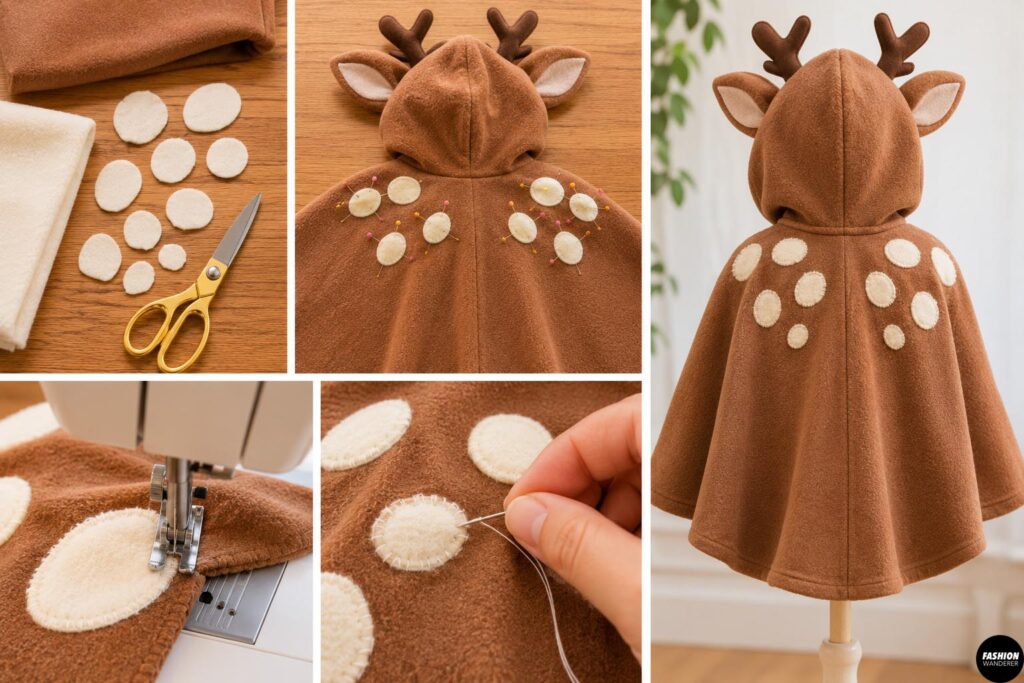
Cut several small oval or circular spots from cream fleece or felt.
Arrange them across the back and shoulders of the cape.
Use different sizes for a natural woodland deer appearance.
Pin each spot into position.
Sew around the edges using a narrow zigzag stitch or hand-sew with small stitches.
Keep the spots concentrated around the upper back for a classic baby deer-inspired design.
Step 10: Finish the Cape Edges and Closure
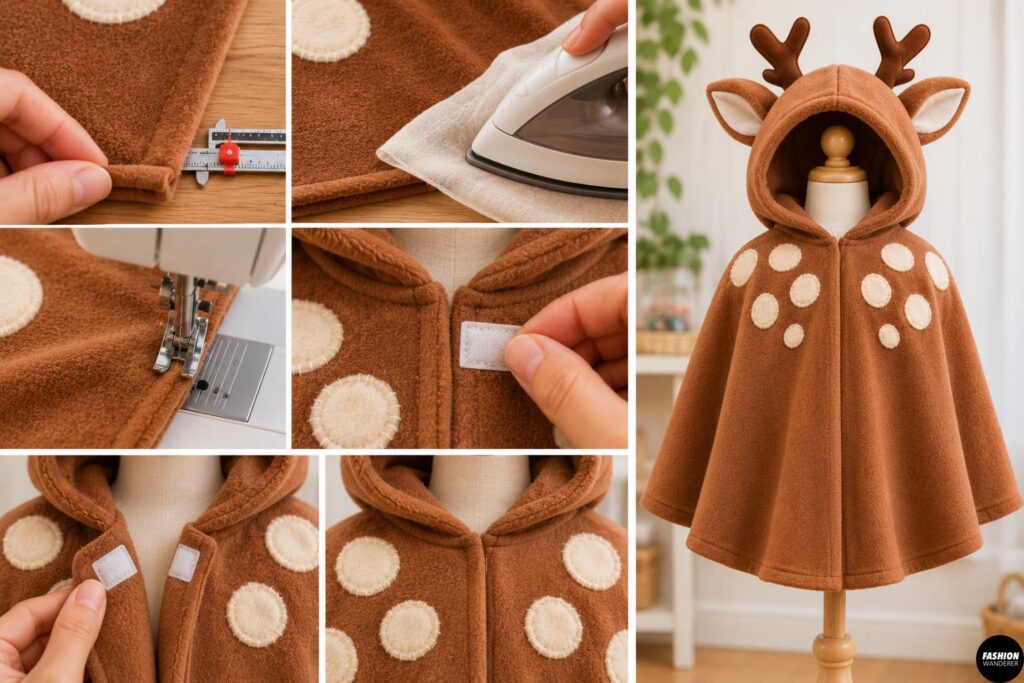
Fold the front and bottom edges inward by ⅜”.
Press gently using a pressing cloth and sew around the edges.
For the front closure, attach a small piece of hook-and-loop tape near the upper chest, below the neckline.
Avoid neck ties, long ribbons, or drawstrings that could create a strangulation hazard.
Check that the cape opens easily and does not feel tight around the neck.
Step 11: Try On and Style Your Woodland Deer Cape
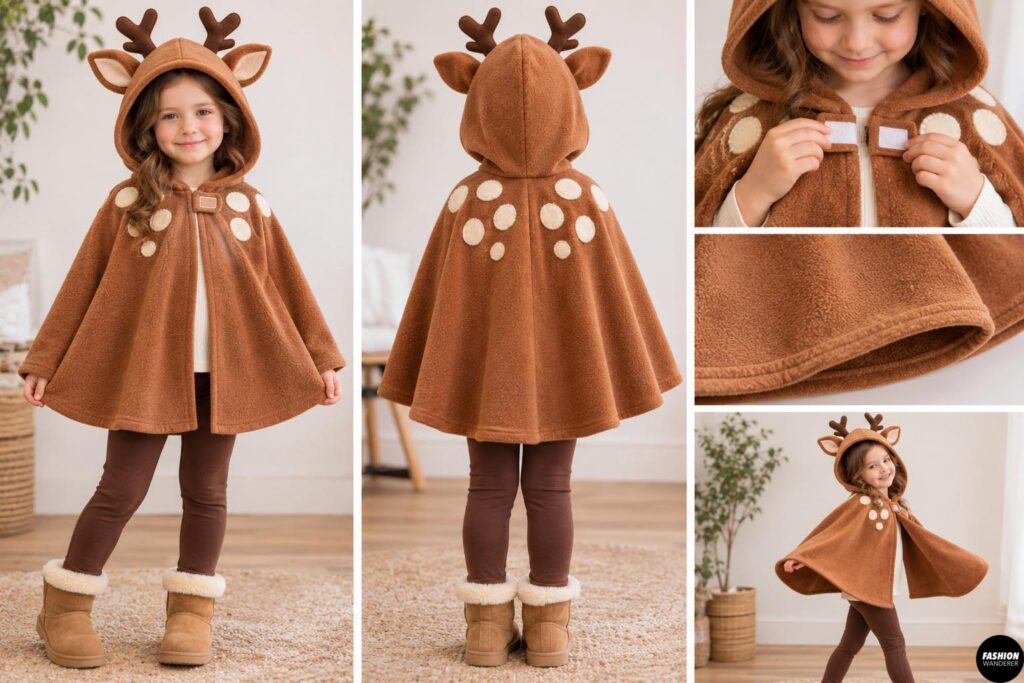
Have your child try on the finished cape.
Check the shoulder fit, hood placement, and overall length.
Make any necessary adjustments to keep the cape comfortable and easy to move in.
Style it with brown leggings, cozy boots, and a cream-colored shirt for an adorable fall woodland outfit.
For safety, use the cape only during supervised play, and remove it before sleeping or playground activities.
Helpful Sewing Tips for Beginners
Use a ballpoint needle: Sweatshirt fabric is usually knitted, so a ballpoint or stretch needle helps prevent skipped stitches.
Avoid stretching the fabric: Let the sewing machine feed the material naturally.
Secure every decoration: Double-check the stitching on the ears, antlers, and spots.
Keep the design lightweight: Soft fleece decorations are more comfortable for little ones.
Final Thoughts
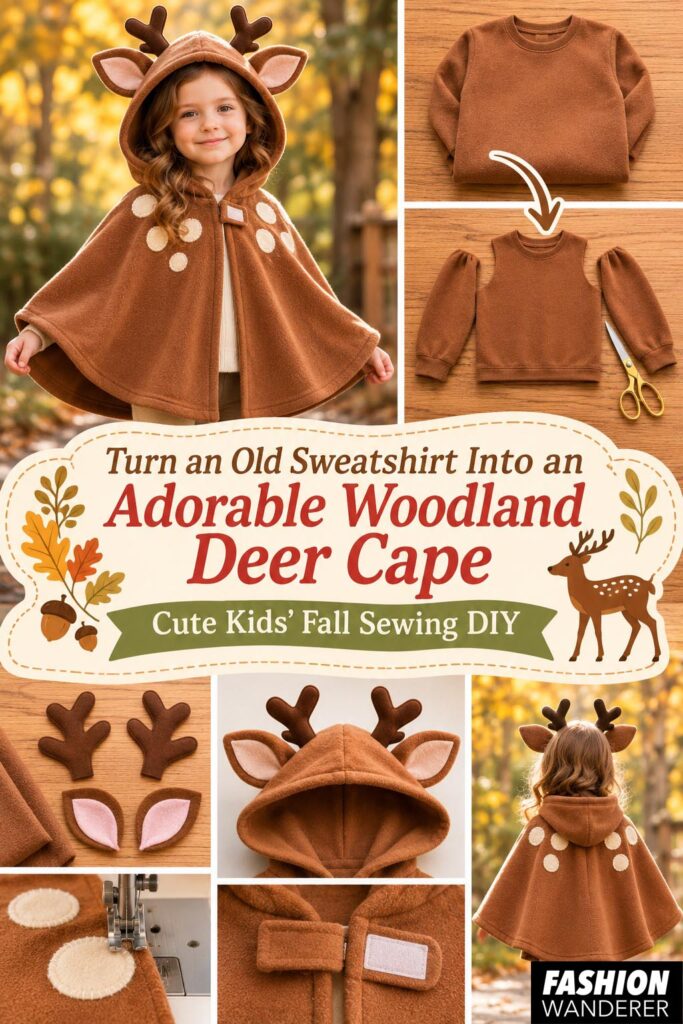
Turning an old sweatshirt into a DIY woodland deer cape for kids is a wonderful way to combine sustainable sewing with creative fall fashion.
With its cozy hood, sweet deer ears, soft antlers, and charming spotted details, this adorable upcycled cape is perfect for autumn photos, Halloween celebrations, and imaginative woodland adventures.
It’s also a fantastic beginner sewing project that gives forgotten clothing a beautiful second life.
So grab that old sweatshirt, gather your fabric scraps, and create a little woodland magic with this easy DIY kids’ deer cape sewing tutorial!