
If you need an easy Renaissance fair outfit, Halloween costume, or fantasy-inspired blouse, you do not have to sew an entire garment from scratch. An oversized button-up shirt can be transformed into a romantic medieval tavern maiden blouse with just a few simple alterations.
This beginner-friendly upcycle uses basic sewing techniques to create a gathered neckline, puffed sleeves, elastic cuffs, and a slightly loose peasant-style fit. The finished blouse pairs beautifully with a corset belt, long skirt, apron, vest, or lace-up bodice for an easy medieval or Renaissance costume.
Best of all, DIY medieval costume projects are budget-friendly and works especially well with thrifted men’s shirts, oversized white blouses, linen-look shirts, and lightweight cotton button-ups.
In this step-by-step tutorial, you will learn how to turn an old button-up shirt into a Renaissance blouse without using a complicated sewing pattern.
Materials You Will Need
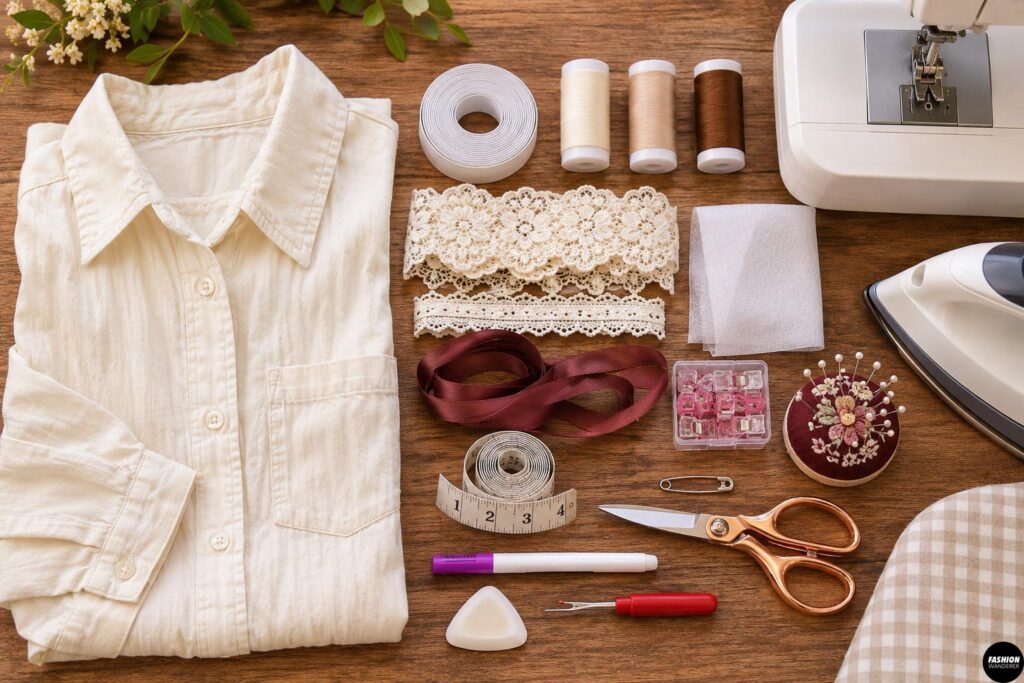
Gather these supplies before you begin:
- 1 oversized white, cream, beige, or ivory button-up shirt
- ½-inch elastic
- Coordinating thread
- Sewing machine
- Fabric scissors
- Seam ripper
- Measuring tape
- Fabric marker or tailor’s chalk
- Safety pin
- Pins or sewing clips
- Iron and ironing board
- Optional lace trim
- Optional ribbon
- Optional lightweight interfacing
For the softest tavern-maiden look, choose a shirt made from cotton, linen blend, rayon, or another lightweight woven fabric.
Avoid very stiff office shirts if possible because softer fabric will gather more easily around the neckline and sleeves.
DIY Medieval Tavern Maiden Blouse
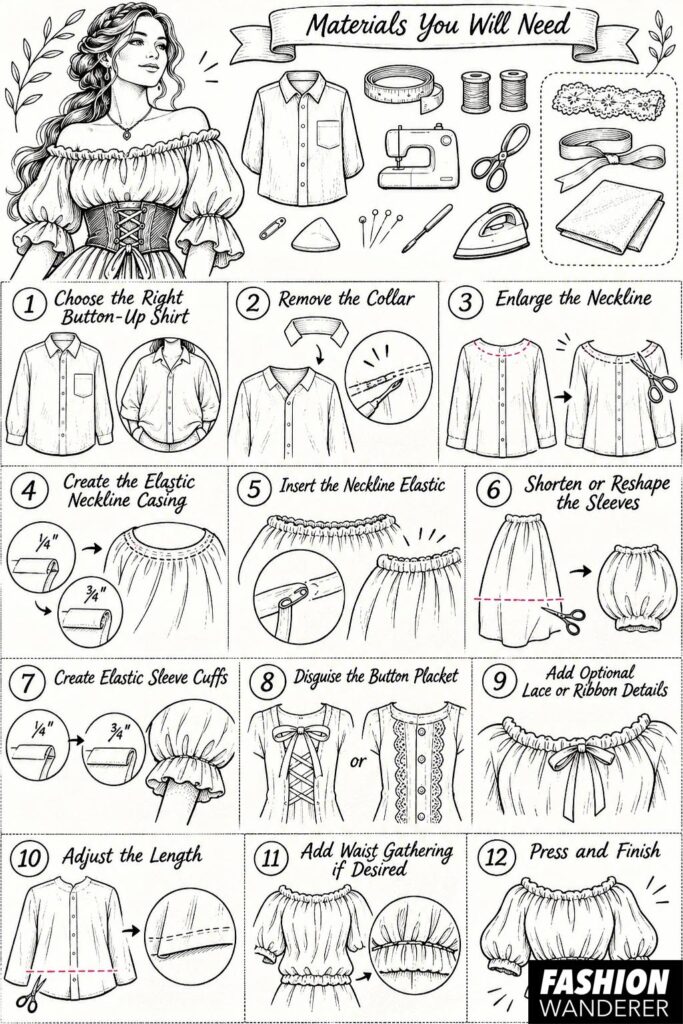
Step 1: Choose the Right Button-Up Shirt
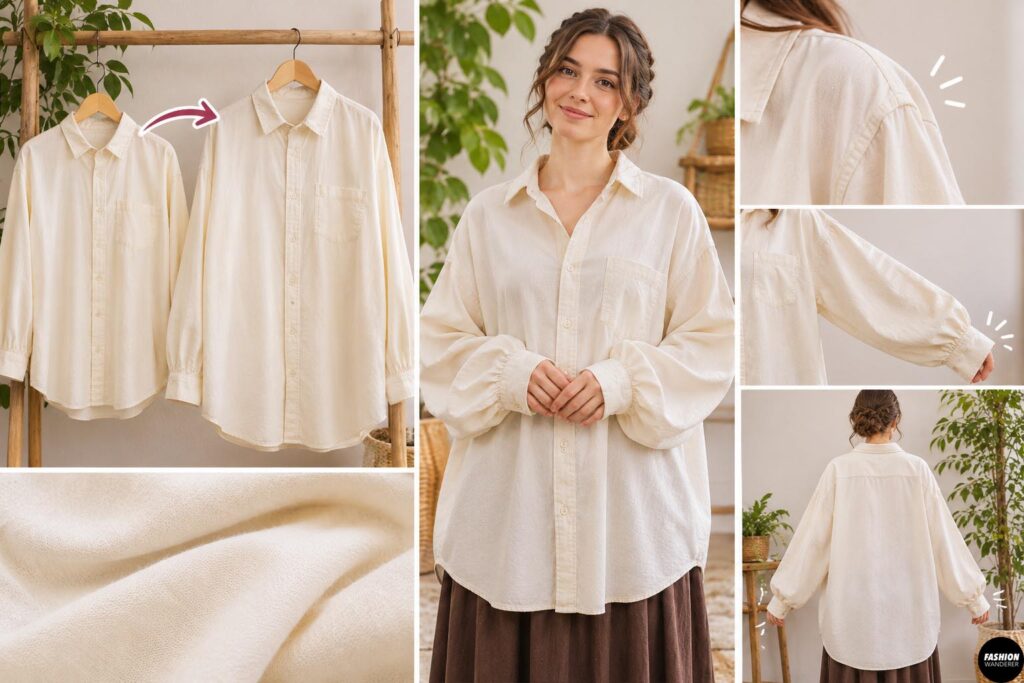
Start with a shirt that is at least one or two sizes larger than your usual size.
An oversized fit gives you enough fabric to create the loose, gathered silhouette commonly associated with medieval-inspired peasant blouses.
Try the shirt on.
Check that the shoulders and upper body feel roomy and that the sleeves are long enough to create a soft puffed effect.
Do not worry if the shirt looks boxy at this stage. Most of that shape will change once you gather the neckline.
Step 2: Remove the Collar
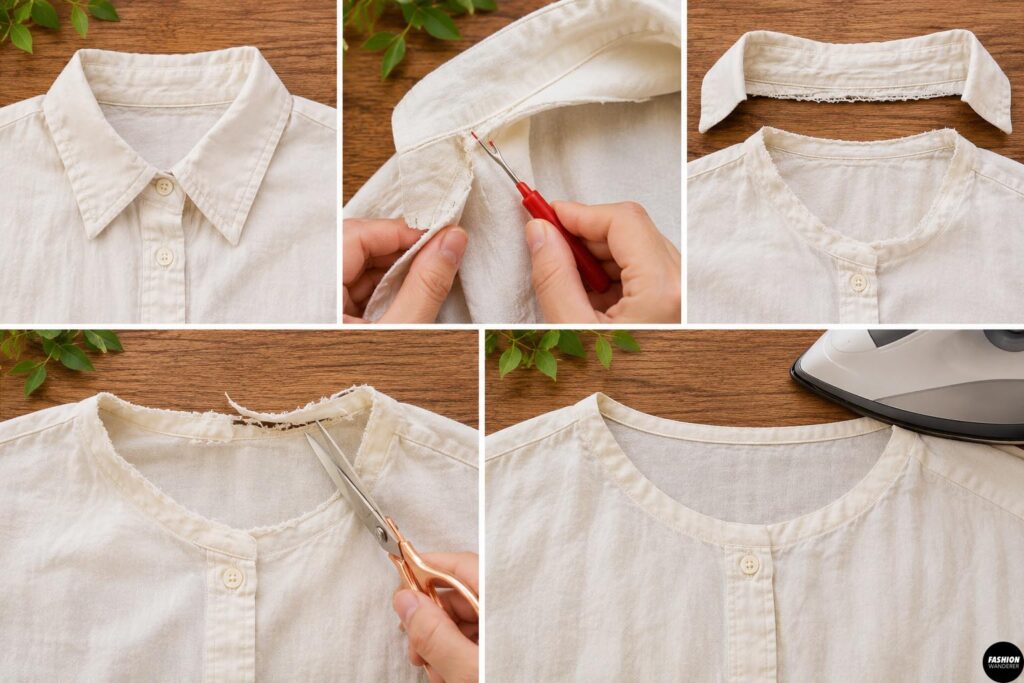
Lay the shirt flat with the front facing upward.
Using a seam ripper, carefully remove the collar from the neckline.
You can leave the collar stand attached temporarily or remove it as well for a softer neckline.
Once the collar is removed, trim away any bulky seam allowance.
Press the neckline flat.
This instantly makes the shirt look less modern and gives you a better base for the gathered Renaissance-style neckline.
Step 3: Enlarge the Neckline
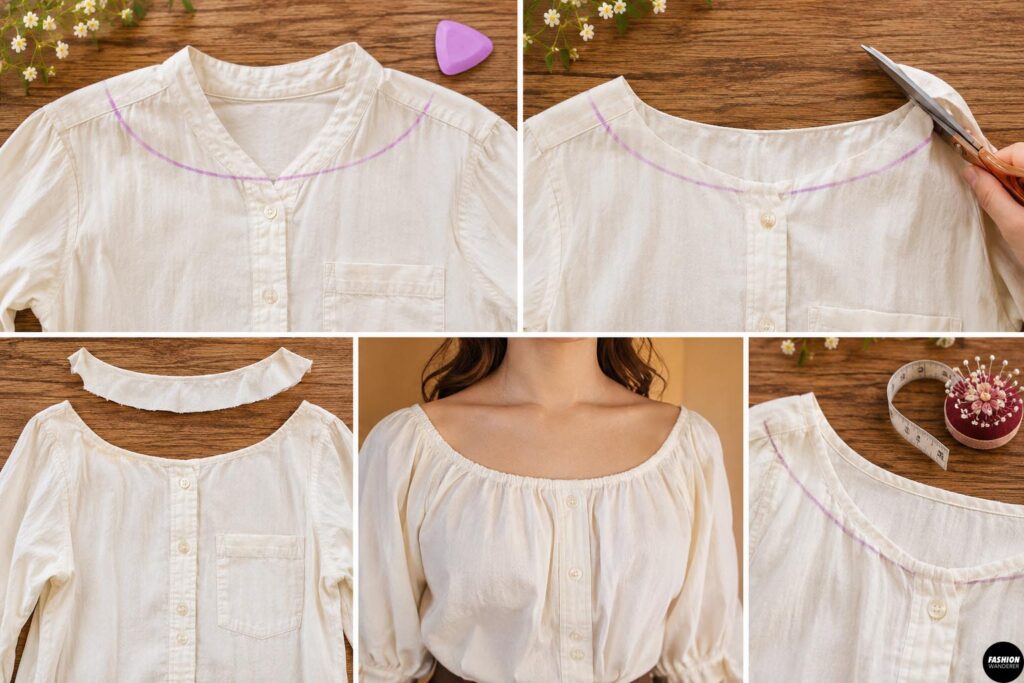
Using tailor’s chalk, draw a gently curved neckline around the front and back of the shirt.
The neckline should be wide enough to sit near the collarbones or slightly off the shoulders.
Start conservatively. You can always cut the neckline wider later.
Cut carefully along your chalk line.
Make sure both sides remain symmetrical.
Try the shirt on again and check the neckline placement.
For a classic tavern-maiden look, the neckline should feel open and relaxed without sliding too far off the shoulders.
Step 4: Create the Elastic Neckline Casing
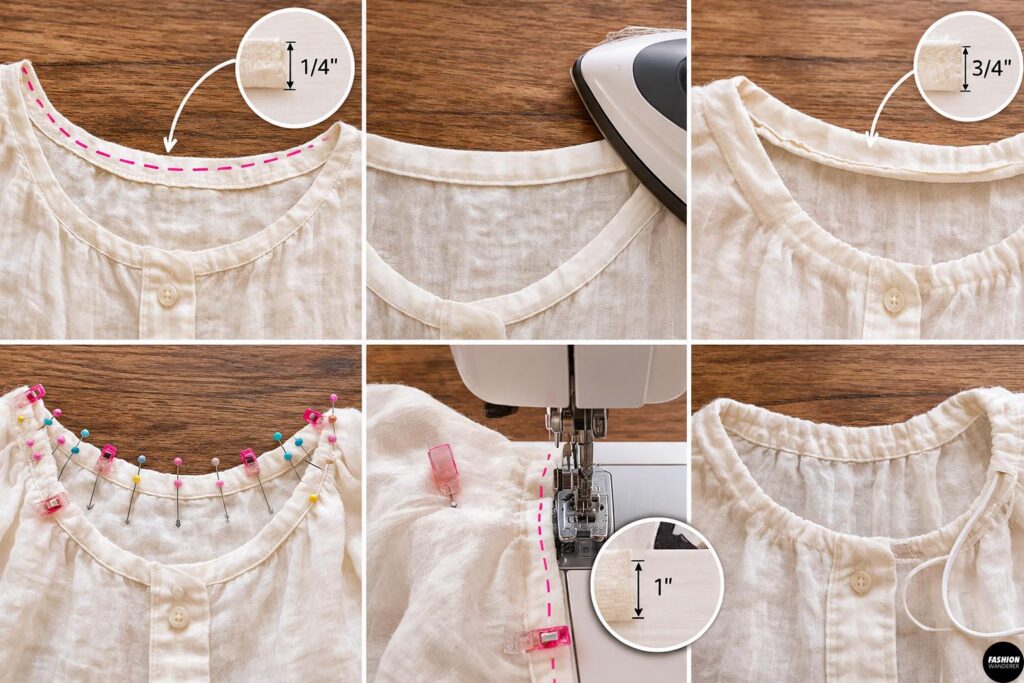
Fold the raw neckline edge toward the wrong side by approximately ¼ inch.
Press.
Fold it again by approximately ¾ inch to create a casing for the elastic.
Pin or clip around the entire neckline.
Sew close to the folded edge, leaving approximately a 1-inch opening.
Do not sew the opening closed yet.
Step 5: Insert the Neckline Elastic
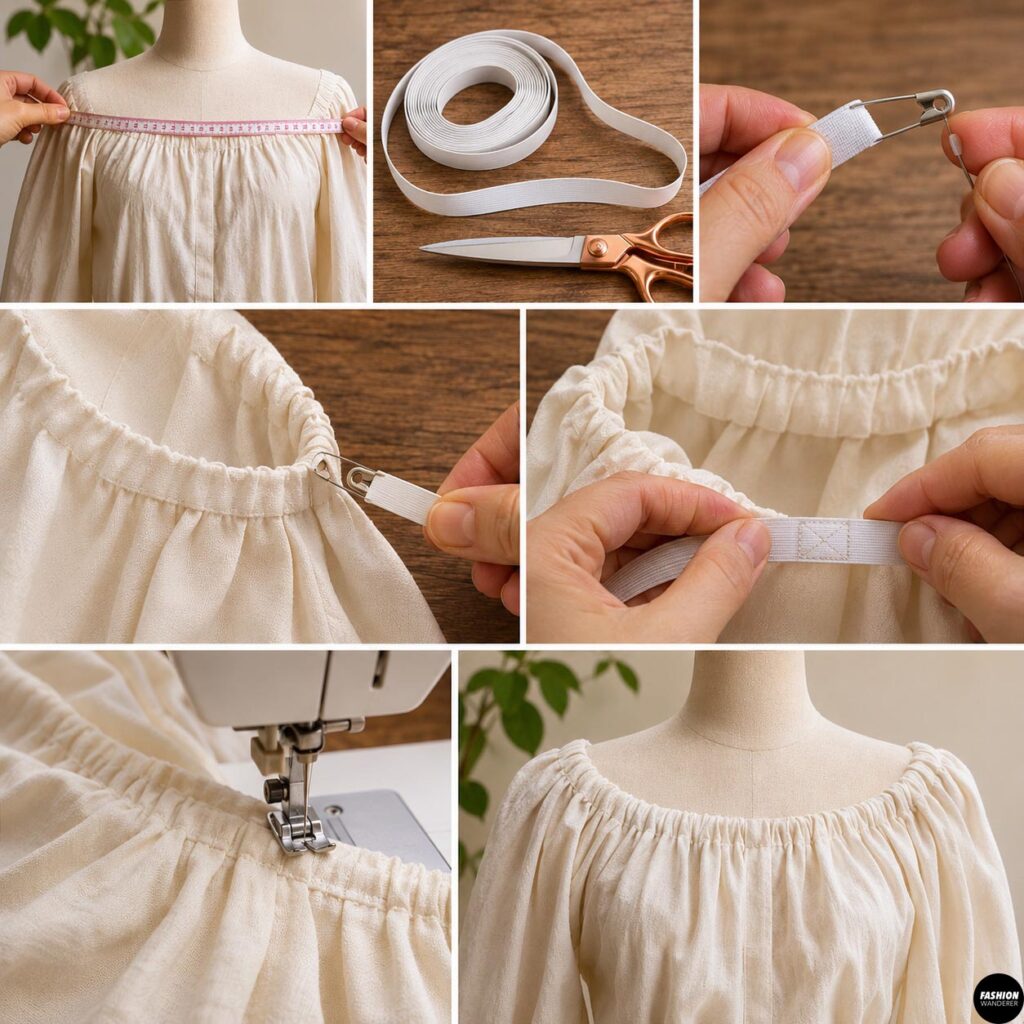
Measure the elastic around the upper chest and shoulders where you want the blouse neckline to sit.
The elastic should feel comfortable and secure but should not be tight.
Add approximately 1 inch for overlap and cut.
Attach a safety pin to one end of the elastic.
Feed the elastic through the neckline casing.
Keep the opposite end outside the casing so it does not disappear inside.
Once the elastic comes back around, overlap the ends by approximately ½ inch and stitch them together securely.
Pull the elastic into the casing.
Sew the opening closed.
Distribute the gathers evenly around the neckline.
You should now have the soft, romantic gathered shape that gives the blouse its Renaissance look.
Step 6: Shorten or Reshape the Sleeves
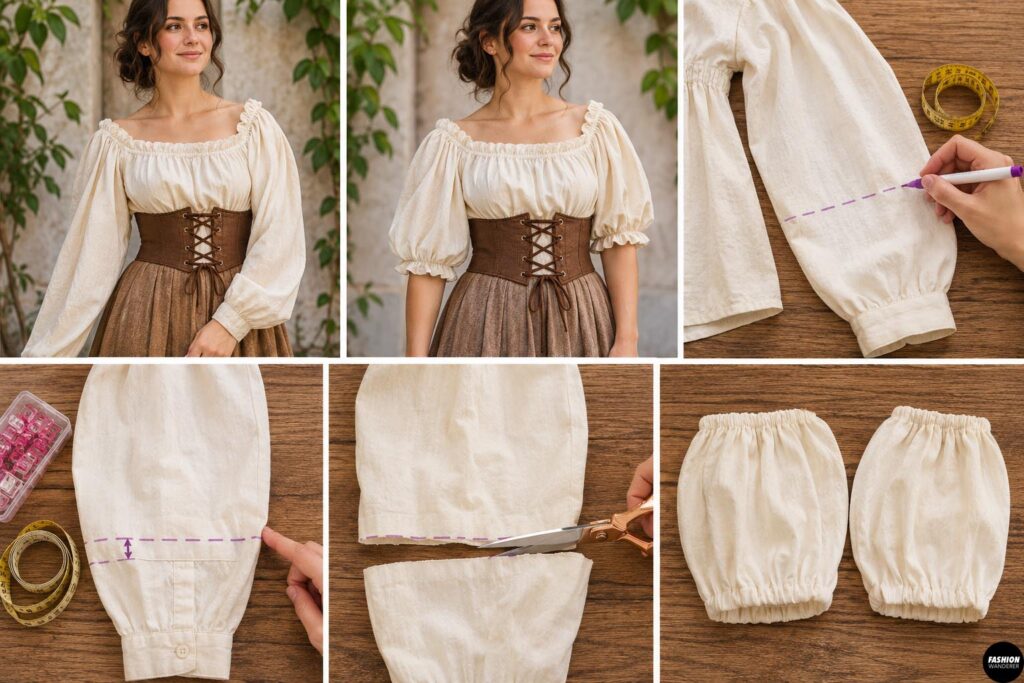
Try the blouse on and decide how long you want the sleeves.
For a traditional tavern-maiden blouse, elbow-length or three-quarter puff sleeves work especially well.
Mark your desired sleeve length.
Add approximately 1 inch for the elastic casing before cutting.
Cut both sleeves evenly.
If you want full-length puff sleeves, you can skip this step and keep the original length.
Step 7: Create Elastic Sleeve Cuffs
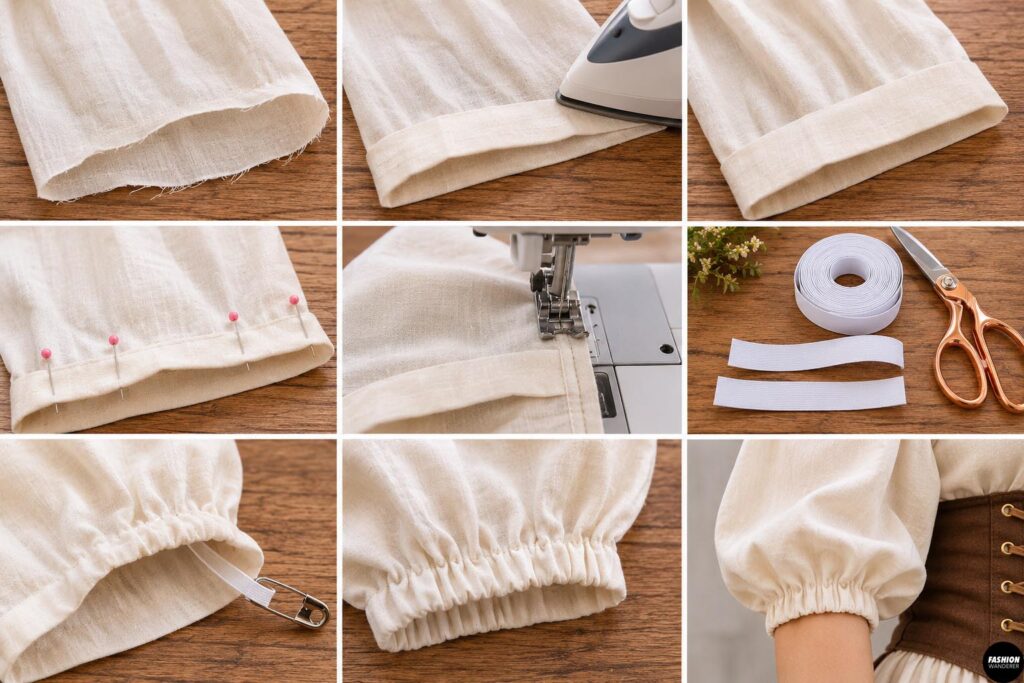
Fold the raw sleeve edge toward the inside by ¼ inch and press.
Fold again by approximately ¾ inch.
Sew around the edge to create an elastic casing, leaving a 1-inch opening.
Measure elastic comfortably around your arm where the sleeve will end.
Cut two matching pieces.
Using a safety pin, feed the elastic through each casing.
Overlap the elastic ends and sew securely.
Close the casing openings.
The sleeves should now gather softly around the arms, creating an easy puff-sleeve effect.
Step 8: Disguise the Button Placket
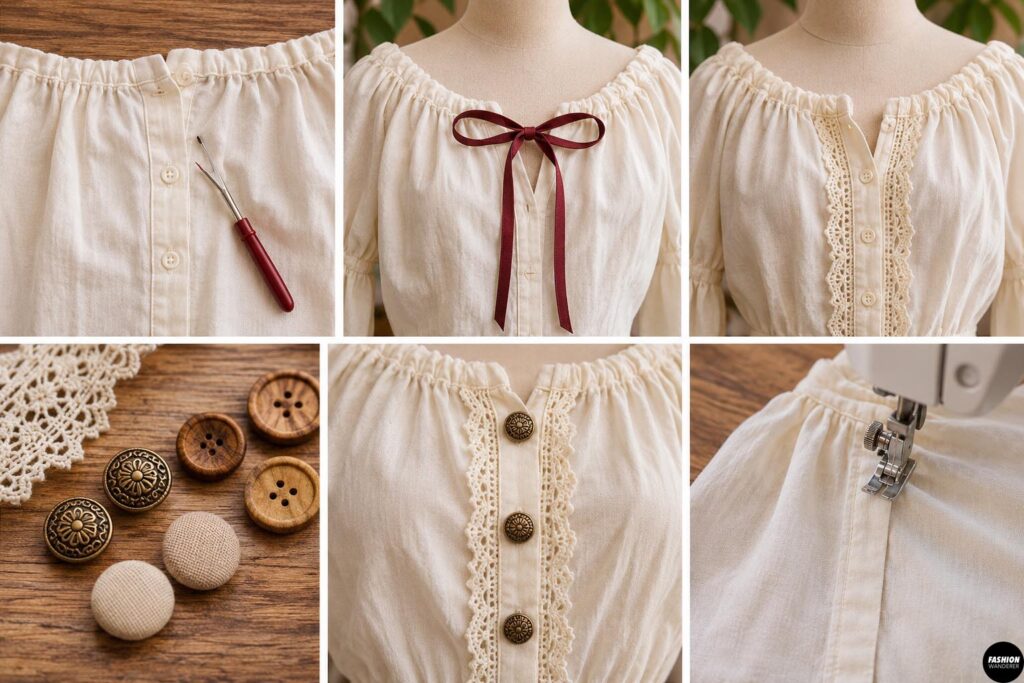
The existing button front is convenient, but you may want to make it look less like a modern dress shirt.
One easy option is to remove the top few buttons and leave the upper portion open.
You can then add ribbon ties near the neckline.
Another option is to sew narrow lace trim along each side of the button placket.
For a more rustic look, replace modern plastic buttons with wooden, metal-look, or fabric-covered buttons.
If you prefer the blouse to appear more like a pullover, you can also stitch the lower portion of the placket closed.
Step 9: Add Optional Lace or Ribbon Details
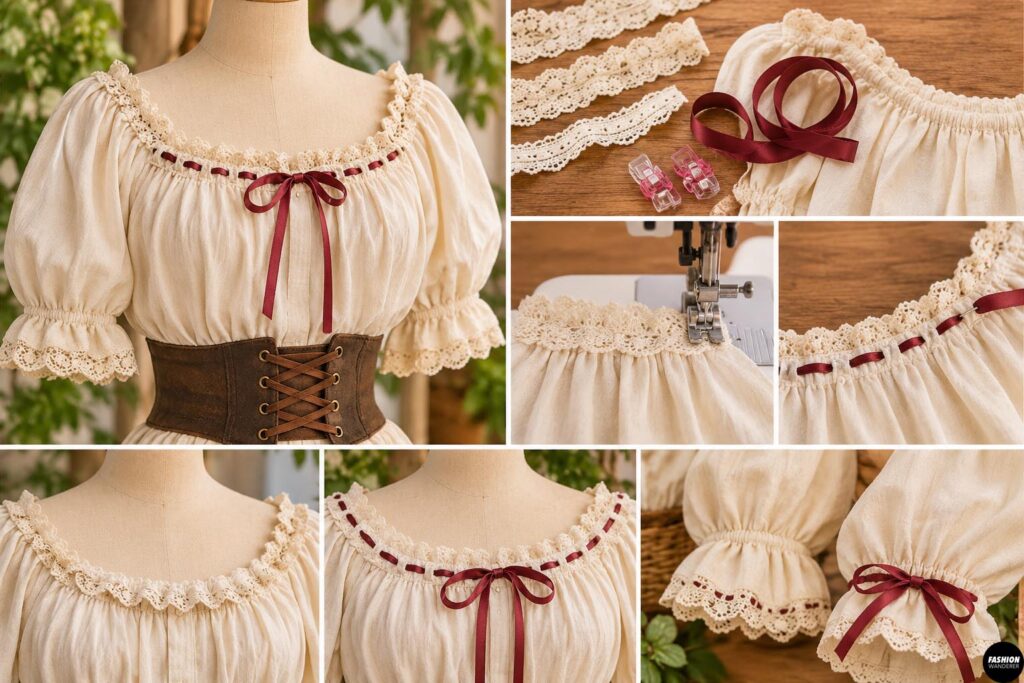
This step is optional, but small details can make your upcycled blouse look much more costume-ready.
Try adding lace trim around the neckline or sleeve cuffs.
You can also sew a narrow ribbon channel across the neckline and thread decorative ribbon through it.
Another idea is to add a small fabric bow at the center front.
Keep the details fairly simple so the blouse still feels rustic rather than overly formal.
Step 10: Adjust the Length
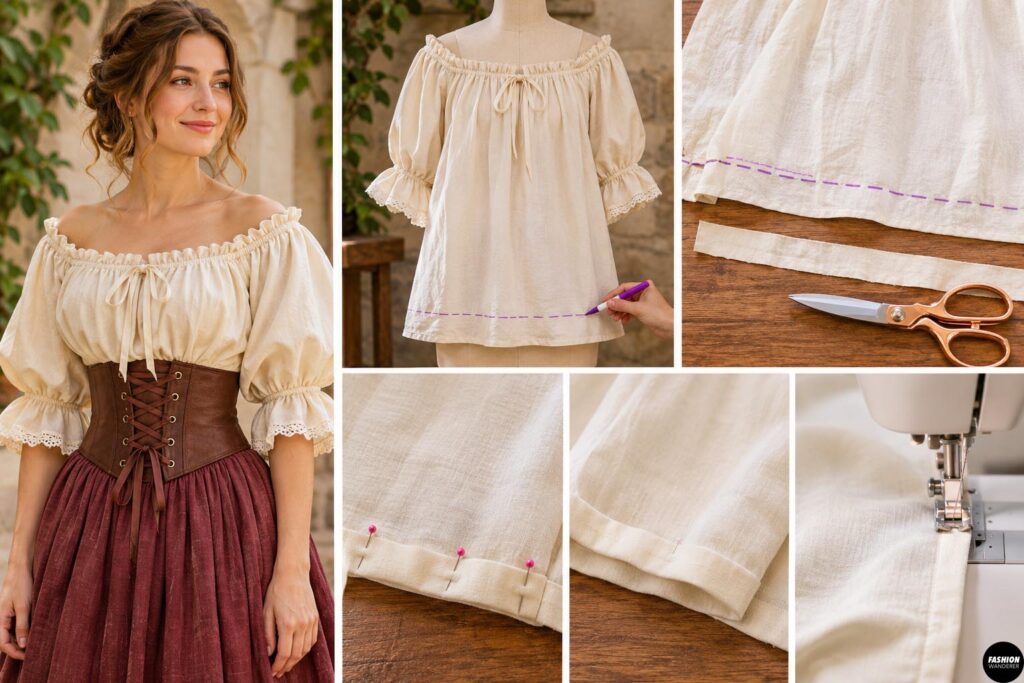
Try the blouse on with the skirt, pants, or corset you plan to wear.
If the shirt is too long, mark your preferred hem.
Leave at least 1 inch for finishing.
Cut away the excess fabric.
Fold the hem upward by ½ inch twice and stitch around the bottom edge.
If the blouse will always be tucked into a skirt, you may prefer to leave it slightly longer.
Step 11: Add Waist Gathering if Desired
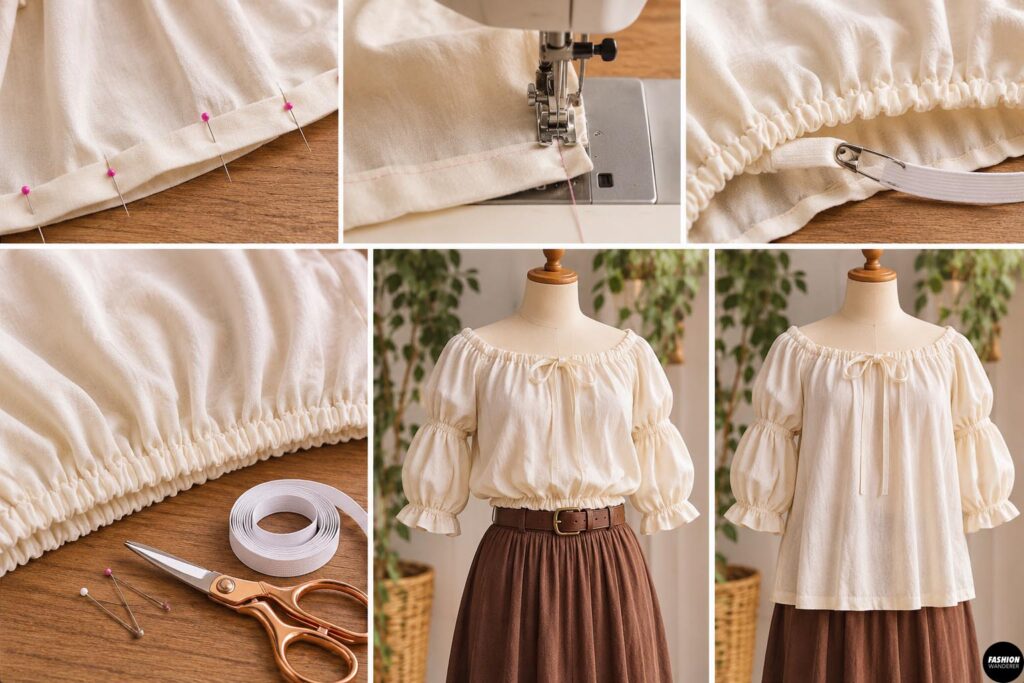
For a more fitted peasant-blouse shape, you can add elastic around the lower edge.
Create a narrow casing along the hem just as you did for the neckline.
Insert elastic that sits comfortably around your natural waist.
This creates a blouson effect and helps the shirt stay tucked into skirts or high-waisted pants.
For a more traditional loose medieval look, simply leave the hem straight.
Step 12: Press and Finish
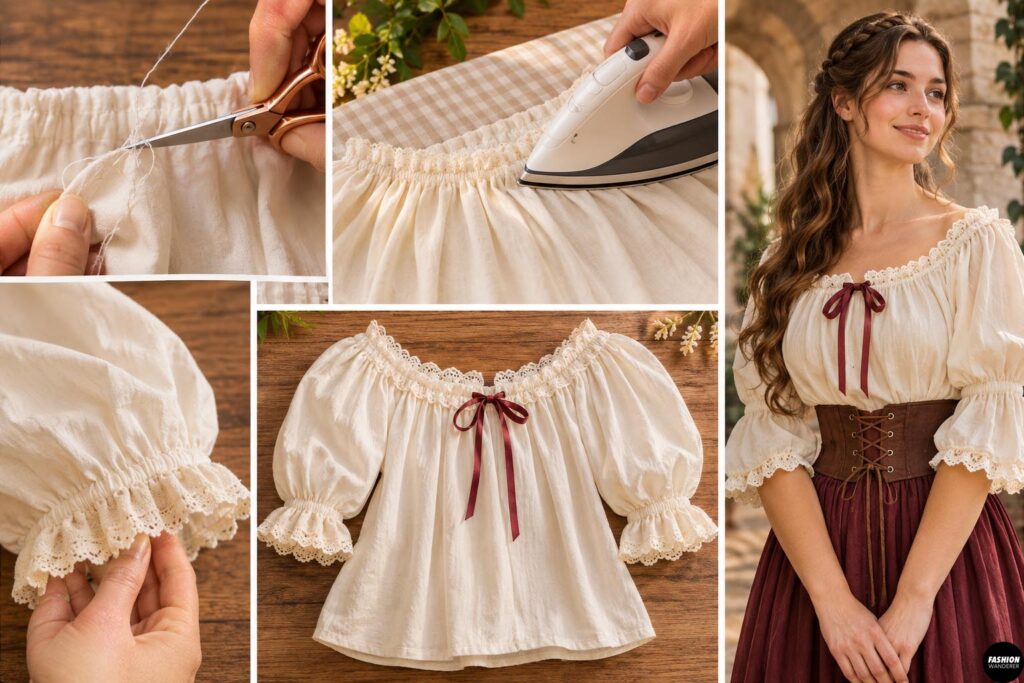
Trim loose threads and check all seams.
Press the blouse carefully, especially around the neckline, cuffs, and hem.
Try it on one final time.
Move your arms, bend, sit, and make sure the elastic feels comfortable.
Adjust any areas that feel too tight before wearing the blouse for a long event.
How to Style Your Medieval Tavern Maiden Blouse
The blouse is only the beginning.
Pair it with:
- A long gathered skirt
- Corset belt
- Lace-up bodice
- Apron
- Brown leather-look belt
- Ankle boots
- Simple pendant necklace
- Fabric head scarf
- Braided hairstyle
- Small crossbody pouch
For a Halloween costume, you can also add a faux leather waist pouch, mug prop, or rustic apron.
For a Renaissance fair outfit, layering the blouse under a structured bodice creates a more historically inspired silhouette.
Final Thoughts
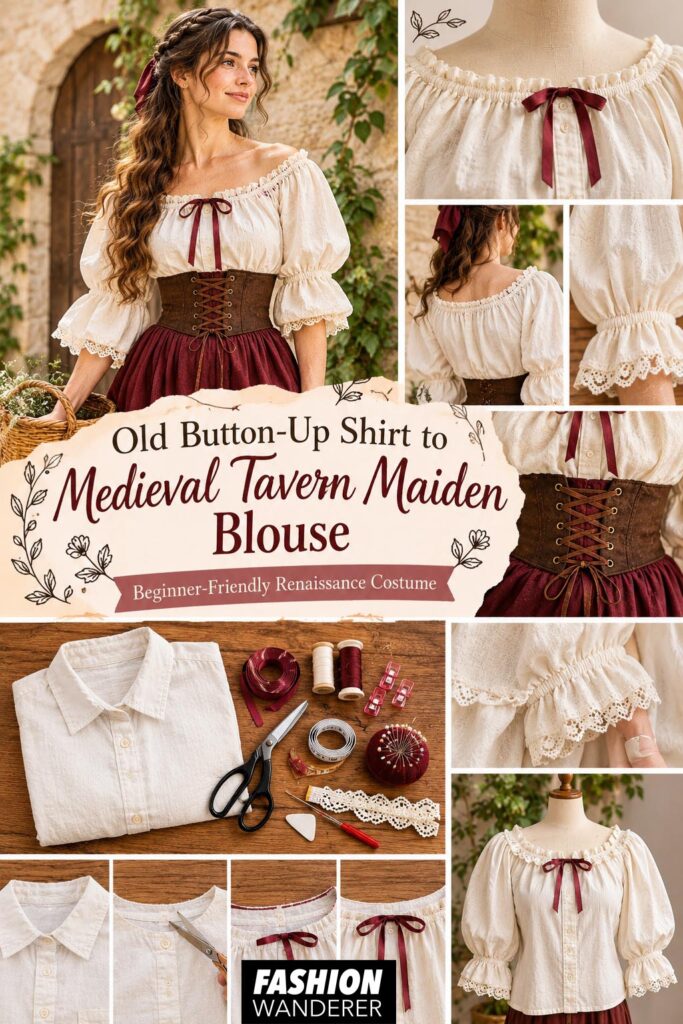
Turning an old button-up shirt into a medieval tavern maiden blouse is one of the easiest ways to create a beginner-friendly Renaissance costume without sewing a garment completely from scratch.
By removing the collar, widening the neckline, adding elastic gathering, and reshaping the sleeves, you can transform an ordinary thrifted shirt into a romantic peasant-style blouse in an afternoon.
This project is perfect for Renaissance fairs, Halloween costumes, fantasy festivals, medieval parties, theater costumes, and creative clothing upcycles.
Once you have made one, try experimenting with ivory linen shirts, soft floral prints, lace edging, or darker earthy colors to create completely different medieval-inspired looks from the same basic technique.