
Looking for an easy Halloween costume you can make from clothes you already own? Turn an old sweatshirt into a DIY medieval knight costume with a few simple sewing supplies, felt, fabric scraps, and basic crafting techniques.
This upcycled Renaissance costume project is perfect for anyone who wants the look of medieval armor without building a heavy costume from cardboard, foam, or plastic. The sweatshirt becomes a soft, comfortable base layer, while silver fabric panels, shoulder pieces, and a bold crest create the illusion of armor.
Best of all, this easy knight costume upcycle is beginner-friendly and can be customized for kids, teens, or adults.
Use an oversized gray, black, navy, or charcoal sweatshirt for the best medieval look. Add leggings, dark pants, boots, and a simple cape to complete the costume.
Why Make a Sweatshirt Knight Costume?
Traditional knight costumes can feel stiff, bulky, and uncomfortable.
Using an old sweatshirt gives you a costume that is soft, warm, easy to move in, and much easier to sew.
This is also a great upcycle project because you can reuse:
- Old sweatshirts
- Felt scraps
- Metallic fabric
- Leftover fleece
- Old belts
- Fabric trims
- Buttons
- Ribbon
Instead of buying a full Halloween costume, you can create something unique while using materials you may already have at home.
Materials You Will Need
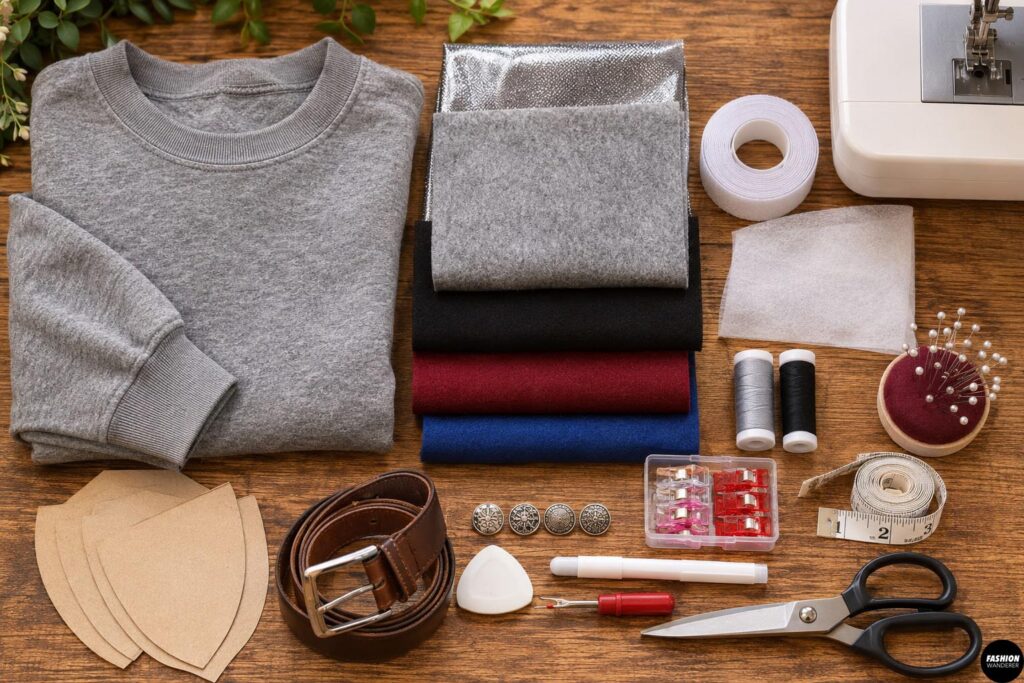
For this DIY medieval knight costume, gather:
- 1 old oversized sweatshirt
- Silver or gray felt
- Metallic fabric, fleece, or vinyl scraps
- Black felt
- Red, blue, or burgundy felt for the crest
- Coordinating thread
- Sewing machine
- Fabric scissors
- Pins or sewing clips
- Fabric chalk or marker
- Measuring tape
- Cardboard for templates
- Hook-and-loop tape
- Optional decorative buttons
- Optional old belt
- Optional lightweight interfacing
Choose soft materials whenever possible so the finished costume remains comfortable to wear.
DIY Medieval Knight Costume
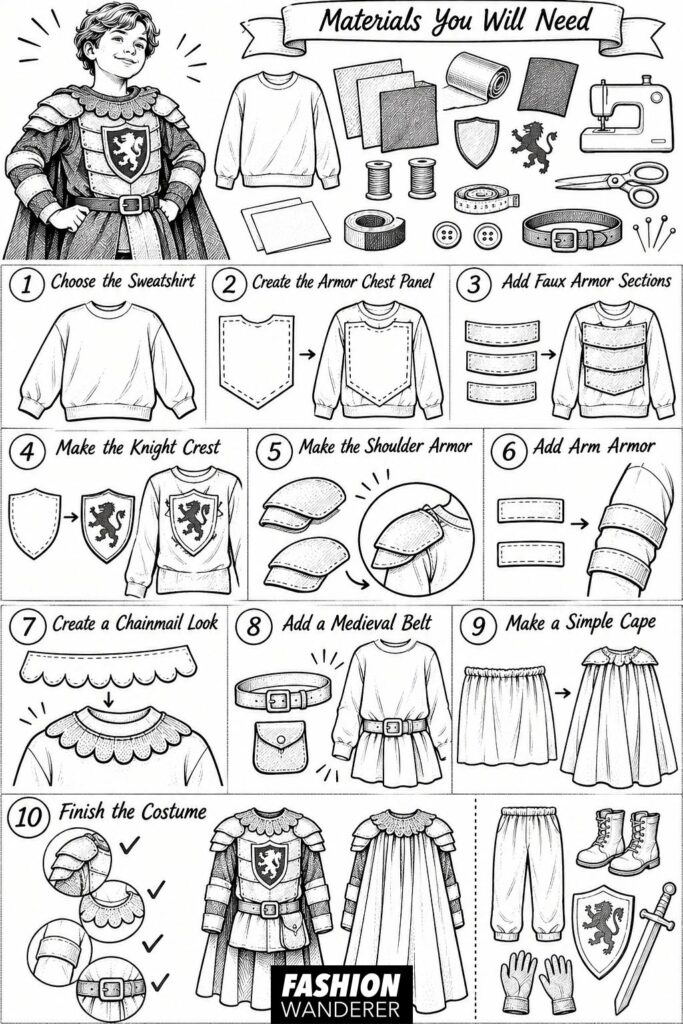
Step 1: Choose the Sweatshirt
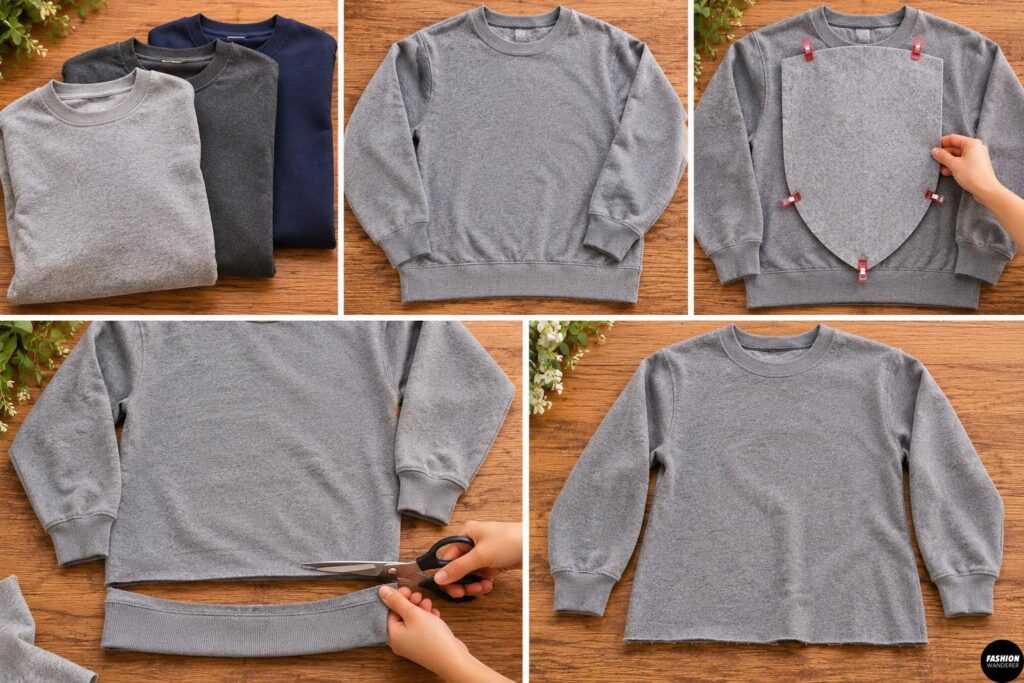
Start with a slightly oversized sweatshirt.
Gray, charcoal, black, or navy works especially well because these colors resemble medieval armor and chainmail.
Lay the sweatshirt flat and smooth out any wrinkles.
If the sweatshirt has a large logo, plan to cover it with the armor chest panel.
For a more tunic-like look, you can trim the waistband off the bottom.
Leave the raw edge unfinished if the fabric does not fray heavily.
Step 2: Create the Armor Chest Panel
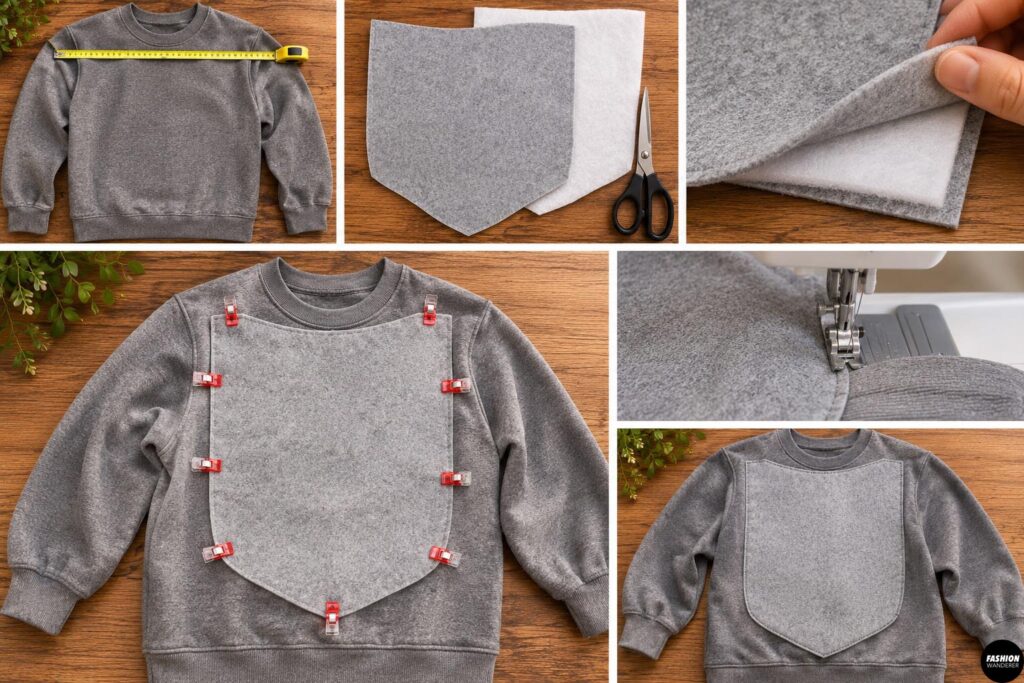
Measure across the front of the sweatshirt from shoulder to shoulder.
Cut a large shield-shaped or rectangular panel from silver or gray felt.
The panel should begin near the neckline and extend down toward the waist.
Round the lower corners or cut the bottom into a shallow point for a medieval tunic shape.
Place the panel on the front of the sweatshirt and pin it in position.
Sew around the outer edge using a straight stitch approximately ⅛ inch from the edge.
If you want a more dimensional armor effect, place lightweight batting or interfacing behind the panel before sewing.
Step 3: Add Faux Armor Sections
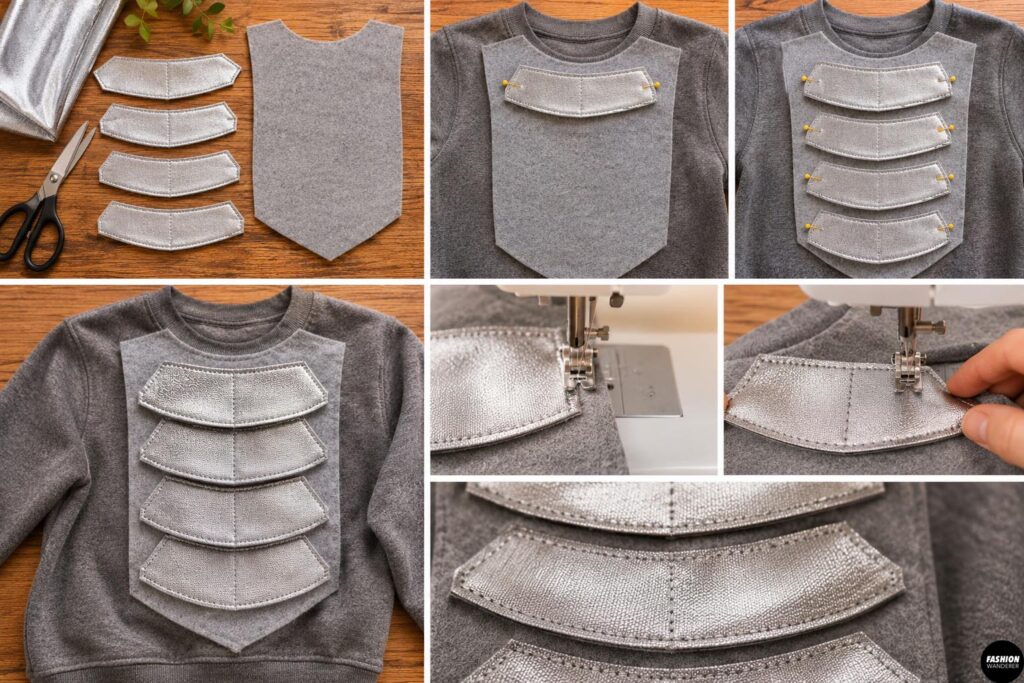
To make the chest panel look more like metal armor, cut several smaller strips of gray or metallic fabric.
Arrange these horizontally across the chest.
You can also cut curved pieces to create the appearance of overlapping armor plates.
Pin each strip in place.
Sew around the edges using matching thread.
Leave a small gap between each section so the individual armor plates remain visible.
For extra detail, sew decorative lines through the center of each panel.
Step 4: Make the Knight Crest
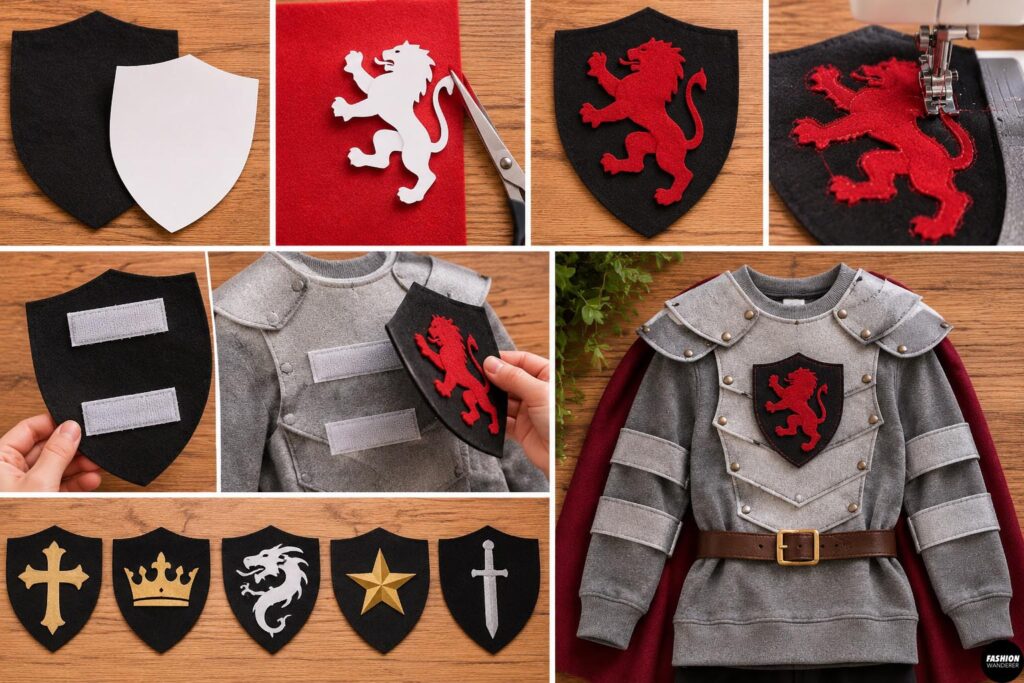
A bold medieval crest instantly makes the costume more recognizable.
Cut a shield shape from black felt approximately 6 to 8 inches tall.
Then cut a simple symbol from red, blue, gold, or white felt.
Easy crest ideas include:
- Cross
- Lion silhouette
- Crown
- Dragon
- Star
- Sword
- Initial
Center the symbol on the shield.
Sew it in place.
Then attach the completed crest to the center of the sweatshirt armor panel.
For a removable version, use hook-and-loop tape instead of sewing it directly onto the sweatshirt.
Step 5: Make the Shoulder Armor
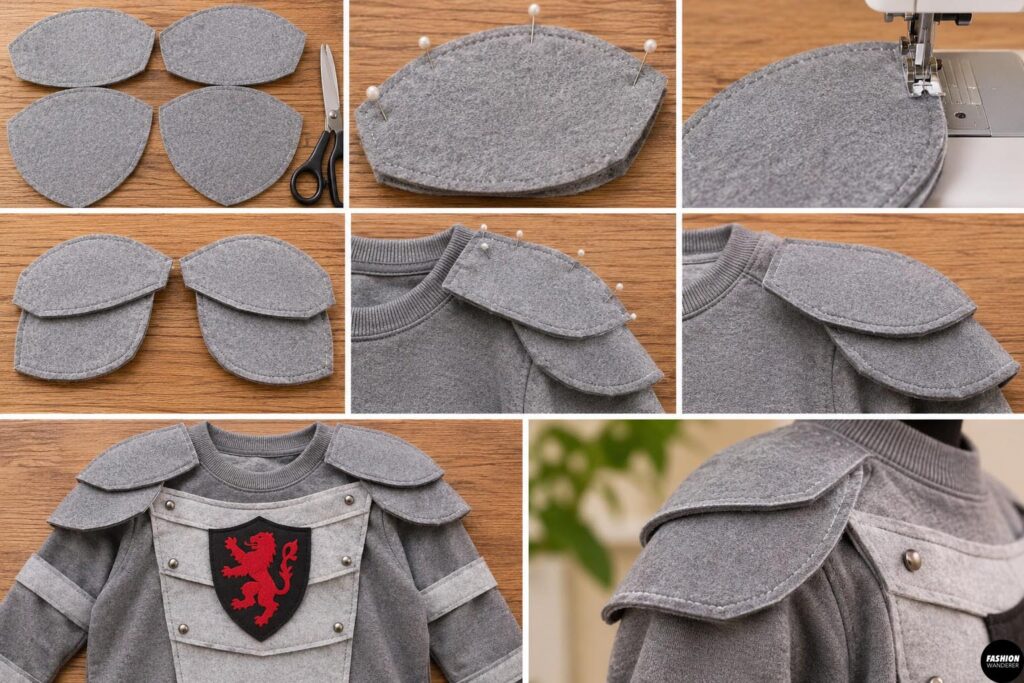
Cut four curved oval or shield-shaped pieces from gray felt.
Each piece should be approximately 5 to 7 inches wide, depending on the size of the sweatshirt.
Layer two pieces together for each shoulder.
Sew around the edges.
You can add lightweight interfacing between the layers to make the shoulder pieces slightly firmer.
Position one shoulder piece over each sweatshirt shoulder seam.
Sew only along the top edge.
Leaving the lower portion loose allows the shoulder armor to move naturally while walking or lifting your arms.
Step 6: Add Arm Armor
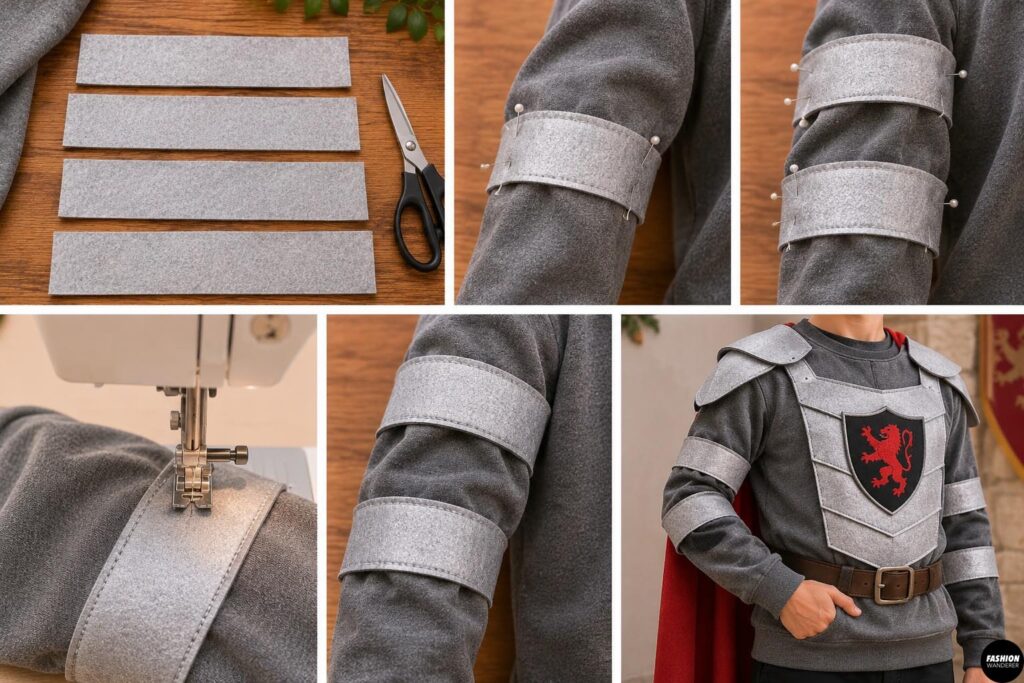
Cut four strips of silver or gray felt approximately 2 to 3 inches wide.
Wrap them loosely around the sweatshirt sleeves.
Position two strips on each arm.
Pin carefully.
Sew the strips directly to the sleeve using two straight vertical lines.
Make sure the sleeve still stretches comfortably.
Avoid wrapping the felt too tightly around the arm.
These simple bands create the illusion of medieval arm guards without making the costume bulky.
Step 7: Create a Chainmail Look
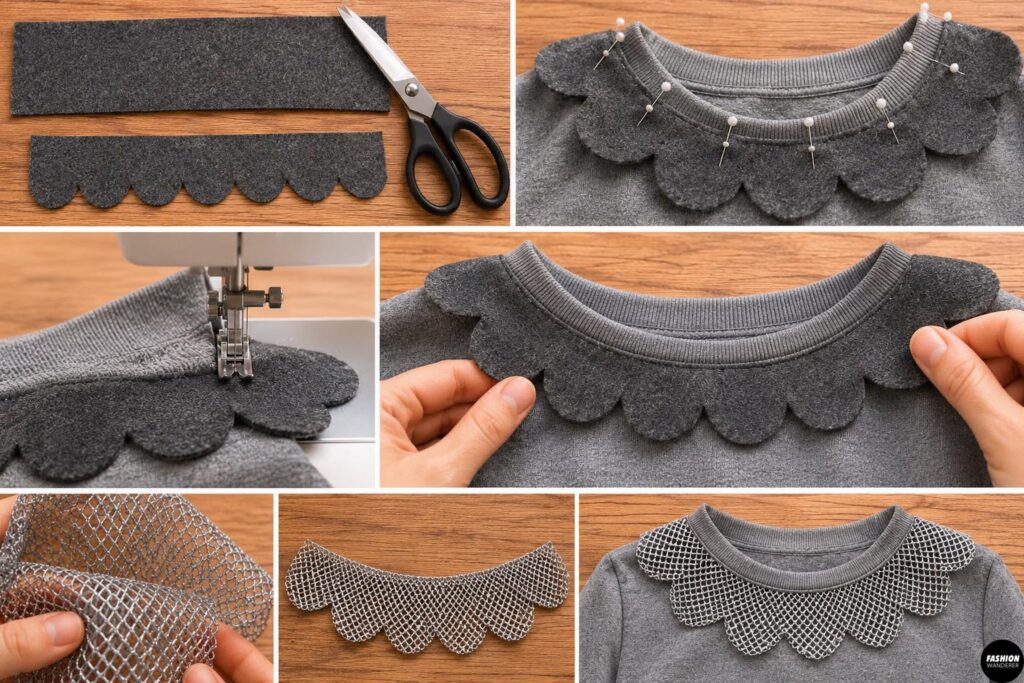
You can add a soft chainmail effect around the neckline.
Cut a strip of black or dark gray felt approximately 4 inches wide.
Cut small rounded scallops along one long edge.
Place the strip around the neckline so the scalloped edge extends outward.
Sew the upper edge around the collar.
Another option is to use gray mesh fabric for a more realistic chainmail texture.
Keep the neckline loose and comfortable.
Step 8: Add a Medieval Belt
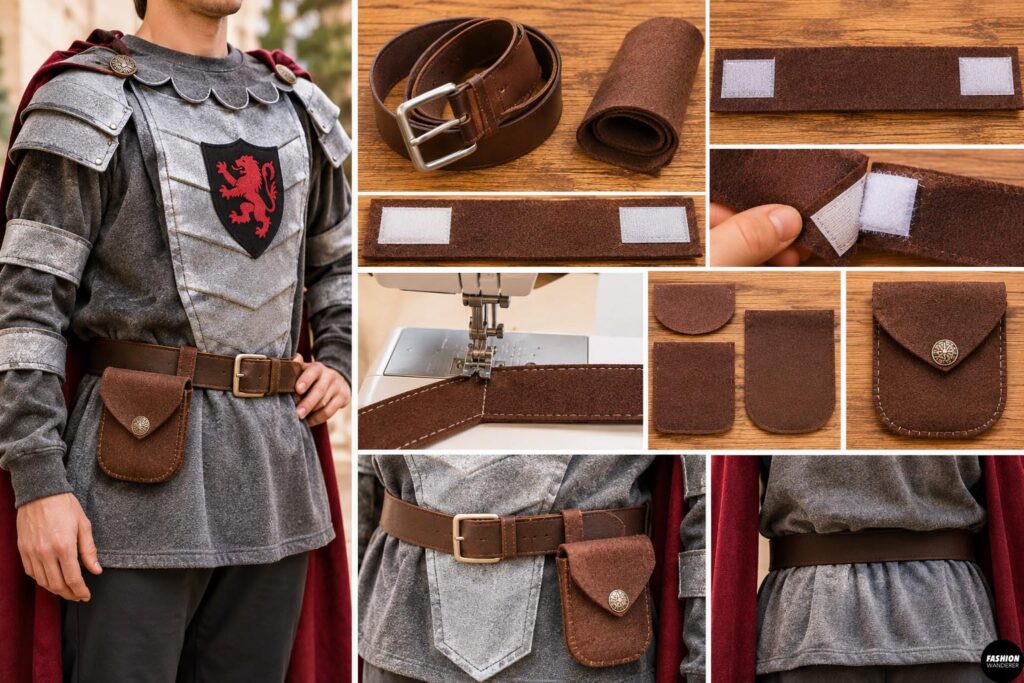
An old brown or black belt works perfectly for this costume.
Wrap it around the waist over the sweatshirt.
If the sweatshirt is very long, gently blouse the fabric over the belt.
You can also make a fabric belt from faux leather or sturdy felt.
Cut a long strip approximately 2 inches wide.
Add hook-and-loop tape to each end for an easy closure.
Attach a small felt pouch or decorative fabric tab if you want more medieval detail.
Step 9: Make a Simple Cape
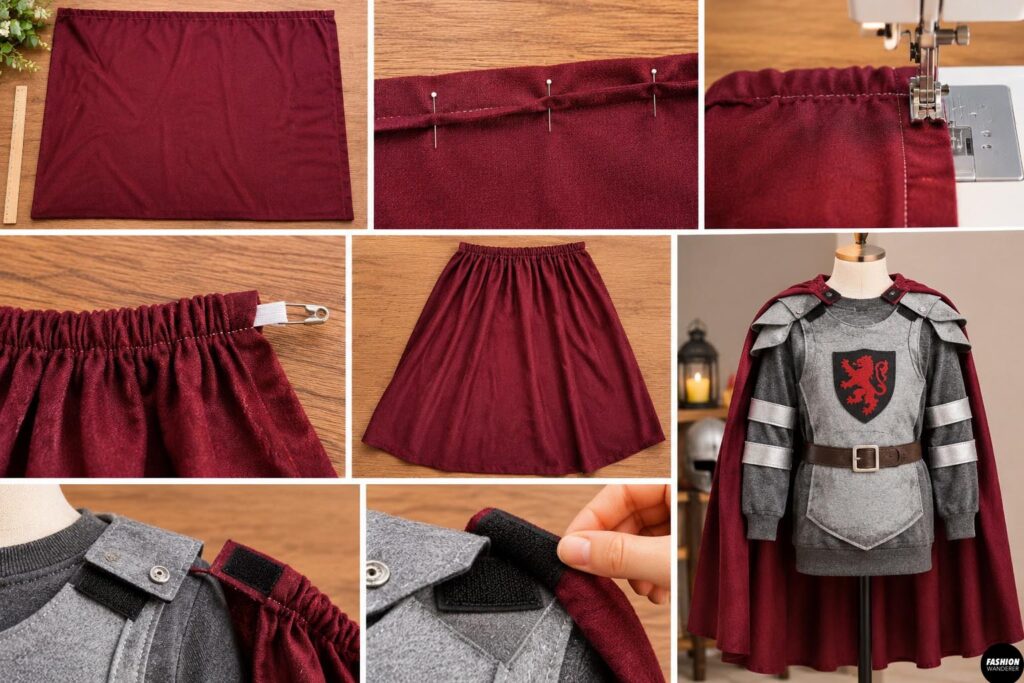
A cape adds instant drama.
Cut a rectangle from an old black, burgundy, or navy sheet or lightweight fabric.
The cape should reach from the shoulders to approximately the knees.
Fold the top edge over about 1 inch and sew a casing.
Thread elastic through the casing.
Instead of tying the cape around the neck, attach it to the sweatshirt shoulders using hook-and-loop tape or snaps.
This creates a safer and more comfortable costume.
Step 10: Finish the Costume
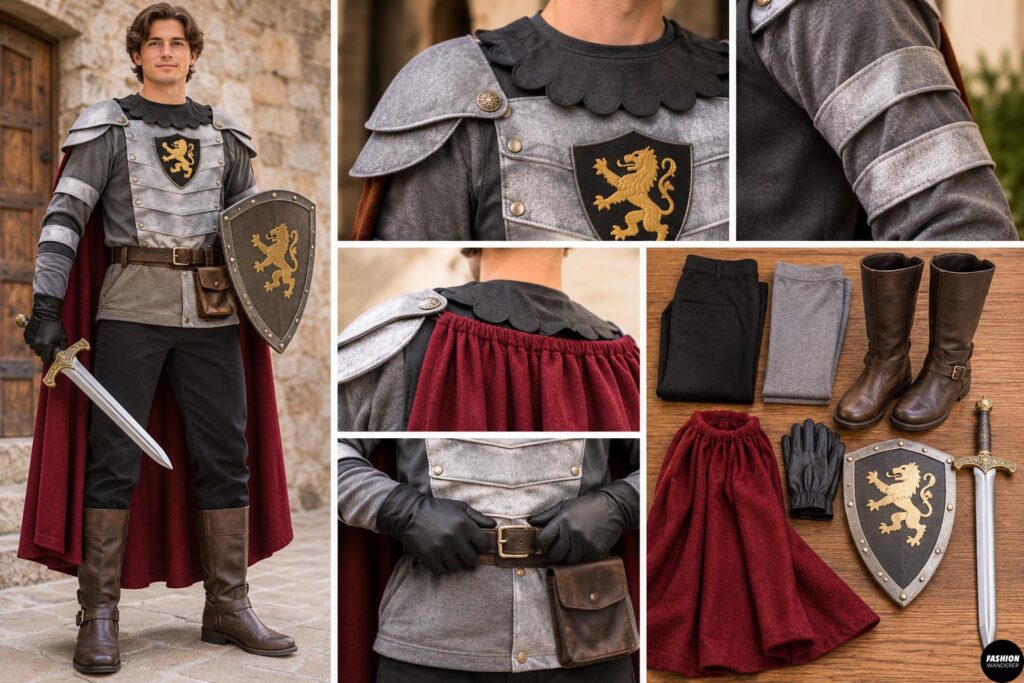
Try on the sweatshirt.
Check that the shoulder armor does not restrict movement.
Make sure the neckline feels comfortable and the arm pieces are not too tight.
Trim loose threads.
Pair your finished knight sweatshirt with:
- Black pants
- Gray leggings
- Boots
- Dark gloves
- Fabric cape
- Toy shield
- Lightweight costume sword
Avoid heavy or sharp costume accessories, especially for children.
Tips for Making the Costume Look More Realistic
Use several shades of gray instead of just one.
Combining charcoal, silver, and medium gray gives the armor more dimension.
You can also topstitch around the panels using dark thread to make each armor section stand out.
Decorative buttons can imitate metal rivets.
For a worn medieval look, lightly brush black fabric paint around the edges of the armor pieces.
Keep the effect subtle so the sweatshirt still looks intentional.
How to Customize Your DIY Knight Costume
This project can easily become different medieval characters.
Change the colors and details to create:
- Royal knight
- Dark knight
- Dragon knight
- Castle guard
- Medieval warrior
- Fantasy prince
- Crusader-inspired costume
- Storybook hero
For a child’s costume, use softer felt and keep the armor lightweight.
For an adult costume, make the chest and shoulder panels larger and add more layered details.
Final Thoughts
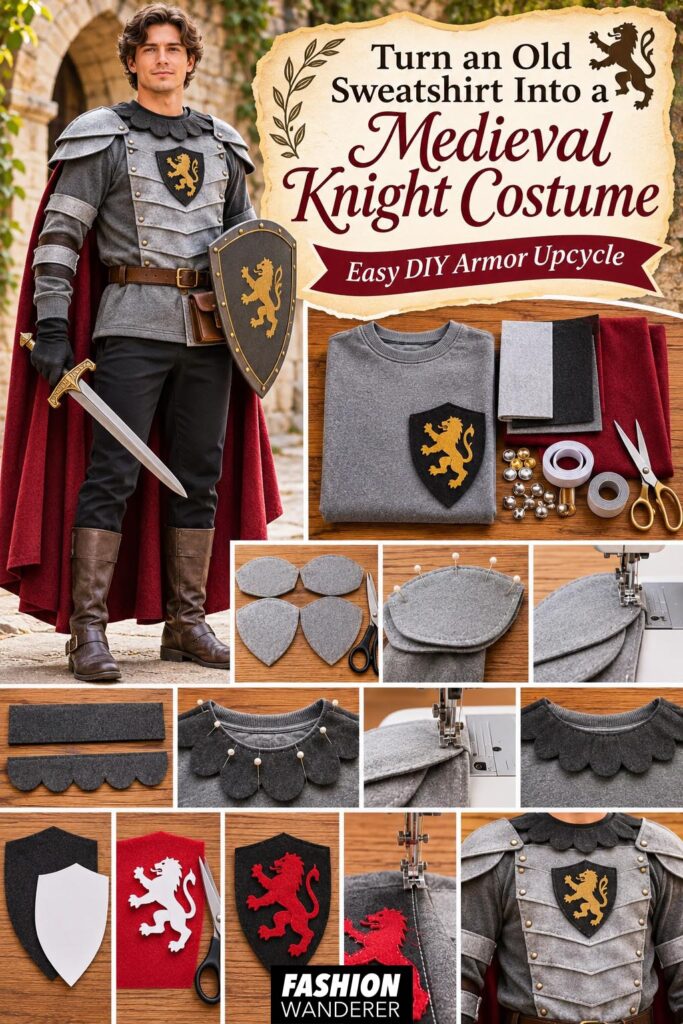
Turning an old sweatshirt into a medieval knight costume is an easy way to create a comfortable Halloween outfit without sewing an entire costume from scratch.
The sweatshirt provides the perfect base, while felt armor panels, a crest, shoulder pieces, and a simple cape transform it into a convincing medieval look.
This DIY armor upcycle is affordable, beginner-friendly, and easy to customize using scraps and materials you already have.
Whether you are making a Halloween costume, school project, Renaissance fair outfit, or dress-up costume, this sweatshirt knight is a fun way to give old clothing a completely new life.