
If you have an old blanket sitting in a closet, you may already have the perfect fabric for a dramatic fantasy costume. With a few simple cuts and beginner-friendly seams, you can transform it into a medieval forest elf hooded cloak that looks perfect for Halloween, Renaissance fairs, fantasy photoshoots, cosplay, or woodland-themed costumes.
This project works especially well with soft green, brown, gray, cream, or plaid blankets. Wool-look throws, fleece blankets, and brushed woven fabrics can all create that cozy, slightly rustic fantasy feel.
The best part is that you do not need a commercial sewing pattern. This easy fantasy costume sewing upcycle uses a simple cloak shape, an oversized hood, and optional decorative details such as leaf appliqués, distressed edges, or a leather-look closure.
Materials You Will Need
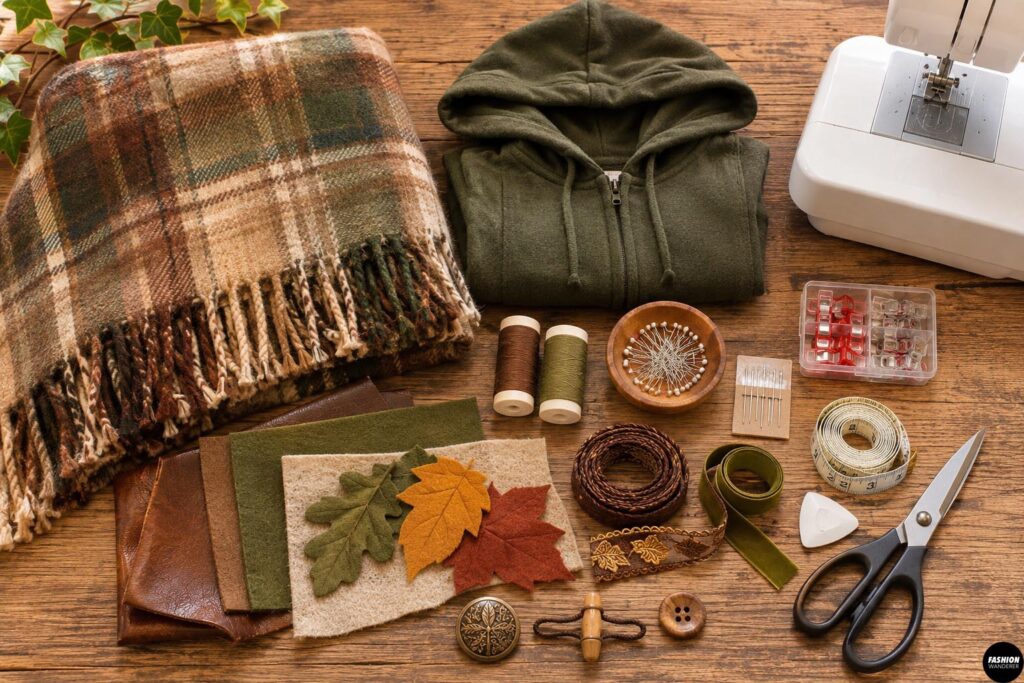
Gather these supplies before starting:
- 1 large old blanket or throw
- A hoodie or hooded jacket for sizing
- Fabric scissors
- Coordinating thread
- Sewing machine
- Pins or sewing clips
- Measuring tape
- Tailor’s chalk or fabric marker
- Hand-sewing needle
- 1 large button, toggle, or decorative clasp
- Optional faux leather or felt scraps
- Optional fabric scraps for leaf appliqués
- Optional ribbon, cord, or trim
A blanket measuring around 50 x 60 inches or larger is ideal for an adult cloak, but you can adjust the size depending on how long and full you want the finished garment.
DIY Medieval Forest Elf Hooded Cloak
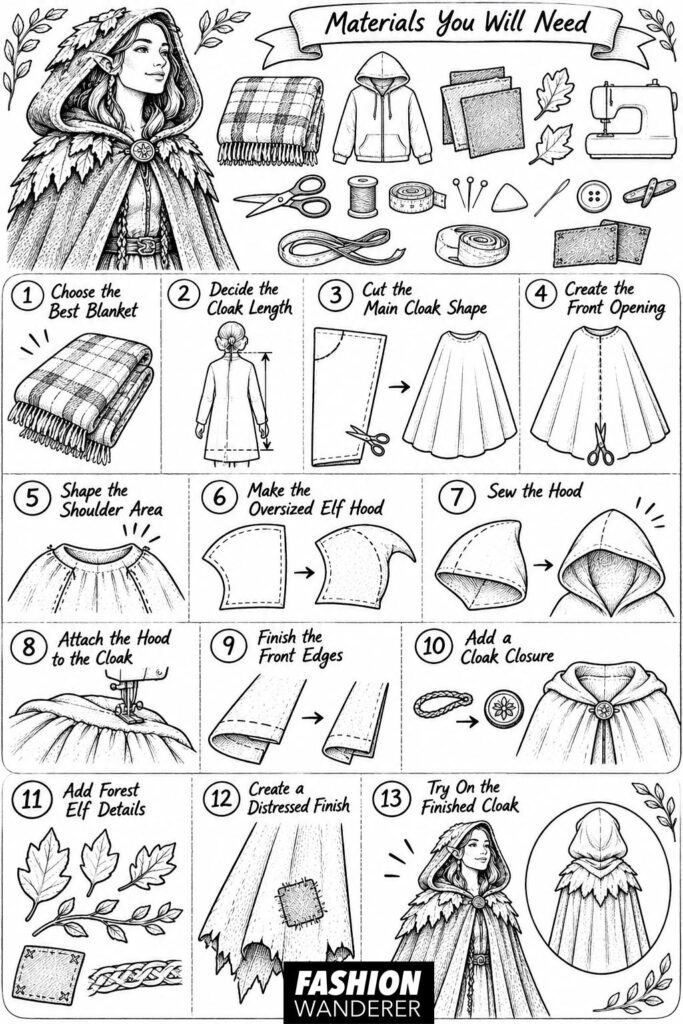
Step 1: Choose the Best Blanket
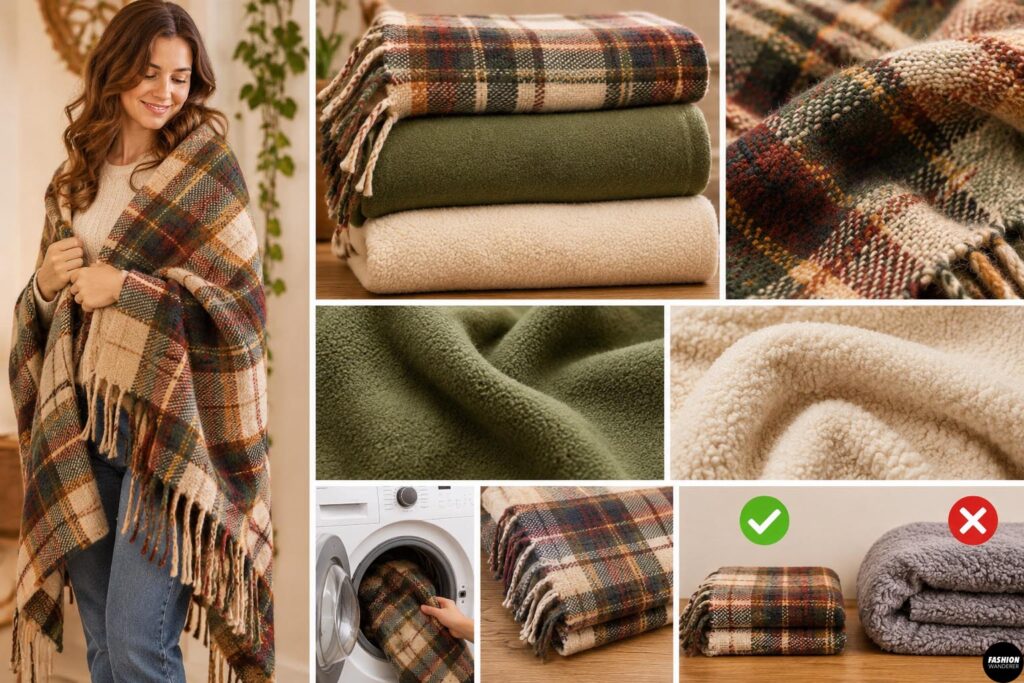
Start with a blanket that drapes well around your shoulders.
Fleece is easiest for beginners because it does not fray much. Woven blankets can create a more authentic medieval look, but you may need to finish the raw edges.
Avoid blankets that are extremely thick because bulky fabric can be difficult to sew at the neckline.
Wash and dry the blanket before cutting if needed.
Step 2: Decide the Cloak Length
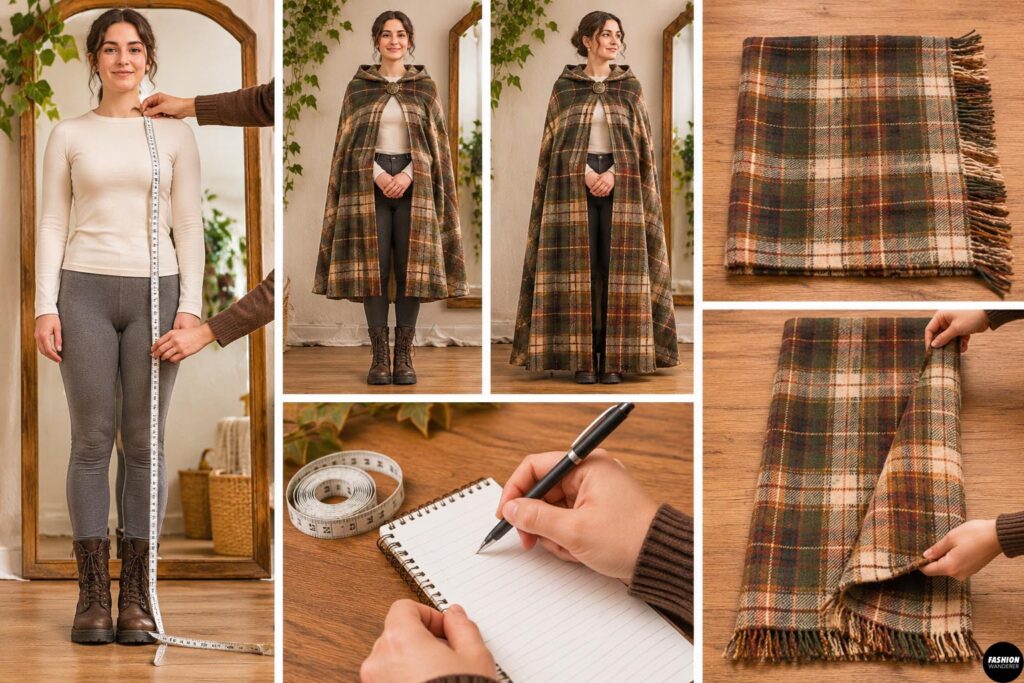
Stand in front of a mirror and measure from the base of your neck down to where you want the cloak to end.
For a dramatic medieval look, aim for mid-calf to ankle length.
For an easier costume that is comfortable for walking, knee or mid-calf length works beautifully.
Write down the measurement.
Fold the blanket in half lengthwise so the two long edges meet.
Step 3: Cut the Main Cloak Shape
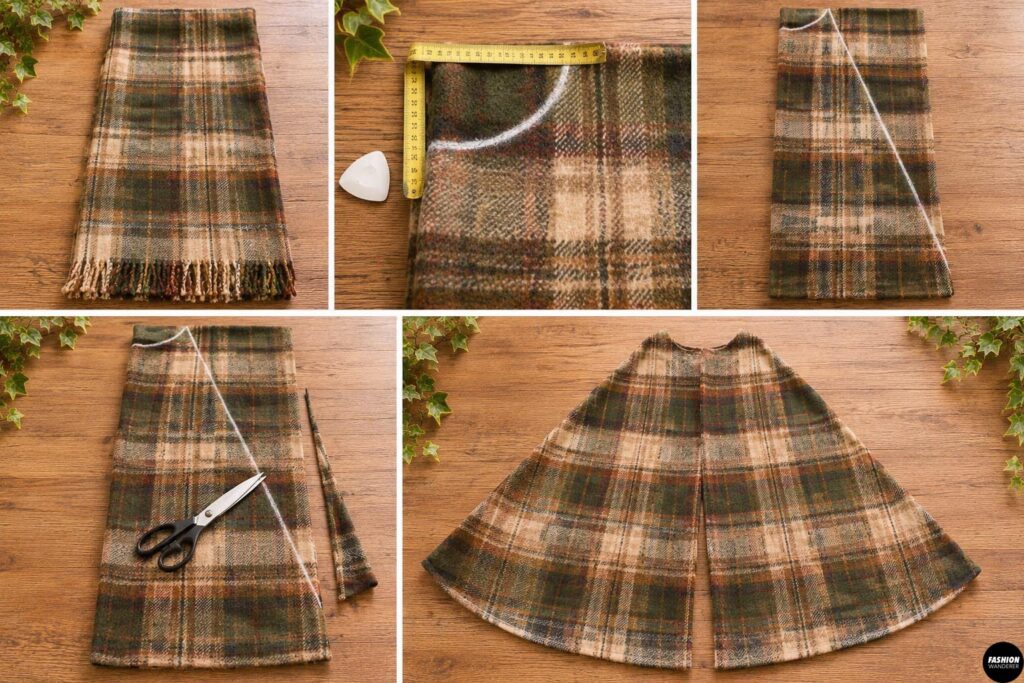
Place the folded blanket on a large table or clean floor.
Mark the neckline near the top folded corner.
For a simple cloak, measure about 3 inches down and 4 inches across from the corner, then draw a shallow curved neckline.
From that neckline, draw a gentle diagonal line toward the lower outer edge.
This creates an A-line shape that is narrower at the shoulders and fuller at the hem.
Cut through both layers.
Open the fabric and check the shape.
You should now have one wide cloak piece.
Step 4: Create the Front Opening
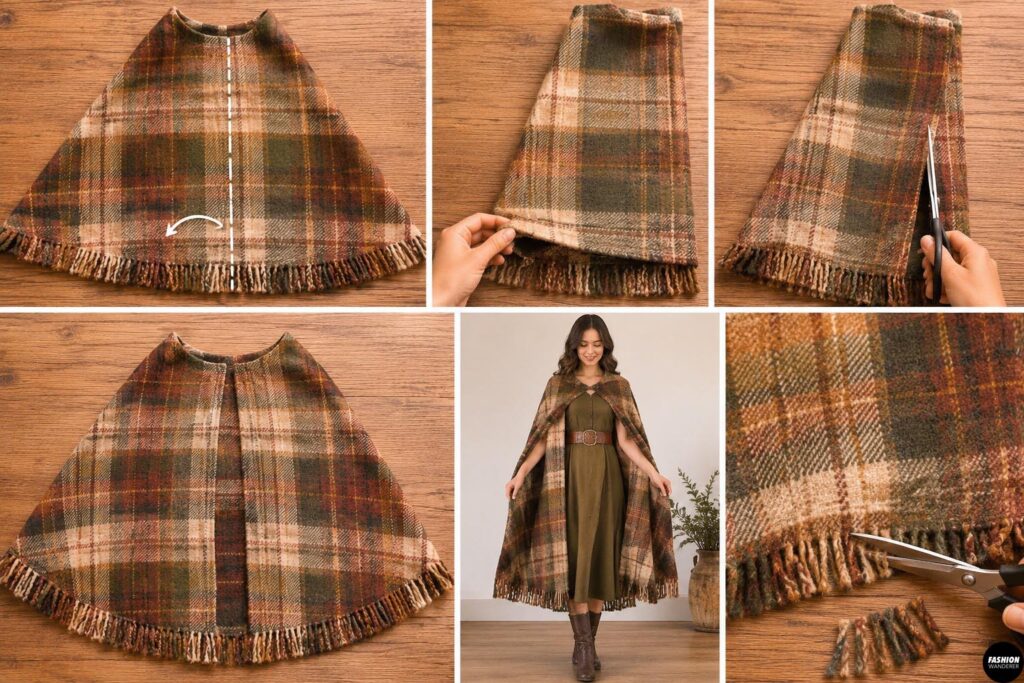
Fold the cloak in half again and identify the center front.
Cut only through the front layer from the neckline straight down to the hem.
Do not cut the back layer.
This creates the front opening of the cloak.
Try the cloak around your shoulders and check the length before continuing.
Trim the hem if needed.
Step 5: Shape the Shoulder Area
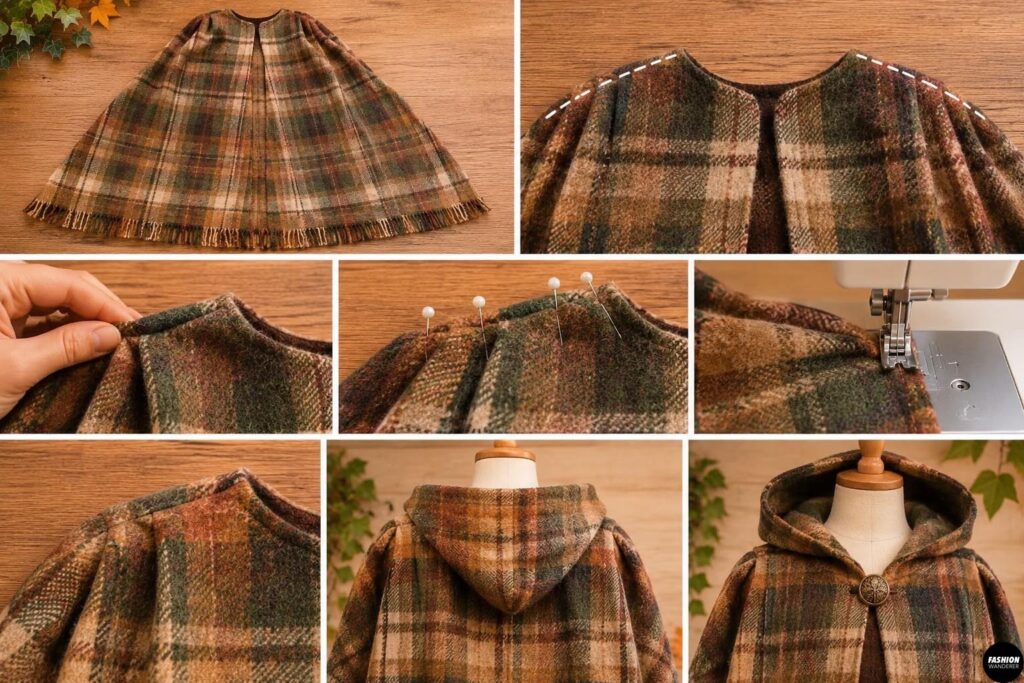
To help the cloak sit more naturally around the shoulders, you can add two small shoulder seams.
Place the cloak right side up.
Measure approximately 8 to 10 inches outward from the center back neckline on each side.
Fold or pinch a small amount of fabric at each shoulder to create gentle shaping.
Pin and sew short seams approximately 3 to 5 inches long.
This step is optional, but it can make the cloak look much less like a flat blanket and more like a real garment.
Step 6: Make the Oversized Elf Hood
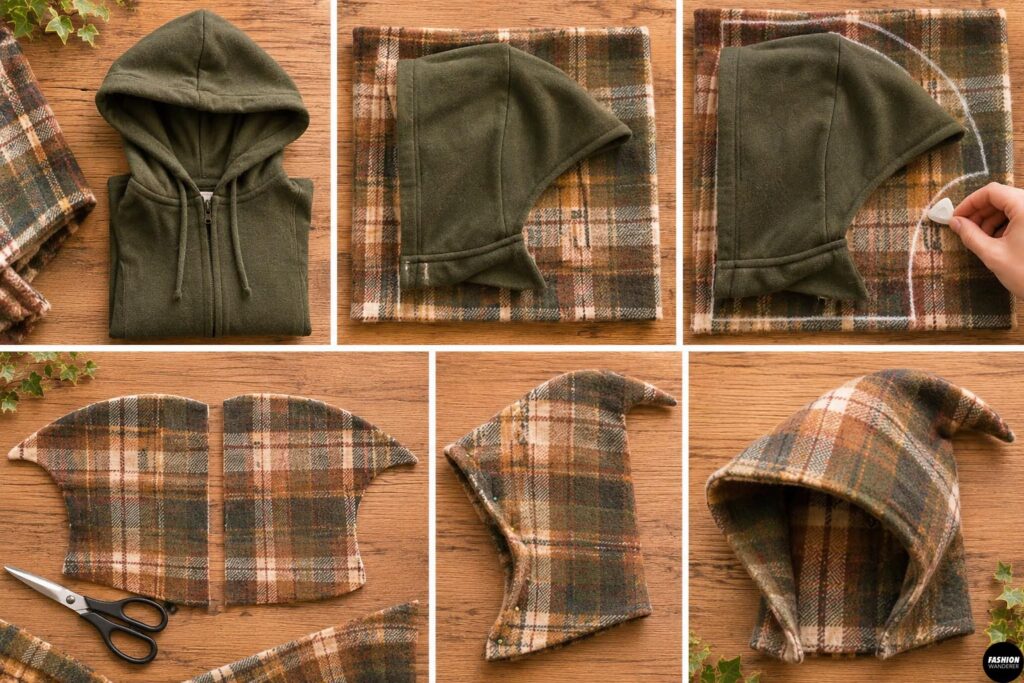
Use a hood from a sweatshirt or jacket as a rough size reference.
Fold a section of leftover blanket fabric in half.
Place the reference hood on top and trace around it, adding approximately 2 inches around the outer edge for a larger fantasy-style hood.
Extend the front edge slightly forward to create a deeper hood.
Cut two mirrored hood pieces.
For a more dramatic forest elf look, gently extend the top back corner into a small point.
Step 7: Sew the Hood
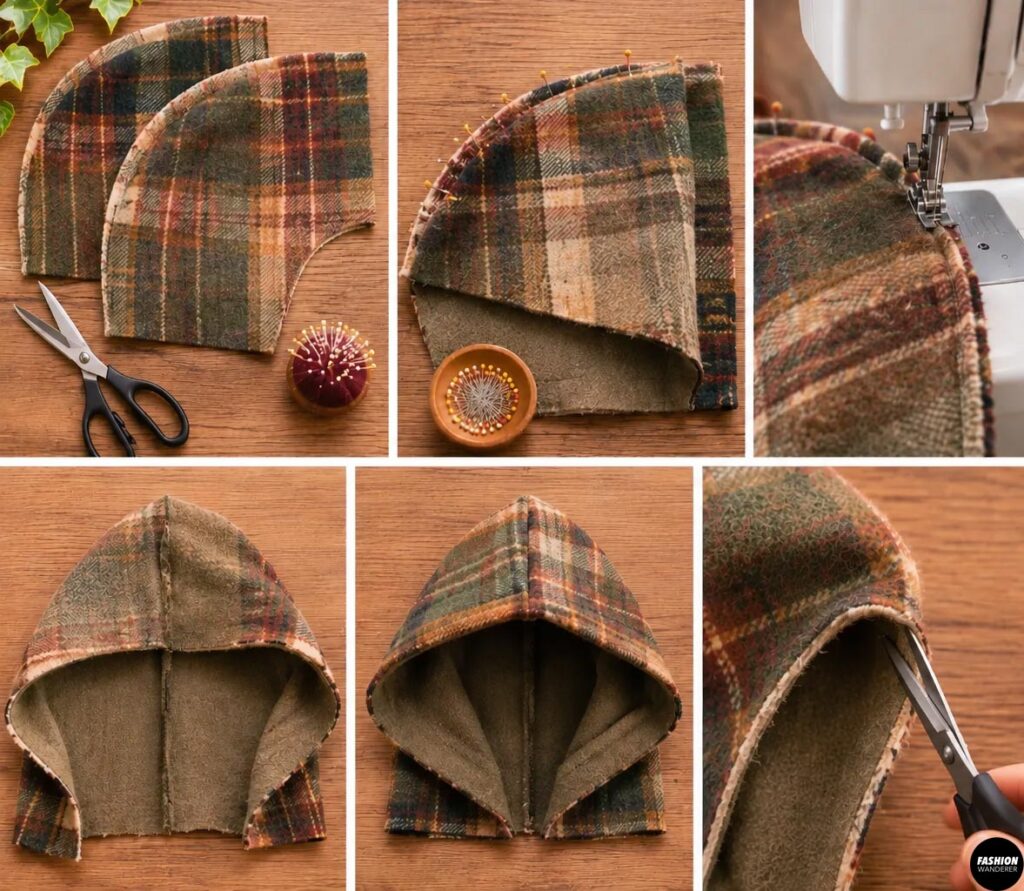
Place the two hood pieces right sides together.
Pin around the curved back and top edge.
Sew using approximately a ⅜-inch seam allowance.
Leave the face opening and neckline edge open.
Turn the hood right side out.
Try it over your head.
The hood should frame your face comfortably without covering your eyes.
Trim the face opening if it feels too deep.
Step 8: Attach the Hood to the Cloak
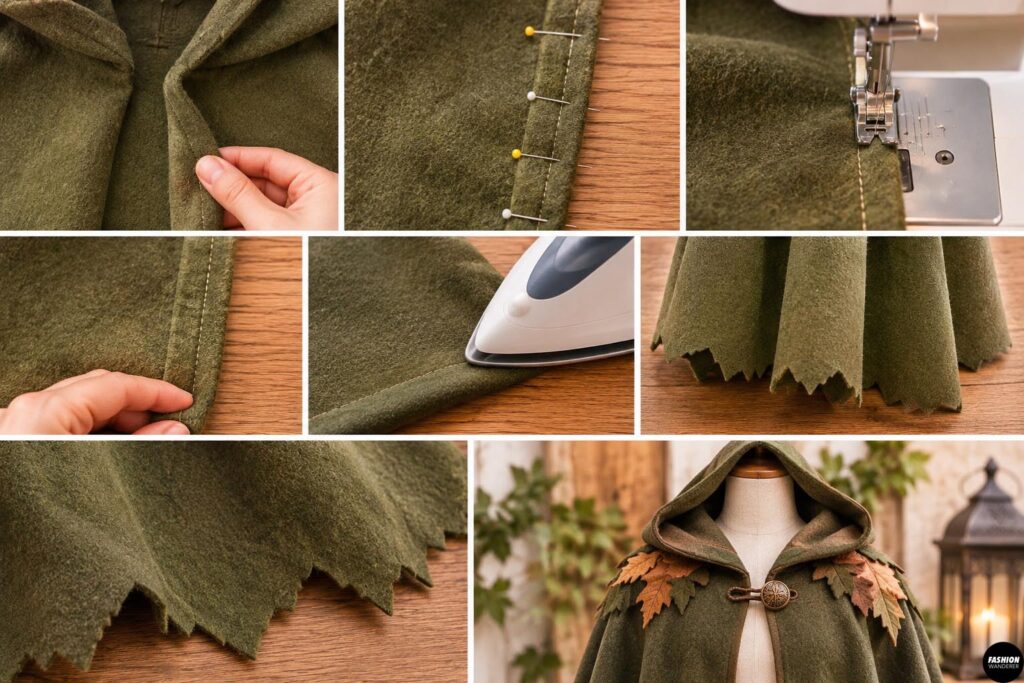
Find the center back of the cloak neckline and the center back of the hood.
Match these two points.
Pin the hood around the neckline with right sides together.
Work from the center back toward each front edge.
If the hood is slightly larger than the neckline, distribute the extra fullness evenly with tiny gathers.
Sew around the neckline using a ⅜-inch seam allowance.
For extra strength, sew a second line of stitching close to the first.
Step 9: Finish the Front Edges
If your blanket fabric frays, fold each front edge toward the wrong side by approximately ½ inch.
Press carefully.
Fold again and stitch close to the inner folded edge.
Repeat along the hem.
If you are using fleece, you can leave the edges raw for a rustic costume look.
You can also trim the hem into subtle uneven points for a woodland fantasy effect.
Step 10: Add a Cloak Closure
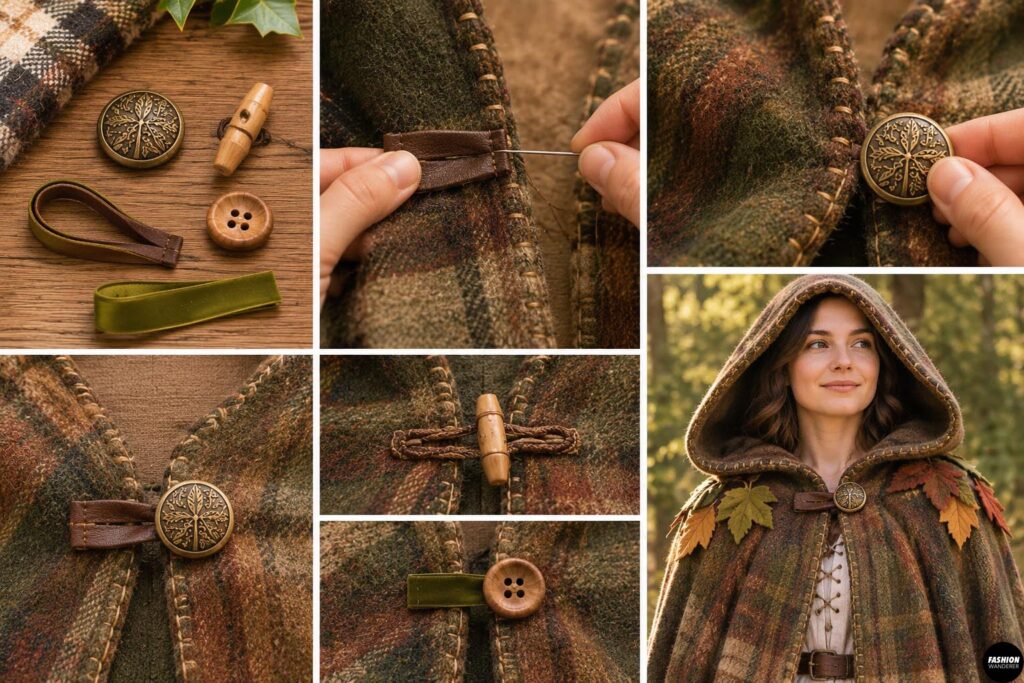
A simple toggle or button closure works well near the upper chest.
Cut a small loop from ribbon, cord, faux leather, or fabric.
Sew the loop securely to one front edge.
Attach a large button or decorative toggle to the opposite side.
Position the closure below the throat so the cloak does not feel tight around the neck.
Avoid long cords or ties, especially for children’s costumes.
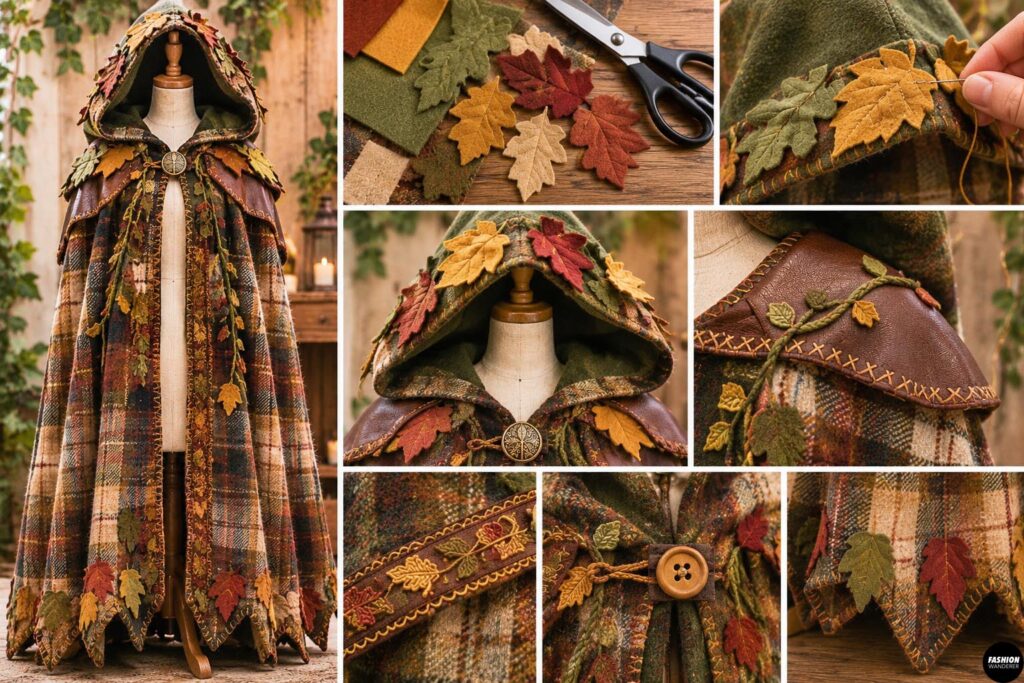
Step 11: Add Forest Elf Details
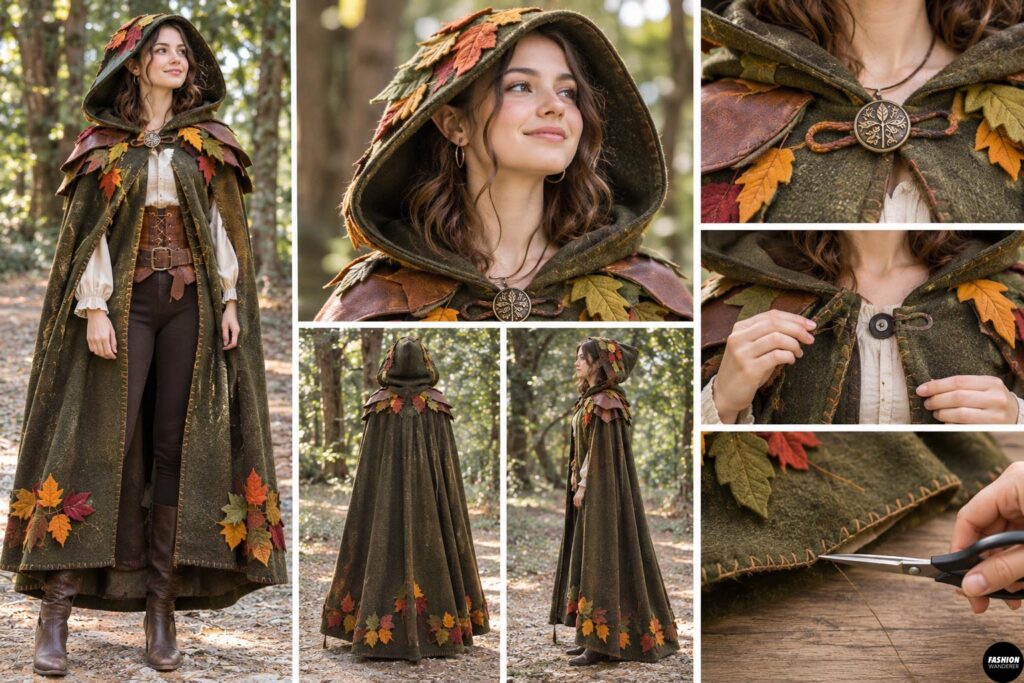
This is where the cloak can start to look especially magical.
Cut small leaf shapes from green, brown, gold, or rust-colored fabric scraps.
Arrange them around the hood edge, shoulders, or lower hem.
Sew each leaf in place with a simple straight stitch.
You can also add:
- Faux leather patches
- Decorative blanket stitching
- Small fabric vines
- Wooden buttons
- Embroidered leaf motifs
- Rustic trim
- Fabric-covered shoulder patches
Keep the details lightweight so the cloak still drapes comfortably.
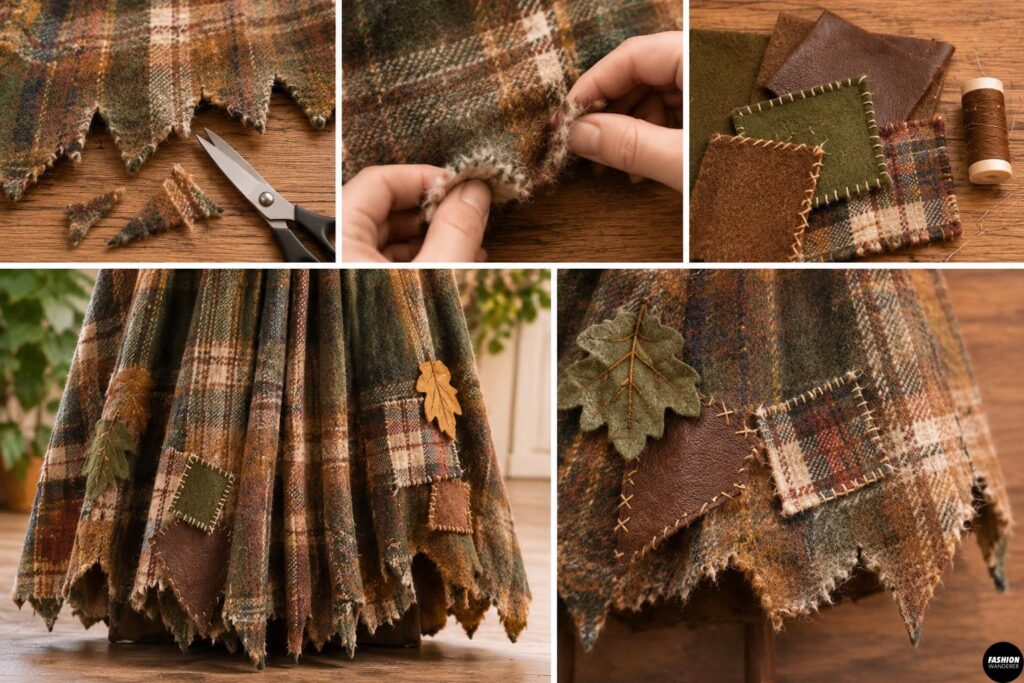
Step 12: Create a Distressed Woodland Finish
For a more weathered fantasy look, lightly distress the hem.
Make a few shallow cuts or uneven points along the bottom edge.
Rub woven fabric gently with your fingers to create a slightly worn appearance.
Do not overdo this step. A few irregular details usually look more believable than a heavily shredded hem.
For extra texture, layer a few small patches of contrasting fabric near the bottom.
Step 13: Try On the Finished Cloak
Put on the cloak and check the overall fit.
Make sure:
- The hood does not block your vision
- The neckline feels comfortable
- The cloak does not drag on the floor
- The closure opens easily
- The hem allows safe walking
- Decorative pieces are firmly attached
Trim or adjust anything that feels too long or bulky.
Styling Ideas for a Medieval Forest Elf Costume
Pair your finished cloak with simple clothing you may already own.
Try:
- Brown or black boots
- Neutral trousers
- A loose cream blouse
- A long tunic
- A simple belt
- Leather-look wrist cuffs
- Braided hair
- Earth-toned makeup
For a softer woodland elf look, use sage green, cream, brown, and muted gold.
For a darker fantasy costume, choose charcoal, deep olive, black, and burgundy.
Final Thoughts
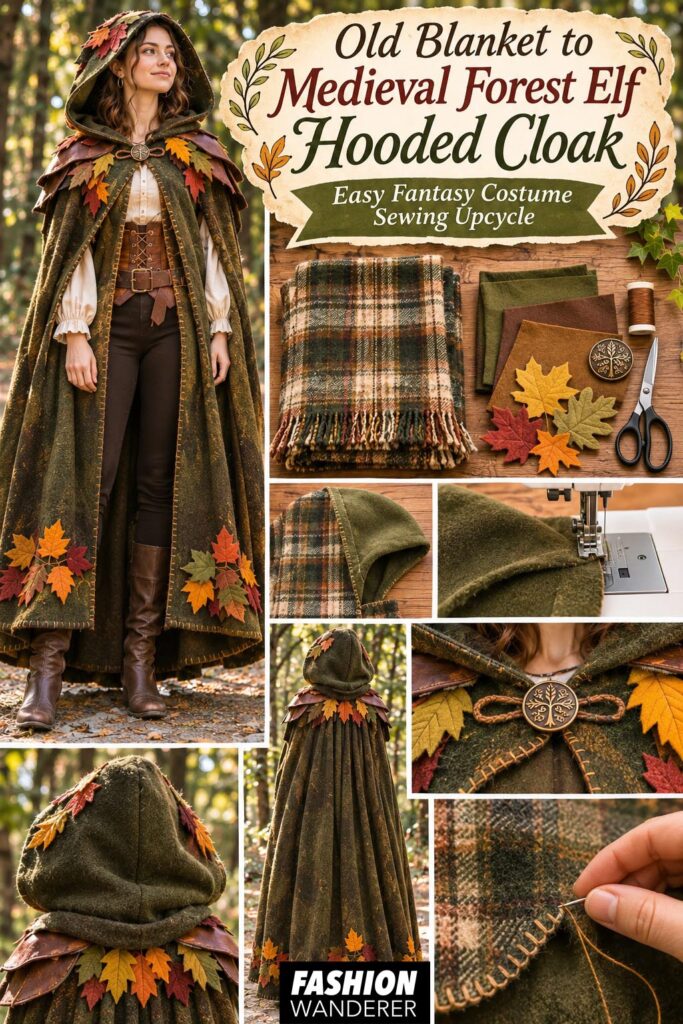
Turning an old blanket into a medieval forest elf hooded cloak is an easy way to create a dramatic fantasy costume without buying expensive fabric or using a complicated sewing pattern.
The basic construction is simple enough for beginners, while the oversized hood, rustic closure, and optional leaf details make the finished cloak feel much more elaborate.
This project is perfect for Halloween costumes, Renaissance fairs, fantasy cosplay, woodland photo sessions, medieval parties, or DIY costume collections.
Best of all, every blanket creates a slightly different result, so your cloak can feel completely unique.
Before buying a new costume, check your linen closet or thrift store. That old forgotten blanket may be one afternoon away from becoming your favorite fantasy costume.