
Want to dress up as one of the most iconic anime characters without spending a fortune on a store-bought costume? This DIY Gojo Satoru costume is the perfect budget-friendly cosplay project for anime fans, beginners, and anyone who loves a clever thrift store transformation!
Inspired by Gojo Satoru from Jujutsu Kaisen, this easy anime cosplay tutorial shows you how to transform a thrifted black jacket into his recognizable high-collar outfit using simple sewing techniques.
With a few inexpensive materials, basic sewing skills, and some creative styling, you can make a Gojo Satoru cosplay costume that’s perfect for Halloween, anime conventions, cosplay parties, or themed events.
The best part? You don’t need to sew an entire outfit from scratch!
Why Make a DIY Gojo Satoru Costume?
Gojo’s signature look is surprisingly simple, making it ideal for a beginner-friendly anime costume upcycle.
His recognizable outfit features a fitted black jacket with a tall standing collar, matching black pants, white hair, and a black blindfold.
Instead of purchasing an expensive cosplay uniform, you can recreate the look using secondhand clothing.
This project is perfect because:
- It’s affordable and beginner-friendly.
- It transforms an old jacket into a stylish anime costume.
- It requires only basic sewing techniques.
- Most materials can be found at thrift stores.
- The finished costume can be reused for multiple cosplay events.
Whether you’re making a last-minute anime Halloween costume or preparing for your first cosplay convention, this tutorial is a great place to start.
Materials You’ll Need
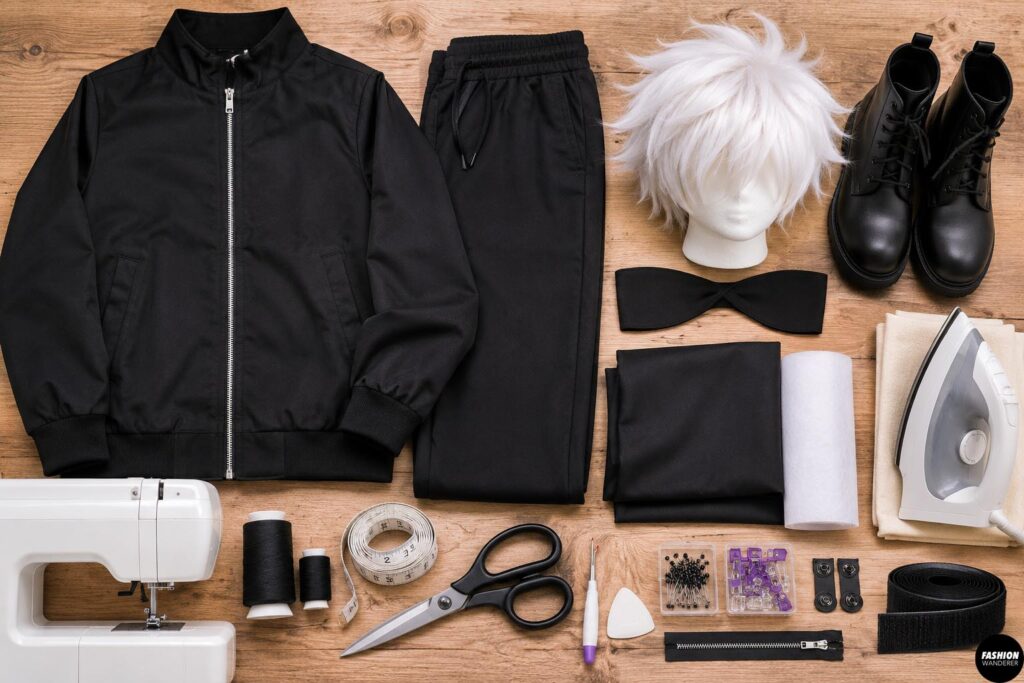
Before starting your DIY Gojo Satoru cosplay, gather these supplies.
Clothing:
- 1 thrifted black jacket with a front zipper
- Black slim-fit pants or joggers
- Black shoes or ankle boots
- Black fabric for the standing collar
- White or silver cosplay wig
- Black stretch fabric for the blindfold
Sewing supplies:
- Sewing machine or hand-sewing needle
- Black coordinating thread
- Fabric scissors
- Measuring tape
- Fabric chalk or washable marker
- Sewing pins or clips
- Seam ripper
- Iron and pressing cloth
- Medium-weight fusible interfacing
- Optional: black zipper, hook-and-loop tape, or snaps
Beginner Tip: Choose a thrifted jacket made from cotton twill, polyester suiting, or another medium-weight woven fabric. A jacket with a simple silhouette and minimal decorative details will be easiest to transform.
DIY Gojo Satoru Cosplay Costume
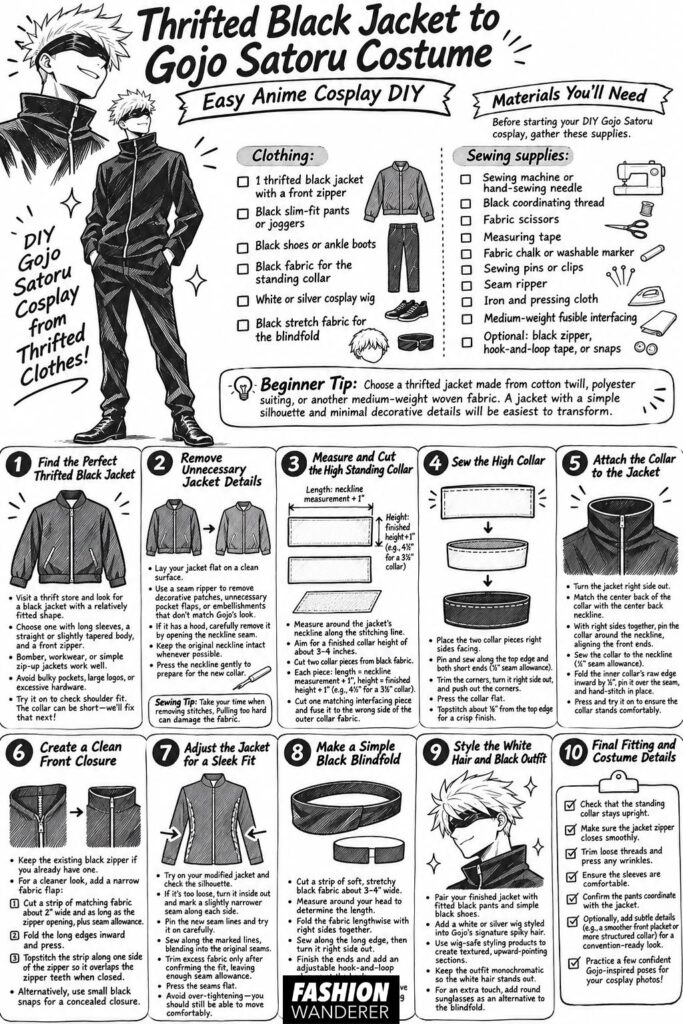
Step 1: Find the Perfect Thrifted Black Jacket
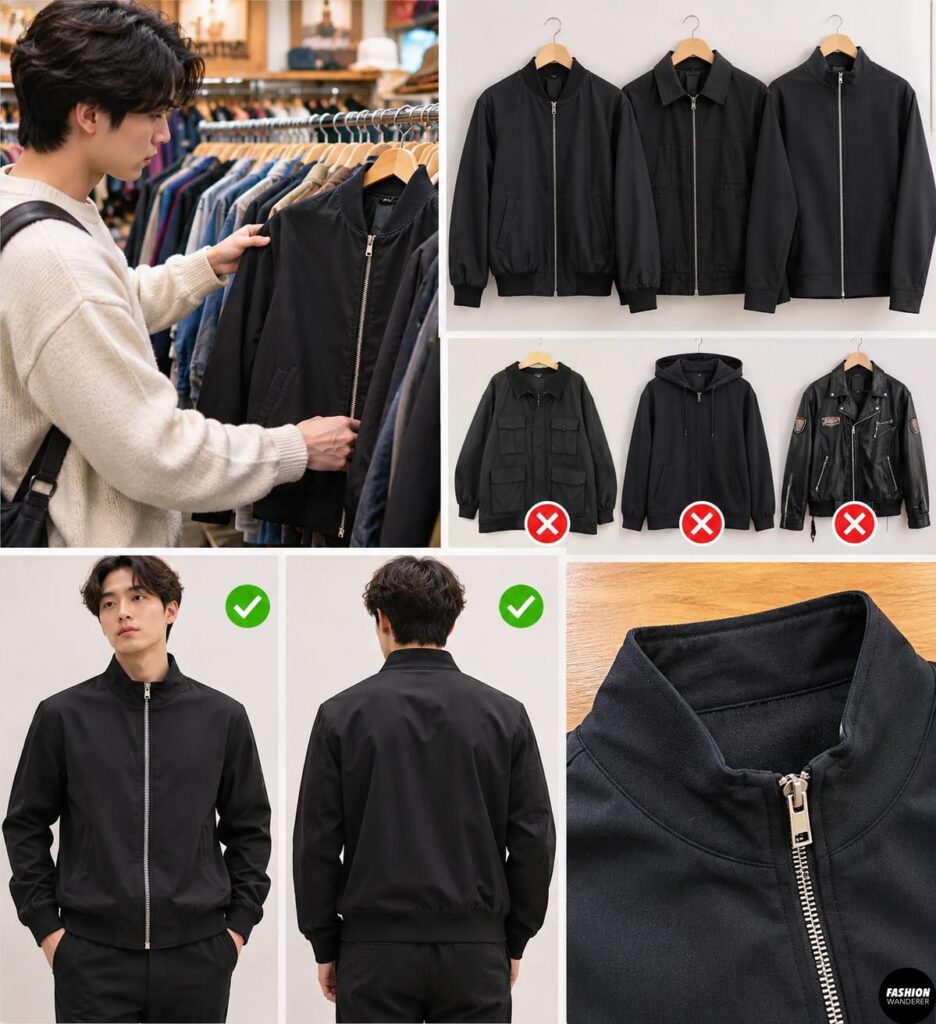
Start by visiting your local thrift store and searching for a black jacket with a relatively fitted shape.
Look for a jacket that has long sleeves, a straight or slightly tapered body, and a front zipper.
A lightweight bomber jacket, workwear jacket, or simple zip-up jacket can work beautifully.
Avoid oversized jackets with bulky pockets, large logos, or excessive hardware.
Try the jacket on and check that the shoulders fit comfortably.
Don’t worry if the collar isn’t tall enough—we’ll fix that in the next steps!
Step 2: Remove Unnecessary Jacket Details
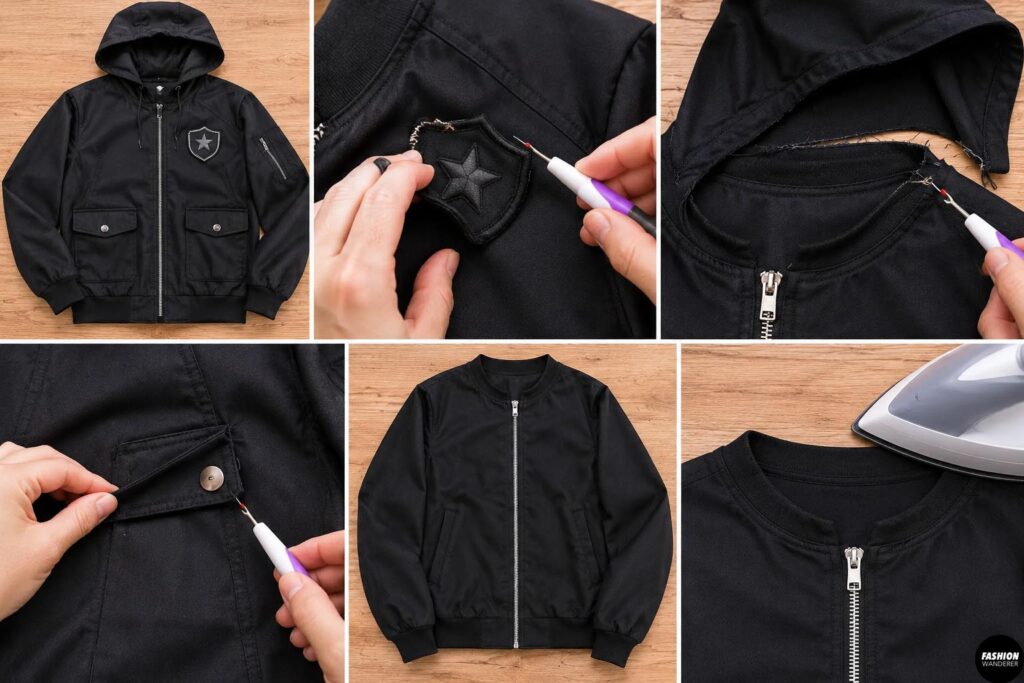
Lay your thrifted jacket flat on a clean work surface.
Use a seam ripper to carefully remove decorative patches, unnecessary pocket flaps, or visible embellishments that don’t match Gojo’s minimalist outfit.
If the jacket has a hood, remove it by carefully opening the neckline seam.
Keep the original neckline intact whenever possible.
If the jacket has a short collar, decide whether to extend it or remove it completely.
Press the neckline gently to prepare it for the new collar.
Sewing Tip: Take your time when removing stitches. Pulling too hard can damage the fabric.
Step 3: Measure and Cut the High Standing Collar
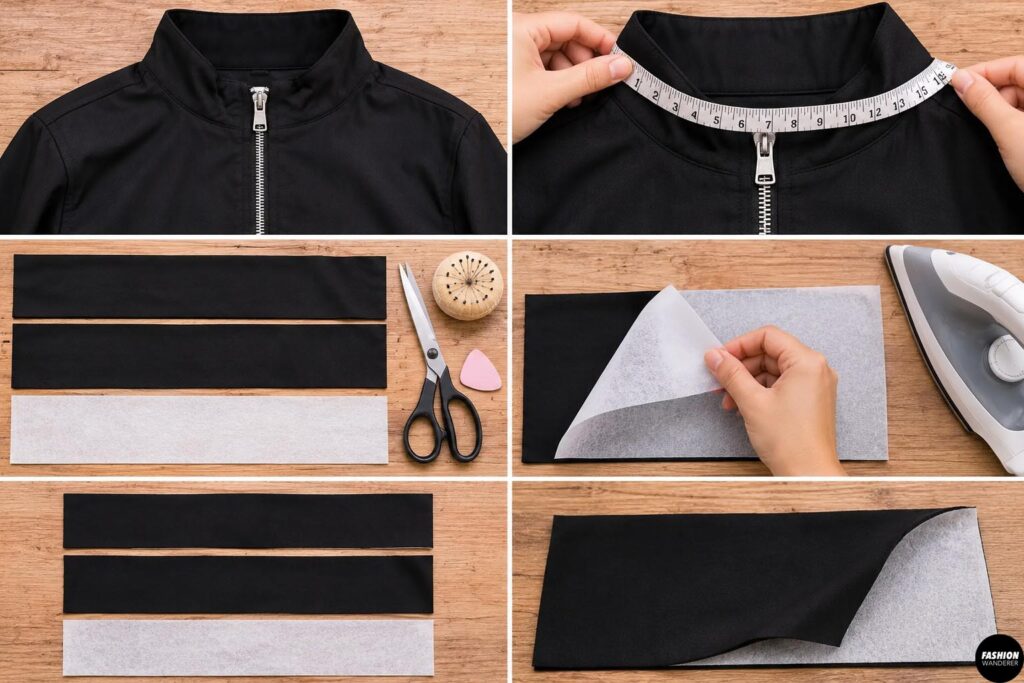
The tall standing collar is the most important feature of this Gojo Satoru jacket DIY.
Measure around the jacket’s neckline along the stitching line.
For an adult costume, aim for a finished collar height of approximately 3–4 inches, adjusting it to your neck length and comfort.
Cut two collar pieces from matching black fabric.
Each piece should measure:
- Length: neckline measurement plus 1 inch for seam allowances
- Height: twice the desired finished collar height is not needed when using two separate collar layers; instead, cut each layer to the finished height plus 1 inch
For example, for a 3½-inch finished collar, cut each piece 4½ inches tall.
Cut one matching interfacing piece and fuse it to the wrong side of the outer collar fabric.
This will help the collar stand upright.
Step 4: Sew the High Collar
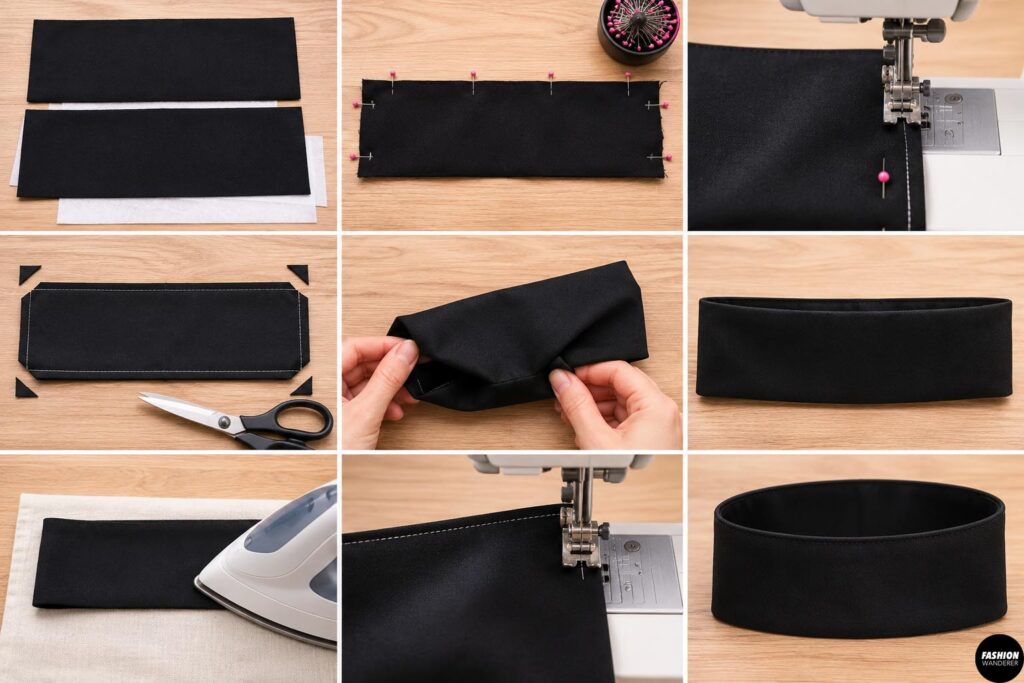
Place the two collar pieces together with right sides facing.
Pin along the top edge and both short ends.
Sew these three edges using a ½-inch seam allowance.
Trim the corners carefully to reduce bulk.
Turn the collar right side out and gently push out the corners.
Press the collar flat.
Topstitch approximately ⅛ inch from the finished top edge for a crisp, professional appearance.
You should now have a structured black standing collar ready to attach to your jacket.
Step 5: Attach the Collar to the Jacket
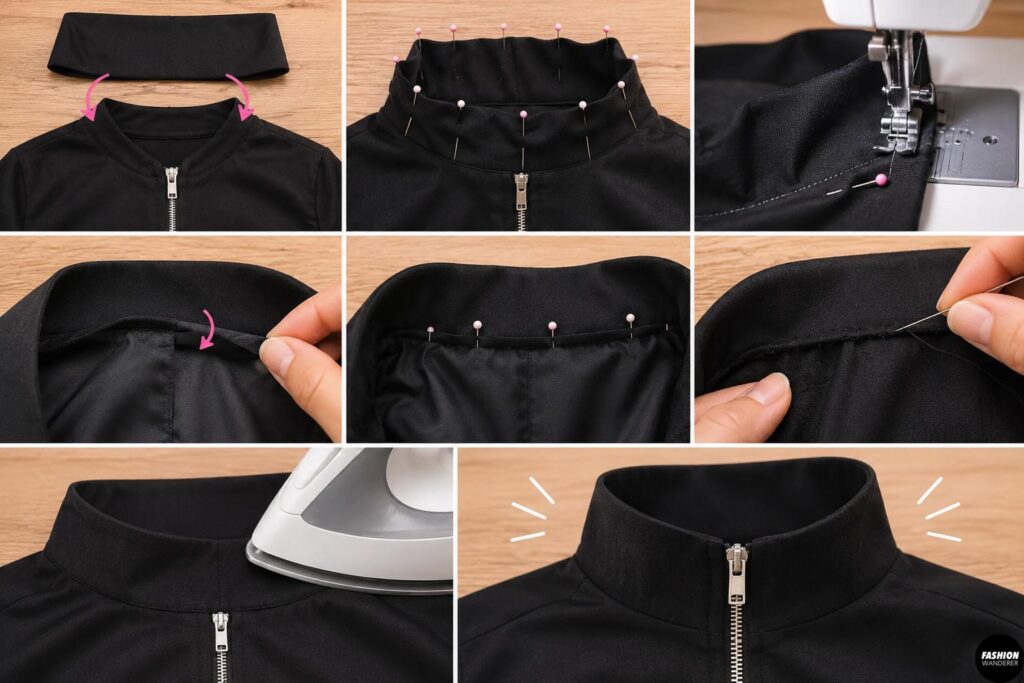
Turn the jacket right side out.
Match the center back of the collar with the center back neckline.
With right sides together, pin the outer collar layer around the neckline, aligning the front ends with the jacket opening.
Sew the collar to the neckline using a ½-inch seam allowance.
Fold the inner collar’s raw edge inward by ½ inch.
Pin it over the neckline seam on the inside of the jacket.
Hand-stitch the folded edge in place using small, nearly invisible stitches.
Press carefully.
Try on the jacket to ensure the collar stands comfortably without restricting neck movement.
Step 6: Create a Clean Front Closure
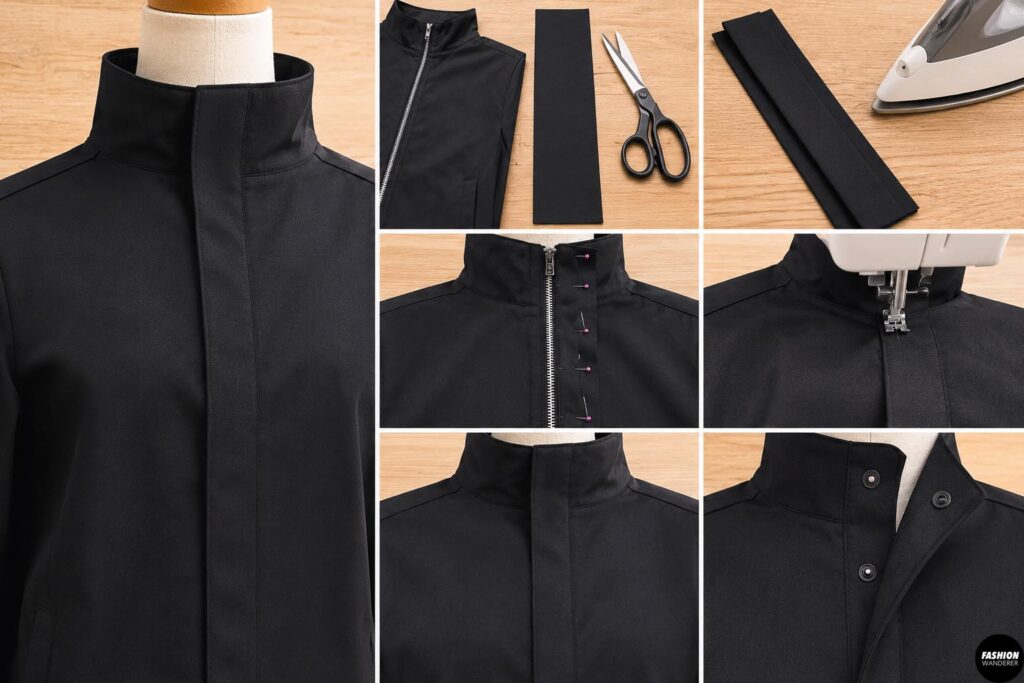
Gojo’s jacket has a sleek, streamlined front, so keeping the closure simple makes a big difference.
If your thrifted jacket already has a black zipper, you can keep it.
For a more seamless appearance, create a narrow black fabric flap to cover the visible zipper.
Cut a strip of matching fabric approximately 2 inches wide and as long as the zipper opening, plus seam allowances.
Fold the long edges inward and press.
Topstitch the strip along one side of the zipper, allowing it to overlap the zipper teeth when closed.
Alternatively, use small black snaps to create a concealed closure.
Make sure the jacket can still open and close comfortably.
Step 7: Adjust the Jacket for a Sleek Fit
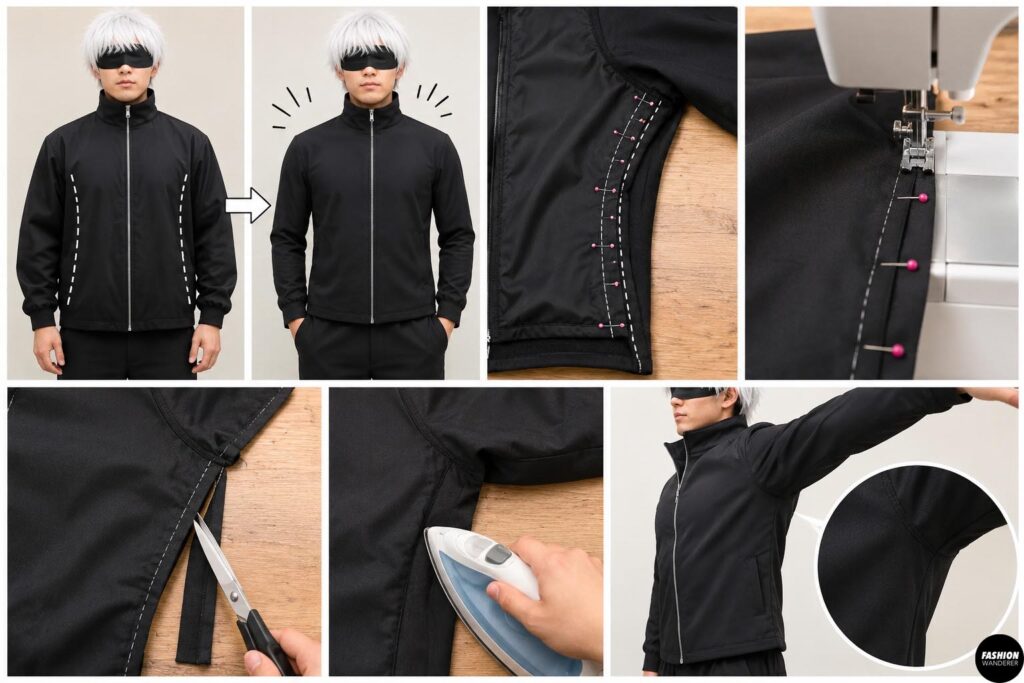
Try on your modified jacket and examine the overall silhouette.
Gojo’s outfit has a clean, fitted appearance without looking overly tight.
If your jacket is too loose, turn it inside out and mark a slightly narrower seam along each side.
Pin the new seam lines and try the jacket on carefully.
Sew along the marked lines, gradually blending into the original seams.
Trim excess fabric only after confirming the fit, leaving enough seam allowance.
Press the seams flat.
Avoid over-tightening the jacket—you should still be able to move your arms comfortably.
Step 8: Make a Simple Black Blindfold
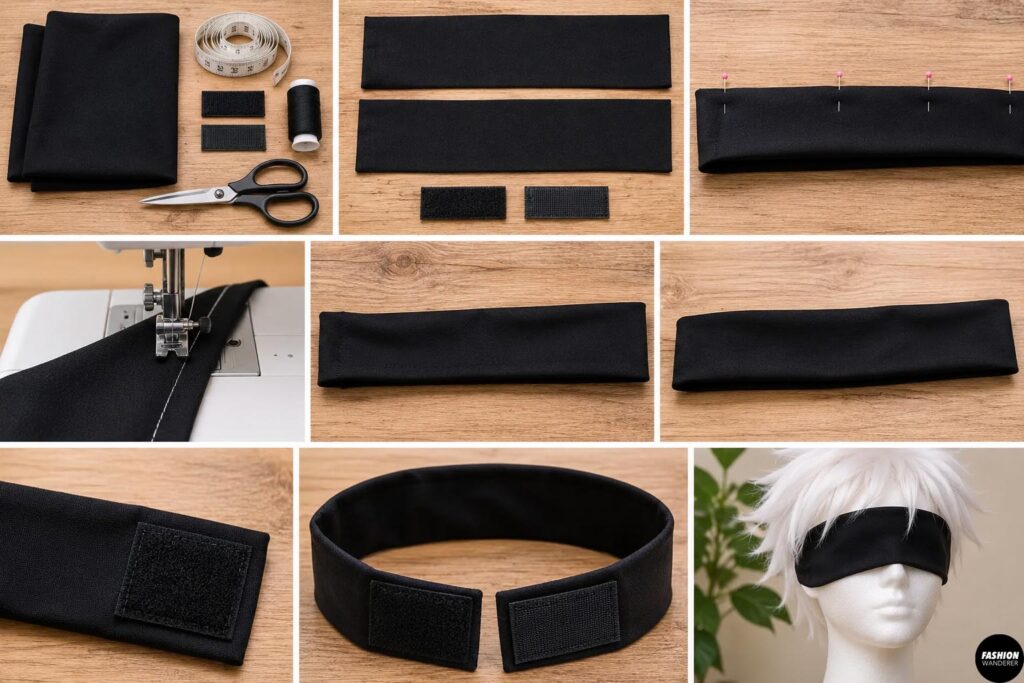
No Gojo Satoru Halloween costume is complete without his recognizable black blindfold!
Cut a strip of soft, stretchy black fabric approximately 3–4 inches wide.
Measure around your head to determine the appropriate length.
Fold the fabric lengthwise with right sides together.
Sew along the long edge, then turn the fabric right side out.
Finish the ends and add an adjustable hook-and-loop closure at the back.
For safety, use this as a decorative accessory rather than covering your vision while walking.
You can also wear it pushed up above your eyes for photos.
Step 9: Style the White Hair and Black Outfit
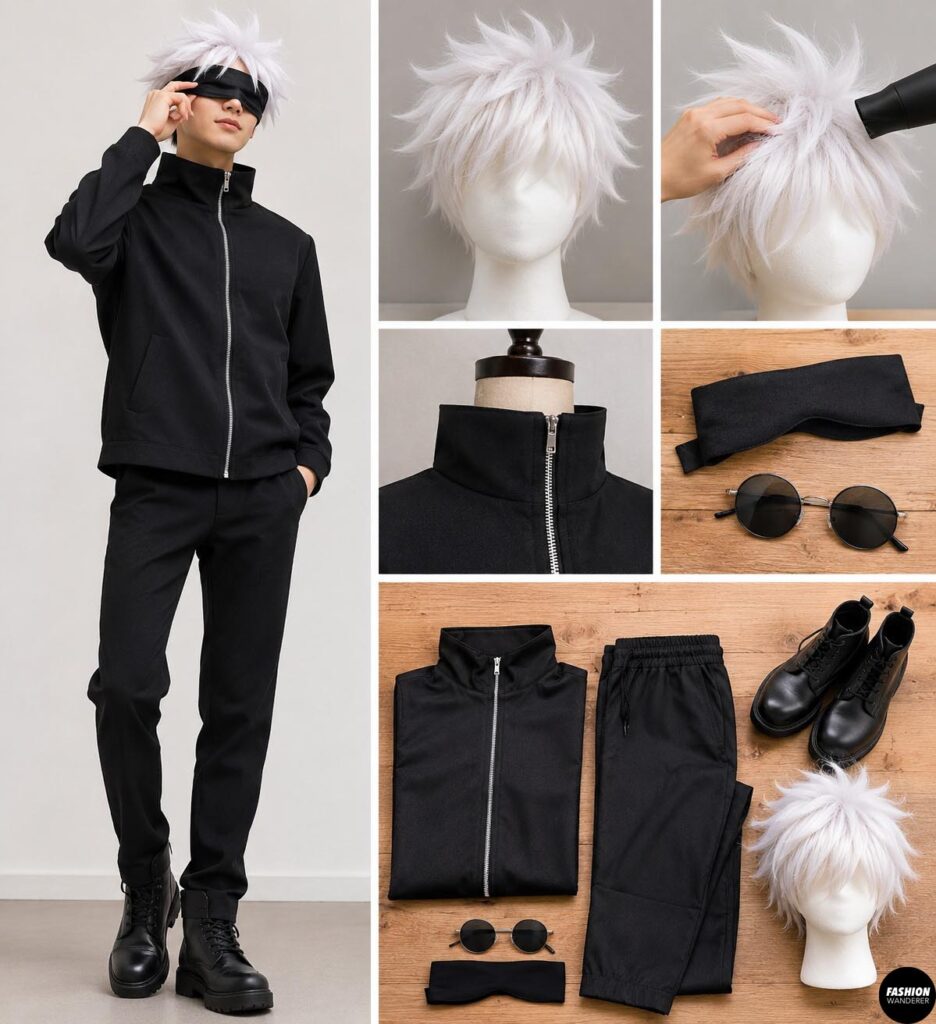
Now comes the fun part—bringing your anime cosplay to life!
Pair your finished jacket with fitted black pants and simple black shoes.
Add a short white or silver wig styled into Gojo’s signature spiky hairstyle.
Use wig-safe styling products to create textured, upward-pointing sections.
Keep the overall outfit monochromatic so the white hair becomes the main focal point.
For an extra anime-inspired touch, add round sunglasses as an alternative to the blindfold.
Your budget-friendly Gojo cosplay is almost complete!
Step 10: Final Fitting and Costume Details
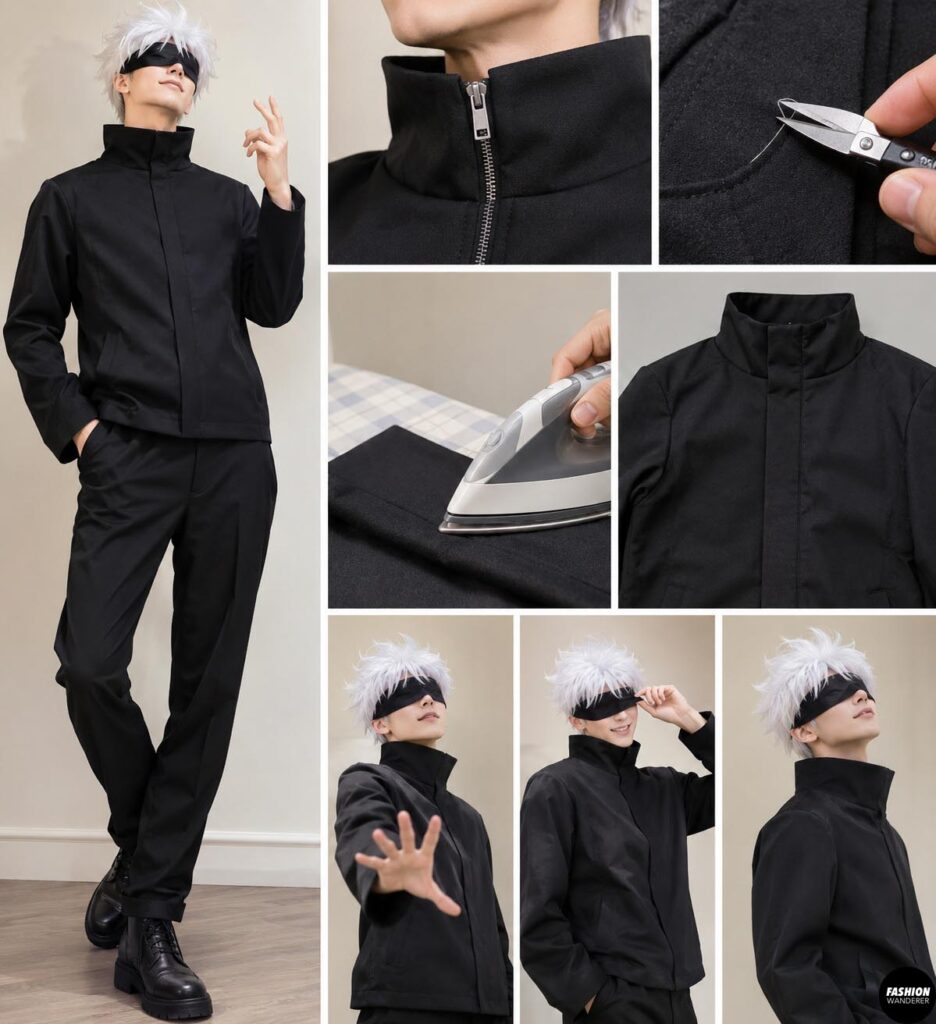
Put on the complete costume and check everything in a full-length mirror.
Make sure the standing collar stays upright and the jacket zipper closes smoothly.
Trim loose threads and press any wrinkled areas.
Check that the sleeves are comfortable and the pants coordinate with the jacket.
If you’re attending an anime convention, consider adding subtle costume details such as a smooth front placket or more structured collar.
Finally, practice a few confident Gojo-inspired poses for your cosplay photos!
Final Thoughts: Easy Gojo Satoru Cosplay on a Budget
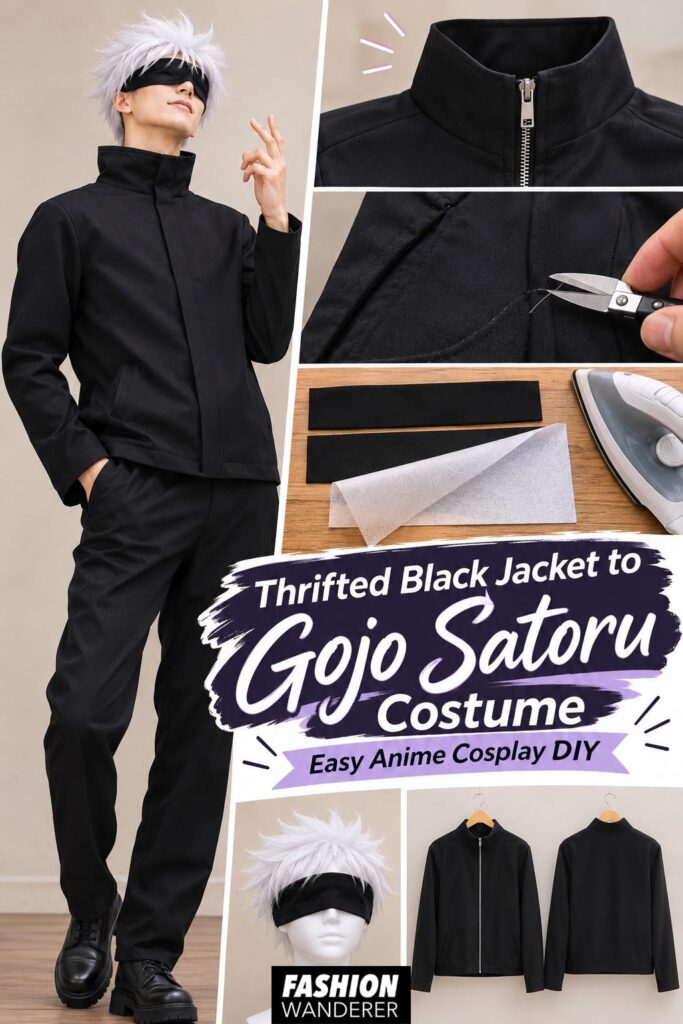
Creating a DIY Gojo Satoru costume from a thrifted black jacket proves that impressive anime cosplay doesn’t have to be expensive or complicated.
With a simple collar modification, a few sewing adjustments, and recognizable accessories, you can transform secondhand clothing into a stylish costume inspired by Jujutsu Kaisen.
This beginner-friendly sewing upcycle is a fun way to save money, reduce clothing waste, and create something unique.
Whether you’re dressing up for Halloween, Comic Con, or an anime-themed party, your handmade Gojo costume is ready to steal the spotlight!
Love easy DIY anime costumes? Explore more thrift store clothing transformations, beginner sewing tutorials, and creative cosplay upcycle ideas to build your next costume without breaking the bank.