
Looking for a funny, inexpensive Halloween costume for your dog that you can make at home? Before buying another pet costume, check your closet for an old pair of black leggings. With a little cutting, stuffing, and sewing, those unwanted leggings can become creepy-cute spider legs for an easy DIY dog spider costume.
This old black leggings upcycle is especially fun because stretchy knit fabric is lightweight, soft, and flexible. The finished spider legs can bounce slightly as your dog walks, creating an adorable crawling-spider effect.
Before tossing out old T-shirts, leggings, or button-up shirts, check out these easy upcycled Halloween costumes for pets for some fun ideas.
This beginner-friendly tutorial shows you how to make a dog spider costume from old leggings step by step, including how to create the spider legs, stuff them, attach them securely, and make the costume comfortable for your pet.
Materials You Will Need
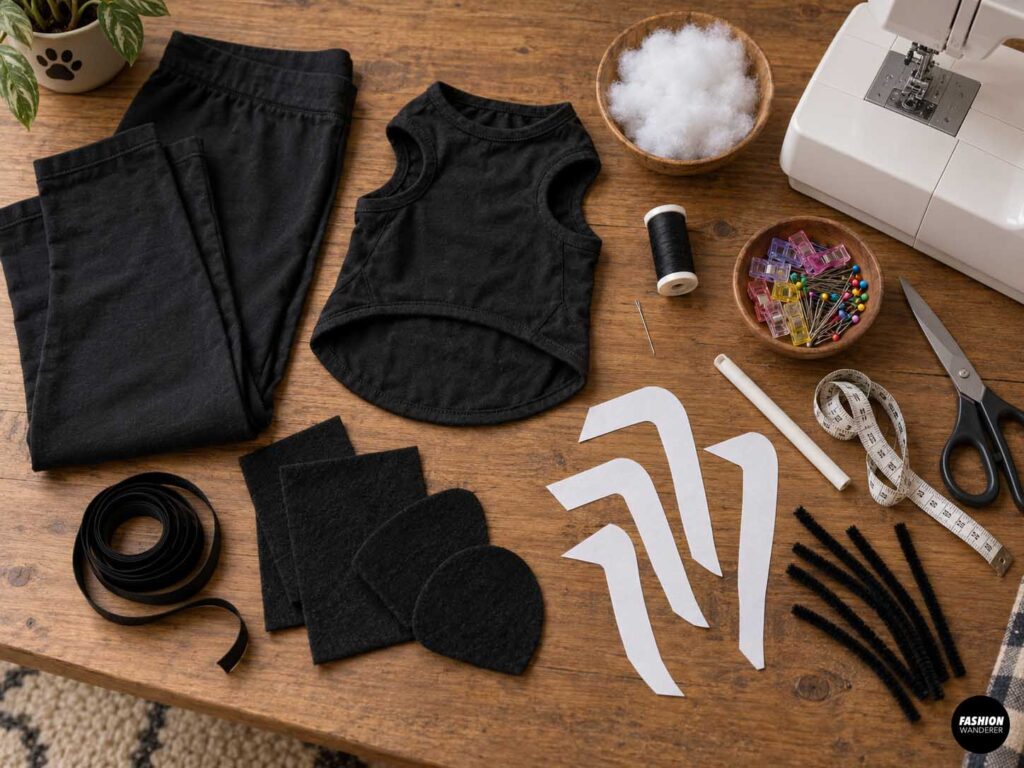
To make your DIY spider dog costume, gather:
- 1 old pair of black leggings
- 1 black dog shirt, lightweight sweatshirt, or comfortable harness-style base
- Polyester fiberfill
- Black polyester thread
- Sewing machine
- Hand-sewing needle
- Fabric scissors
- Pins or sewing clips
- Fabric marker or tailor’s chalk
- Measuring tape
- Paper for making a spider-leg template
- Black ribbon, elastic cord, or sturdy thread
- Optional black felt for reinforcing attachment areas
- Optional pipe cleaners or lightweight flexible craft wire for shaping the legs
Choose lightweight materials whenever possible. A Halloween costume should never feel heavy or restrict your dog’s natural movement.
Easy Dog Spider Costume From Old Black Leggings
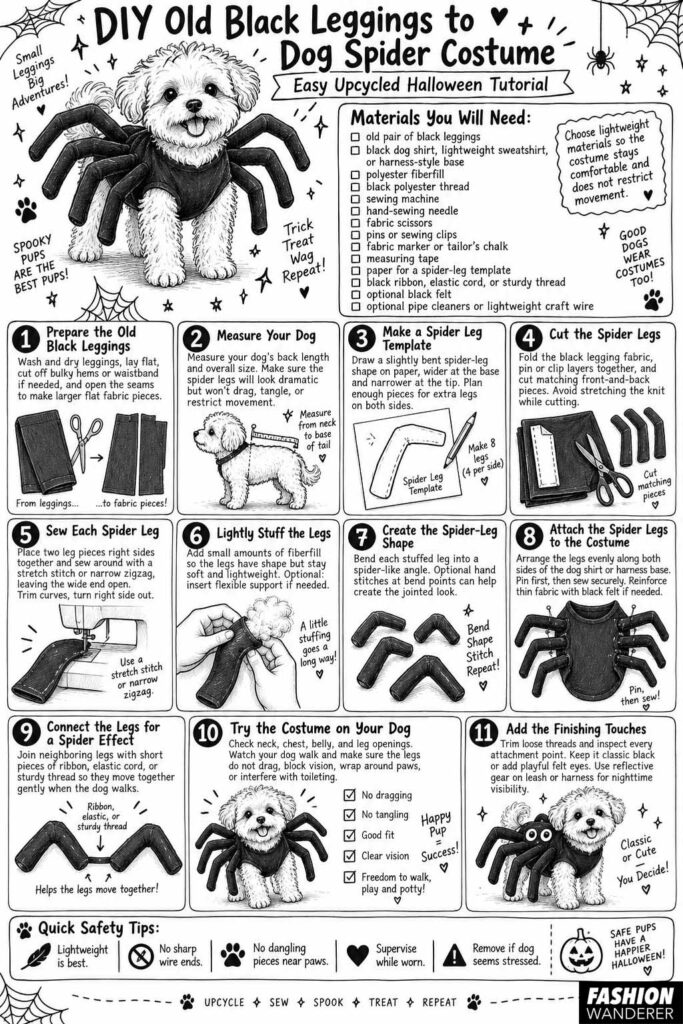
Step 1: Prepare the Old Black Leggings
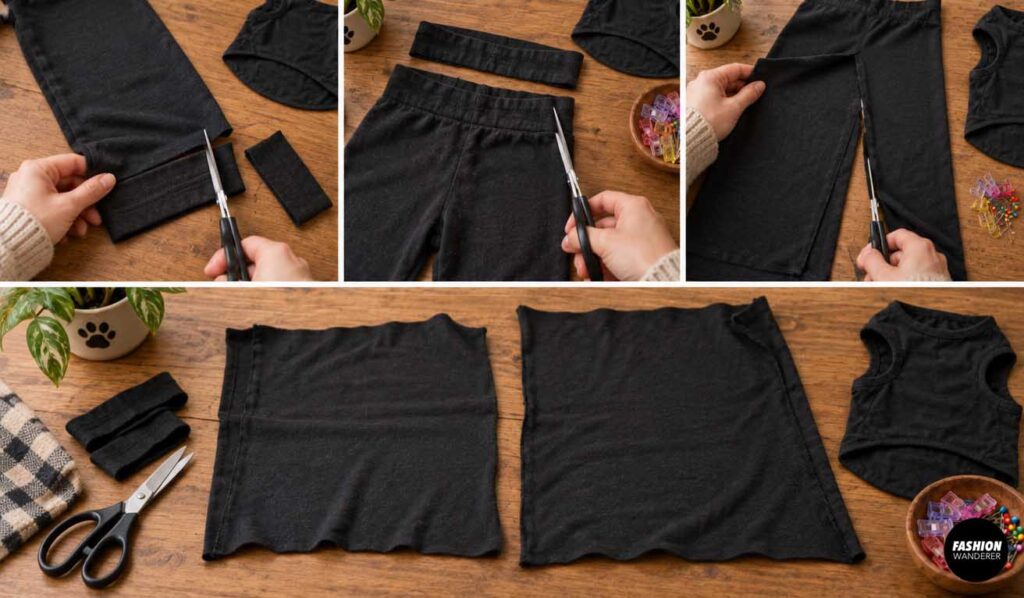
Wash and dry the leggings before beginning.
Lay them flat on your work surface and inspect the fabric. Small holes or worn knees usually aren’t a problem because you can position your spider-leg pieces around damaged areas.
Cut away bulky ankle hems and the waistband if necessary. Next, open the leggings along their seams so you have larger flat sections of black stretch fabric.
Don’t worry if the material curls slightly after cutting. That’s common with knit fabrics.
Step 2: Measure Your Dog
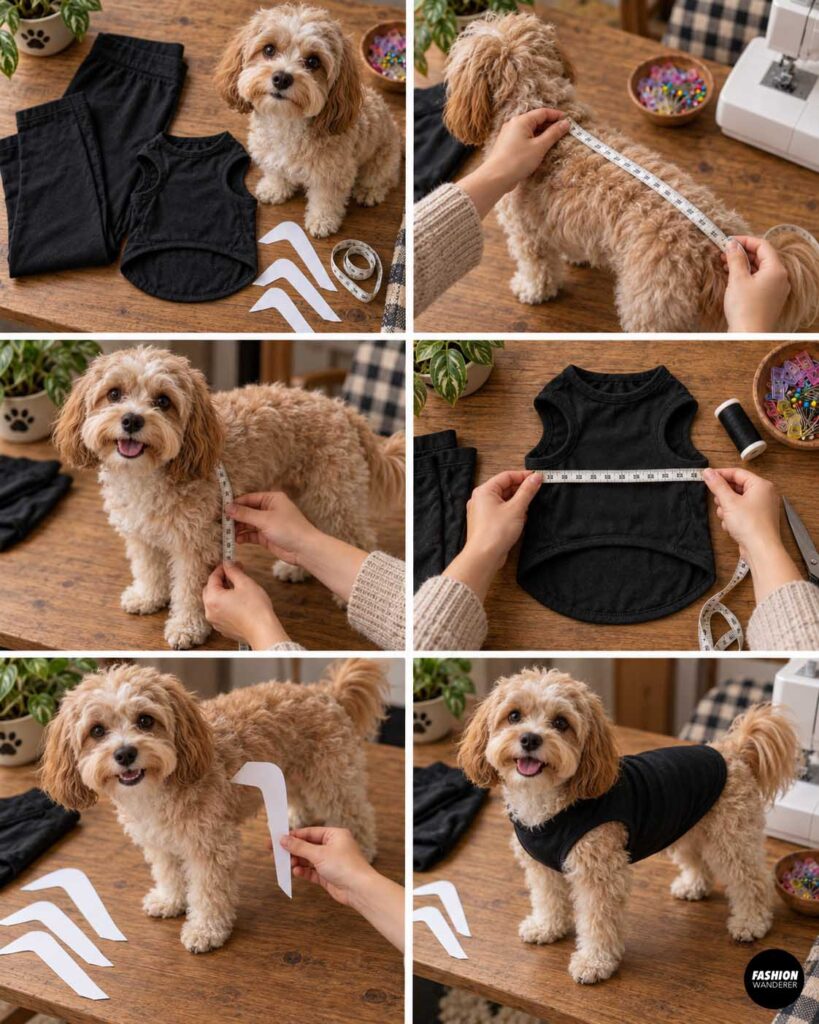
Before creating the spider legs, check the size of your dog.
Measure along the dog’s back from approximately the shoulder area toward the base of the tail. Also consider your dog’s height and leg length.
The spider legs should look dramatic without being so long that they touch the ground, become tangled around your dog’s legs, or catch on furniture.
For a small dog, shorter lightweight legs usually work best. A larger dog can comfortably carry slightly longer spider legs.
Step 3: Make a Spider Leg Template
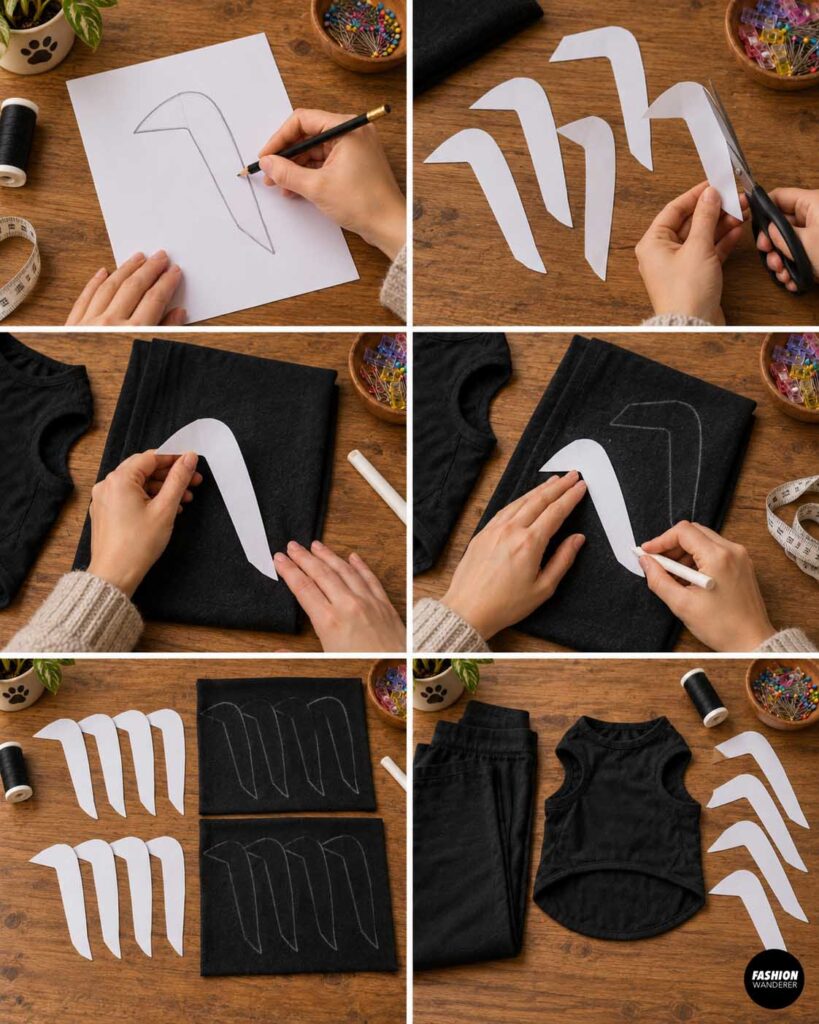
Draw a simple spider leg onto paper.
Instead of making each leg perfectly straight, create a slightly angled or bent shape. This gives the finished costume a more recognizable spider silhouette.
Make the leg wider where it attaches to the body and gradually narrower toward the tip.
Place the paper template on your prepared legging fabric and trace around it.
You’ll need enough fabric to create four additional spider legs on each side for the classic eight-leg spider appearance. Remember that your dog’s own legs will still be visible underneath, so you can also use fewer costume legs if that creates a lighter, more comfortable design.
Step 4: Cut the Spider Legs
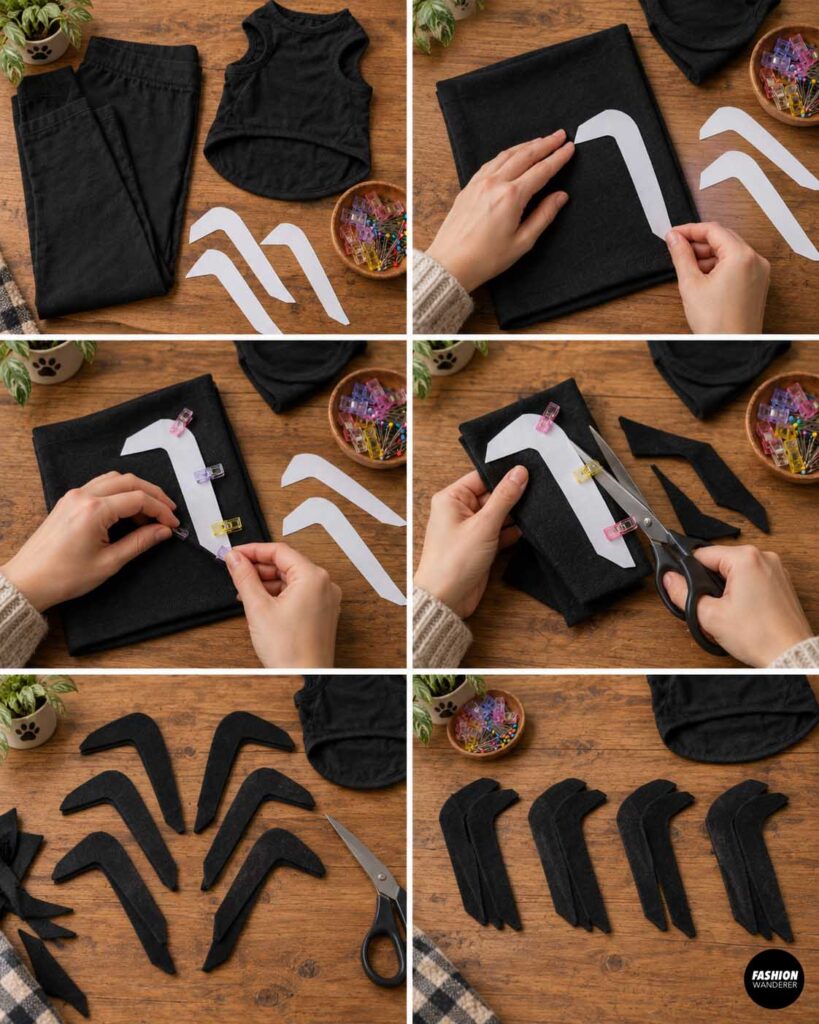
Fold the black legging fabric so you can cut two matching layers at once.
Pin or clip the layers together and cut around your template.
Repeat until you have matching front-and-back pieces for each stuffed leg.
Because leggings are stretchy, avoid pulling the fabric while cutting. Let it rest naturally on the table so all your spider legs remain approximately the same size.
Step 5: Sew Each Spider Leg
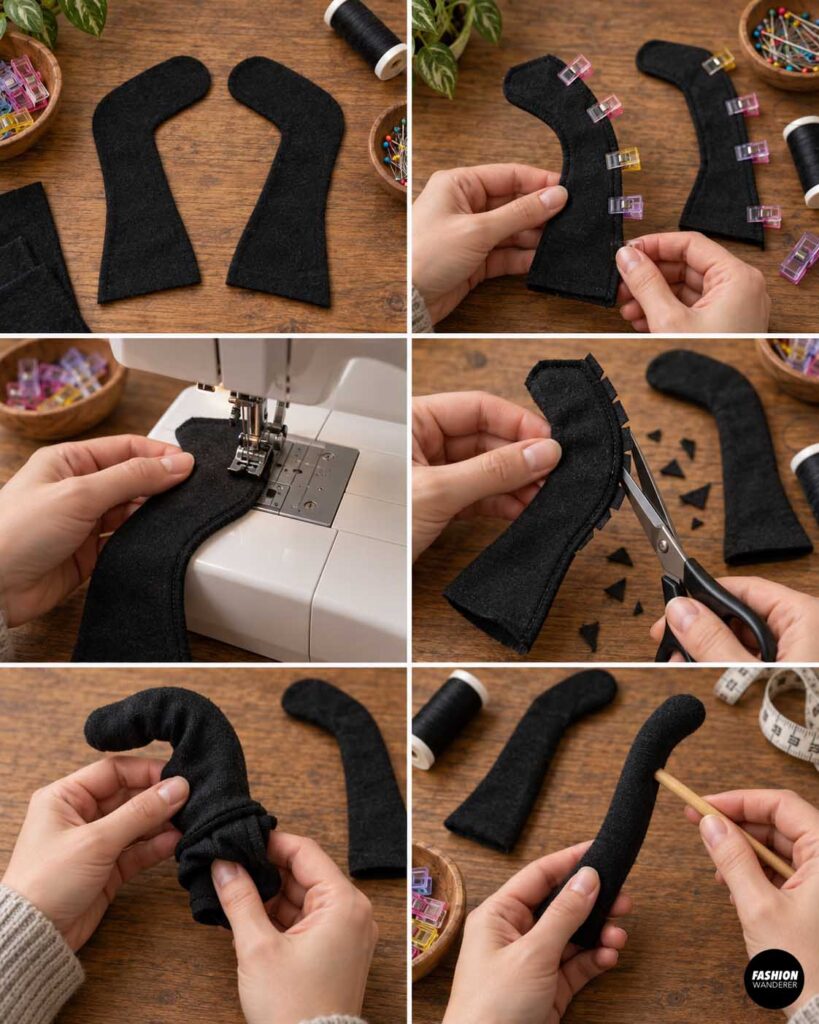
Place two matching spider-leg pieces right sides together.
Pin or clip around the edges.
Using a stretch stitch, narrow zigzag stitch, or another stitch suitable for knit fabric, sew around the leg approximately 1/4 inch from the raw edge.
Leave the wide end open for turning and stuffing.
Trim excess fabric around tight curves if necessary, being careful not to cut through your stitching.
Turn the spider leg right side out.
A chopstick, point turner, or other blunt tool can help gently push out narrow sections.
Step 6: Lightly Stuff the Legs
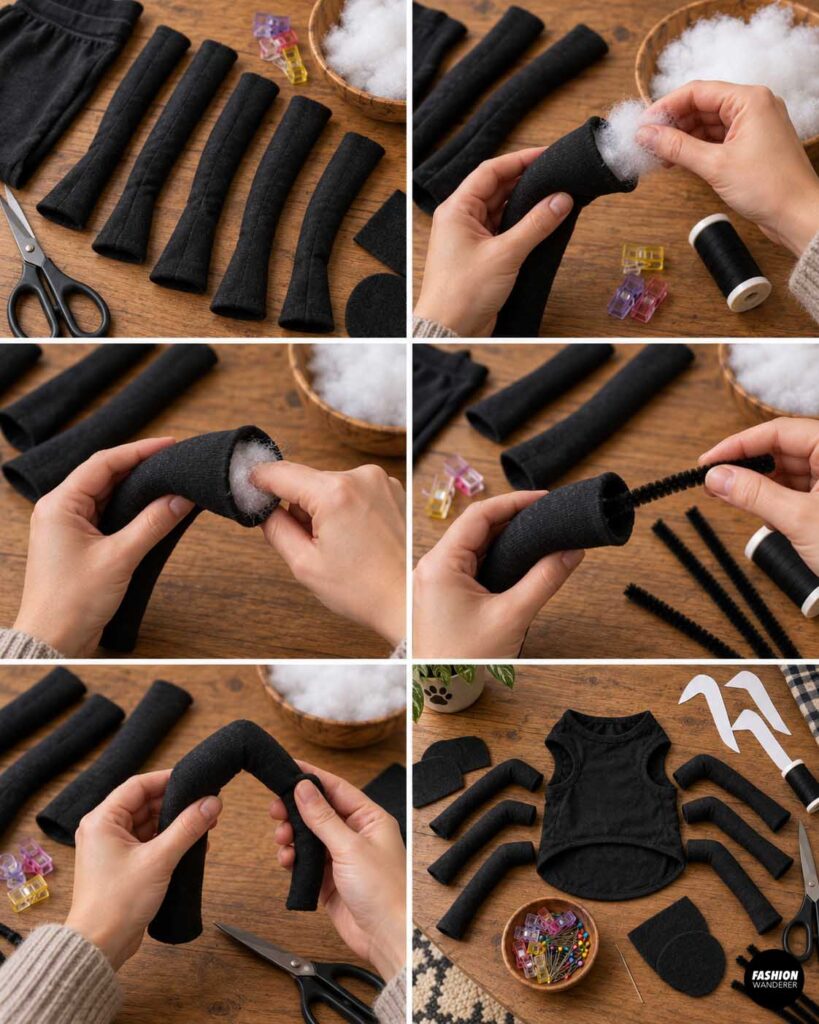
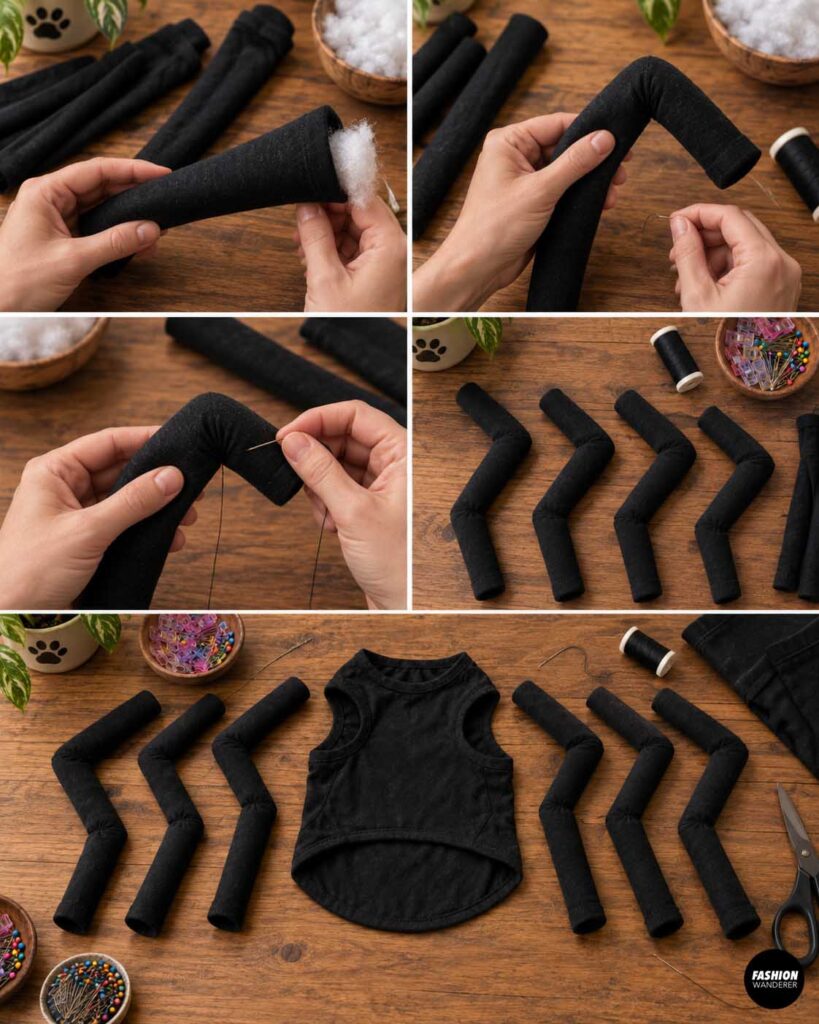
Add small amounts of polyester fiberfill through the open end.
The goal is to give each leg dimension—not make it rock-hard.
Light stuffing allows the spider legs to move and bounce naturally while keeping the costume comfortable.
If you’d like more defined bends, place a lightweight flexible support inside the leg before finishing. However, skip rigid materials or anything with sharp ends that could poke your dog.
Repeat until all the spider legs are filled evenly.
Step 7: Create the Spider-Leg Shape
Here’s the fun part!
Bend each stuffed leg slightly so it resembles a spider’s jointed legs.
You can also create the illusion of joints without internal supports. Hand-stitch a small section at the desired bend, gently pulling the fabric inward. This creates an angled shape while keeping the leg soft.
Arrange all the legs on your table before attaching them. This lets you compare their angles and make adjustments.
Step 8: Attach the Spider Legs to the Costume
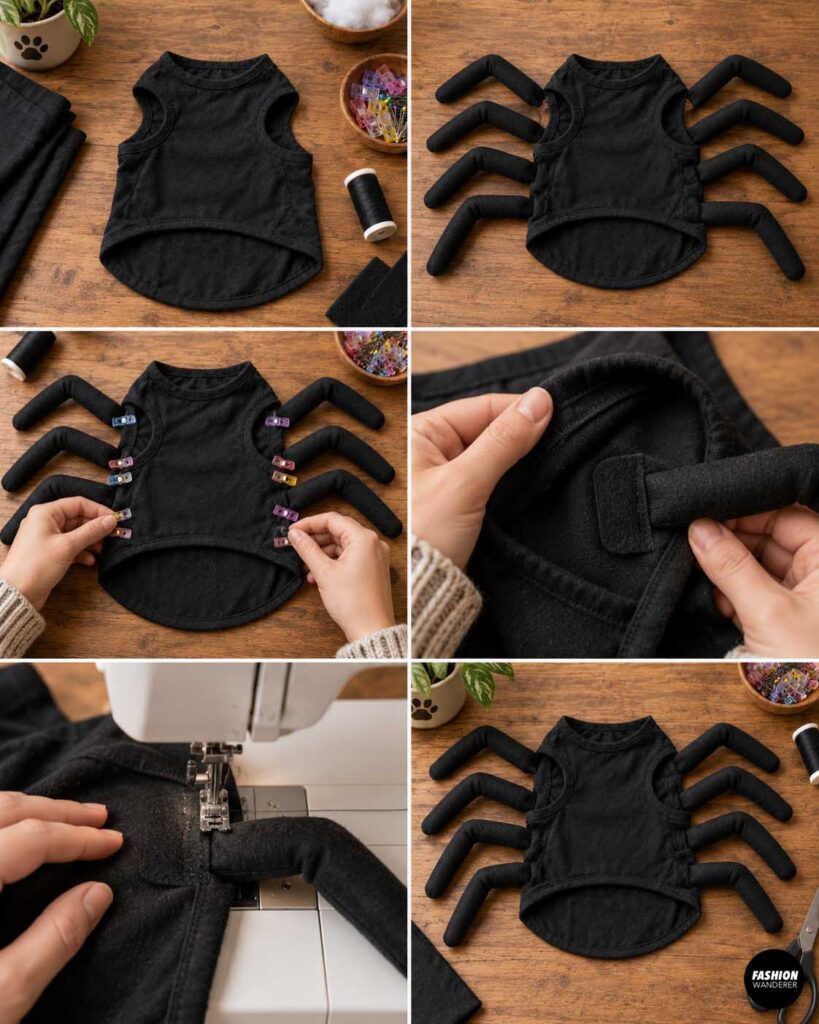
Place the black dog shirt or harness-style base flat on your work surface.
Arrange the spider legs along both sides of the back.
Pin or hand-baste them temporarily before permanently sewing. Try to keep the arrangement balanced from side to side.
Stitch each leg securely to the costume base. Sew over the attachment point several times because this area receives the most movement.
For thin knit shirts, add a small patch of black felt inside the garment to reinforce each attachment area.
Step 9: Connect the Legs for a Spider Effect
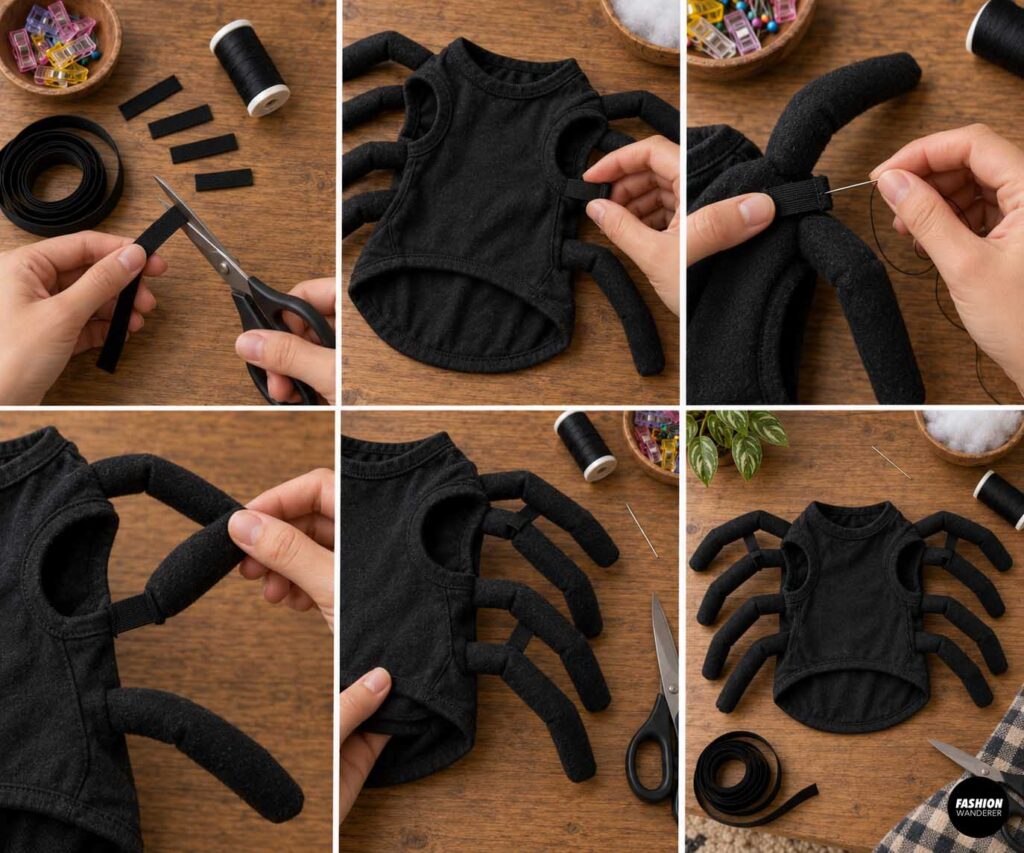
Want the spider legs to move together?
Connect neighboring legs with short pieces of black ribbon, elastic cord, or sturdy thread.
When your dog walks, the connected legs will gently move along with the costume.
Keep these connections short and positioned well away from your dog’s natural legs. Nothing should dangle low enough to become tangled around paws.
Step 10: Try the Costume on Your Dog
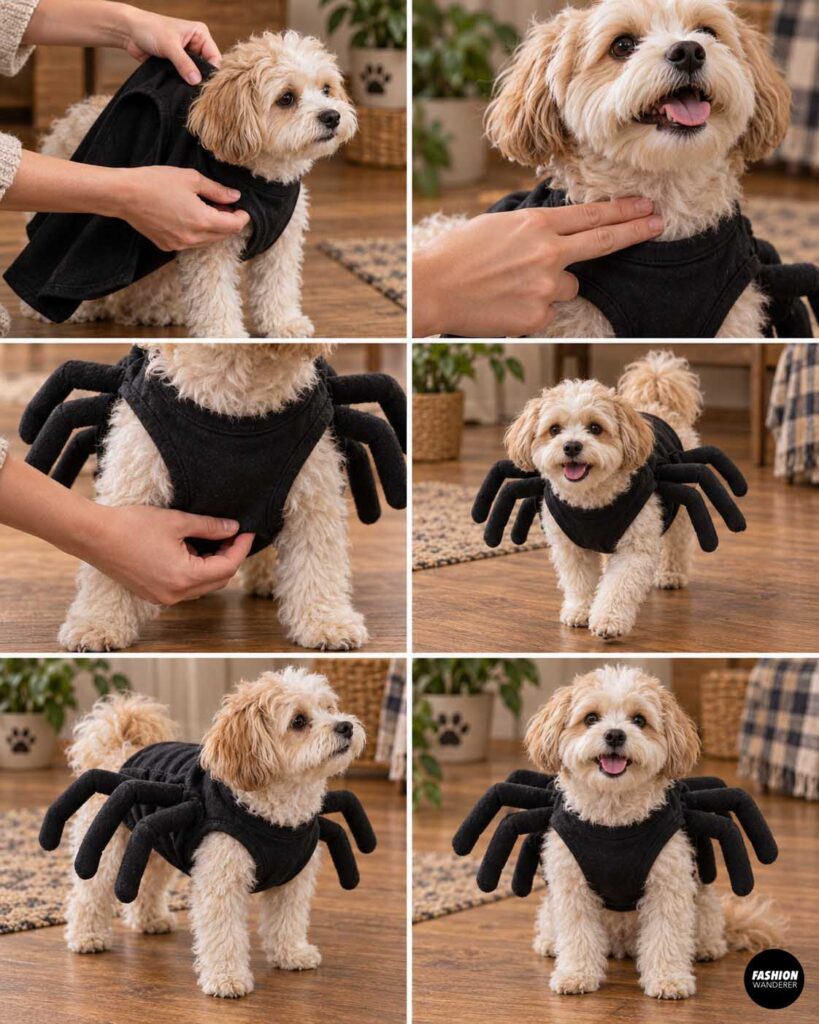
Before Halloween, do a short fitting.
Check the neck, chest, belly, and leg openings. You should be able to comfortably slide your fingers between the costume and your dog’s body.
Let your dog walk around indoors while you watch how the spider legs move.
Make sure they don’t:
- Drag on the floor
- Block your dog’s vision
- Wrap around the natural legs
- Interfere with walking or toileting
- Cover or restrict a collar or harness needed for safe control
If your dog freezes, repeatedly scratches at the costume, tries to bite the spider legs, or appears uncomfortable, remove it and simplify the design.
Step 11: Add the Finishing Touches
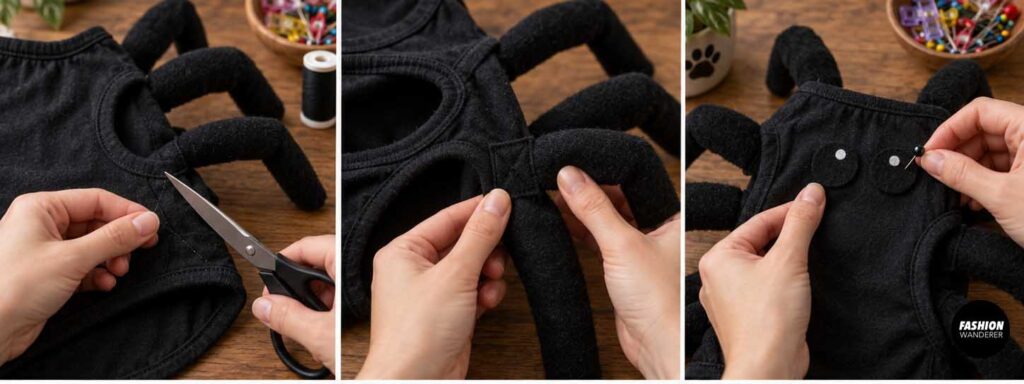
Trim loose threads and check every attachment point.
You can keep the costume completely black for a classic spooky spider or add lightweight felt eyes to the back for a playful Halloween look.
For nighttime trick-or-treating, consider adding reflective trim to the dog’s regular harness or leash rather than relying on the dark costume for visibility.
And you’re finished!
Turn Old Clothes Into an Adorable Halloween Costume
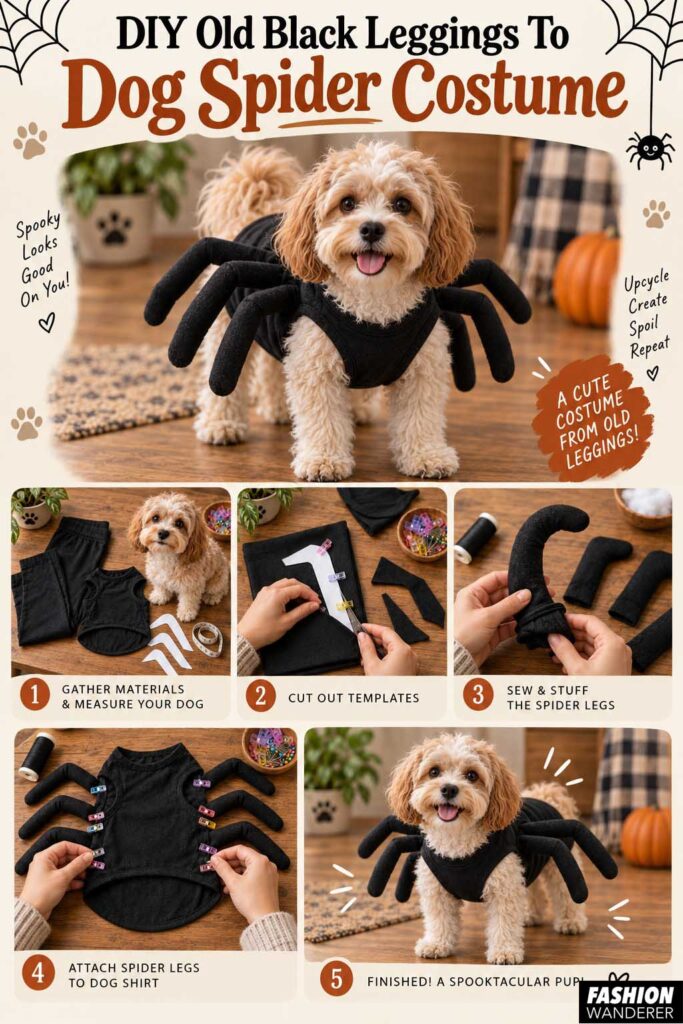
This DIY old black leggings to dog spider costume proves that a great Halloween project doesn’t have to start at the fabric store. An unwanted pair of leggings can become an entirely new costume with just a few basic sewing supplies.
It’s also an excellent project for beginner sewists because the individual spider legs are small and forgiving. Even slightly different leg shapes can make your homemade spider look more quirky and fun.
The best part? Every time your dog walks, those lightweight stuffed legs wiggle along beside them.
So before tossing those old black leggings into the donation pile, give them one more Halloween adventure. Your eight-legged—or technically more-than-eight-legged—little monster might just steal the show.