
If you have a handful of orange, cream, tan, or brown fabric scraps left over from fall sewing projects, don’t toss them. In about 20 minutes, you can turn those scraps into an adorable pumpkin pie dog bandana that is perfect for Thanksgiving walks, family photos, or holiday dinner at home.
This easy Thanksgiving dog bandana DIY is a beginner-friendly fall pet upcycle project that uses small pieces of fabric, so it is ideal for reducing waste while making something cute and useful. The design is inspired by a slice of pumpkin pie, with a warm orange body, a tan “crust” edge, and an optional cream “whipped cream” detail.
Because the bandana is made from fabric scraps, every version will look a little different. You can use plaid, corduroy, cotton, flannel, canvas, or even an old fall shirt. The key is choosing warm autumn colors and keeping the finished bandana lightweight and comfortable for your dog.
Why Make a Pumpkin Pie Dog Bandana?
Dog bandanas are one of the easiest pet sewing projects because they require very little fabric and only a few straight seams.
This version is especially fun for Thanksgiving because the shape naturally works with the pumpkin pie theme. The pointed end of the bandana becomes the pie slice, while the top edge acts like the crust.
It is also a practical scrap-busting project. Even small leftover pieces can be used for the crust strip, whipped cream accent, or patchwork details.
If you are new to sewing pet accessories, this is a great place to start.
Materials You’ll Need
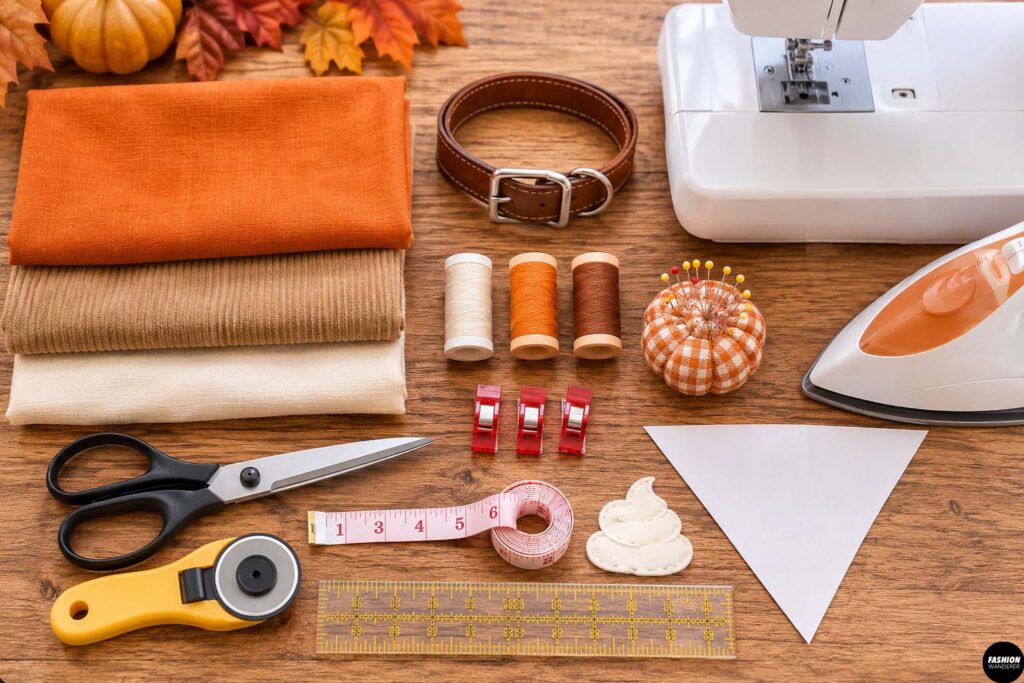
For this 20-minute Thanksgiving dog bandana, gather:
- Orange fabric scrap for the pumpkin pie filling
- Tan or brown fabric scrap for the crust
- Cream or white fabric scrap for whipped cream, optional
- Matching or coordinating thread
- Fabric scissors or rotary cutter
- Sewing machine
- Pins or sewing clips
- Iron and ironing board
- Ruler or measuring tape
- Your dog’s collar for sizing
Cotton and flannel are easiest for beginners, but lightweight corduroy also works beautifully for a cozy fall look.
DIY Pumpkin Pie Dog Bandana
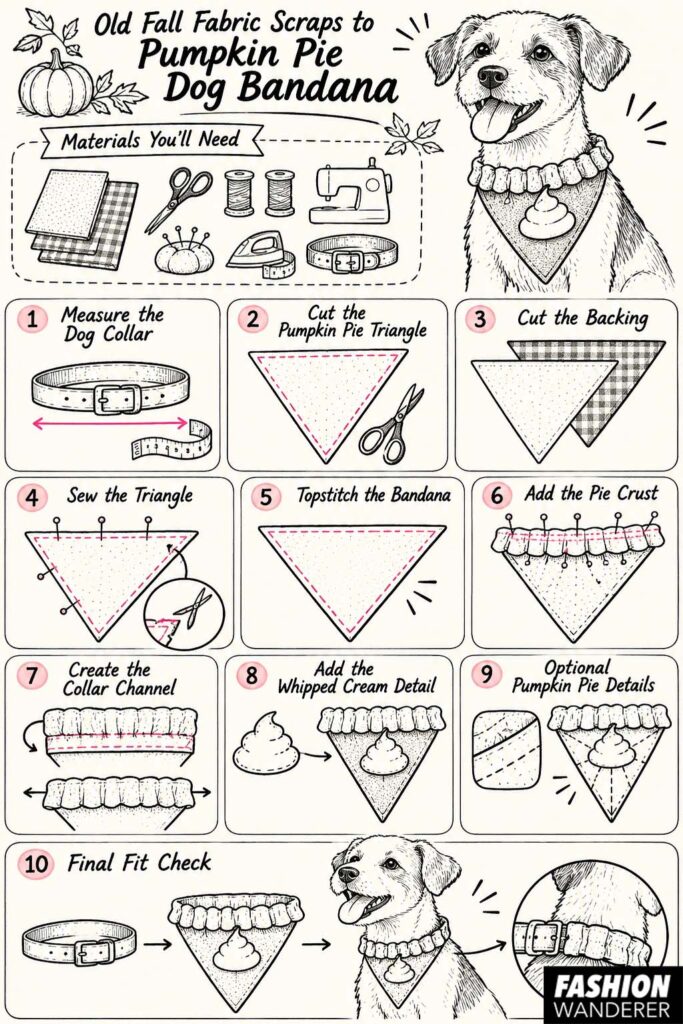
Step 1: Measure the Dog Collar
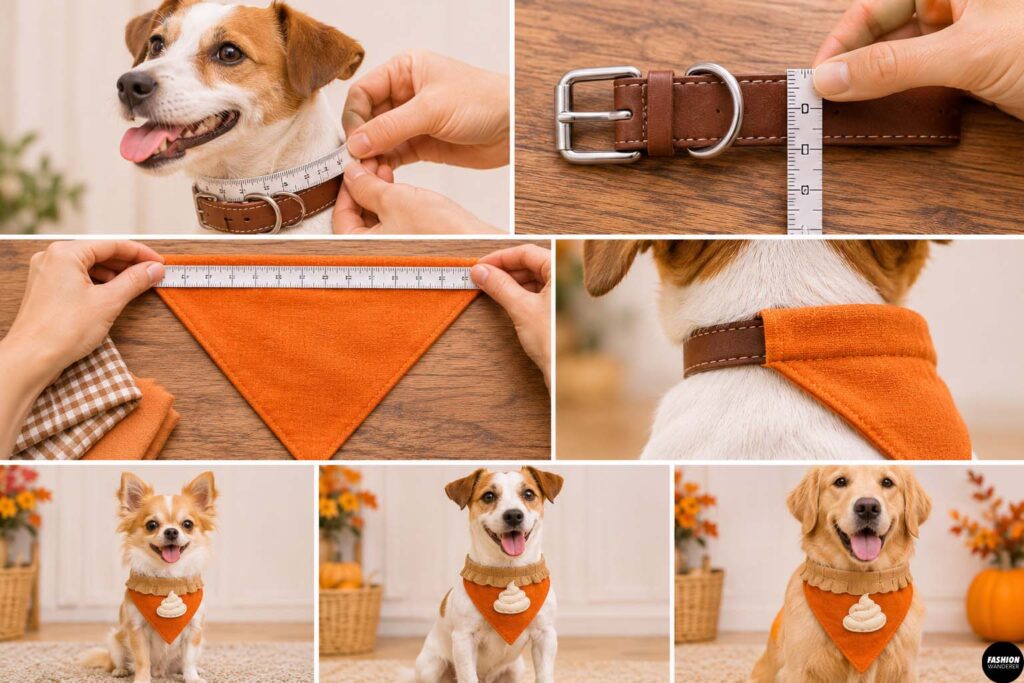
Measure the width of your dog’s collar and note the length you want the bandana to cover.
For a simple over-the-collar design, the top edge of the bandana should be slightly shorter than the collar length so it sits comfortably without wrapping too far around the neck.
A good starting point is:
- Small dog: 5 to 7 inches wide
- Medium dog: 7 to 10 inches wide
- Large dog: 10 to 13 inches wide
The exact size is flexible because this project is designed to slide over the collar rather than tie around the neck.
Step 2: Cut the Pumpkin Pie Triangle
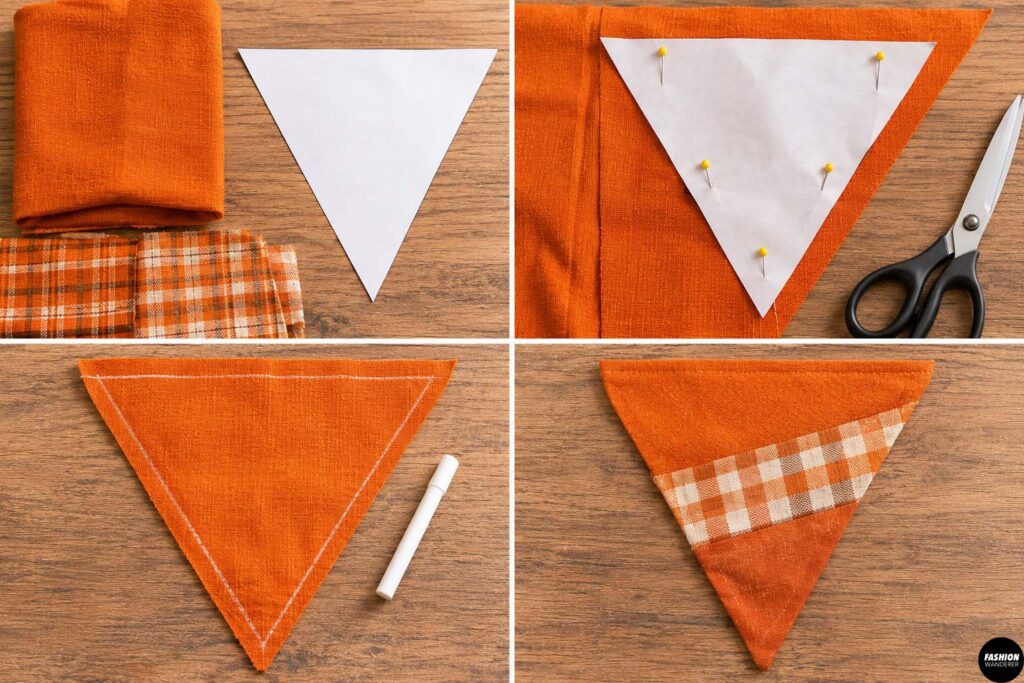
Cut an orange triangle for the main pie section.
You can make the triangle symmetrical or slightly wider at the top for a fuller pie-slice look.
Add about 1/2 inch seam allowance around the edges.
If your orange scrap is too small, piece two or three scraps together first and then cut the triangle. This gives the bandana a fun patchwork look and makes the project even more zero-waste.
Step 3: Cut the Backing
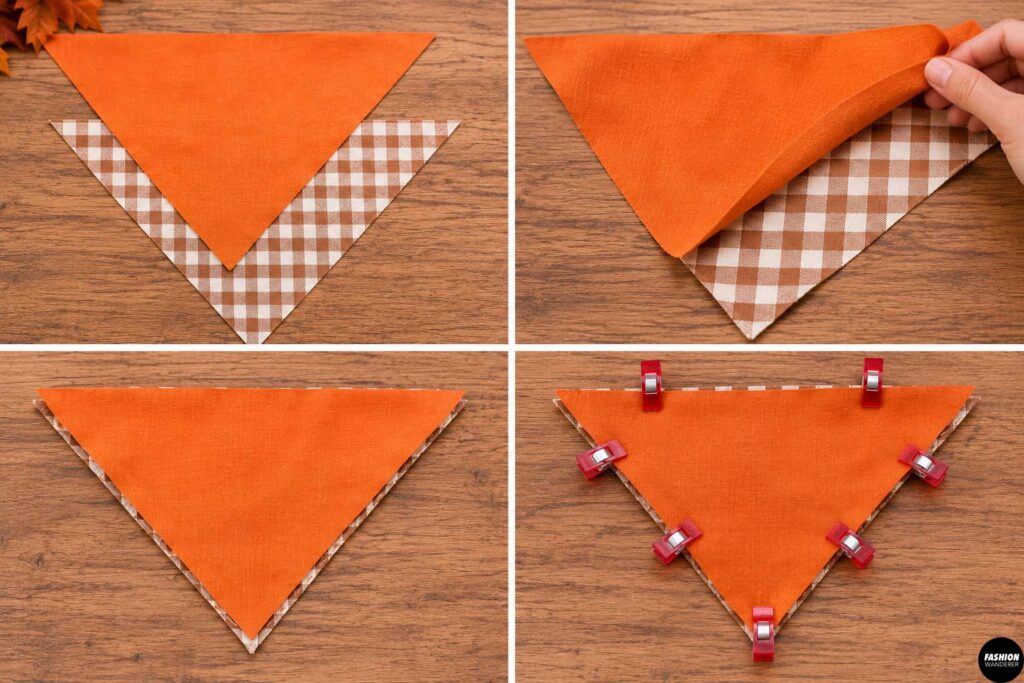
Use the orange triangle as a template and cut a second triangle from a coordinating scrap.
This backing fabric can be orange, plaid, cream, or brown.
Place the two triangles right sides together.
Pin or clip around the edges.
Step 4: Sew the Triangle
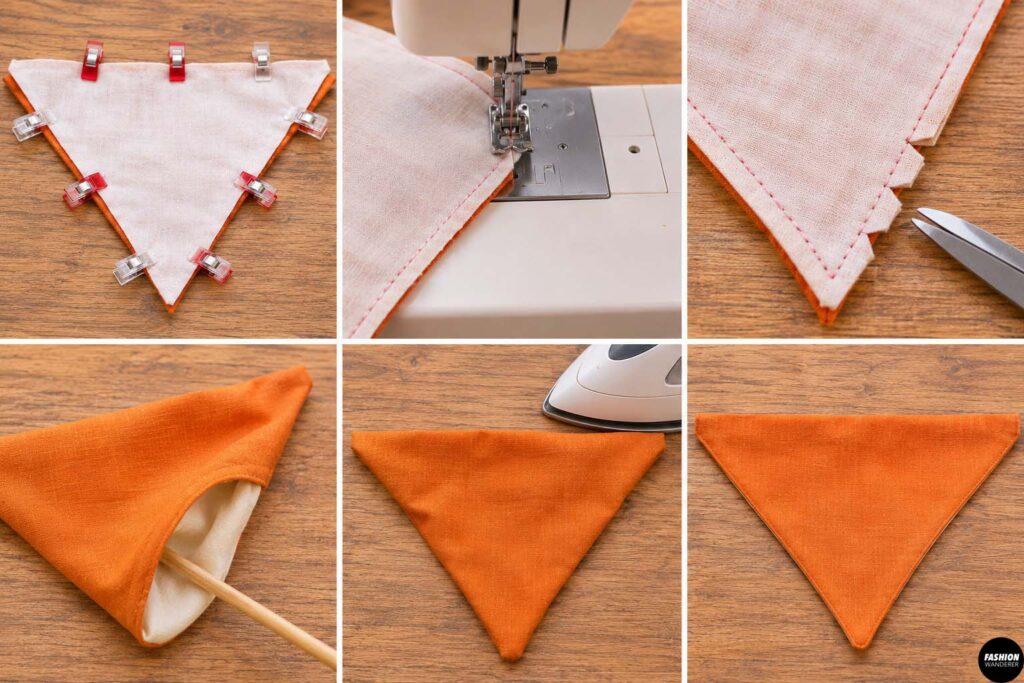
Sew around the triangle using about a 1/4-inch seam allowance.
Leave a small opening along one side for turning.
Clip the point carefully without cutting through the stitches.
Turn the bandana right side out and use a blunt tool or chopstick to gently push out the point.
Press flat.
Step 5: Topstitch the Bandana
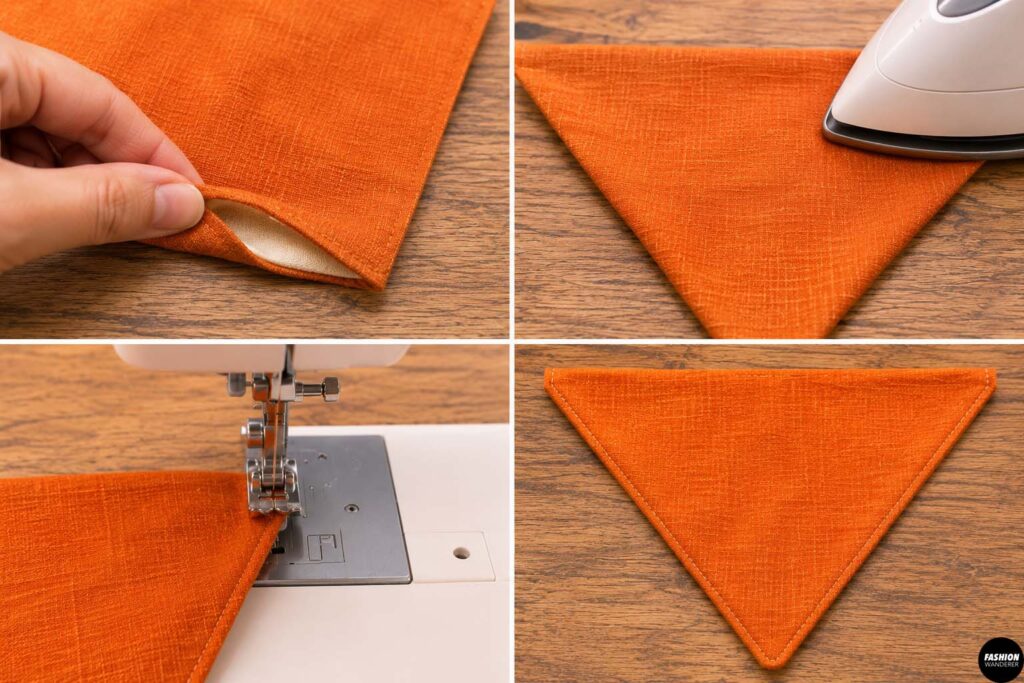
Fold the opening inward and press.
Topstitch around the entire triangle about 1/8 inch from the edge.
This closes the turning opening and gives the bandana a neat, finished look.
At this stage, you already have a basic Thanksgiving dog bandana.
Step 6: Add the Pie Crust
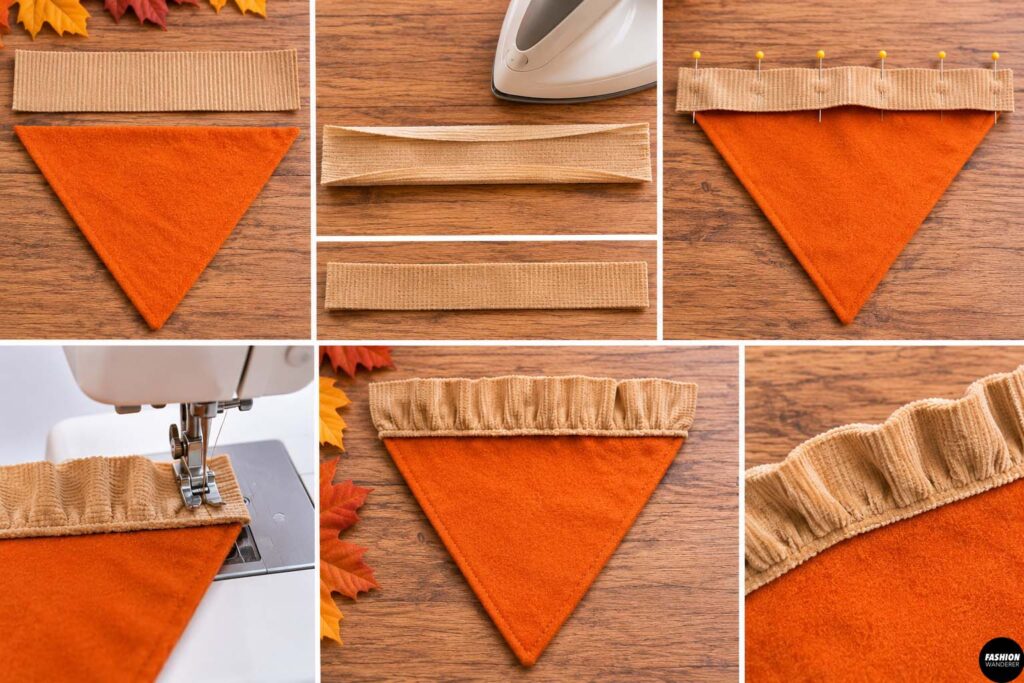
Cut a long strip of tan or brown fabric for the pumpkin pie crust.
The strip should be slightly wider than the top edge of the bandana.
Fold the long edges inward and press.
Place the crust strip across the top edge of the orange triangle and stitch it in place.
For extra texture, lightly gather or pleat the strip before sewing.
This makes the crust look puffier and more realistic.
You can also use corduroy or textured fabric for the crust to make the detail stand out.
Step 7: Create the Collar Channel
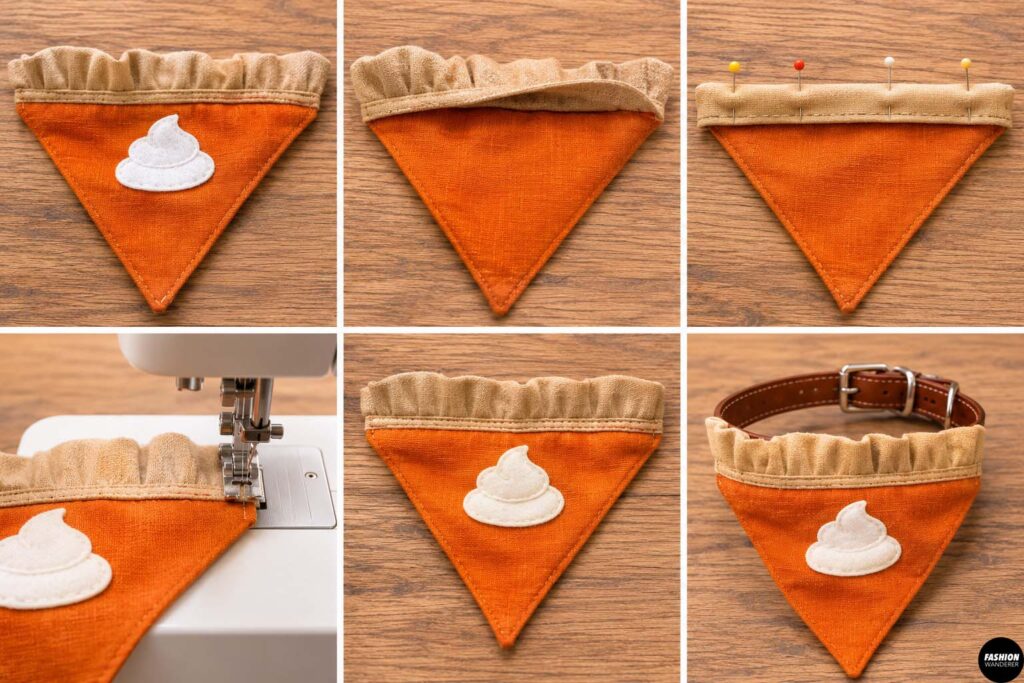
To make the bandana slide over the dog’s collar, fold the crust section toward the back.
Leave enough space for the collar to pass through easily.
A simple rule is to make the channel about 1/2 inch wider than the collar itself.
Pin and sew across the lower edge of the folded section.
Do not sew the side openings closed.
Test the collar by sliding it through the channel.
It should move smoothly without bunching.
Step 8: Add the Whipped Cream Detail
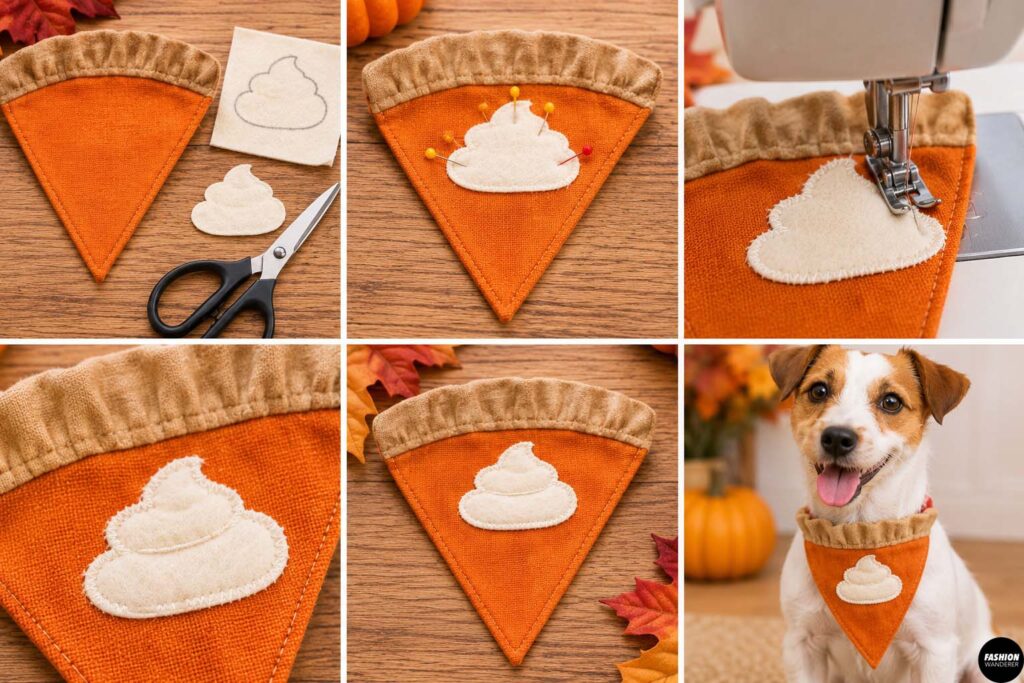
For an extra cute Thanksgiving touch, make a small whipped cream applique.
Cut a small cream or white fabric scrap into a rounded cloud or swirl shape.
Place it near the center or top of the pumpkin pie section.
Pin it in place and stitch around the edges using a small zigzag stitch or straight stitch.
You can also use felt for this detail because felt does not fray.
Keep the applique flat and securely attached so your dog cannot easily pull it off.
Step 9: Add Optional Pumpkin Pie Details
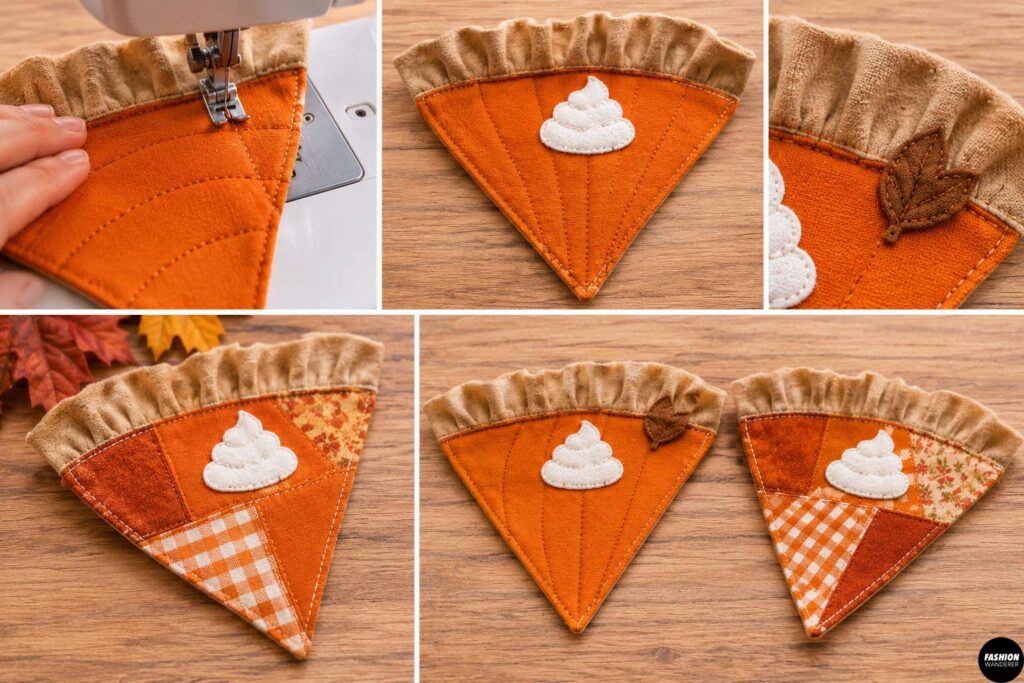
If you want the bandana to look even more like pumpkin pie, add a few subtle details.
You can stitch curved lines across the orange section using darker orange thread, add a tiny brown patch near the crust, or piece several orange scraps together for a handmade patchwork effect.
Avoid beads, buttons, sequins, or loose embellishments on pet accessories.
Flat sewn details are safer and more comfortable.
Step 10: Final Fit Check
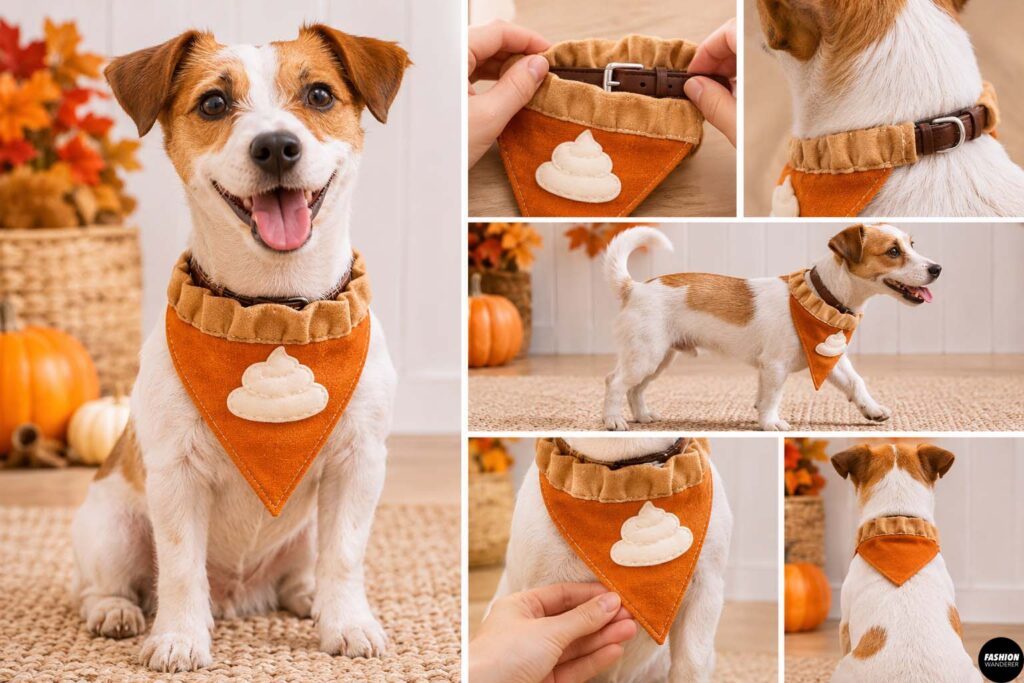
Slide the finished bandana onto your dog’s collar.
Fasten the collar normally and check the fit.
The bandana should lie flat against the chest without restricting movement.
Make sure it does not hang so low that the dog can step on it.
If needed, shorten the point or adjust the collar channel.
Once the fit looks good, your pumpkin pie dog bandana is ready for Thanksgiving.
Easy Fabric Scrap Variations
One of the best things about this project is that you can adapt it to whatever scraps you have.
Try orange plaid for a rustic farmhouse version, burnt orange corduroy for a cozy vintage look, or patchwork flannel for a more casual handmade style.
You could also make coordinating bandanas for multiple pets using the same scrap collection.
For family photos, use leftover fabric from kids’ Thanksgiving outfits to create matching pet accessories.
Tips for Sewing Dog Bandanas
Prewash fabric whenever possible so it does not shrink later.
Press after each sewing step for cleaner edges and easier stitching.
Use lightweight fabrics so the bandana stays comfortable.
Most importantly, check the finished piece regularly for loose threads or damaged seams.
Pet accessories should always be worn under supervision.
Final Thoughts
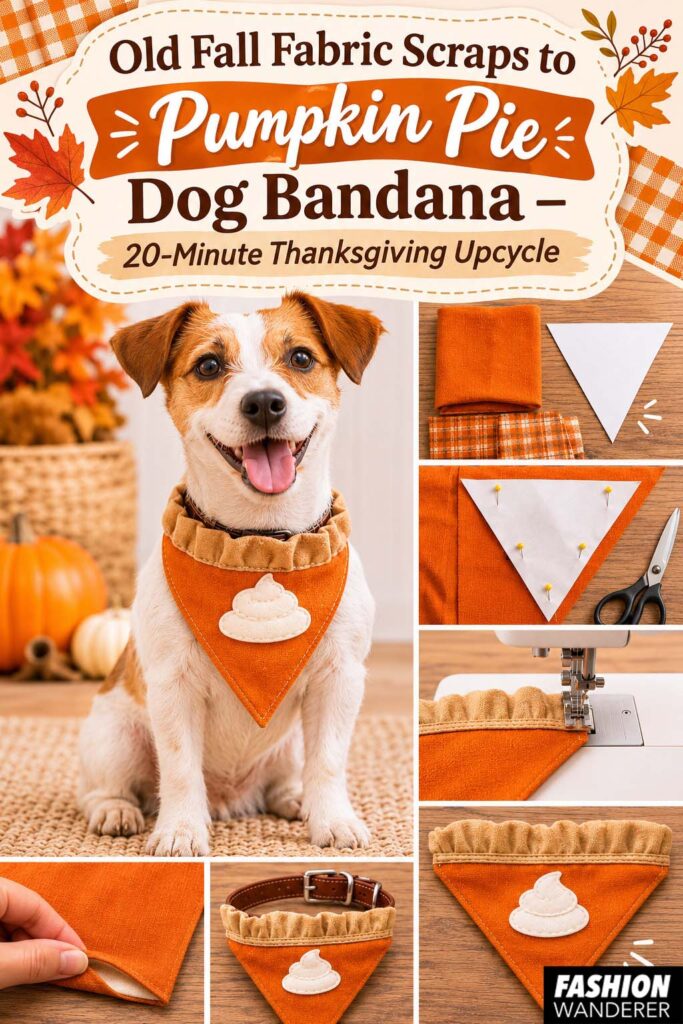
Turning old fall fabric scraps into a pumpkin pie dog bandana is a quick, inexpensive way to make your pet part of the Thanksgiving celebration.
This project takes about 20 minutes, uses very little fabric, and is easy enough for beginners. It is also a smart way to use leftover orange, tan, brown, cream, plaid, or corduroy scraps that might otherwise end up in the trash.
With a simple triangle, a pie-crust strip, and an optional whipped cream applique, you can create a festive DIY Thanksgiving dog bandana that looks adorable in photos and feels completely unique.
Before buying a new holiday pet accessory, check your scrap basket first. You may already have everything you need to make the cutest slice of pumpkin pie at the Thanksgiving table.