
Jeans are a wardrobe staple, but finding the perfect inseam length can be a hassle—especially when your favorite pair is just a bit too long. Rather than lugging your jeans to a tailor or breaking out a sewing machine, you can hem your denim quickly and easily at home with no sewing required.
In this guide, we’ll explore several no-sew hemming techniques—from fusible hemming tape to fabric glue—so you can customize the length of your jeans in minutes.
Why You Should Try a No-Sew Hem
- Cost-Effective: Avoid tailor fees and invest in inexpensive hemming supplies instead.
- Speed: Get perfectly hemmed jeans in under 30 minutes.
- Versatility: Easily adjust or undo your hem if you change styles or sizes.
- Accessibility: No sewing skills or special equipment required—anyone can do it!
Materials You’ll Need (Per Pair of Jeans)
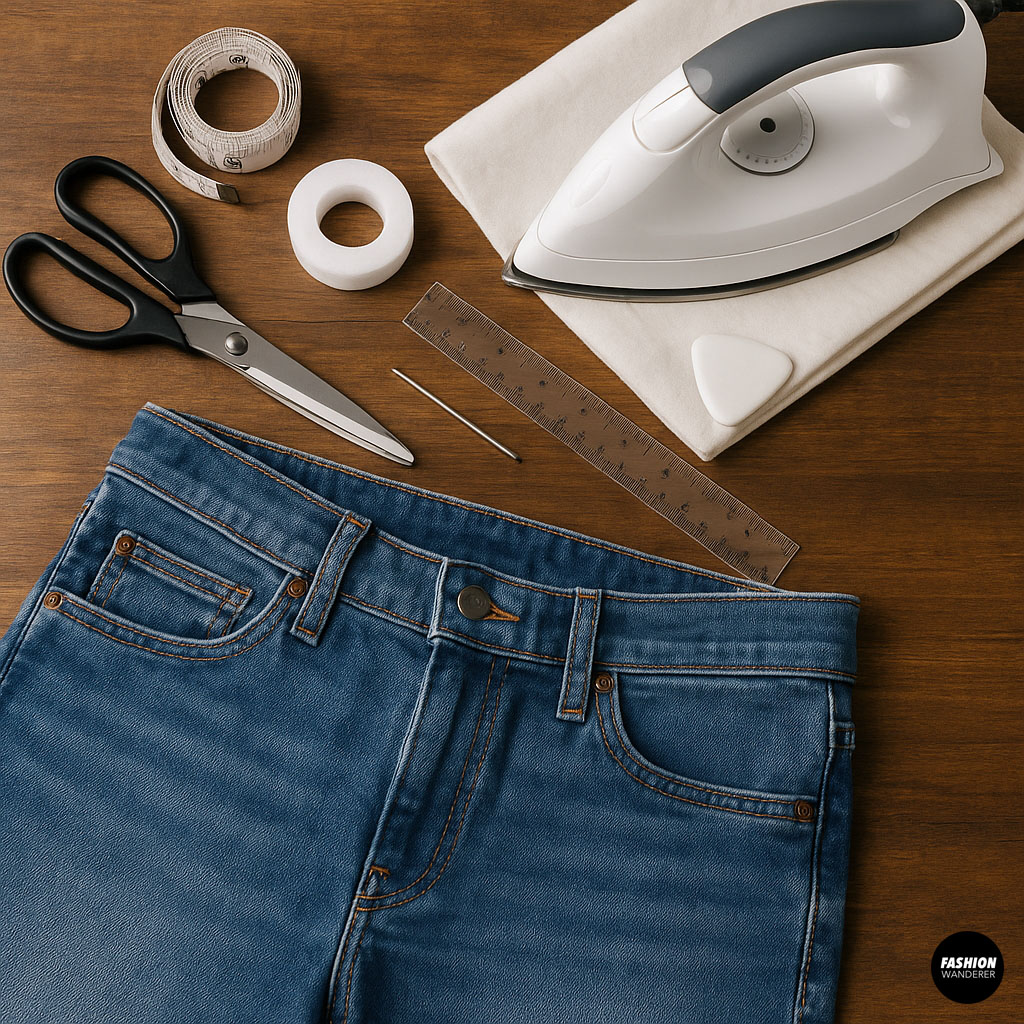

- Jeans that need hemming (any weight, any wash)
- Hemming tape (fusible tape designed for denim)
- Iron and ironing board
- Scissors (sharp fabric scissors recommended)
- Measuring tape or ruler
- Fabric chalk or marker
- Cloth or pressing cloth (to protect your jeans when ironing)
Optional Supplies:
- Fabric glue (for an alternate no-heat method)
- Double-sided fabric tape (for temporary holds)
- Styrofoam board or thick cardboard (slip inside pant leg to prevent glue leak-through)
Step-by-Step Tutorial: How to Hem Jeans Without Sewing
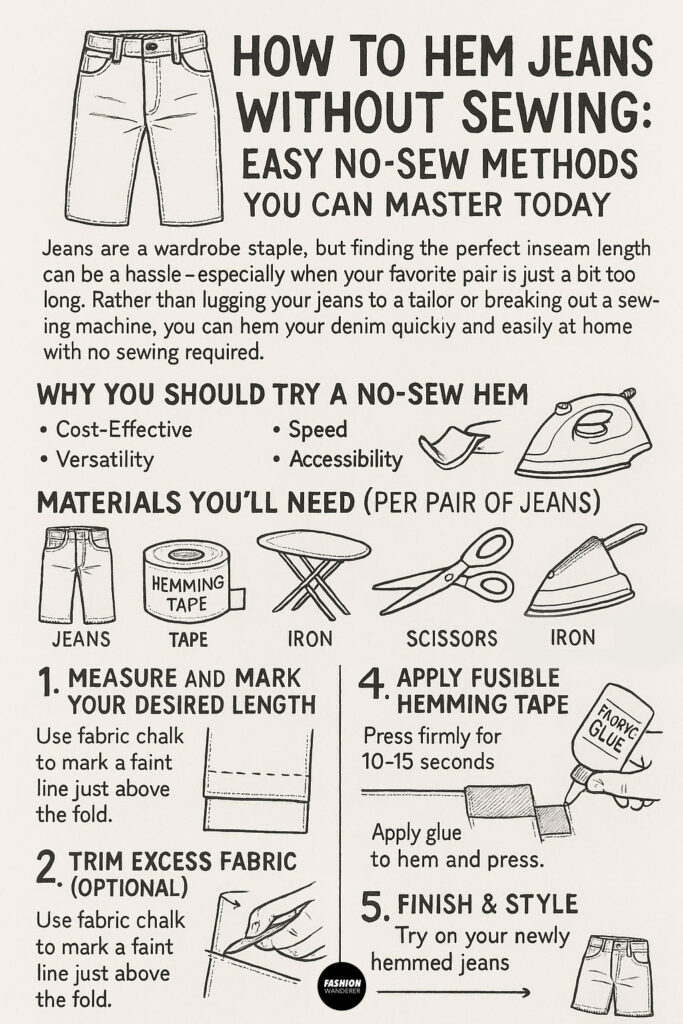
Step 1: Measure and Mark Your Desired Length
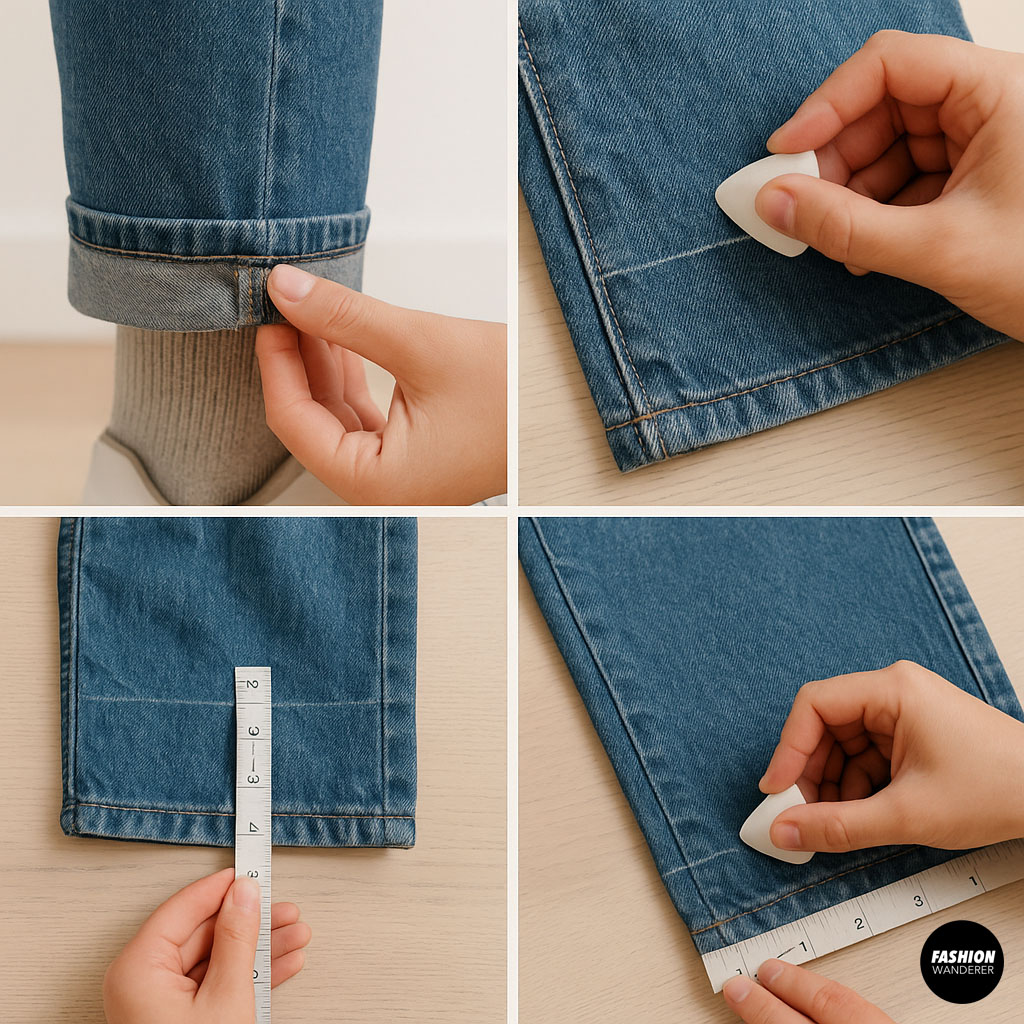
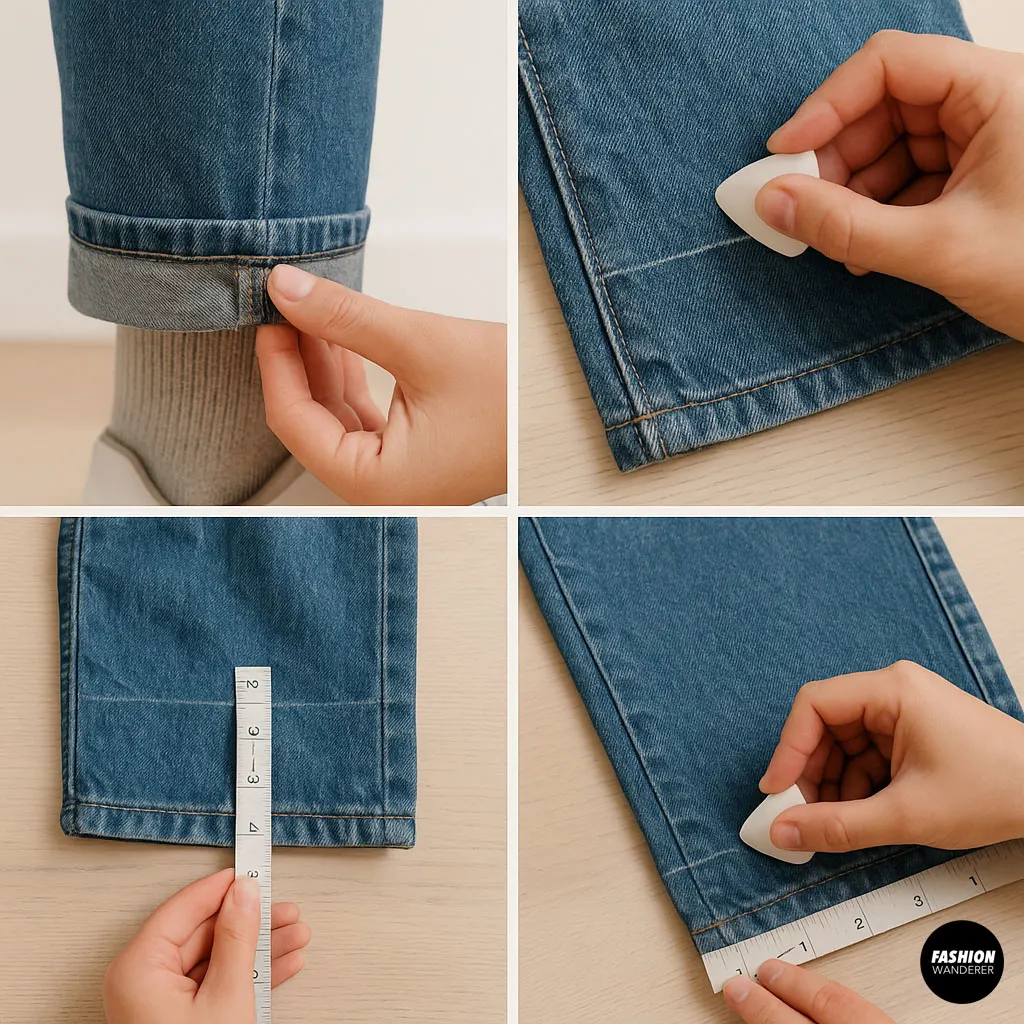
- Put on your jeans and fold up the hem to your ideal length. Most people hem just above the ankle or to a cropped length, depending on style.
- Use fabric chalk to mark a faint line just above the fold. Ensure both legs match by measuring from the crotch seam or side seam to the chalk mark.
- Remove your jeans and lay them flat. Draw a straight chalk line along the hem on each leg, using a ruler for precision.
Pro Tip: If you plan to retain the original hem as a “faux cuff,” mark your fold line 1–1.5 inches above where you want the final hem to sit after folding.
Step 2: Trim Excess Fabric (Optional)

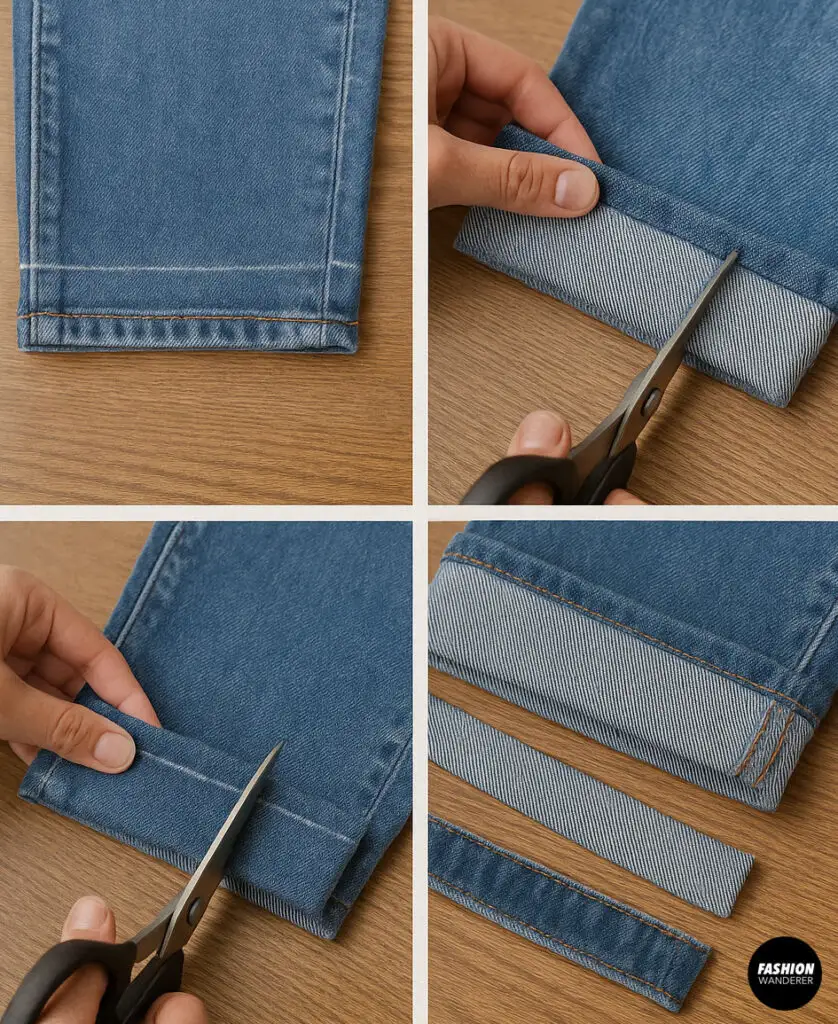
If your jeans are significantly longer than needed, you may want to cut off the bulk before applying tape:
- Fold jeans along the chalk line so the original hem lies flat against itself.
- Carefully trim the excess fabric below the original hem, leaving an extra ½ inch beyond the chalk line. This allowance makes it easier to apply tape without the raw edge visible.
Note: If you prefer a raw-edge look, skip trimming and simply fold up the full length. The tape will secure the fold in place.
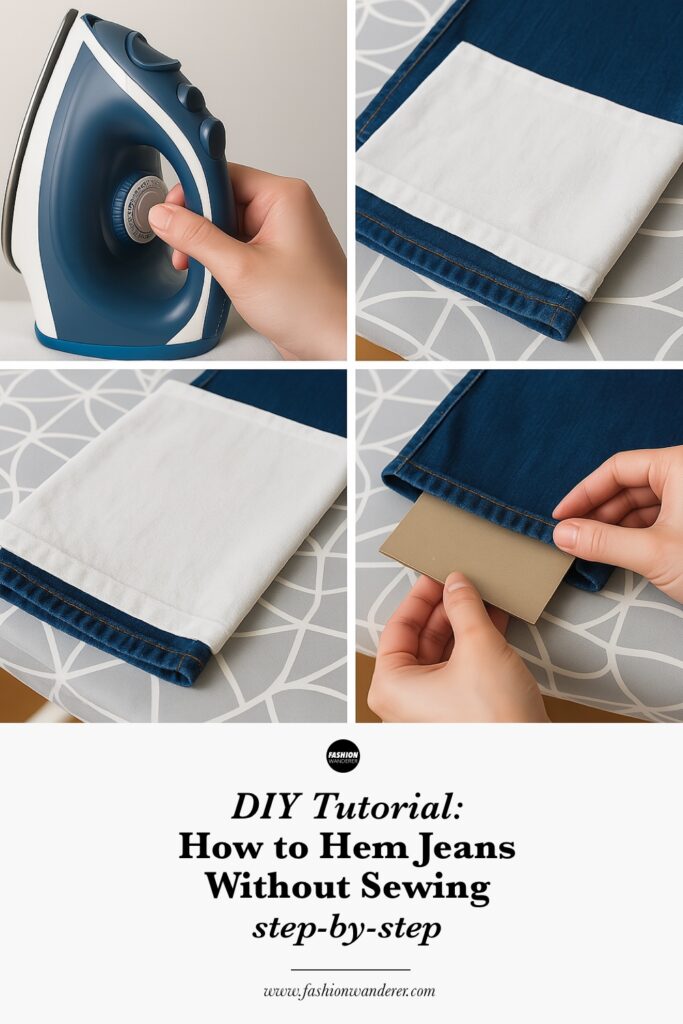
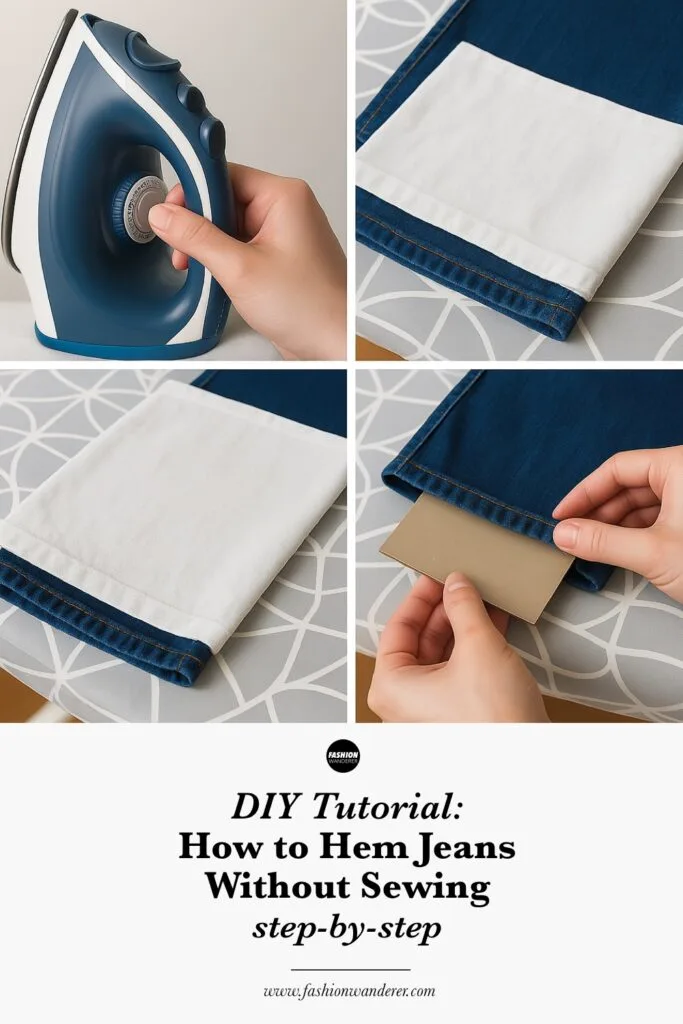
Step 3: Prepare to Iron
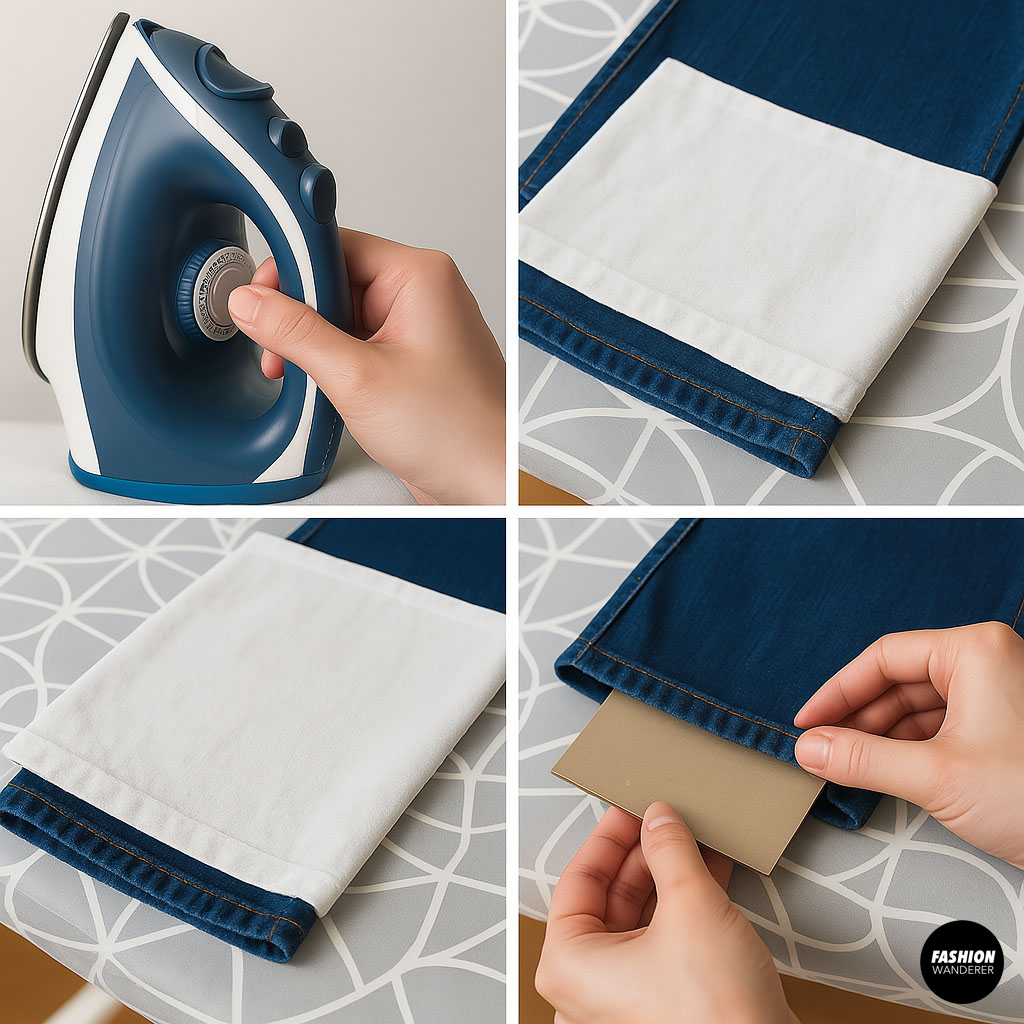

- Set your iron to the temperature recommended on your hemming tape package—usually a medium to high cotton setting.
- Place a pressing cloth (a thin cotton towel or lightweight cotton cloth) over the area you’ll be ironing to avoid scorching your jeans or the tape.
- Slip cardboard or a thin Styrofoam board inside each pant leg to prevent the tape from sticking to the back side of the fabric.
Step 4: Apply Fusible Hemming Tape

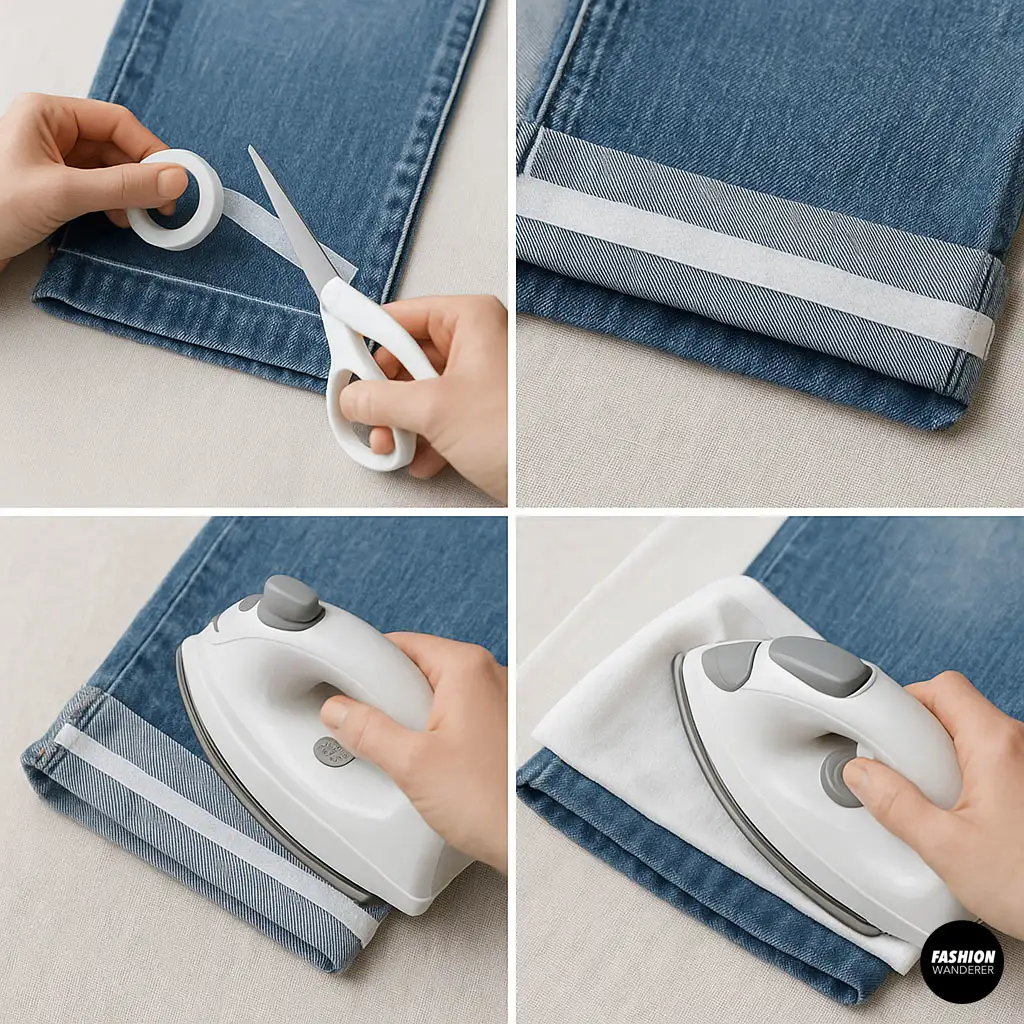
- Cut two strips of hemming tape the circumference of each leg opening, plus an extra ¼ inch to overlap.
- Position the tape between the folded layers of denim, aligning tape directly under your chalk line. The rough side of the tape (the adhesive side) should face up toward the raw or folded edge.
- Press with an iron:
- Place your iron on the pressing cloth and apply firm, even pressure for 10–15 seconds per section.
- Lift and move—don’t slide—then press the next section until the entire circumference is fused.
- Allow cooling for 1–2 minutes so the adhesive sets fully before moving the jeans.
Quick Check: Gently tug the hem to ensure it’s firmly bonded. If areas pull away, reapply the iron for another 5–10 seconds.
Step 5: Secure with Fabric Glue (Alternate No-Heat Method)
If you don’t have an iron or prefer a no-heat option, fabric glue can provide a lasting hem:
- Fold your jeans along the chalk line, matching both legs to the same height.
- Place cardboard inside each leg to prevent bleed-through.
- Apply fabric glue in a thin line just above the hem fold. Press the fold firmly against the glued area.
- Hold or clip the folded hem in place for the glue’s recommended setting time (usually 5–10 minutes).
- Let dry fully for 24 hours before washing.
Pro Tip: Look for fabric glues labeled “washable” and “permanent” to ensure your hem survives multiple laundry cycles.
Step 6: Finish & Style
- Remove cardboard and any cloth wrappings.
- Try on your newly hemmed jeans and admire the perfectly tailored length!
- Wash & care:
- Turn jeans inside out and launder on a gentle cycle with cold water.
- Air-dry or tumble-dry on low to preserve adhesive strength.
Style Suggestions:
- Pair your cropped, hemmed jeans with sandals or sneakers for a casual look.
- Add a statement belt and ankle boots to elevate denim for a night out.
Troubleshooting Common Issues
| Issue | Solution |
| Tape isn’t sticking | Re-press with higher heat or more pressure; ensure pressing cloth is dry. |
| Glue seeps through | Use less glue and apply it slightly above the fold line. |
| Uneven hems | Re-measure both legs before applying tape; trim excess fabric evenly. |
| Hem bunches or puckers | Press tape in small sections; smooth fabric with your hand before ironing. |
Why No-Sew Hemming Works
- Temporary or permanent: Easily remove or refold later without stitch marks.
- Saves time: Complete hemming in under 30 minutes, versus hours with hand-sewing.
- Professional finish: Fusible tape creates a smooth, flat hem that looks tailored.
Final Thoughts
Hemming jeans without sewing is a game-changer for anyone who loves denim but hates the hassle of traditional alterations. With just a T-shaped strip of fusible tape or a tube of fabric glue, you can customize the length of your favorite jeans in a flash. Perfect for beginners and seasoned DIYers alike, these no-sew hemming techniques will keep you looking sharp—and hemline-perfect—every time.
So grab your scissors, tape, or glue, and make those jeans fit your style today!
If you found this tutorial helpful, share your no-sew hem results on social media with #JeansToPerfectionDIY and tag us at #FashionWandererOfficial. We love seeing your transformations!
Trendy, Affordable Sewing Patterns for All Sizes


Tie Shoulder Jumpsuit Pattern


Palazzo Pants Sewing Pattern


Pocket Overall Romper Pattern


Wrap Maxi Skirt Sewing Pattern


Tie Back Top Sewing Pattern