
If you have an old pair of jeans and a plaid shirt sitting in the back of a closet, this is the perfect Thanksgiving sewing project to give them a second life. This kids’ Thanksgiving patchwork jacket combines sturdy denim with cozy plaid for a trendy, handmade layer that looks boutique-worthy but costs almost nothing to make.
This upcycle is especially fun for fall because the mix of denim and plaid instantly feels warm, rustic, and seasonal. It also lets you use small fabric sections creatively, making it a great scrap fabric upcycle for kids.
The finished jacket can be worn over a T-shirt, sweater, or simple upcycle fall outfit. Best of all, the patchwork placement does not have to be perfectly symmetrical. A slightly mismatched design actually makes the jacket look more modern and intentional.
Why This Thanksgiving Upcycle Works
Denim gives the jacket structure while plaid adds softness and color. Together, they create an easy fall patchwork jacket for kids that works for Thanksgiving dinner, family photos, school events, or everyday autumn outfits.
This project is also flexible. You can use a child’s existing jacket as a pattern, work from a basic jacket sewing pattern, or simply update a denim jacket that already fits.
For the easiest version, start with an existing child-size denim jacket or lightweight jean shirt and add plaid patchwork panels. If you want a bigger transformation, you can cut jacket pieces from old jeans and use the plaid shirt for sleeves, pockets, or decorative sections.
Materials You’ll Need
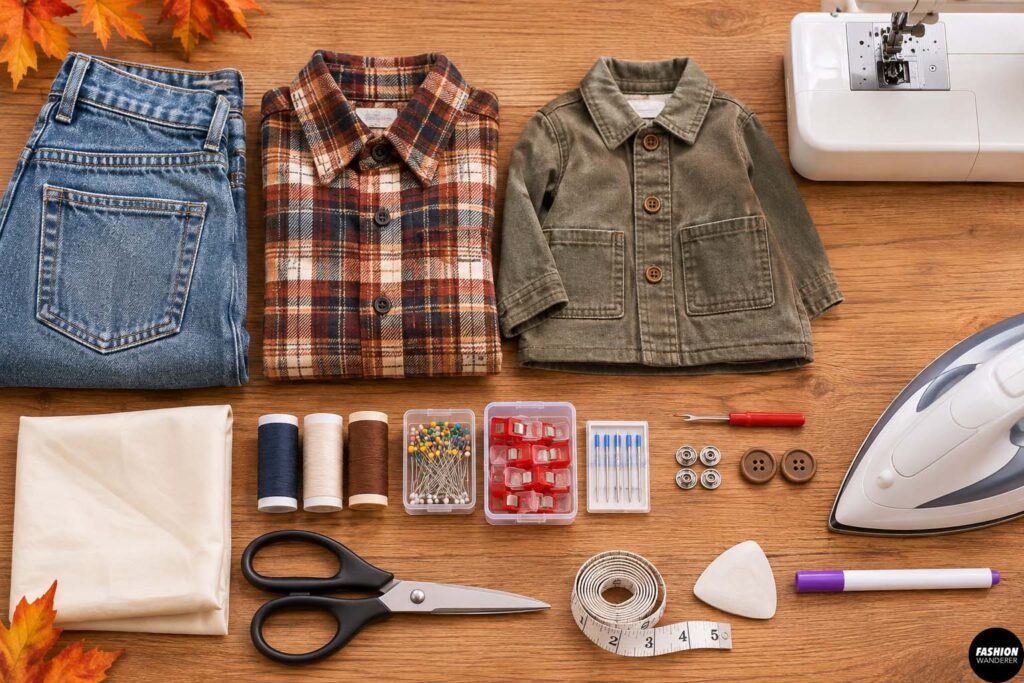
- One pair of old adult jeans
- One old plaid button-up shirt
- Child-size jacket or shirt to use as a pattern
- Coordinating sewing thread
- Fabric scissors
- Pins or sewing clips
- Sewing machine
- Denim needle
- Seam ripper
- Measuring tape
- Fabric marker or tailor’s chalk
- Iron
- Optional snaps or buttons
- Optional lightweight lining fabric
Prewash both garments before cutting, especially if they have not been washed recently. This helps prevent shrinking after the finished jacket is sewn.
Upcycle Kids’ Thanksgiving Patchwork Jacket
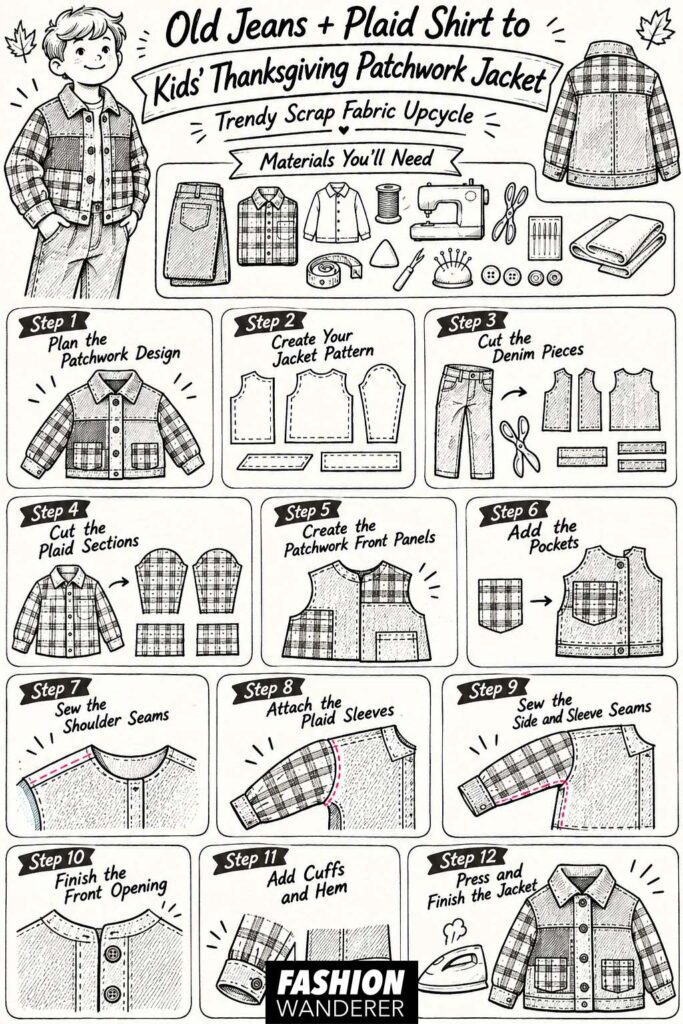
Step 1: Plan the Patchwork Design
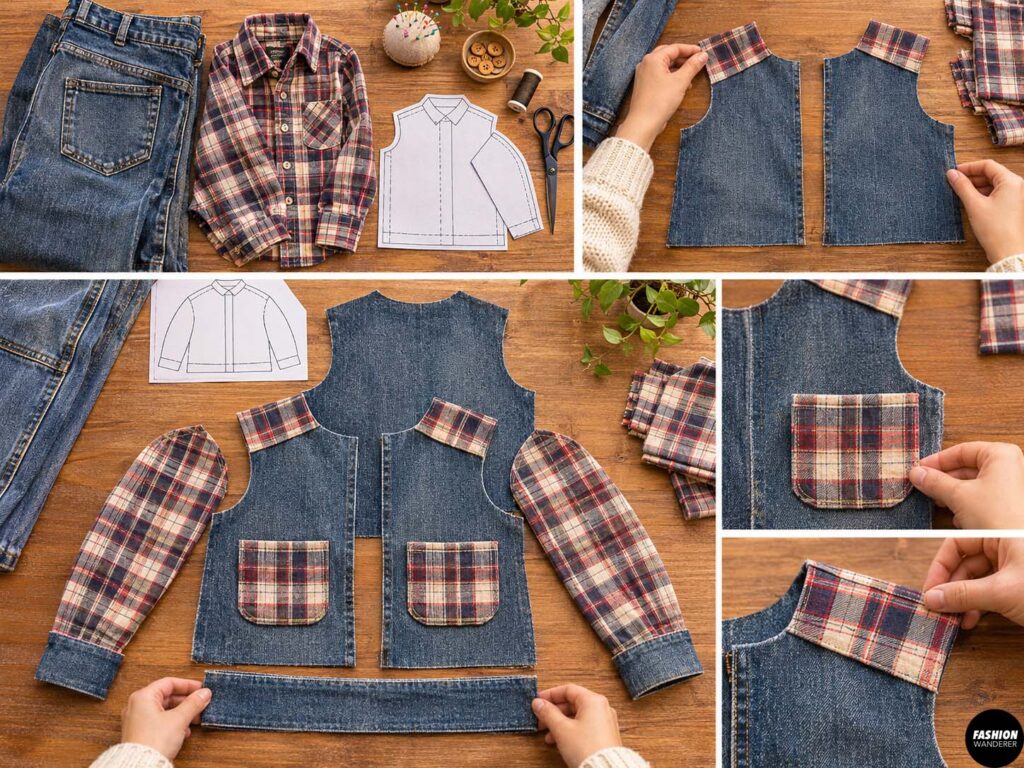
Lay the jeans and plaid shirt flat on a large table.
Before cutting anything, decide which areas you want to use for each part of the jacket.
A simple layout is:
- Denim for the main front and back body
- Plaid for the sleeves
- Plaid patch pockets
- Small plaid panels across the shoulders
- Denim cuffs and waistband
You can also mix small denim and plaid rectangles together for a true patchwork effect.
Try to keep the thicker jean seams away from areas where several layers will overlap.
Step 2: Create Your Jacket Pattern
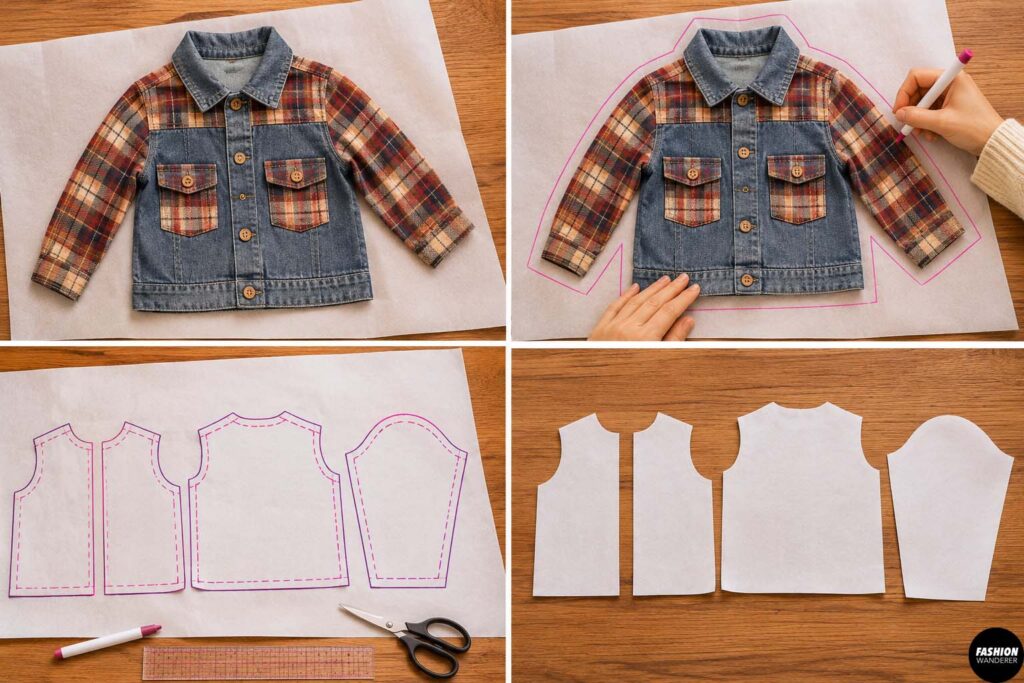
Place a child-size jacket, overshirt, or sweatshirt flat on paper.
Trace around the front, back, and sleeves, leaving about 1/2 inch around the edges for seam allowance.
For the front, divide the pattern into two separate pieces so you can add a button or snap opening.
If you are using an existing sewing pattern, choose a simple boxy jacket style. A slightly oversized fit works especially well for this project because it leaves room for layering.
Step 3: Cut the Denim Pieces
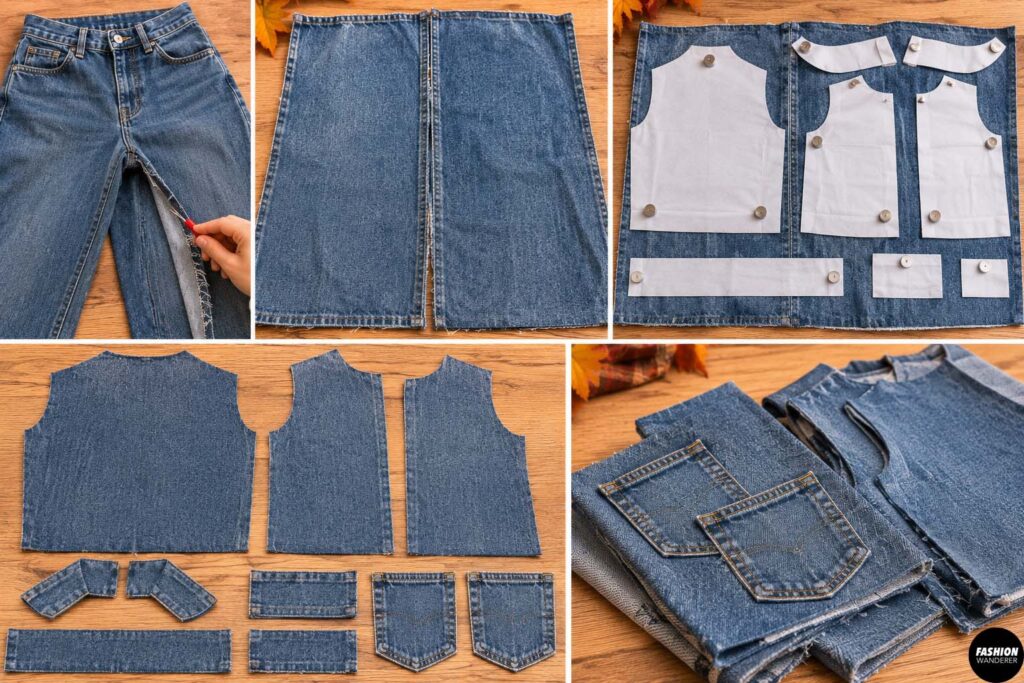
Open the old jeans along the inner leg seams to create larger flat fabric sections.
Place your jacket pattern pieces over the denim.
Cut:
- Two front pieces
- One back piece on the fold if possible
- Optional denim cuffs
- Optional denim waistband
- Optional collar pieces
Try to position the pattern pieces away from thick original seams unless you want those seams to become a decorative feature.
Save the back pockets from the jeans. They can make adorable ready-made jacket pockets.
Step 4: Cut the Plaid Sections
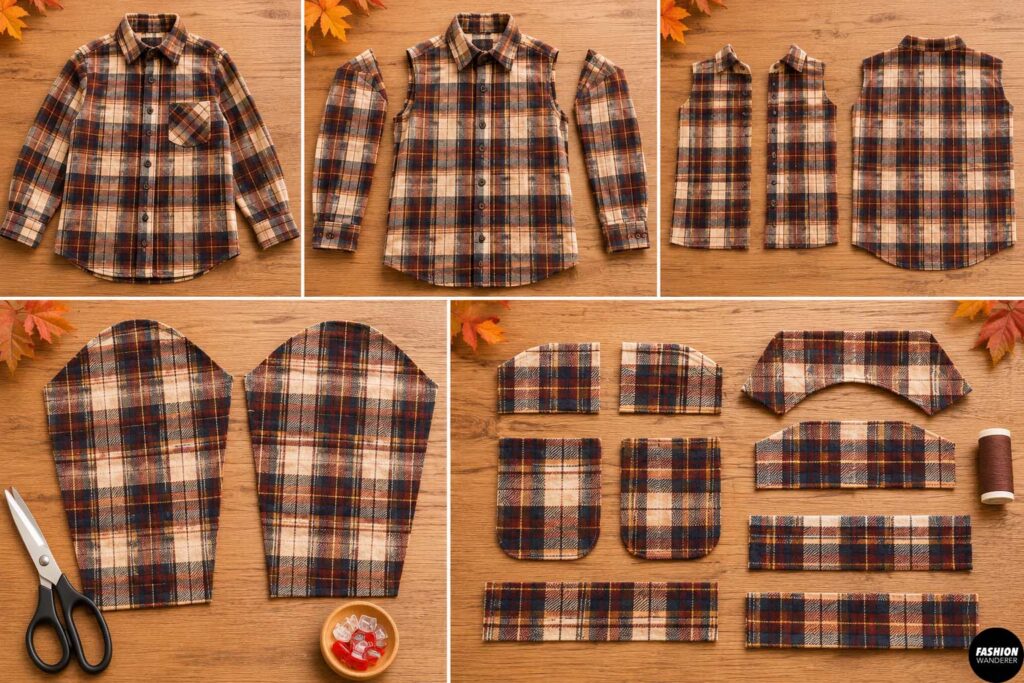
Open the plaid shirt by removing the sleeves and cutting along the side seams.
Use the largest sections for your jacket sleeves.
Cut two sleeve pieces, making sure the plaid direction looks similar on both sides.
Then cut additional plaid pieces for:
- Shoulder patches
- Front patchwork panels
- Pockets
- Collar facing
- Sleeve accents
Do not worry if every plaid line does not match perfectly. The handmade patchwork look is part of the charm.
Step 5: Create the Patchwork Front Panels
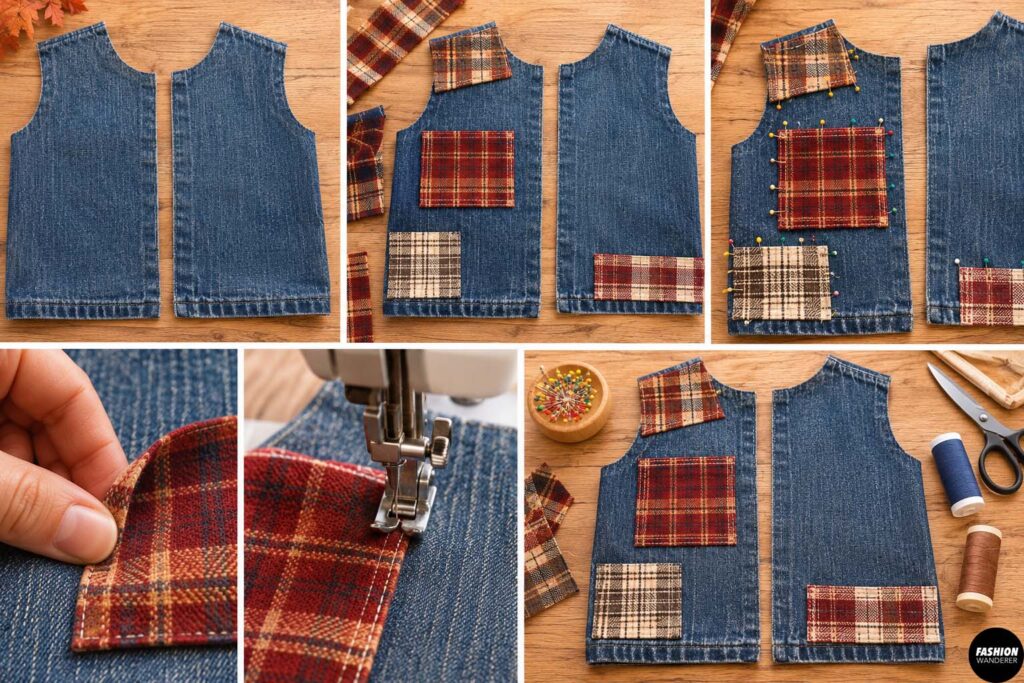
Place your plaid scraps over the denim front jacket pieces.
Try several layouts before sewing.
You might place one plaid rectangle near the chest, another near the lower hem, and a smaller piece along one shoulder.
Once you like the arrangement, pin each patch in place.
Turn the raw edges under by about 1/4 inch and topstitch around each patch.
For a more casual look, leave some edges raw and stitch about 1/4 inch inside the edge. The fabric will soften and fray slightly over time.
Step 6: Add the Pockets
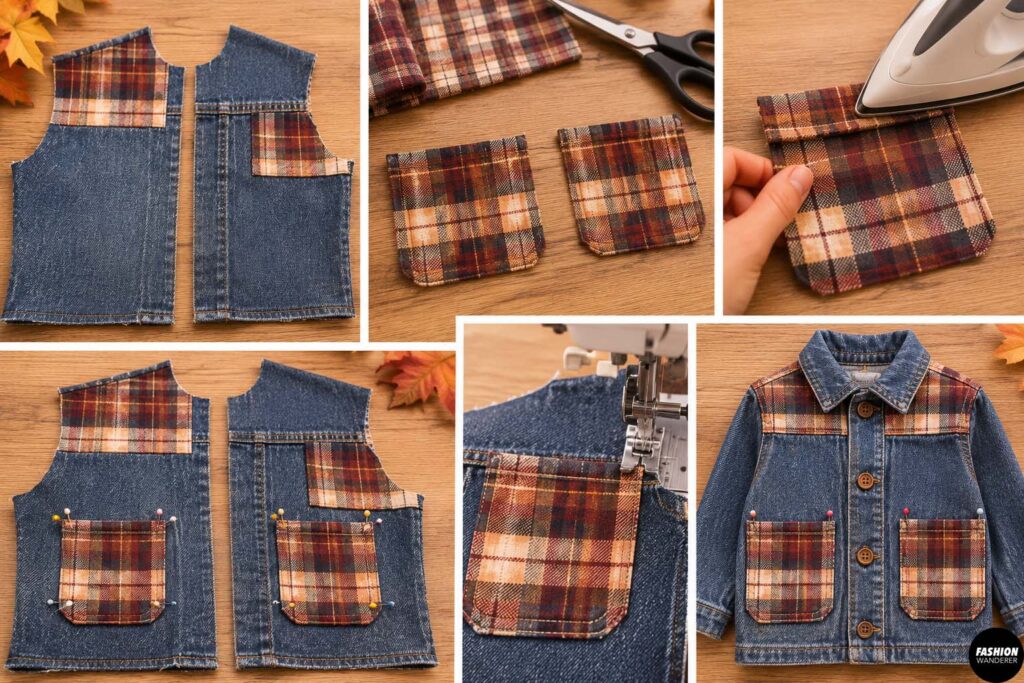
Use the original jean back pockets or create simple rectangular pockets from the plaid shirt.
Position the pockets on the lower front pieces.
Make sure both pockets are at a comfortable height for the child.
Topstitch around the sides and bottom, leaving the top open.
A contrasting plaid pocket against denim gives the jacket an especially cute Thanksgiving look.
Step 7: Sew the Shoulder Seams
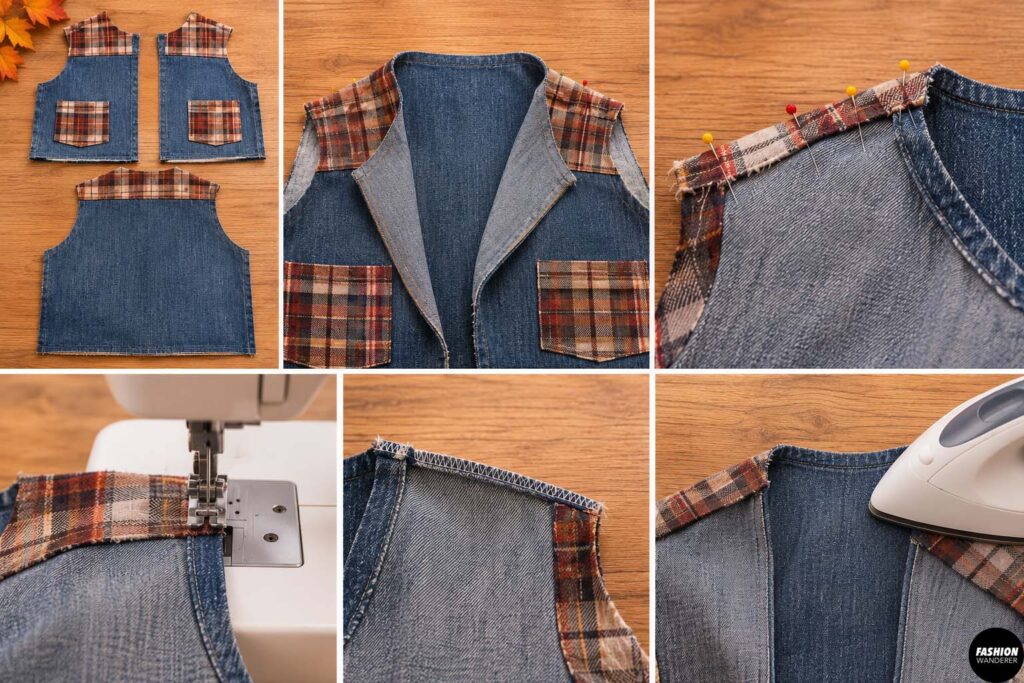
Place the front jacket pieces right sides together with the back piece.
Match the shoulders.
Pin and sew using a 1/2-inch seam allowance.
Finish the raw edges with a zigzag stitch or serger if desired.
Press the seams toward the back.
Step 8: Attach the Plaid Sleeves
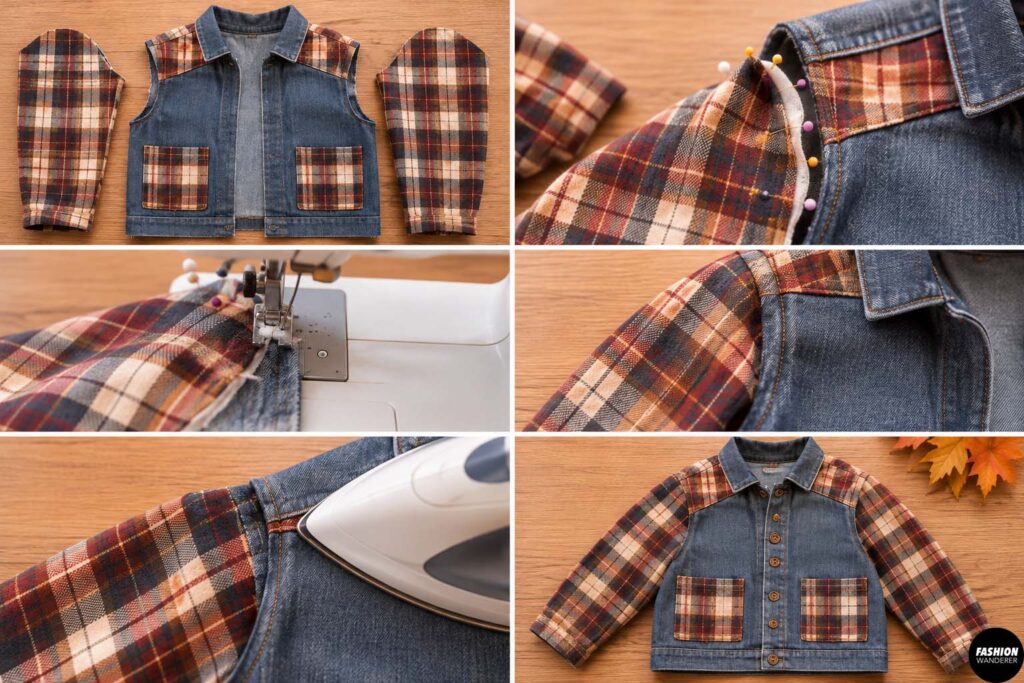
With the jacket opened flat, match the center of each sleeve cap with the shoulder seam.
Pin the sleeve gradually around the armhole.
Sew slowly, easing the fabric around the curve.
Repeat with the second sleeve.
Press the seams toward the sleeve.
The plaid sleeves are what really give this DIY Thanksgiving kids jacket its cozy, modern personality.
Step 9: Sew the Side and Sleeve Seams
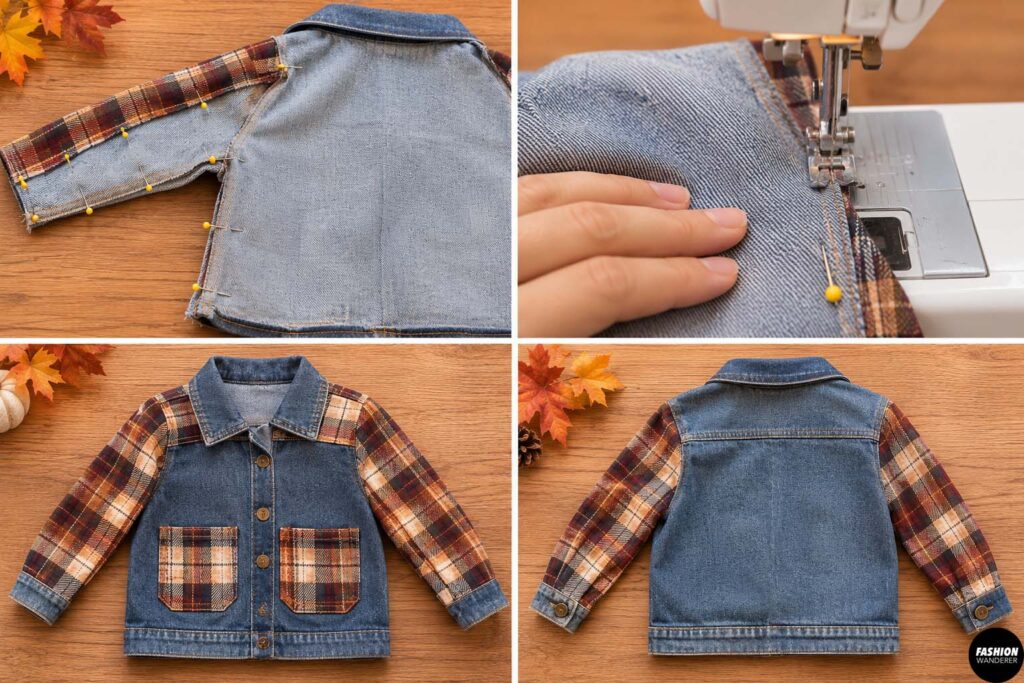
Fold the jacket so the front and back are right sides together.
Match the sleeve edges and side seams.
Starting at the sleeve cuff, sew continuously down the sleeve and along the side of the jacket.
Repeat on the other side.
Turn the jacket right side out and check the fit.
Step 10: Finish the Front Opening
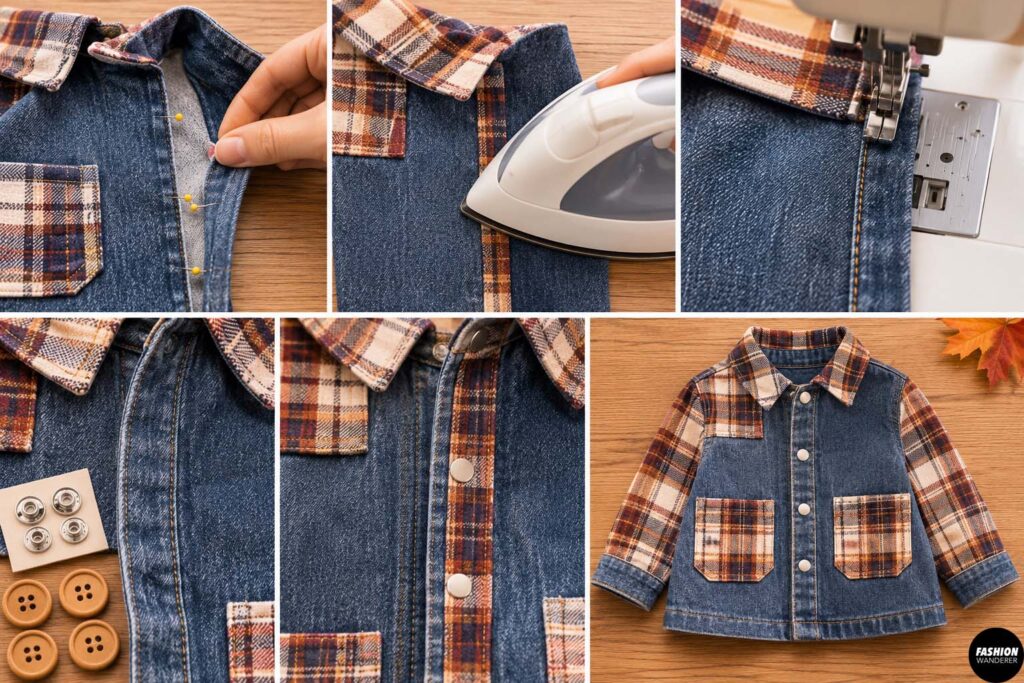
Fold the front opening edges toward the inside by about 1 inch.
Press well.
Topstitch close to the folded edge.
You can add buttons, snaps, or leave the jacket open like a lightweight fall shacket.
For younger children, snaps are often the easiest option.
Step 11: Add Cuffs and Hem
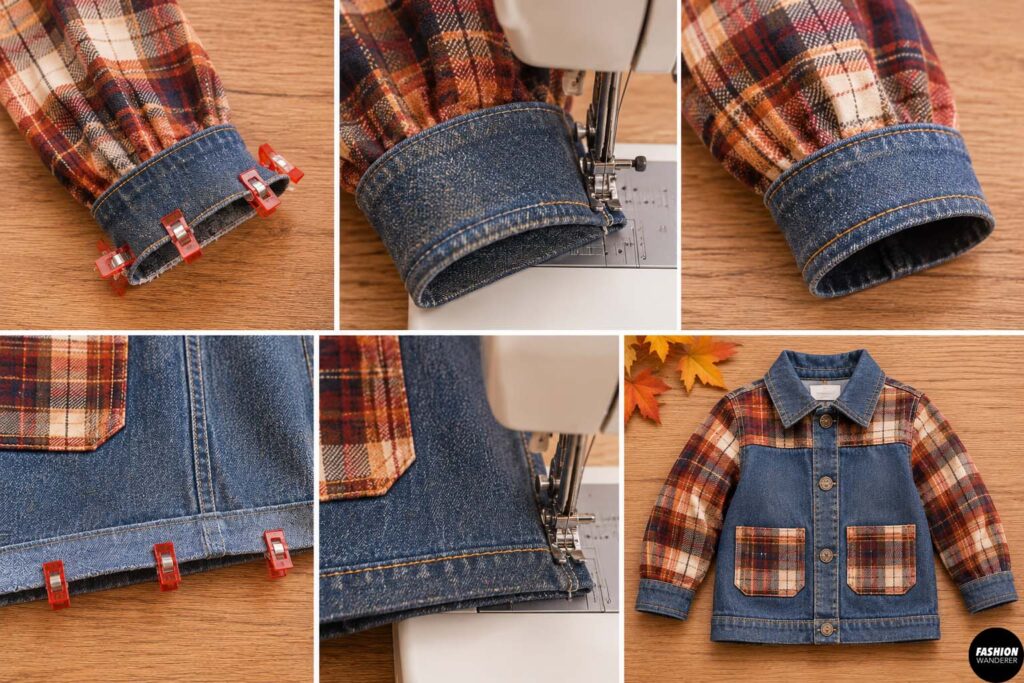
For simple cuffs, fold the sleeve ends under twice and topstitch.
Alternatively, attach denim cuff strips for extra contrast.
Finish the bottom hem the same way by folding the edge under twice and stitching.
If the denim is very thick, use a longer stitch length and sew slowly over bulky sections.
Step 12: Press and Finish the Jacket
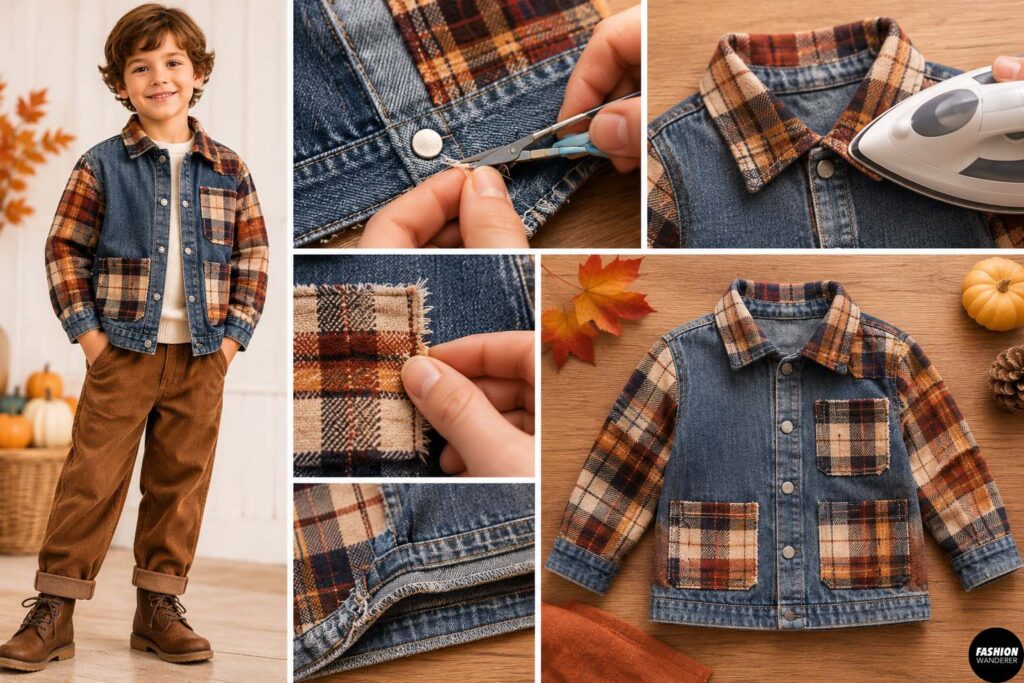
Trim loose threads and inspect the seams.
Give the entire jacket a gentle press.
If you added raw-edge patches, lightly rough up the edges with your fingers to encourage a soft frayed look.
Try the jacket on your child over a simple cream, rust, brown, or mustard-colored outfit.
The finished combination of denim and plaid creates an easy Thanksgiving outfit for kids without buying something new.
Styling Ideas for Thanksgiving
Pair the finished patchwork jacket with neutral basics so the fabric mix stays the focus.
For girls, try leggings, a simple knit dress, or corduroy pants with ankle boots.
For boys, pair it with chinos, a cream T-shirt, or a lightweight sweater and sneakers.
The jacket also looks adorable in outdoor family photos surrounded by fall leaves, pumpkins, or rustic Thanksgiving décor.
Final Thoughts
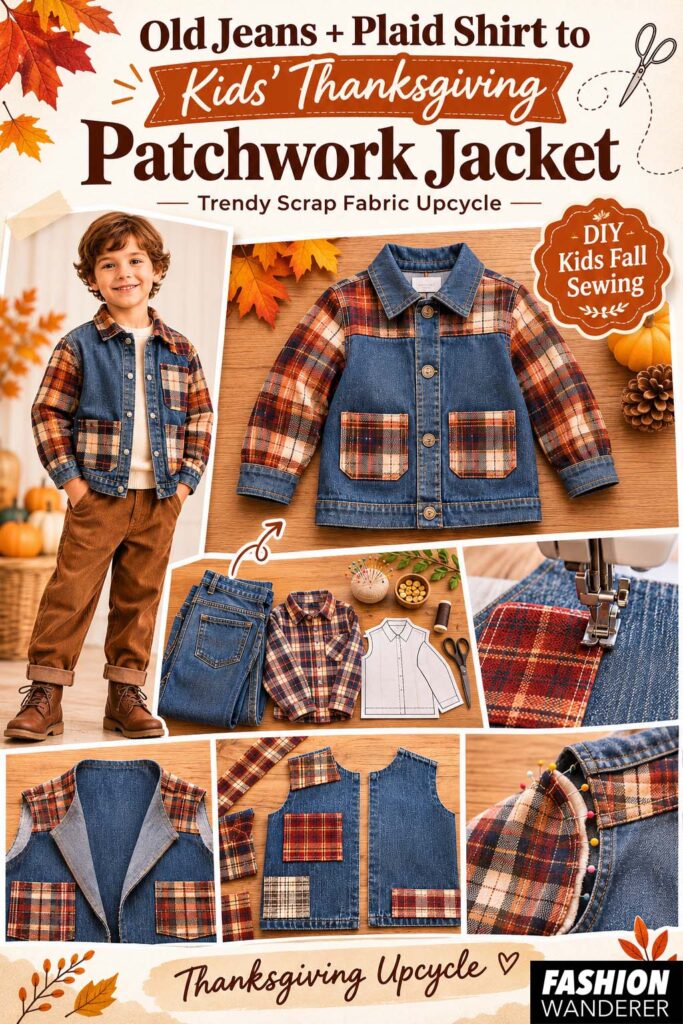
Turning old jeans and a plaid shirt into a kids’ Thanksgiving patchwork jacket is a fun way to reuse clothing while creating something completely unique.
The project uses simple sewing techniques, works beautifully with leftover fabric, and does not require perfect matching or complicated tailoring. In fact, the slightly imperfect patchwork effect is exactly what makes the finished jacket look modern and handmade.
Instead of tossing worn-out denim and an outdated plaid shirt, turn them into a cozy fall layer your child can wear long after Thanksgiving is over.
This beginner-friendly scrap fabric upcycle proves that some of the best seasonal outfits can start with clothes you already own.