
Looking for a Halloween costume that feels fun, stylish, and a little unexpected? Turn an old retro shirt into a 1970s disco vampire costume using a few simple sewing tricks and accessories you may already have at home.
This easy mens Halloween upcycle combines two instantly recognizable looks: dramatic vampire style and flashy 1970s disco fashion. Think wide collars, flared pants, dark colors, a hint of satin, and just enough gothic drama to make the costume feel spooky.
Best of all, you do not need to sew an entire outfit from scratch. Start with an old button-up shirt, thrifted retro blouse, or oversized collared shirt and transform it with simple fabric additions.
This beginner-friendly tutorial will show you how to make a DIY disco vampire costume for men with an exaggerated collar, dramatic cuffs, flared pants, and an optional mini cape.
Materials You Will Need
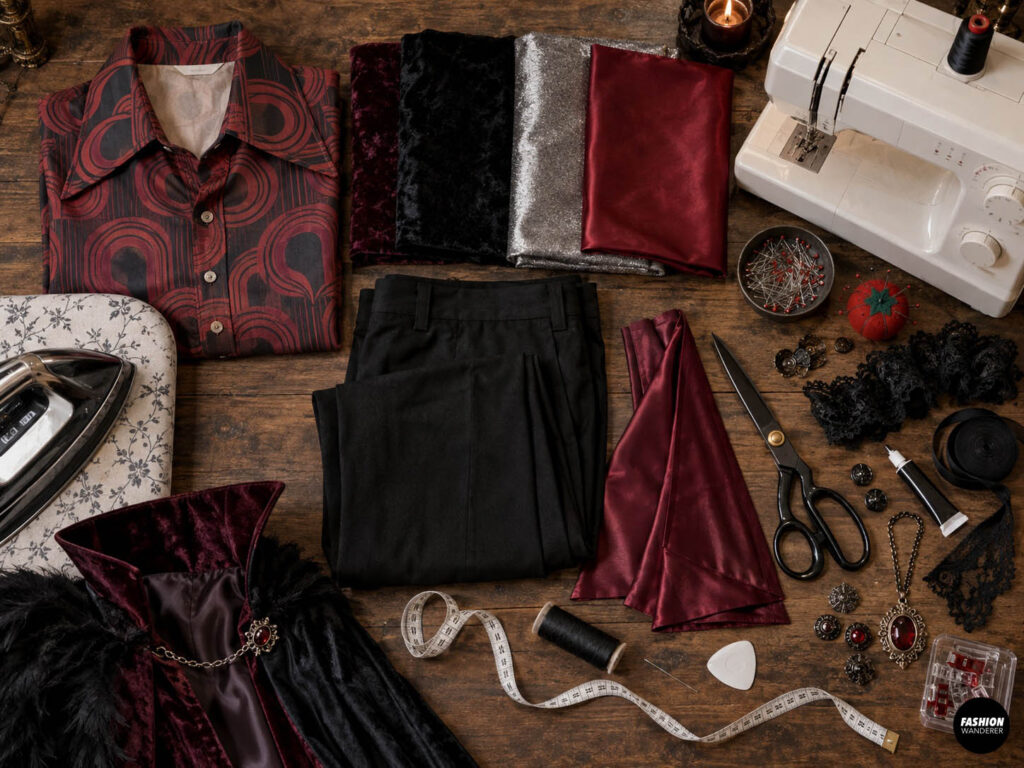
- Old button-up shirt or retro collared shirt
- ½ yard satin, velvet, or lightweight polyester fabric
- Black or dark trousers
- ¼ to ½ yard matching or contrasting fabric for flare inserts
- Black or coordinating thread
- Sewing machine
- Fabric scissors
- Pins or sewing clips
- Measuring tape
- Chalk or fabric marker
- Iron and ironing board
- Hand-sewing needle
- Optional black lace
- Optional decorative buttons
- Optional narrow ribbon or elastic
- Optional old necklace or medallion
- Optional temporary fabric adhesive
For a classic disco vampire palette, try black, burgundy, plum, deep red, silver, or midnight blue.
DIY 70s Disco Vampire Costume
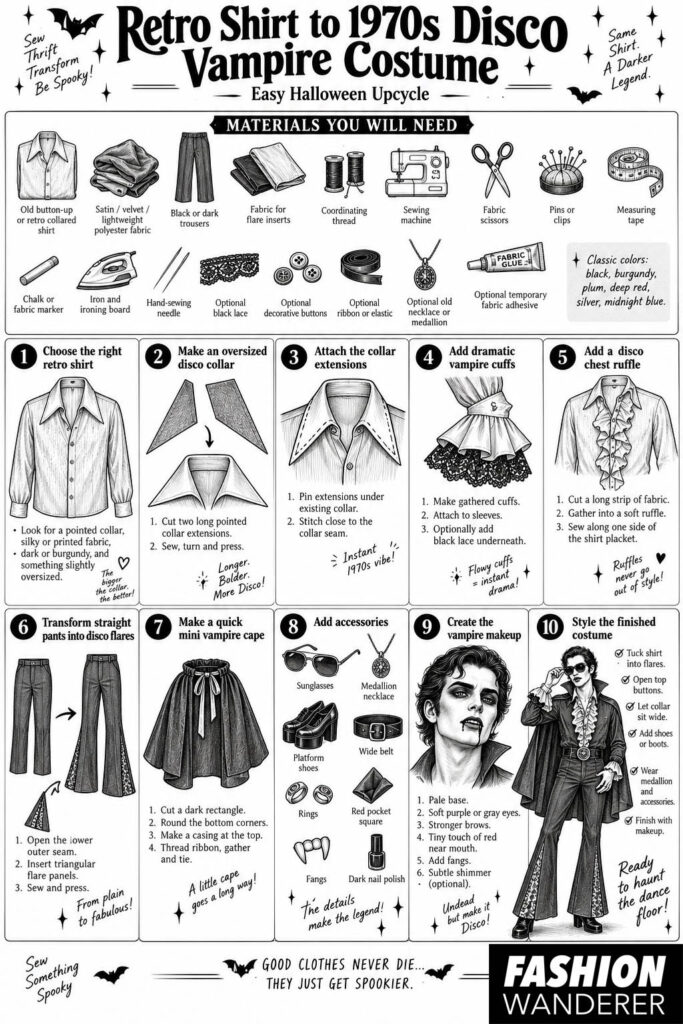
Step 1: Choose the Right Retro Shirt
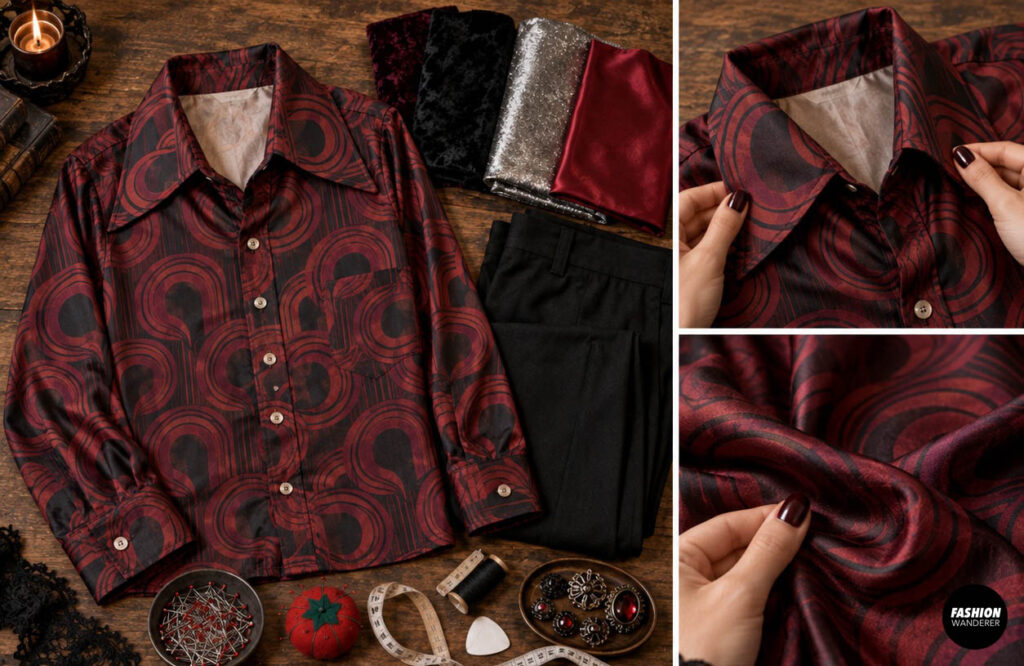
Start with a shirt that already has a strong 1970s feel.
Look for:
- A pointed collar
- Satin or silky fabric
- Bold print
- Dark floral pattern
- Black or burgundy color
- Slightly oversized fit
A thrift-store shirt works perfectly for this project.
If the shirt already has a wide collar, you may only need to exaggerate the shape slightly. If the collar is small, the next step will make it much more dramatic.
Step 2: Make an Oversized Disco Collar
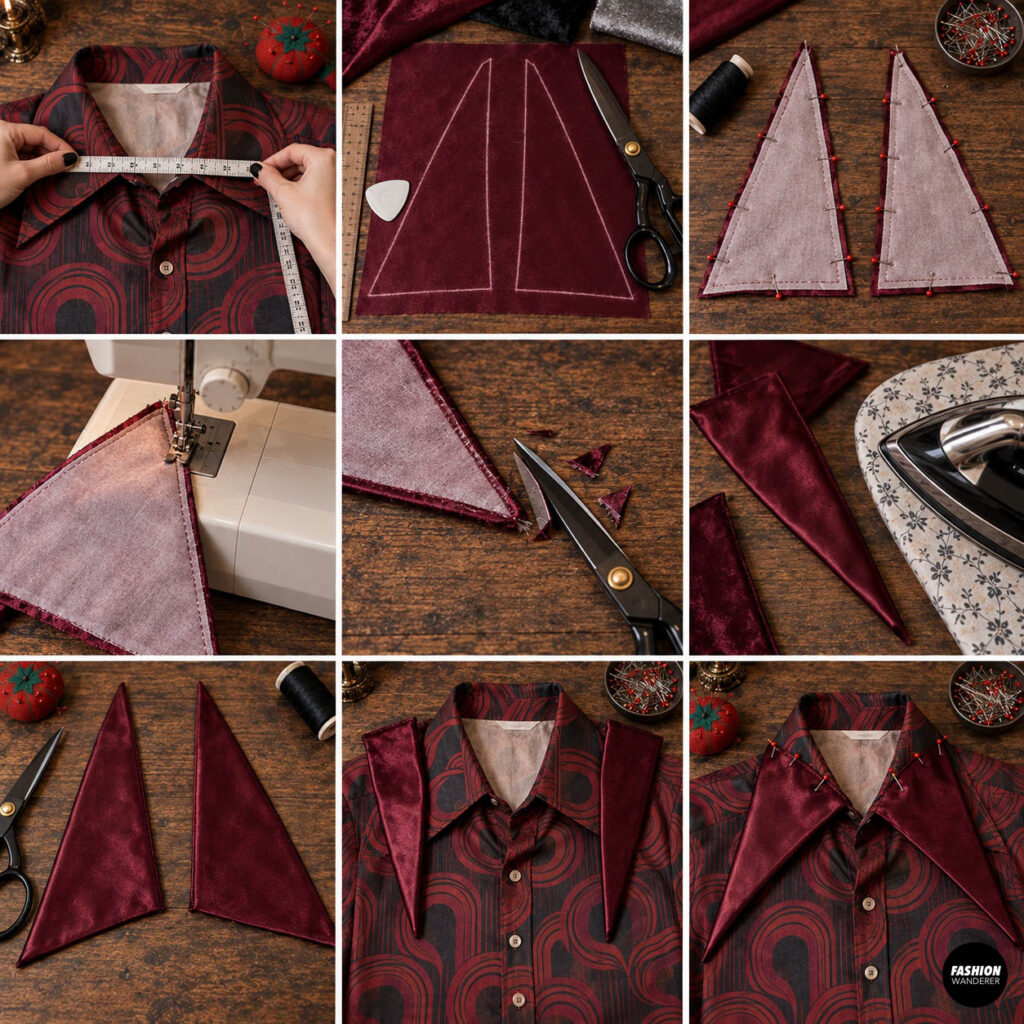
Lay the shirt flat and measure the existing collar.
Cut two long triangular or pointed collar extensions from your contrasting fabric.
Each piece should be approximately 6 to 8 inches long, depending on how dramatic you want the finished look.
Place two collar pieces right sides together.
Sew around the outer edges using a ¼-inch seam allowance, leaving the top open.
Trim the point carefully.
Turn the collar right side out and press.
Repeat for the second side.
Step 3: Attach the Collar Extensions
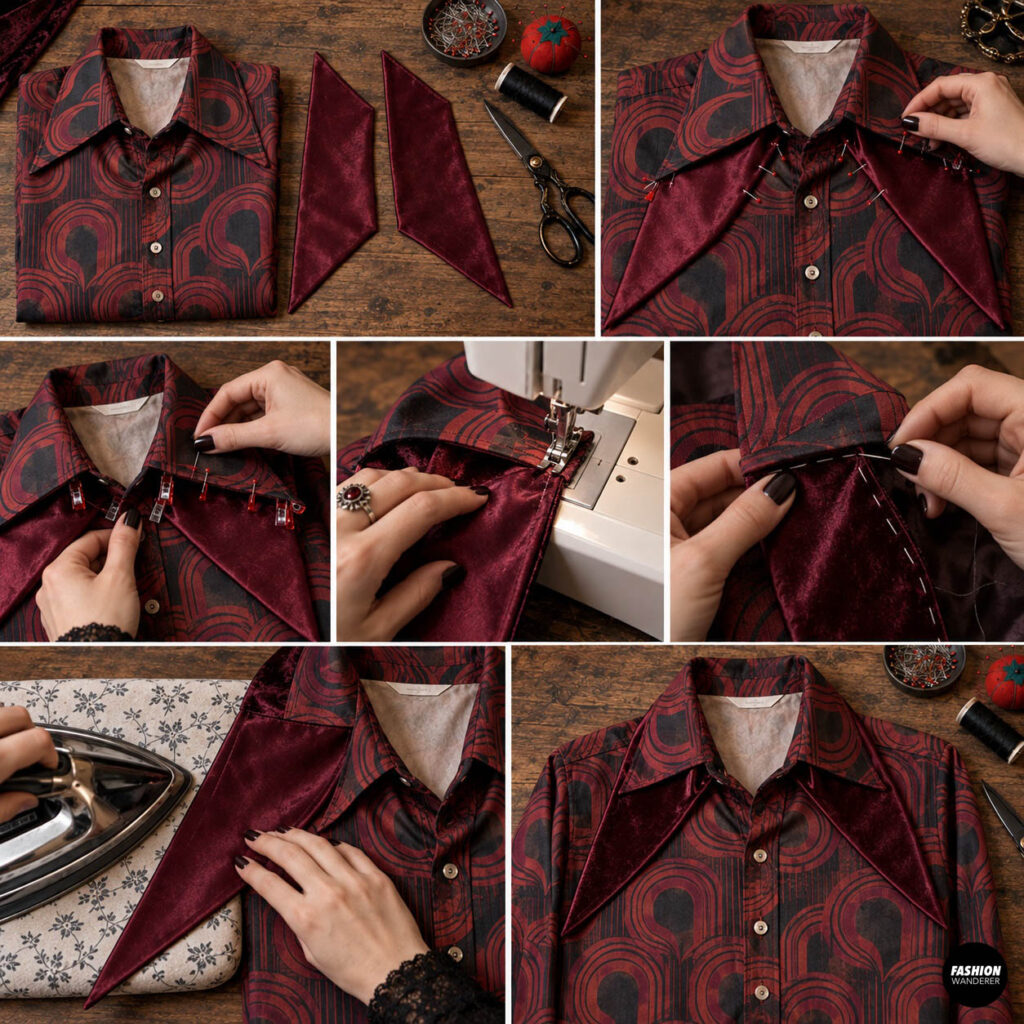
Position each collar extension underneath the existing shirt collar.
The point should extend several inches beyond the original collar.
Pin or clip in place.
Sew along the upper edge of the collar extension, keeping your stitches close to the original collar seam.
If you want the costume to remain temporary, hand sew the extensions using long removable stitches.
Press the new collar gently.
This single detail instantly gives the shirt a stronger disco silhouette.
Step 4: Add Dramatic Vampire Cuffs
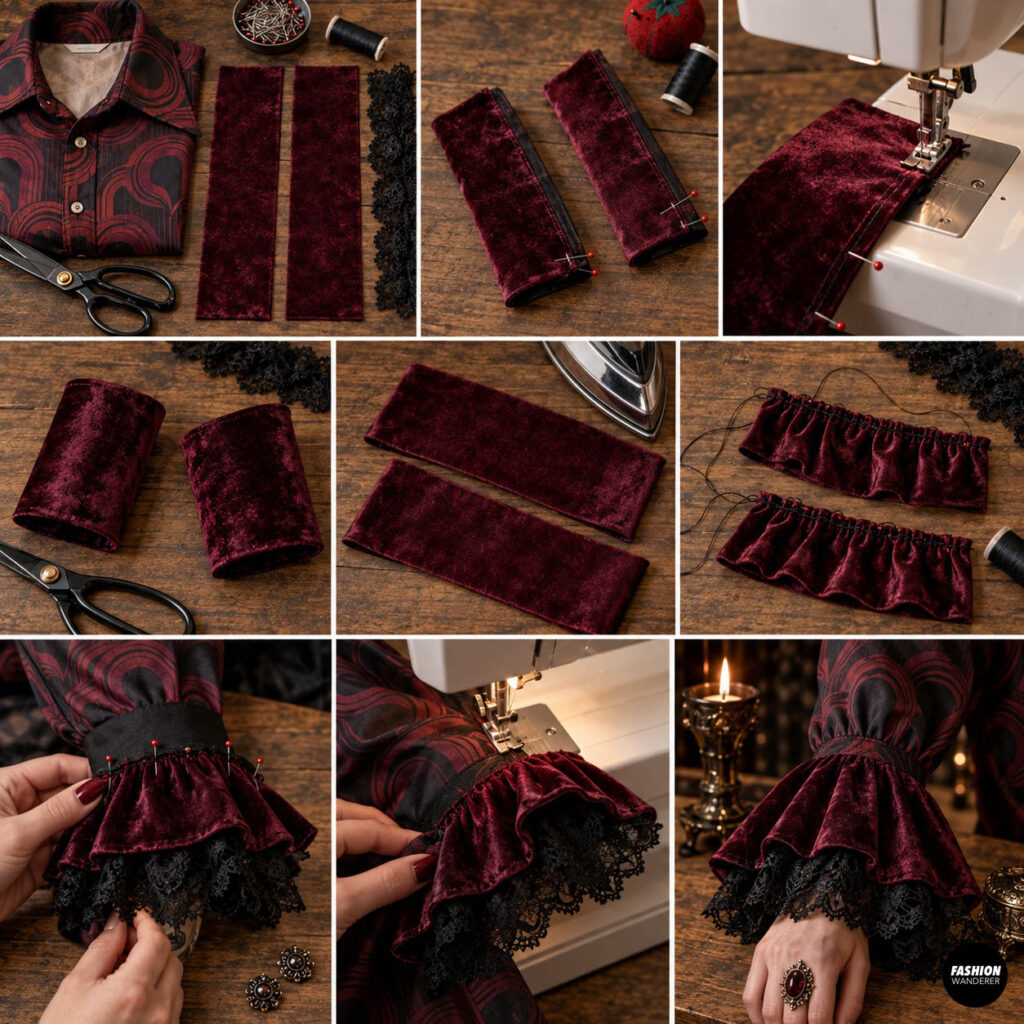
Cut two fabric strips approximately:
5 inches wide x wrist measurement plus 2 inches
Fold each strip in half lengthwise with right sides together.
Sew the short ends.
Turn right side out and press.
Gather one long edge slightly using a long machine stitch.
Pin the gathered edge around the inside of the shirt cuff.
Sew in place.
For extra drama, add a narrow strip of black lace underneath the fabric cuff.
When the cuff falls below the sleeve opening, it creates a romantic vampire look while still fitting the 1970s theme.
Step 5: Add a Disco Chest Ruffle
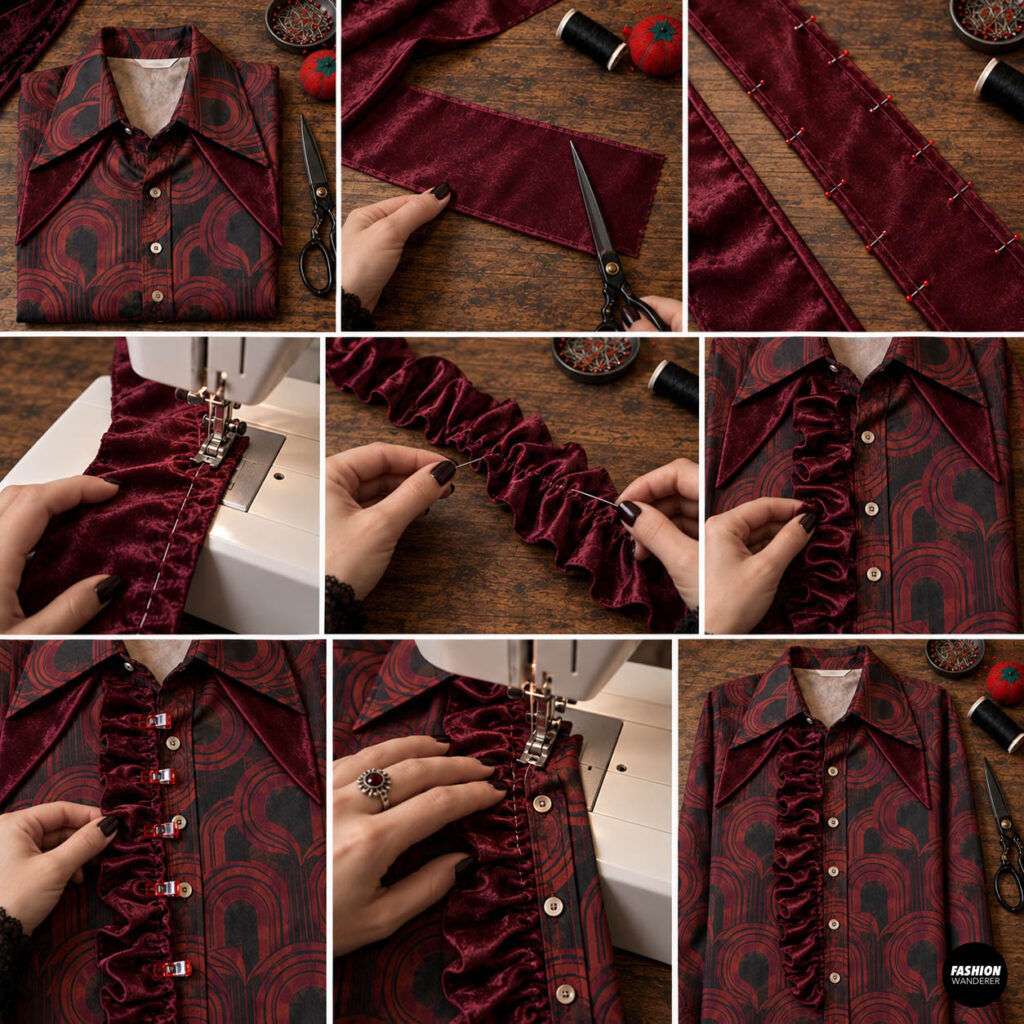
This step is optional but gives the shirt a theatrical finish.
Cut a strip of lightweight fabric approximately:
4 inches wide x 30 inches long
Finish the long edges with a narrow hem or leave them raw if the fabric does not fray badly.
Sew a long gathering stitch down the center.
Pull the bobbin thread gently until the strip forms a soft ruffle.
Position the ruffle vertically along one side of the shirt placket.
Pin it in place.
Sew directly down the center of the ruffle.
You can make the ruffle full and dramatic or keep it subtle.
Step 6: Transform Straight Pants Into Disco Flares
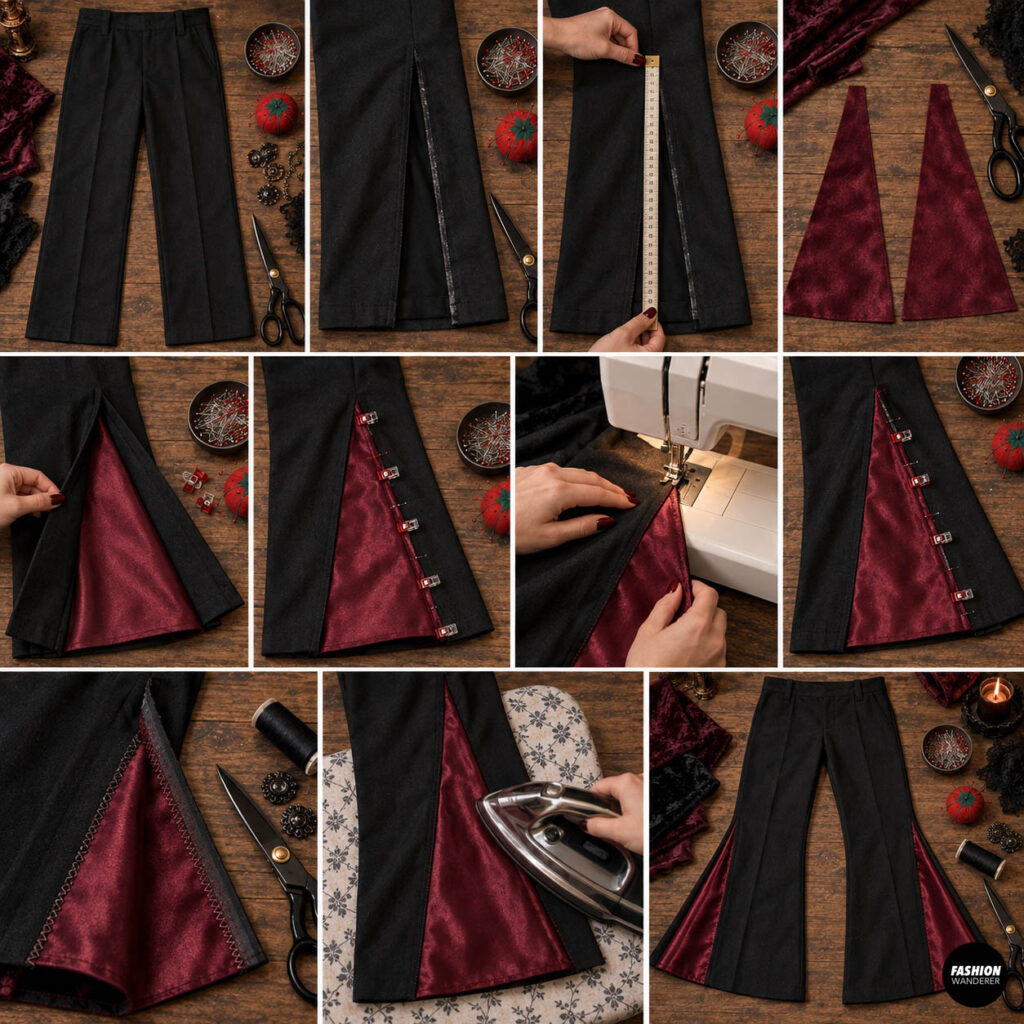
If you already own flared trousers, skip this step.
To transform straight-leg pants, open the outer seam from the hem upward approximately 10 to 14 inches.
Measure the opening.
Cut two triangular fabric inserts.
The top of each triangle should be narrow and the bottom approximately 8 to 12 inches wide.
Place one triangle into each opened pant leg with right sides together.
Pin one side of the triangle to the pant opening.
Sew using a ⅜-inch seam allowance.
Repeat on the other side.
Finish the raw edges with a zigzag stitch if necessary.
Press the seams.
The wider the bottom of the triangle, the more dramatic the flare will be.
Step 7: Make a Quick Mini Vampire Cape
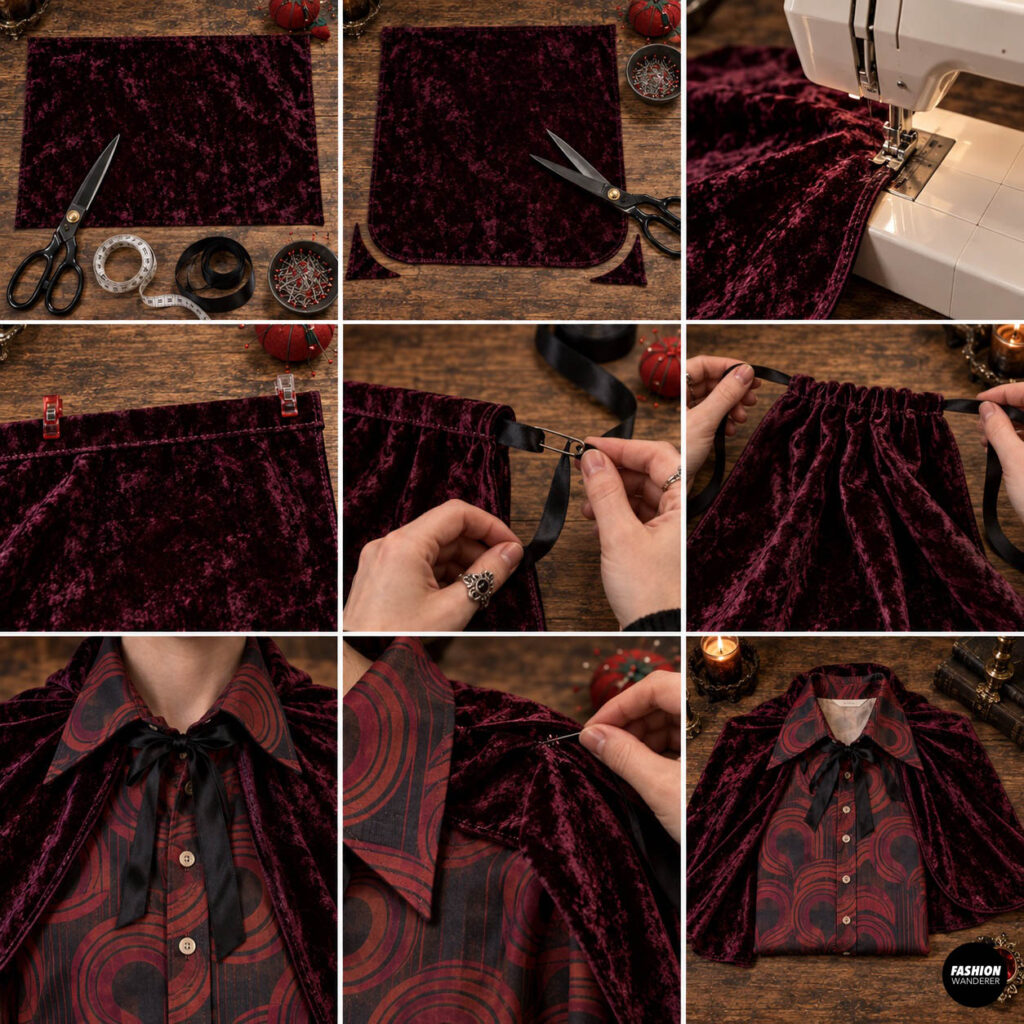
For an optional cape, cut a rectangle of dark satin or velvet approximately:
30 inches wide x 24 inches long
Round the bottom corners slightly.
Finish the edges with a narrow hem or zigzag stitch.
Fold the upper edge down approximately 1 inch and sew to create a casing.
Thread a ribbon through the casing.
Gather the top slightly.
Tie the cape loosely around the neck underneath the shirt collar.
For safety, make sure the ties release easily and are not tight.
You can also attach the cape directly to the shirt shoulders with a few hand stitches.
Step 8: Add Accessories
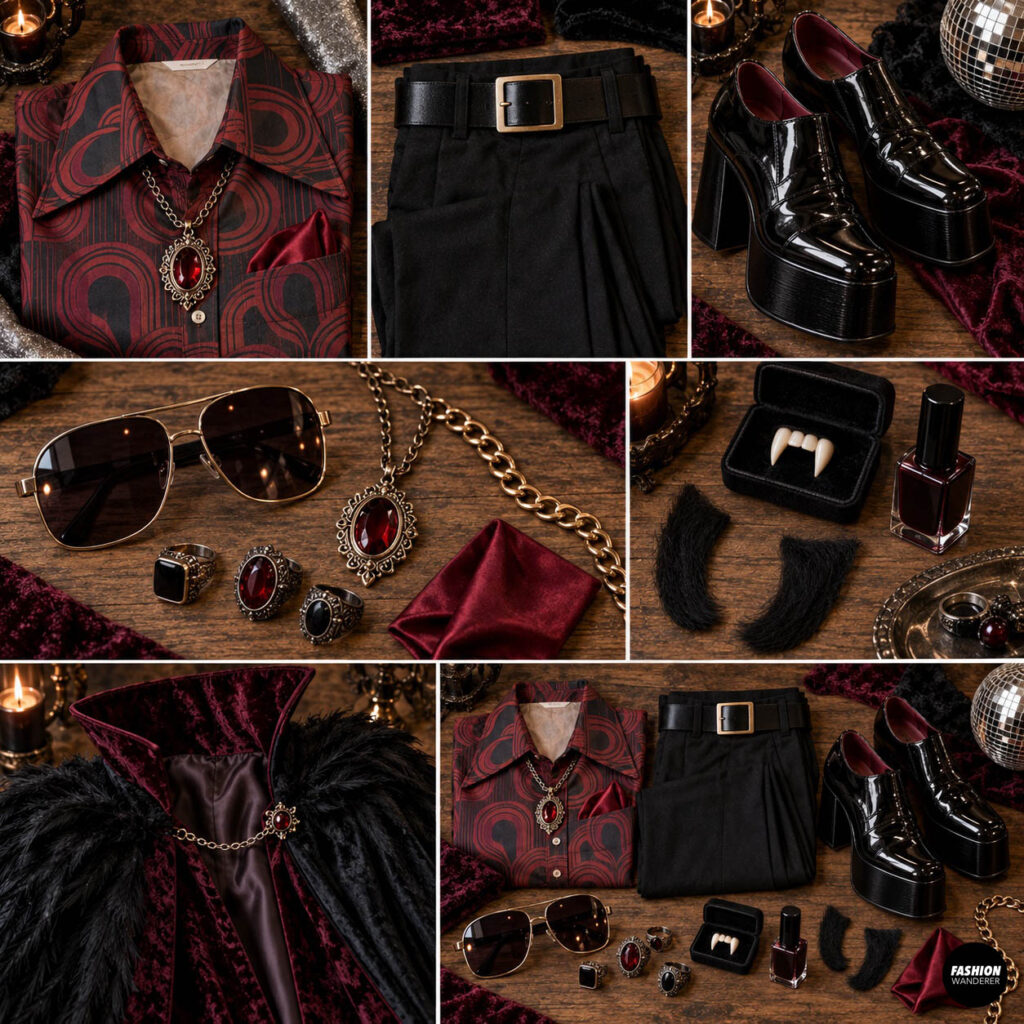
The accessories are what make the disco vampire theme obvious.
Try adding:
- Large sunglasses
- Vintage medallion necklace
- Gold chain
- Platform shoes
- Wide belt
- Dark rings
- Red pocket square
- Faux vampire fangs
- Temporary sideburns
- Dark nail polish
Keep the accessories slightly exaggerated for a fun Halloween look.
Step 9: Create the Vampire Makeup
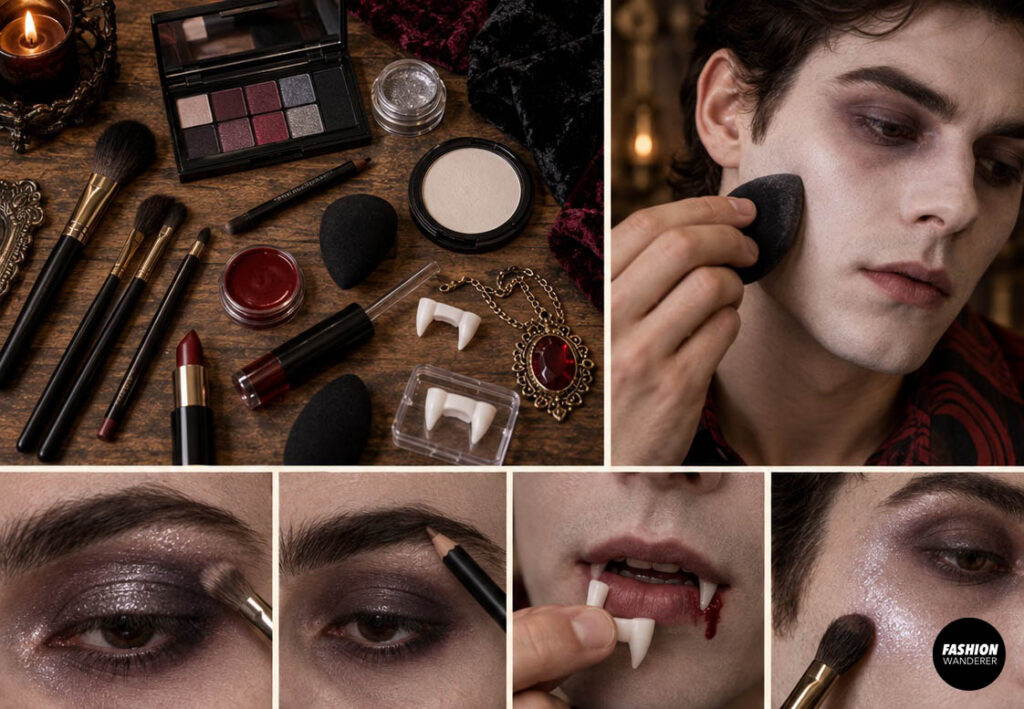
Start with a slightly pale base.
Add gray or soft purple shading around the eyes.
Use dark brow pencil for stronger brows.
Add a small amount of red makeup near the mouth or use fake blood sparingly.
Finish with vampire fangs.
For a disco twist, add subtle shimmer around the eyes or cheekbones.
Step 10: Style the Finished Costume
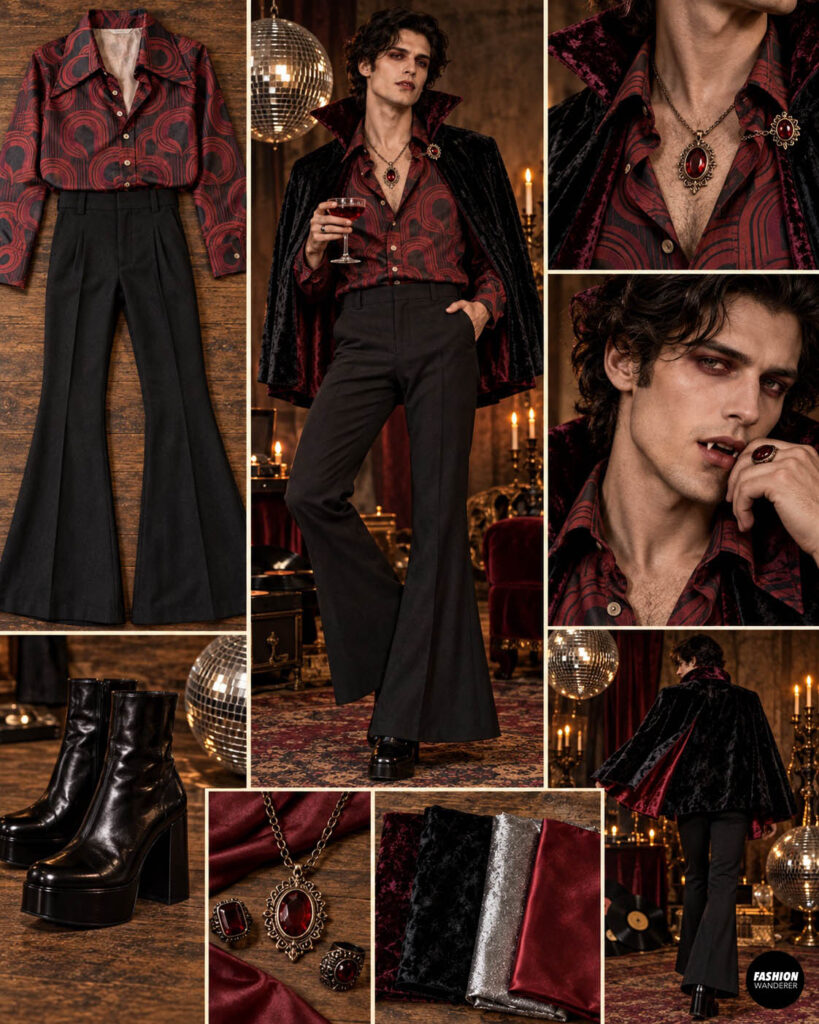
Tuck the retro shirt into your flared trousers.
Open the top two or three buttons.
Let the oversized collar sit over the jacket or cape.
Add platform-style shoes or dark boots.
Finish with a medallion and vampire makeup.
The result should feel like a vampire who accidentally walked out of a 1970s nightclub—and that is exactly the point.
Tips for a Better Halloween Upcycle
Try to use clothing you already own before buying new fabric.
Thrift stores are excellent places to find retro shirts, flared pants, and costume accessories.
If you want the clothing to remain wearable after Halloween, use removable hand stitches instead of permanent machine stitching.
You can also replace fabric additions with safety pins or temporary fabric adhesive.
Final Thoughts
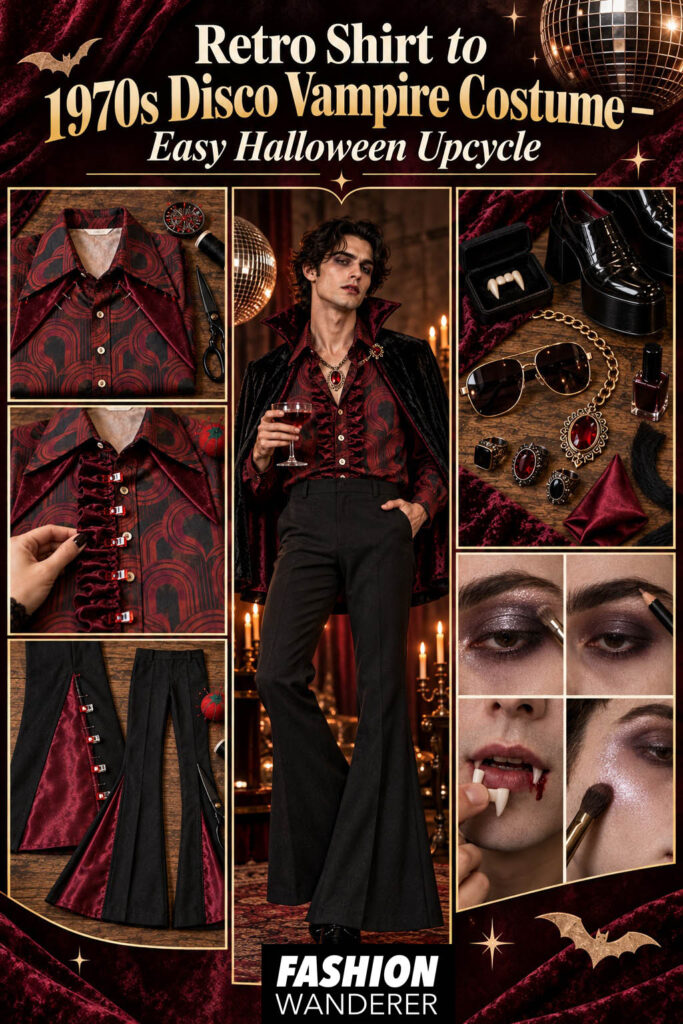
This Retro Shirt to 1970s Disco Vampire Costume is a fun way to turn everyday clothing into a unique Halloween outfit without sewing an entire costume from scratch.
With an oversized collar, dramatic cuffs, flared trousers, and a mini vampire cape, an old button-up shirt can quickly become something completely different.
Whether you are making a costume for a Halloween party, themed event, or last-minute celebration, this easy clothing upcycle is stylish, funny, and beginner friendly.
So before buying a costume, check your closet or thrift store. That forgotten retro shirt might already be the beginning of your best DIY Halloween costume yet.