
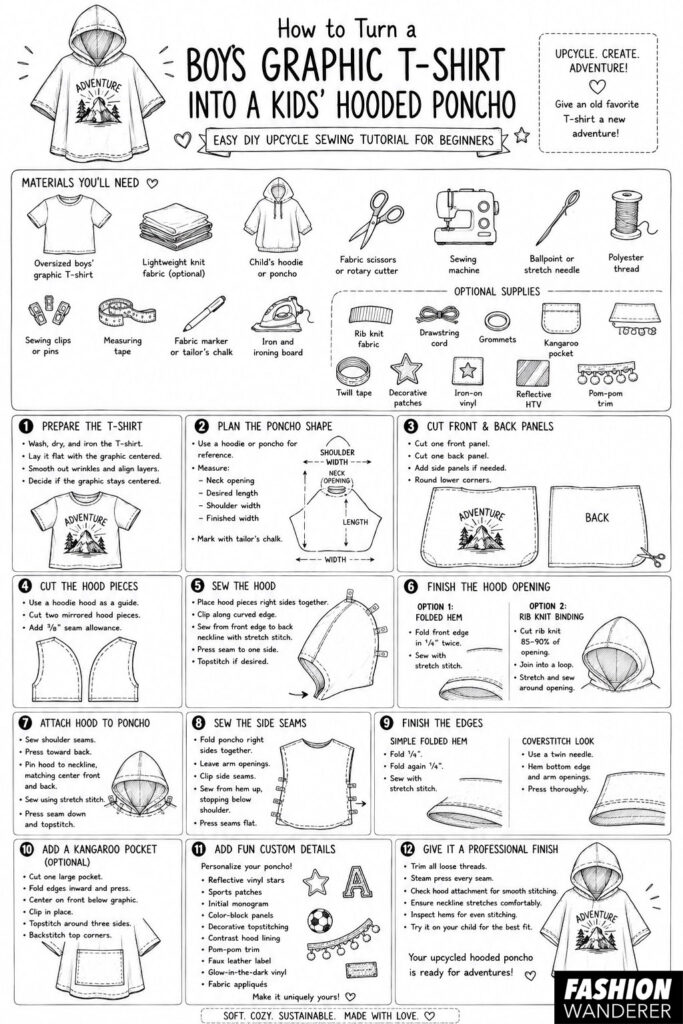
Got an old boys’ graphic T-shirt that’s too small but too cute to throw away? Give it a second life by transforming it into a cozy kids’ hooded poncho! This beginner-friendly upcycling project is perfect for chilly mornings, camping trips, beach days, school, or everyday adventures. Better yet, you’ll preserve your child’s favorite graphic while creating a practical new garment.
Since T-shirts are made from soft knit fabric that doesn’t fray easily, this project is ideal for beginners learning to sew with stretchy fabrics. With just a few simple tools and basic sewing techniques, you can make a comfortable hooded poncho in an afternoon.
In this detailed tutorial, you’ll learn exactly how to turn a graphic T-shirt into a stylish hooded poncho step by step. For more inspiration, here are cute kids’ t-shirt upcycle ideas that are guaranteed to peak your interest!
Why You’ll Love This DIY Project
- Perfect beginner sewing project
- Great way to recycle favorite graphic T-shirts
- Comfortable and lightweight
- Excellent for layering year-round
- Budget-friendly handmade clothing
- Quick weekend sewing project
- Fun personalized gift idea
Materials You’ll Need
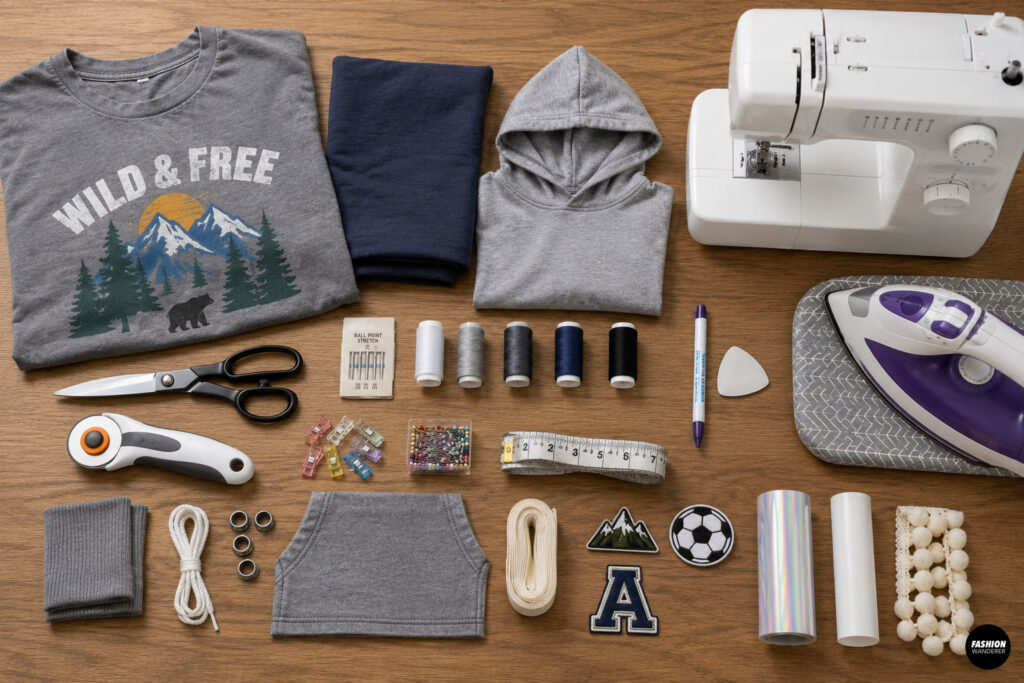
- 1 oversized boys’ graphic T-shirt (adult Small–Large or oversized youth works well)
- Lightweight knit fabric for the hood (optional if extra T-shirt fabric isn’t enough)
- Child’s hoodie or poncho for sizing reference
- Fabric scissors or rotary cutter
- Sewing machine
- Ballpoint or stretch sewing needle
- Polyester thread
- Sewing clips or pins
- Measuring tape
- Fabric marker or tailor’s chalk
- Iron and ironing board
Optional Supplies
- Rib knit fabric for hood opening
- Drawstring cord
- Grommets
- Kangaroo pocket
- Twill tape
- Decorative patches
- Iron-on vinyl
- Reflective heat-transfer vinyl
- Pom-pom trim
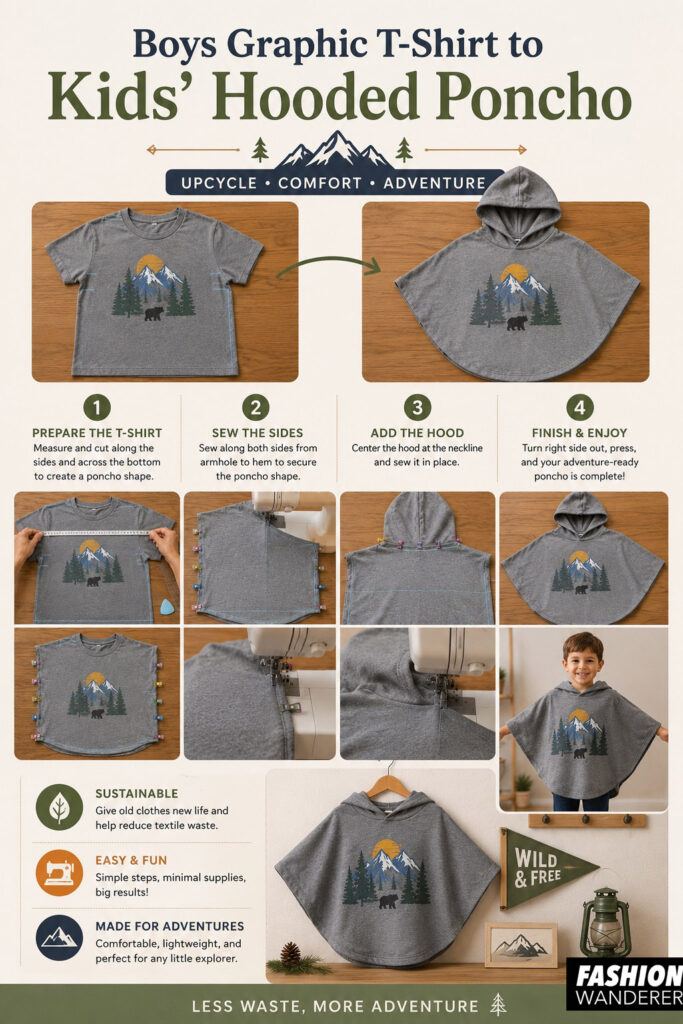
Upcycle T-Shirt into Kids’ Hooded Poncho
Step 1: Prepare the T-Shirt
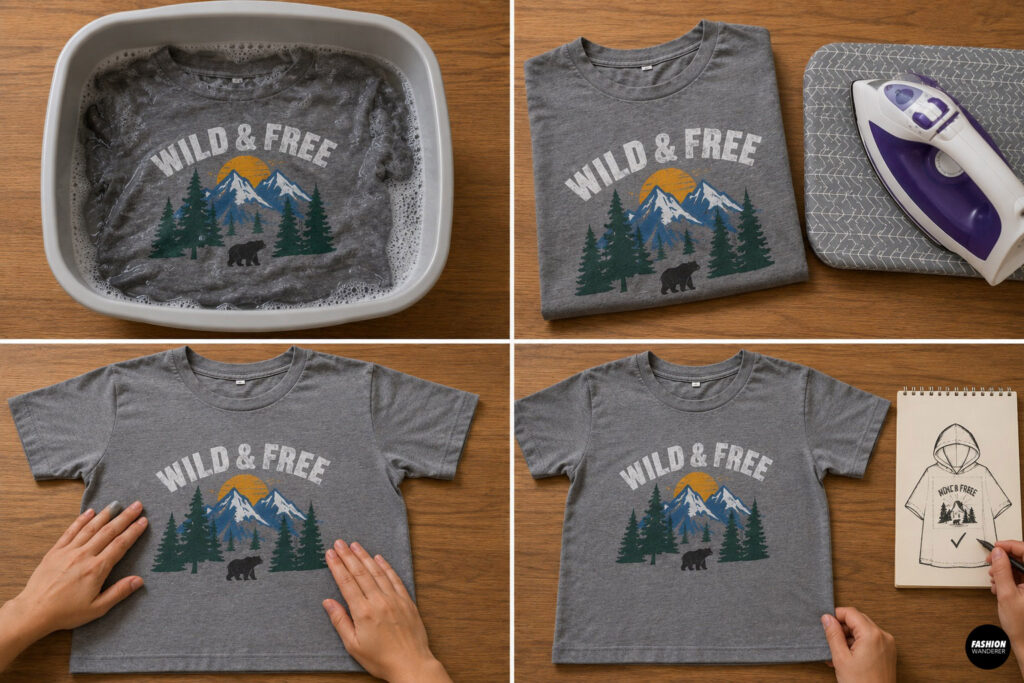
Wash, dry, and iron the T-shirt before starting.
Lay it flat on your cutting table with the graphic centered.
Smooth away wrinkles and make sure both layers are evenly aligned.
Decide whether the front graphic will remain centered on the finished poncho.
Step 2: Plan the Poncho Shape
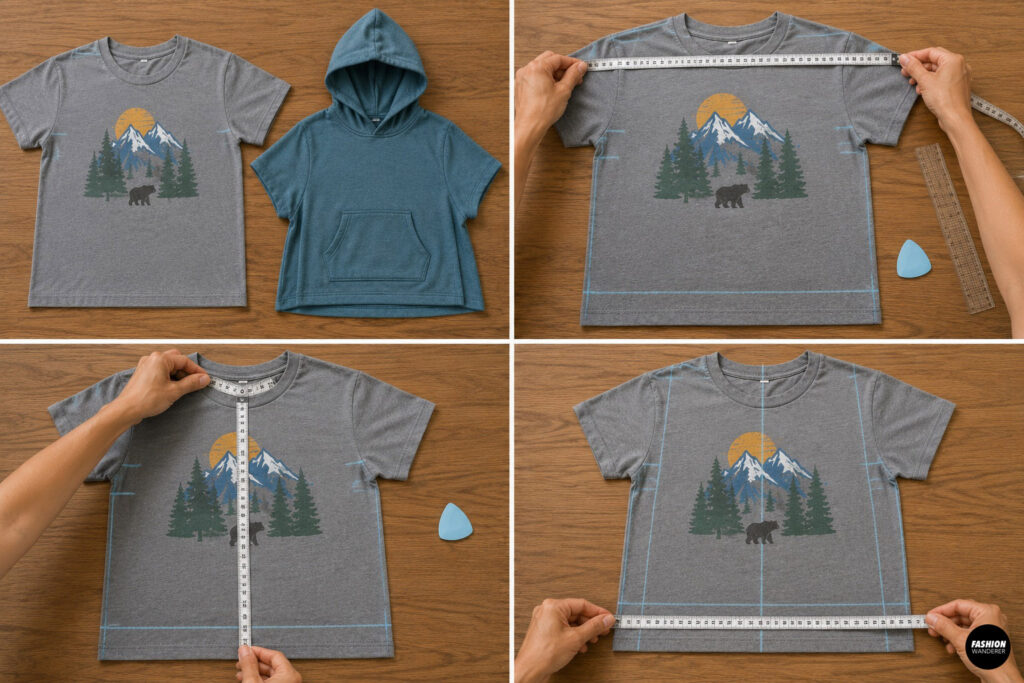
A poncho is loose-fitting, so you don’t need an exact pattern.
Use a child’s hoodie or poncho as a sizing guide.
Measure:
- Neck opening
- Desired length
- Shoulder width
- Finished width
Mark these measurements using tailor’s chalk.
Step 3: Cut the Front and Back Panels
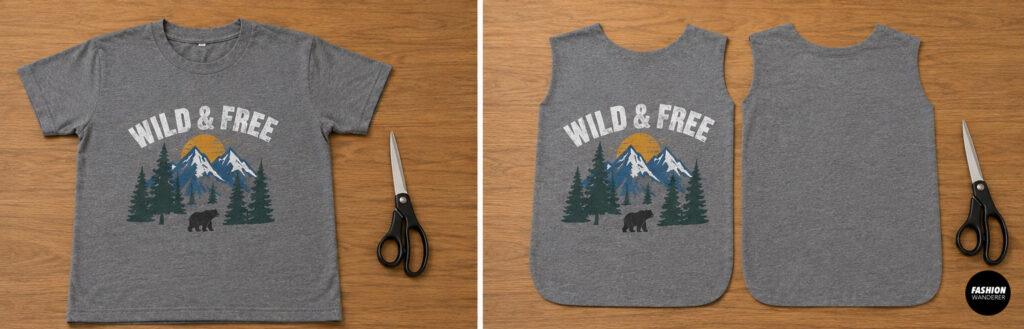
Using the largest sections of the T-shirt, cut:
- One front panel
- One back panel
If your T-shirt isn’t wide enough, sew extra side panels using leftover fabric or a coordinating knit.
Round the lower corners slightly for a softer look.
Step 4: Cut the Hood Pieces
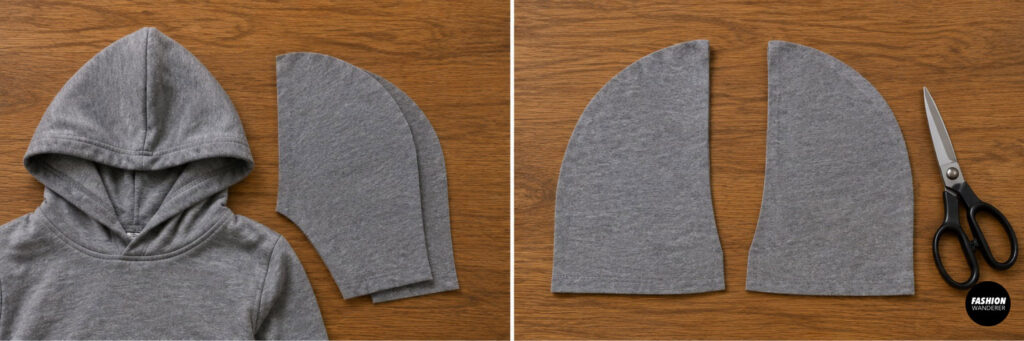
Use a child’s hoodie hood as a guide.
Cut:
- Two mirrored hood pieces
If needed, combine leftover T-shirt fabric with matching knit fabric to make the hood large enough.
Remember to add approximately ⅜-inch seam allowances.
Step 5: Sew the Hood
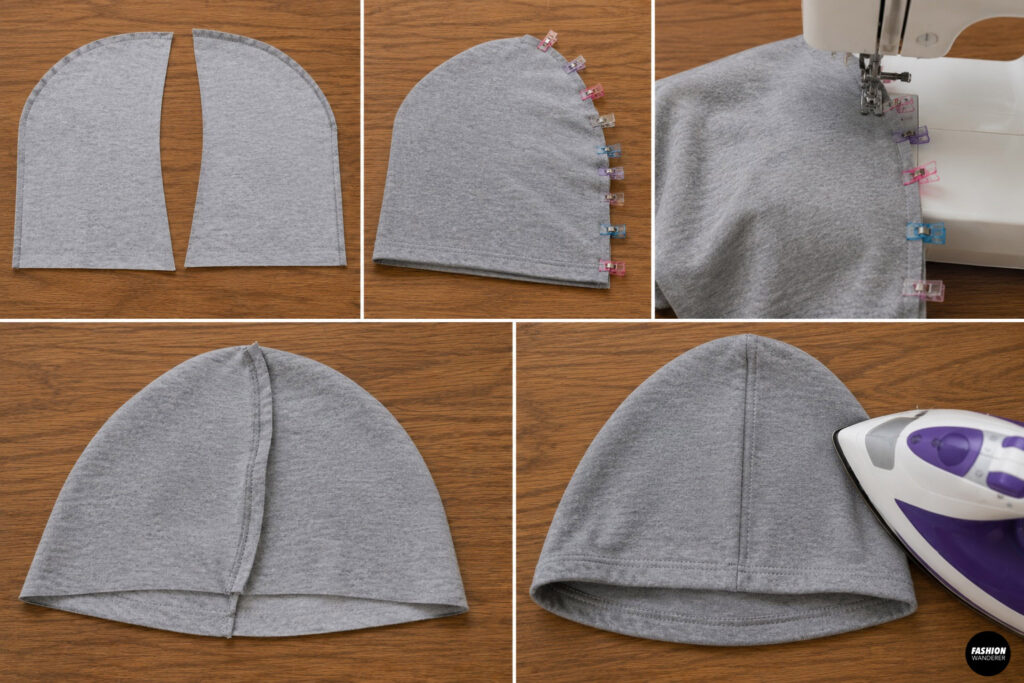
Place both hood pieces right sides together.
Clip along the curved edge.
Using a stretch stitch or narrow zigzag stitch, sew from the front edge to the back neckline.
Press the seam toward one side.
If desired, topstitch the seam for a professional finish.
Step 6: Finish the Hood Opening
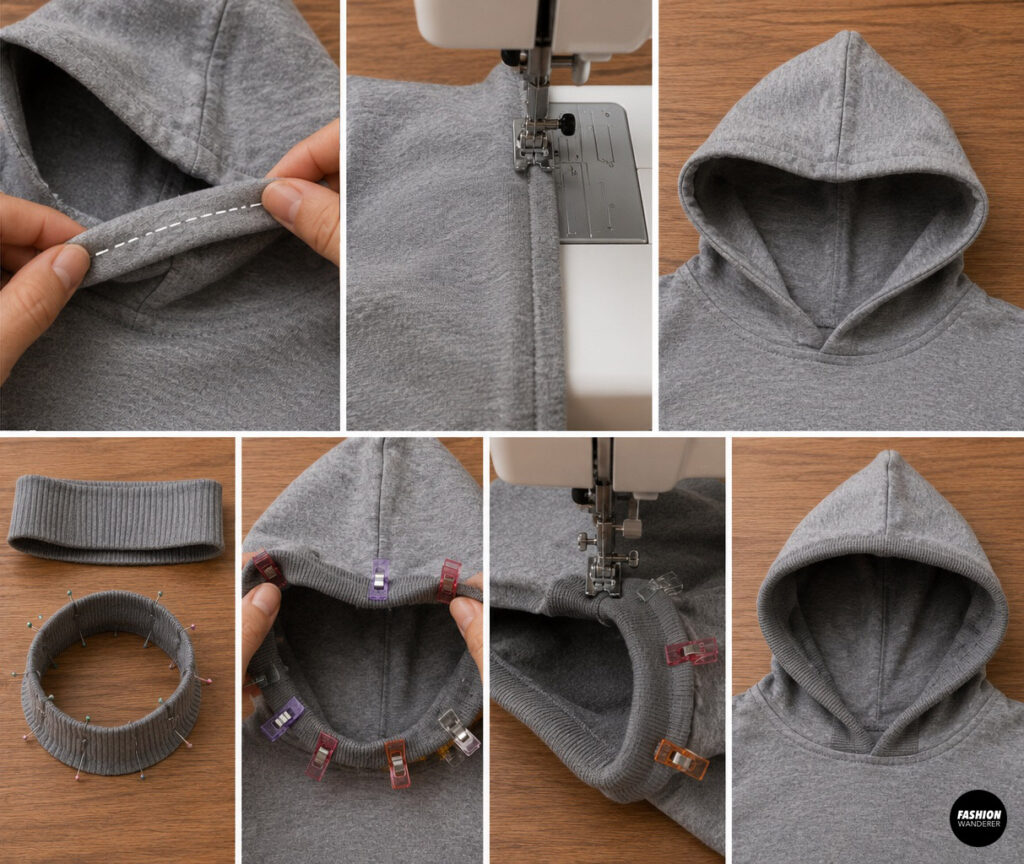
Choose one of these beginner-friendly options.
Option 1: Folded Hem
Fold the front hood edge inward ¼ inch twice.
Sew using a stretch stitch.
Option 2: Rib Knit Binding
Cut rib knit approximately 85–90% of the hood opening.
Join into a loop.
Stretch evenly while sewing around the hood opening.
This gives the hood a neat store-bought appearance.
Step 7: Attach the Hood to the Poncho
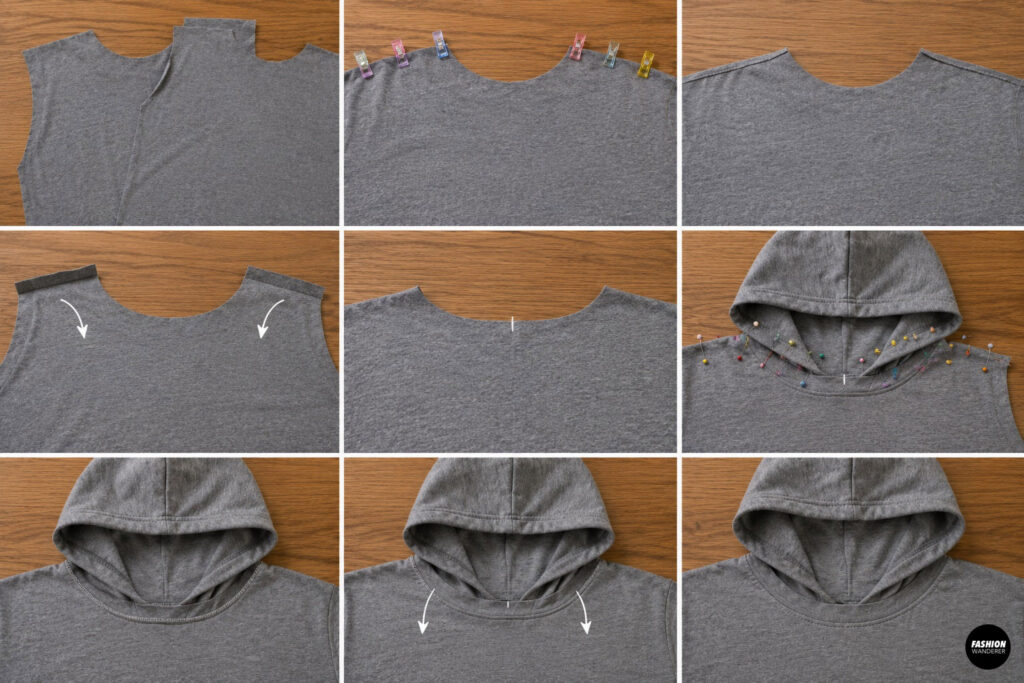
Lay the front and back poncho panels right sides together at the shoulders.
Sew the shoulder seams.
Press them toward the back.
Mark the center front and center back neckline.
Pin the hood evenly around the neckline.
Sew using a stretch stitch.
Press the seam allowance downward.
Topstitch if desired.
Step 8: Sew the Side Seams
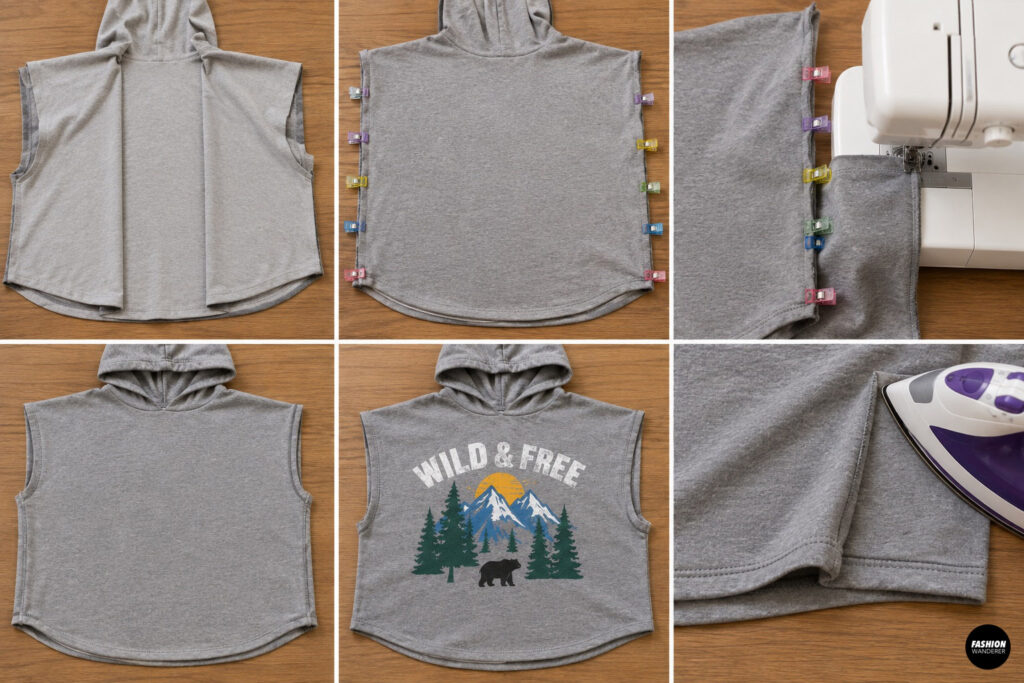
Fold the poncho right sides together.
Leave generous arm openings for easy movement.
Clip the side seams.
Sew from the hem upward, stopping several inches below the shoulder to create comfortable arm openings.
Press seams flat.
Step 9: Finish the Edges
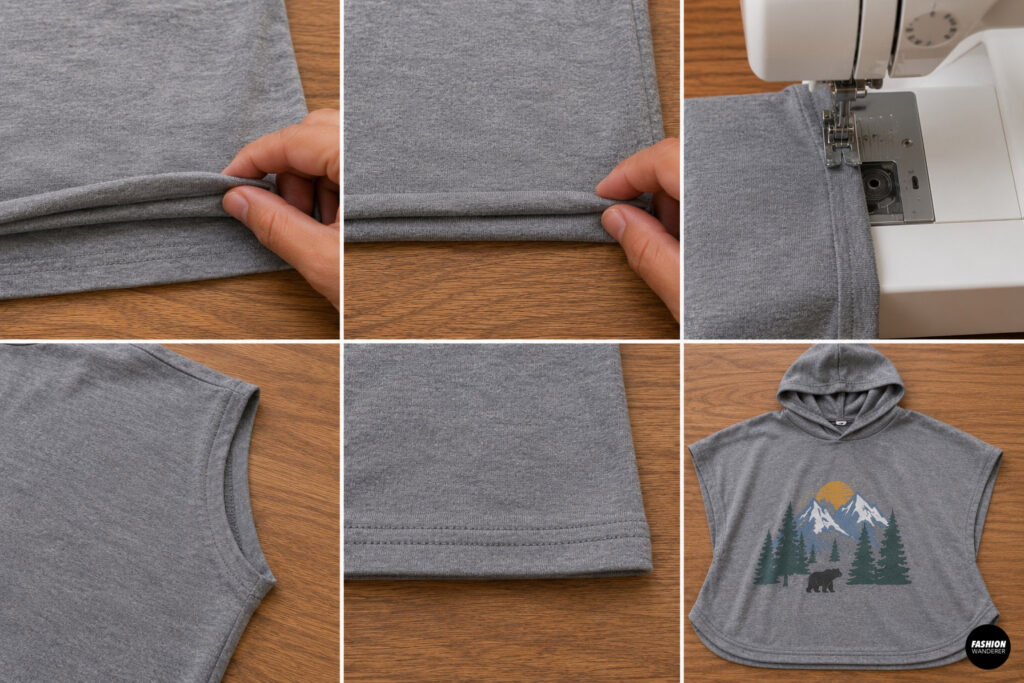
Since knit fabric doesn’t fray, finishing is easy.
You can:
Simple Folded Hem
Fold:
- ¼ inch
- Then another ¼ inch
Sew using a stretch stitch.
Coverstitch Look
Use a twin needle for a professional-looking finish.
Hem:
- Bottom edge
- Arm openings
Press thoroughly.
Step 10: Add a Kangaroo Pocket (Optional)
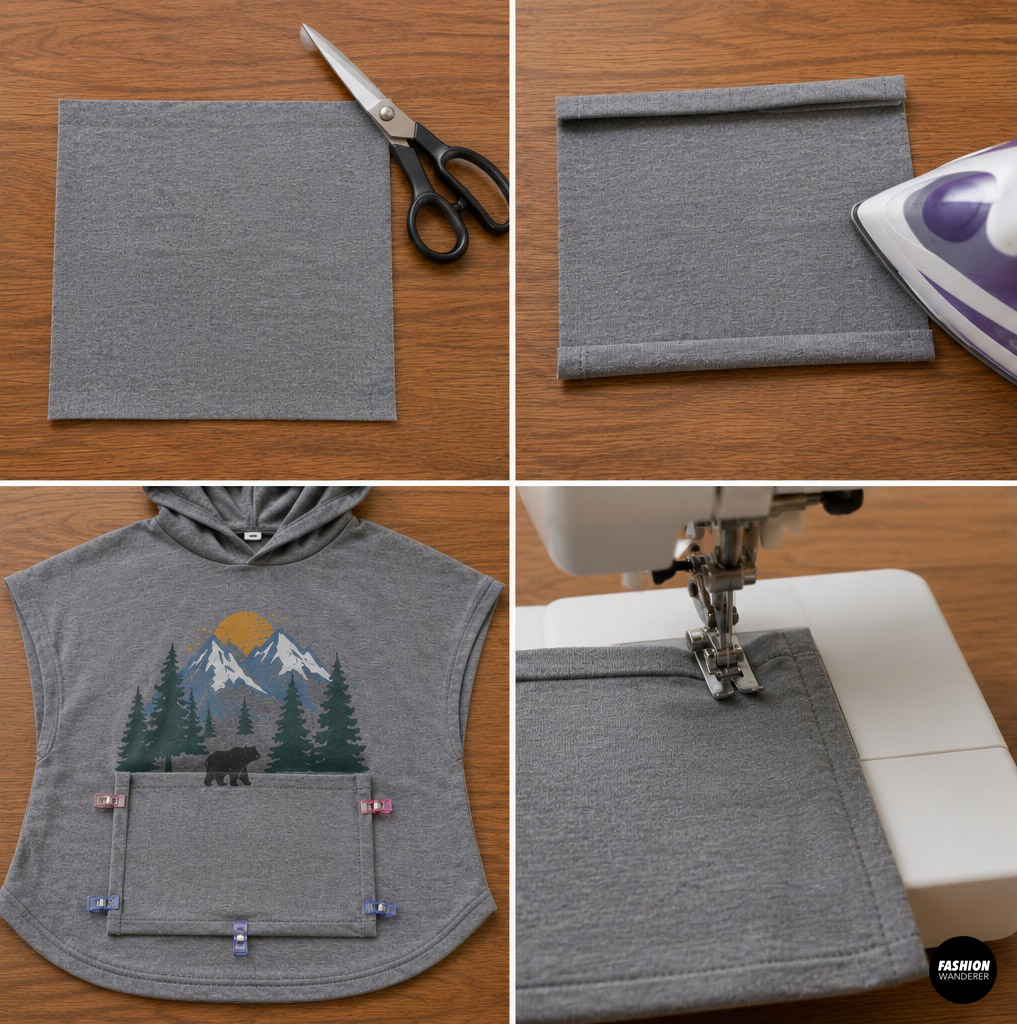
Use leftover T-shirt fabric.
Cut one large pocket.
Fold the edges inward.
Press.
Center the pocket on the front panel below the graphic.
Clip into place.
Topstitch around three sides.
Backstitch at both top corners for durability.
Step 11: Add Fun Custom Details
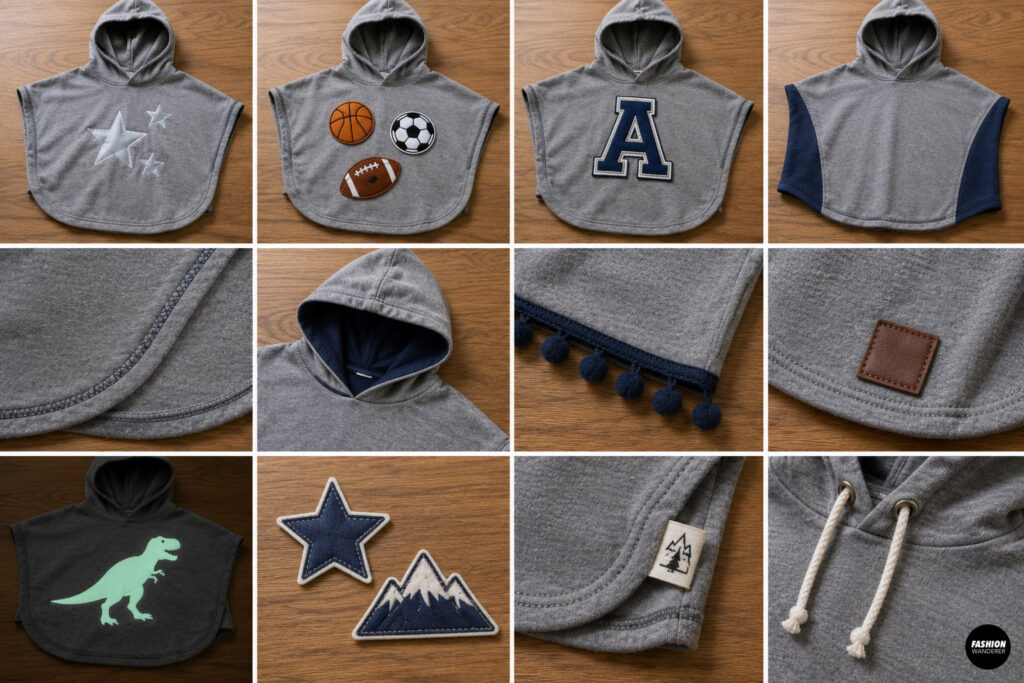
Now personalize your poncho.
Ideas include:
- Reflective vinyl stars
- Sports patches
- Initial monogram
- Color-block side panels
- Decorative topstitching
- Contrast hood lining
- Pom-pom trim
- Faux leather label
- Glow-in-the-dark vinyl
- Fabric appliqués
These details make every poncho one of a kind.
Step 12: Give It a Professional Finish
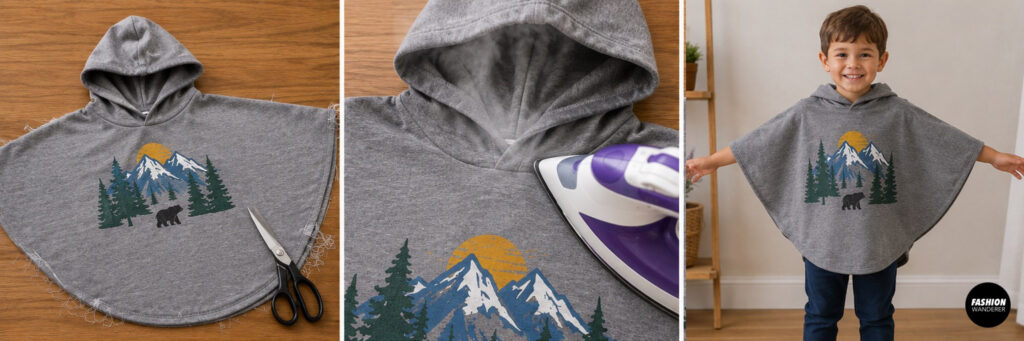
Trim all loose threads.
Steam press every seam.
Check the hood attachment for smooth stitching.
Make sure the neckline stretches comfortably.
Inspect every hem for even stitching.
Try the poncho on your child to ensure the length, arm openings, and hood fit comfortably.
Your upcycled hooded poncho is now ready for adventures!
Creative Design Ideas
Customize your hooded poncho with these fun themes:
- Dinosaur graphics
- Superhero prints
- Space theme
- Skateboard style
- Camping adventure
- Sports team colors
- Cartoon characters
- Rainbow color blocking
- Mountain explorer
- Beach poncho
Beginner Sewing Tips
- Always use a ballpoint needle for knit fabrics.
- Test your stitch settings on fabric scraps before sewing.
- Use sewing clips instead of pins to avoid stretching the knit.
- Press every seam for a cleaner finish.
- Sew slowly around curves, especially on the hood.
- Use polyester thread for strong, flexible seams.
- Avoid pulling the fabric while sewing to prevent wavy seams.
Frequently Asked Questions
What size T-shirt works best?
An oversized youth T-shirt or an adult Small to Large T-shirt usually provides enough fabric for a child’s hooded poncho, depending on the child’s size.
Can I make this without a serger?
Yes! A regular sewing machine with a narrow zigzag, lightning stitch, or stretch stitch works perfectly.
What fabrics work best?
Cotton jersey, cotton-poly blends, lightweight French terry, and bamboo knit are all excellent choices. If you need extra fabric for the hood or side panels, choose a knit with similar stretch and weight.
Can I line the hood?
Absolutely. A second layer of lightweight knit or jersey adds warmth and gives the hood a polished finish while keeping it soft and comfortable.
Is this project suitable for beginners?
Definitely! Because knit fabric doesn’t fray and the poncho has a relaxed fit with minimal shaping, it’s one of the easiest upcycling projects for new sewists.
Final Thoughts
Turning a boys’ graphic T-shirt into a kids’ hooded poncho is a creative way to preserve favorite T-shirt designs while making a practical new garment your child can enjoy year-round. This simple upcycled t-shirt project helps reduce textile waste, saves money, and builds confidence with beginner sewing techniques such as sewing knit fabrics, attaching a hood, hemming, and finishing seams.
Whether you’re sewing for outdoor adventures, cool evenings, or simply giving a treasured graphic tee a new purpose, this easy DIY hooded poncho is a fun project that combines comfort, creativity, and sustainability into one stylish handmade piece.