
Have an oversized T-shirt hiding in your closet? Instead of donating it, transform it into an adorable ruffle-sleeve romper that’s perfect for babies, toddlers, and young girls. This beginner-friendly DIY sewing project is an affordable way to upcycle old clothing while creating something stylish and comfortable.
A T-shirt romper is soft, stretchy, lightweight, and ideal for everyday play, vacations, summer outings, or lounging at home. Since knit fabric doesn’t fray easily, it’s one of the easiest materials for beginner sewists to work with.
In this step-by-step tutorial, you’ll learn exactly how to make a T-shirt to ruffle-sleeve romper, including cutting tips, sewing instructions, and beginner-friendly techniques. The new sewing skills you learn are easily applied to each of these kids’ t-shirt upcycle projects that are guaranteed to add style to your kids wardrobe!
Why You’ll Love This DIY Project
- Beginner-friendly sewing project
- Great way to recycle oversized T-shirts
- Soft and comfortable for kids
- Budget-friendly handmade clothing
- Quick project that takes about 1–2 hours
- Endless color and print possibilities
Materials You’ll Need
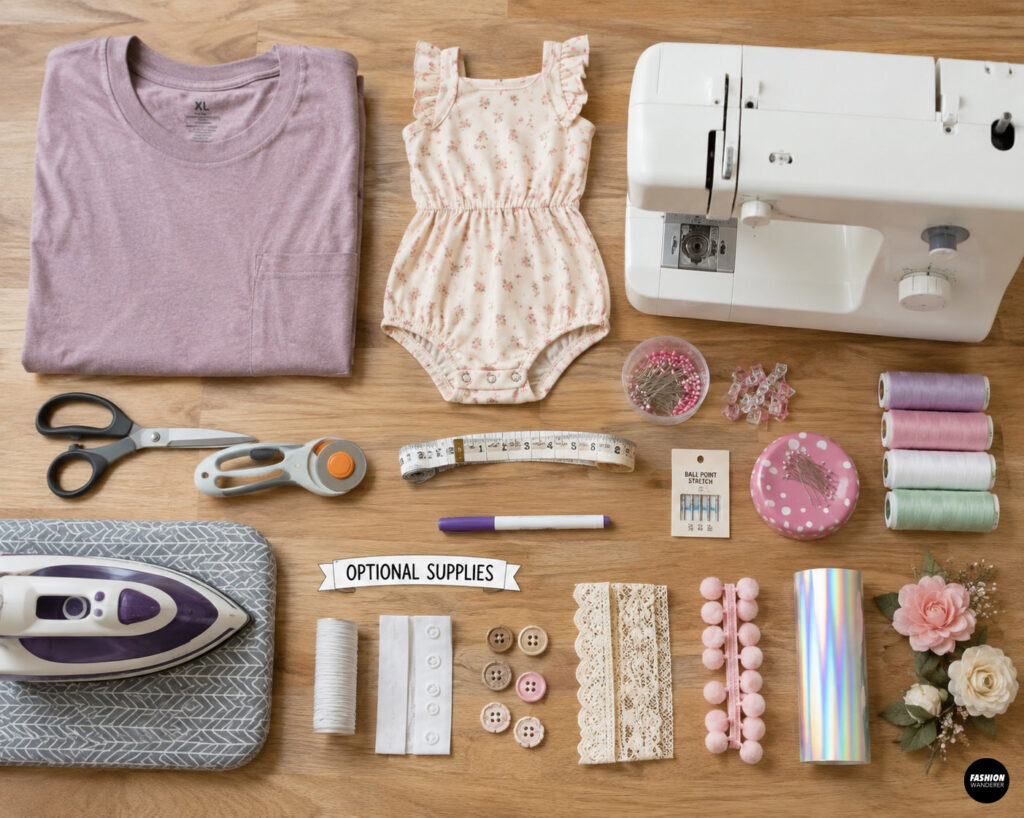
- 1 oversized adult T-shirt (XL–3XL works best)
- Child’s romper for sizing reference or romper sewing pattern
- Fabric scissors or rotary cutter
- Sewing machine
- Ballpoint or stretch needle
- Polyester thread
- Sewing clips or pins
- Measuring tape
- Fabric marker or tailor’s chalk
- Iron and ironing board
Optional Supplies
- ¼-inch elastic for leg openings
- Snap tape or plastic snaps
- Decorative buttons
- Lace trim
- Pom-pom trim
- Heat-transfer vinyl
- Fabric flowers
DIY T-Shirt into Ruffle-Sleeve Romper
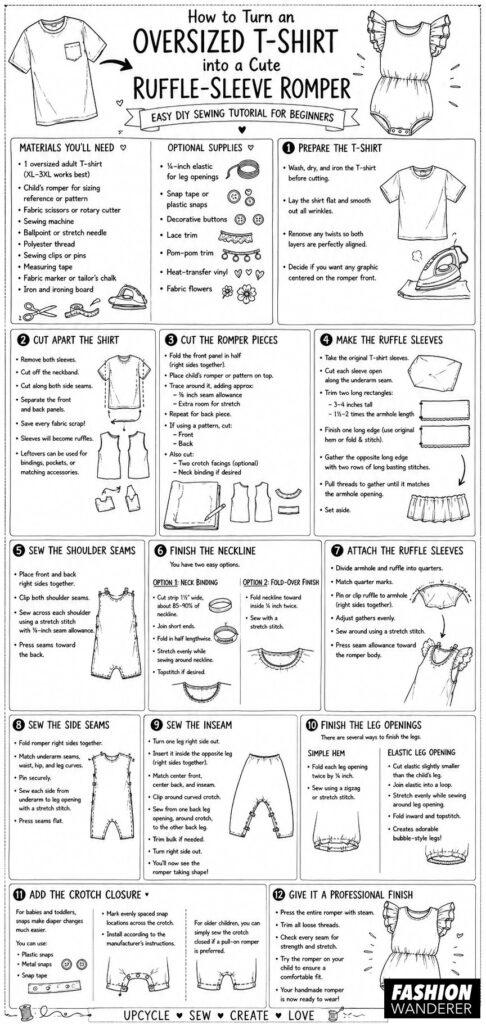
Step 1: Prepare the T-Shirt
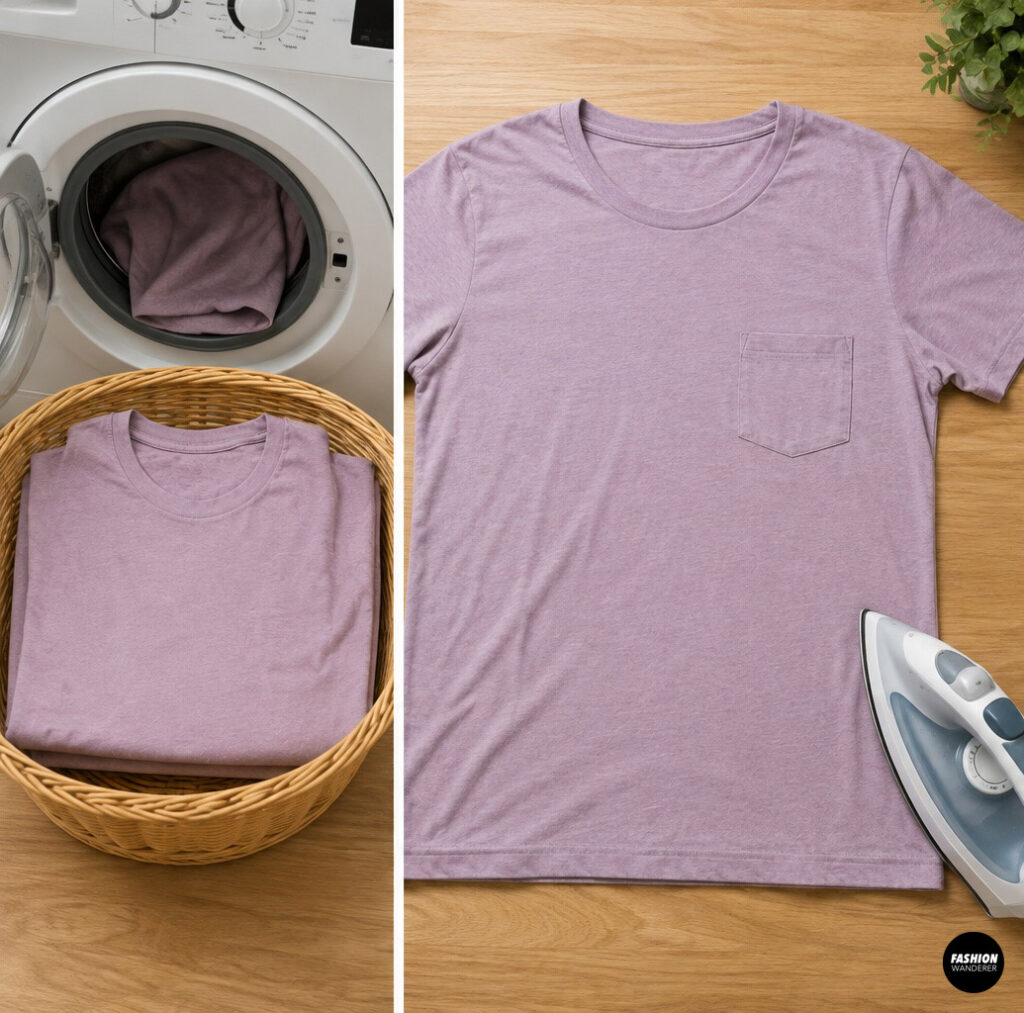
Wash, dry, and iron the T-shirt before cutting. This removes shrinkage and makes the fabric easier to work with.
Lay the shirt flat on your cutting table and smooth out any wrinkles. Remove any twists so both layers are perfectly aligned.
If the shirt has a large graphic, decide whether you’d like it centered on the romper front.
Step 2: Cut Apart the Shirt
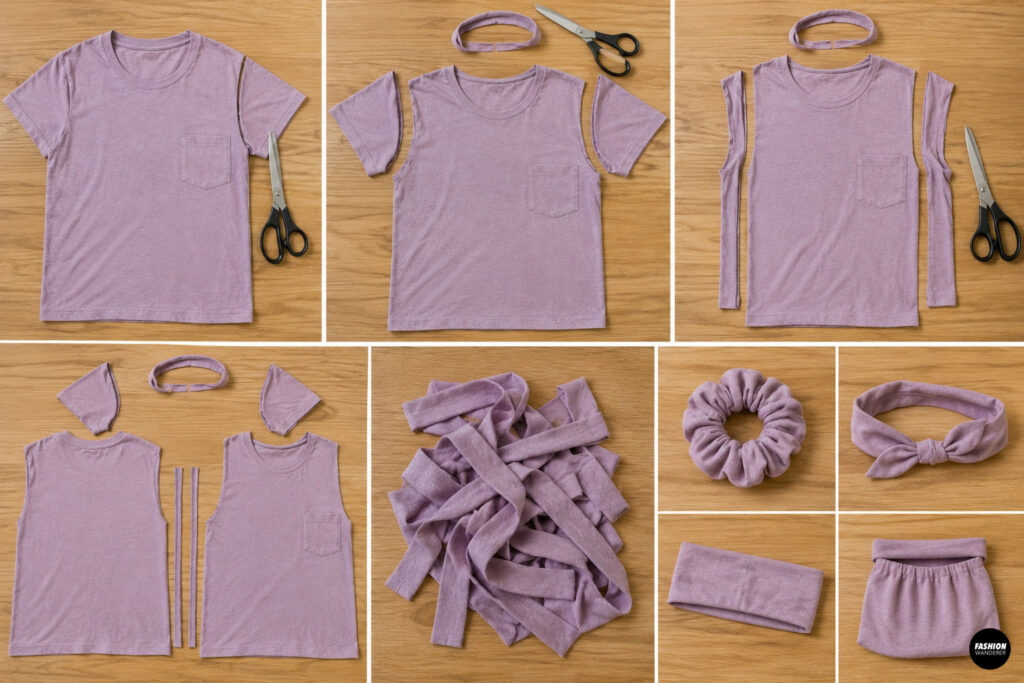
Cut:
- Remove both sleeves.
- Cut off the neckband.
- Cut along both side seams.
- Separate the front and back panels.
Save every fabric scrap.
The sleeves will become beautiful ruffles, while leftover fabric can be used for bindings, pockets, or matching hair accessories.
Step 3: Cut the Romper Pieces
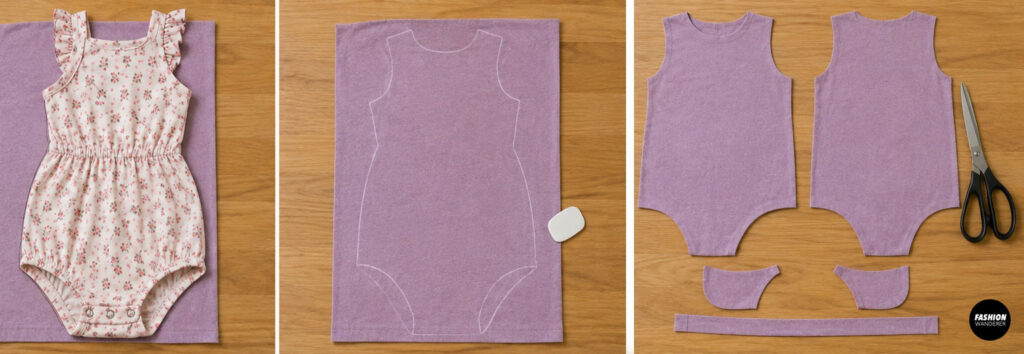
Fold the front fabric panel in half with right sides together.
Place your child’s romper (or pattern) on top.
Trace around it while adding approximately:
- ⅜ inch seam allowance
- Extra room for stretch if needed
Repeat for the back piece.
If using a pattern, cut:
- Front
- Back
Also cut:
- Two crotch facings (optional)
- Neck binding if desired
Step 4: Make the Ruffle Sleeves
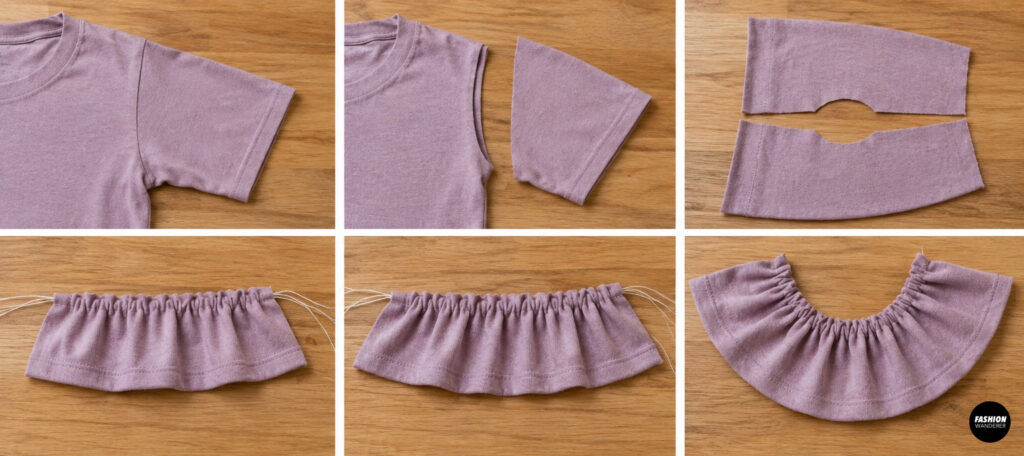
Take the original T-shirt sleeves.
Cut each sleeve open along the underarm seam.
Trim two long rectangles approximately:
- 3–4 inches tall
- 1½–2 times the armhole length
The extra width creates soft gathers.
Finish one long edge by leaving the original sleeve hem or folding and stitching a narrow hem.
Gather the opposite long edge by sewing two rows of long basting stitches.
Pull the threads gently until the ruffle matches the armhole opening.
Set aside.
Step 5: Sew the Shoulder Seams
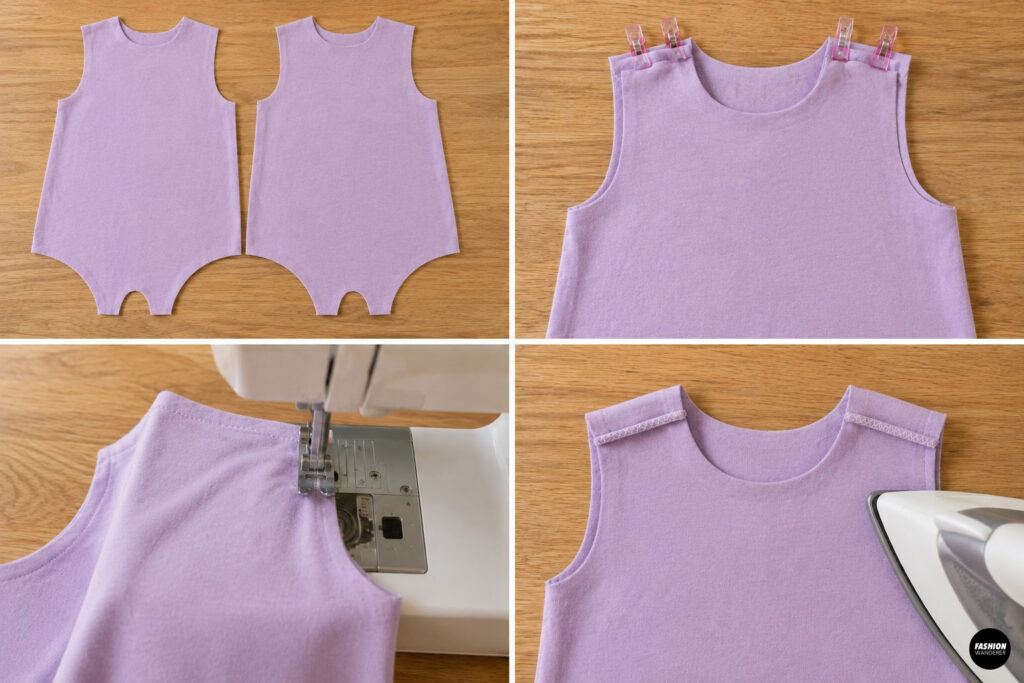
Place the romper front and back right sides together.
Clip both shoulder seams.
Using a stretch stitch, lightning stitch, or narrow zigzag stitch, sew across each shoulder using a ⅜-inch seam allowance.
Press the seams toward the back.
Step 6: Finish the Neckline
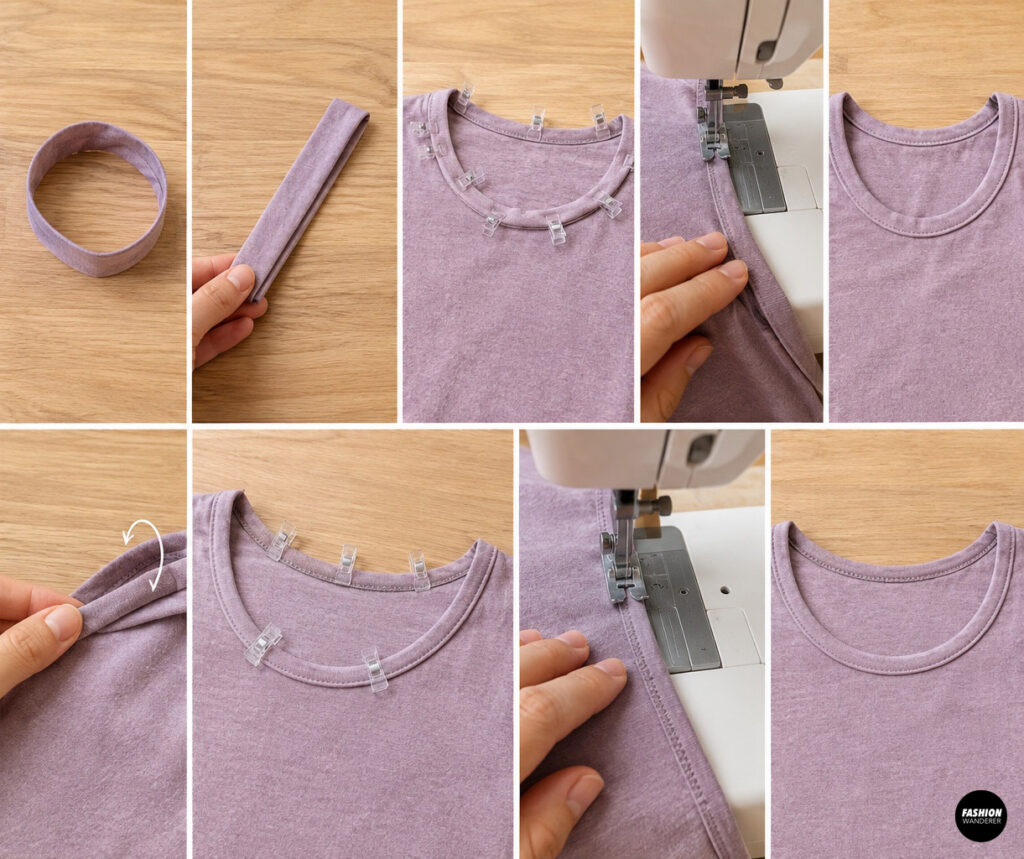
You have two easy options.
Option 1: Neck Binding
Cut a strip of knit fabric approximately:
- 1½ inches wide
- About 85–90% of the neckline measurement
Join the short ends.
Fold in half lengthwise.
Evenly stretch the binding while sewing around the neckline.
Topstitch if desired.
Option 2: Fold-Over Finish
Fold the neckline toward the inside by ¼ inch twice.
Sew with a stretch stitch.
Step 7: Attach the Ruffle Sleeves
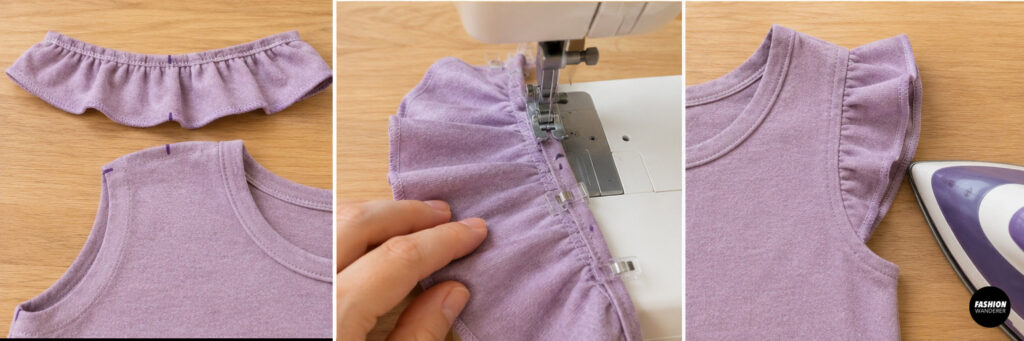
Divide both the armhole and gathered ruffle into quarters.
Match the quarter marks.
Pin or clip the ruffle to the armhole with right sides together.
Adjust the gathers evenly.
Sew around each armhole using a stretch stitch.
Finish by pressing the seam allowance toward the romper body.
The soft ruffles instantly give the romper a boutique-style look.
Step 8: Sew the Side Seams
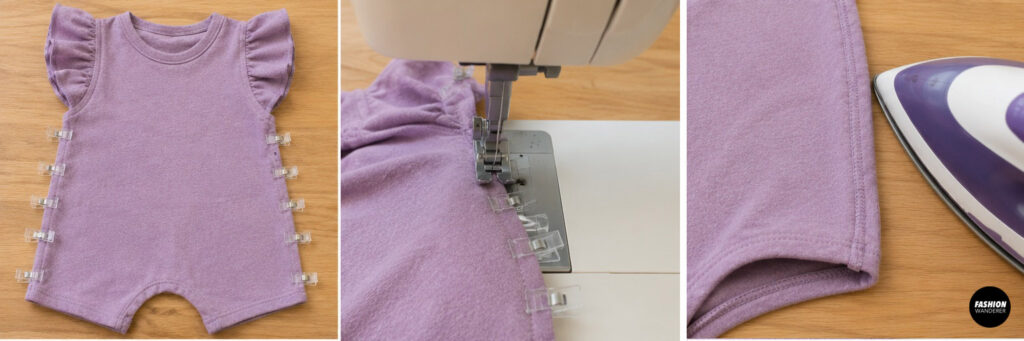
Fold the romper right sides together.
Match:
- Underarm seams
- Waist
- Hip
- Leg curves
Pin everything securely.
Sew each side from the underarm to the leg opening using a stretch stitch.
Press seams flat.
Step 9: Sew the Inseam
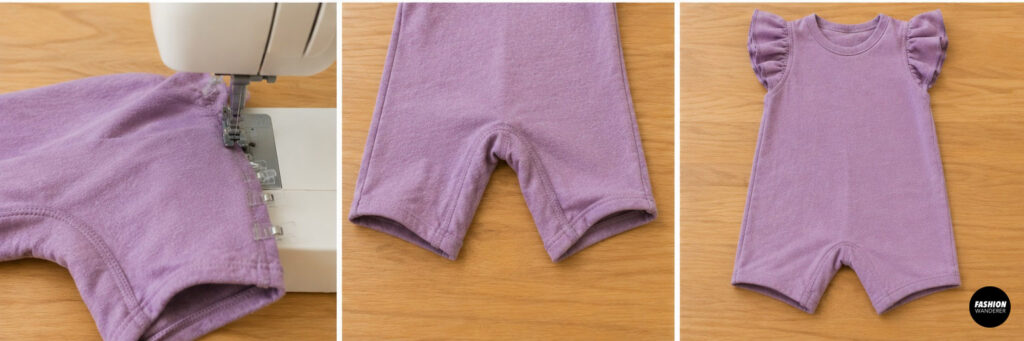
Turn one leg right side out.
Insert it inside the opposite leg so right sides face together.
Match:
- Center front
- Center back
- Inseam
Clip carefully around the curved crotch.
Sew continuously from one back leg opening around the crotch and down to the opposite leg.
Trim bulk if necessary.
Turn the romper right side out.
You’ll now see the romper taking shape.
Step 10: Finish the Leg Openings
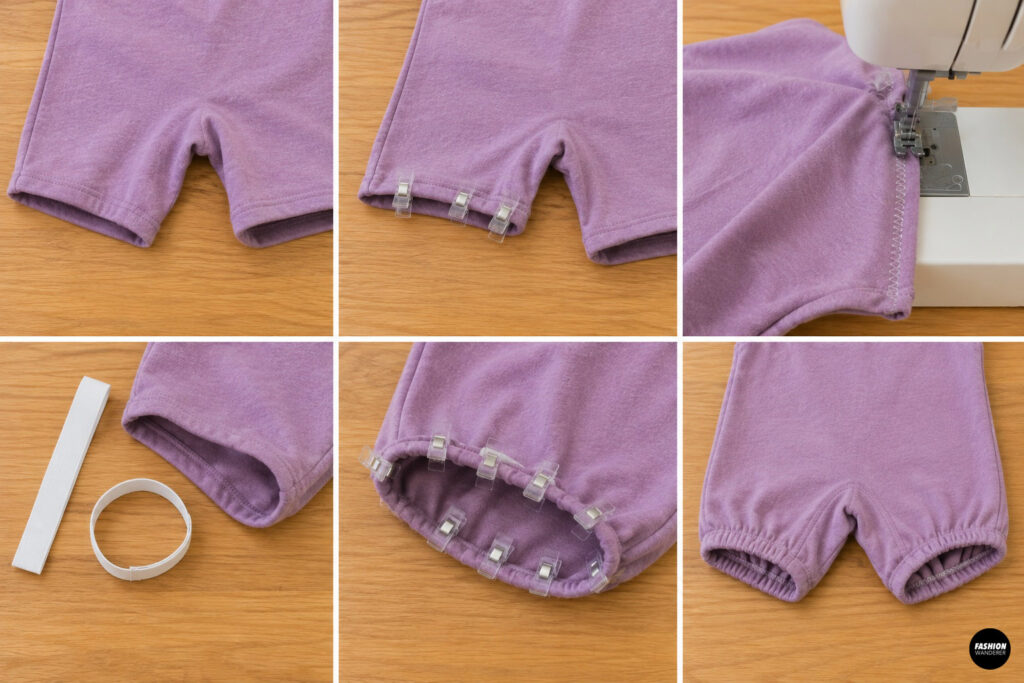
There are several ways to finish the legs.
Simple Hem
Fold each leg opening twice by ¼ inch.
Sew using a zigzag or stretch stitch.
Elastic Leg Opening
Cut elastic slightly smaller than the child’s leg measurement.
Join the elastic into a loop.
Stretch evenly while sewing it around the leg opening.
Fold inward and topstitch.
This creates adorable bubble-style legs.
Step 11: Add the Crotch Closure
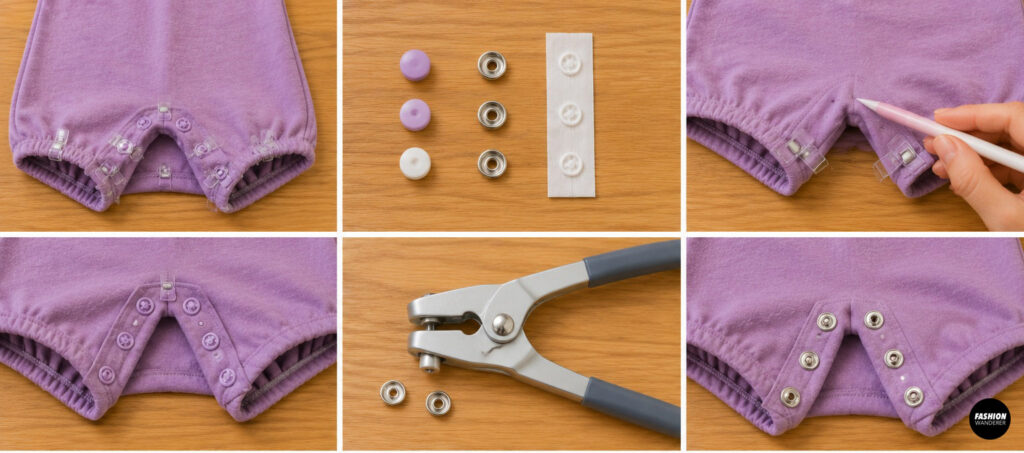
For babies and toddlers, snaps make diaper changes much easier.
You can use:
- Plastic snaps
- Metal snaps
- Snap tape
Mark evenly spaced snap locations across the crotch.
Install according to the manufacturer’s instructions.
For older children, you can simply sew the crotch closed if a pull-on romper is preferred.
Step 12: Give It a Professional Finish
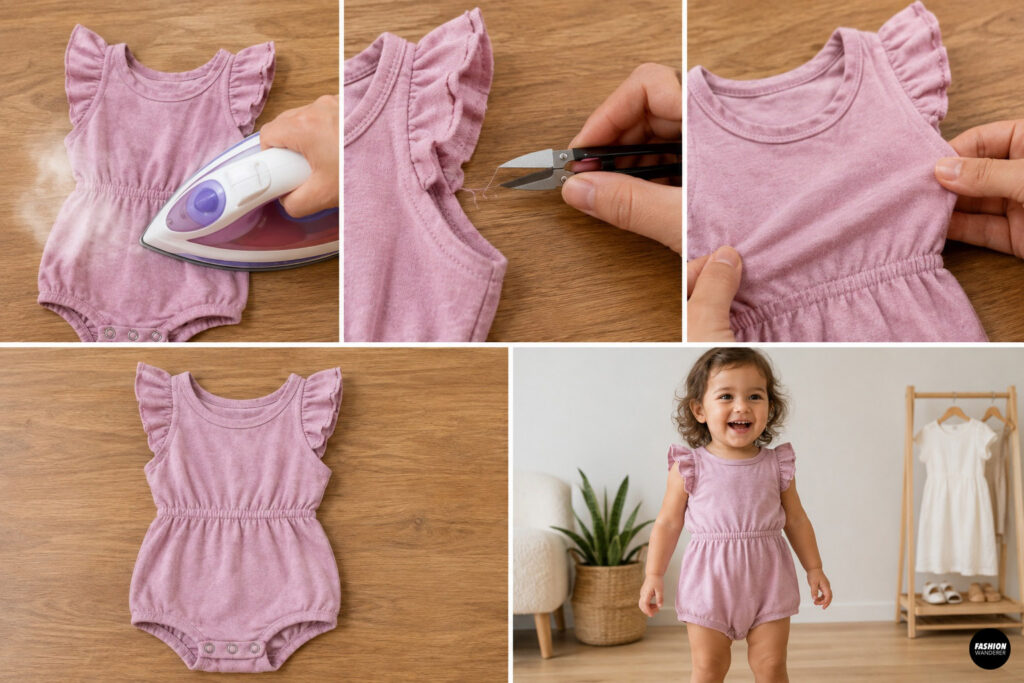
Press the entire romper with steam.
Trim all loose threads.
Check every seam for strength and stretch.
Try the romper on your child to ensure a comfortable fit.
Your handmade romper is now ready to wear.
Easy Customization Ideas
One of the best things about upcycling is making each project unique.
Try adding:
- Front patch pockets
- Decorative bows
- Contrast neck binding
- Lace-trimmed ruffles
- Pom-pom trim
- Fabric flowers
- Iron-on appliqués
- Matching fabric headband
- Matching bloomers
- Personalized heat-transfer vinyl
Every romper becomes one-of-a-kind.
Beginner Sewing Tips
- Always use a ballpoint needle when sewing knit fabric.
- Avoid pulling the fabric while sewing.
- Test stitch settings on fabric scraps first.
- Use sewing clips instead of pins to prevent stretching.
- Press after every seam for a cleaner finish.
- Sew slowly around curves for smoother results.
Frequently Asked Questions
What size T-shirt works best?
Adult XL to 3XL T-shirts provide the most usable fabric for children’s rompers.
Can I sew this without a serger?
Absolutely. A regular sewing machine with a zigzag or stretch stitch works perfectly.
What fabric works best?
Cotton jersey, cotton-poly blends, bamboo knits, and lightweight French terry all make excellent rompers.
Can I add pockets?
Yes! Patch pockets are simple to sew and make the romper even more practical.
Is this project suitable for beginners?
Definitely. Since T-shirt knit fabric doesn’t unravel easily, this is one of the easiest clothing upcycle projects for new sewists.
Final Thoughts
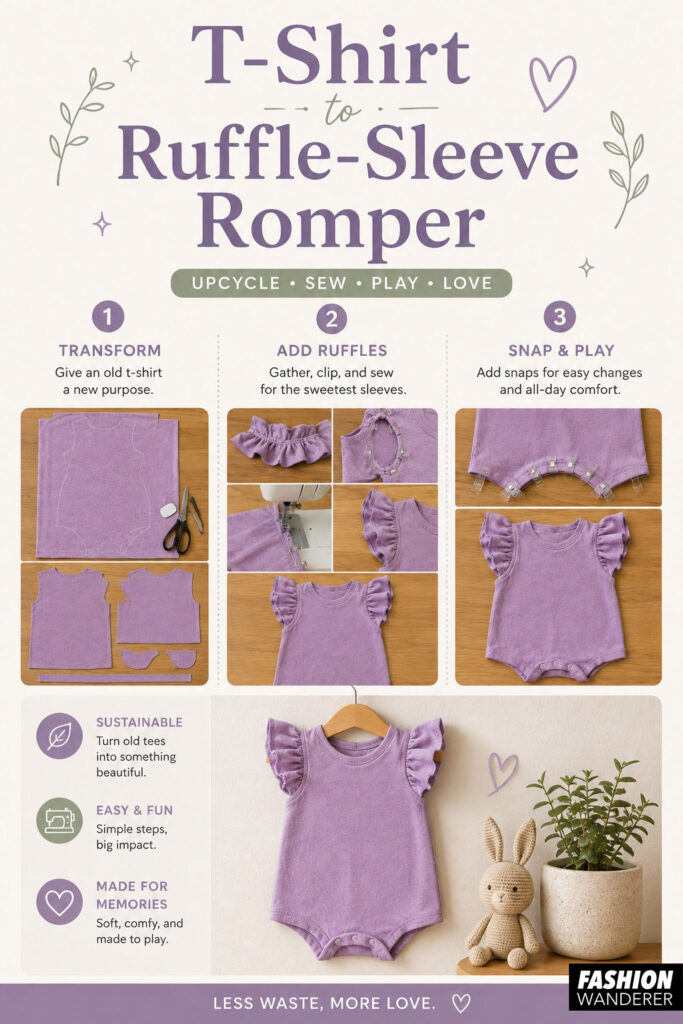
Turning an oversized T-shirt into a ruffle-sleeve romper is a fun, affordable, and rewarding sewing project that gives old clothing a brand-new purpose. With just a few basic sewing tools and some simple techniques, you can create a soft, comfortable romper that’s perfect for everyday adventures.
Whether you’re sewing for your own child, making a handmade baby gift, or looking for creative ways to reduce textile waste, this easy upcycle project is a wonderful way to practice your sewing skills while creating something truly special. Once you’ve finished your first romper, experiment with colorful T-shirts, playful trims, and different sleeve styles to make every piece uniquely your own.