
Looking for an easy Halloween costume you can make without buying yards of new fabric? This DIY bat wing harness made from an old black T-shirt is a fun, budget-friendly upcycle that turns something already sitting in your closet into a dramatic pair of wearable bat wings.
Unlike wings permanently sewn onto a hoodie or shirt, this design is made as a separate harness. That means you can wear the bat wings over a black sweatshirt, dress, T-shirt, or jacket and remove them whenever you want. It is especially handy for kids because the costume can be layered over warm clothes on a chilly Halloween night.
You can turn clothes you already have at home into adorable costumes with these DIY pet Halloween costume ideas using old clothing.
This beginner-friendly project requires only basic sewing, and you do not need a commercial pattern. You will create your own simple bat-wing shape using the T-shirt fabric, add lightweight structure if desired, and attach comfortable shoulder straps.
Why Make a Removable Bat Wing Harness?
A separate bat wing harness gives you much more flexibility than permanently attaching wings to a garment. You can reuse the wings for Halloween, school dress-up days, pretend play, costume parties, or even pair them with different outfits.
Using an old black T-shirt also keeps the project inexpensive. Jersey knit is soft, lightweight, and comfortable to wear. Better yet, most T-shirt knit does not fray badly, so this is a forgiving project for beginner sewists.
For a child-size costume, one adult black T-shirt is often enough. For larger wings, use an oversized or XL shirt.
Materials You Will Need
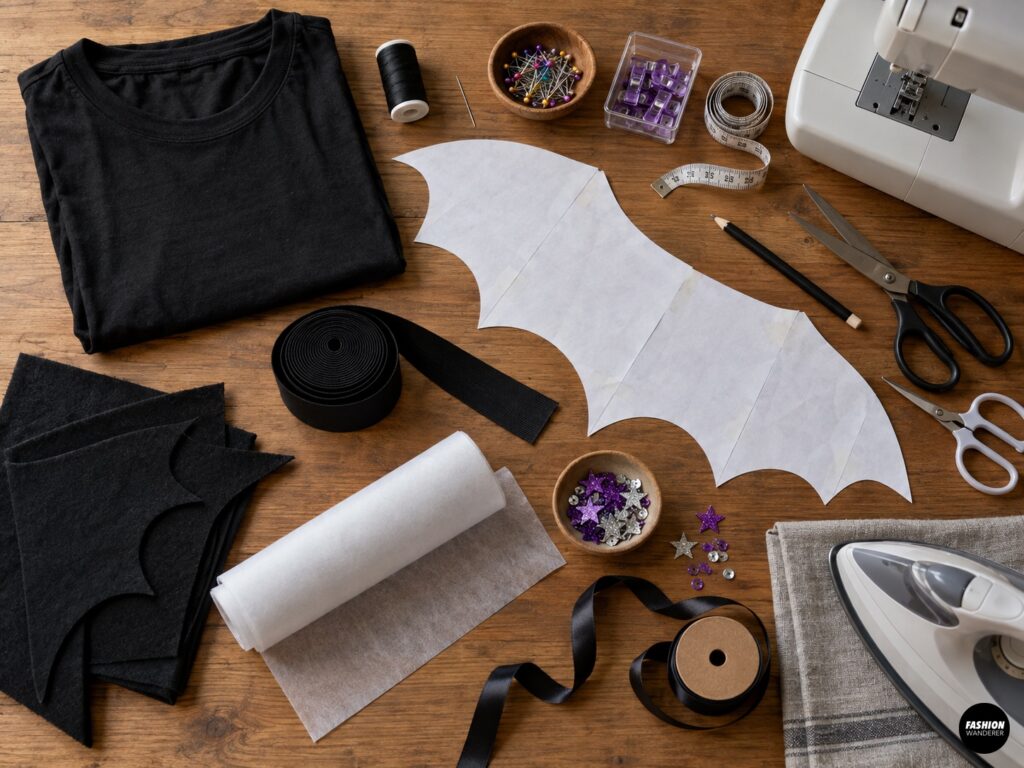
- 1 old black T-shirt, preferably adult size
- Black polyester thread
- Sewing machine
- Hand-sewing needle
- Fabric scissors
- Paper scissors
- Large paper or taped-together printer paper
- Pencil or fabric marker
- Measuring tape or ruler
- Pins or sewing clips
- 1–1½ yards black elastic, approximately ¾–1 inch wide
- Optional lightweight fusible interfacing
- Optional felt for reinforced wing tips
- Optional black ribbon
- Optional purple, silver, or glitter details
- Iron and pressing cloth
DIY Dog Bat Wing Costume From Old Black T-Shirt
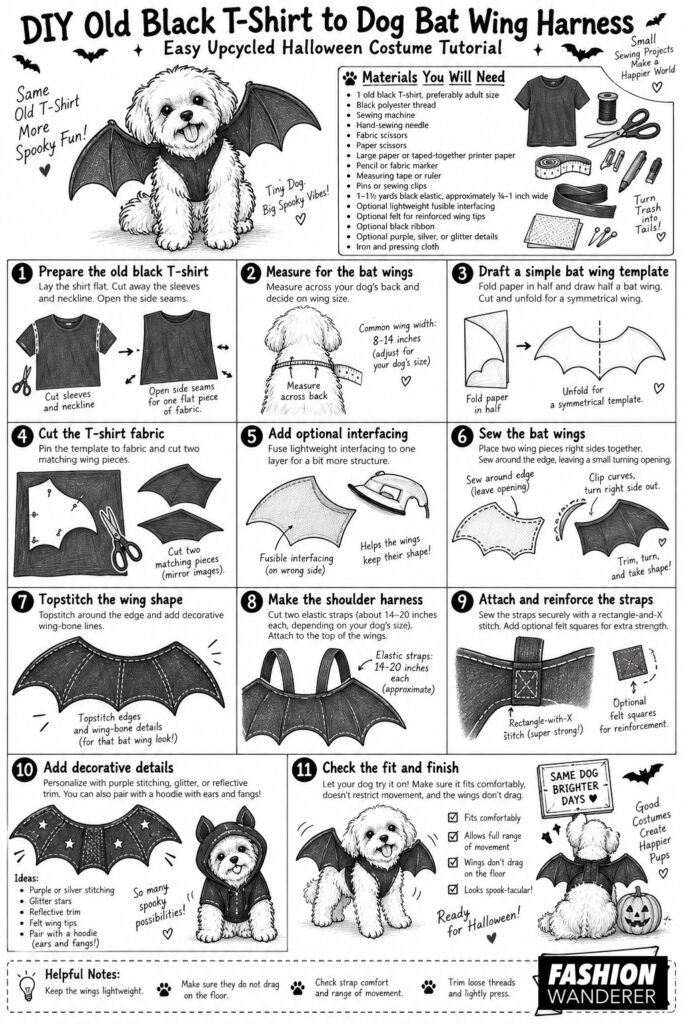
Step 1: Prepare the Old Black T-Shirt
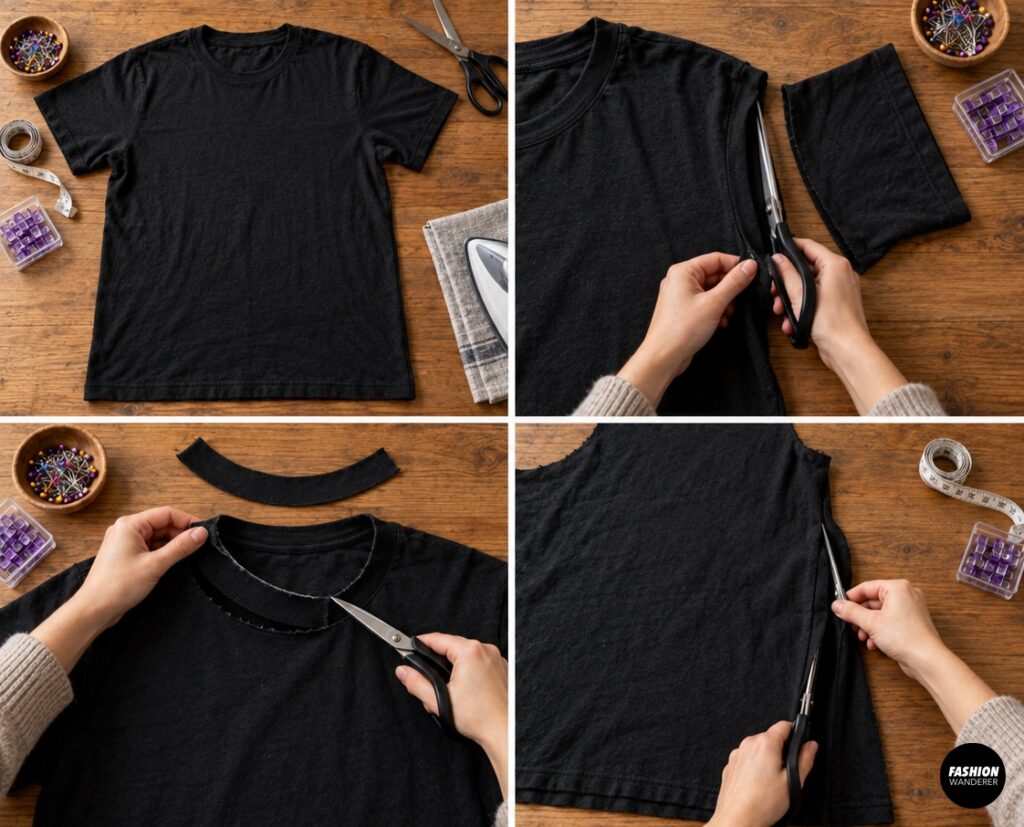
Wash and dry the T-shirt before cutting so there will not be any surprise shrinking later.
Lay the shirt completely flat and smooth out the wrinkles. Cut away the sleeves and neckline, then open the side seams. You should now have two relatively large sections of black knit fabric from the front and back.
Press the pieces lightly if needed. Avoid using excessive heat, especially if the shirt contains synthetic fibers.
Step 2: Measure for the Bat Wings
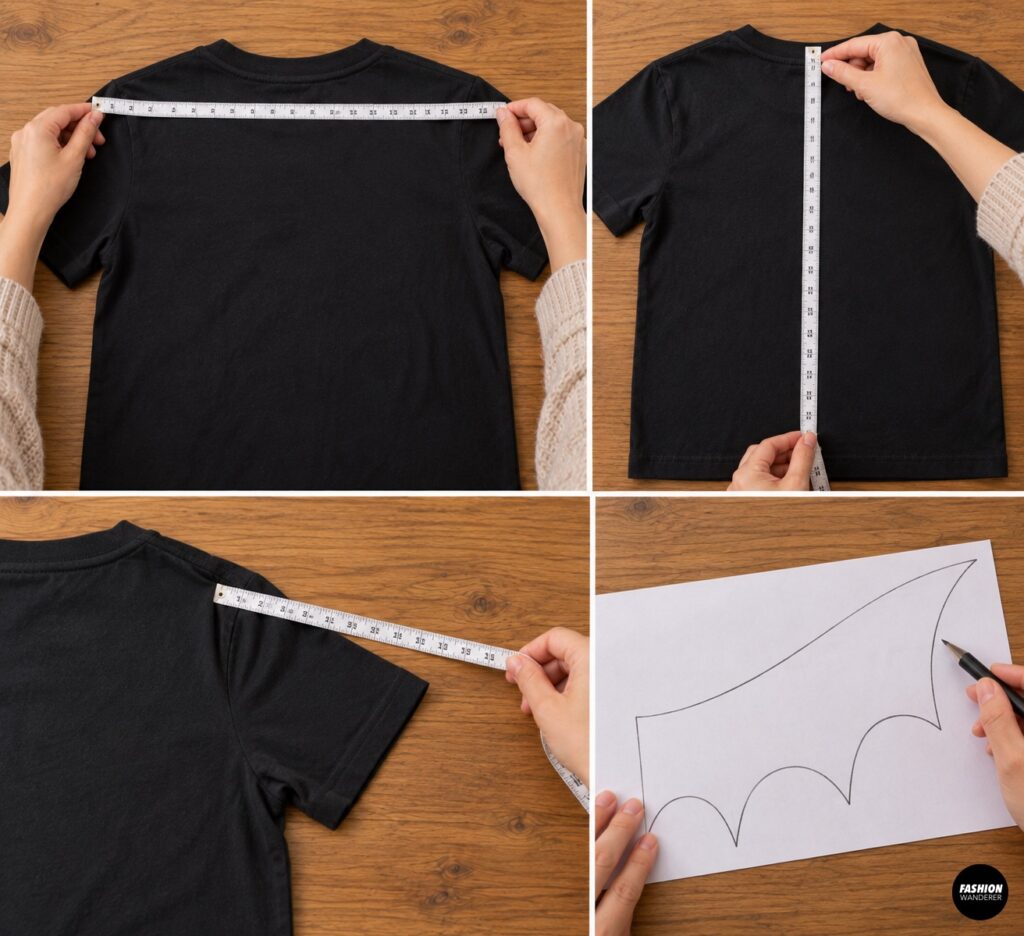
Measure across the wearer’s back from shoulder to shoulder. Then decide how wide you want the wings.
For younger children, wings extending about 6–10 inches beyond each shoulder are usually dramatic without becoming difficult to walk around in.
Measure vertically from the upper back to approximately the waist or upper hip. This will become the approximate height of your wing harness.
Keep the wings lightweight and short enough that they do not drag on the floor.
Step 3: Draft a Simple Bat Wing Template
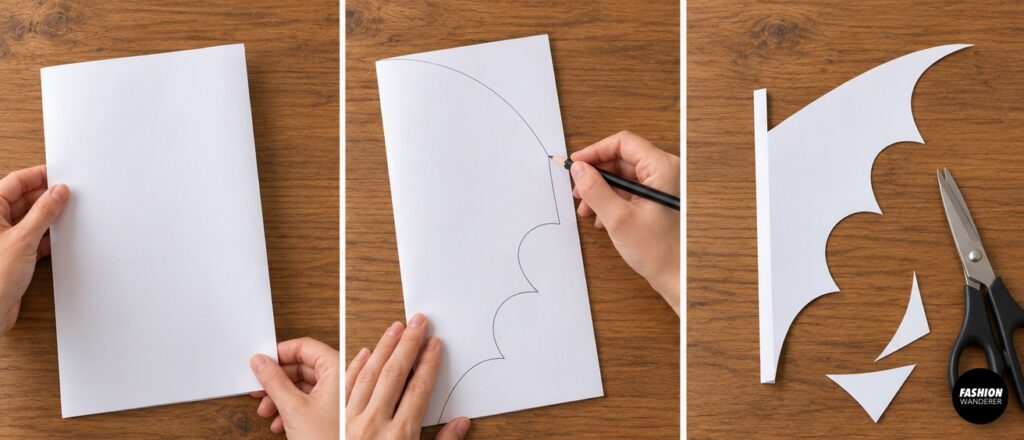
Fold a large sheet of paper in half.
Along the folded edge, draw half of the center-back section. From the upper corner, extend a gently curved line outward to form the top of the wing.
Now create three or four scalloped points along the lower edge. Think of a classic bat silhouette: one long upper tip followed by several smaller pointed curves.
Cut the template out and unfold it. You should have a symmetrical pair of bat wings connected through the center.
Hold the paper template against the wearer’s back and adjust the width or length before cutting your fabric.
Step 4: Cut the T-Shirt Fabric
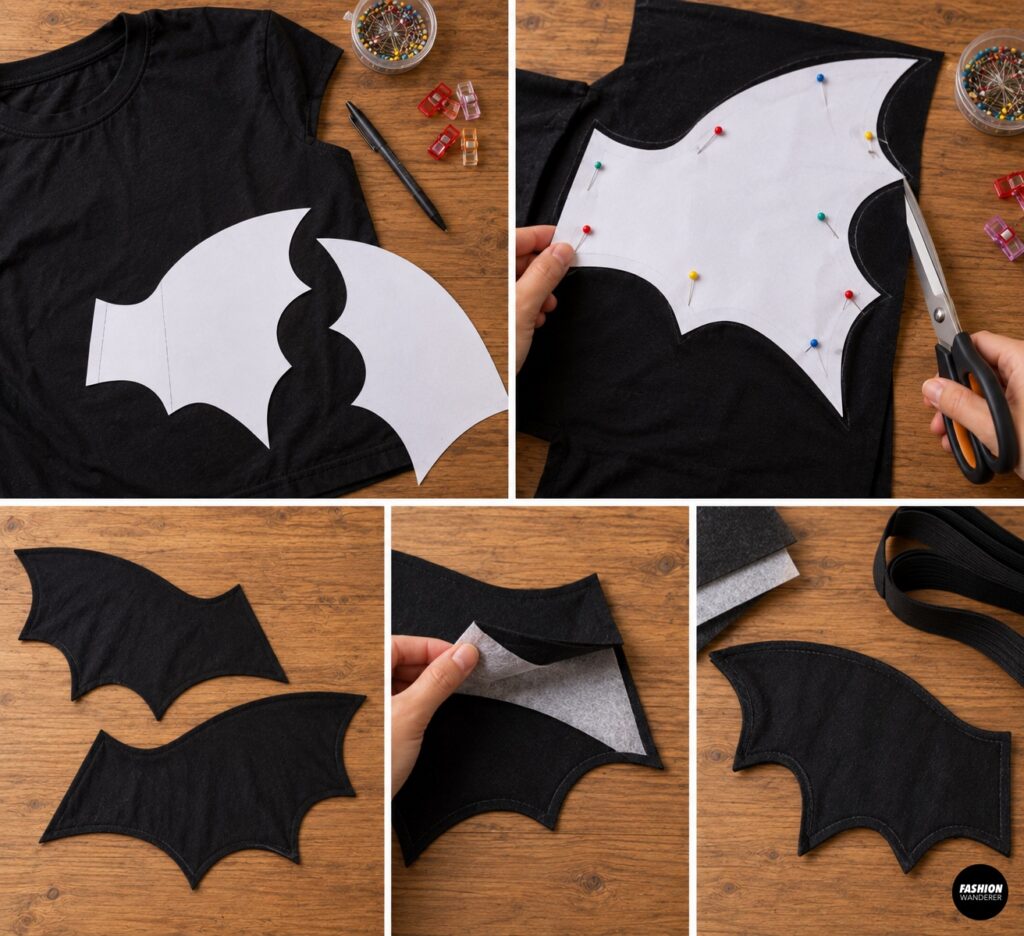
Place the black T-shirt fabric flat on your work surface.
Position the paper template over the fabric and pin it securely. Cut around the entire wing shape.
For sturdier wings, cut two matching wing pieces and sew them together. If the fabric is especially thin, add lightweight interfacing between the layers.
Using two layers also gives the wing edges a cleaner appearance.
Step 5: Add Optional Interfacing
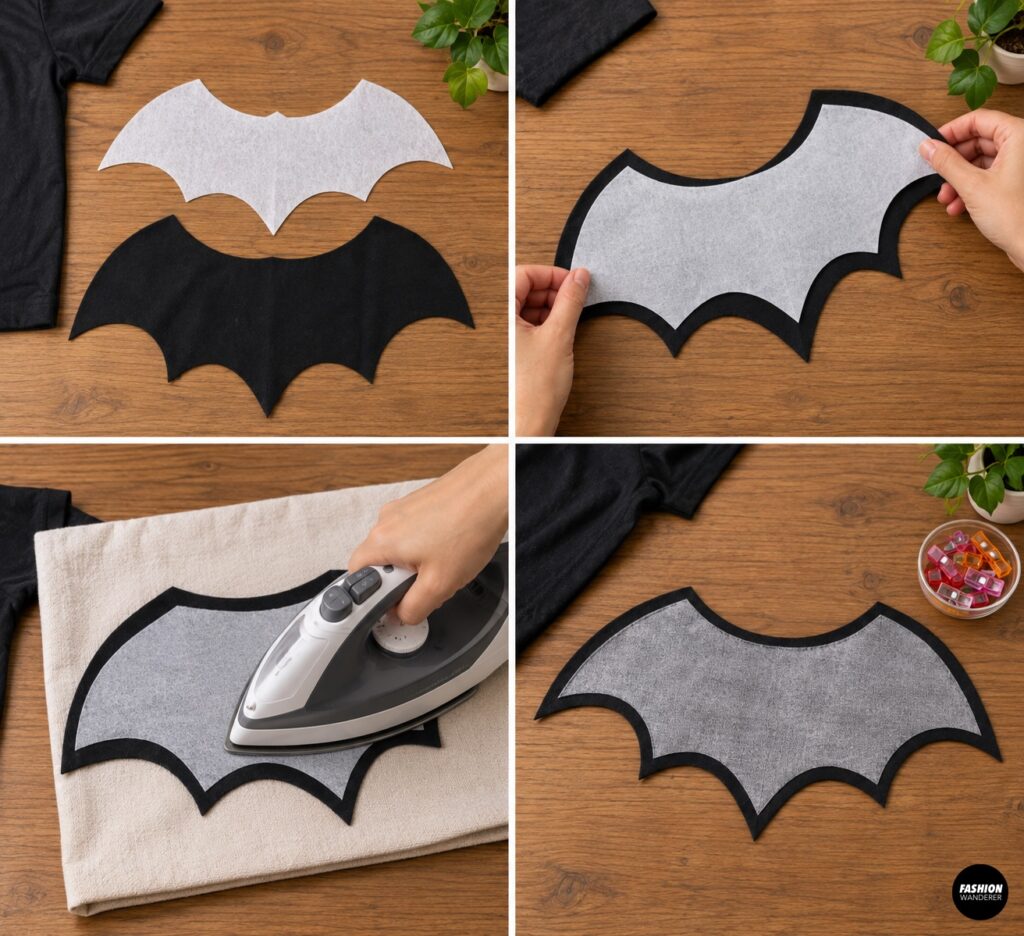
If you want slightly more structured bat wings, cut lightweight fusible interfacing approximately ¼ inch smaller than your wing piece.
Fuse it to the wrong side of one fabric layer according to the manufacturer’s instructions.
Keep the interfacing lightweight. Heavy interfacing can make the wings stiff, uncomfortable, and difficult for a child to move in.
Step 6: Sew the Bat Wings
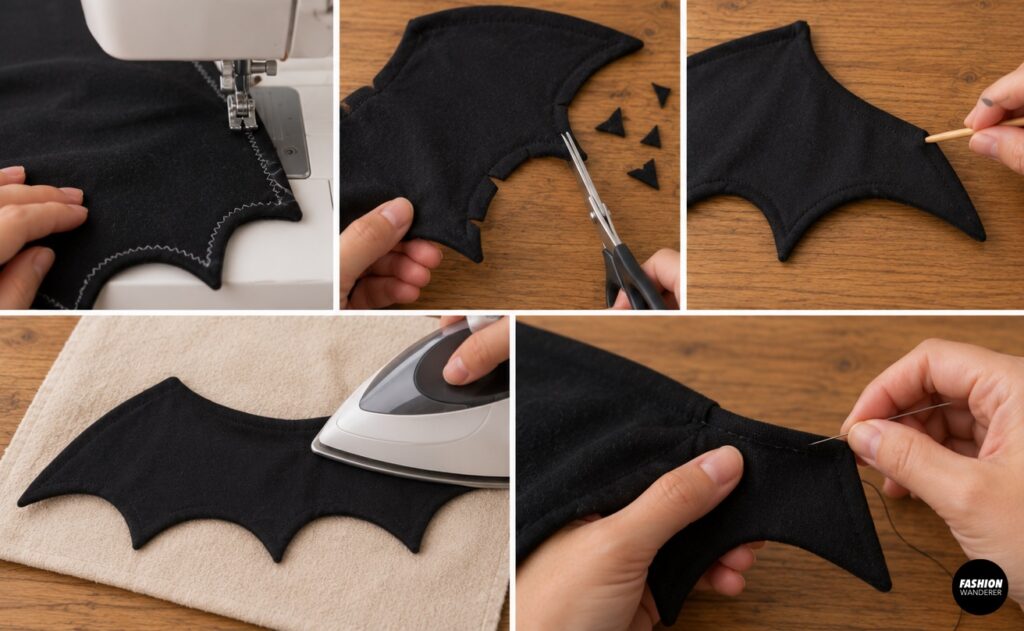
Place the two wing pieces right sides together.
Pin or clip around the outer edge. Leave a 3–4 inch opening near the center bottom.
Using a stretch stitch or narrow zigzag, sew approximately ⅜ inch from the edge.
Carefully clip into the inner curves without cutting through the stitching. Trim bulky corners around the pointed wing tips.
Turn the wings right side out through the opening.
Use a point turner or blunt chopstick to gently shape each point. Press lightly using a pressing cloth.
Close the opening with a small ladder stitch or machine topstitch close to the edge.
Step 7: Topstitch the Wing Shape
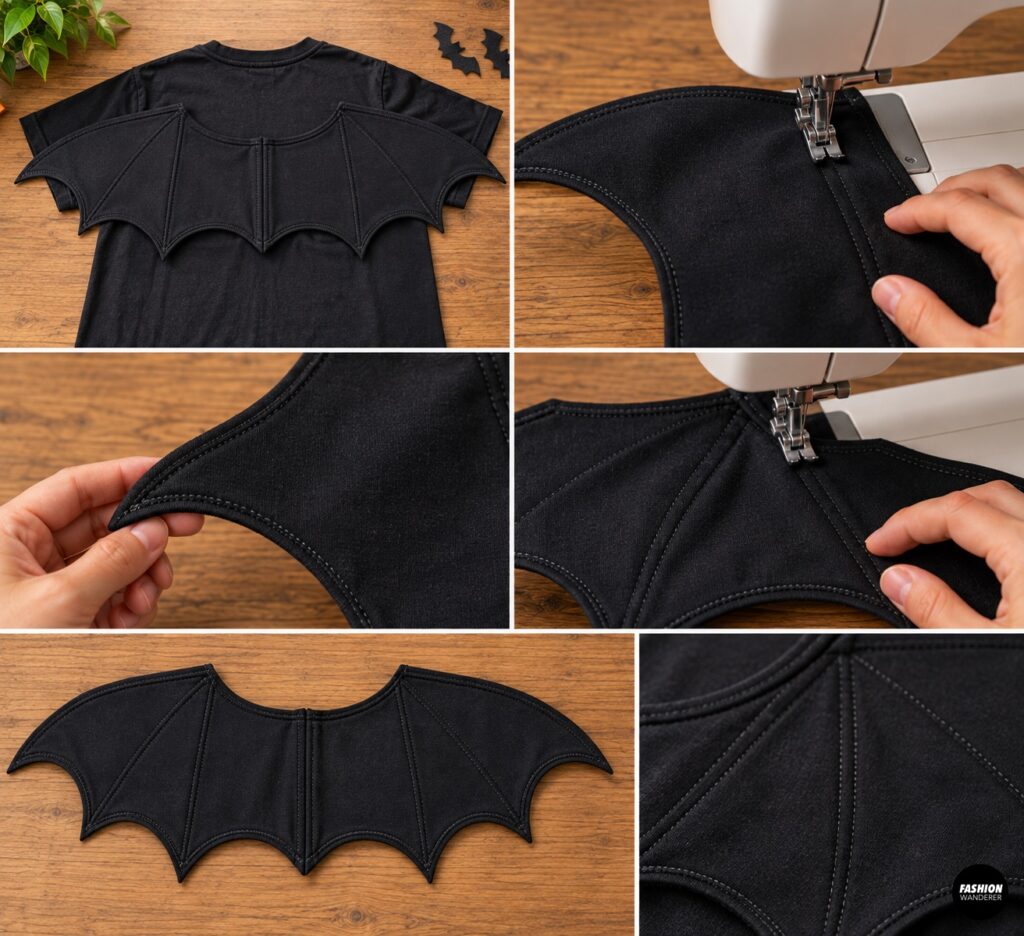
Topstitch approximately ⅛ inch around the outside edge.
This step makes the wings look more polished and helps keep the layers from shifting.
You can also sew decorative lines from the center back toward each wing point to mimic bat-wing bones. These stitched lines give the wings extra shape without adding much weight.
Step 8: Make the Shoulder Harness
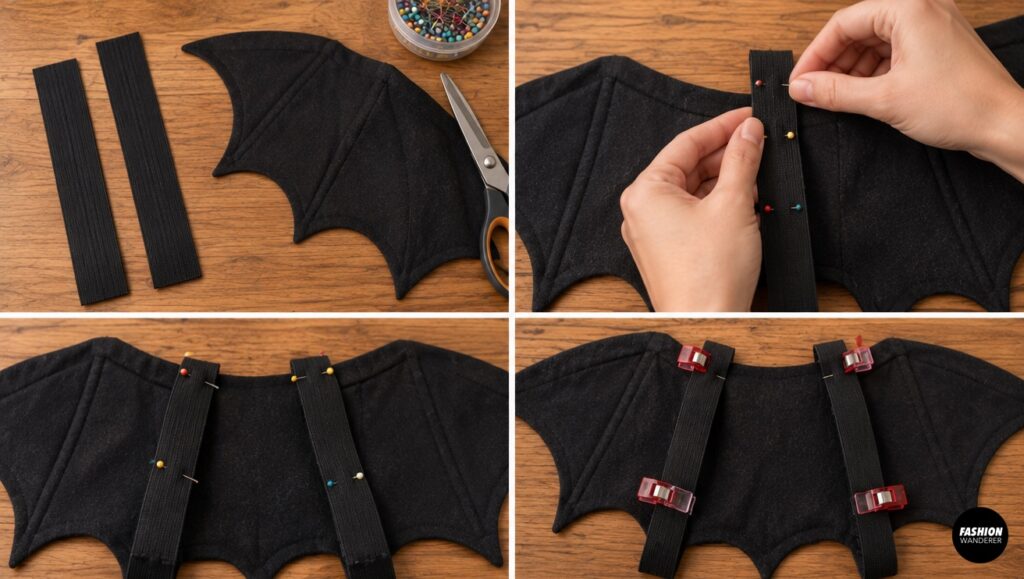
Cut two pieces of elastic long enough to comfortably fit around each shoulder like backpack straps.
A good starting point for dog is approximately 14–20 inches per strap, but always measure the wearer before cutting.
Pin one end of each elastic strap near the upper center of the wings and the other end several inches lower.
Temporarily safety-pin the straps and test the fit before sewing them permanently.
The harness should sit securely against the upper back without pulling tightly against the shoulders.
Step 9: Attach and Reinforce the Straps
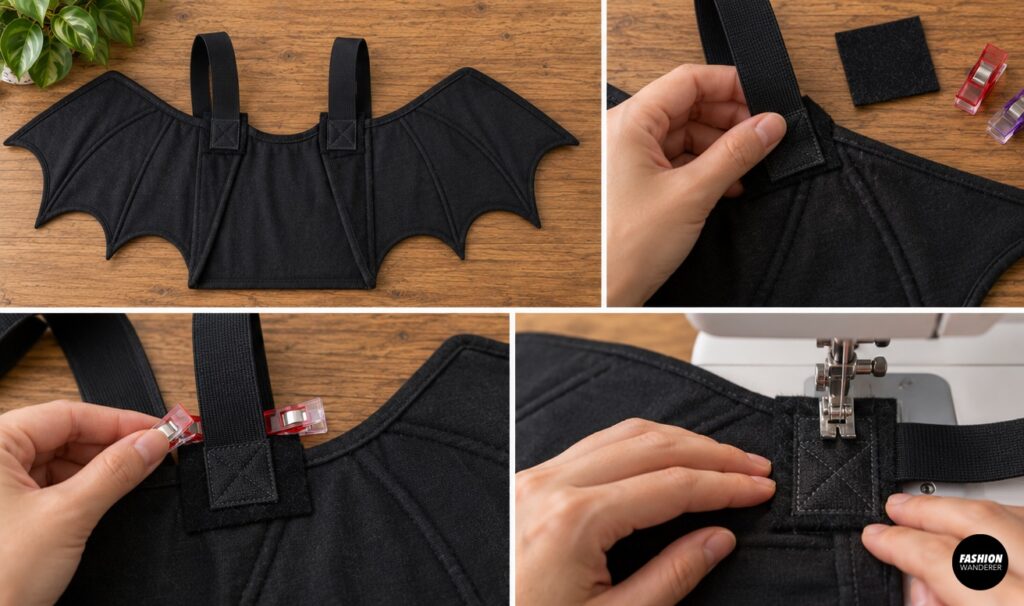
Once the fit feels comfortable, sew each elastic end securely to the wing panel.
Use a rectangle with an X stitched through the middle for extra strength.
Go over the stitching two or three times, especially if the wings will be worn by an active child.
For even more reinforcement, place a small square of black felt behind each strap attachment point.
Step 10: Add Decorative Details
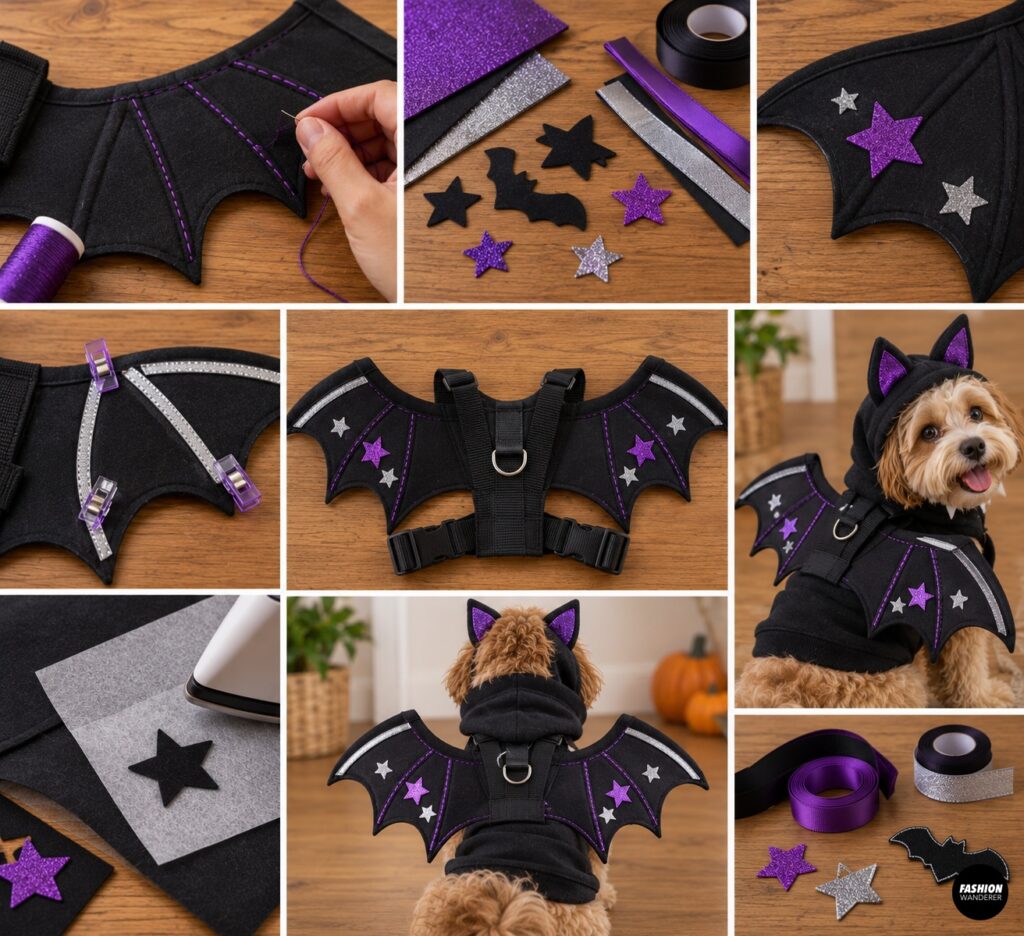
Your bat wing harness can stay completely black for a minimalist look, or you can personalize it.
Try purple topstitching, glitter felt stars, reflective trim, small fabric patches, or contrasting wing-bone stitching.
For a cute bat costume, pair the harness with a black hoodie featuring felt ears and tiny white fangs.
Step 11: Check the Fit and Finish
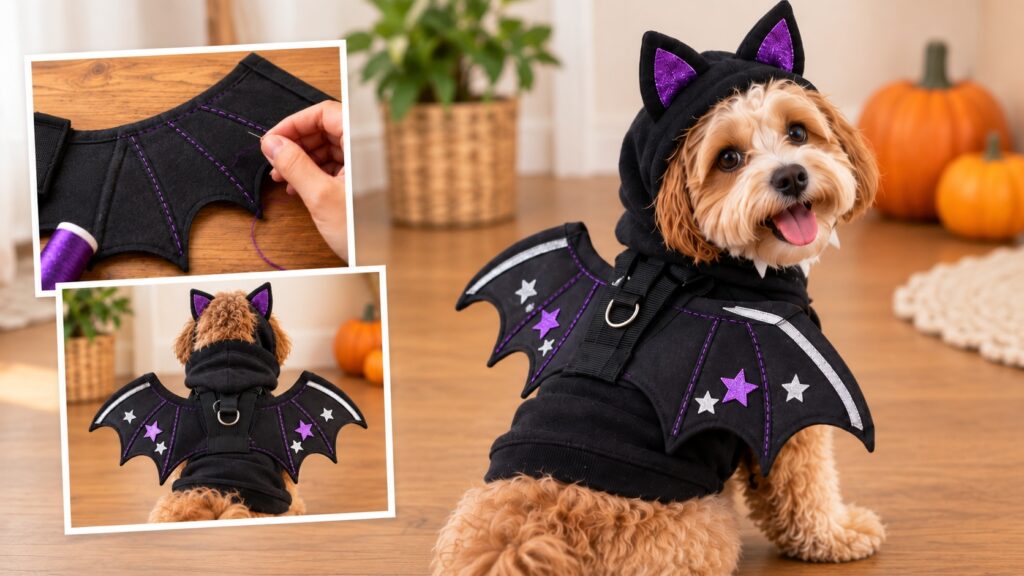
Have the wearer put on the complete harness and move around naturally. Ask them to raise their arms, sit down, walk, bend, and turn.
Check that the elastic straps are comfortable and that the wings do not block their hands or drag behind them.
Trim loose threads, reshape the wing points, and give the finished harness a light press.
Your DIY old black T-shirt bat wing harness is ready for Halloween.
Easy Ways to Style Your DIY Bat Costume
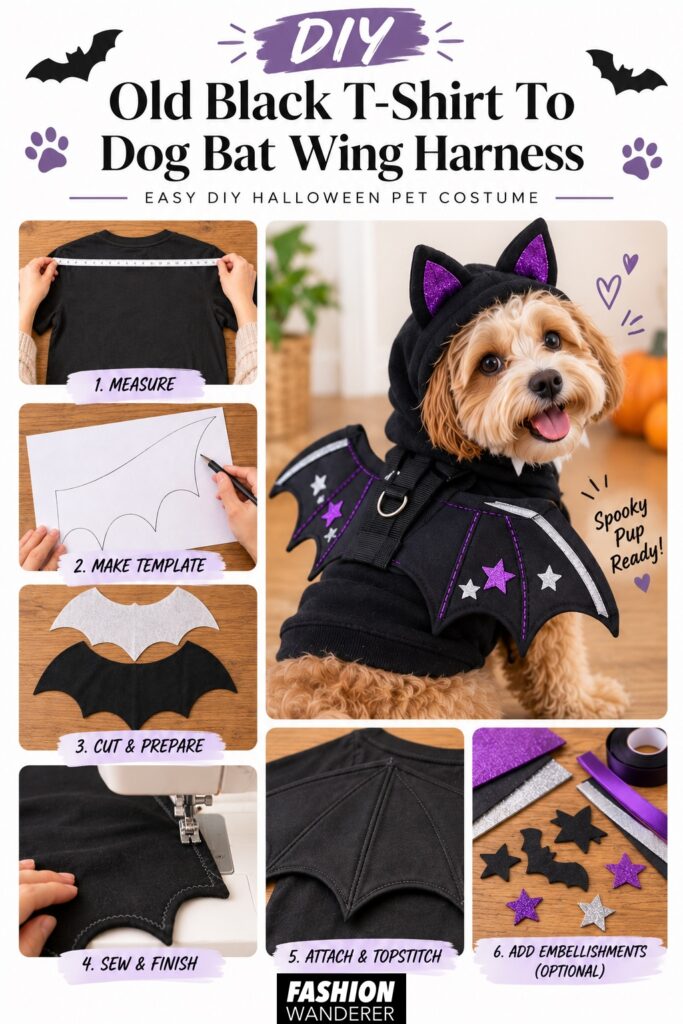
Pair the finished wings with black leggings and a black sweatshirt for the fastest costume. Add felt bat ears to a headband for an extra detail. For colder weather, simply wear the harness over a coat or hoodie.
Because the wings are removable, you can use the same DIY bat wing harness year after year—and when Halloween is over, it takes up almost no storage space.
This simple old T-shirt upcycle Halloween costume is proof that you do not need an expensive pattern or complicated sewing techniques to make something memorable. A forgotten black tee, a little elastic, and an afternoon of sewing can become a surprisingly impressive bat costume.