
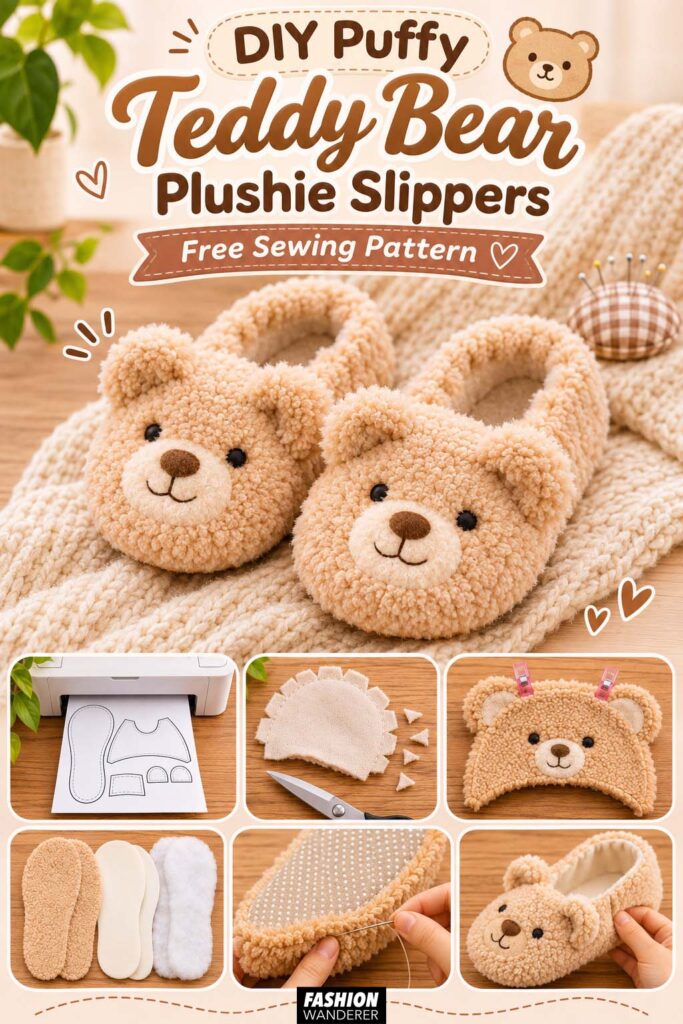
If cozy, oversized accessories are your weakness, these DIY puffy teddy bear plushie slippers might become your favorite sewing project of the season. Soft, squishy, and ridiculously cute, these handmade slippers combine plush teddy fabric with a padded sole and adorable bear-face details.
This free slipper sewing pattern is beginner-friendly and works especially well with sherpa, teddy fleece, minky, or faux fur. DIY plushie house slippers make a fun weekend project, handmade holiday gift, or cozy addition to your own cold-weather wardrobe.
The basic slipper is constructed from a sole, padded upper, heel section, and lining. Once the slipper is assembled, small ears and an embroidered or appliquéd teddy bear face turn it into a playful plushie-style shoe.
Materials You Will Need
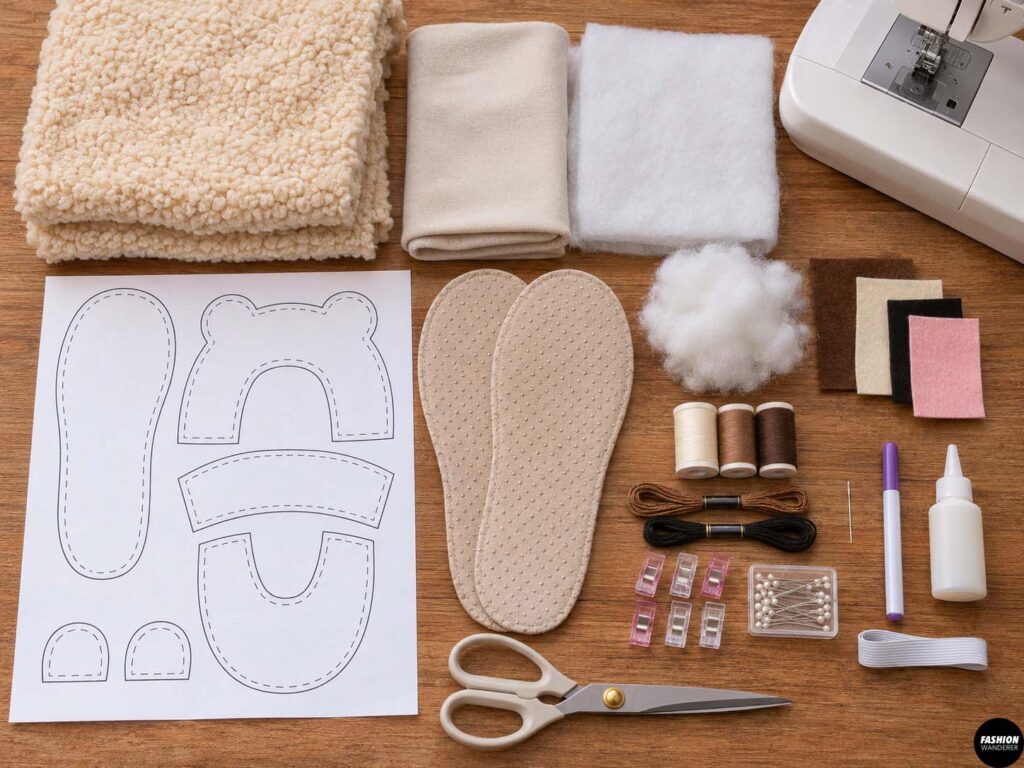
To make one pair of teddy bear slippers, gather:
- Free teddy bear slipper sewing pattern
- 1/2 yard teddy fleece, sherpa, minky, or plush fabric
- 1/2 yard soft cotton, fleece, or minky for lining
- 1/4 yard foam, quilt batting, or fusible fleece
- Non-slip fabric, suede, or slipper sole fabric
- Small scraps of brown, black, cream, or pink felt
- Polyester stuffing
- Coordinating thread
- Embroidery floss
- Sewing machine
- Fabric scissors
- Pins or sewing clips
- Hand-sewing needle
- Fabric marker
- Optional fabric glue
- Optional elastic
Choose a plush fabric with a short or medium pile if you are a beginner. Extremely fluffy faux fur can hide your seam lines and make the pieces more difficult to sew accurately.
Free Puffy Teddy Bear Plushie Slippers Sewing Pattern
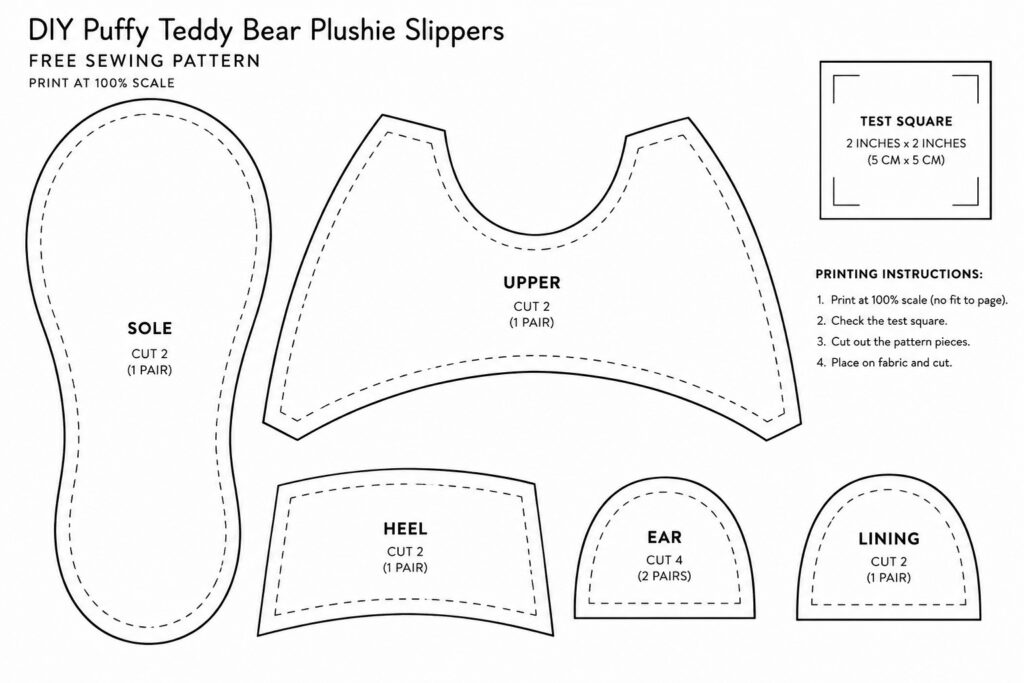
This free teddy bear slippers pattern should include:
Sole cut 2
Upper cut 2
Heel cut 2
Ear cut 4
Lining cut 2
Be sure to print the free slippers pattern at 100% and do not select fit to page.
DIY Puffy Teddy Bear Plushie Slippers
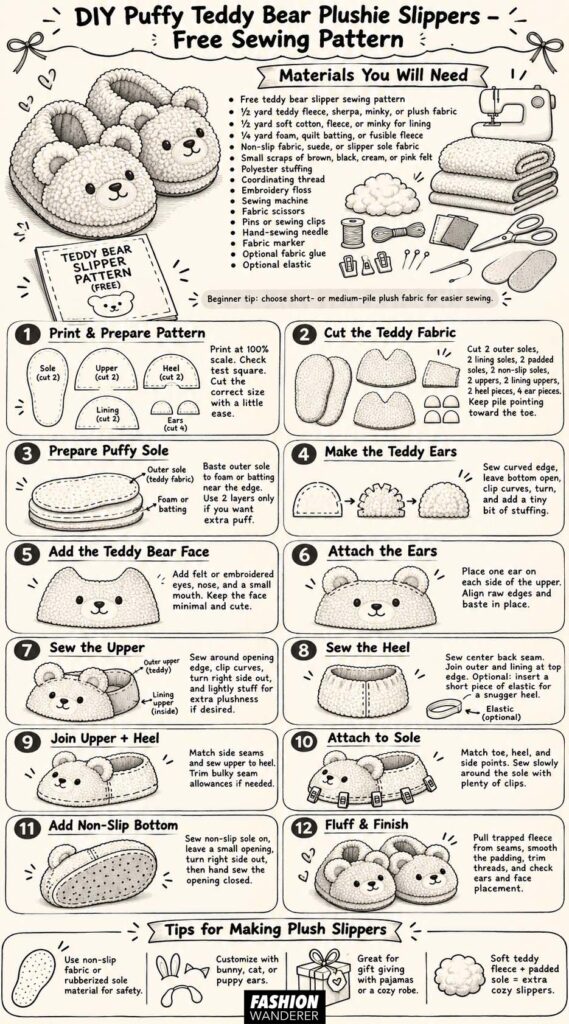
Step 1: Print and Prepare the Free Slipper Pattern
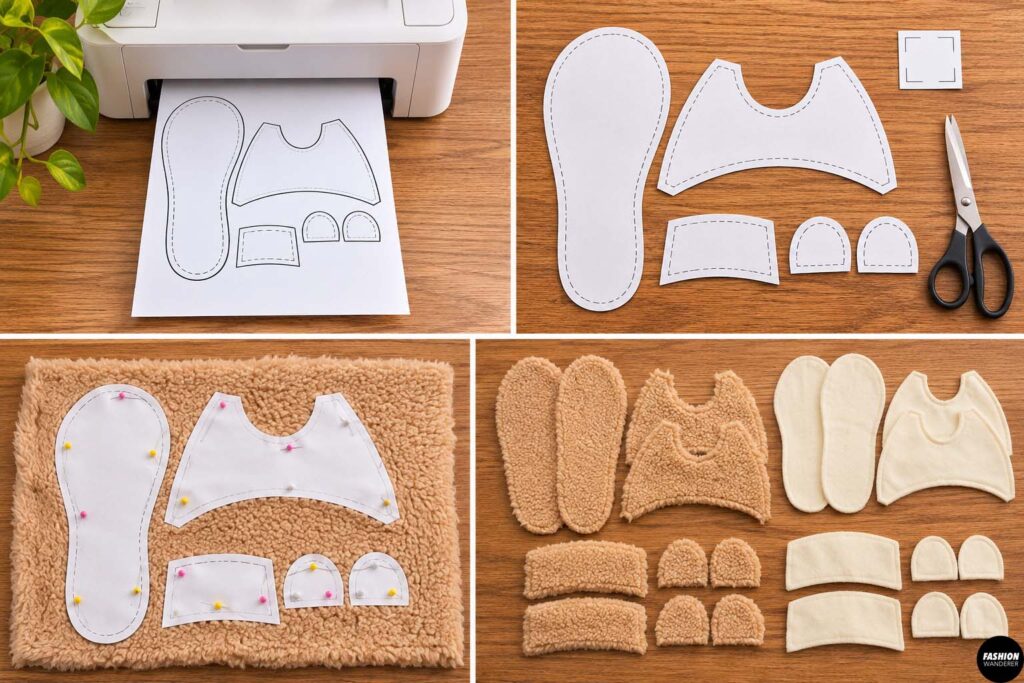
Print your free teddy bear slipper sewing pattern at 100% scale.
The pattern should include pieces for:
- Sole
- Upper
- Heel
- Lining
- Teddy bear ears
Check the test square before cutting your pattern pieces.
Cut out the appropriate size and place the paper pieces on your fabric.
Because slippers should feel comfortable rather than tight, leave a small amount of ease around your foot.
If you fall between sizes, choose the larger size.
Step 2: Cut the Teddy Fabric
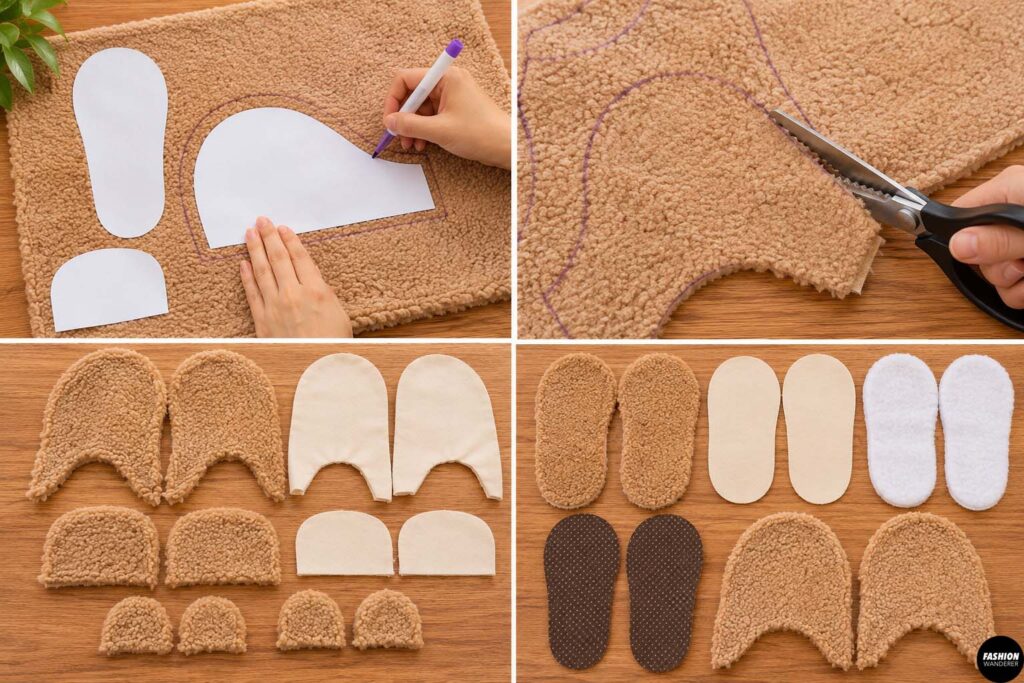
Place your teddy fleece with the wrong side facing upward.
Trace the sole, upper, and heel pieces using fabric chalk or a washable marker.
Remember that you need mirrored pieces for the left and right slippers.
Cut:
- 2 outer soles
- 2 lining soles
- 2 padded sole pieces
- 2 non-slip bottom soles
- 2 outer uppers
- 2 lining uppers
- 2 heel pieces
- 4 ear pieces
If your teddy fabric has a directional pile, make sure the fur points toward the toe.
Step 3: Prepare the Puffy Sole
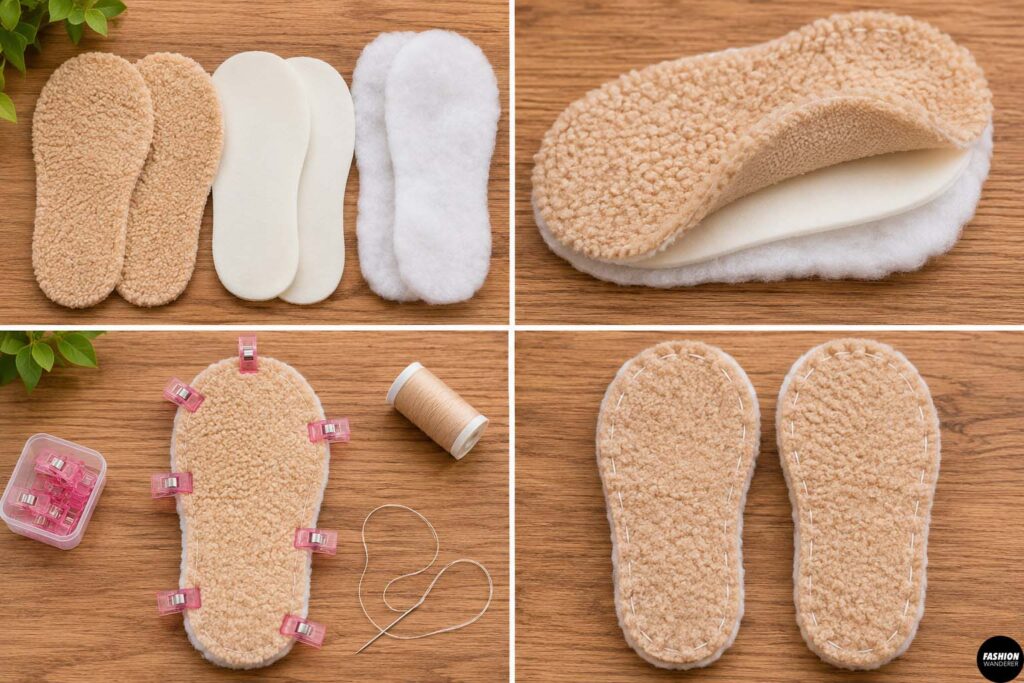
A thick padded sole is what gives these plushie slippers their soft, oversized appearance.
Place one outer sole on top of a layer of foam, batting, or fusible fleece.
Baste around the edge approximately 1/8 inch from the raw edge.
Repeat for the second slipper.
For an extra-puffy sole, use two layers of batting.
Avoid making the sole excessively thick, however, because very bulky layers can become difficult to sew.
Step 4: Make the Teddy Bear Ears
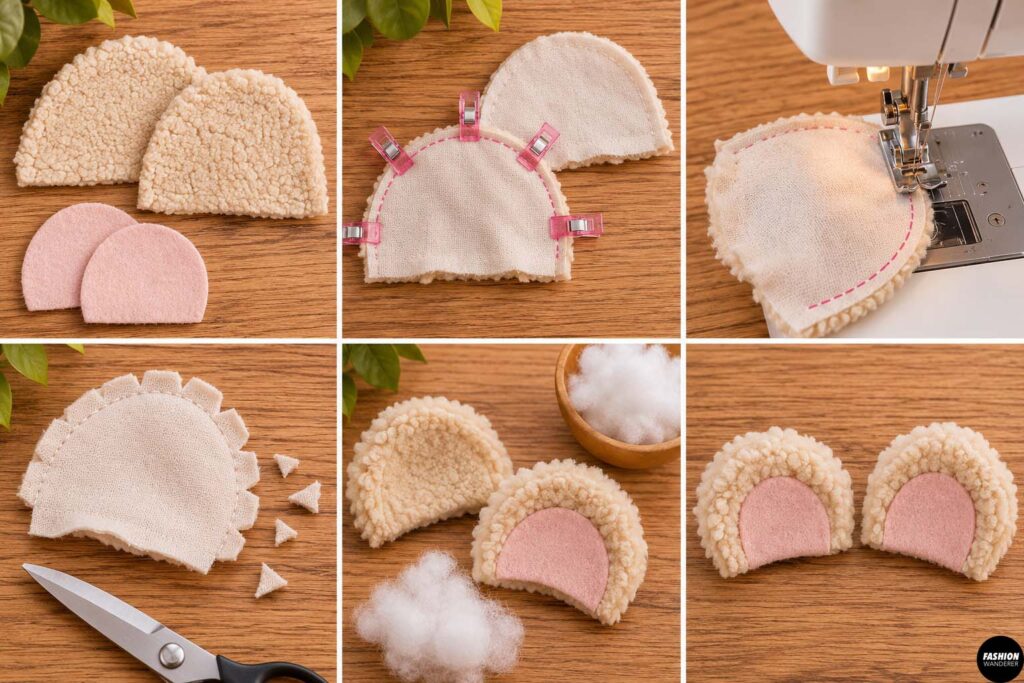
Place two ear pieces right sides together.
Sew around the curved edge using approximately a 1/4-inch seam allowance, leaving the straight bottom edge open.
Clip the curves carefully.
Turn the ear right side out.
Add a tiny amount of polyester stuffing to create a soft plush appearance.
Repeat with the second ear.
You can also add a smaller piece of pink or beige felt to the center of each ear before assembling them.
Step 5: Add the Teddy Bear Face
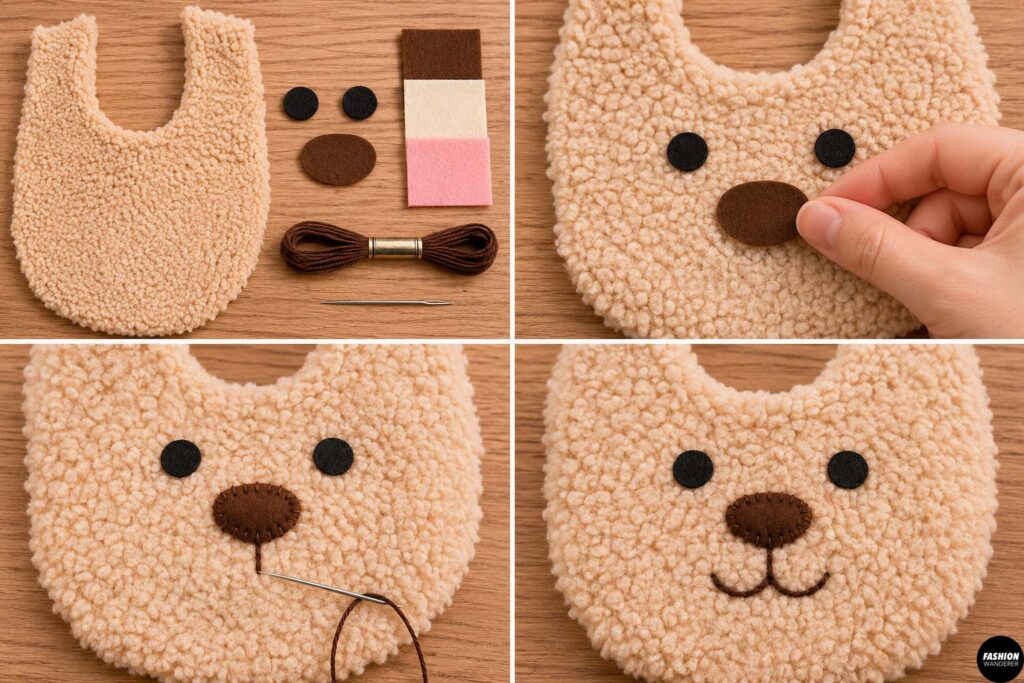
Before sewing the slipper upper together, create the bear face.
Position two small black felt circles for the eyes.
Add an oval brown or black nose toward the center of the toe.
You can sew these pieces using a small zigzag stitch or attach them by hand.
For a softer handmade appearance, embroider the eyes and nose using embroidery floss.
Add a short vertical line beneath the nose and two small curved lines to create the bear’s mouth.
Keep the facial features simple. Minimal details usually create the cutest teddy bear expression.
Step 6: Attach the Teddy Bear Ears
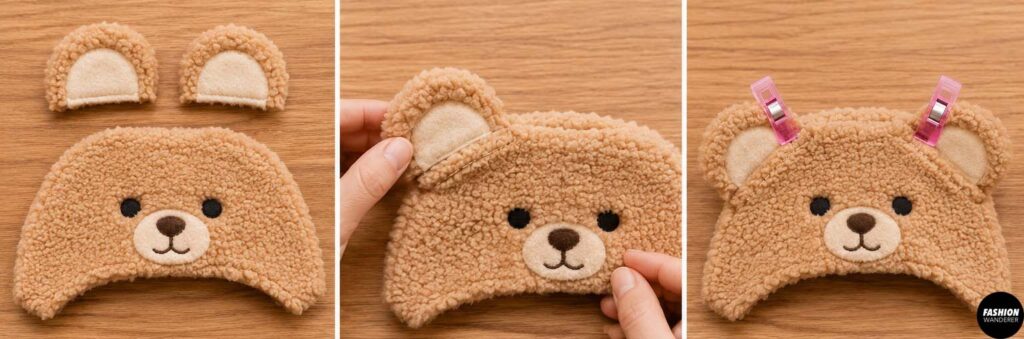
Position one ear along each side of the slipper upper.
The raw edge of each ear should align with the raw edge of the upper.
Angle the ears slightly outward.
Baste them approximately 1/8 inch from the edge.
The ears will initially point inward toward the slipper. Once the seam is sewn and turned, they will flip outward.
Step 7: Sew the Slipper Upper
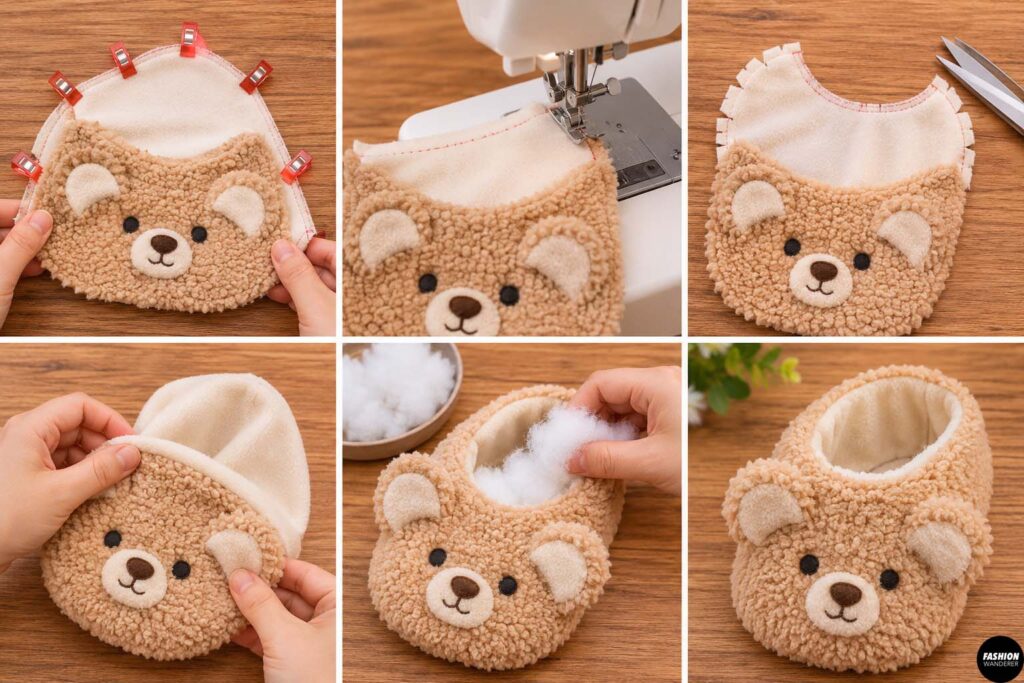
Place the outer upper and lining upper right sides together.
Sew around the opening edge.
Clip the curves and turn the upper right side out.
Press gently using your fingers rather than a hot iron if you are working with synthetic teddy fleece.
Topstitch around the opening if desired.
For an especially plush effect, lightly stuff the space between the outer fabric and lining with small pieces of polyester filling.
Do not overstuff it.
Step 8: Sew the Heel
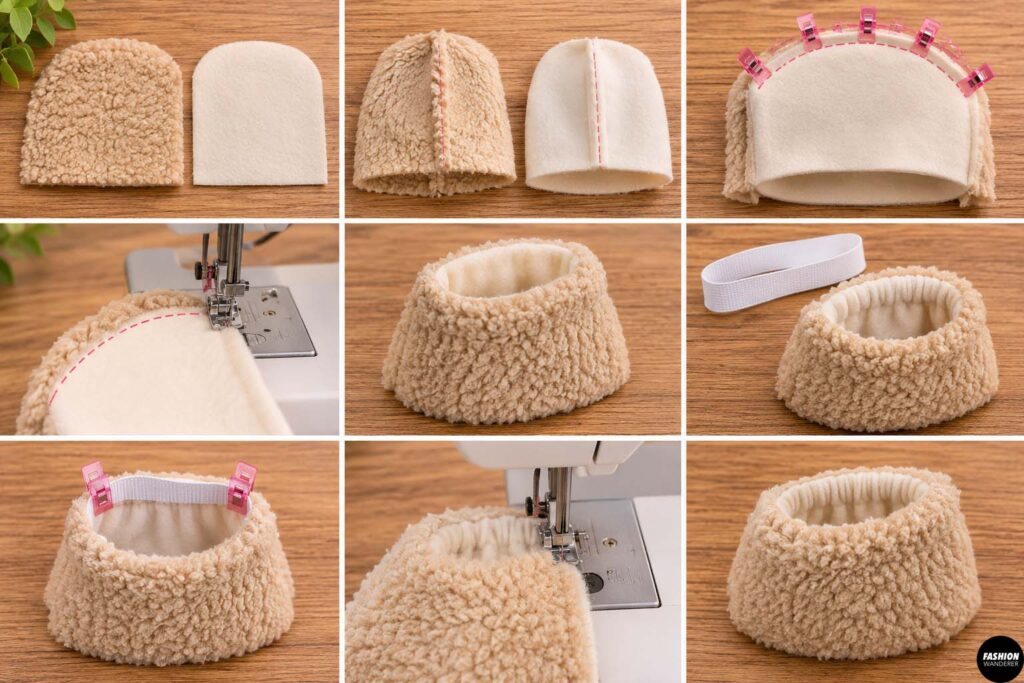
Fold the heel piece right sides together and sew the center-back seam.
Repeat with the lining.
Place the outer heel and lining heel right sides together and sew along the upper edge.
Turn right side out.
If you want the slipper to grip the heel more securely, insert a short piece of elastic inside the upper heel edge.
Stretch it slightly while sewing.
Step 9: Join the Upper and Heel
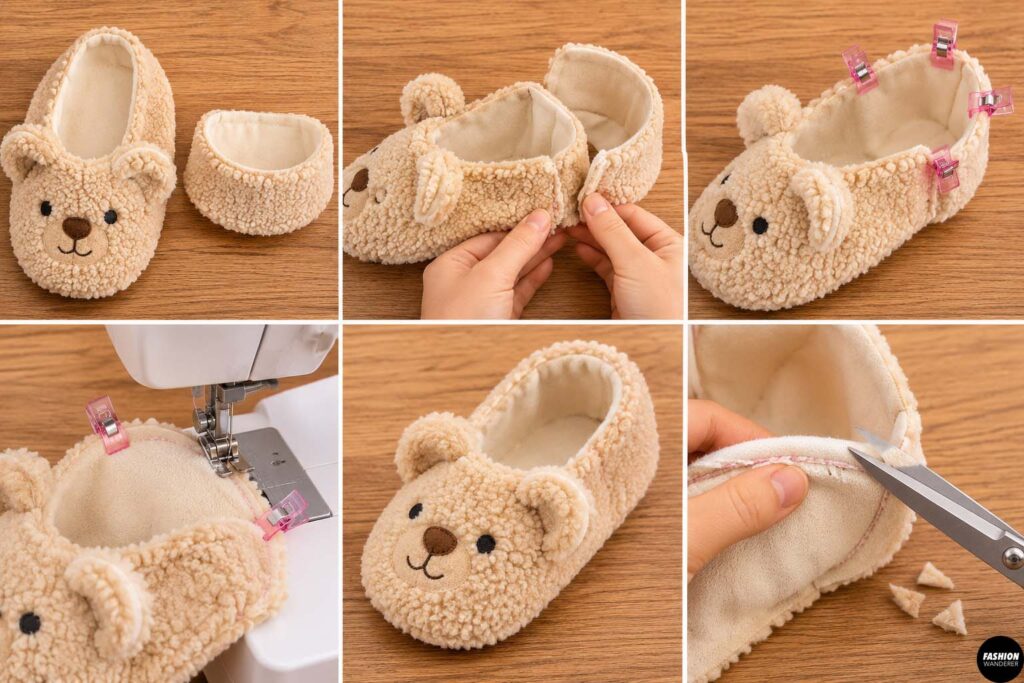
Place the heel section around the back edge of the slipper upper.
Match the side seams.
Pin or clip securely.
Sew the pieces together using a 3/8-inch seam allowance.
Check that the seam feels smooth inside the slipper.
Trim bulky seam allowances if necessary.
Step 10: Attach the Slipper to the Sole
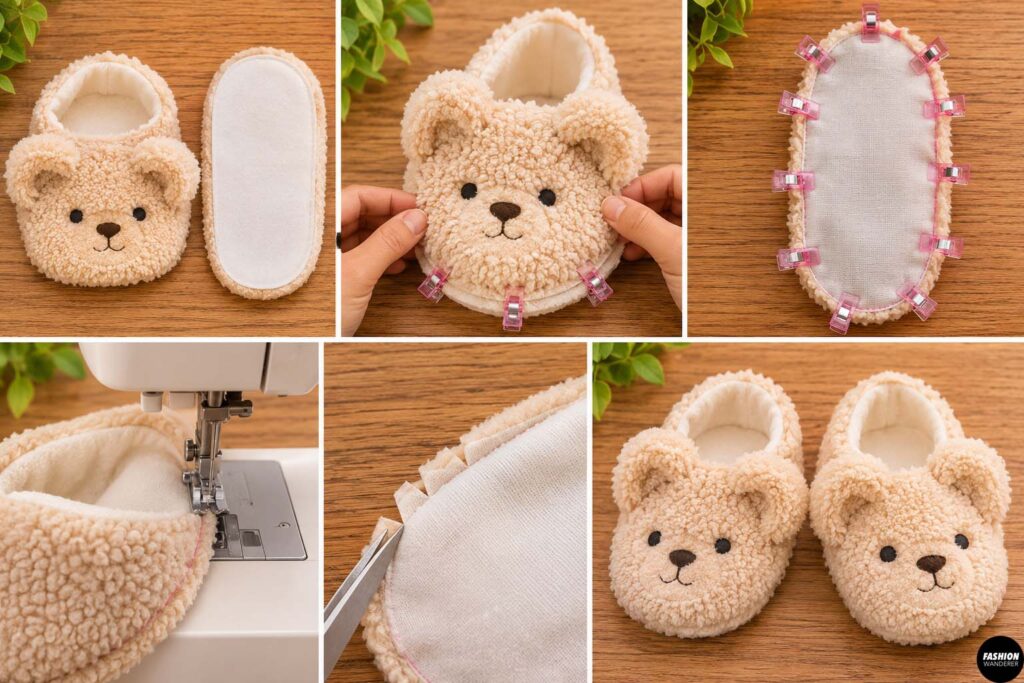
Position the completed slipper upper around the padded sole with right sides facing.
Match the center toe, center heel, and side points.
Use plenty of sewing clips because plush fabric can shift easily.
Sew slowly around the entire sole.
A walking foot can be helpful when sewing multiple thick layers.
Clip the seam allowance around curved areas without cutting through the stitching.
Step 11: Add the Non-Slip Bottom
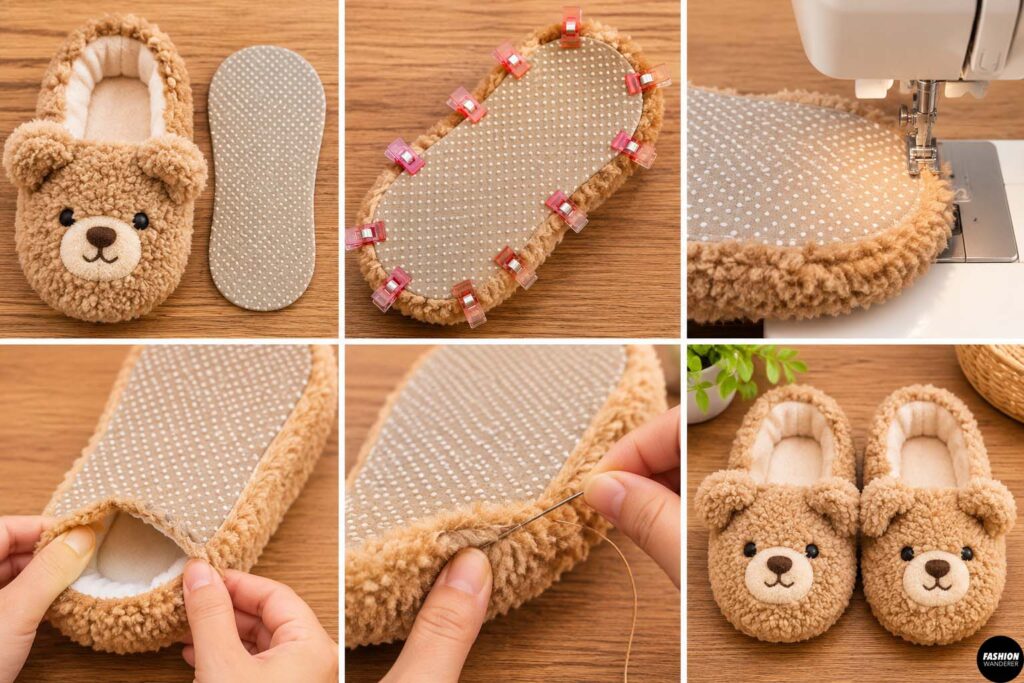
Place the non-slip sole against the bottom of the slipper.
Pin or clip around the perimeter.
Sew around the edge while leaving approximately a 2-inch opening near the heel.
Turn the slipper right side out through the opening.
Push out the toe gently.
Hand sew the opening closed using a ladder stitch.
Repeat for the second slipper.
Step 12: Fluff and Finish
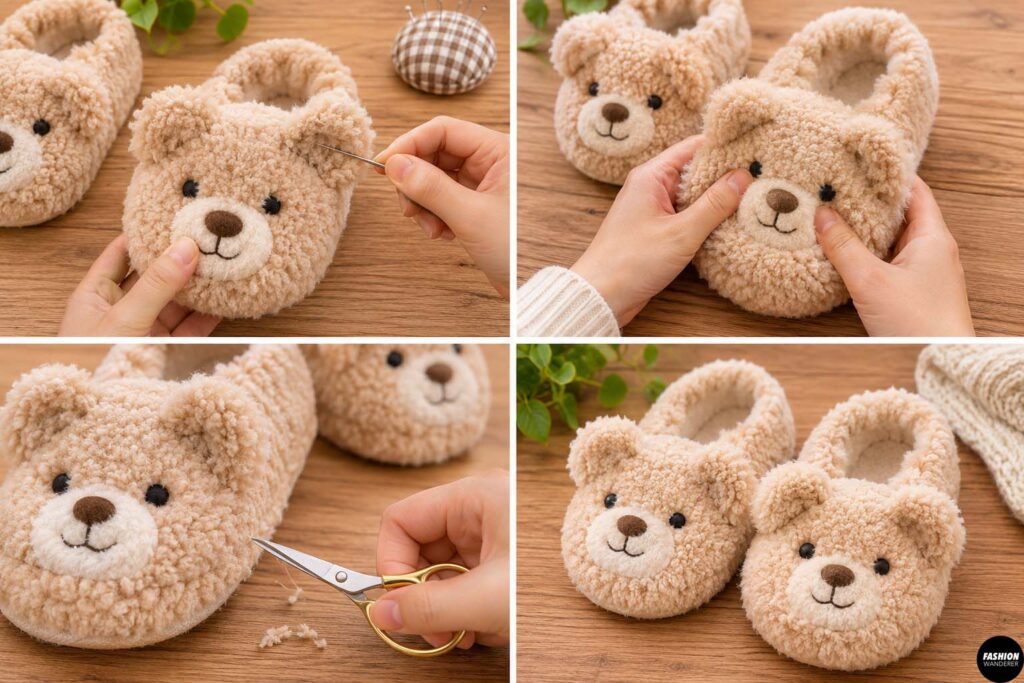
Use a pin or needle to gently pull trapped teddy fleece fibers out of the seams.
Massage the padding with your fingers so the slippers look evenly puffy.
Trim loose threads and check that the teddy bear ears and face are positioned evenly.
Your DIY puffy teddy bear plushie slippers are finished!
Tips for Making Plush Slippers
For safer indoor slippers, always use a non-slip fabric or rubberized sole material on the bottom.
You can also customize your slippers by making different animals. Add long ears for bunny slippers, pointed ears for cats, or floppy ears for puppies.
These handmade teddy bear slippers are also perfect for gift giving. Pair them with pajamas, a handmade robe, or a cozy blanket for an adorable DIY holiday gift set.
Once you make one pair, you may find yourself sewing an entire collection. With soft teddy fleece, a padded sole, and a simple free sewing pattern, these plushie slippers are an easy way to turn a few inexpensive materials into something wonderfully cozy and cute.