
If you love cute handmade accessories, these DIY kawaii frog plushie slippers are about to become your new favorite sewing project. They are soft, cozy, beginner-friendly, and ridiculously adorable thanks to their rounded frog faces, big eyes, and squishy padded shape.
This free frog slipper sewing pattern is perfect for using fleece, minky, plush fabric, felt, or other soft materials you may already have in your fabric stash. You can make DIY plushie house slippers for yourself, sew a matching pair as a handmade gift, or even turn the idea into a fun sewing-to-sell project.
The best part is that you do not need complicated shoemaking skills. These slippers are constructed more like stuffed plush accessories with a soft sole, making them approachable for confident beginners.
Materials You Will Need
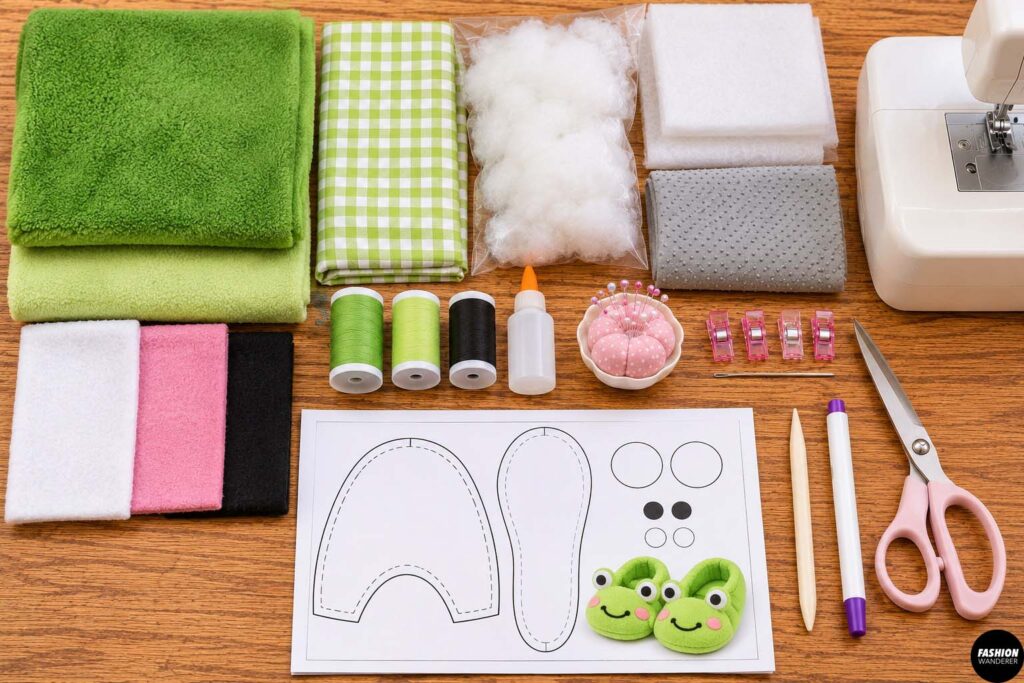
To make one pair of kawaii frog plushie slippers, gather:
- Free frog slipper sewing pattern
- 1/2 yard green fleece, minky, velour, or plush fabric
- Small scraps of lighter green fabric
- White felt or fleece for the eyes
- Black felt for the pupils
- Pink felt for optional cheeks
- 1/2 yard cotton or fleece for lining
- Foam, quilt batting, or fusible fleece for cushioning
- Non-slip fabric or grippy sole material
- Polyester fiberfill
- Coordinating thread
- Sewing machine
- Fabric scissors
- Pins or sewing clips
- Hand-sewing needle
- Fabric marker or chalk
- Optional fabric glue
For the softest slippers, choose fleece or minky for the outer fabric. If you are a beginner, fleece is usually easier to sew because it is less slippery.
DIY Kawaii Frog Plushie Slippers
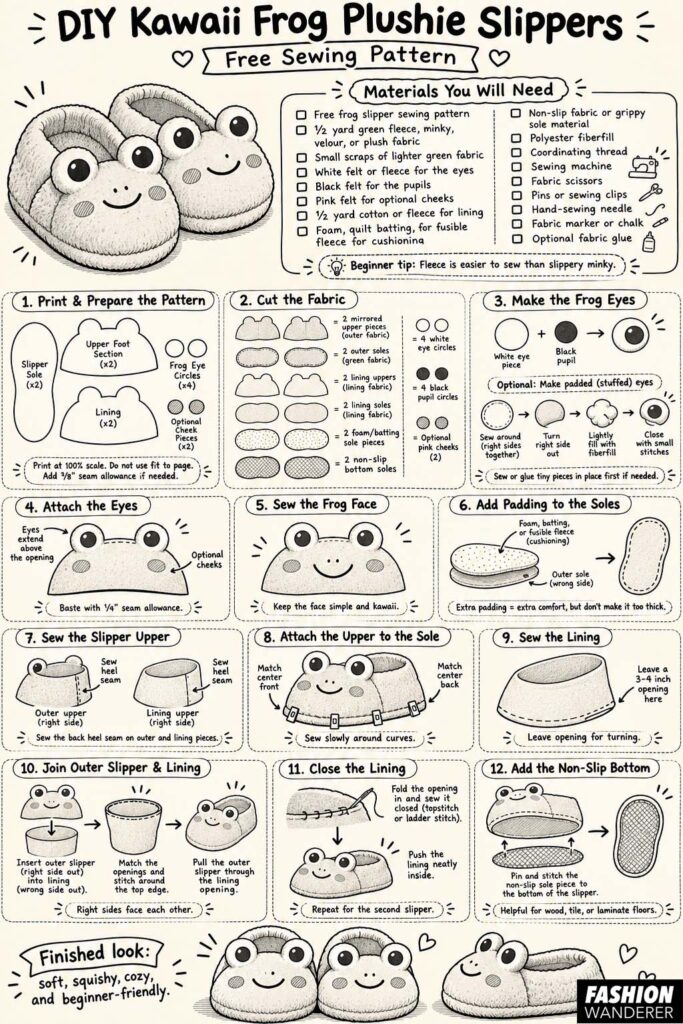
Step 1: Print and Prepare the Free Sewing Pattern
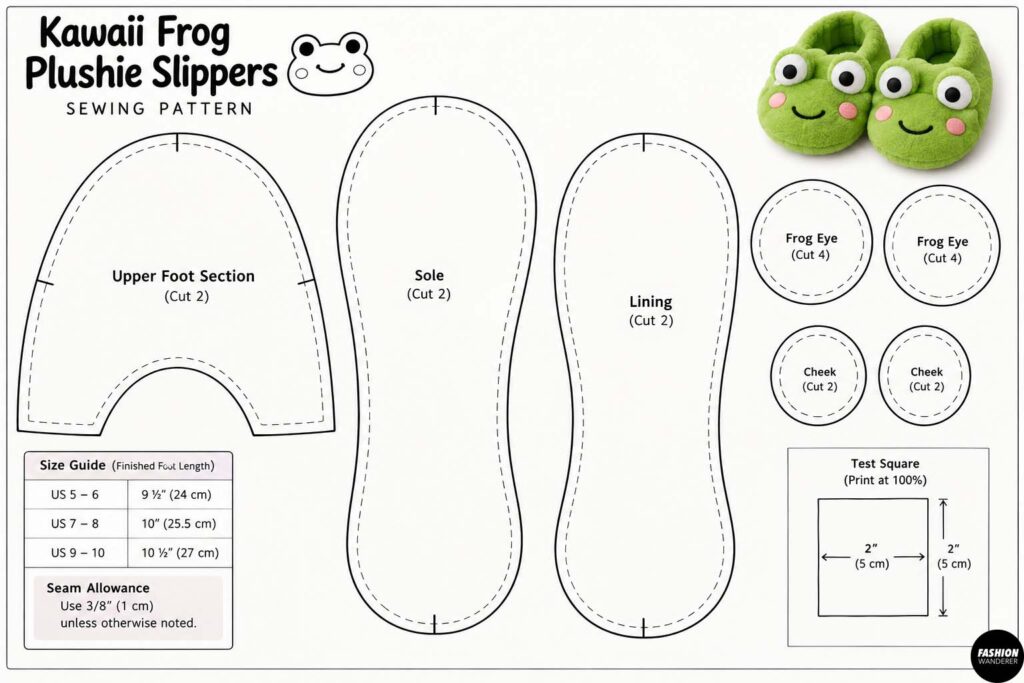
Download and print the free kawaii frog slipper sewing pattern at 100% scale.
Do not select “fit to page,” because this may change the finished slipper size.
Cut out all the paper pattern pieces.
You should have pieces for:
- Slipper sole
- Upper foot section
- Lining
- Frog eye circles
- Optional cheek pieces
If your pattern includes seam allowances, follow the printed guidelines. If it does not, add approximately 3/8 inch around each sewing edge.
For a more customized fit, compare the sole pattern piece with a slipper or shoe that already fits you comfortably.
Step 2: Cut the Slipper Fabric
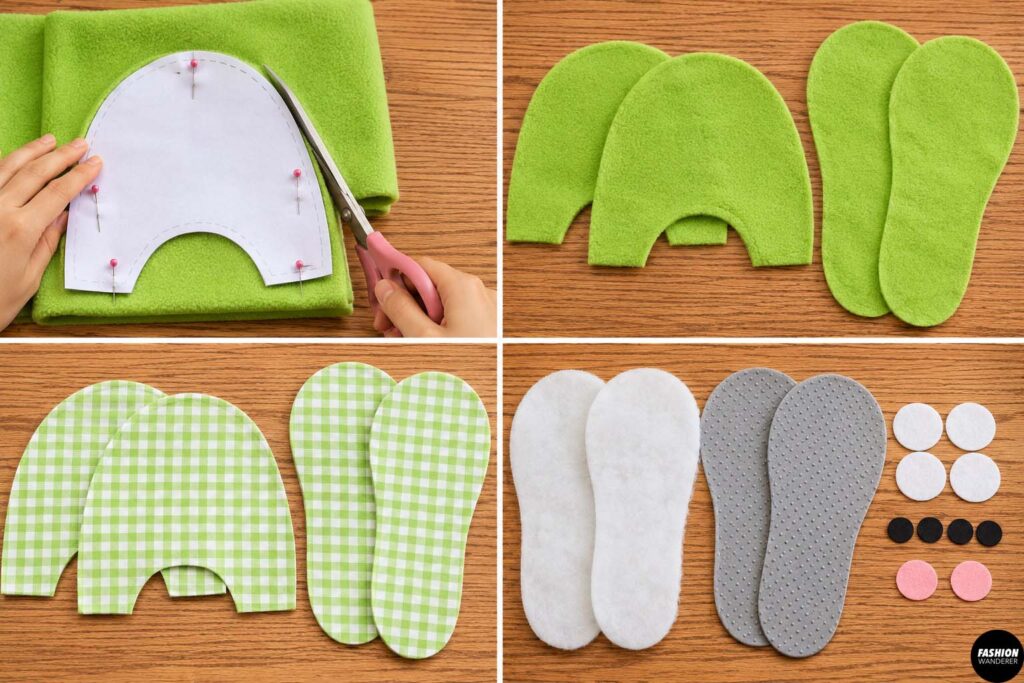
Fold your green outer fabric with right sides together.
Place the upper slipper pattern on top and pin it securely.
Cut two mirrored upper pieces.
Next, cut:
- Two outer sole pieces
- Two lining upper pieces
- Two lining sole pieces
- Two foam or batting sole pieces
- Two non-slip bottom sole pieces
Cut four white circles for the frog eyes and four smaller black circles for the pupils.
You can also cut two small pink circles or ovals if you want the slippers to have cute blushing cheeks.
Step 3: Make the Frog Eyes
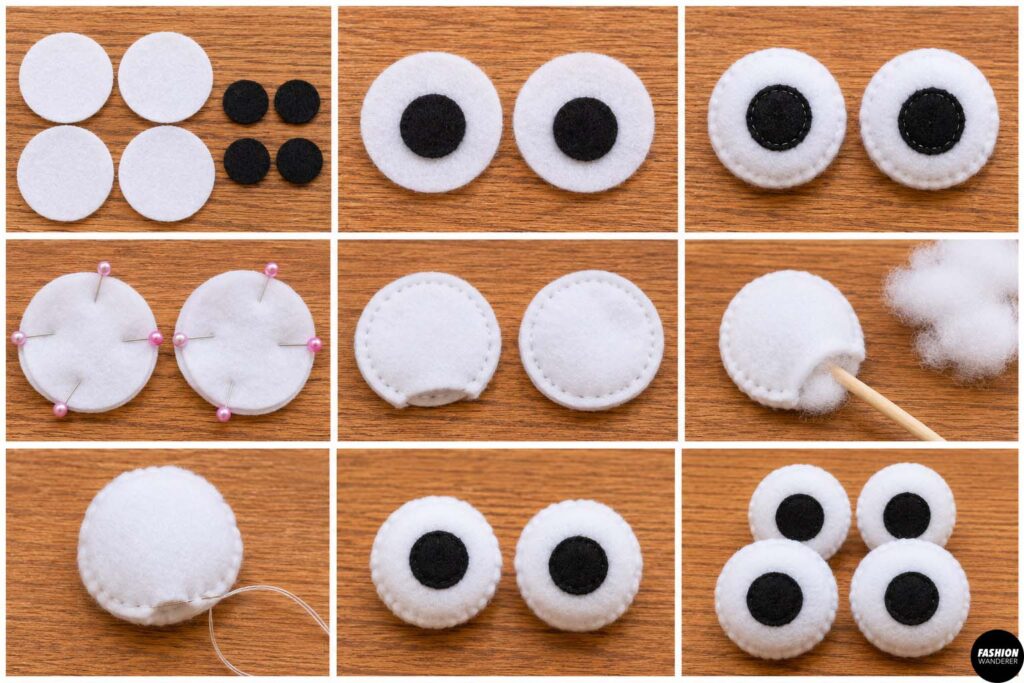
Place one black pupil in the center of each white eye piece.
Sew around the black circles using a short straight stitch or narrow zigzag stitch.
If your fabric is difficult to sew because the pieces are very small, use a tiny amount of fabric glue to hold everything in place first.
For an extra plush look, place two matching white eye pieces right sides together.
Sew around the curved edge, leaving a small opening.
Turn right side out.
Add a tiny amount of polyester fiberfill.
Hand sew the opening closed.
Repeat until you have four padded frog eyes.
Step 4: Attach the Eyes to the Slipper Upper
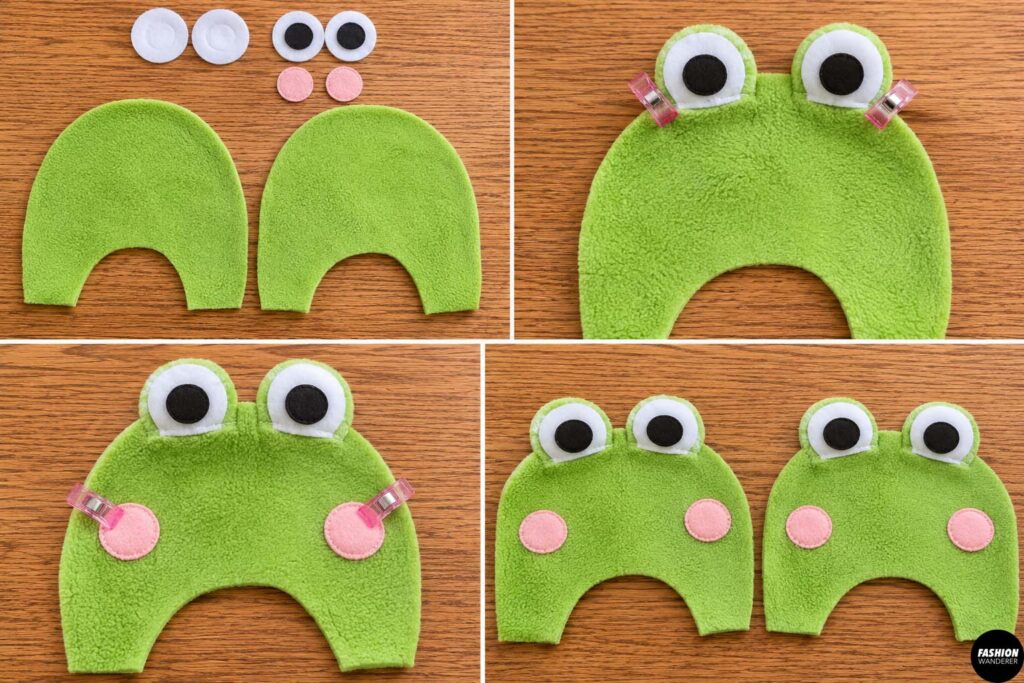
Lay one green slipper upper piece flat with the right side facing upward.
Position two frog eyes near the top edge.
The eyes should sit slightly apart and extend above the finished slipper opening.
Pin or clip them in place.
Baste the lower edge of each eye to the slipper upper using a 1/4-inch seam allowance.
Repeat for the second slipper.
If you are adding pink cheeks, position them underneath the eyes and sew around the edges before assembling the slippers.
Step 5: Sew the Frog Face
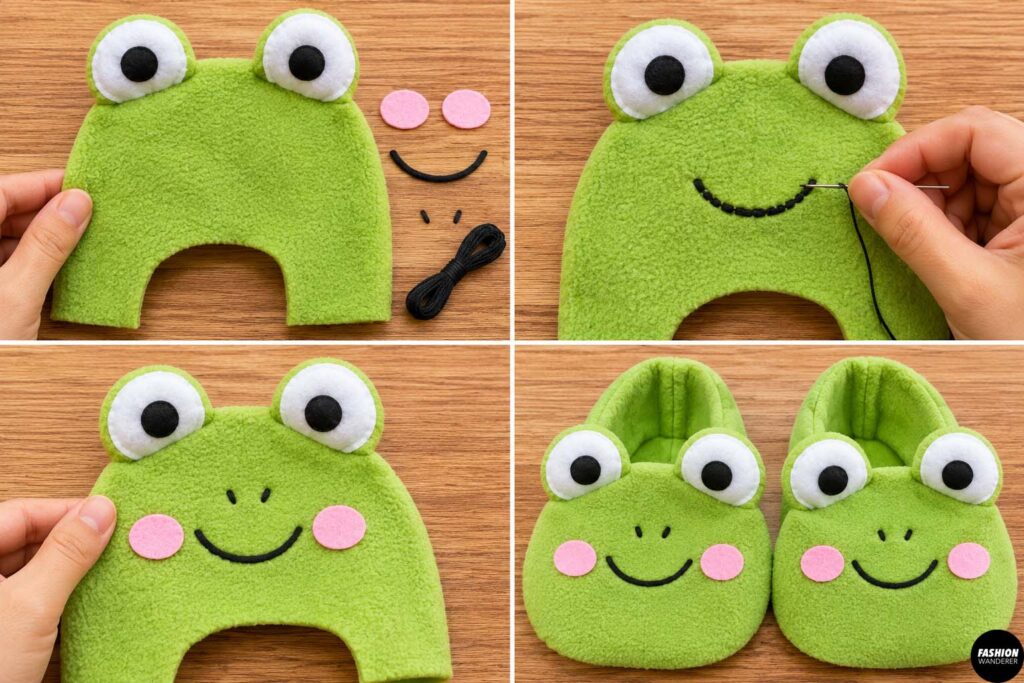
A simple smiling mouth makes the slippers instantly look more kawaii.
Use black embroidery thread, narrow ribbon, or a small strip of black felt.
Create a gentle curved smile near the center of each slipper upper.
For a super simple version, sew a short curved line with a hand-sewing needle.
You can also add two tiny nostril stitches above the mouth for extra frog character.
Keep the face simple because oversized eyes are already the main feature.
Step 6: Add Padding to the Soles
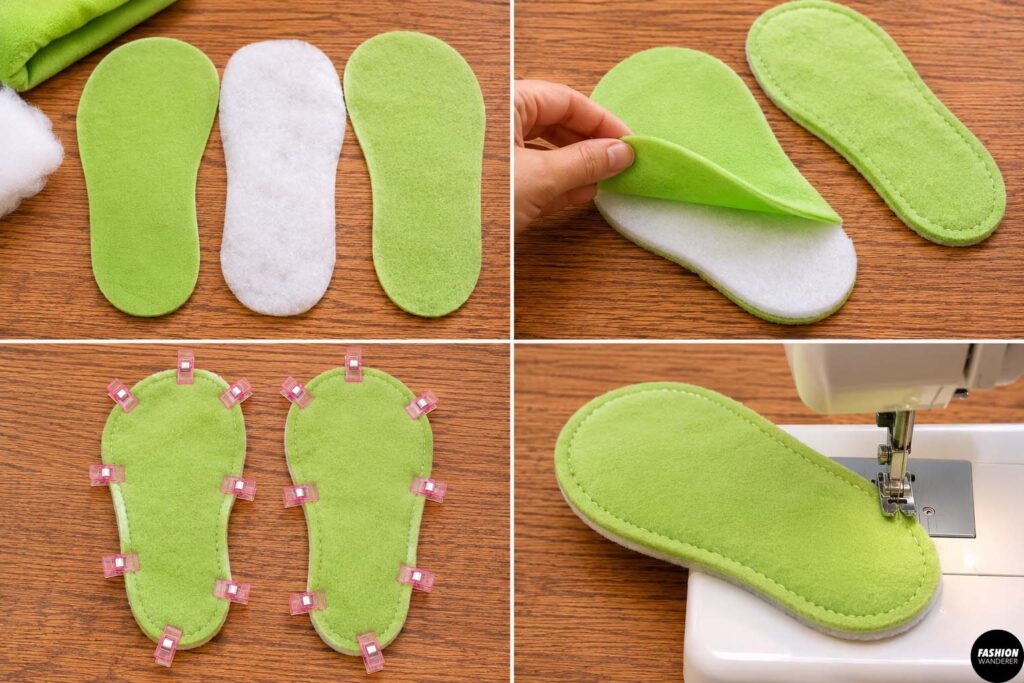
Place one foam or quilt batting piece against the wrong side of each outer sole.
Baste around the edge approximately 1/4 inch from the raw edge.
This padding creates the soft plushie feel and makes the slippers more comfortable.
For extra cushioning, use two layers of batting.
Avoid making the sole excessively thick because it may become difficult to sew through several layers later.
Step 7: Sew the Slipper Upper
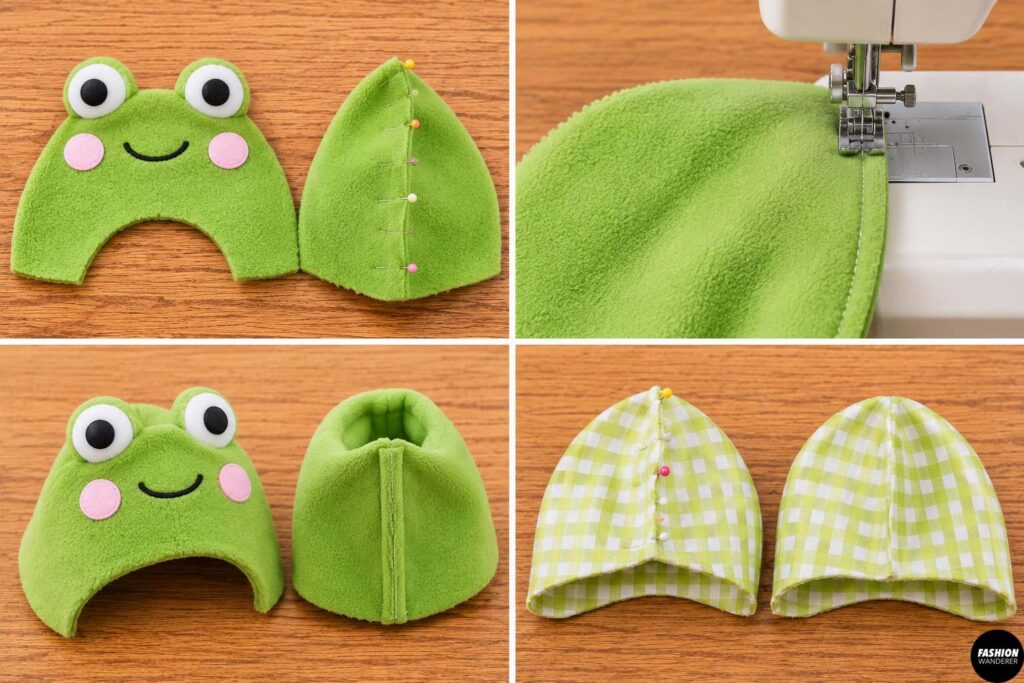
Take one outer slipper upper.
Bring the side edges together around the heel area with right sides facing.
Pin securely.
Sew the back heel seam using approximately a 3/8-inch seam allowance.
Repeat with the other slipper.
Then sew the same heel seam on both lining pieces.
Press or finger press the seams open.
Step 8: Attach the Upper to the Sole
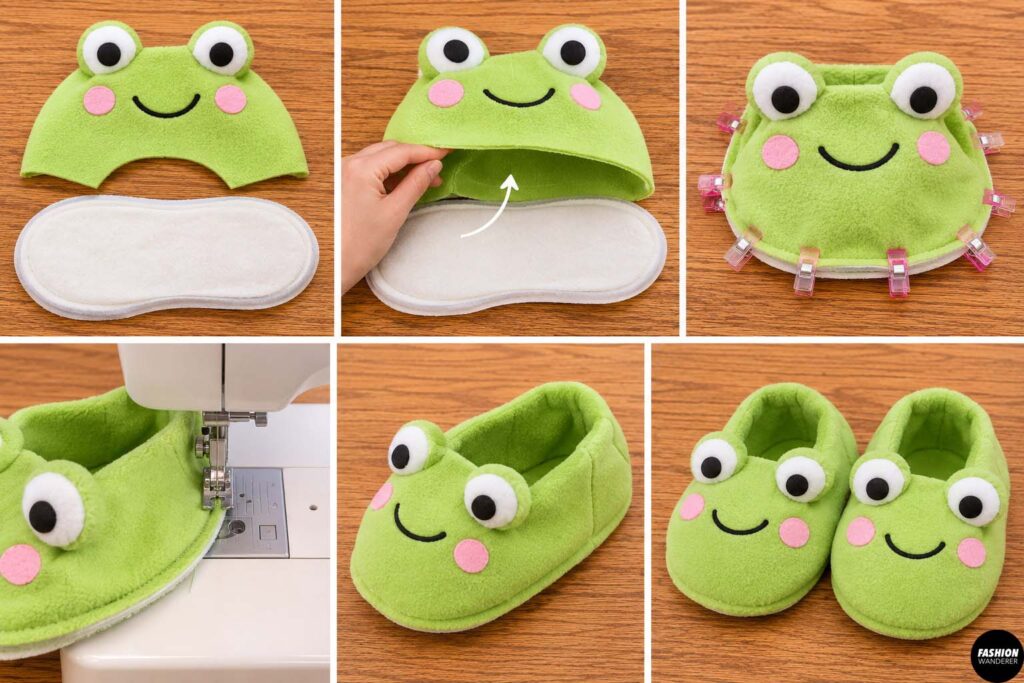
Place the padded outer sole right side up.
Position the slipper upper over the sole with right sides together.
Match the heel seam with the center back of the sole.
Then match the center front.
Pin or clip around the entire edge.
Sew slowly around the sole using a 3/8-inch seam allowance.
If the fabric begins to bunch around the curves, stop and reposition it instead of stretching aggressively.
Repeat for the second slipper.
Step 9: Sew the Lining
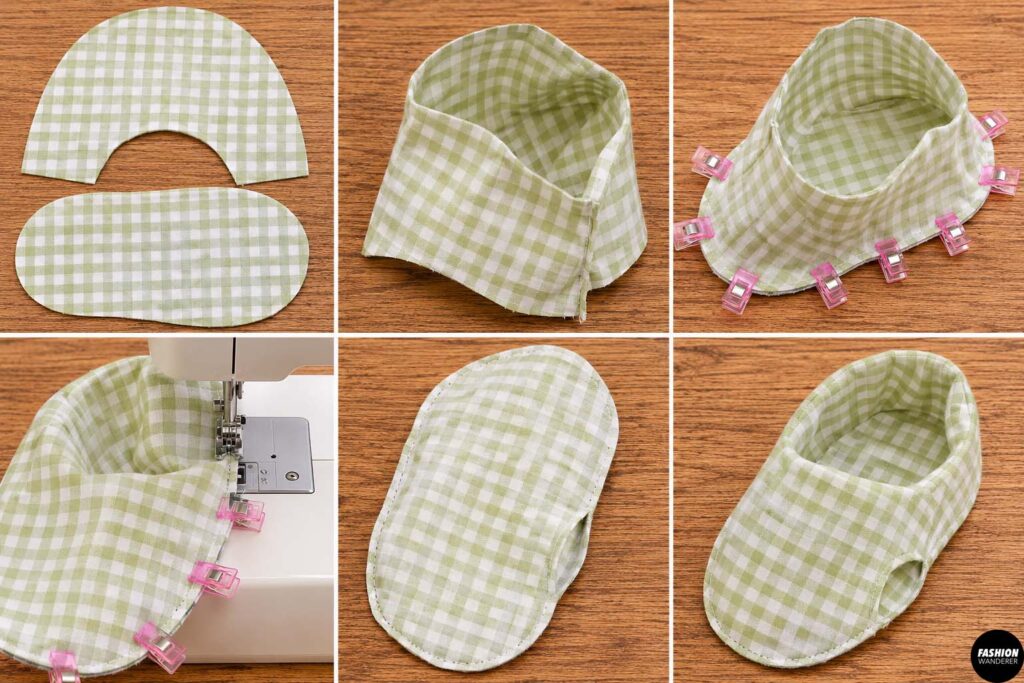
Attach each lining upper to a lining sole using the same method.
Leave a 3- to 4-inch opening along one side of the lining sole.
You will use this opening to turn the slipper right side out later.
Step 10: Join the Outer Slipper and Lining
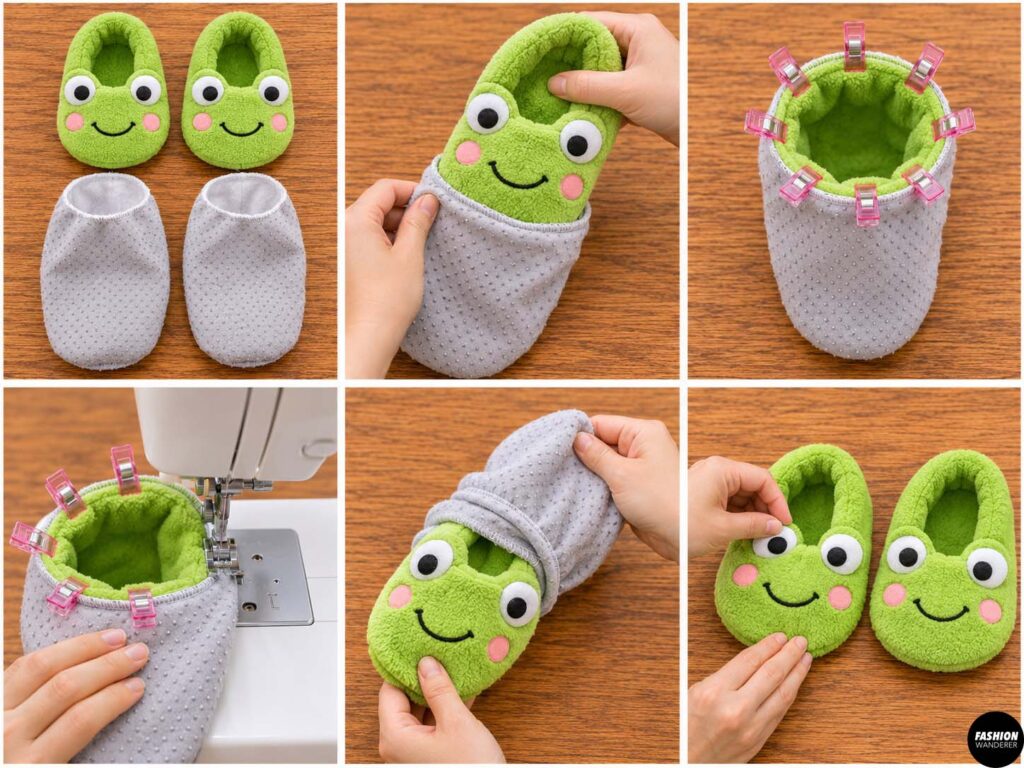
Turn the outer slipper right side out.
Keep the lining wrong side out.
Place the outer slipper inside the lining so that the right sides are facing each other.
Match the top opening edges.
Pin around the opening.
Sew completely around the top edge using a 3/8-inch seam allowance.
Carefully pull the outer slipper through the opening left in the lining.
Push out the frog eyes and smooth the seams with your fingers.
Step 11: Close the Lining
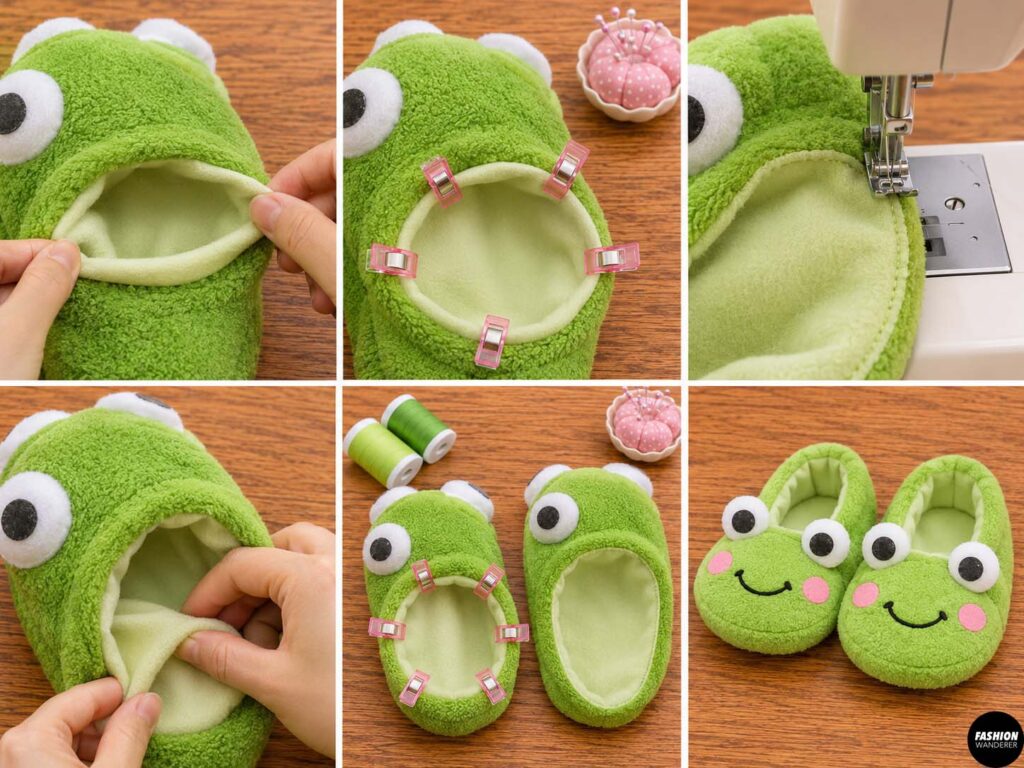
Fold the raw edges of the lining opening approximately 3/8 inch toward the inside.
Pin the opening closed.
Topstitch very close to the folded edge or hand sew it closed using a ladder stitch.
Push the lining neatly inside the slipper.
Repeat for the second slipper.
Step 12: Add the Non-Slip Bottom
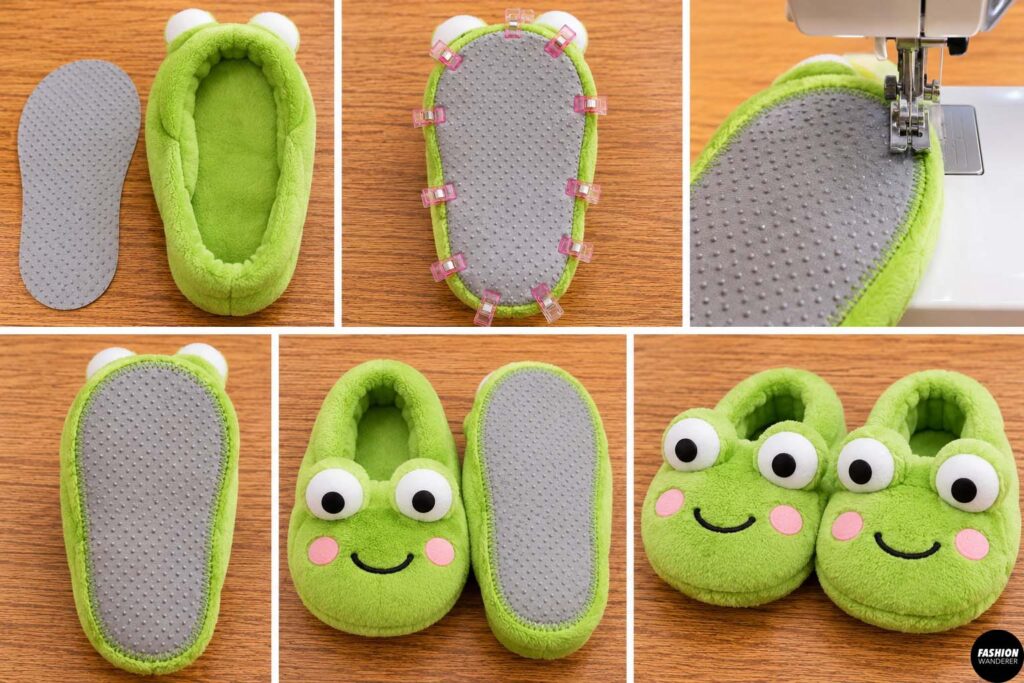
Place one non-slip sole piece against the bottom of each slipper.
Pin carefully around the edges.
Sew around the perimeter using a narrow zigzag stitch or straight stitch.
If the sole material is difficult to sew, use fabric glue designed for textiles.
Non-slip soles are especially helpful if the slippers will be worn on wood, tile, or laminate floors.
Final Tips for Cute Kawaii Frog Slippers
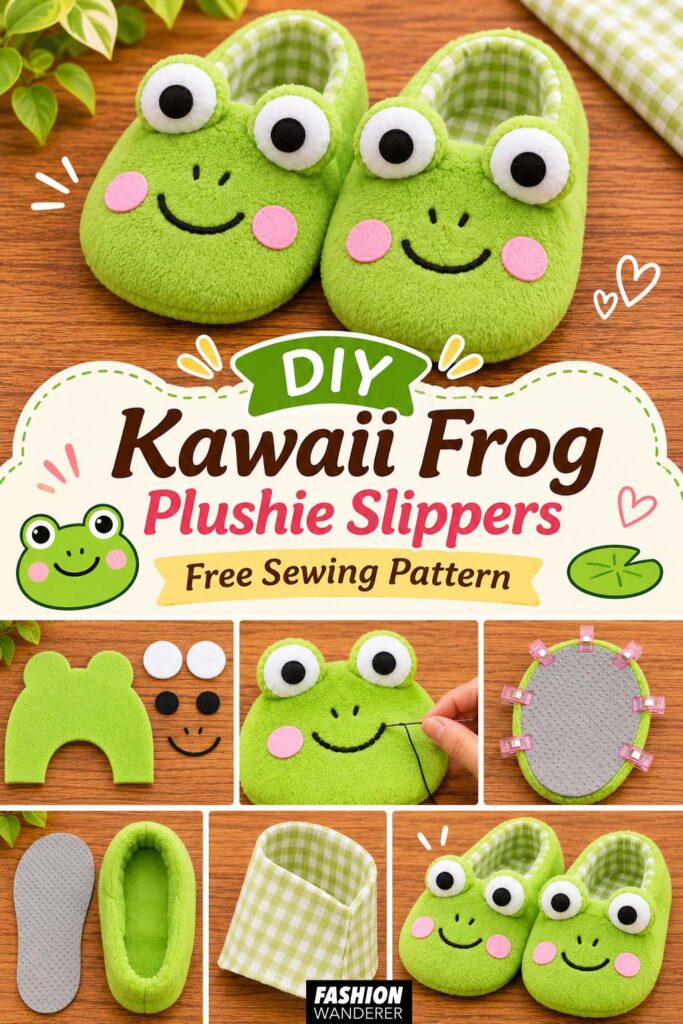
Give the slippers a final shape with your hands and fluff the padded eyes.
If the toes look too flat, you can carefully add a small amount of polyester fiberfill between the outer fabric and lining near the front.
Try playful variations such as pastel green frogs, pink frogs, yellow frogs, or matching parent-and-child slippers.
You can even add a tiny felt crown to create a frog prince version.
These DIY frog plushie slippers are a fun way to combine practical sewing with kawaii-inspired style. With soft fabric, padded soles, oversized eyes, and a simple beginner-friendly construction, this free sewing project makes an adorable handmade accessory for cozy days at home.