
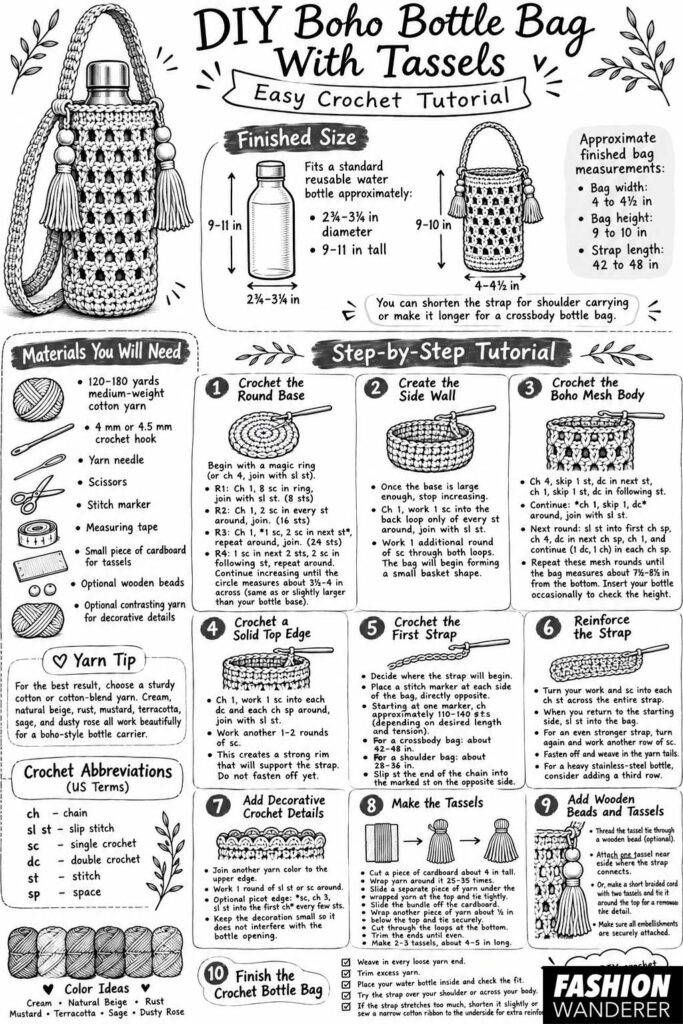
A handmade crochet bottle bag with tassels is one of those small projects that is both useful and stylish. Crochet water bottle bags are perfect for carrying a reusable water bottle on walks, festivals, markets, travel days, or casual outings when you want to keep your hands free.
This DIY boho bottle bag uses simple crochet stitches, a sturdy round base, an open textured body, and a comfortable shoulder strap. The tassels add the relaxed bohemian detail that makes the finished bag feel more like an accessory than a basic bottle holder.
This project is beginner-friendly and works especially well with cotton yarn because cotton is strong, washable, and does not stretch as much as many soft acrylic yarns.
The finished bag can also be adjusted easily for different bottle sizes.
Finished Size
This pattern is designed to fit a standard reusable water bottle approximately:
- 2¾ to 3¼ inches in diameter
- 9 to 11 inches tall
Approximate finished bag measurements:
- Bag width: 4 to 4½ inches
- Bag height: 9 to 10 inches
- Strap length: 42 to 48 inches
You can shorten the strap for shoulder carrying or make it longer for a crossbody bottle bag.
Materials You Will Need
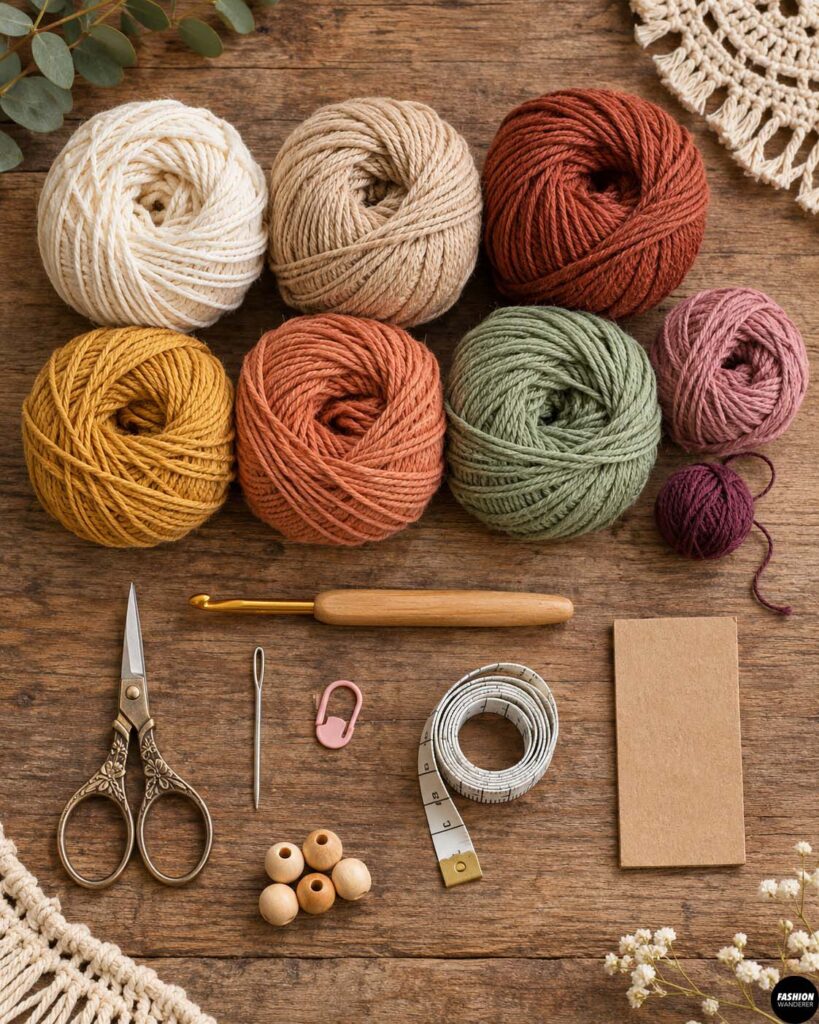
- 120–180 yards medium-weight cotton yarn
- 4 mm or 4.5 mm crochet hook
- Yarn needle
- Scissors
- Stitch marker
- Measuring tape
- Small piece of cardboard for tassels
- Optional wooden beads
- Optional contrasting yarn for decorative details
For the best result, choose a sturdy cotton or cotton-blend yarn. Cream, natural beige, rust, mustard, terracotta, sage, and dusty rose all work beautifully for a boho-style bottle carrier.
Crochet Abbreviations
This tutorial uses US crochet terminology.
ch – chain
sl st – slip stitch
sc – single crochet
dc – double crochet
st – stitch
sp – space
DIY Crochet Water Bottle Bag – Free Pattern
Step 1: Crochet the Round Base
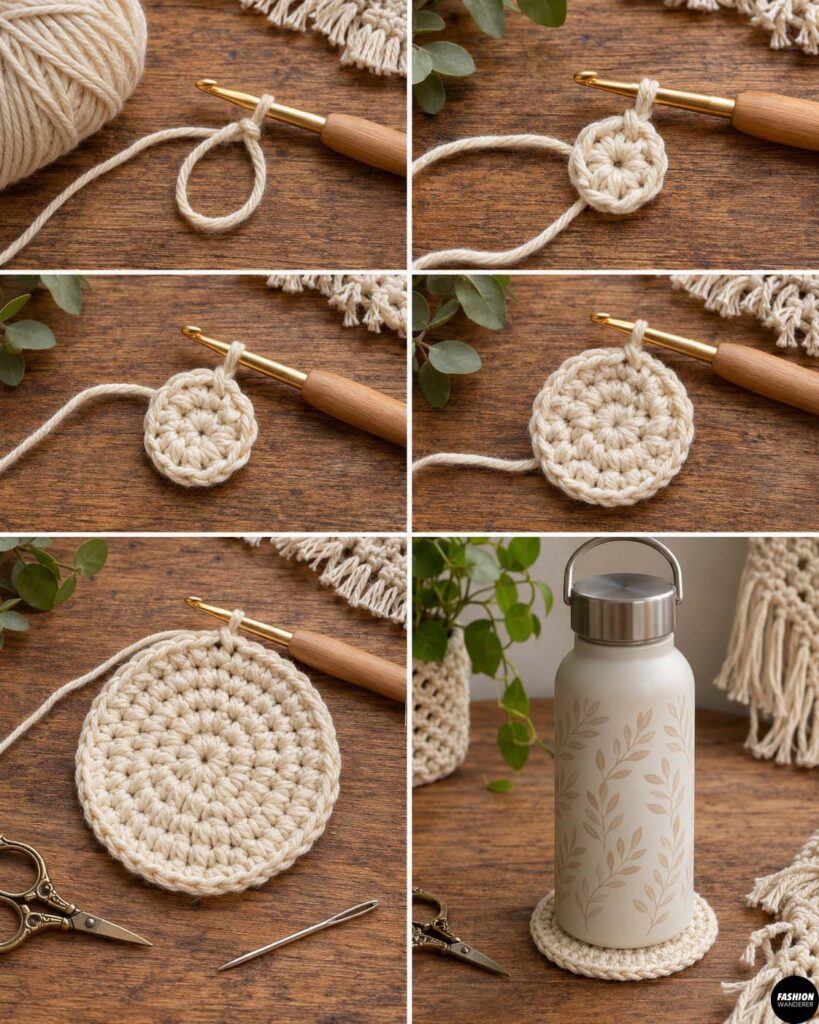
Begin with a magic ring.
If you prefer, chain four and join with a slip stitch to create a ring.
Round 1
Chain 1.
Work 8 single crochet stitches into the center of the ring.
Join with a slip stitch to the first single crochet.
You should have 8 stitches.
Round 2
Chain 1.
Work 2 single crochet stitches into every stitch around.
Join with a slip stitch.
You should now have 16 stitches.
Round 3
Chain 1.
Work:
1 single crochet in the first stitch, then 2 single crochet in the next stitch.
Repeat this sequence around.
Join with a slip stitch.
You should have 24 stitches.
Round 4
Work 1 single crochet in each of the next two stitches, then 2 single crochet in the following stitch.
Repeat around.
Continue increasing until your circle measures approximately 3½ to 4 inches across.
Place your bottle on top of the circle.
The base should be approximately the same width as the bottom of the bottle or slightly larger.
Step 2: Create the Side Wall
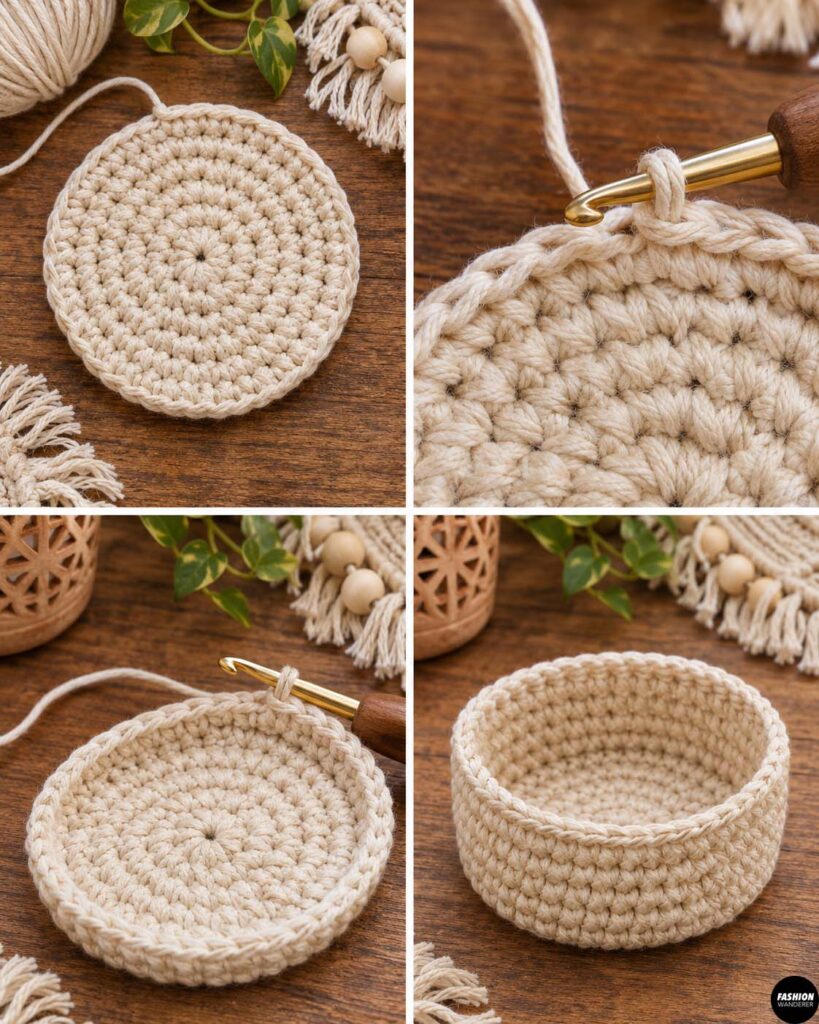
Once the base is large enough, stop increasing.
Chain 1.
Work one single crochet into the back loop only of every stitch around.
Working into the back loops creates a subtle ridge and helps the sides of the bag turn upward.
Join with a slip stitch.
Work one additional round of single crochet through both loops.
The bottle bag should now begin forming a small basket shape.
Step 3: Crochet the Boho Mesh Body
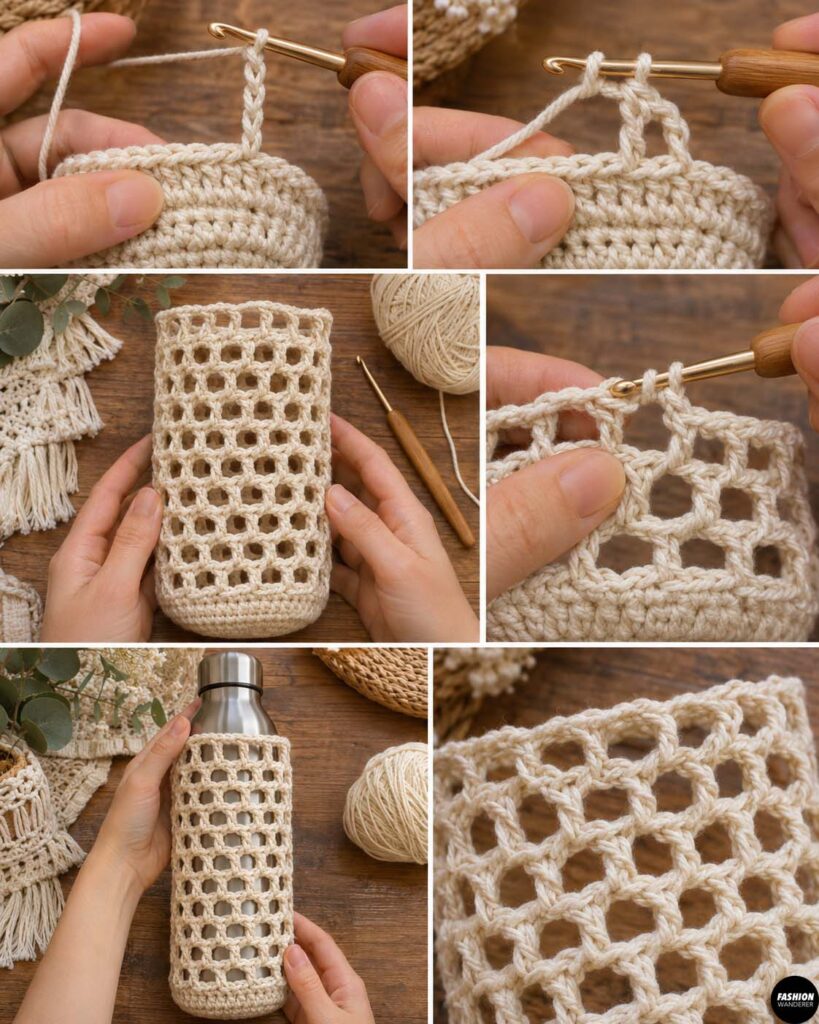
The open mesh section keeps the project lightweight and gives the bottle carrier a relaxed handmade appearance.
Chain 4.
Skip one stitch.
Double crochet into the next stitch.
Chain 1.
Skip one stitch and double crochet into the following stitch.
Continue working:
chain 1, skip 1, double crochet
around the bag.
Join with a slip stitch near the beginning chain.
For the next round, slip stitch into the first chain space.
Chain 4.
Double crochet into the next chain space.
Chain 1.
Continue working one double crochet and one chain into each chain space around.
Repeat these mesh rounds until the bottle bag measures approximately 7½ to 8½ inches from the bottom.
Insert your bottle occasionally to check the height.
Step 4: Crochet a Solid Top Edge
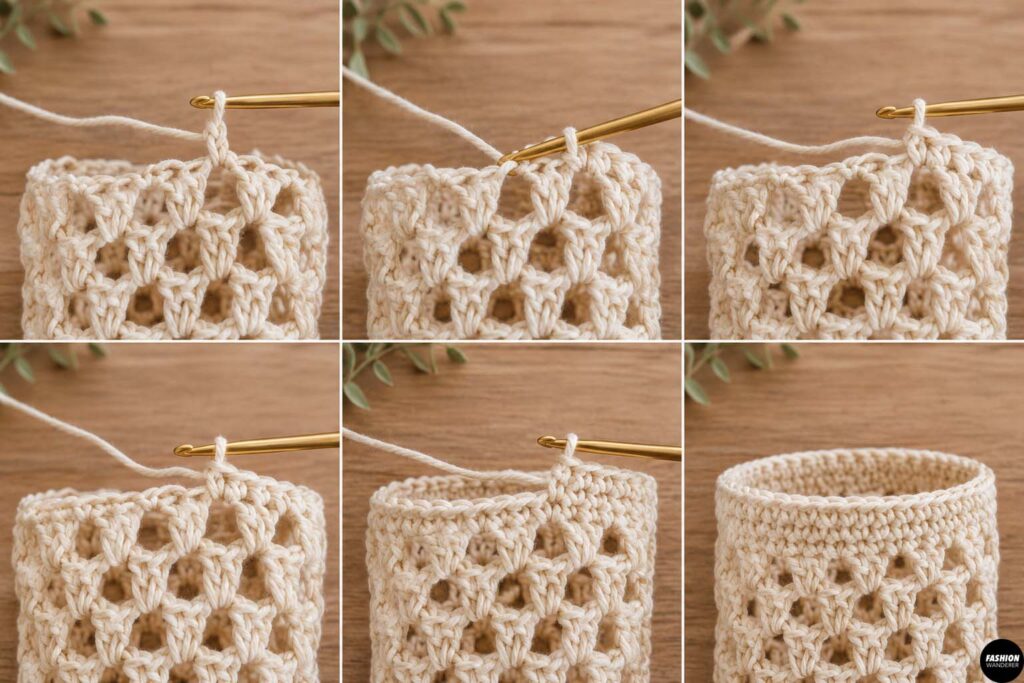
Once the mesh body reaches the desired height, create a sturdier top edge.
Chain 1.
Work one single crochet into each double crochet and each chain space around.
Join with a slip stitch.
Work another one or two rounds of single crochet.
This creates a strong rim that will support the shoulder strap.
Do not fasten off yet.
Step 5: Crochet the First Strap
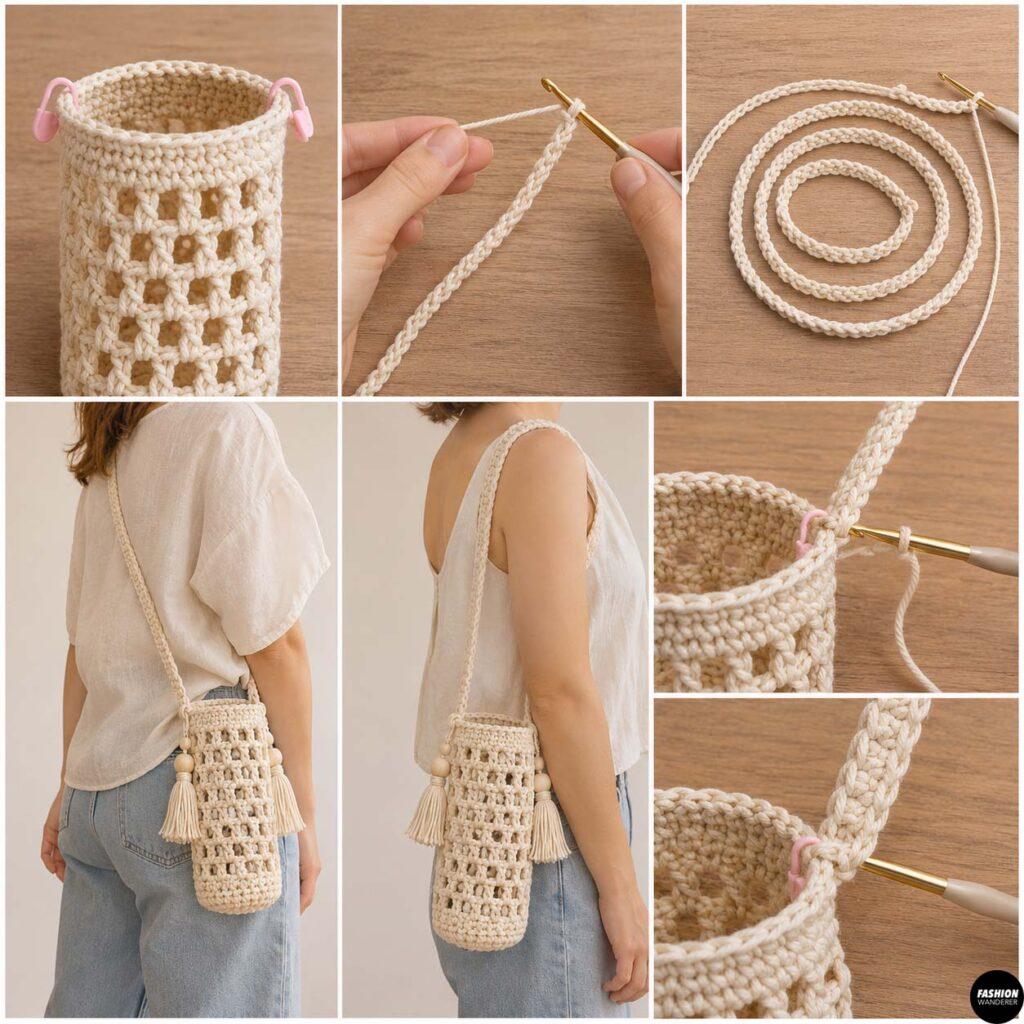
Decide where you want the strap to begin.
Place a stitch marker at each side of the bottle bag directly opposite one another.
Starting at one marker, chain approximately 110 to 140 stitches.
The exact number depends on your preferred strap length and crochet tension.
Before attaching the chain, hold the bag against your body.
For a crossbody bag, the strap usually works well at approximately 42 to 48 inches.
For a shoulder-length bag, make it approximately 28 to 36 inches.
Slip stitch the end of the chain securely into the marked stitch on the opposite side.
Step 6: Reinforce the Strap
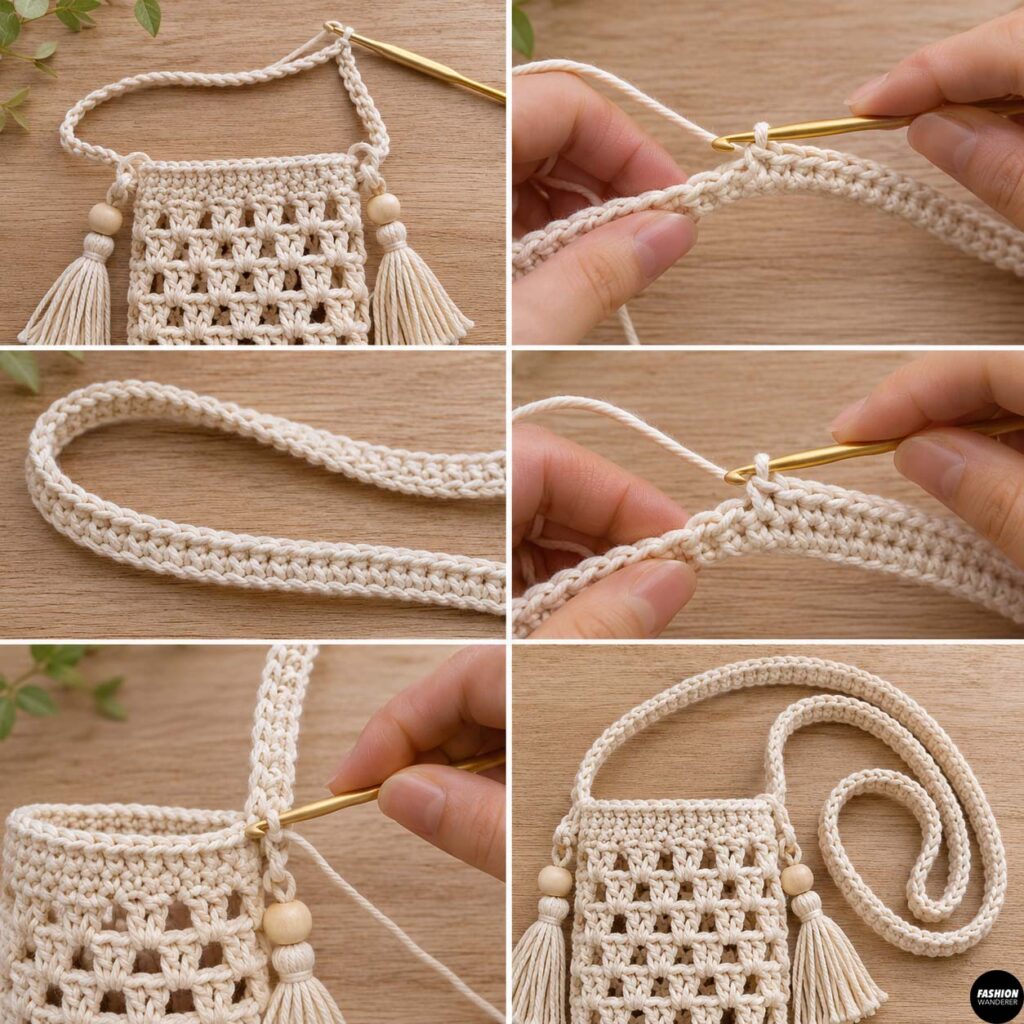
A single chain can stretch, especially when carrying a full bottle.
Turn your work and single crochet into each chain stitch across the entire strap.
When you return to the starting side, slip stitch securely into the bag.
For an even stronger strap, turn again and work another row of single crochet.
Fasten off and weave in the yarn tails securely.
If you regularly carry a heavy stainless-steel bottle, consider adding a third row to the strap.
Step 7: Add Decorative Crochet Details
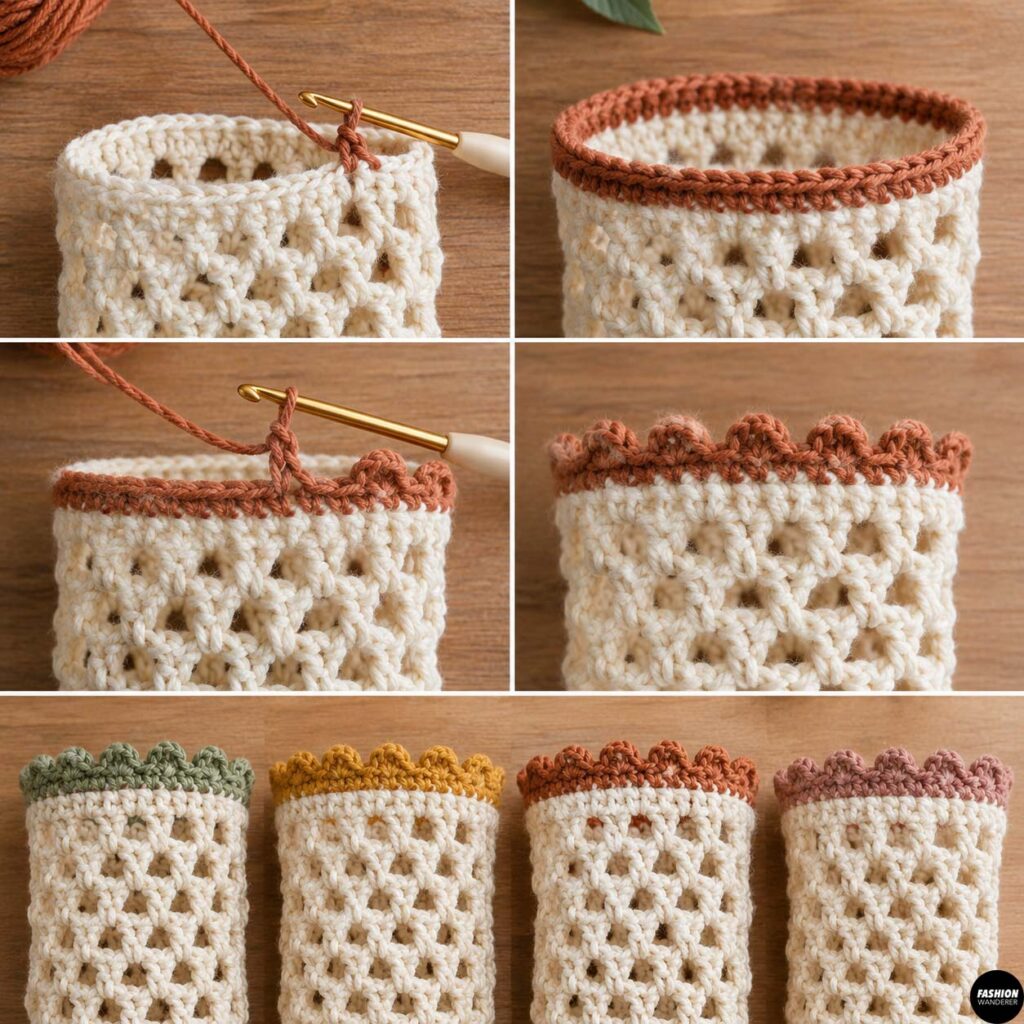
For a more distinctive boho appearance, add a contrasting border around the top.
Join another yarn color to the upper edge.
Work one round of slip stitches or single crochet around the rim.
Colors such as rust, mustard, dark brown, sage, or muted coral look especially pretty against natural cotton.
You can also crochet a small picot edge by working:
single crochet, chain 3, slip stitch into the first chain
every few stitches.
Keep the decoration relatively small so it does not interfere with the bottle opening.
Step 8: Make the Tassels
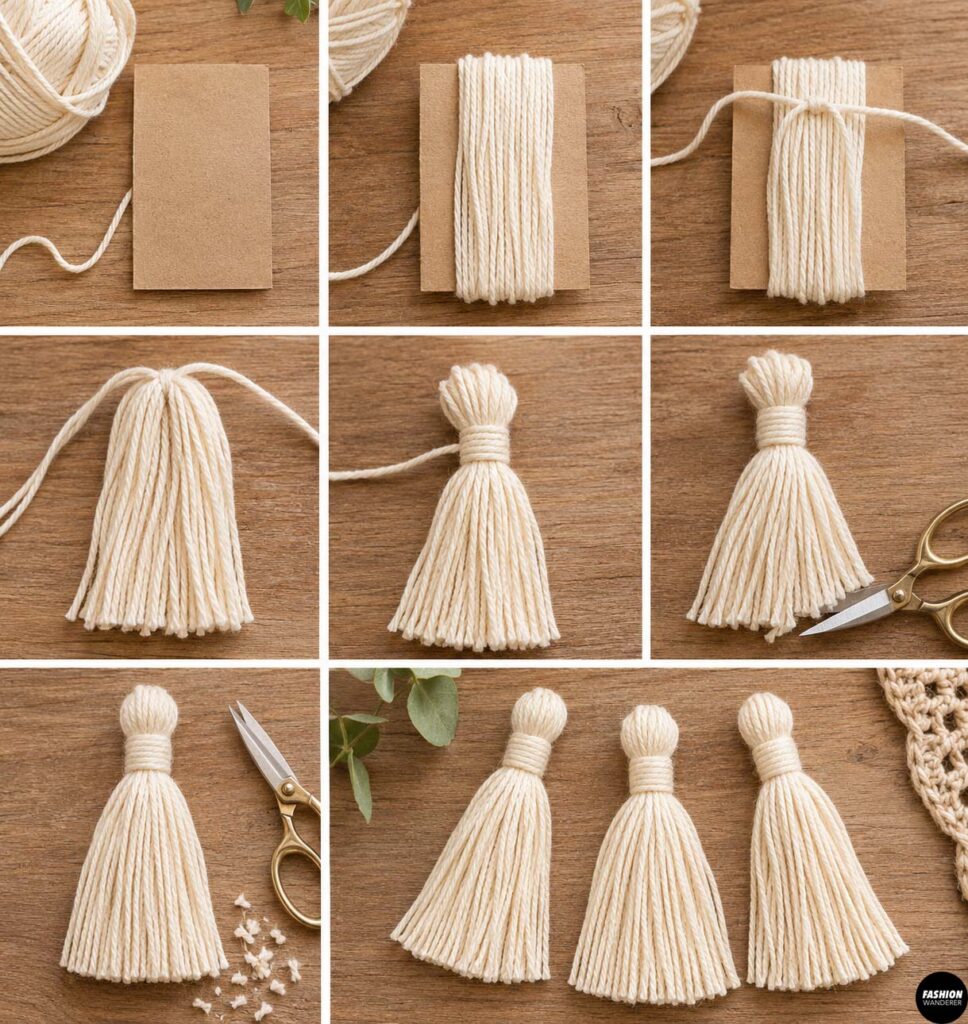
Cut a piece of cardboard approximately 4 inches tall.
Wrap yarn around the cardboard 25 to 35 times.
Slide a separate piece of yarn underneath the wrapped yarn at the top.
Tie tightly.
Carefully slide the yarn bundle off the cardboard.
Wrap another piece of yarn around the bundle approximately ½ inch below the top.
Tie securely.
Cut through the loops at the bottom.
Trim the yarn ends until the tassel looks even.
Make two or three tassels.
For a fuller boho style, make the tassels approximately 4 to 5 inches long.
Step 9: Add Wooden Beads and Tassels
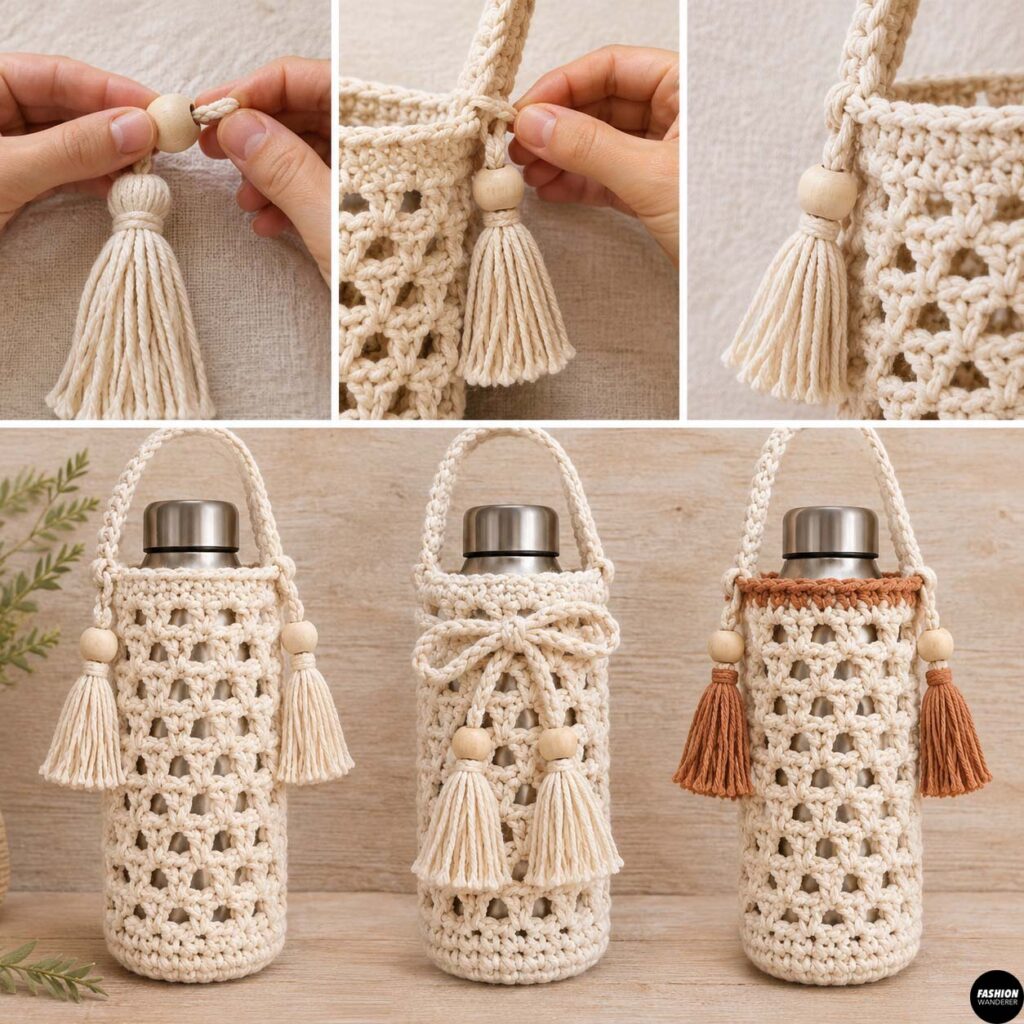
Thread the tassel tie through a wooden bead if desired.
Attach one tassel near each side of the bottle bag where the strap connects.
You can also create a short braided yarn cord and attach two tassels to the ends.
Tie the cord around the top of the bag for a removable decorative detail.
Make sure all embellishments are securely attached.
Step 10: Finish the Crochet Bottle Bag
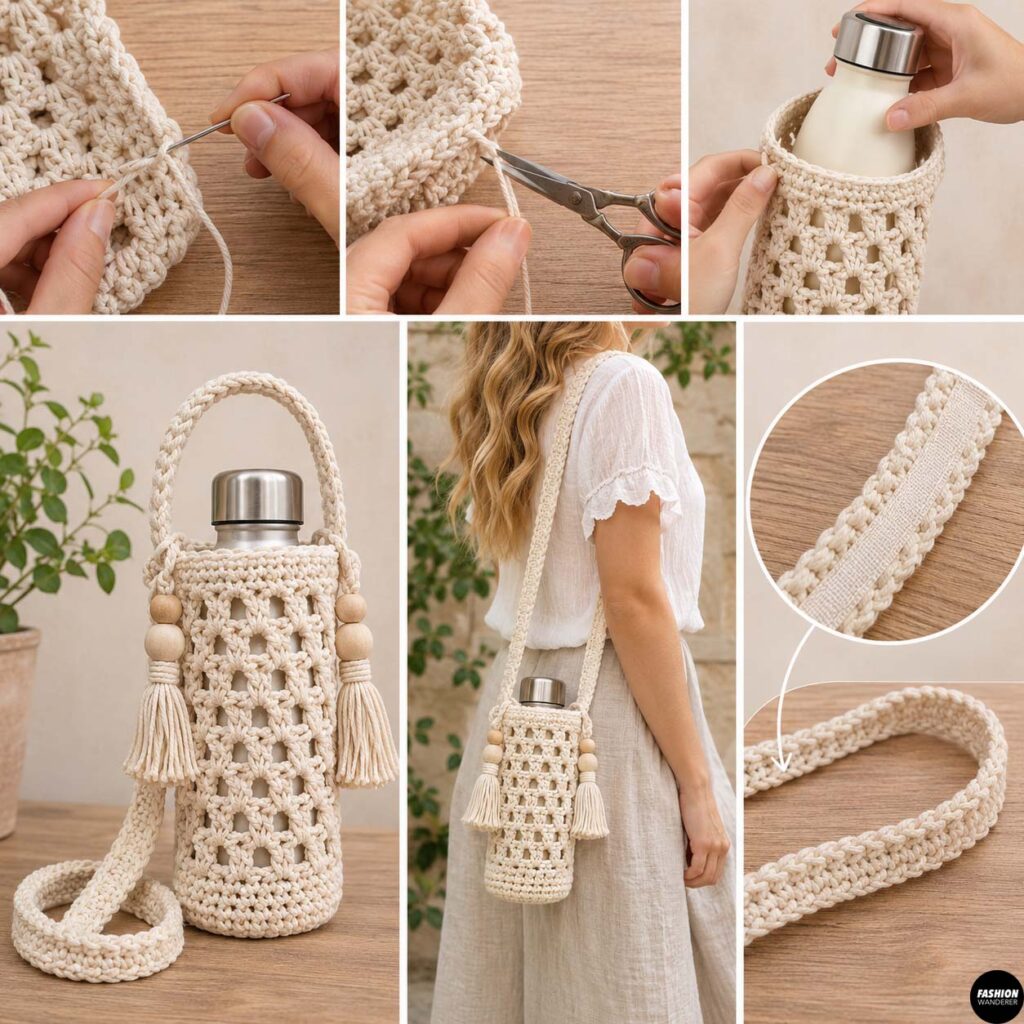
Weave in every loose yarn end with a yarn needle.
Trim excess yarn.
Place your water bottle inside and check the fit.
The bag should hug the bottle without squeezing it tightly.
Try the strap over your shoulder or across your body.
If the strap stretches too much, shorten it slightly or sew a narrow cotton ribbon to the underside for extra reinforcement.
Your DIY crochet boho bottle bag with tassels is now ready to use.
Ways to Customize Your Bottle Bag
Once you understand the basic construction, this pattern is easy to personalize.
Try making a cream bottle bag with terracotta tassels for a warm neutral look, or combine sage green with natural wooden beads for a softer earthy style.
You can also add granny-square motifs, embroidered flowers, shell stitches, stripes, or several tiny tassels around the bottom edge.
For a beach-inspired version, use natural cotton with shell beads. For festivals, try brighter colors with oversized tassels.
Final Thoughts
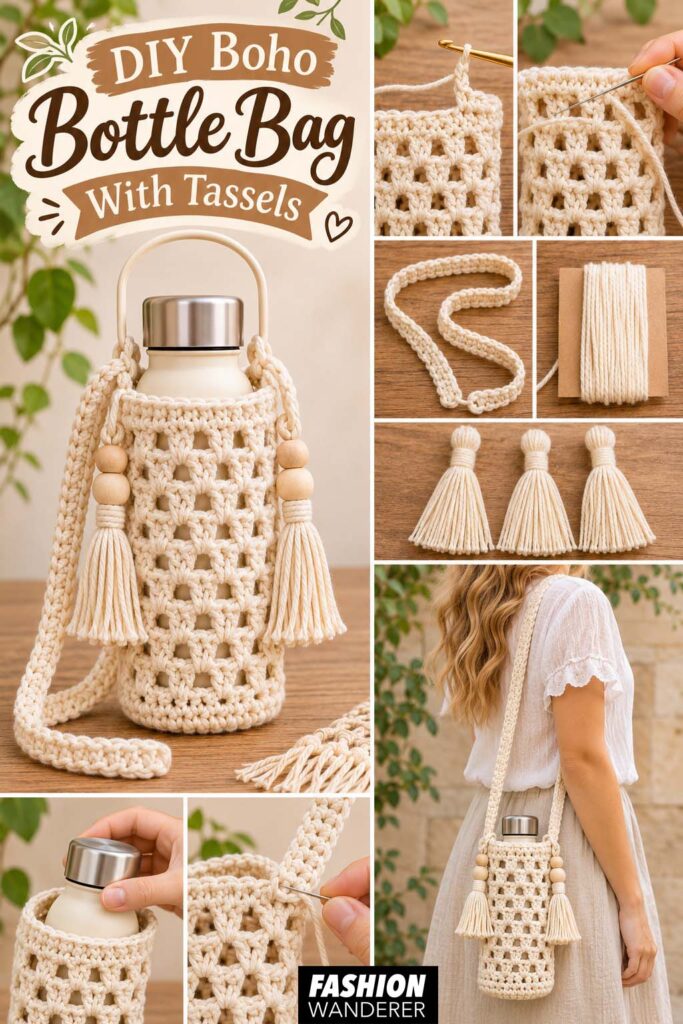
This easy crochet bottle holder pattern is a great project when you want something useful that does not require days of crocheting.
The round base keeps the bottle secure, the mesh body reduces bulk, and the reinforced strap makes the finished carrier practical enough for everyday use.
Best of all, the tassels and optional wooden beads turn a simple water bottle holder into a stylish boho crochet accessory.
Make one for summer walks, festivals, hiking trips, farmers markets, or travel, then use leftover yarn to create matching versions for friends. Once you have made the first one, it is easy to adjust the pattern for coffee tumblers, smaller bottles, or extra-large reusable water bottles.