
A DIY checkerboard bottle bag is one of those crochet projects that looks trendy, practical, and much harder than it actually is. With a simple two-color checkerboard pattern, sturdy strap, and narrow bottle-friendly shape, a handmade crochet bottle carrier is perfect for water bottles, reusable drink bottles, coffee tumblers, or even a small wine bottle.
This project is especially great for beginners who want to practice color changes in crochet without committing to a large blanket or sweater. The repeated blocks are easy to memorize, and the bag works up quickly with cotton yarn.
You can make it in classic black and white, brown and cream, sage and ivory, pink and red, or any color combination that fits your style.
Materials You Will Need
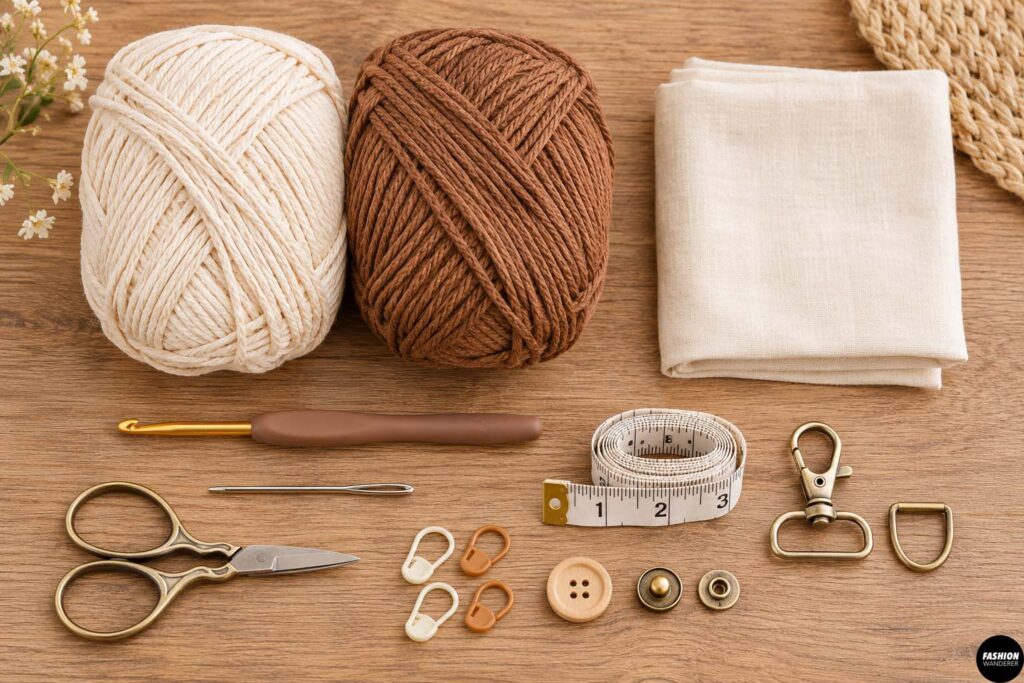
To make one crochet checkerboard bottle bag, gather:
- 2 colors of worsted-weight cotton yarn
- 4 mm or 4.5 mm crochet hook
- Yarn needle
- Scissors
- Stitch markers
- Measuring tape
- Optional small button or snap
- Optional fabric lining
- Optional swivel hook or D-ring for the strap
Cotton yarn works especially well because it is durable, washable, and less stretchy than many acrylic yarns.
For the cleanest checkerboard design, choose two colors with strong contrast.
Finished Size
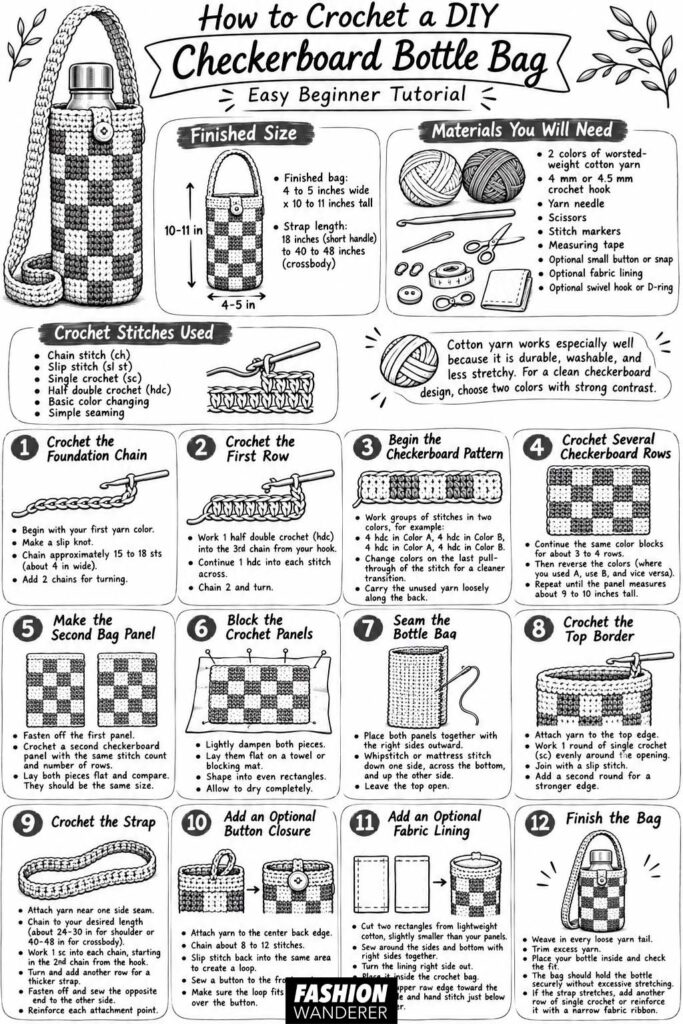
The finished bottle bag should measure approximately:
4 to 5 inches wide x 10 to 11 inches tall
The strap can be customized anywhere from approximately 18 inches for a short carry handle to 40 to 48 inches for a crossbody bottle bag.
Always compare the bag with the bottle you plan to carry before finishing the top edge.
Crochet Stitches Used
This pattern uses:
- Chain stitch
- Slip stitch
- Single crochet
- Half double crochet
- Basic color changing
- Simple seaming
The checkerboard section can be worked entirely in half double crochet, which gives the bag enough structure while still working up quickly.
DIY Crochet Checkerboard Bottle Bag
Step 1: Crochet the Foundation Chain
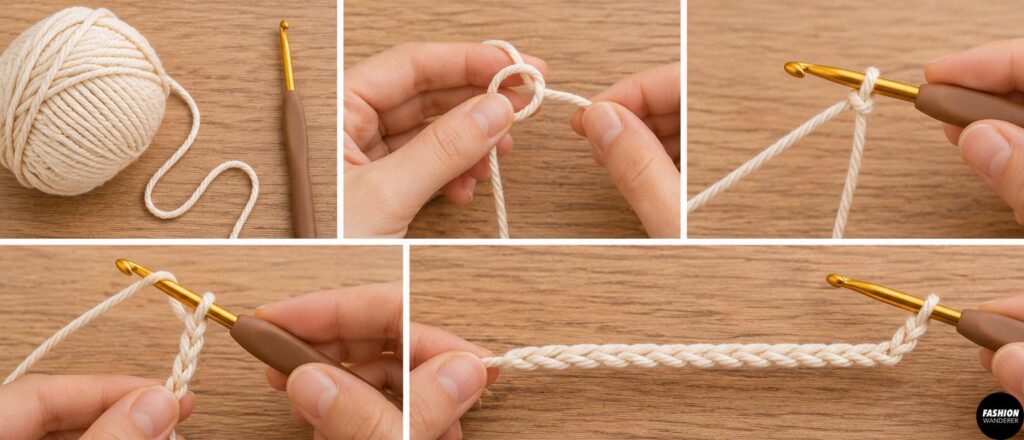
Begin with your first yarn color.
Make a slip knot.
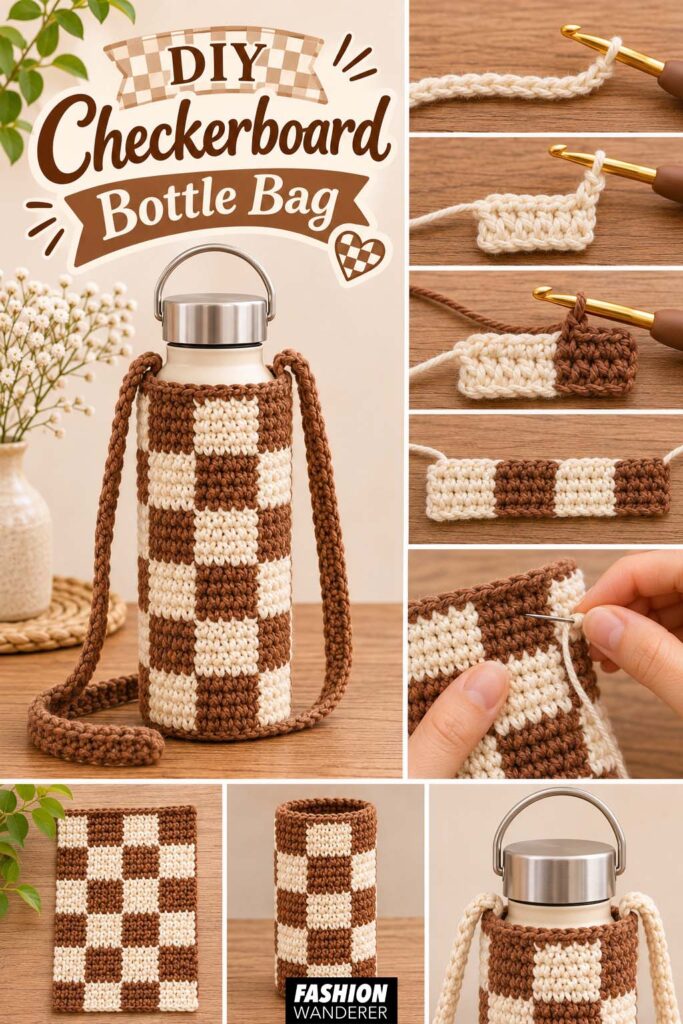
Chain approximately 15 to 18 stitches, depending on your yarn, hook size, and desired bottle width.
Your foundation chain should measure roughly 4 inches.
Add two chains for turning.
If you are making the bag for a particularly wide water bottle, add a few extra chains.
Step 2: Crochet the First Row
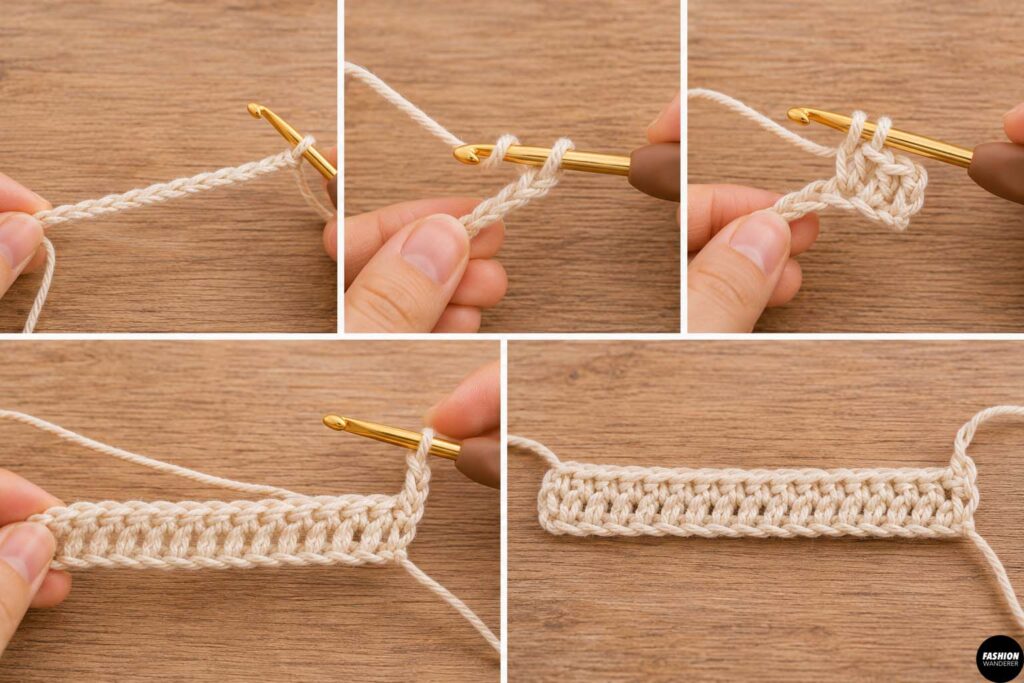
Work one half double crochet into the third chain from your hook.
Continue making one half double crochet into each stitch across.
Chain two and turn.
This creates the first solid row and gives you a stable base for starting the checkerboard design.
Step 3: Begin the Checkerboard Pattern
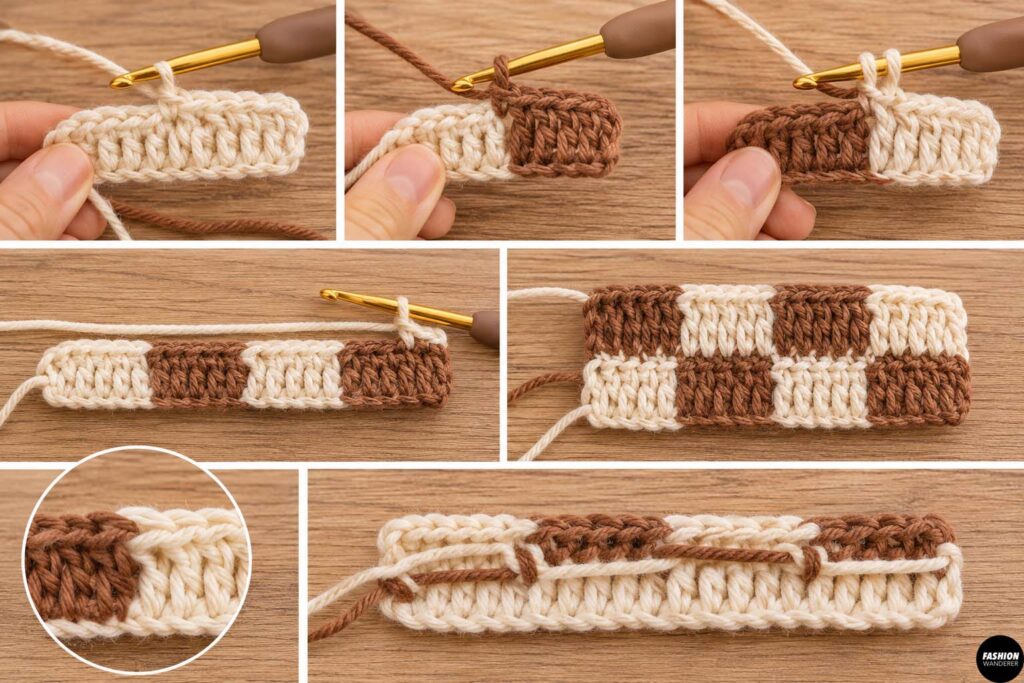
A simple checkerboard pattern is created by alternating groups of stitches in two colors.
For example, work:
- 4 half double crochet in Color A
- 4 half double crochet in Color B
- 4 half double crochet in Color A
- 4 half double crochet in Color B
Adjust the number of stitches in each block if your starting chain is different.
To change colors, begin your final half double crochet with the old color but complete the last yarn-over and pull-through with the new color.
This creates a cleaner transition.
Carry the unused yarn loosely along the back of your work instead of cutting it after every block.
Step 4: Crochet Several Checkerboard Rows
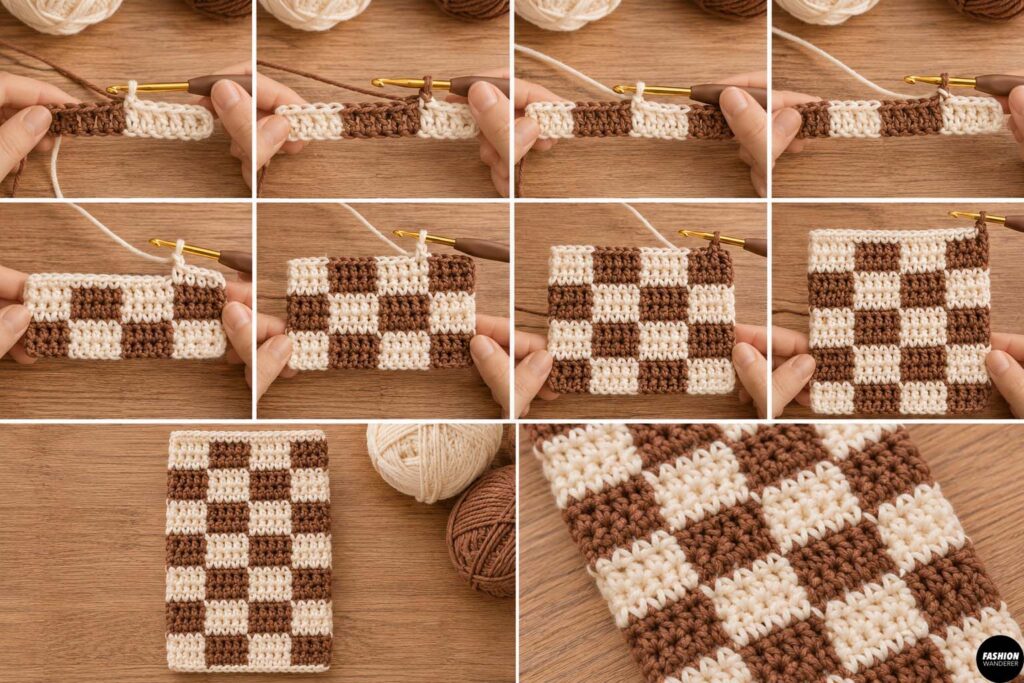
Continue working the same color blocks for approximately 3 to 4 rows.
This creates the first horizontal row of squares.
At the end of the final row, reverse the colors.
Where you previously used Color A, switch to Color B.
Where you used Color B, switch to Color A.
Continue for another 3 to 4 rows.
You will now see the checkerboard pattern beginning to form.
Repeat this sequence until your crochet panel measures approximately 9 to 10 inches tall.
Step 5: Make the Second Bag Panel
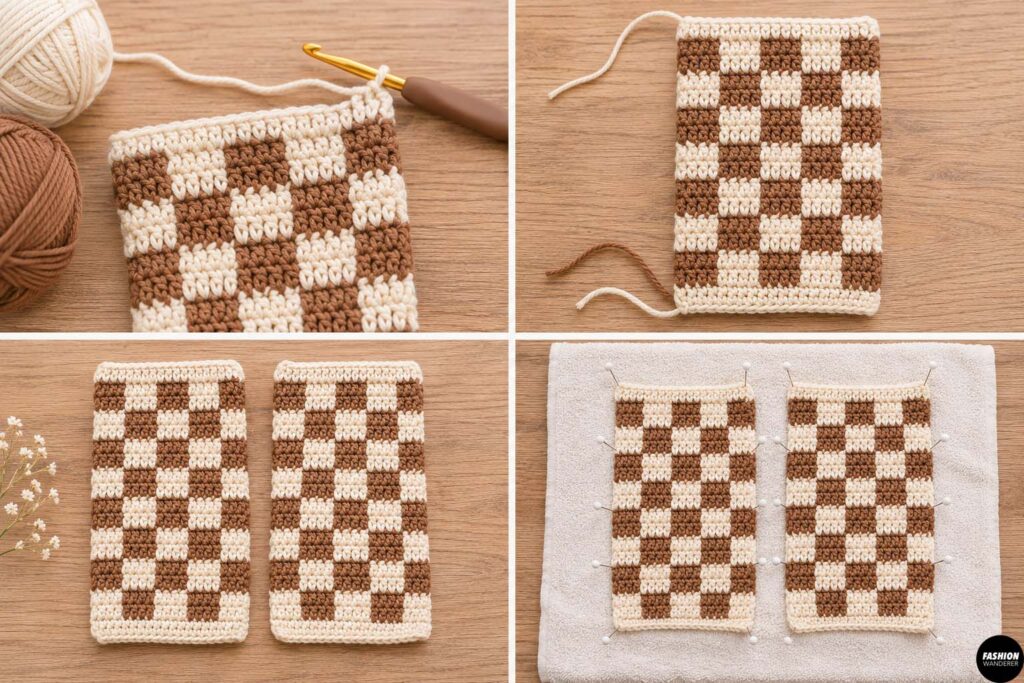
Fasten off the first panel.
Crochet a second checkerboard panel using the exact same stitch count and number of rows.
Lay both pieces flat and compare them.
They should be approximately the same size.
If one piece is slightly longer, gently block both panels before assembling the bag.
Step 6: Block the Crochet Panels
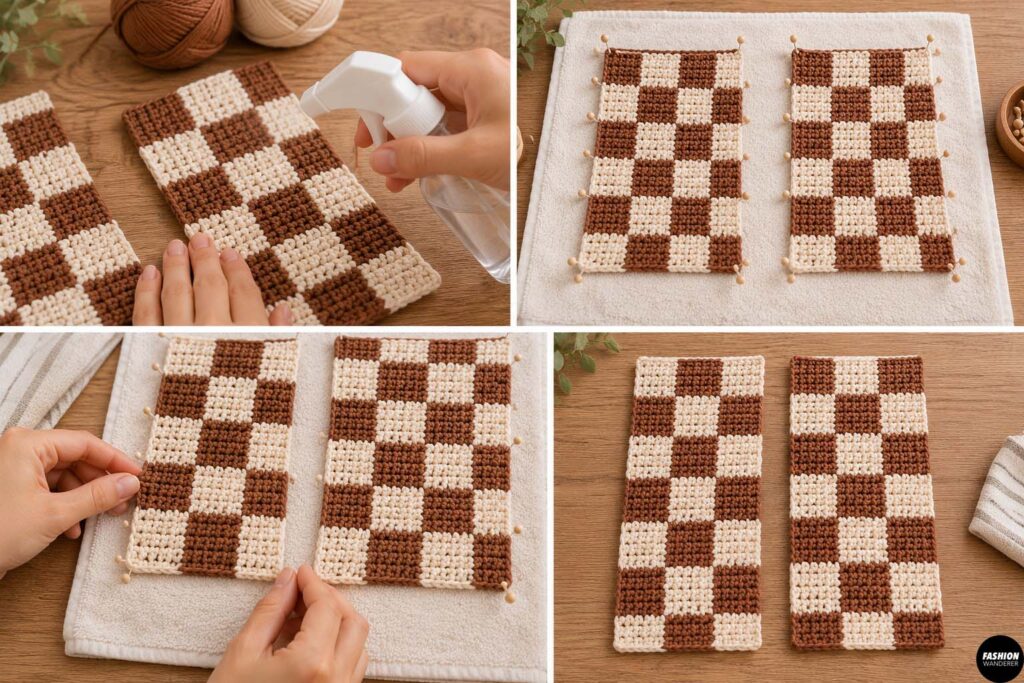
Blocking helps straighten the checkerboard squares and makes the finished bag look much more polished.
Lightly dampen both pieces.
Lay them flat on a towel or blocking mat.
Shape them into even rectangles.
Allow them to dry completely.
Avoid stretching the pieces excessively because you still want the bag to fit snugly around the bottle.
Step 7: Seam the Bottle Bag
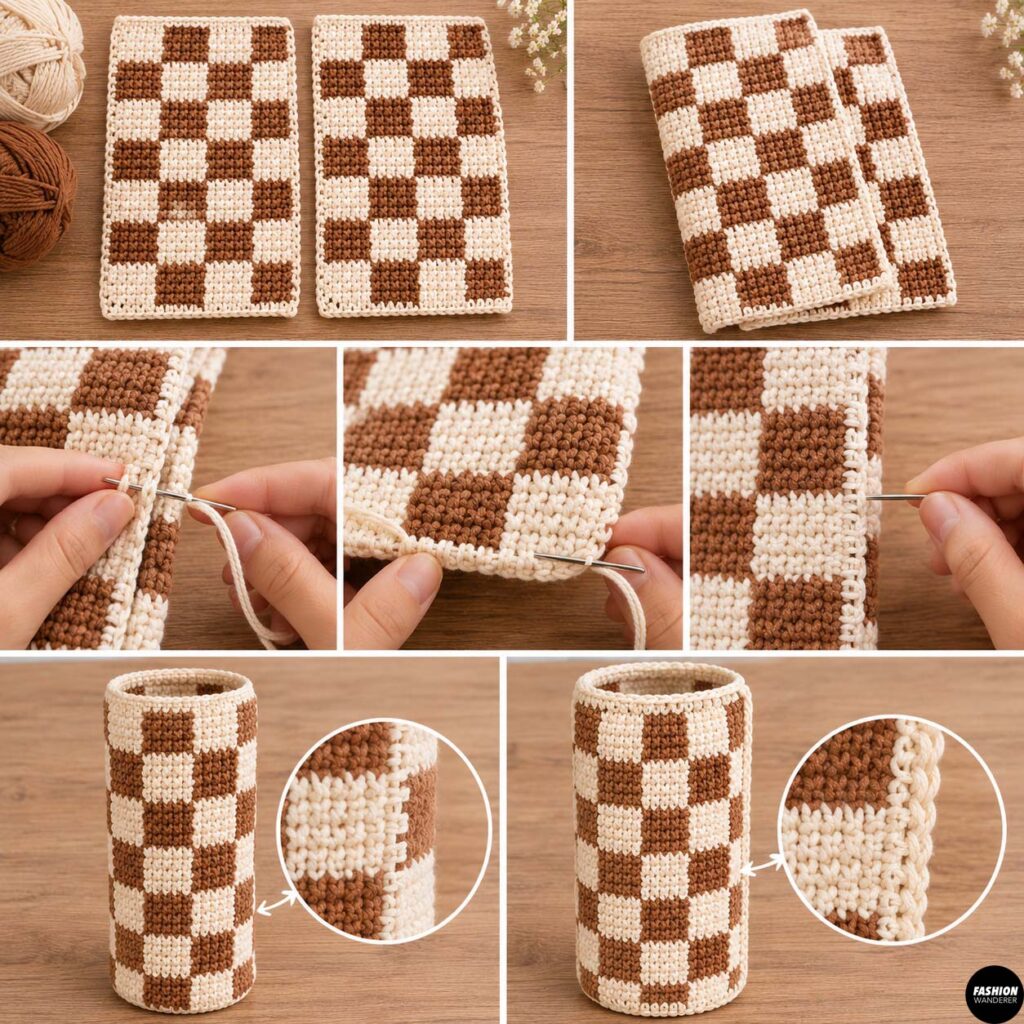
Place both checkerboard panels together with the right sides facing outward.
Thread your yarn needle with matching yarn.
Whipstitch or mattress stitch down one side, across the bottom, and up the opposite side.
Leave the top completely open.
Keep your stitches secure but do not pull them so tightly that the edges begin to pucker.
Alternatively, you can join the panels with single crochet for a more visible decorative edge.
Step 8: Crochet the Top Border
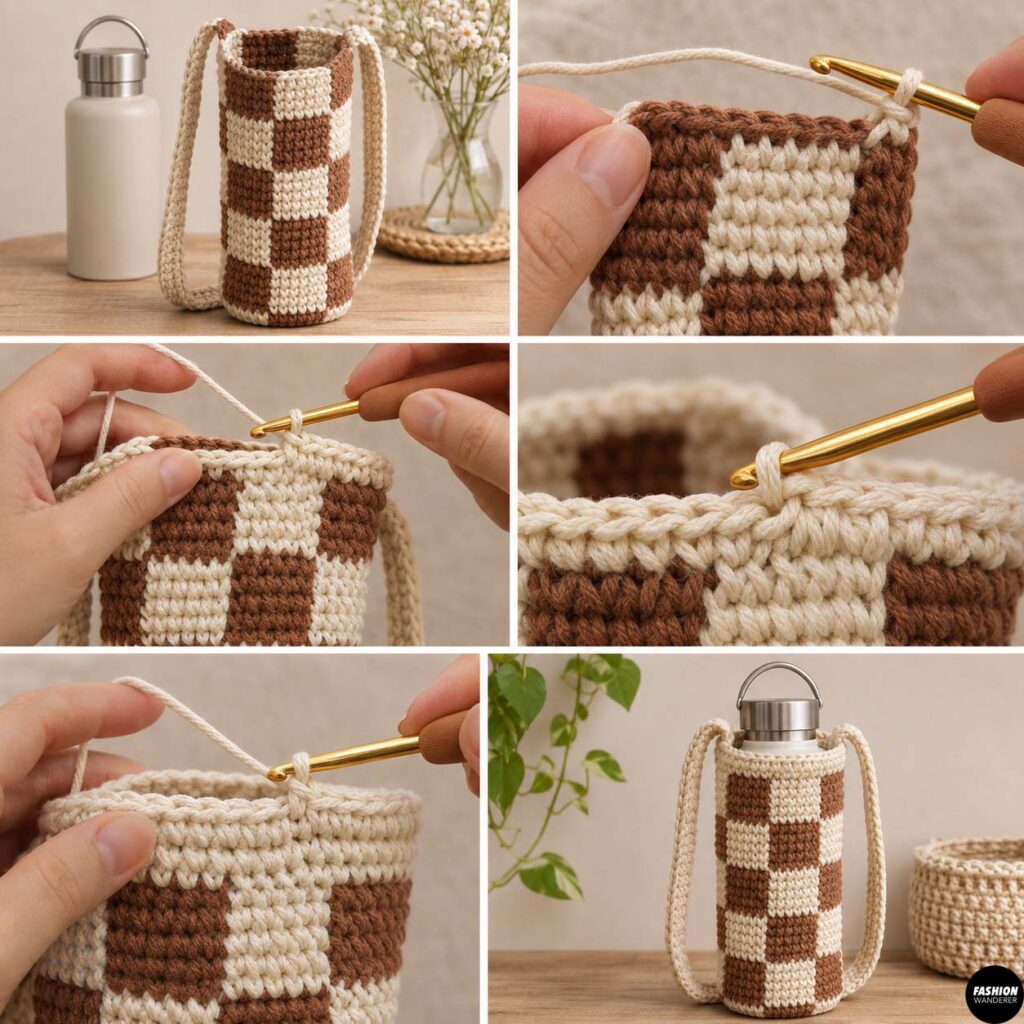
Attach yarn to the top edge.
Work one round of single crochet evenly around the entire opening.
Join with a slip stitch.
Add a second round if you want a stronger top edge.
A firm border helps prevent the opening from stretching when the bag is carrying a heavier bottle.
Step 9: Crochet the Strap
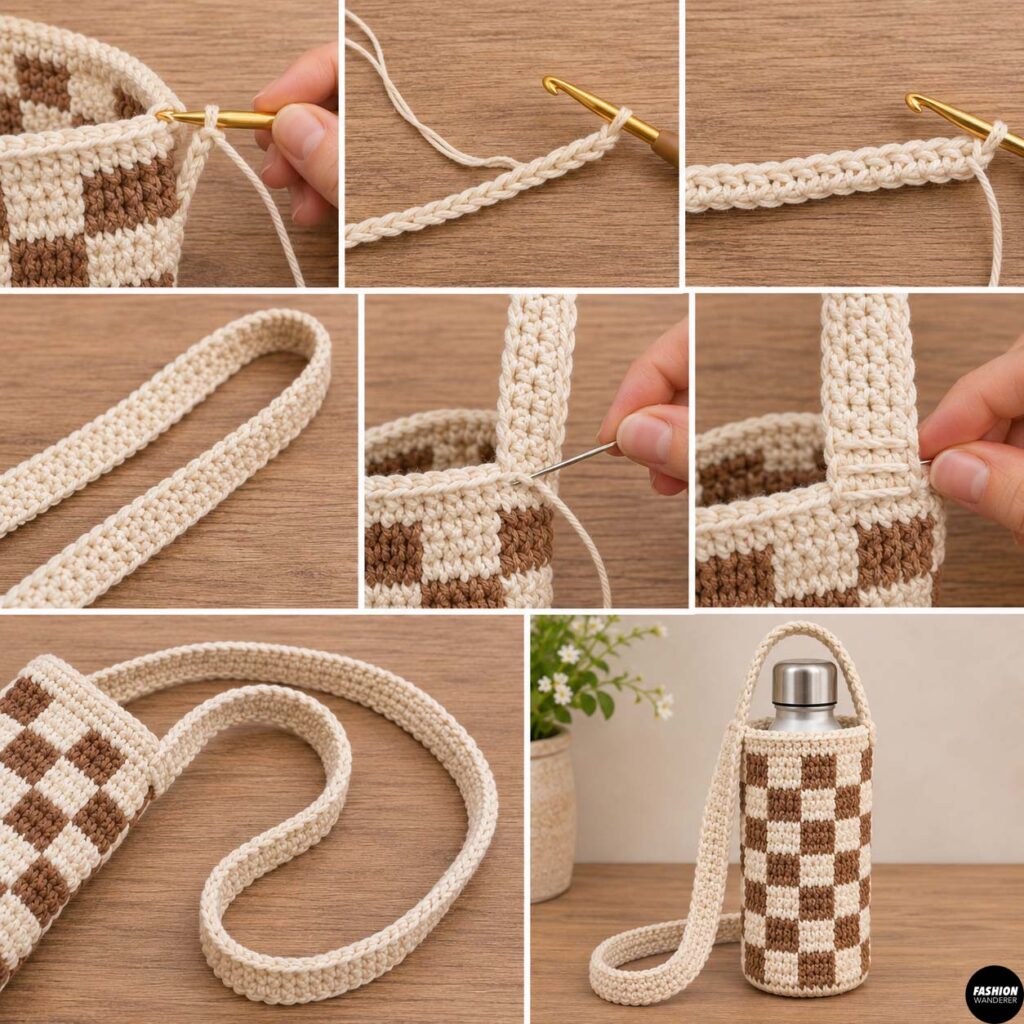
Attach yarn near one side seam.
Chain until the strap reaches your desired length.
For a shoulder bag, approximately 24 to 30 inches usually works well.
For a crossbody bottle carrier, try approximately 40 to 48 inches.
Beginning in the second chain from your hook, work one single crochet into every chain.
For a thicker strap, turn and crochet another row.
Fasten off.
Sew the opposite end securely to the other side of the bag.
Reinforce each attachment point several times because these areas will carry most of the bottle’s weight.
Step 10: Add an Optional Button Closure
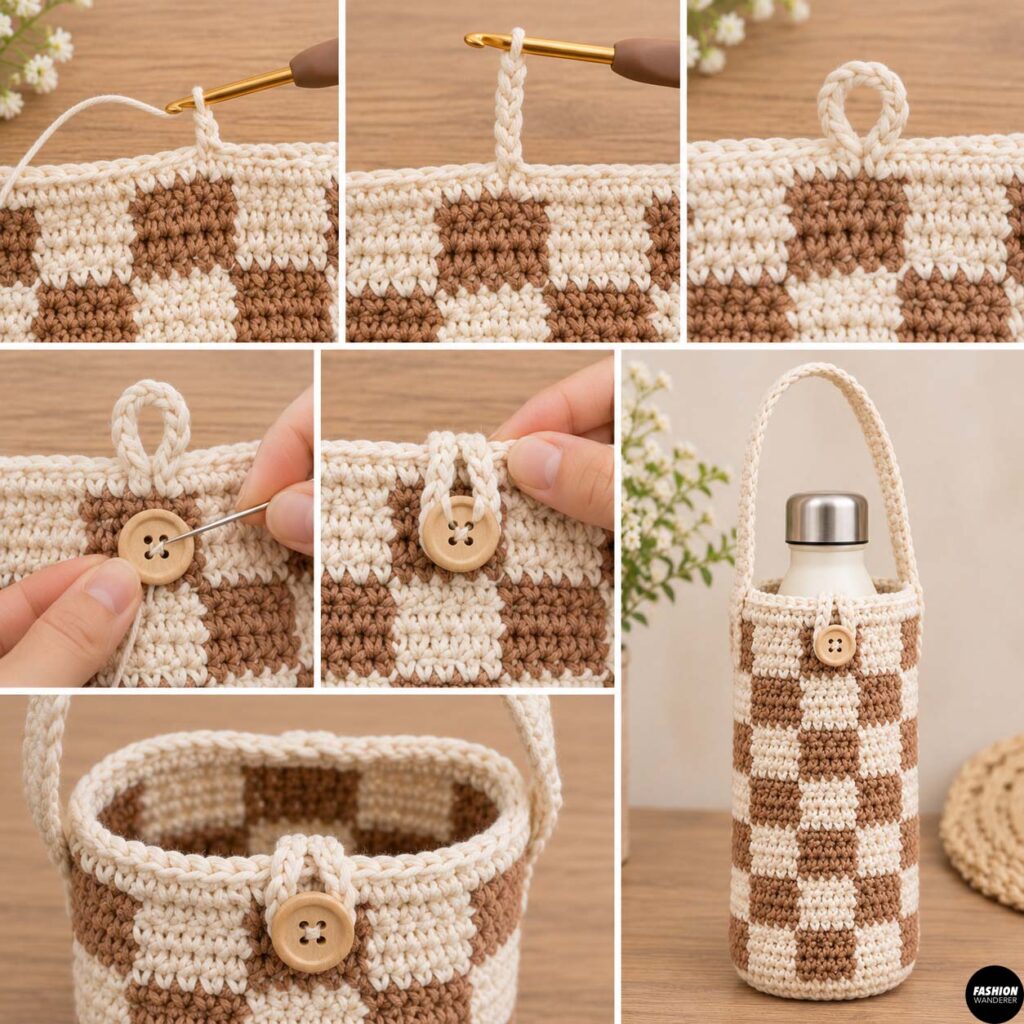
If you want the bottle to feel more secure, add a small loop closure.
Attach yarn to the center back edge.
Chain approximately 8 to 12 stitches.
Slip stitch back into the same area to create a loop.
Sew a button to the front center of the bag.
Make sure the loop fits comfortably over the button without pulling the top edge too tightly.
Step 11: Add an Optional Fabric Lining
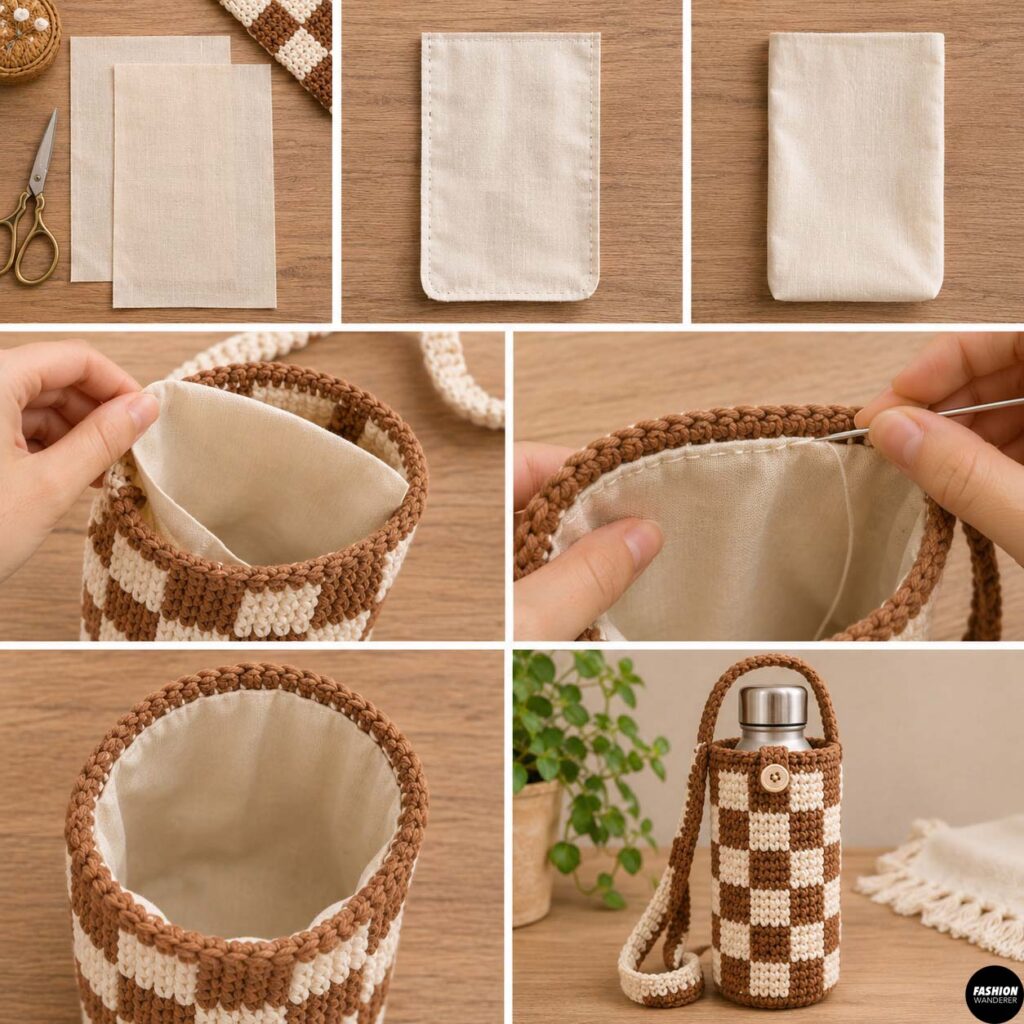
A lining is not necessary, but it can make the bottle bag feel more finished.
Cut two rectangles from lightweight cotton slightly smaller than your crochet panels.
Sew around the sides and bottom with right sides together.
Turn the lining right side out.
Place it inside the crochet bag.
Fold the upper raw edge toward the wrong side and hand stitch it just below the crochet border.
Step 12: Finish the Bag
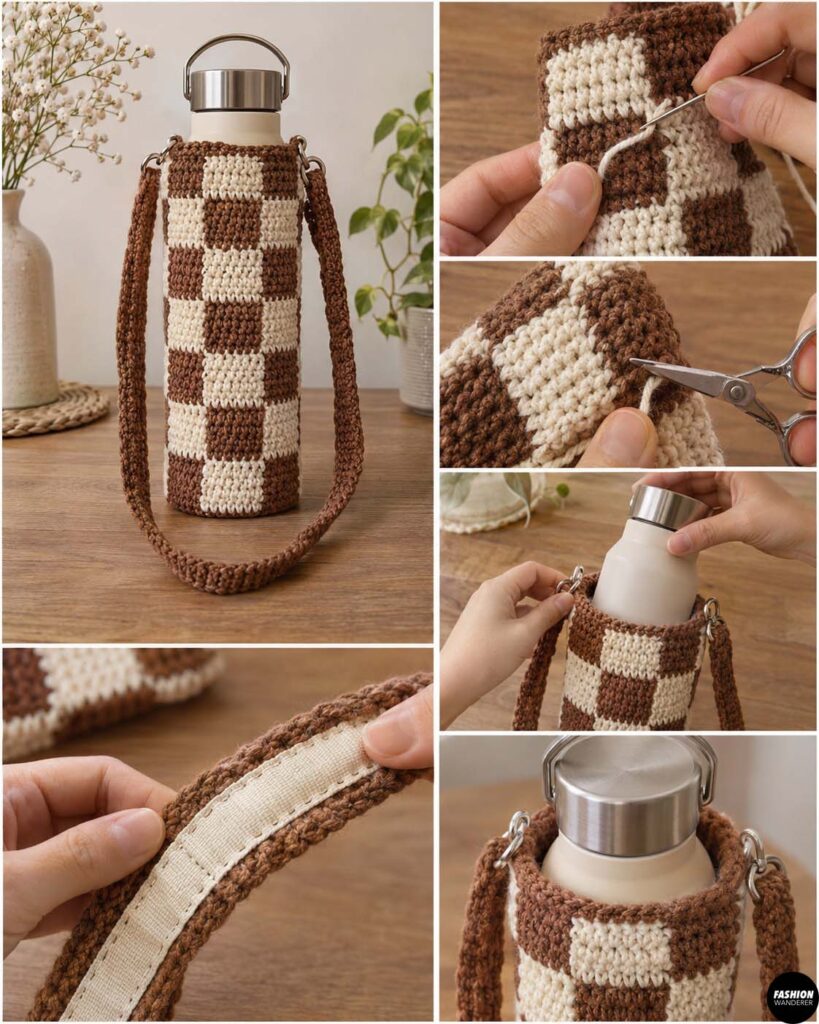
Weave in every loose yarn tail.
Trim excess yarn.
Place your bottle inside and check the fit.
The bag should hold the bottle securely without excessive stretching.
If the strap stretches more than expected, add another row of single crochet or reinforce it with a narrow fabric ribbon sewn to the underside.
Easy Color Ideas
Try cream and black for a classic checkerboard bottle bag, chocolate brown and beige for a neutral retro look, or pink and burgundy for something more playful.
You can also crochet the strap in one solid color so the checkerboard body remains the focal point.
Final Thoughts
This DIY crochet checkerboard bottle bag is an easy way to turn basic crochet stitches into a trendy and useful everyday accessory.
The project is small enough for beginners, requires very little yarn, and provides great practice with color changes, seaming, and strap construction.
Once you understand the basic pattern, you can easily resize it for skinny water bottles, oversized tumblers, wine bottles, or even small thermos containers.
It also makes a fun handmade gift and a practical scrap-yarn project—especially if you already have two coordinating balls of cotton yarn waiting in your stash.