
A DIY rainbow-striped bottle sling is one of those crochet projects that is practical, colorful, and surprisingly quick to make. It is perfect for carrying a reusable water bottle on walks, hikes, festivals, school trips, farmers market runs, or everyday errands when you want to keep your hands free.
This beginner-friendly crochet water bottle holder pattern uses simple stitches, bold rainbow stripes, and a long crochet strap. You can customize the colors, length, and size to fit almost any reusable bottle.
The finished sling has a fitted crochet base, an open or lightly textured body, and a sturdy shoulder strap that can be worn crossbody.
Skill Level
Beginner to confident beginner.
You should be comfortable with:
- Chain stitch
- Slip stitch
- Single crochet
- Double crochet
- Working in the round
- Changing yarn colors
- Basic increasing
- Weaving in yarn ends
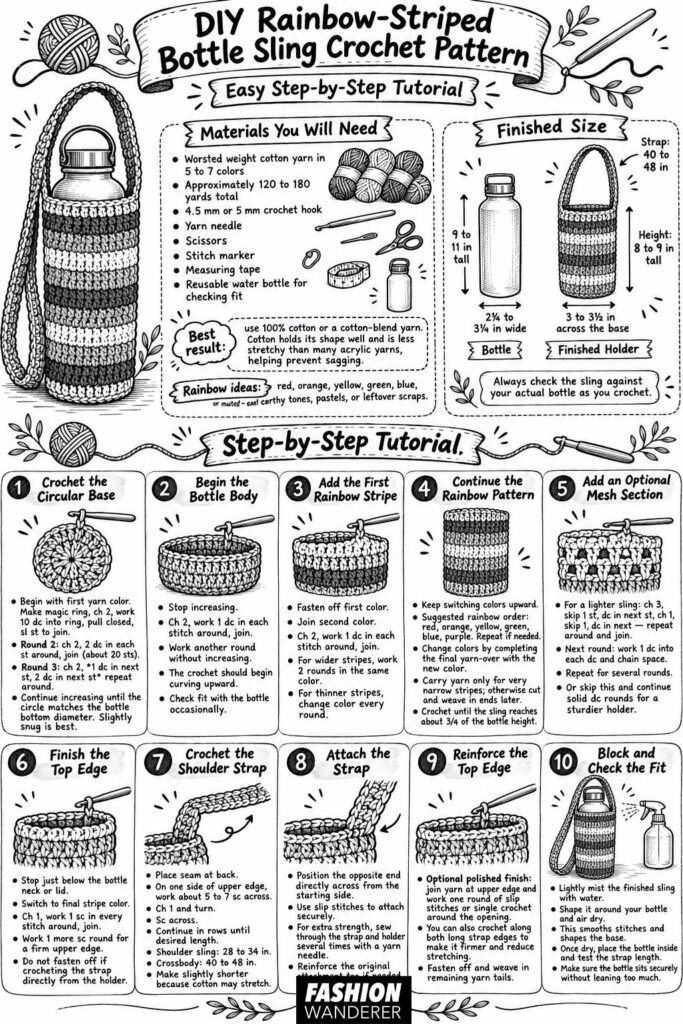
Materials You Will Need
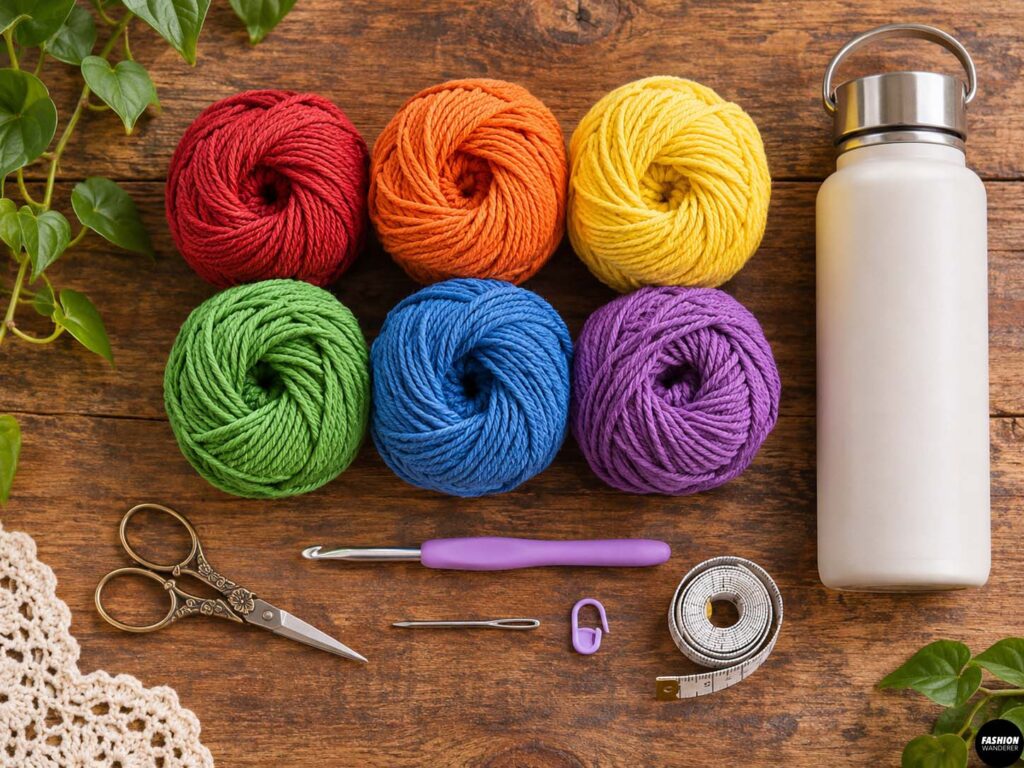
- Worsted weight cotton yarn in 5 to 7 colors
- Approximately 120 to 180 yards total
- 4.5 mm or 5 mm crochet hook
- Yarn needle
- Scissors
- Stitch marker
- Measuring tape
- Reusable water bottle for checking fit
For the best result, use 100% cotton or a cotton-blend yarn. Cotton holds its shape well and is less stretchy than many acrylic yarns, which helps prevent the bottle sling from sagging.
A fun rainbow palette might include red, orange, yellow, green, blue, and purple. You can also use muted earthy colors, pastels, or leftover yarn scraps.
Finished Size
This pattern is designed for a standard reusable bottle approximately:
- 2¾ to 3¼ inches wide
- 9 to 11 inches tall
The finished bottle holder will measure approximately:
- 3 to 3½ inches across the base
- 8 to 9 inches tall
- 40 to 48 inch strap
Always check the sling against your actual bottle as you crochet.
DIY Rainbow-Striped Bottle Sling Crochet Pattern
Step 1: Crochet the Circular Base
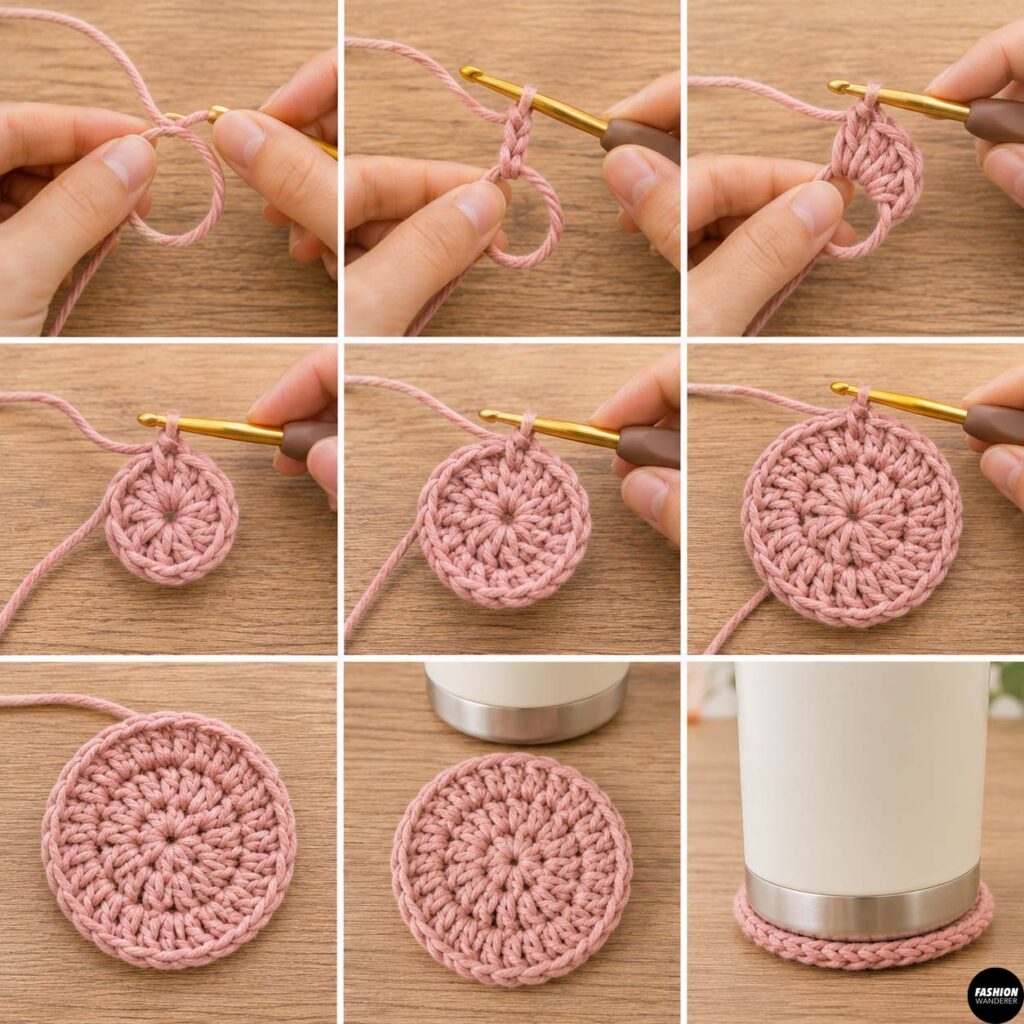
Begin with your first yarn color.
Make a magic ring.
Chain 2.
Work 10 double crochet stitches into the ring.
Pull the ring closed.
Slip stitch into the top of the first double crochet to join.
You should now have a small flat circle.
For Round 2, chain 2 and work 2 double crochet stitches into every stitch around.
Join with a slip stitch.
You should have approximately 20 stitches.
For Round 3, chain 2.
Work:
- 1 double crochet in the first stitch
- 2 double crochet in the next stitch
Repeat this pattern around.
Join with a slip stitch.
Continue increasing until the circle is approximately the same diameter as the bottom of your water bottle.
Do not make the base much larger than the bottle. A slightly snug base will help keep the bottle secure.
Step 2: Begin the Bottle Body
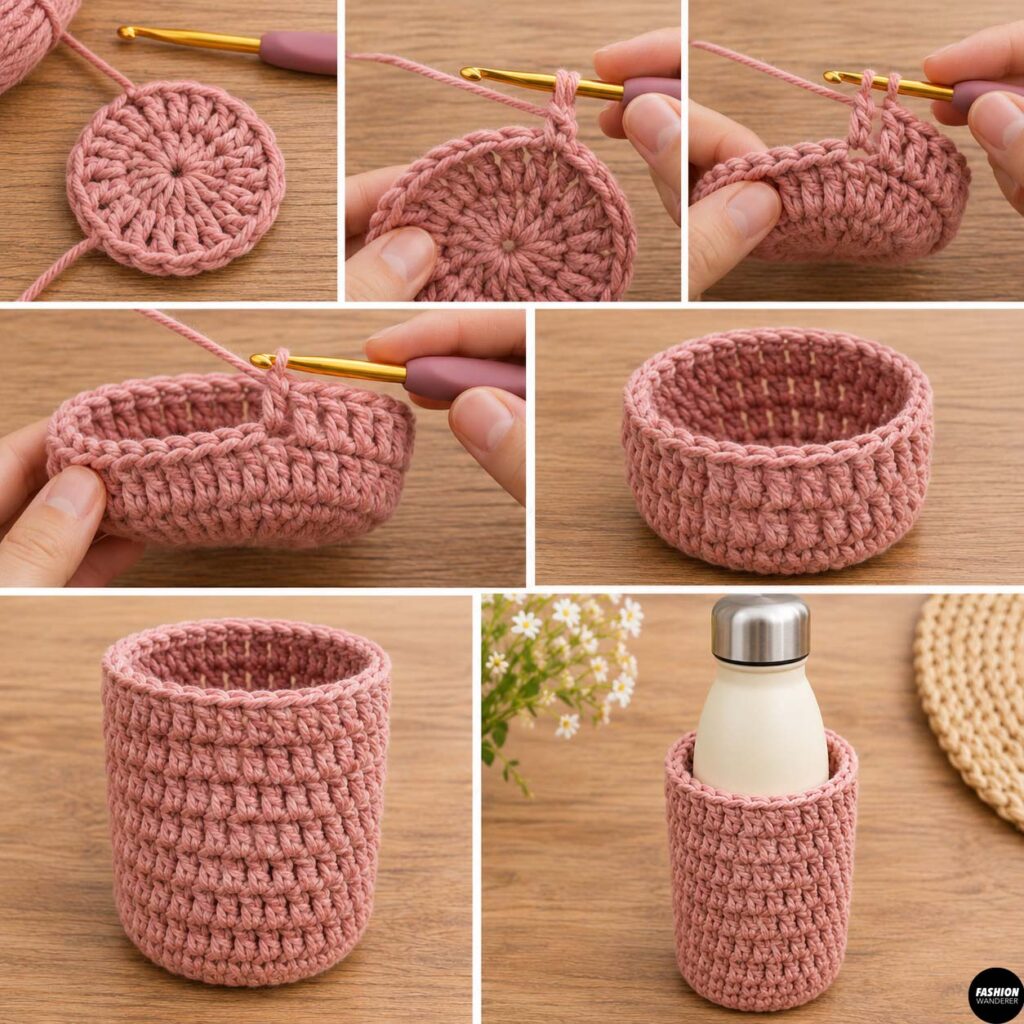
Once the base is large enough, stop increasing.
Chain 2.
Work one double crochet into each stitch around.
Join with a slip stitch.
This creates the first vertical round and begins forming the sides of the bottle sling.
Work another round without increasing.
At this point, the crochet should naturally start curving upward around the bottle.
Place the bottle inside occasionally to check the fit.
Step 3: Add the First Rainbow Stripe
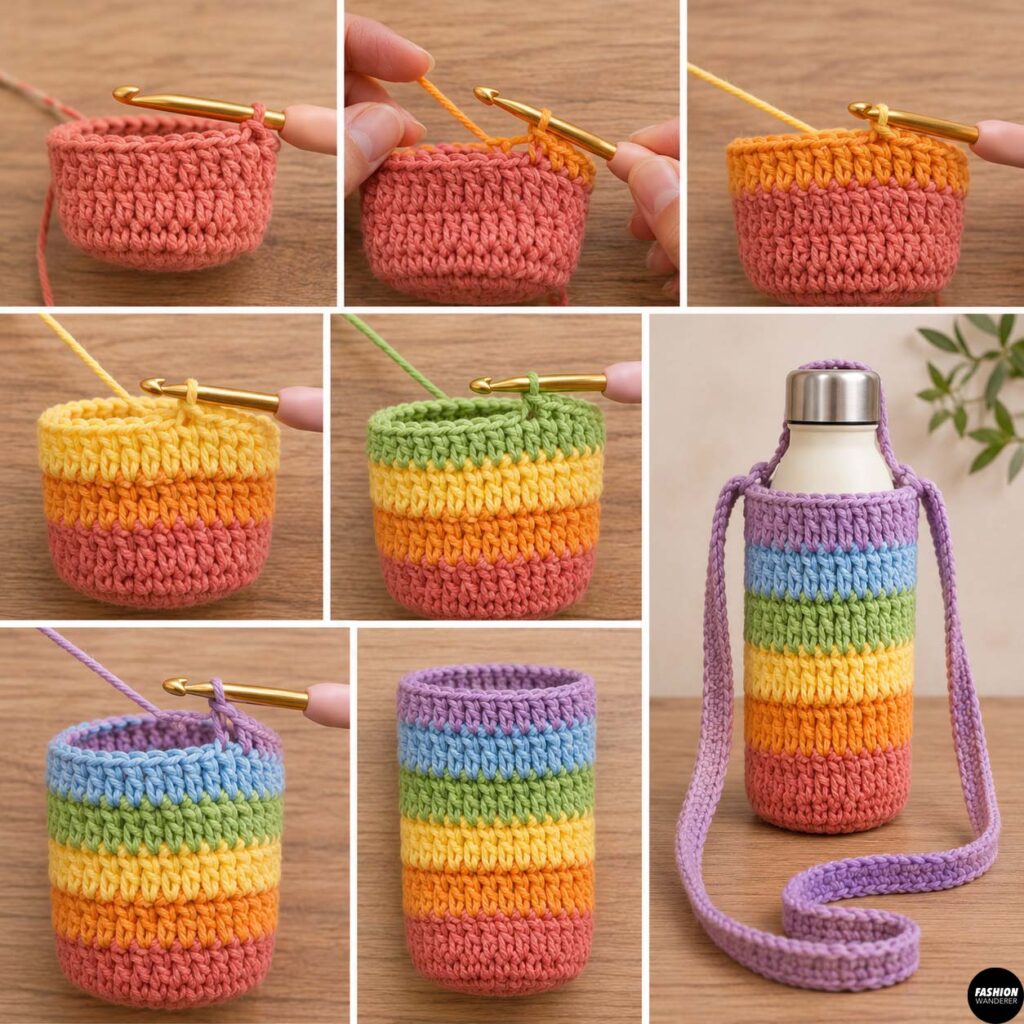
Fasten off your first color.
Join the second color at the beginning of the next round.
Chain 2.
Work one double crochet into each stitch around.
Join with a slip stitch.
For a wider stripe, work two rounds in the same color.
For a thinner striped look, change color after every round.
A combination of one- and two-round stripes creates a fun handmade appearance.
Step 4: Continue the Rainbow Pattern
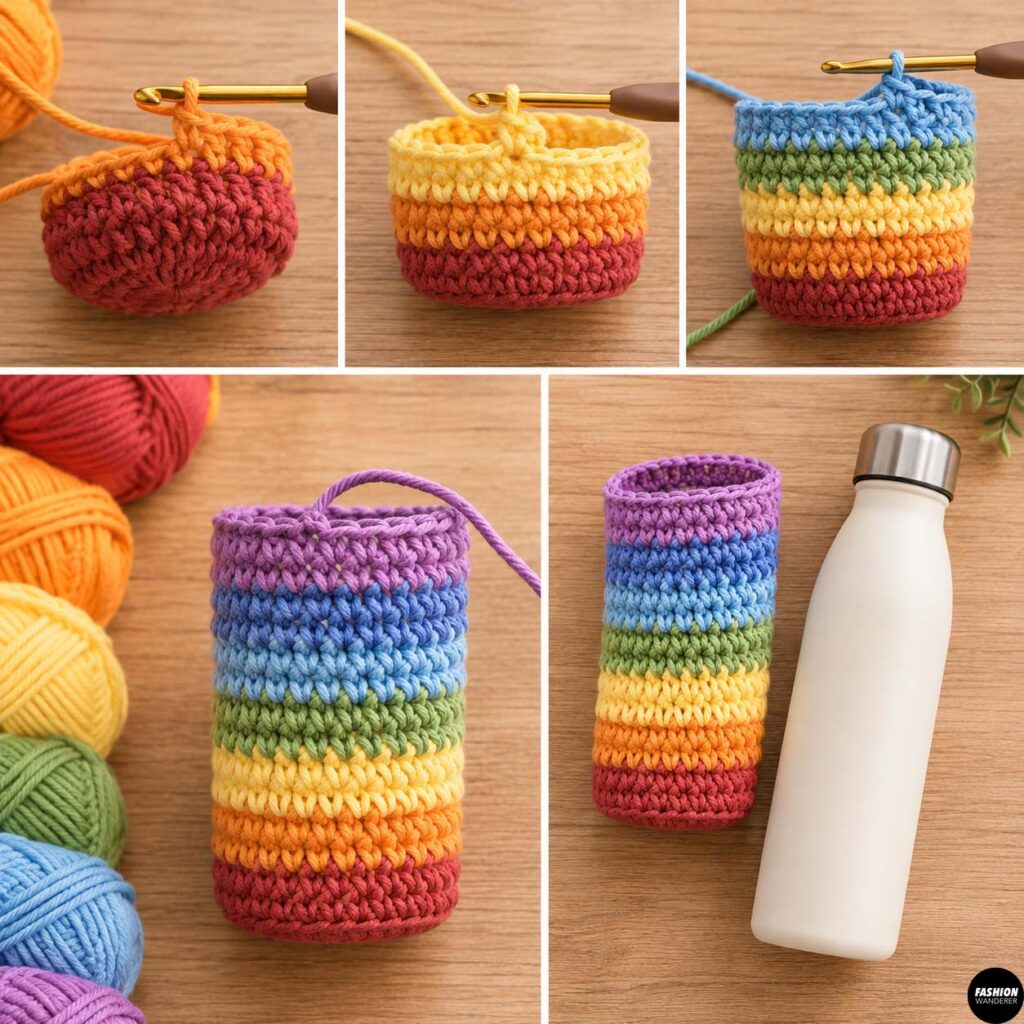
Continue switching colors as you crochet upward.
For a classic rainbow, try:
- Red
- Orange
- Yellow
- Green
- Blue
- Purple
Repeat the sequence if necessary.
When changing colors, complete the final yarn-over of the previous stitch with the new color.
This creates a cleaner color transition.
Carry the unused yarn only if your stripes are very narrow. Otherwise, cut the yarn and weave in the ends later.
Continue until the bottle sling reaches approximately three-quarters of the height of your bottle.
Step 5: Add an Optional Mesh Section
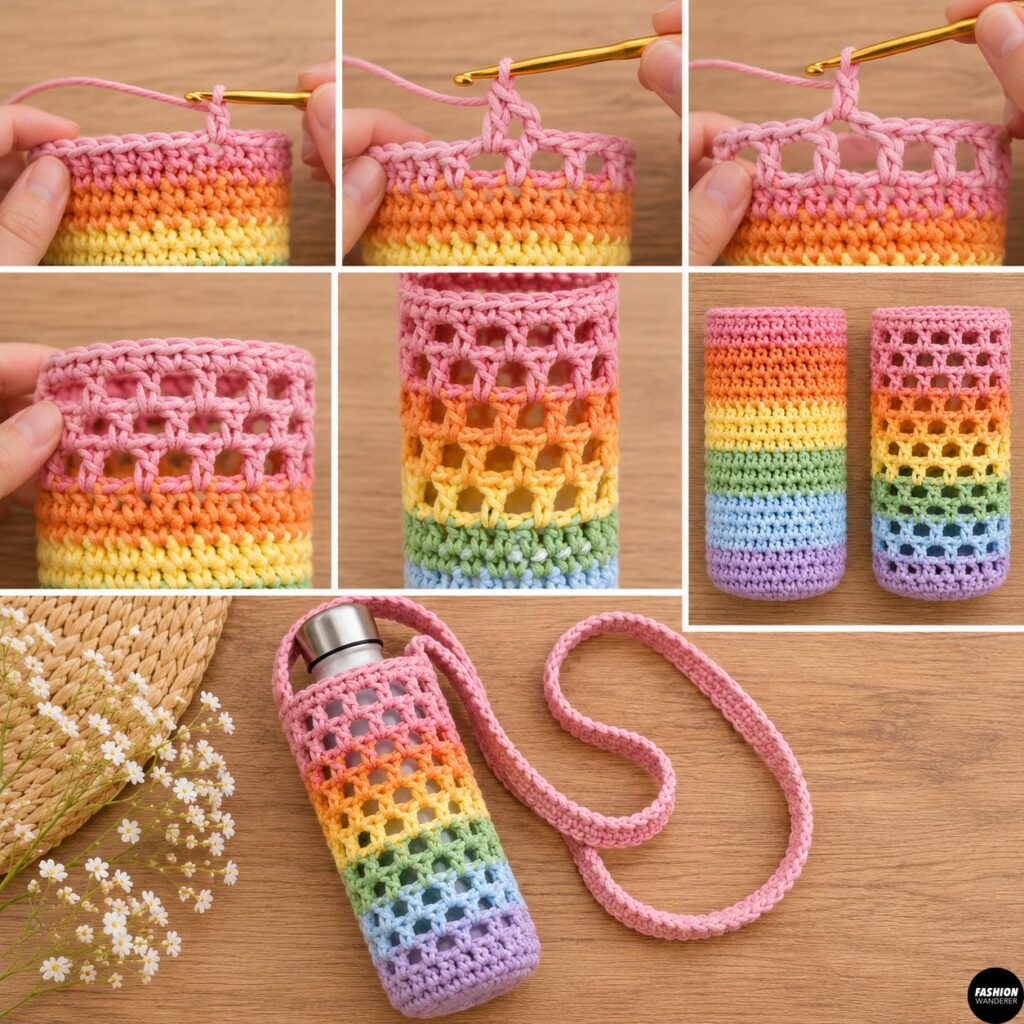
If you want a lighter, more flexible sling, add a mesh section.
Chain 3.
Skip one stitch.
Double crochet into the next stitch.
Chain 1.
Skip one stitch.
Double crochet into the next stitch.
Repeat around.
Join with a slip stitch.
For the next round, work one double crochet into each double crochet and chain space.
Repeat this mesh pattern for several rounds.
Mesh works especially well for summer bottle holders because it uses less yarn and allows the bottle color to show through.
For a sturdier bottle sling, simply continue working solid double crochet rounds instead.
Step 6: Finish the Top Edge
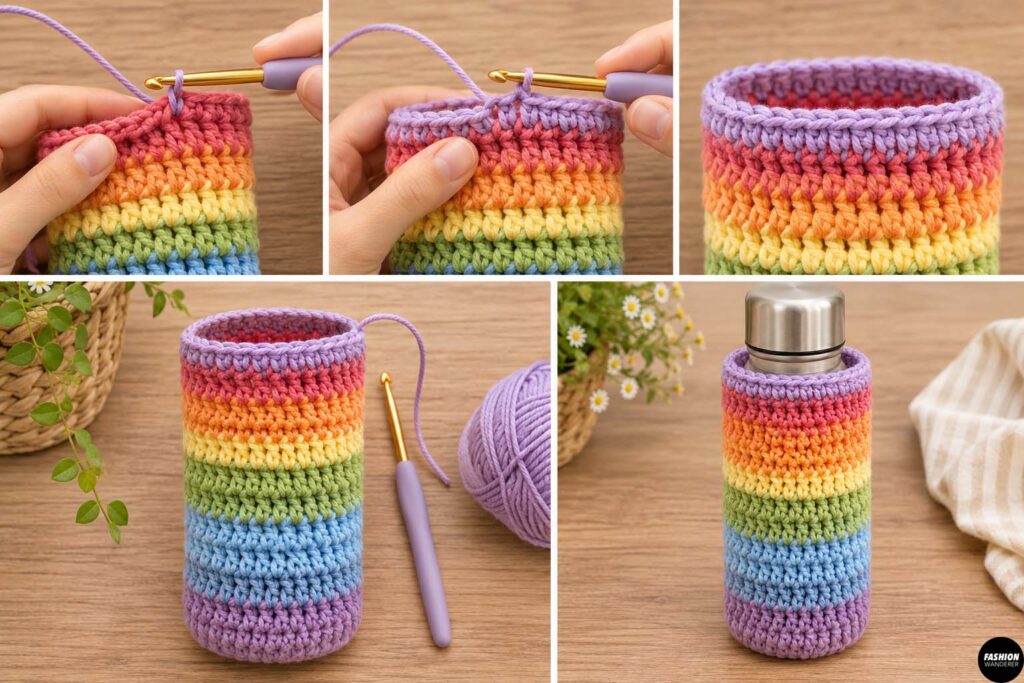
Stop crocheting when the holder reaches just below the bottle neck or lid.
Switch to your final stripe color.
Chain 1.
Work one single crochet into every stitch around.
Join with a slip stitch.
Work one additional single crochet round.
This creates a firm upper edge that helps prevent stretching.
Do not fasten off yet if you plan to crochet the strap directly from the bottle holder.
Step 7: Crochet the Shoulder Strap
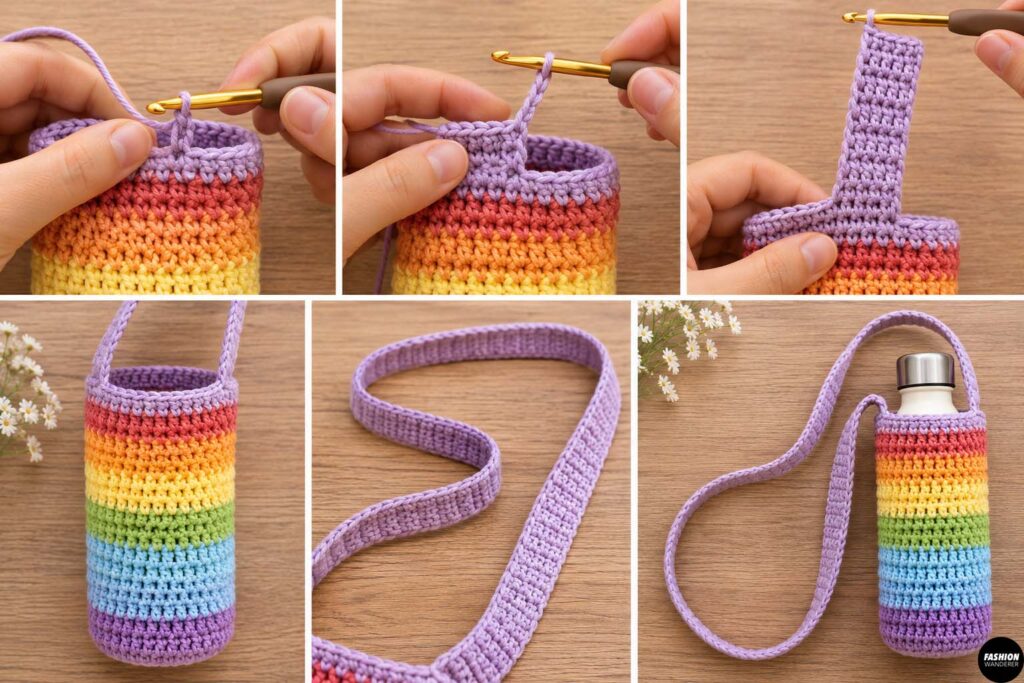
Position the bottle holder so the color seam is toward the back.
Choose one side of the upper edge for the strap.
Work approximately 5 to 7 single crochet stitches across.
Chain 1 and turn.
Single crochet across those stitches.
Continue working back and forth in rows until the strap reaches your desired length.
For a shoulder sling, aim for approximately 28 to 34 inches.
For a crossbody bottle sling, make the strap approximately 40 to 48 inches long.
Remember that cotton can stretch slightly once the bottle is inside, so make the strap a little shorter than your ideal finished length.
Step 8: Attach the Strap
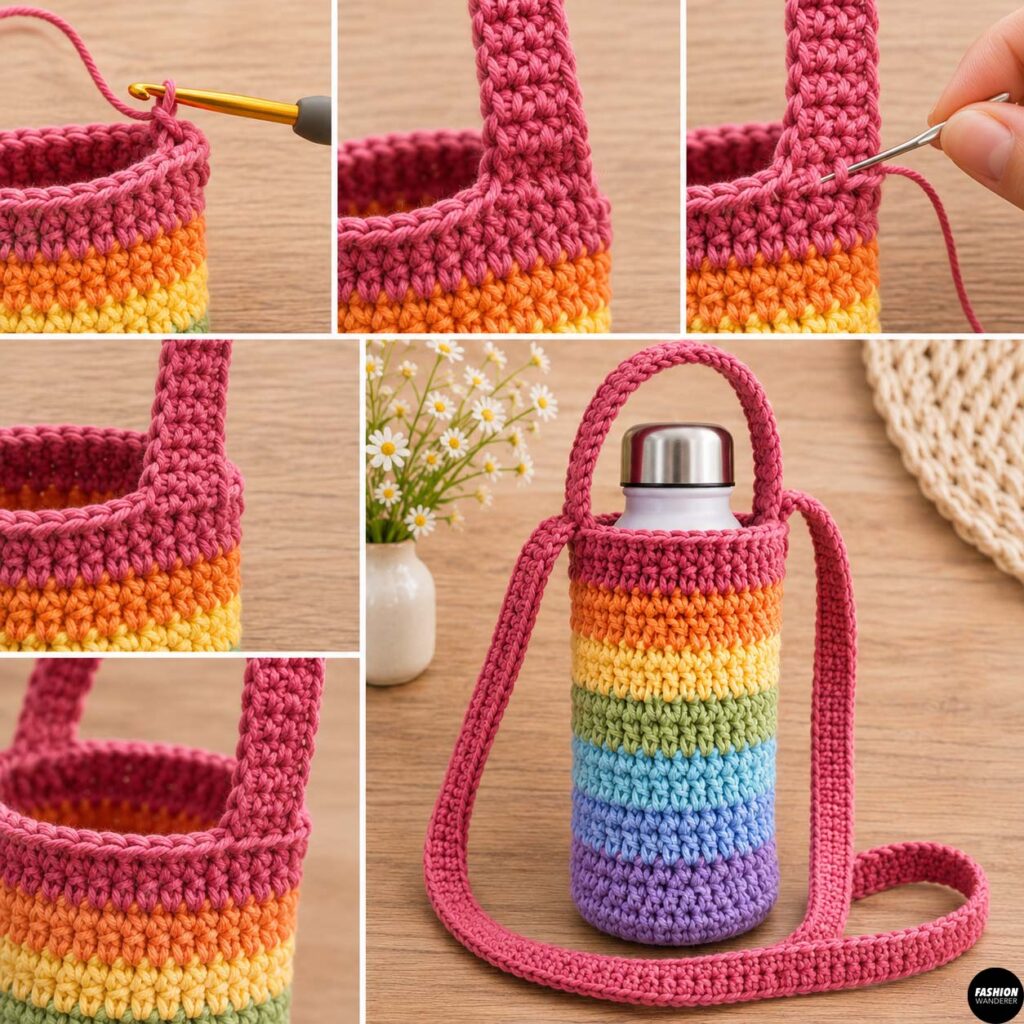
Once the strap is long enough, position the opposite end directly across from where the strap began.
Use slip stitches to attach the strap securely to the top edge.
For extra strength, fasten off and thread the yarn tail onto a yarn needle.
Sew through the strap and bottle holder several times.
Repeat on the original strap attachment if necessary.
The strap should feel very secure because it will support the full weight of the water bottle.
Step 9: Reinforce the Top Edge
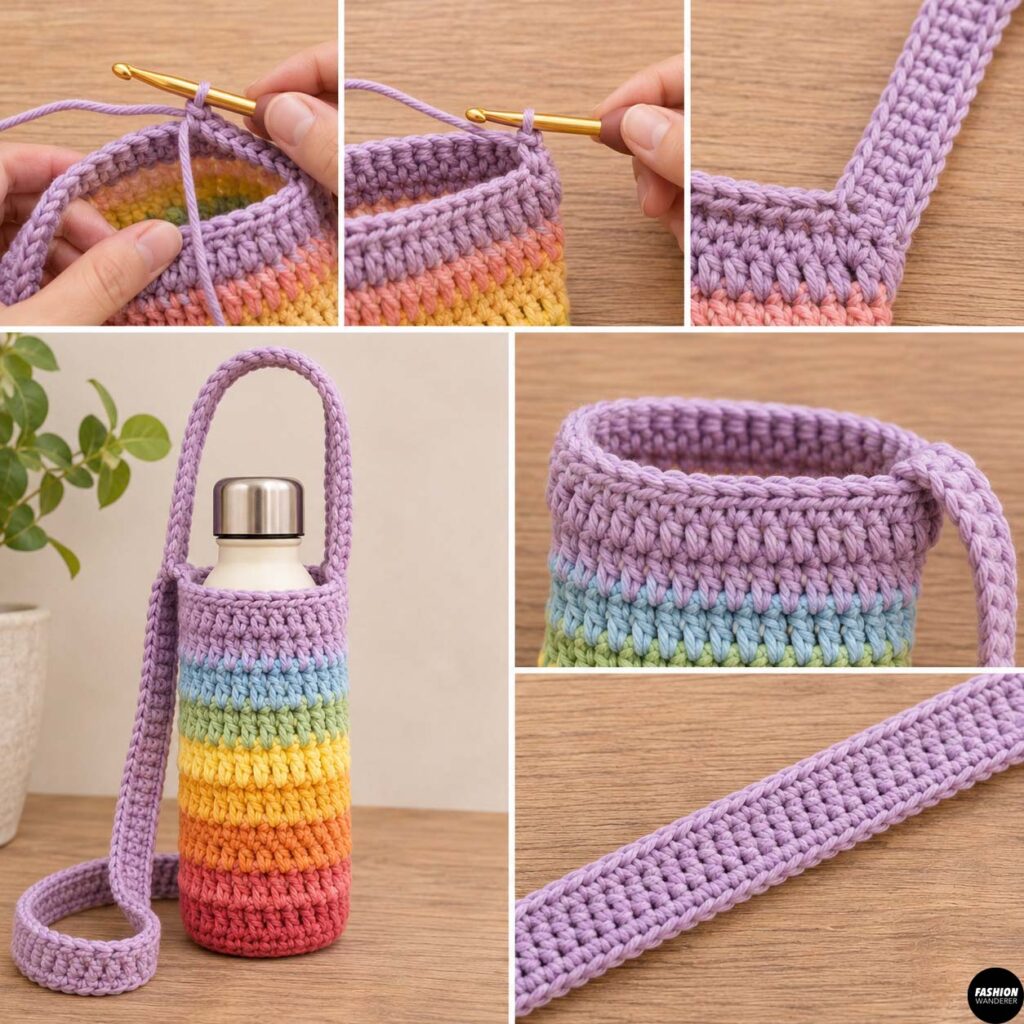
For an optional polished finish, join yarn at the upper edge.
Work one round of slip stitches or single crochet around the opening.
You can also crochet along both long edges of the strap.
This makes the strap slightly firmer and helps reduce stretching.
Fasten off and weave in all remaining yarn tails.
Step 10: Block and Check the Fit
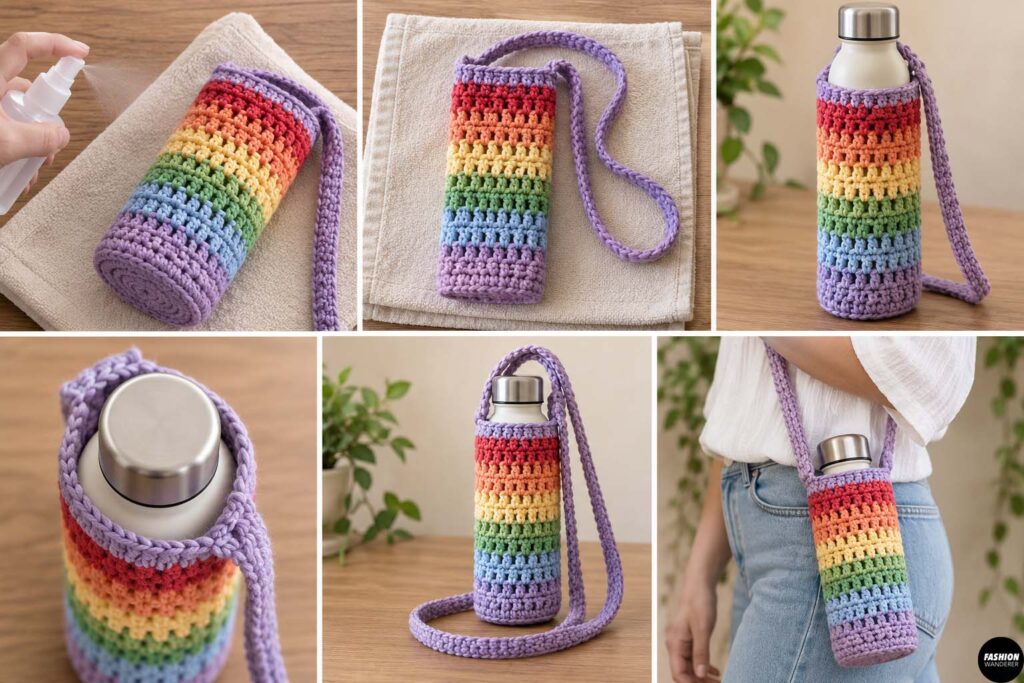
Lightly mist the finished bottle sling with water.
Shape it around your water bottle.
Allow it to air dry.
This gentle blocking process helps smooth the crochet stitches and shape the base.
Once dry, place your bottle inside and test the strap length.
Check that the bottle sits securely without leaning excessively.
Easy Ways to Customize Your Crochet Bottle Sling
Once you understand the basic construction, this pattern is incredibly easy to personalize.
Try adding:
- Pastel rainbow stripes
- Neutral boho colors
- Scrap yarn stripes
- A striped strap
- Crochet flowers
- Granny-square details
- Wooden beads
- Small tassels
- A drawstring top
- A mini pocket for keys
- A carabiner loop
You can also make matching bottle slings for kids using shorter straps and smaller reusable bottles.
Final Thoughts
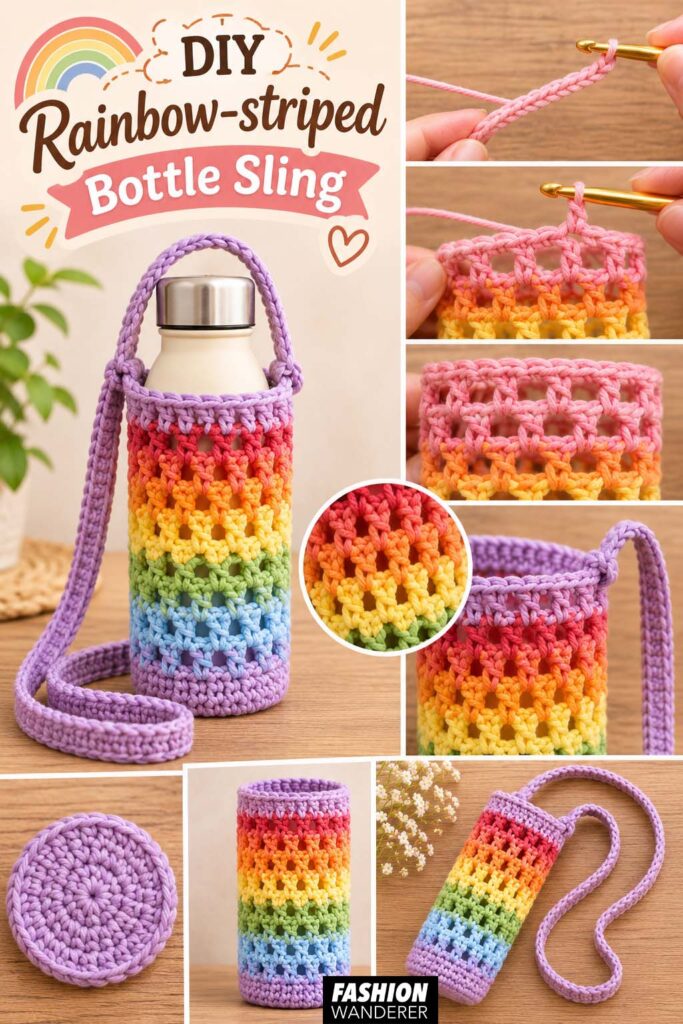
This DIY rainbow-striped bottle sling crochet pattern is a fun way to combine colorful crochet with something you can actually use every day.
The simple circular base makes it easy to customize the holder to your bottle, while the rainbow body lets you experiment with color without needing complicated crochet techniques.
It is also an excellent scrap yarn crochet project, since each stripe only requires a small amount of yarn.
Make one for your everyday water bottle, crochet a few as handmade gifts, or create different color combinations for hiking, festivals, travel, and summer outings. Once you make the first one, you will probably want a bottle sling in every color combination.