
Looking for a cute way to display your favorite K-Pop idol photocard while using up leftover fabric? This DIY K-Pop photocard bow bag charm is the perfect combination of trendy accessories, creative sewing, and sustainable fashion!
Inspired by the coquette aesthetic, K-Pop upcycle culture, and adorable Korean-style bag accessories, this beginner-friendly sewing project transforms small fabric scraps into a beautiful oversized bow with a built-in photocard holder.
Whether you’re decorating your everyday tote bag, getting ready for a K-Pop concert, or making handmade gifts for your fandom besties, this DIY fabric bow bag charm is affordable, customizable, and surprisingly easy to sew.
The best part? You can create this adorable accessory using fabric leftovers from previous sewing projects.
Why You’ll Love This DIY K-Pop Photocard Bow Charm
This easy zero-waste-inspired sewing project is perfect for beginners who love fashionable handmade accessories.
- Beginner-friendly: Uses simple straight stitches and basic hand sewing.
- Scrap-friendly: Repurposes leftover cotton, satin, gingham, or floral fabrics.
- Trendy aesthetic: Combines oversized bows with K-Pop photocard accessories.
- Budget-friendly: Requires only small fabric pieces and inexpensive hardware.
- Perfect for gifts: Make matching bag charms for your K-Pop-loving friends.
- Customizable: Add lace, pearls, ribbons, embroidery, or colorful beads.
Estimated sewing time: 30–60 minutes
Skill level: Beginner
Finished size: Approximately 5 inches wide × 6 inches tall, including the bow tails.
Materials You’ll Need
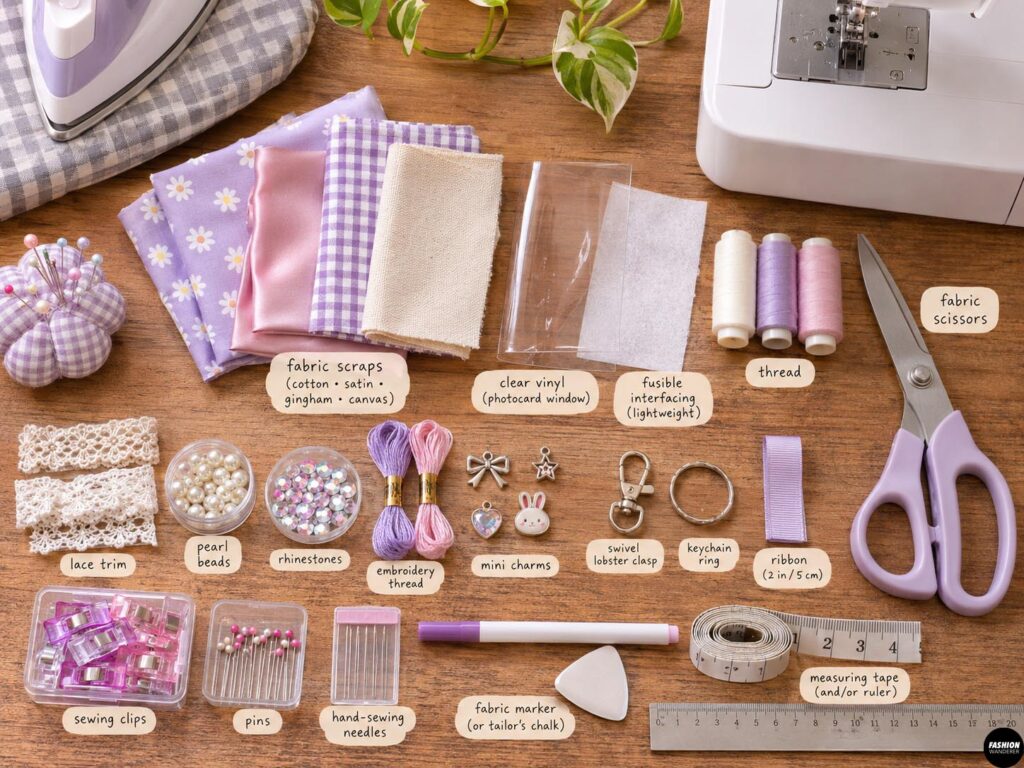
Before starting your DIY K-Pop photocard holder bag charm, gather these supplies:
- Fabric scraps (cotton, satin, gingham, or lightweight canvas)
- Clear flexible vinyl for the photocard window
- Lightweight fusible interfacing (optional)
- Coordinating sewing thread
- Fabric scissors
- Sewing machine or hand-sewing needle
- Measuring tape or ruler
- Fabric marker or tailor’s chalk
- Sewing clips or pins
- Small swivel lobster clasp or keychain ring
- 2-inch ribbon or fabric strip for the hanging loop
- Iron and ironing board
- Optional: lace trim, pearl beads, embroidery thread, rhinestones, or miniature charms
Beginner tip: Cotton fabric is easiest to sew. Satin creates a beautiful K-Pop-inspired look but can be slippery, so use sewing clips to keep everything aligned.
Upcycled K-Pop Photocard Bow Bag Charm
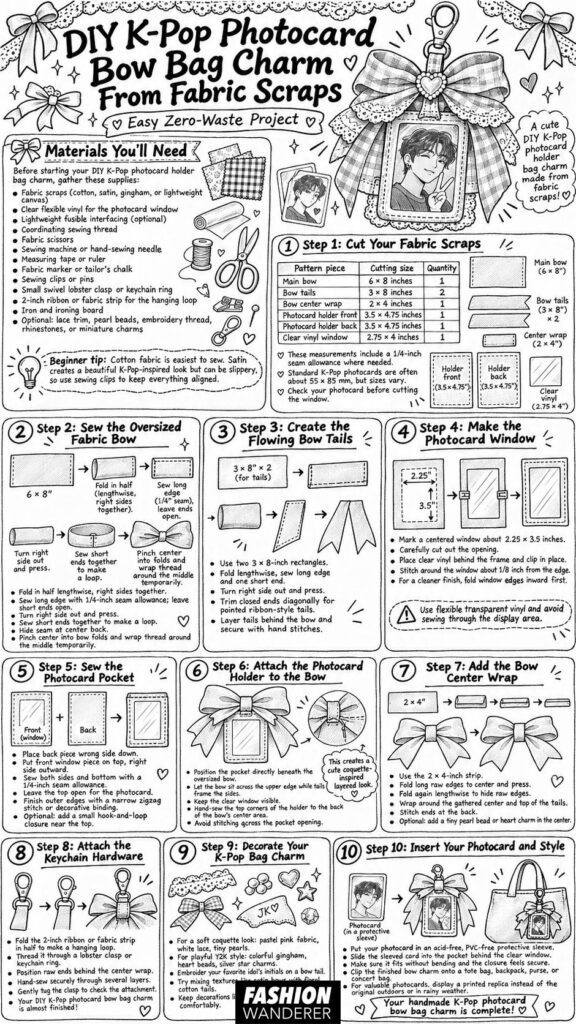
Step 1: Cut Your Fabric Scraps
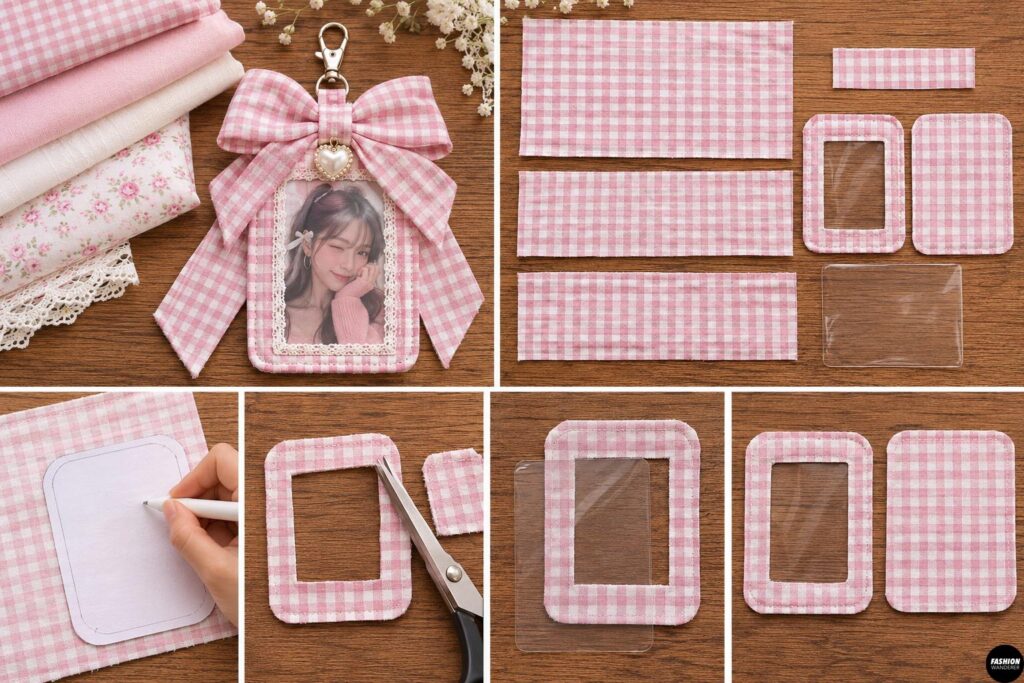
Start by choosing coordinating fabric scraps for your bow and photocard holder.
For this tutorial, cut the following pieces:
| Pattern piece | Cutting size | Quantity |
| Main bow | 6 × 8 inches | 1 |
| Bow tails | 3 × 8 inches | 2 |
| Bow center wrap | 2 × 4 inches | 1 |
| Photocard holder front | 3.5 × 4.75 inches | 1 |
| Photocard holder back | 3.5 × 4.75 inches | 1 |
| Clear vinyl window | 2.75 × 4 inches | 1 |
These measurements include a ¼-inch seam allowance where needed.
Standard K-Pop photocards are often approximately 55 × 85 mm, although sizes vary.
Check your photocard measurements before cutting the window.
Step 2: Sew the Oversized Fabric Bow
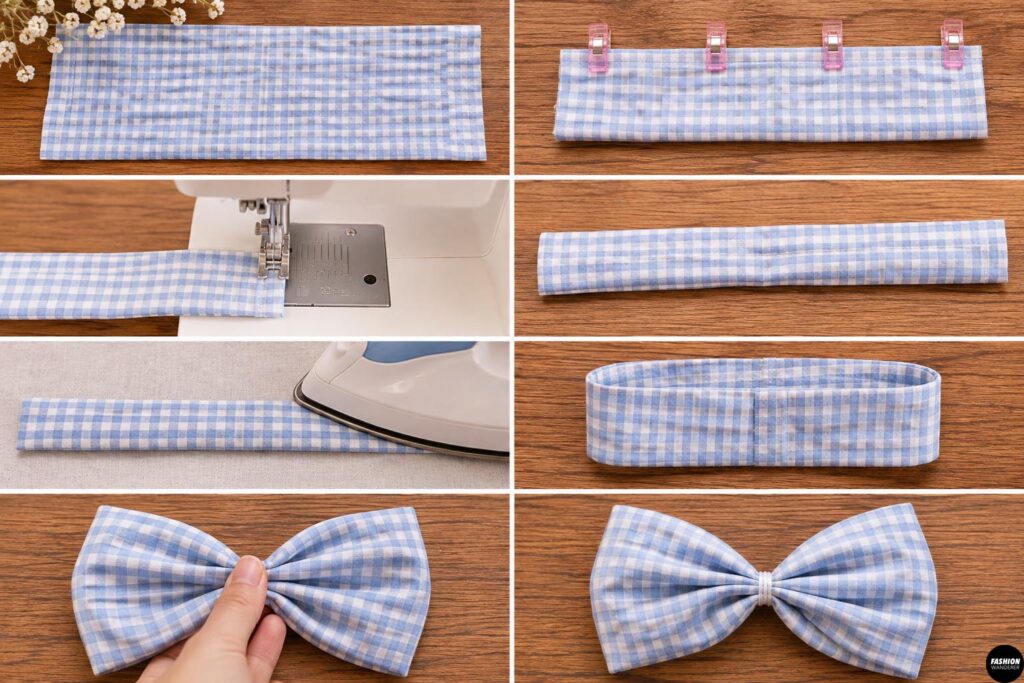
Take your 6 × 8-inch fabric rectangle and fold it in half lengthwise, right sides together, creating a 3 × 8-inch rectangle.
Sew along the long edge using a ¼-inch seam allowance, leaving both short ends open.
Turn the fabric tube right side out and press it flat, positioning the seam along the back.
Fold the tube in half so the short ends meet. Sew the short ends together to create a loop.
Turn the loop so the joining seam is hidden at the center back.
Pinch the middle into accordion folds to create a beautiful bow shape.
Wrap a temporary piece of thread around the center to hold the folds.
Step 3: Create the Flowing Bow Tails
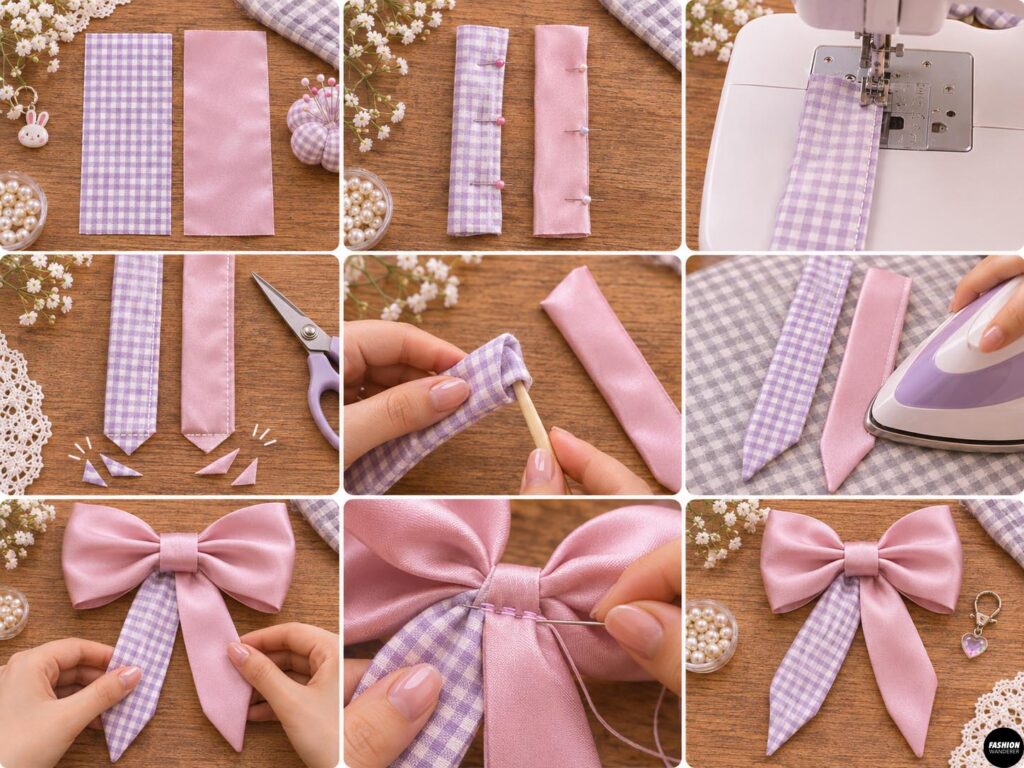
Take your two 3 × 8-inch fabric rectangles.
Fold each piece lengthwise, right sides together.
Sew along the long edge and one short end using a ¼-inch seam allowance.
Turn each tail right side out and press.
For an elegant finish, trim the closed ends diagonally before sewing to create pointed ribbon-style tails.
Arrange both tails behind your bow, slightly overlapping at the top.
Secure them with several hand stitches.
Your oversized fabric bow is beginning to take shape!
Step 4: Make the Photocard Window
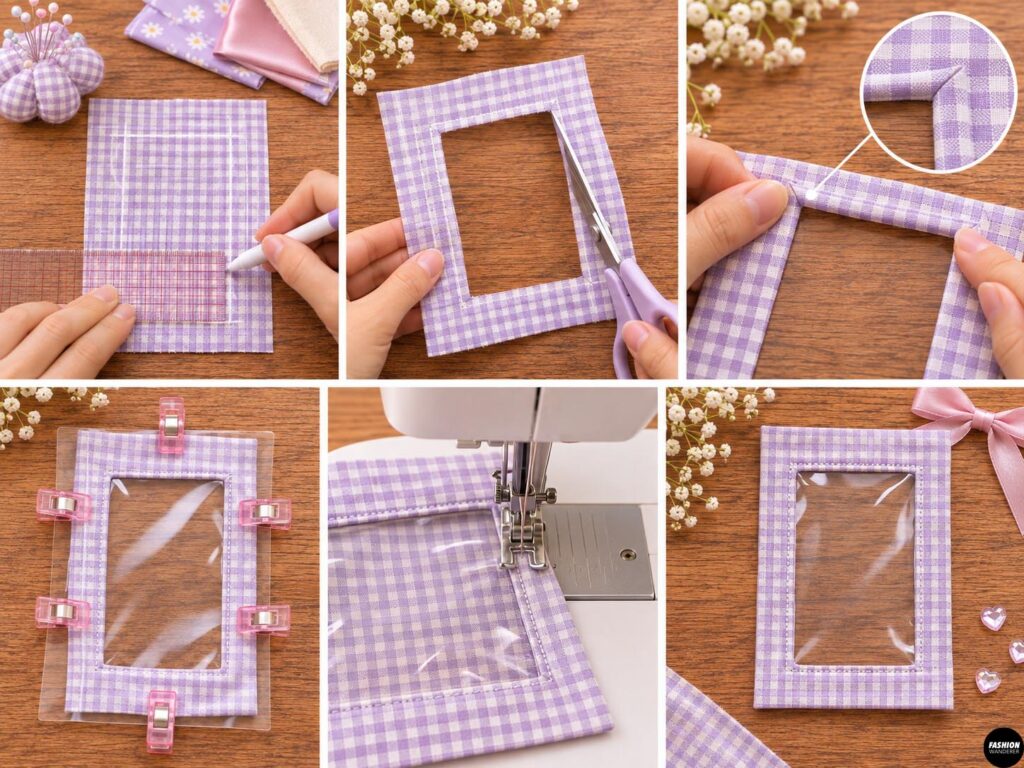
Take the front photocard holder fabric piece.
Mark a centered rectangular window measuring approximately 2.25 × 3.5 inches.
Carefully cut out the opening.
Place your clear vinyl behind the fabric frame, ensuring it overlaps the opening on all sides.
Secure with sewing clips.
Stitch around the window approximately ⅛ inch from the raw fabric edge.
For a cleaner finish, fold the fabric window edges inward before attaching the vinyl. Cut a slightly smaller opening first to allow for these folds.
Important: Use flexible, transparent vinyl and avoid sewing directly through the area where your photocard will sit.
Step 5: Sew the Photocard Pocket
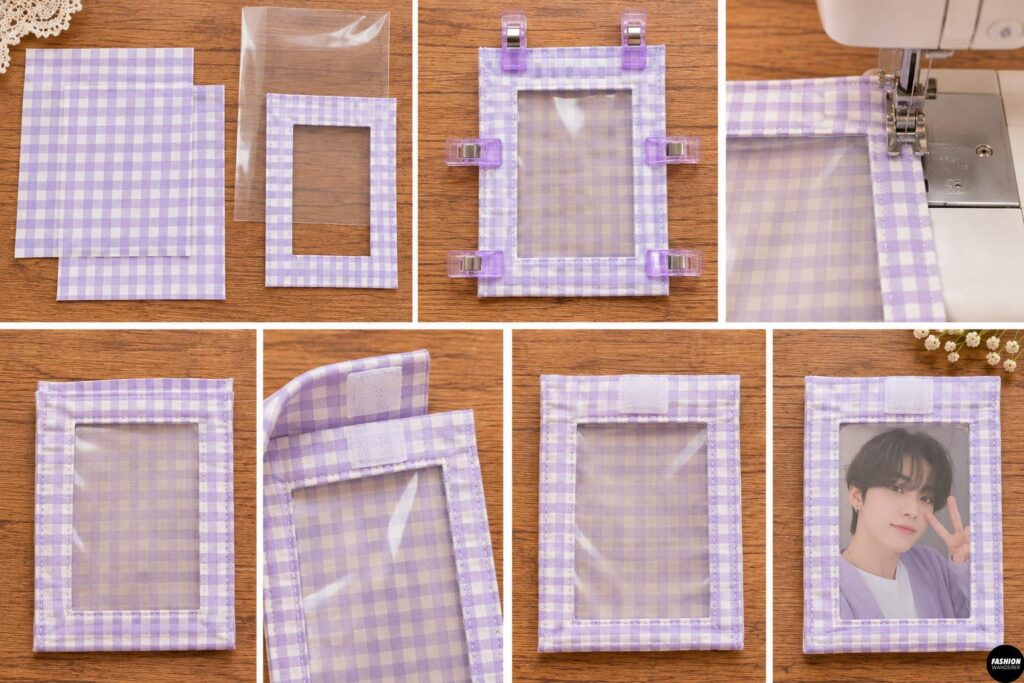
Place your photocard holder back piece wrong side down.
Position the front window piece on top, right side facing outward.
Align the edges and secure with sewing clips.
Sew along both sides and the bottom using a ¼-inch seam allowance.
Leave the top open so you can insert and remove your photocard.
Finish the exposed outer edges with a narrow zigzag stitch or decorative bias binding.
For additional security, sew a small hook-and-loop closure near the top opening.
This will help keep your photocard from slipping out while your bag charm moves around.
Step 6: Attach the Photocard Holder to the Bow
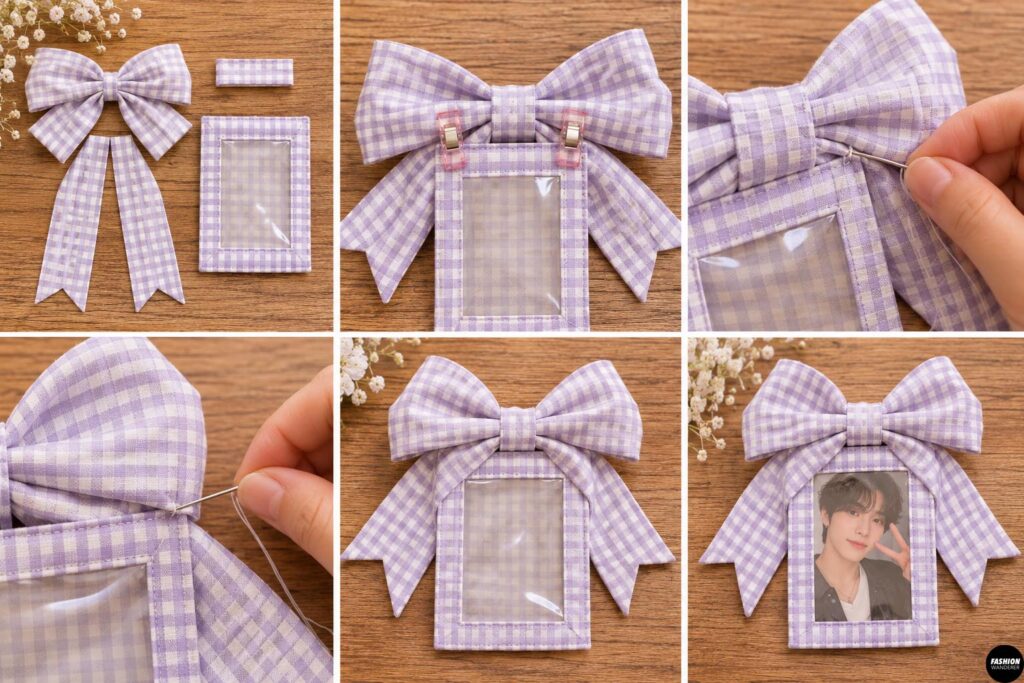
Position your finished photocard pocket directly beneath the oversized fabric bow.
The bow should sit across the upper edge of the holder, while the flowing tails frame the sides.
Adjust the placement until the photocard window remains fully visible.
Hand-sew the top corners of the photocard holder to the back of the bow’s center area.
Use several small, secure stitches.
Avoid stitching across the pocket opening.
This creates the adorable layered look commonly seen in coquette-inspired K-Pop bag charms.
Step 7: Add the Bow Center Wrap
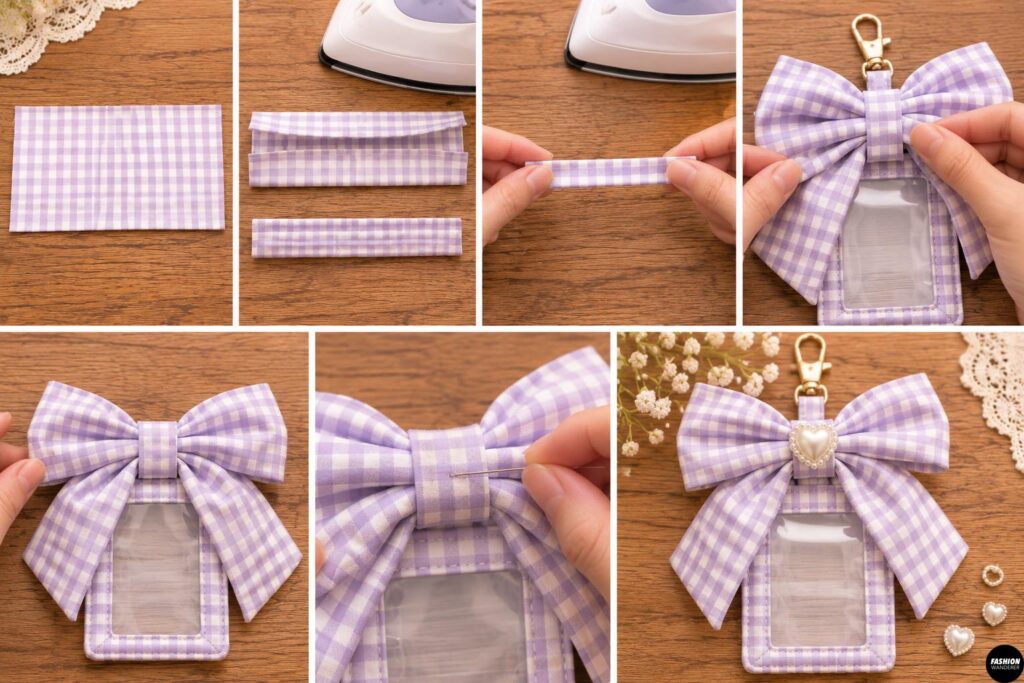
Take your 2 × 4-inch fabric strip.
Fold the long raw edges toward the center and press.
Fold the strip in half lengthwise again to hide the raw edges.
Wrap it around the middle of your bow, covering the gathering stitches and the top of the bow tails.
Secure the ends at the back with small hand stitches.
Keep the center wrap snug enough to maintain the bow shape without crushing the fabric.
For extra decoration, sew a tiny pearl bead or heart-shaped charm onto the center.
Step 8: Attach the Keychain Hardware
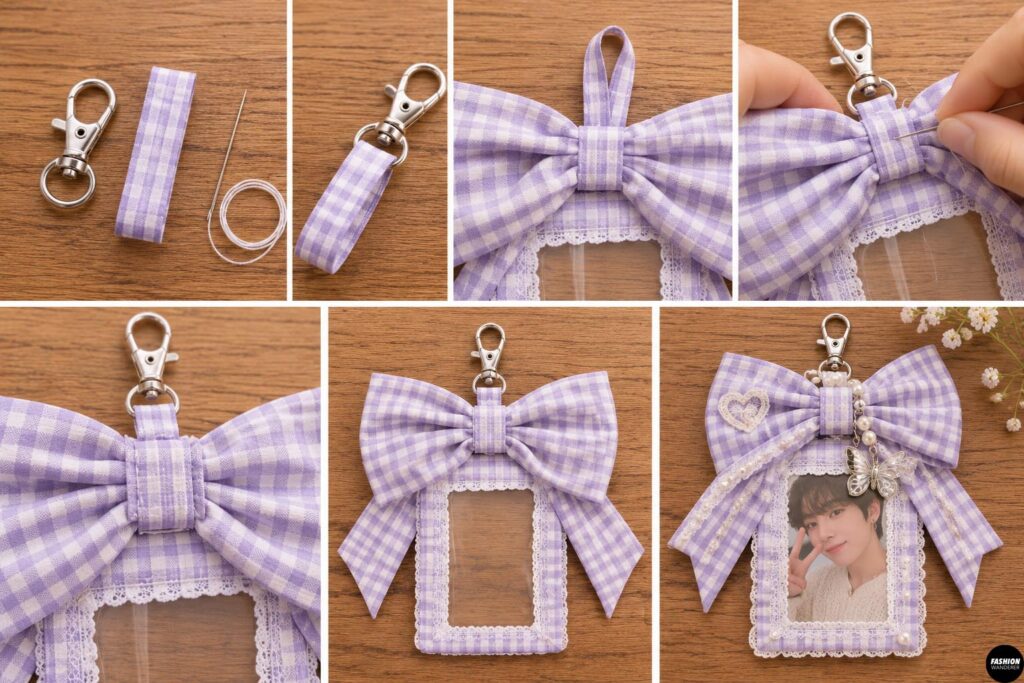
Fold your 2-inch ribbon or fabric strip in half to create a hanging loop.
Thread the loop through your lobster clasp or keychain ring.
Position both raw ends behind the bow’s center wrap.
Hand-sew the loop securely to the bow’s reinforced center.
Stitch through several layers to create a strong attachment.
Gently tug on the clasp to check that it is secure.
Your DIY K-Pop photocard bow bag charm is almost finished!
Step 9: Decorate Your K-Pop Bag Charm
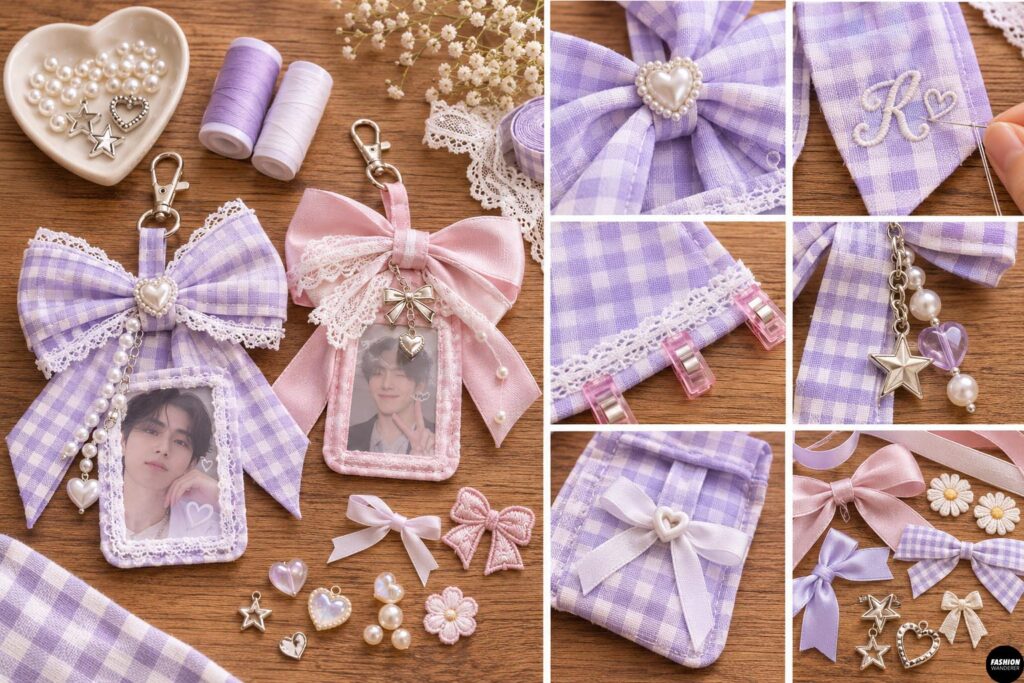
Now comes the fun part: customizing your charm!
For a soft coquette aesthetic, use pastel pink fabric, white lace, and tiny pearl embellishments.
For a playful Y2K look, combine colorful gingham with heart-shaped beads and silver star charms.
You can also embroider your favorite idol’s initials onto one bow tail or attach a miniature ribbon in your fandom’s favorite color.
Try mixing different fabric textures, such as satin bows with floral cotton tails.
Keep decorations lightweight so your bag charm hangs comfortably.
Step 10: Insert Your Photocard and Style
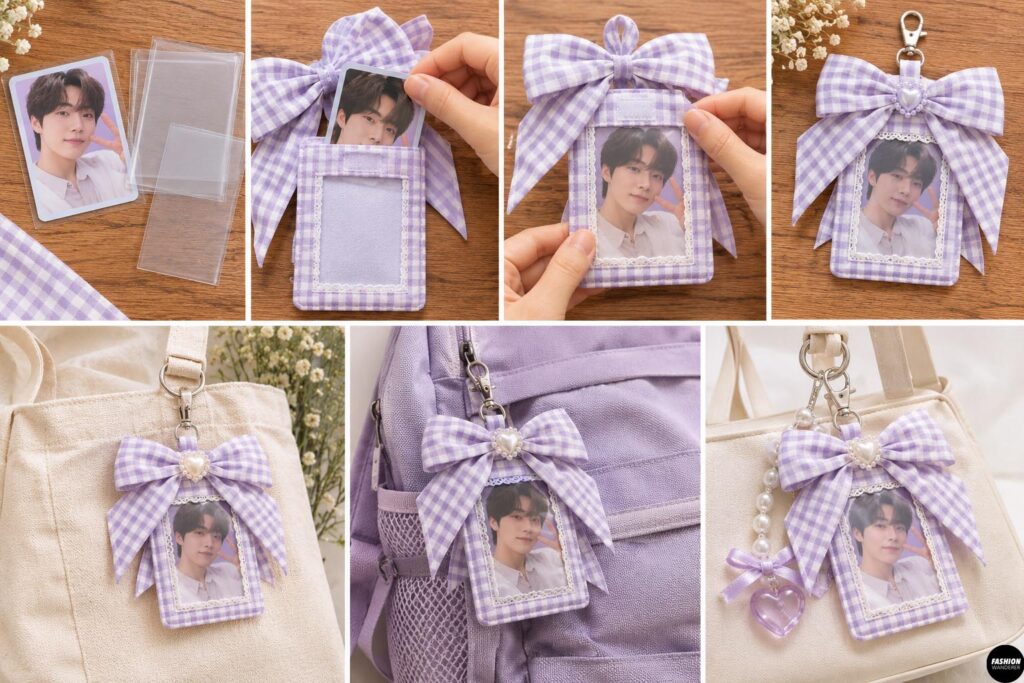
Place your favorite K-Pop photocard inside a properly sized, acid-free, PVC-free protective sleeve.
Carefully slide the sleeved card into the fabric pocket behind the clear window.
Check that it fits without bending and that the closure holds securely.
Clip your finished bow charm onto your tote bag, backpack, purse, or concert bag.
For valuable photocards, consider displaying a printed replica instead of the original, especially outdoors or in rainy weather.
Your handmade K-Pop photocard bow bag charm is complete!
Creative Fabric Combinations to Try
Want to make several charms? Experiment with these adorable combinations:
- Pink coquette: Baby pink satin, white lace, and pearl details.
- Cottagecore: Tiny floral cotton, cream ribbons, and wooden beads.
- Y2K K-Pop: Blue gingham, silver stars, and colorful charms.
- Minimalist Korean style: Ivory linen, neutral ribbons, and simple stitching.
- Concert-ready: Black satin, metallic accessories, and embroidered initials.
Each combination creates a completely different look using the same beginner-friendly sewing technique.
Final Thoughts
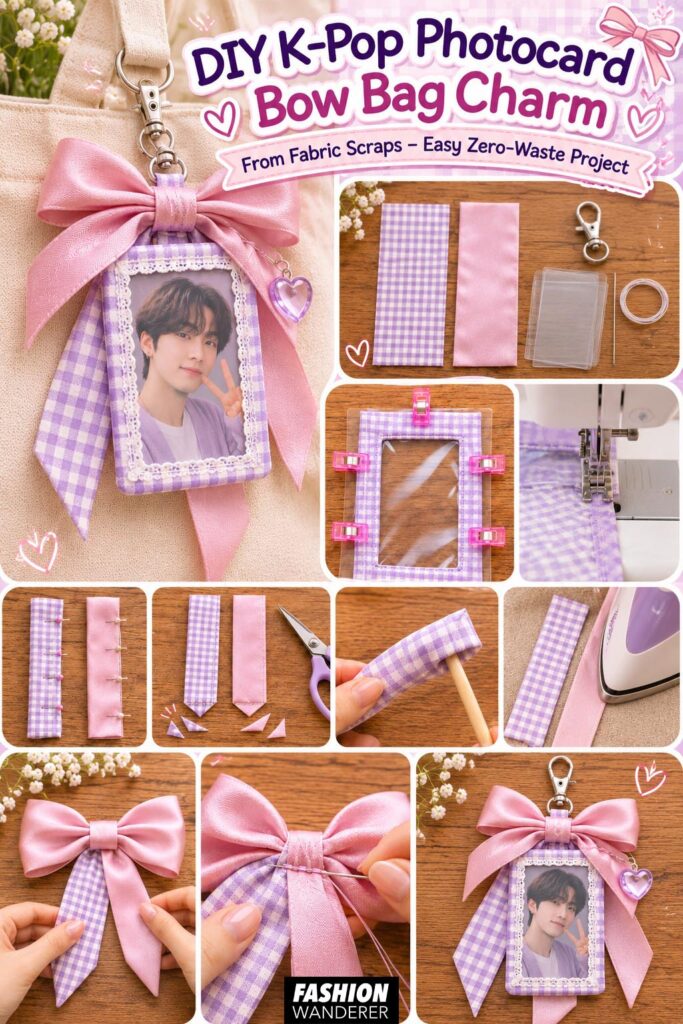
Making a DIY K-Pop photocard bow bag charm from fabric scraps is a creative way to transform leftover materials into an adorable everyday accessory.
This easy sewing project combines sustainable upcycling, K-Pop fandom, and trendy coquette fashion in one handmade design.
Whether you’re creating a charm for yourself, preparing concert accessories, or making gifts for friends, every bow can be customized to reflect your favorite colors and personal style.
Grab your fabric scraps, choose your favorite photocard, and start sewing your own cute K-Pop-inspired bag charm!