
Want to turn an oversized thrifted shirt into something that looks straight out of a K-Pop music video? This DIY K-Pop corset top is the perfect way to transform an old button-up shirt into a trendy, fitted fashion piece without spending a fortune.
Inspired by the stylish stage outfits, Y2K fashion, and corset-inspired streetwear often seen in K-Pop upcycle fashion, this beginner-friendly thrift flip combines a classic button-up shirt with a flattering, waist-defining silhouette.
The best part? You don’t need complicated corset-making skills or expensive materials. With a few simple sewing techniques, you can create a corset-style top from an old shirt featuring a fitted waist, decorative front seams, and an optional lace-up back.
Whether you’re styling an outfit for a K-Pop concert, creating a dance-cover look, or refreshing your everyday wardrobe, this DIY fashion project is a fun way to give old clothes a second life.
Why You’ll Love This DIY K-Pop Corset Top
This button-up shirt upcycle is a creative way to turn an oversized piece into something modern and wearable.
- Budget-friendly: Transform a thrifted shirt or one already in your closet.
- Beginner-friendly: Uses basic sewing techniques and simple fitting adjustments.
- Trendy: Inspired by K-Pop stage fashion, Y2K corset tops, and Korean streetwear.
- Customizable: Add lace-up details, ribbons, decorative stitching, or contrasting panels.
- Sustainable: Give an old button-up shirt a stylish second life.
Skill level: Confident beginner · Estimated time: 2–3 hours · Sewing allowance: ⅜ inch (1 cm), unless otherwise noted
Materials You’ll Need
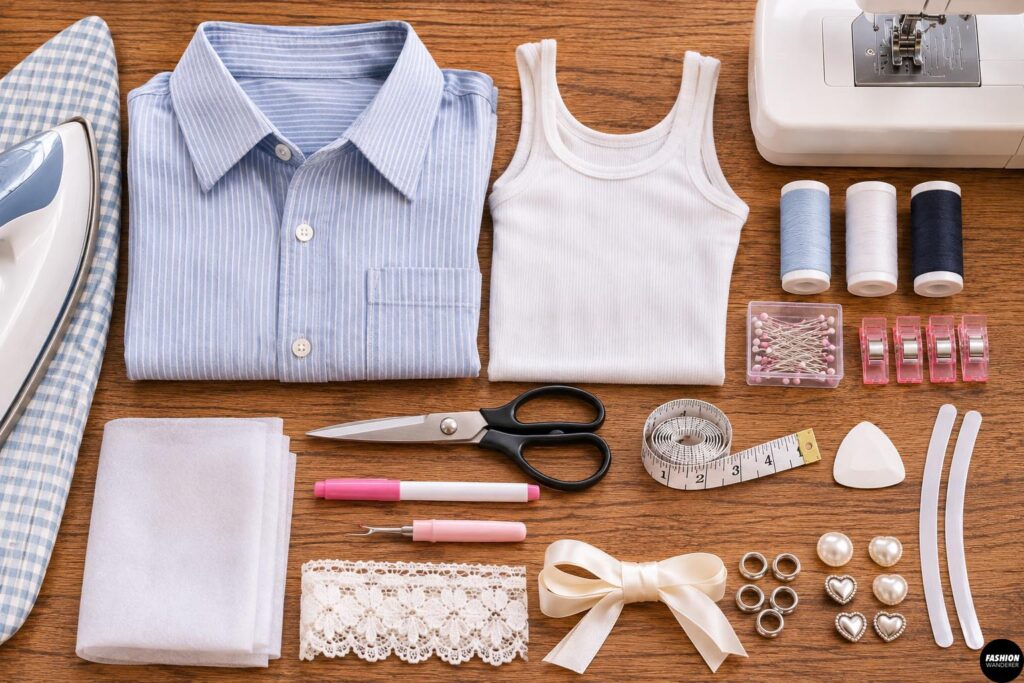
Before starting your DIY corset top sewing tutorial, gather these supplies:
- 1 oversized button-up shirt (cotton or cotton-blend recommended)
- A fitted sleeveless top for reference
- Fabric scissors
- Sewing machine
- Coordinating thread
- Fabric pins or sewing clips
- Measuring tape
- Fabric marker or tailor’s chalk
- Seam ripper
- Iron and ironing board
- Lightweight fusible interfacing
- Optional: ribbon, lace trim, eyelets, decorative buttons, or boning
Beginner tip: Choose a woven cotton button-up shirt with little stretch. Avoid slippery satin or very thin fabrics for your first project, as these can be more challenging to cut and sew.
DIY K-Pop Corset Top
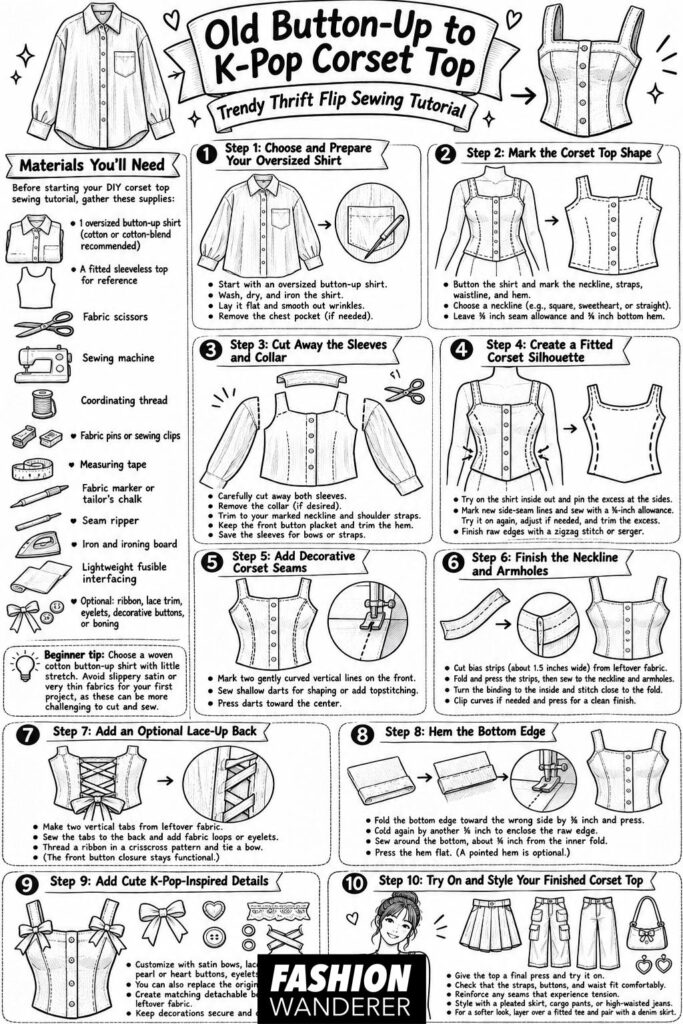
Step 1: Choose and Prepare Your Oversized Shirt
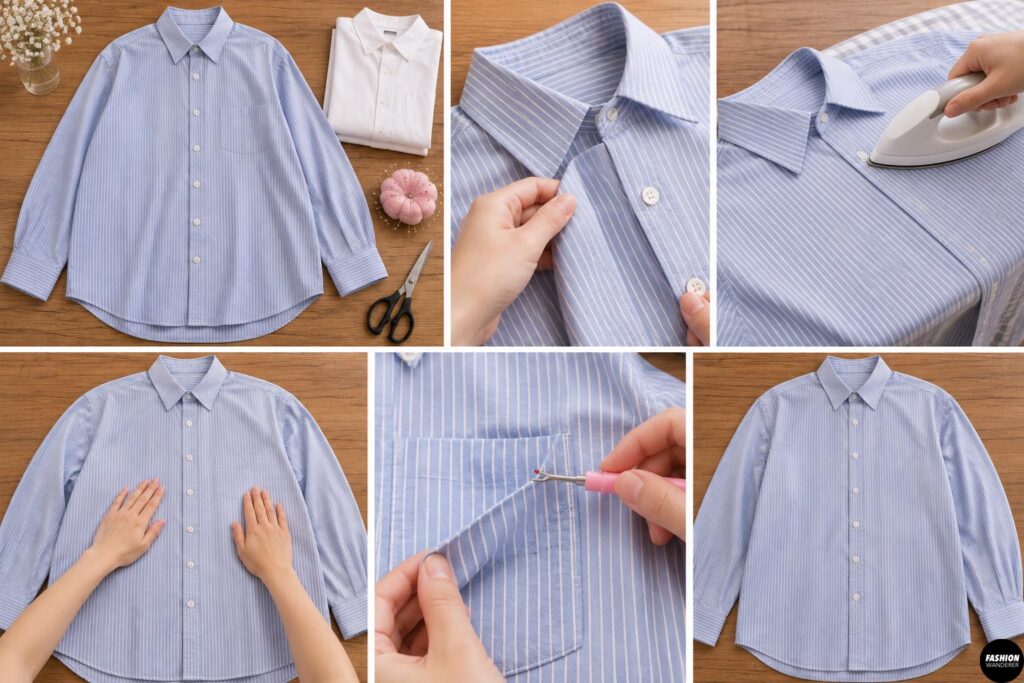
Start with an oversized button-up shirt that has enough fabric to create your desired fitted shape.
Men’s dress shirts work especially well because they usually offer extra width and length.
Wash, dry, and iron the shirt before cutting.
Lay it flat on your worktable and smooth out any wrinkles.
Examine the existing buttons, collar, and seams. For this tutorial, we’ll reuse the original front button closure to give the corset top a cute, structured look.
If the shirt has a chest pocket, carefully remove it with a seam ripper.
Style tip: White, baby blue, and pinstriped shirts are especially cute for creating a K-Pop-inspired corset top.
Step 2: Mark the Corset Top Shape
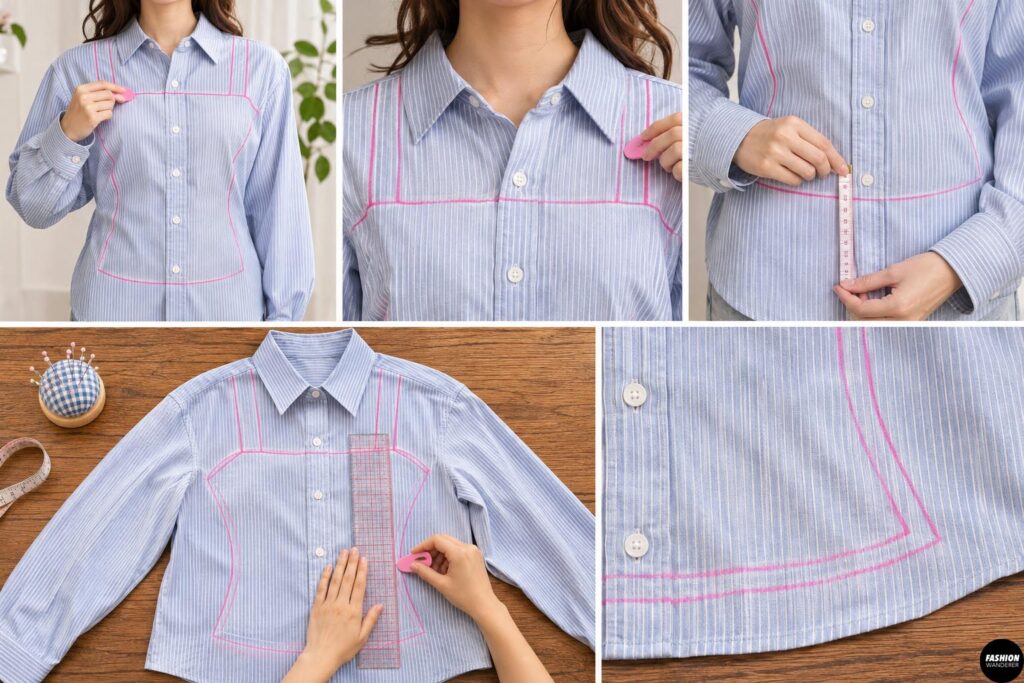
Put on the oversized shirt and button it closed.
Using a fabric marker, lightly mark your desired neckline, waistline, and bottom hem.
For a trendy cropped corset silhouette, position the finished hem approximately 1–2 inches below your natural waist.
Next, decide whether you want a sweetheart neckline, square neckline, or straight neckline.
A square neckline is one of the easiest options for beginners.
Mark the shoulder straps approximately 1.5–2 inches wide.
Carefully remove the shirt and lay it flat.
Use a ruler to connect your markings into smooth cutting lines.
Leave approximately ⅜ inch for seam allowances and ¾ inch for the bottom hem.
Step 3: Cut Away the Sleeves and Collar
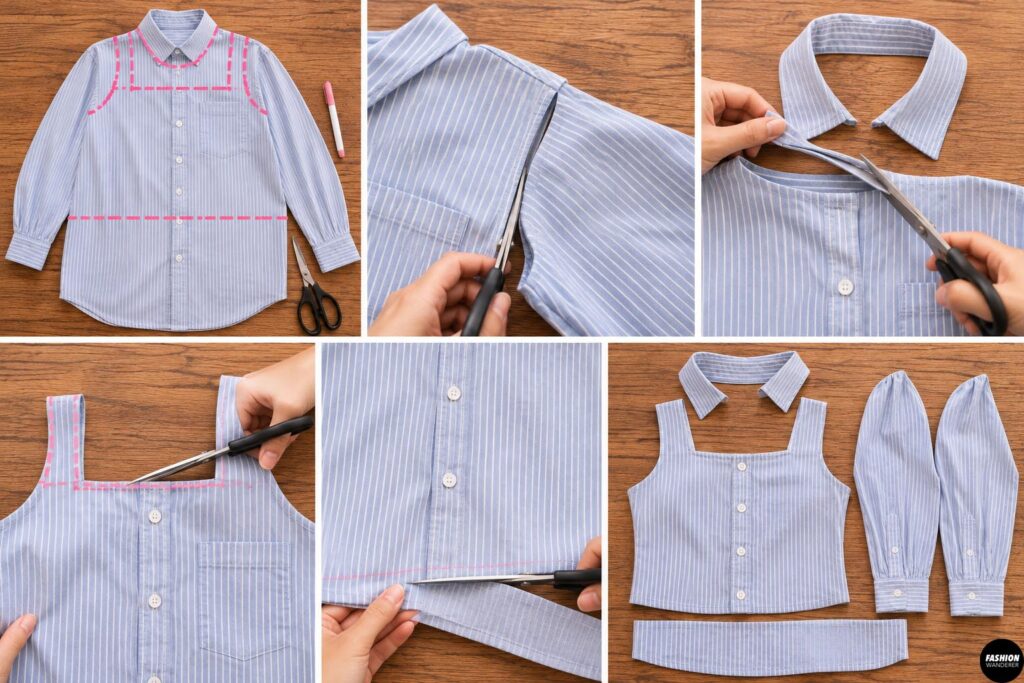
Using fabric scissors, carefully cut away both sleeves along their original armhole seams.
Remove the collar and collar stand if you’re creating a square or sweetheart neckline.
Next, trim the upper shirt into your chosen neckline and shoulder-strap shape.
Keep the original front button placket intact.
Trim the bottom of the shirt to your marked length, remembering to leave enough fabric for hemming.
Save the leftover sleeves because you can reuse them for straps, decorative bows, or matching accessories.
Beginner tip: Cut slightly outside your marked lines first. You can always remove more fabric during fitting, but you can’t easily add it back.
Step 4: Create a Fitted Corset Silhouette
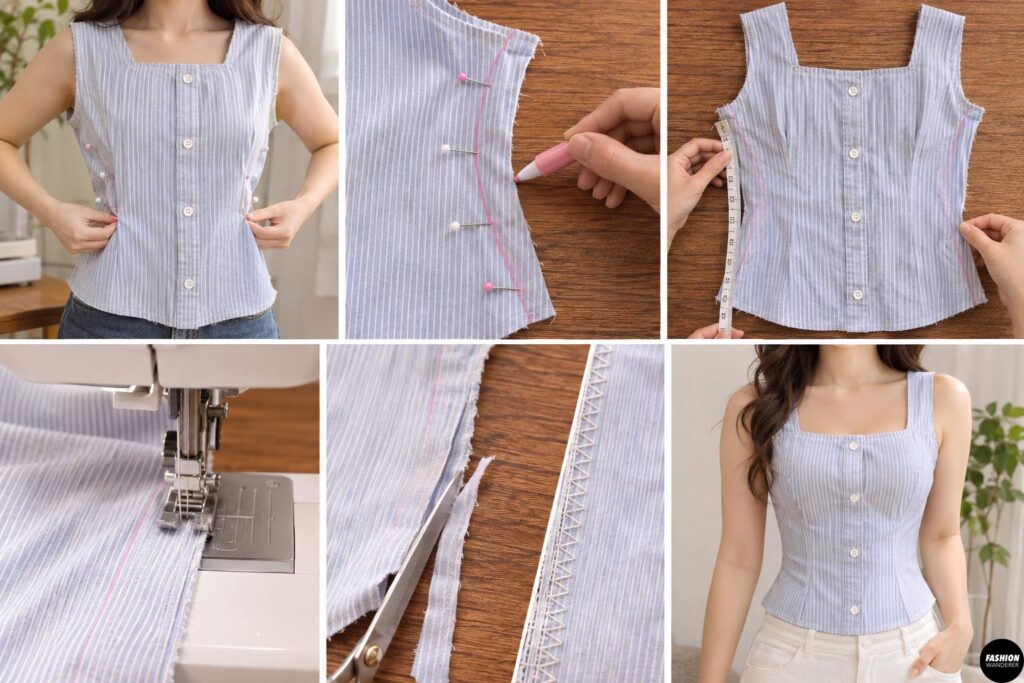
Turn the shirt inside out and put it on.
Pin the excess fabric along both side seams until the top fits comfortably around your bust and waist.
Keep enough ease to breathe, sit, and move naturally.
Remove the shirt carefully and mark the new side-seam lines.
Measure both sides to make sure they’re symmetrical.
Sew along the marked lines using a straight stitch and ⅜-inch seam allowance.
Try the top on again.
If necessary, make small adjustments until the waist looks fitted without feeling restrictive.
Trim the excess seam allowance and finish the raw edges with a zigzag stitch or serger.
Step 5: Add Decorative Corset Seams
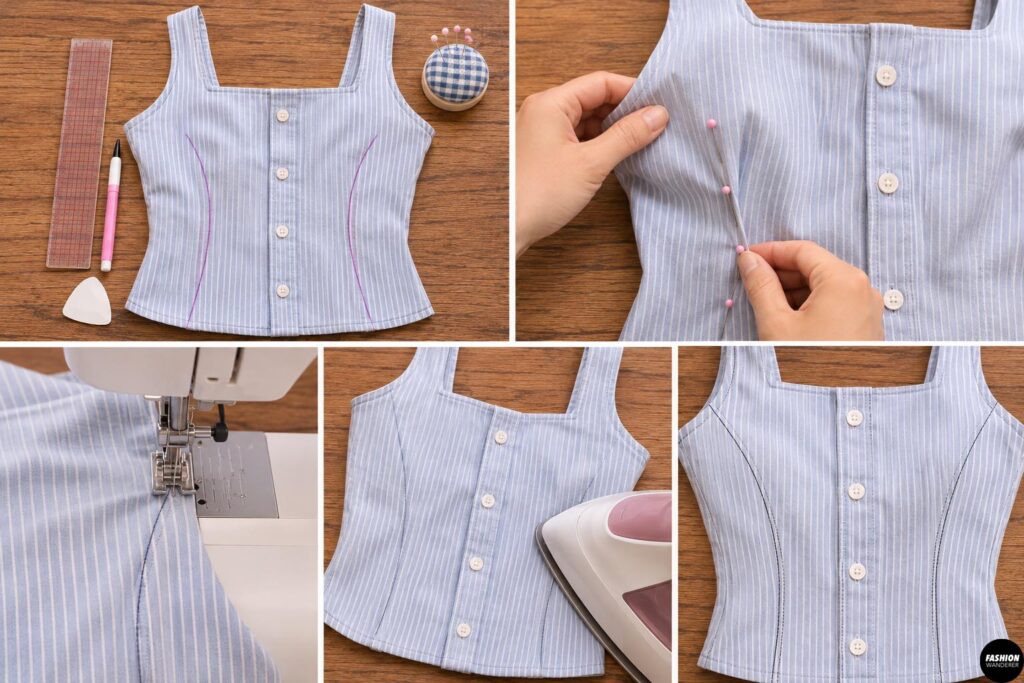
To create that trendy K-Pop corset-inspired look, add vertical seams or decorative topstitching.
With the top lying flat, mark two gently curved vertical lines on the front, starting below the bust and continuing toward the hem.
For actual shaping, you can sew shallow darts along these lines, tapering smoothly toward the bust and waist.
Pinch and pin the fabric while wearing the top inside out to determine how much shaping is needed.
Avoid sewing darts directly across the fullest part of the bust.
Once you’re happy with the fit, sew the darts and press them toward the center.
For a more dramatic corset effect, add decorative topstitching along the dart lines.
Style tip: Contrasting black thread on a white shirt creates an edgy, stage-inspired look.
Step 6: Finish the Neckline and Armholes
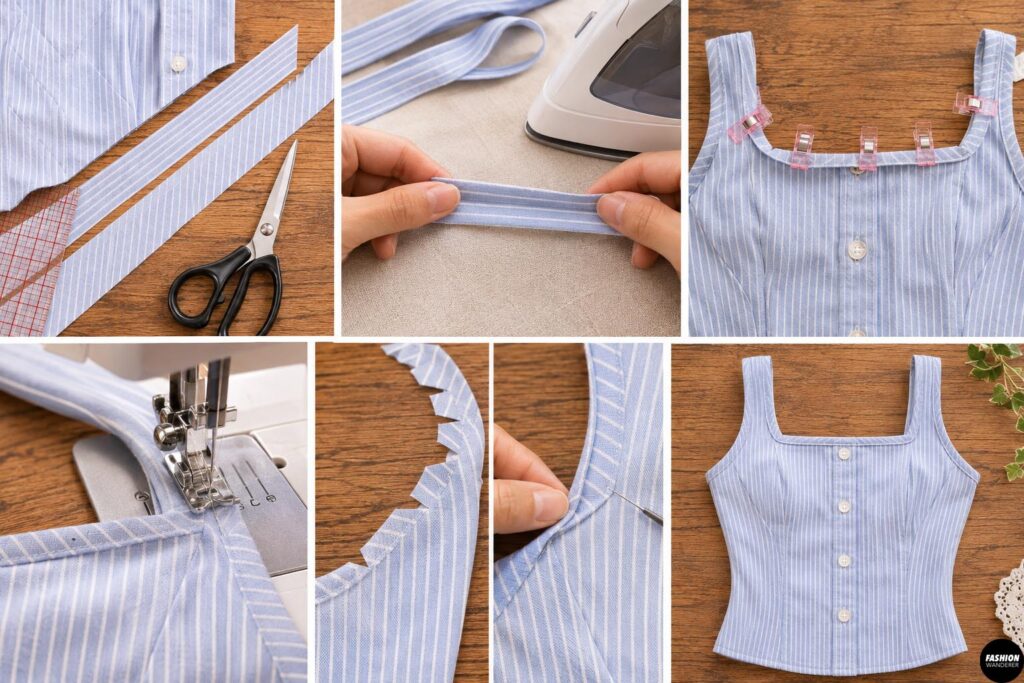
A clean neckline makes your handmade corset top look polished.
Use leftover shirt fabric to cut bias strips approximately 1.5 inches wide.
Fold each strip lengthwise and press.
With right sides together, sew the binding to the neckline using a ⅜-inch seam allowance.
Fold the binding toward the inside, turn under its raw edge, and stitch close to the fold.
Repeat around both armholes.
Clip curved seam allowances where needed so the fabric lies smoothly.
Press everything carefully for a professional finish.
Step 7: Add an Optional Lace-Up Back
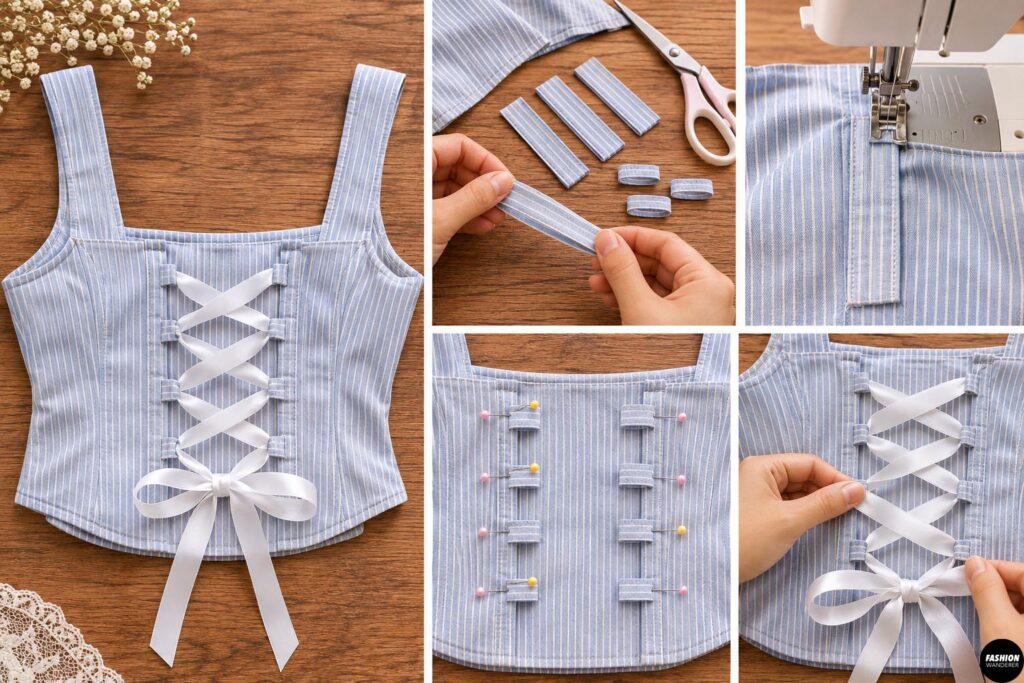
Want a more dramatic K-Pop stage outfit?
Add decorative ribbon lacing to the back of your corset top.
Cut two narrow fabric strips from the leftover sleeves and fold them into sturdy vertical tabs.
Finish the edges and sew the tabs securely onto the back, positioning them symmetrically.
Attach small fabric loops or properly installed eyelets along each tab.
Thread satin ribbon through the loops in a crisscross pattern.
Tie the ribbon into a bow at the bottom.
For this beginner version, the original button closure remains functional, while the back lacing serves primarily as decoration.
If you want functional adjustable lacing, you’ll need a reinforced opening and a properly fitted back panel.
Step 8: Hem the Bottom Edge
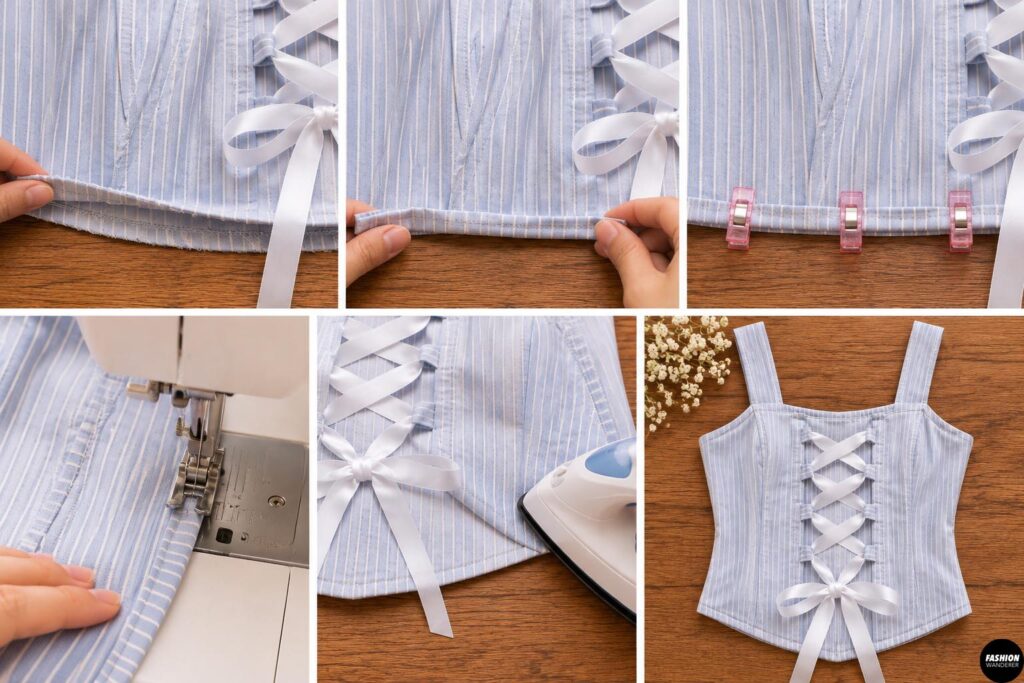
Fold the bottom raw edge toward the wrong side by ⅜ inch and press.
Fold it again by another ⅜ inch to enclose the raw edge.
Pin or clip the hem in place.
Sew around the bottom using a straight stitch, keeping your stitching approximately ⅛ inch from the inner folded edge.
Press the finished hem flat.
For a trendy corset-inspired silhouette, you can create a subtle pointed front hem, although this requires a shaped facing rather than a simple double-fold hem.
Step 9: Add Cute K-Pop-Inspired Details
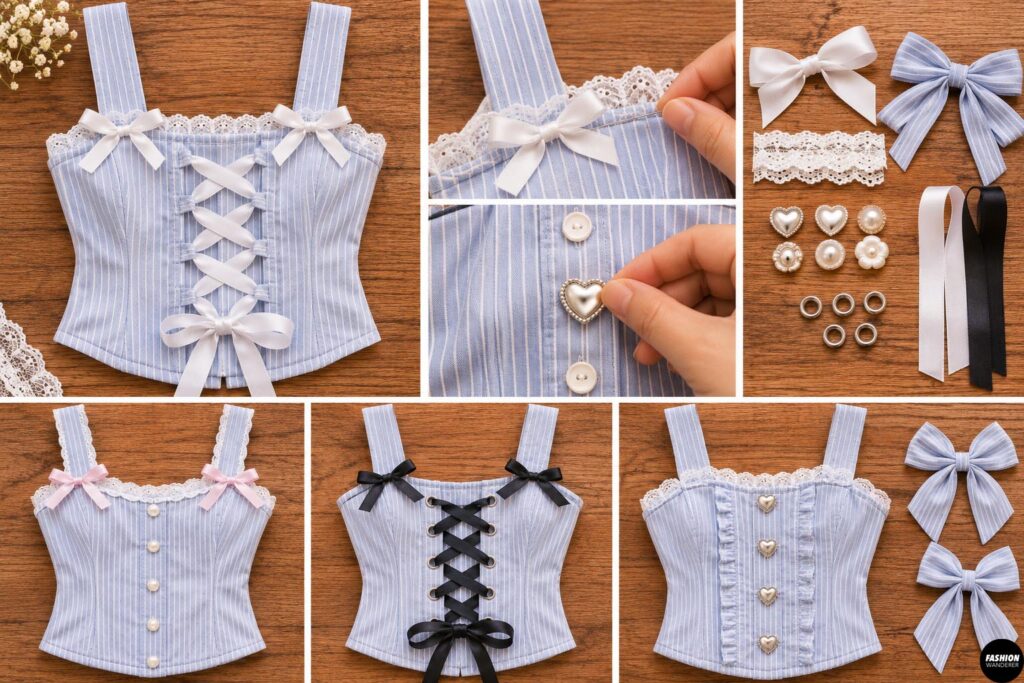
Now comes the fun part: customizing your upcycled button-up corset top!
Try adding tiny satin bows along the neckline for a feminine coquette-inspired look.
For an edgy K-Pop aesthetic, use black ribbon, silver eyelets, or contrasting topstitching.
You can also replace the original shirt buttons with pearl, heart-shaped, or metallic buttons.
For a softer look, sew delicate lace trim around the neckline.
Want something extra playful? Create matching detachable bows from the leftover sleeve fabric.
Keep decorations secure and avoid placing bulky embellishments where they could rub against your skin.
Step 10: Try On and Style Your Finished Corset Top
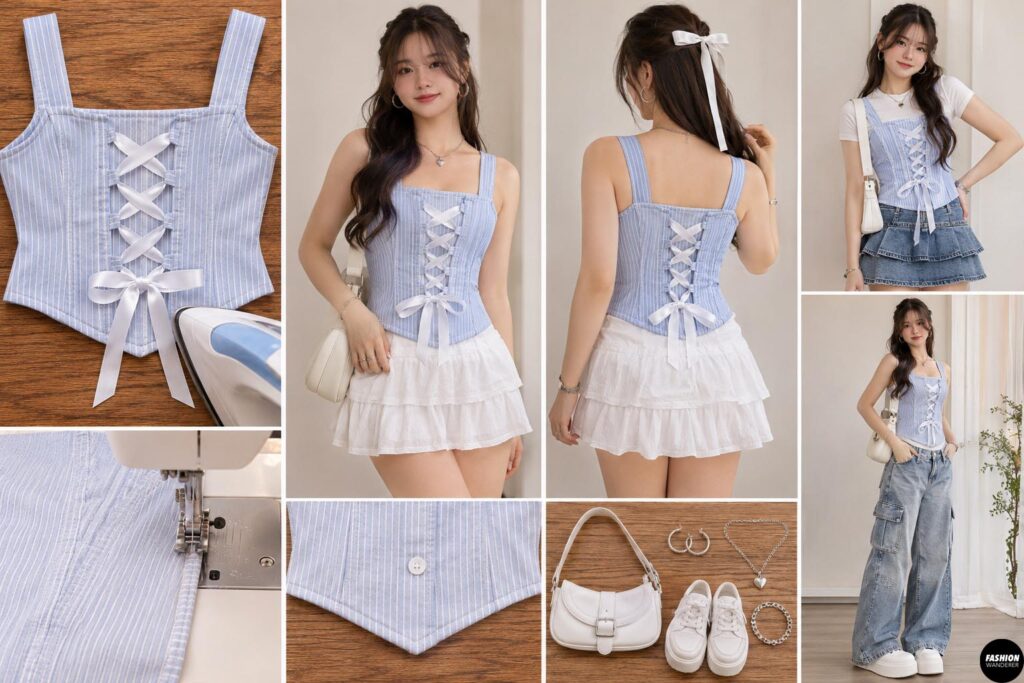
Give your finished top one final press.
Try it on and check that the straps stay in place, the button placket lies flat, and the waist feels comfortable.
Reinforce any seams that experience tension.
Now style your DIY K-Pop corset top with a pleated mini skirt, wide-leg cargo pants, or high-waisted jeans.
Add platform shoes, a mini shoulder bag, and silver jewelry for a concert-ready outfit.
For a softer Korean streetwear look, layer the top over a fitted white tee and pair it with a denim skirt.
Your old button-up shirt has officially become a trendy new wardrobe piece!
Final Thoughts
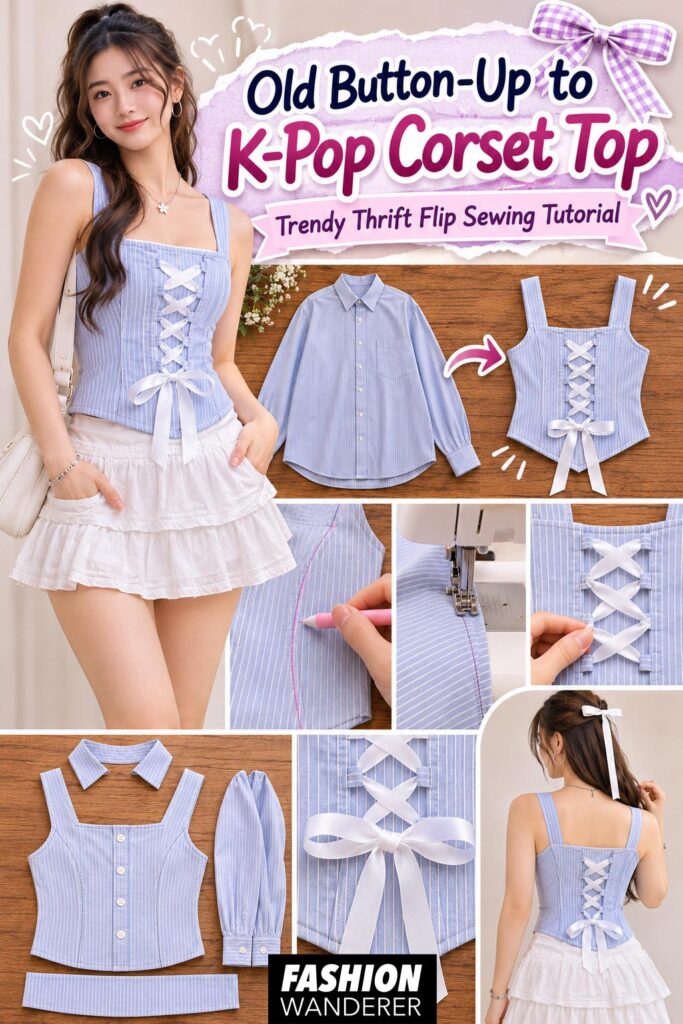
Turning an old button-up shirt into a K-Pop corset top is an affordable and creative way to experiment with fashion while reducing textile waste.
With a few basic sewing techniques, you can transform an oversized thrift-store find into a fitted, stylish top that feels completely personalized.
Whether you love Y2K fashion, Korean streetwear, or DIY concert outfits, this easy thrift flip is a great addition to your sewing project list.
So grab that forgotten button-up shirt and give it a fashionable makeover!