
Looking for an easy upcycle Thanksgiving outfit that feels cozy but still looks effortlessly stylish? Instead of buying something new, transform an old oversized sweater into a chic off-shoulder Thanksgiving top with this beginner-friendly DIY sweater upcycle.
This simple sewing project gives a forgotten sweater a fresh, boutique-inspired look. The relaxed fit, soft neckline, and slightly slouchy silhouette make it perfect for Thanksgiving dinner, Friendsgiving celebrations, or cozy fall weekends.
The best part? You can create this DIY off-shoulder sweater using basic sewing supplies and a sweater you already own.
Whether you prefer warm oatmeal, chocolate brown, burgundy, or classic cream, this easy fall clothing transformation is a fun way to refresh your wardrobe on a budget.
Why You’ll Love This DIY Thanksgiving Sweater
- Beginner-friendly: Requires only basic sewing skills.
- Budget-friendly: Upcycle an oversized sweater instead of buying a new top.
- Comfortable: Perfect for relaxing, eating, and celebrating Thanksgiving.
- Trendy: Features a wide off-shoulder neckline and relaxed silhouette.
- Customizable: Add a folded neckline, slightly cropped hem, or fitted waistband.
Skill Level: Beginner to confident beginner
Estimated Time: 45–90 minutes
Estimated Cost: $0–$15 if using a sweater you already own
Materials You’ll Need
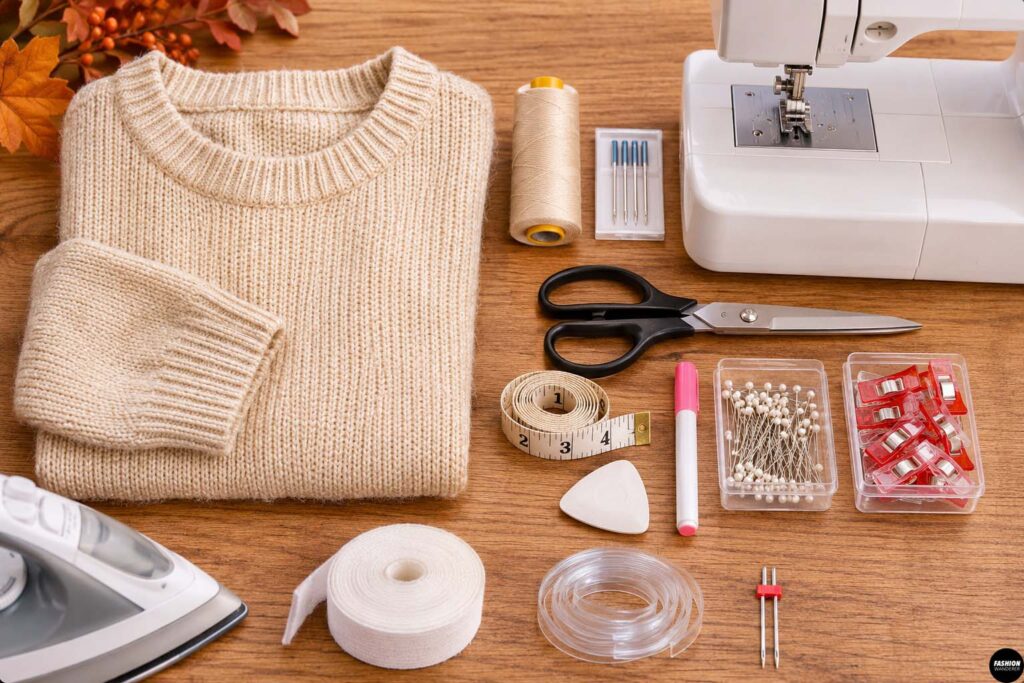
Gather these supplies before starting your sweater transformation:
- 1 oversized sweater (preferably cotton knit, acrylic, or sweater jersey)
- Matching polyester thread
- Sewing machine
- Stretch or ballpoint sewing machine needle
- Fabric scissors
- Measuring tape
- Fabric chalk or washable marker
- Sewing clips or ballpoint pins
- Iron with adjustable temperature
- Optional knit stay tape
- Optional clear elastic for neckline support
- Optional twin needle for finishing
Fabric Tip: Choose a medium-weight sweater with enough stretch to move comfortably. Avoid extremely loose, chunky hand-knit sweaters for your first project because cutting them can cause the stitches to unravel.
For a beautiful Thanksgiving-inspired look, choose camel, cream, rust, chocolate brown, sage green, or burgundy.
Upcycle Oversized Sweater to Off-Shoulder Top
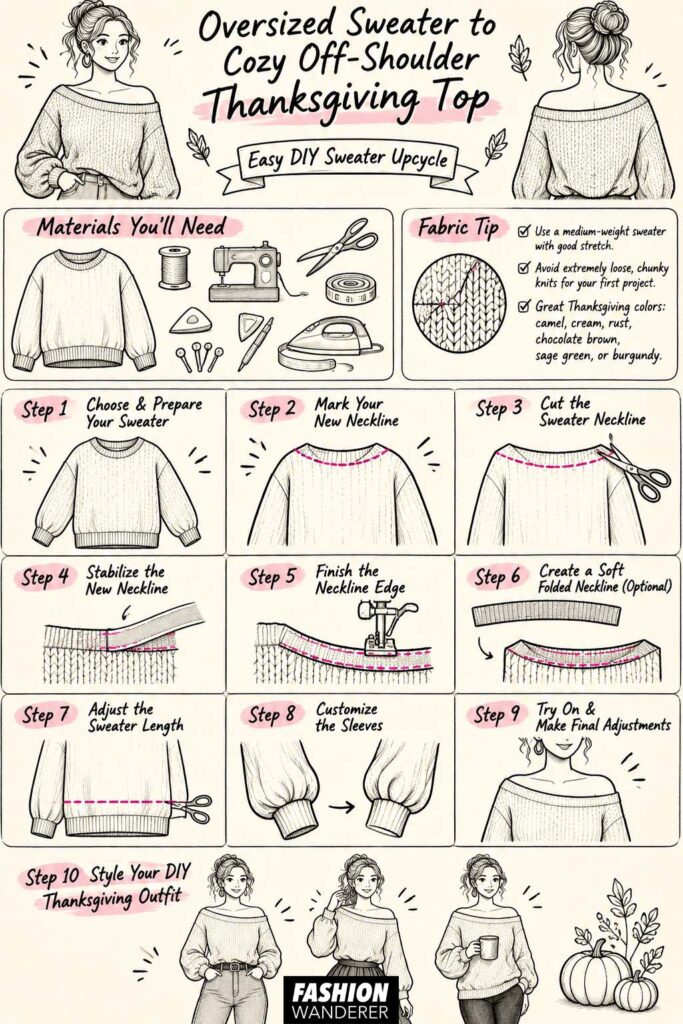
Step 1: Choose and Prepare Your Oversized Sweater
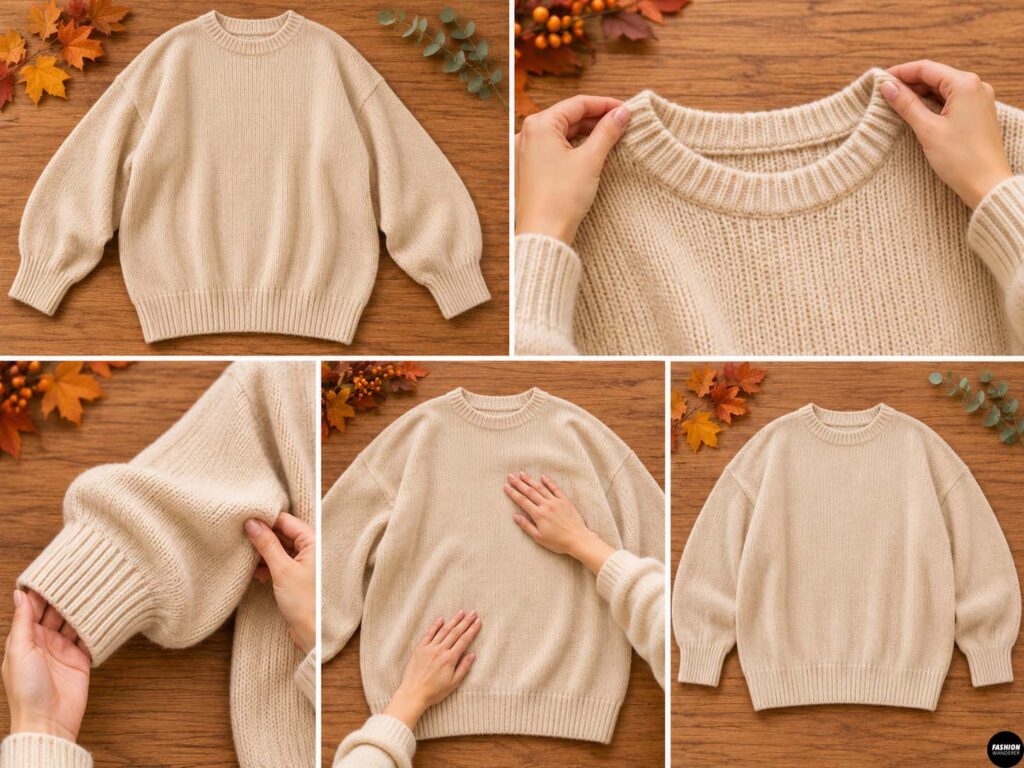
Start with a sweater that is at least one size larger than your usual fit.
A relaxed crewneck sweater works especially well for this transformation because it provides extra fabric around the shoulders.
Try the sweater on and examine the fit.
Check that the sleeves are comfortable, the body hangs loosely, and the neckline has enough room for your desired off-shoulder style.
Wash and dry the sweater according to its care label before cutting.
Lay it flat on your worktable and smooth out any wrinkles.
Beginner Tip: Avoid sweaters with complicated cable-knit patterns or heavy embellishments near the neckline.
Step 2: Mark Your New Off-Shoulder Neckline
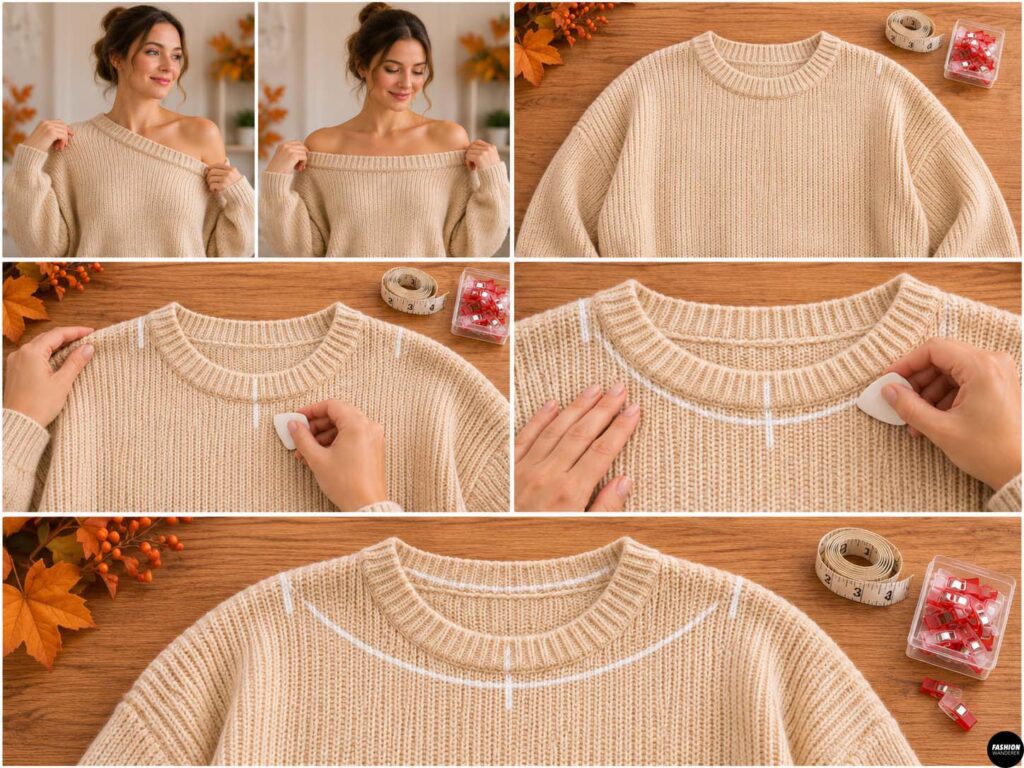
Put the sweater on and decide how low you want the neckline to sit.
For a subtle look, allow one shoulder to show. For a more dramatic Thanksgiving outfit, create a wider neckline that can sit below both shoulders.
Use fabric chalk to mark the desired neckline position at the center front, center back, and near both shoulders.
Remove the sweater and lay it flat.
Connect the markings with a smooth, shallow curved line.
Important: Start with a smaller neckline than you think you need. You can always cut away more fabric, but you cannot easily replace it.
Make sure the neckline remains high enough at the back to feel comfortable and secure.
Step 3: Cut the Sweater Neckline
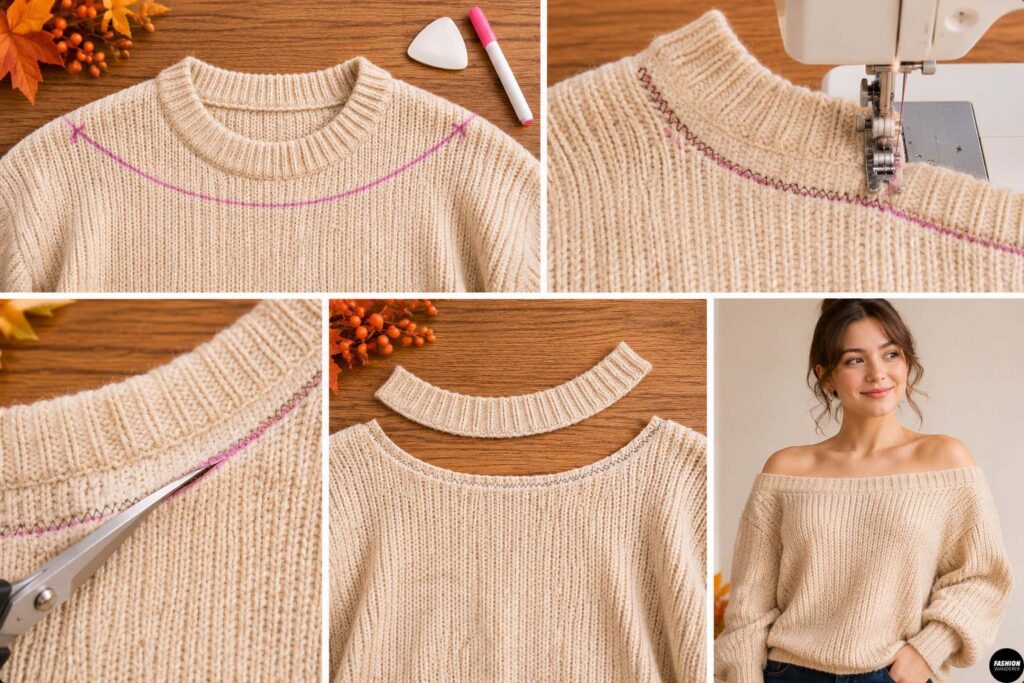
Before cutting, reinforce the sweater knit if necessary.
For stable sweater jersey, you can carefully cut along your marked line.
For looser sweater knits, sew a narrow zigzag or stretch stitch just below the proposed cutting line first. This helps prevent the knit loops from unraveling.
Use sharp fabric scissors and cut slowly along the marked curve.
Keep the sweater flat and avoid stretching the fabric while cutting.
Try the sweater on again.
Check whether the neckline sits naturally across your shoulders.
Make small adjustments if necessary, cutting away only a little fabric at a time.
Step 4: Stabilize the New Neckline
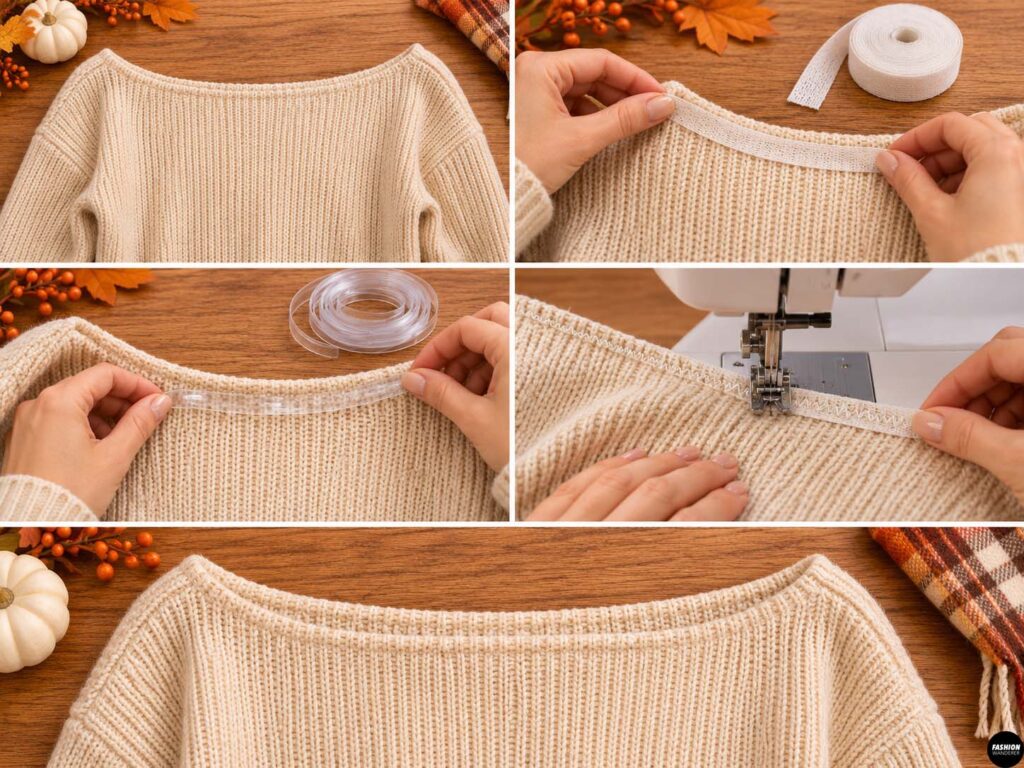
A freshly cut sweater neckline can stretch out of shape if it is not stabilized.
Apply lightweight knit stay tape along the neckline edge, following the manufacturer’s instructions.
Alternatively, sew clear elastic to the inside edge using a narrow zigzag stitch.
Avoid stretching the elastic aggressively. Its purpose is to support the neckline while allowing comfortable movement.
For a very stretchy sweater, this step is particularly helpful.
If the neckline is loose enough to slide down excessively, you may need to remove a little width or add gentle elastic tension.
Step 5: Finish the Raw Neckline Edge
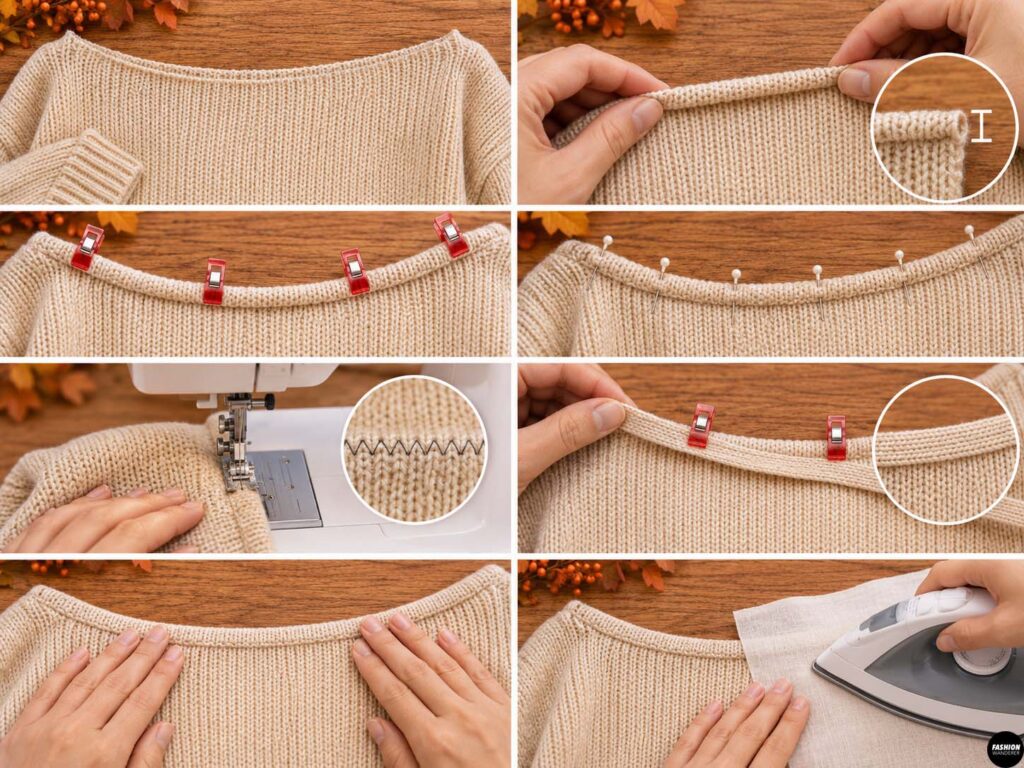
Fold the neckline edge approximately 3/8 inch toward the wrong side.
Secure it using sewing clips or ballpoint pins.
Sew around the neckline using a narrow zigzag stitch or another stretch-compatible stitch.
A straight stitch may break when the neckline stretches, so use a stitch that allows movement.
If your fabric is bulky, finish the edge with a narrow knit binding instead of folding it.
Sew slowly and avoid pulling the sweater through the machine.
Once finished, gently smooth the seam with your fingers.
Use a low-temperature iron and pressing cloth if your fabric allows pressing.
Step 6: Create a Soft Folded Neckline (Optional)
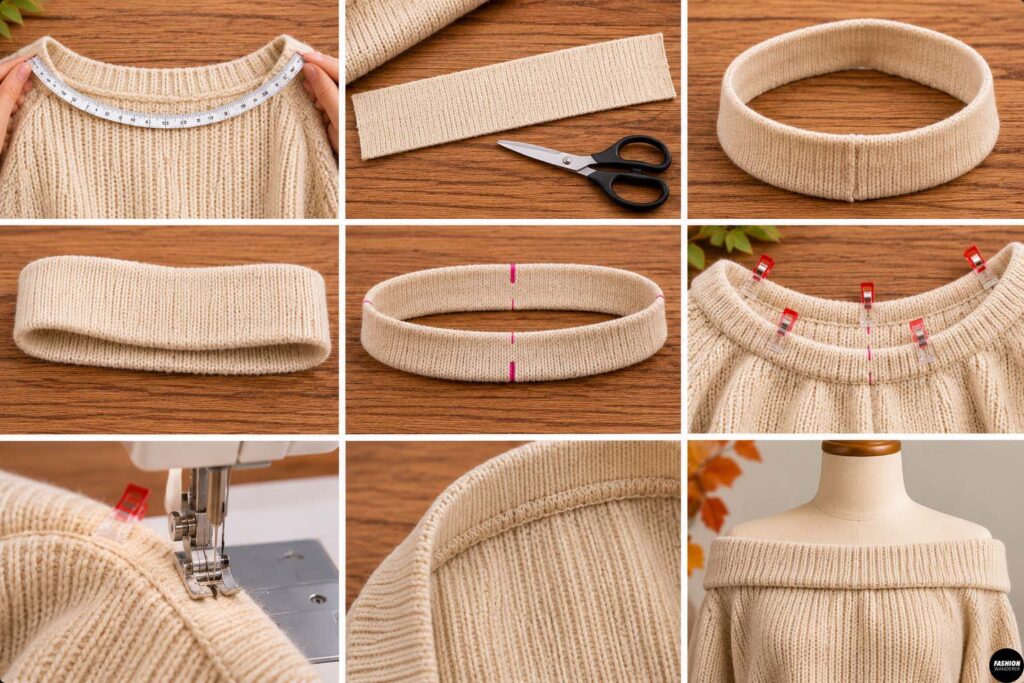
For a more polished, boutique-inspired finish, add a wide folded band using matching knit fabric.
Measure the finished neckline circumference.
Cut a knit strip approximately 3–4 inches wide, with its length adjusted to the stretch of your fabric.
Join the short ends to form a loop.
Fold the band lengthwise with wrong sides together.
Quarter-mark both the band and neckline, then align the markings.
Sew the band to the neckline using a stretch stitch, easing it evenly without creating puckers.
The finished band creates a soft, rounded neckline that looks especially stylish with an oversized sweater.
Step 7: Adjust the Sweater Length
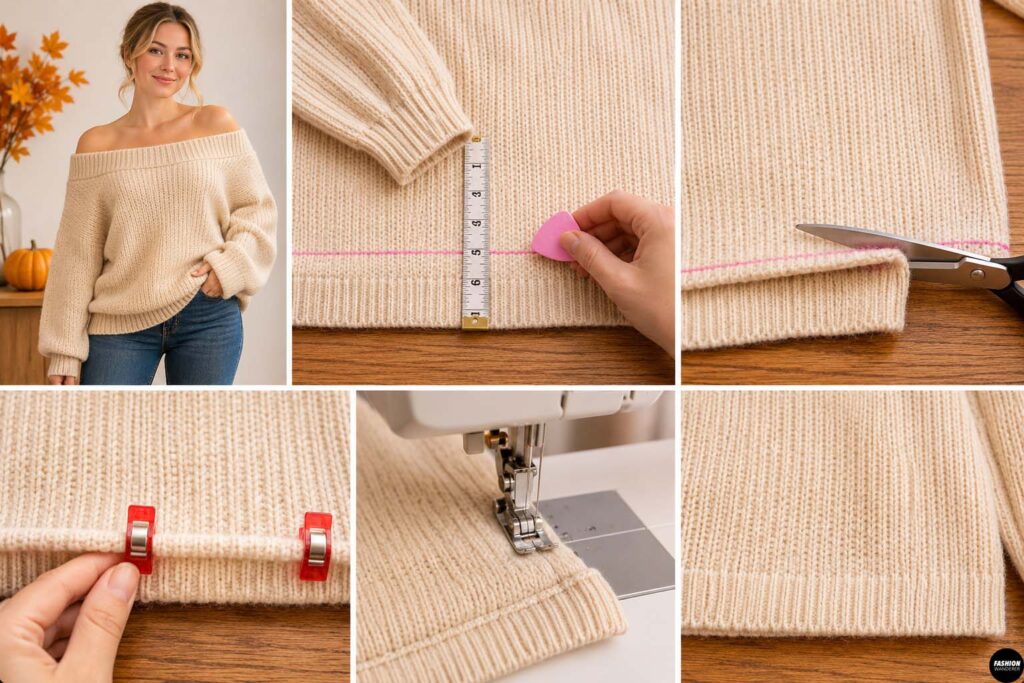
Try the sweater on and decide whether to keep the original oversized length.
For a relaxed Thanksgiving outfit, a hip-length sweater looks beautiful with fitted jeans or leggings.
For a modern silhouette, you can shorten it slightly.
Mark your preferred hemline while wearing the sweater.
Remove the sweater and measure evenly around the bottom.
If shortening, cut below your marked finished length to allow for the new hem.
Finish the raw edge with a stretch stitch, then fold and stitch the hem.
Style Tip: Keeping the original ribbed hem is usually the easiest option and maintains the sweater’s professional finish.
Step 8: Customize the Sleeves
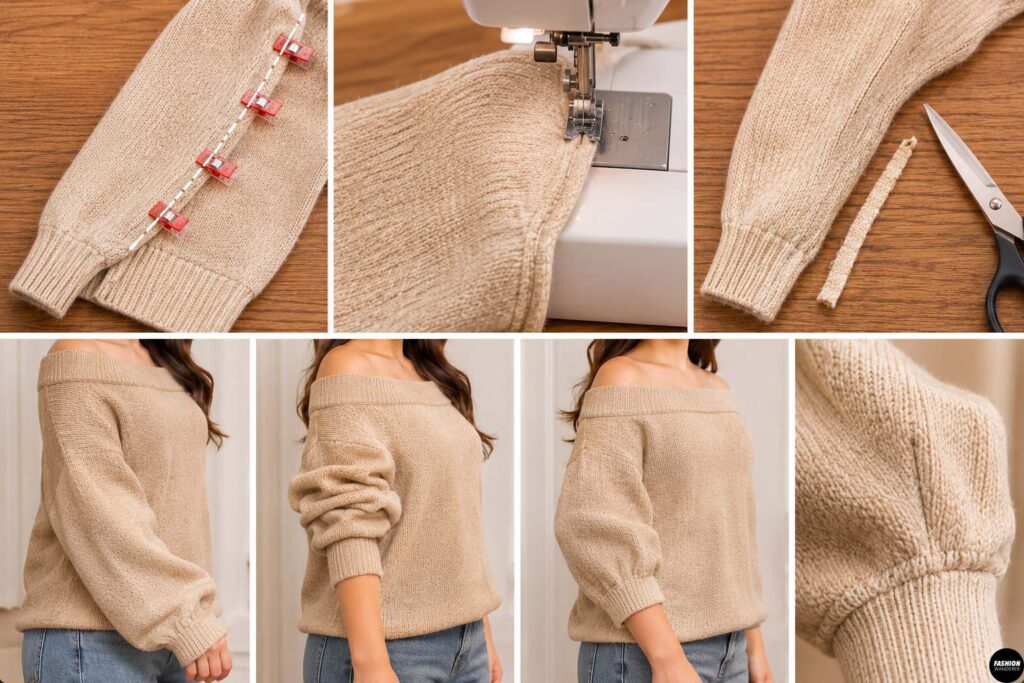
Oversized sleeves add to the cozy Thanksgiving aesthetic.
You can leave them long and slightly slouchy or shorten them for a cleaner fit.
For extra volume, push the cuffs toward your forearms and let the fabric gather naturally.
If the cuffs feel too loose, carefully take in the sleeve seams near the wrists.
Try the sweater on before making permanent adjustments.
Avoid removing too much fabric because the relaxed sleeve shape is part of the charm of this upcycled design.
Step 9: Try On and Make Final Adjustments
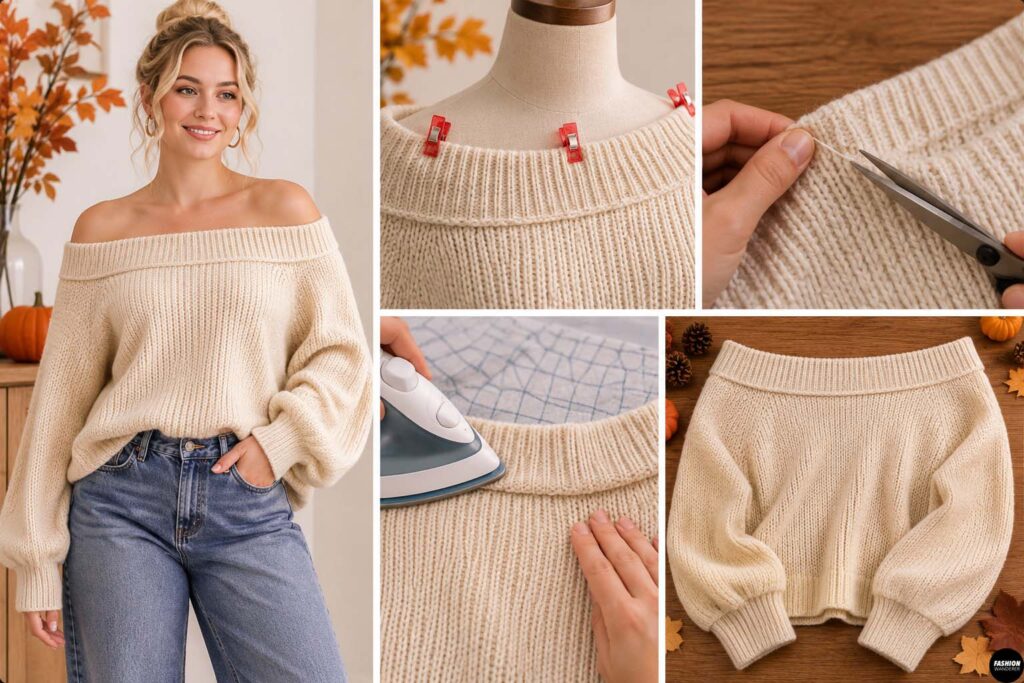
Put on your newly transformed off-shoulder sweater.
Move your arms, sit down, and walk around to test the neckline.
Check that the top stays comfortably in place without slipping excessively.
Inspect the neckline stitching for puckering, uneven tension, or loose threads.
If necessary, reinforce areas that feel stretched or unstable.
Trim excess threads and gently press the finished seams according to the sweater’s care instructions.
Your DIY off-shoulder Thanksgiving top is ready to wear!
Step 10: Style Your DIY Thanksgiving Outfit
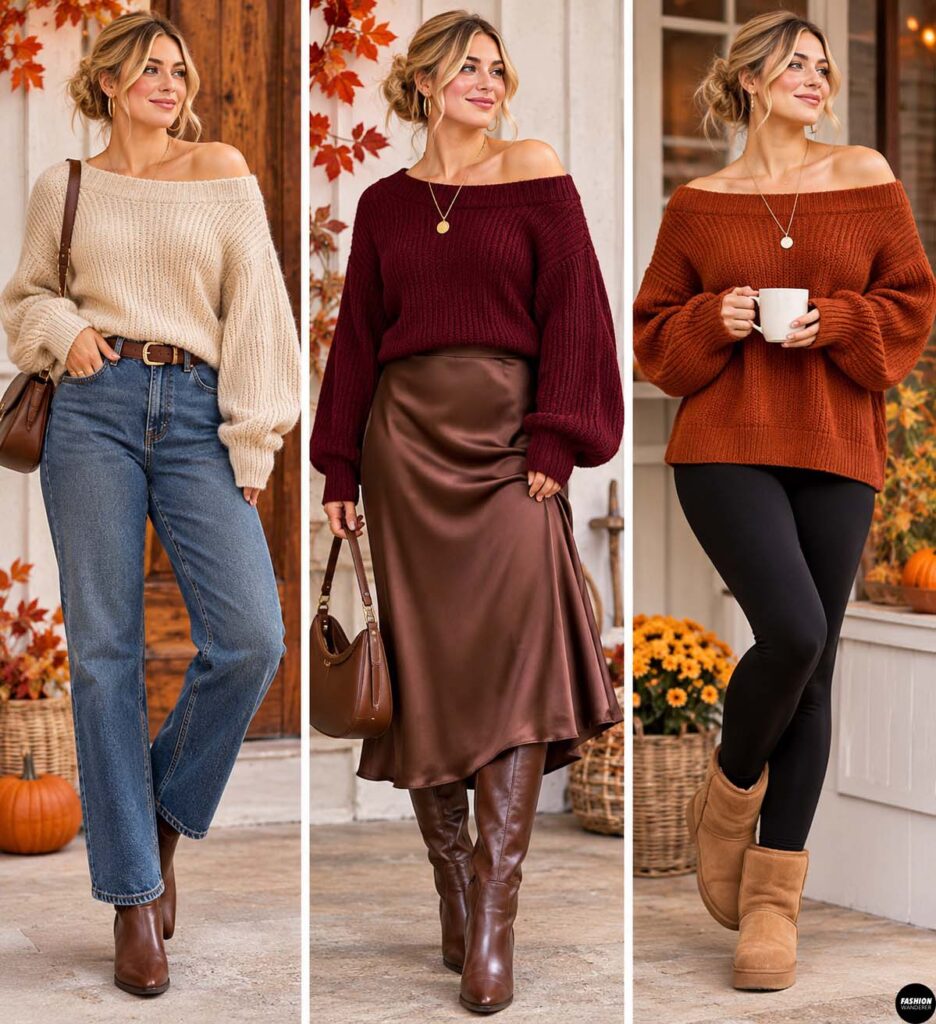
Now comes the fun part—styling your upcycled sweater.
For a casual Thanksgiving dinner, pair your off-shoulder top with high-waisted jeans, ankle boots, and gold hoop earrings.
For a dressier Friendsgiving celebration, style it with a satin midi skirt and knee-high boots.
You can also create a cozy minimalist outfit with black leggings, suede boots, and a simple pendant necklace.
A cream or oatmeal sweater looks especially pretty with chocolate-brown accessories, while burgundy and rust sweaters add beautiful seasonal color.
For a relaxed, effortless finish, let the neckline fall naturally over one shoulder.
Tips for a Professional-Looking Sweater Upcycle
Use stretch-friendly stitches. Knit fabric needs seams that move without popping.
Cut conservatively. Always test the neckline before removing additional fabric.
Keep the original hem. Preserving factory-finished details saves time and creates a cleaner result.
Avoid overstretching. Support the knit fabric while sewing to prevent wavy edges.
Choose the right sweater. Stable, medium-weight sweater knits are easier to alter than loose hand-knitted fabrics.
Final Thoughts
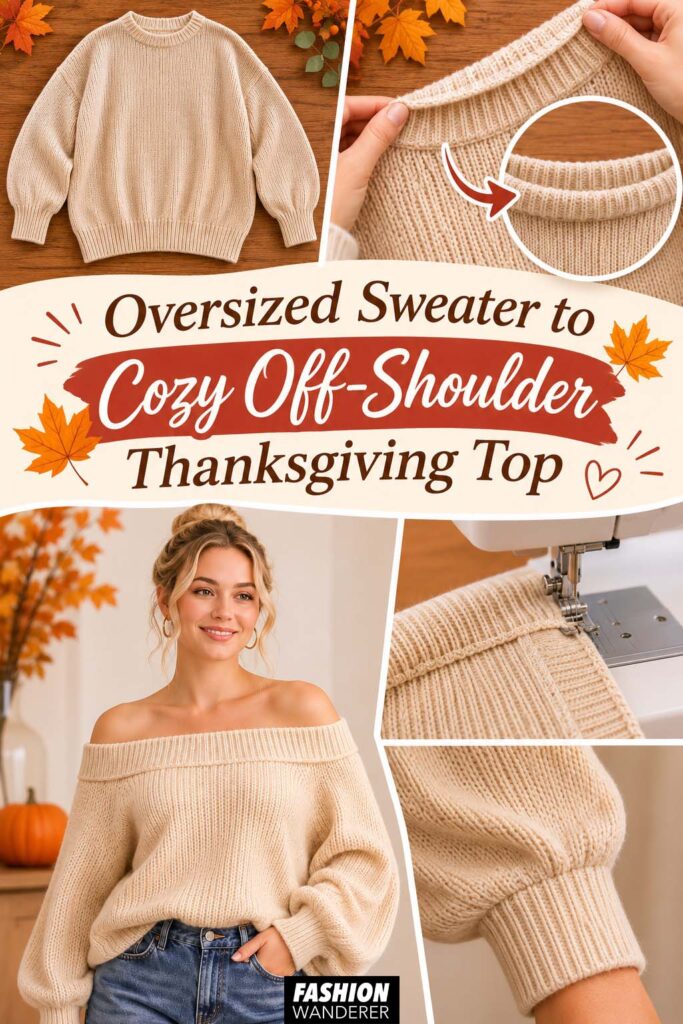
Turning an oversized sweater into a cozy off-shoulder Thanksgiving top is an affordable way to create a stylish fall outfit without purchasing new clothing.
With a carefully shaped neckline, stretch-friendly stitching, and a few simple adjustments, you can transform an ordinary sweater into a comfortable, flattering piece for Thanksgiving dinner and beyond.
This beginner-friendly DIY sweater upcycle is also a great introduction to refashioning knit garments.
So before donating that oversized sweater sitting in your closet, give it a second chance. A few simple sewing techniques might turn it into your new favorite fall top!