
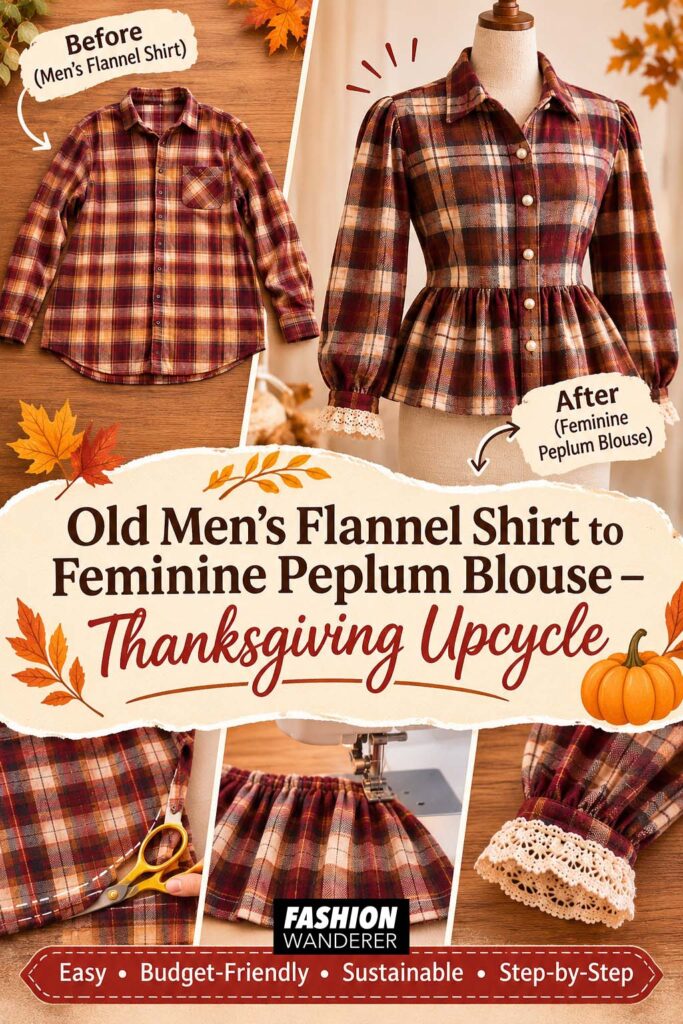
Thanksgiving is the perfect time to get creative with cozy fall upcycled fashion, because you don’t need to buy a new outfit to look stylish! If you have an oversized men’s flannel shirt hiding in your closet, you can transform it into an adorable feminine peplum blouse with just a few simple sewing techniques.
This beginner-friendly flannel shirt upcycle turns an ordinary button-down into a flattering top featuring a gathered peplum waist, comfortable relaxed fit, and charming rustic style.
The best part? You can reuse the original buttons, collar, sleeves, and shirt details, making this an affordable and sustainable DIY clothing project.
Whether you’re planning a casual Thanksgiving dinner outfit, heading to a pumpkin patch, or looking for a cute fall layering piece, this DIY peplum blouse from an old men’s shirt is a great addition to your handmade wardrobe.
Why You’ll Love This Thanksgiving Flannel Upcycle
- Budget-friendly: Transform a thrifted or unwanted men’s flannel shirt.
- Beginner-friendly: Uses basic cutting, gathering, and straight stitching.
- Sustainable fashion: Give an old shirt a stylish second life.
- Perfect for fall: Cozy plaid fabric creates a classic autumn look.
- Customizable: Make your peplum short, long, subtle, or extra gathered.
Skill Level: Confident beginner
Estimated Time: 1.5–3 hours
Seam Allowance: ½ inch unless otherwise specified
Materials You’ll Need
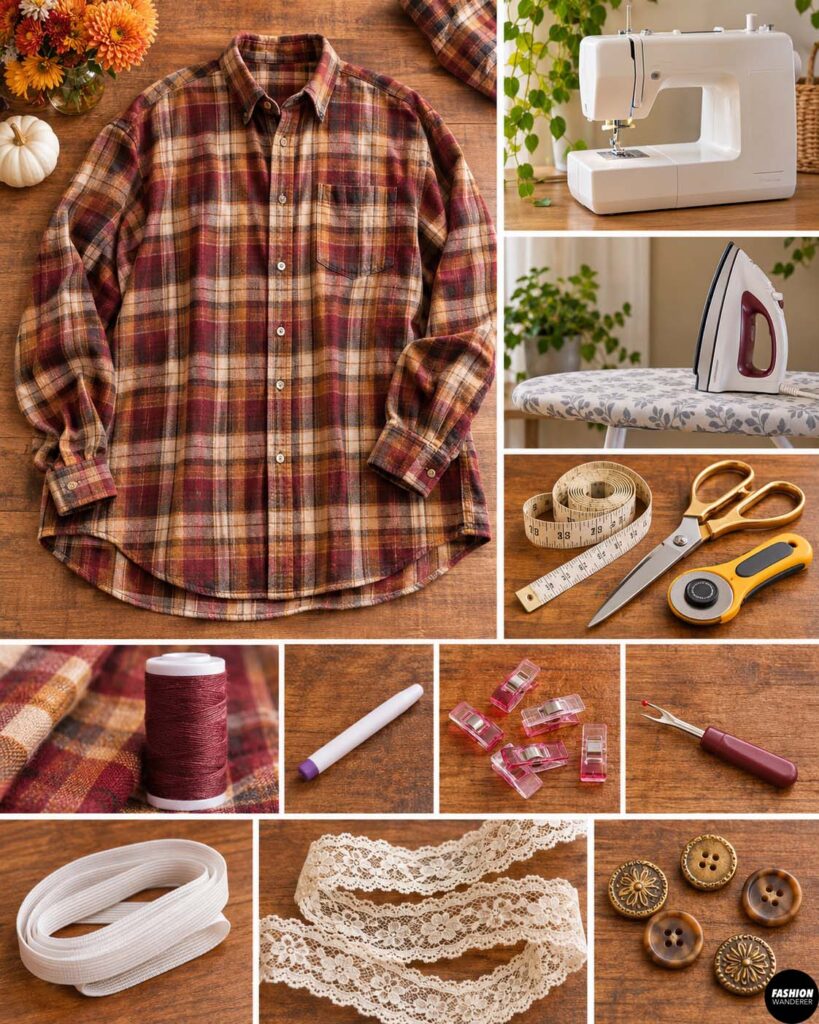
Gather these supplies before starting your DIY flannel blouse:
- 1 oversized men’s flannel button-down shirt (preferably 2–3 sizes larger than your usual size)
- Matching polyester thread
- Sewing machine
- Fabric scissors or rotary cutter
- Measuring tape
- Fabric chalk or washable marker
- Sewing pins or clips
- Seam ripper
- Iron and ironing board
- Optional ¼-inch elastic
- Optional lace trim or decorative buttons
Fabric Tip: Choose a soft cotton flannel with enough length and width to create both the blouse bodice and gathered peplum. A large plaid shirt works beautifully for Thanksgiving-inspired outfits.
Upcycle Old Flannel Shirt into Peplum Blouse
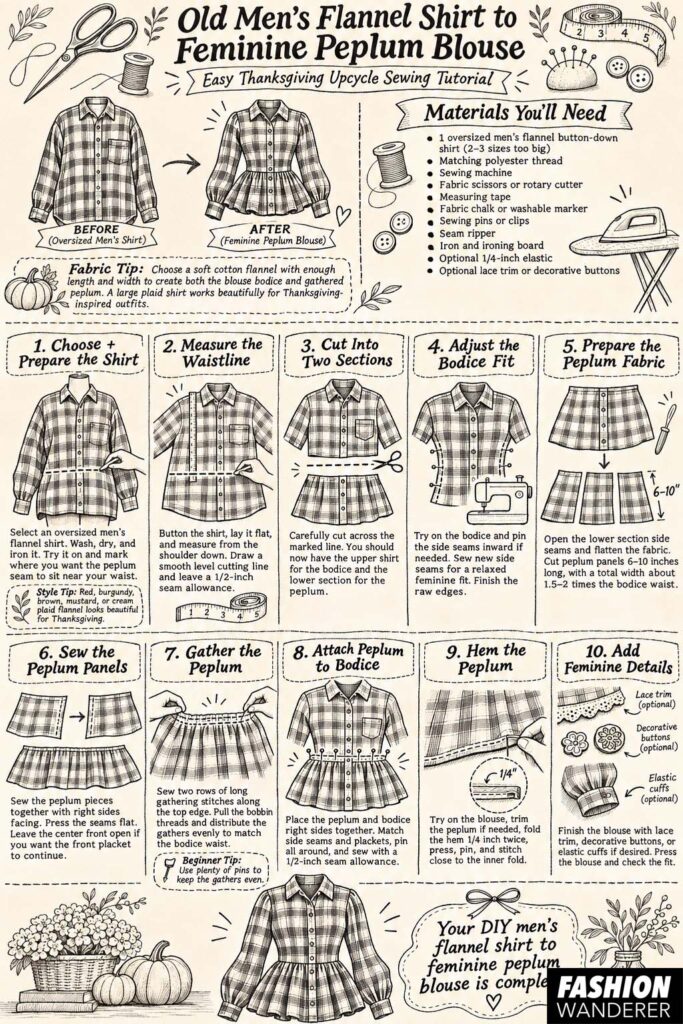
Step 1: Choose and Prepare Your Flannel Shirt
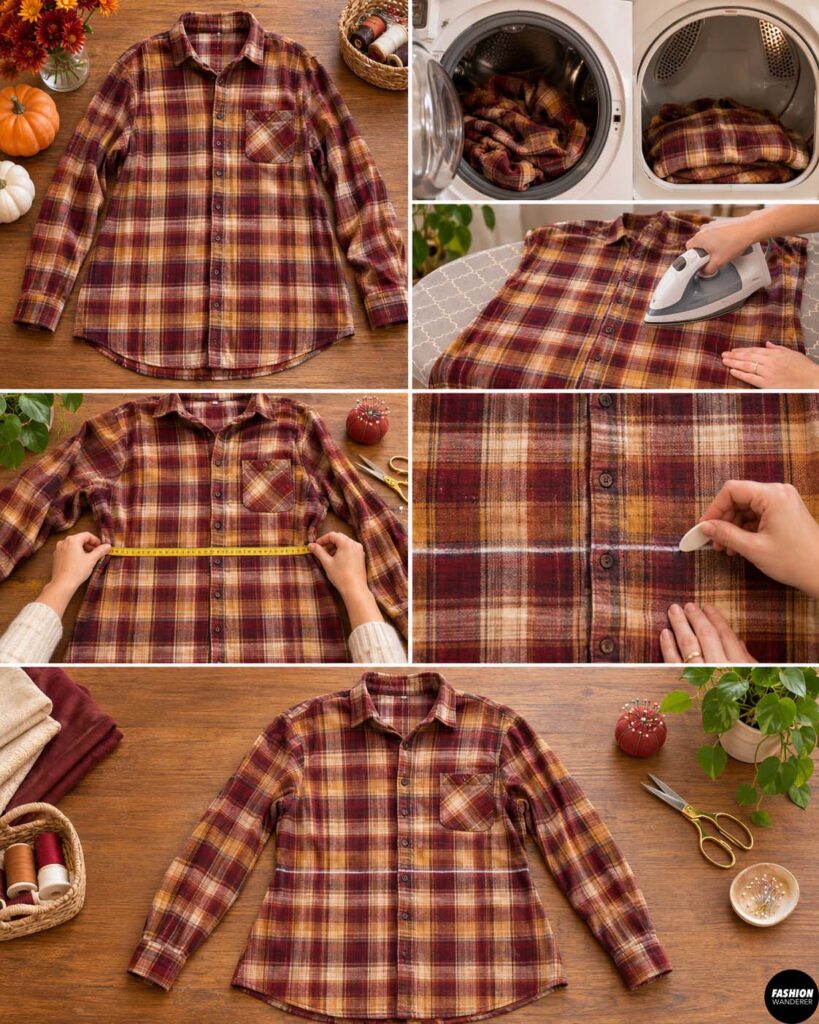
Start by selecting an oversized men’s flannel shirt.
Look for a shirt with a comfortable neckline, intact buttons, and enough extra fabric around the waist.
Wash and dry the shirt before cutting to prevent unexpected shrinkage later.
Iron it flat, paying special attention to the side seams, button placket, and lower hem.
Try the shirt on and decide where you want the peplum seam to sit.
For a feminine silhouette, position the seam near your natural waist or approximately 1–2 inches above it.
Mark this point with fabric chalk.
Style Tip: Red, burgundy, brown, mustard, or cream plaid flannel creates a beautiful Thanksgiving color palette.
Step 2: Measure and Mark the Waistline
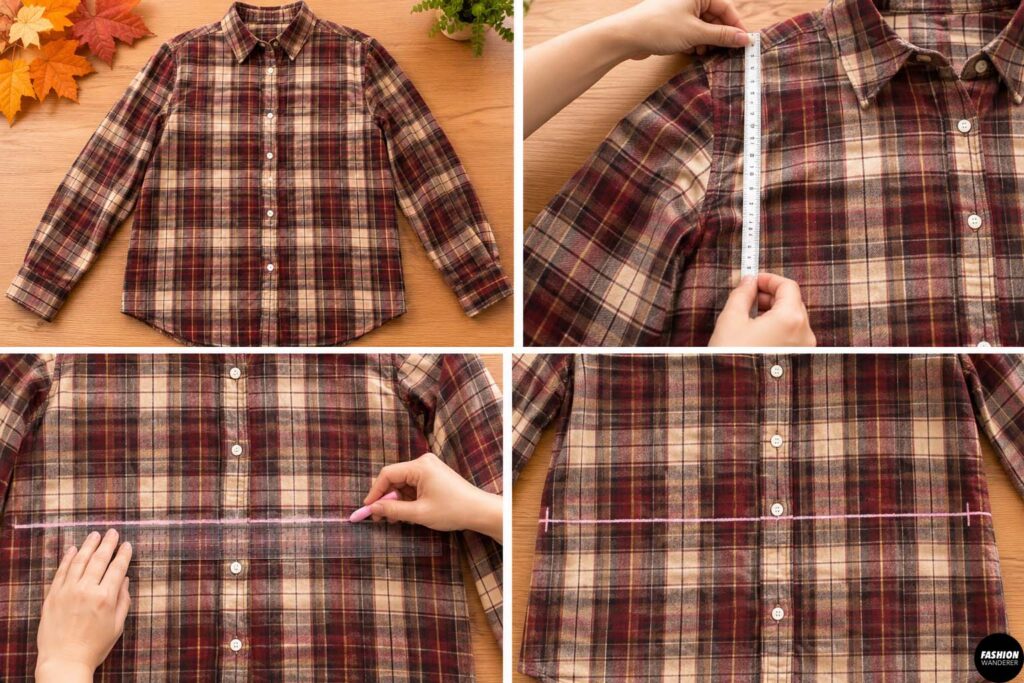
Button the shirt and lay it flat on your worktable.
Measure from the shoulder seam down to your desired peplum seam.
Mark the measurement on both side seams and across the front and back.
Use a ruler to draw a smooth, level cutting line.
Remember that you’ll need a ½-inch seam allowance below this line on the bodice.
Try the shirt on once more to make sure the planned seam falls comfortably.
A slightly raised waistline creates a flattering babydoll-inspired silhouette, while a natural waist gives a more fitted peplum appearance.
Step 3: Cut the Shirt Into Two Sections
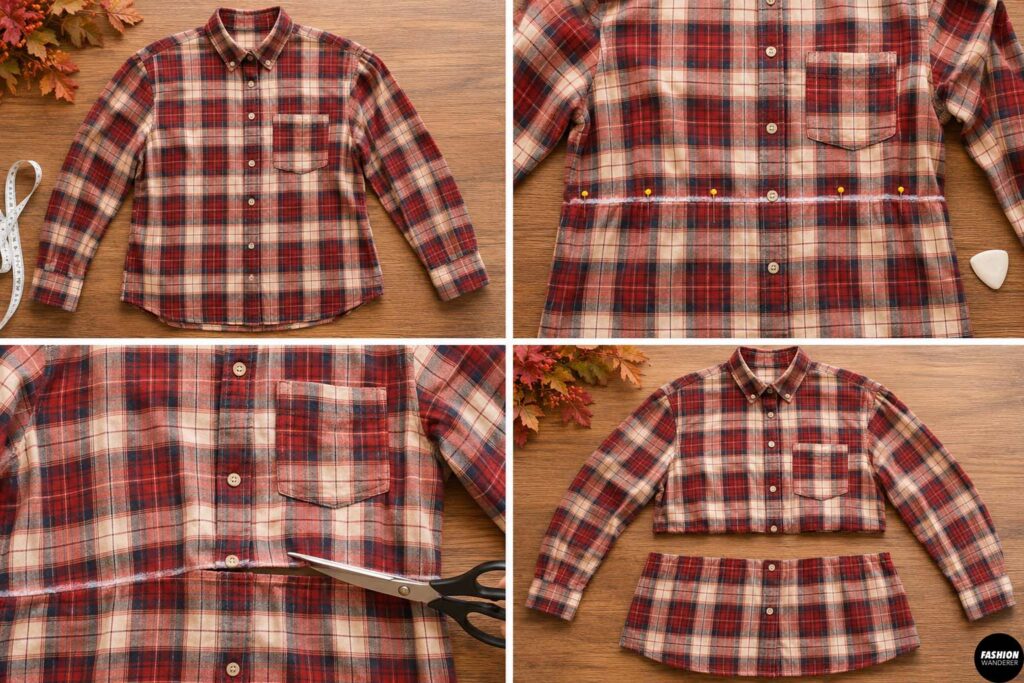
Lay the shirt flat with the front and back layers aligned.
Carefully cut across the marked waistline, making sure you’ve included the seam allowance.
You should now have two sections:
- The upper shirt, which becomes the blouse bodice.
- The lower shirt section, which supplies fabric for the peplum.
Set the lower section aside.
Keep the original collar, shoulder seams, button placket, and sleeves intact.
This saves time and gives your finished DIY blouse a professional shirt-style finish.
Step 4: Adjust the Bodice Fit
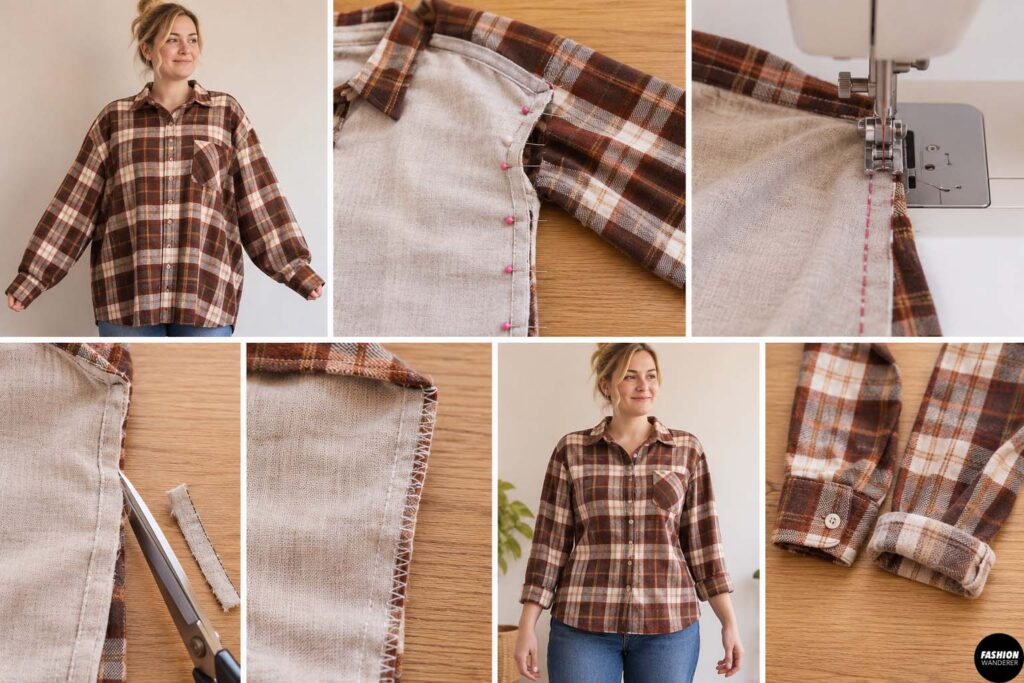
Turn the upper shirt inside out and try it on.
Pin the side seams slightly inward if the bodice feels excessively oversized.
For a comfortable relaxed fit, avoid making the waist too tight.
Remove the shirt and sew along the new side seam lines, blending the stitching gradually into the existing underarm seams.
Trim excess seam allowance if needed and finish the raw edges using a zigzag stitch or serger.
Try the bodice on again.
You should be able to move comfortably without pulling across the bust or shoulders.
If the sleeves feel too long, you can shorten them later or simply roll up the cuffs for a casual Thanksgiving look.
Step 5: Prepare the Peplum Fabric
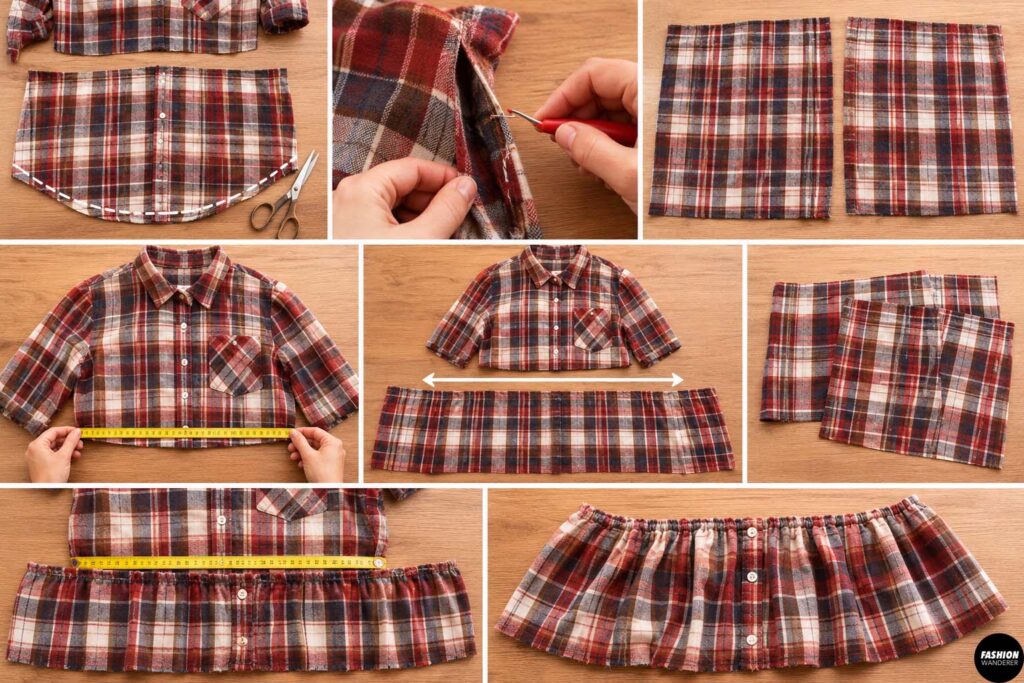
Take the lower flannel section and remove its original curved hem if necessary.
Open the side seams using a seam ripper.
Lay the fabric pieces flat.
Measure the finished lower edge of your bodice, including both front and back sections.
For a softly gathered peplum, aim for a total fabric width approximately 1.5–2 times the bodice waist measurement.
Cut peplum panels approximately 6–10 inches long, including seam and hem allowances.
If the lower shirt section doesn’t provide enough fabric, combine matching scraps from the shirt or add coordinating fabric.
Keep the original center-front button placket aligned if you want the blouse to button all the way down.
Step 6: Sew the Peplum Panels Together
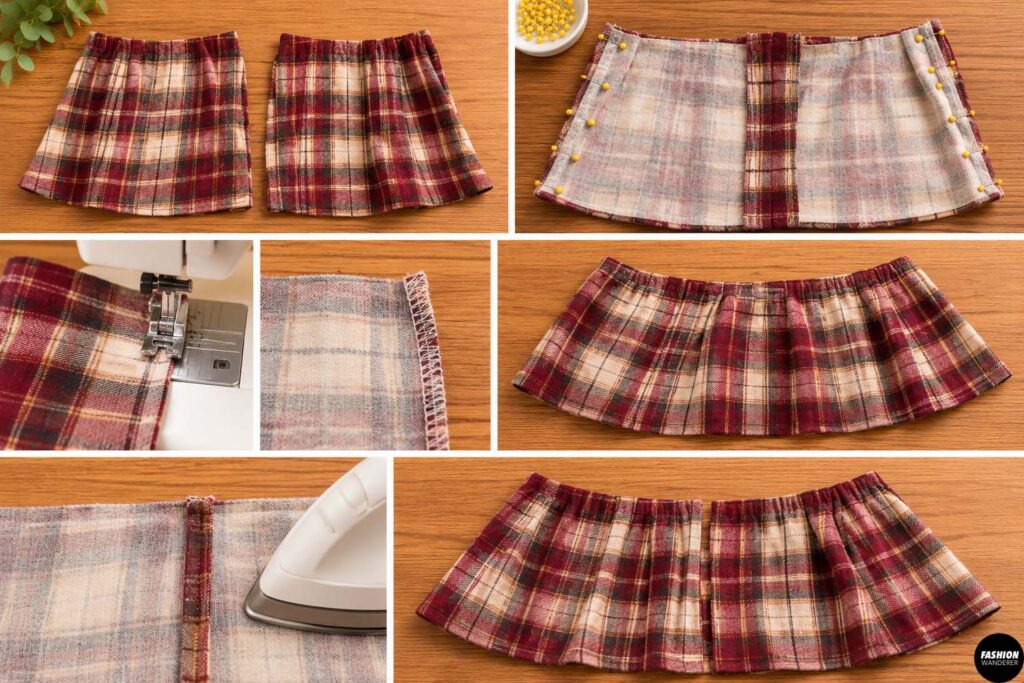
Arrange the peplum pieces with right sides facing.
Pin and sew the side seams using a ½-inch seam allowance.
Finish the raw edges.
If you’re preserving the original front button placket, leave the peplum open at the center front.
Make sure the button and buttonhole sides will align with the bodice above.
Press the seams flat.
Your peplum should now form a wide, gently flared lower section ready for gathering.
Step 7: Gather the Peplum Waist
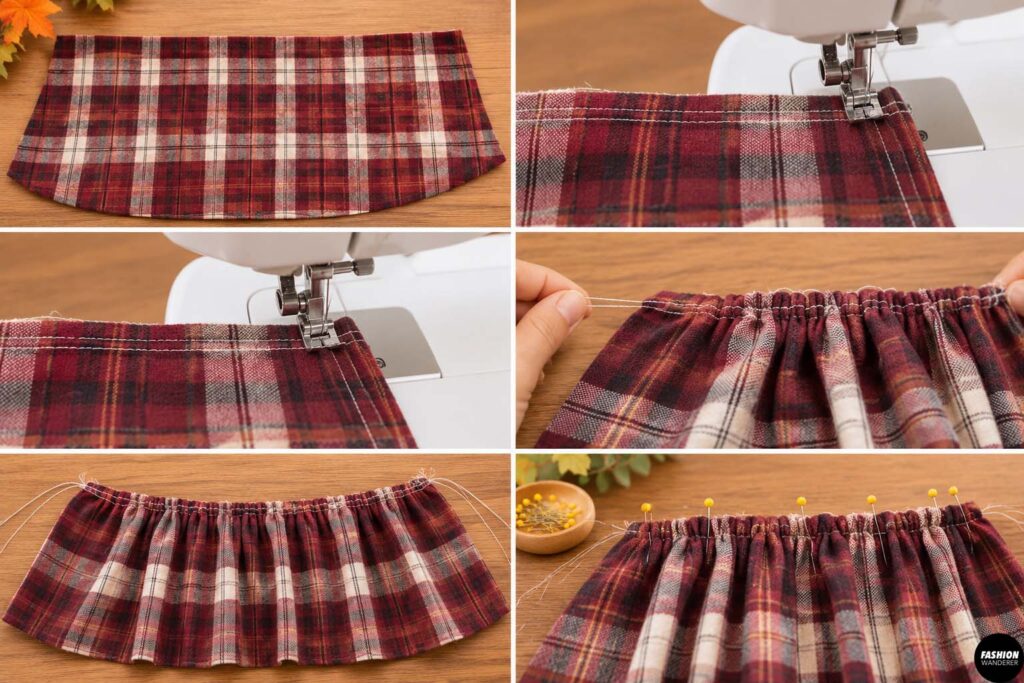
Set your sewing machine to its longest straight stitch.
Sew one gathering row approximately ¼ inch from the top raw edge of the peplum.
Sew a second row approximately ⅜ inch from the edge.
Leave long thread tails at both ends.
Gently pull the bobbin threads to create gathers.
Distribute the fullness evenly around the peplum.
The gathered upper edge should match the length of the bodice’s lower edge.
Avoid gathering directly over bulky seams or button plackets.
Beginner Tip: Use plenty of pins to distribute the gathers evenly before stitching the two sections together.
Step 8: Attach the Peplum to the Bodice
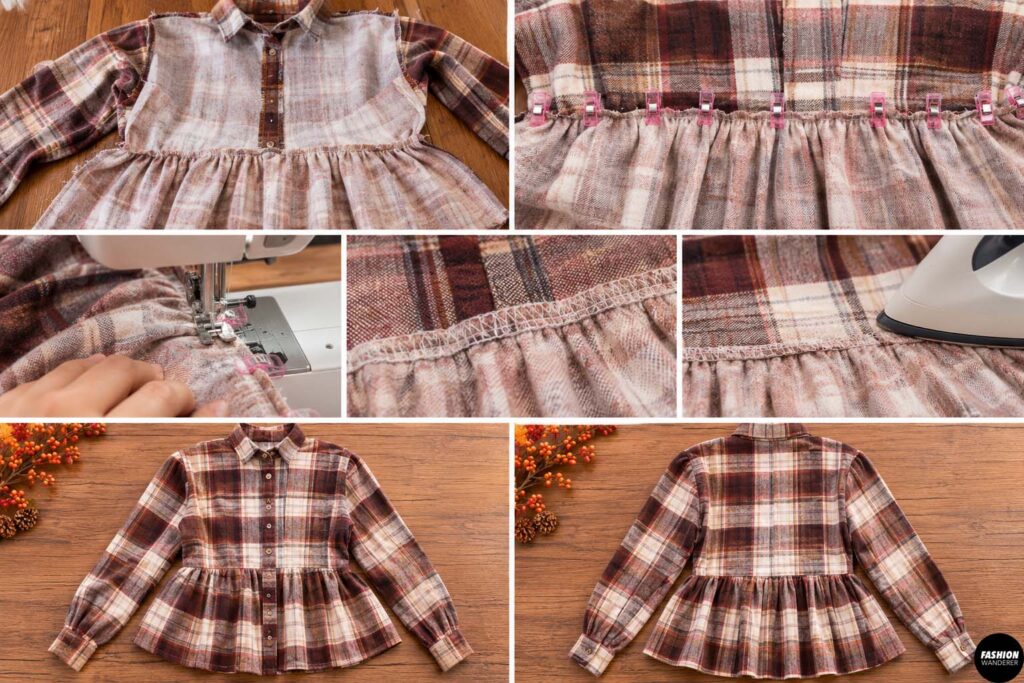
Turn the bodice inside out.
Place the peplum inside the bodice with right sides together and raw waist edges aligned.
Match the side seams and center-back points.
If the blouse has a continuous front opening, carefully align both button plackets.
Pin or clip around the waist.
Sew using a ½-inch seam allowance, stitching between the gathering rows where practical.
Remove visible gathering stitches below the seam.
Finish the raw edges with a zigzag stitch or serger.
Press the seam allowance upward toward the bodice.
Turn the blouse right side out.
Your feminine peplum silhouette is beginning to take shape!
Step 9: Hem the Peplum
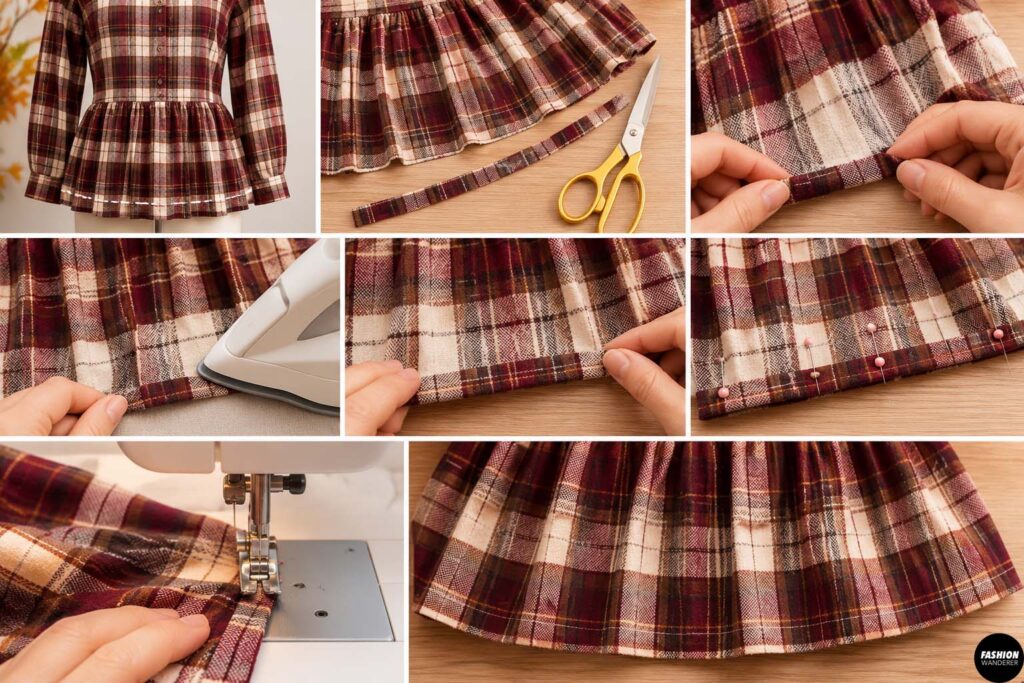
Try on your blouse and check the peplum length.
Trim the hem evenly if necessary.
Fold the lower raw edge toward the wrong side by ¼ inch and press.
Fold another ¼ inch and press again.
Pin the folded hem in place.
Sew close to the inner folded edge using a straight stitch.
For curved areas, work slowly and avoid stretching the flannel.
Press the completed hem carefully for a neat, polished finish.
Step 10: Add Feminine Finishing Details
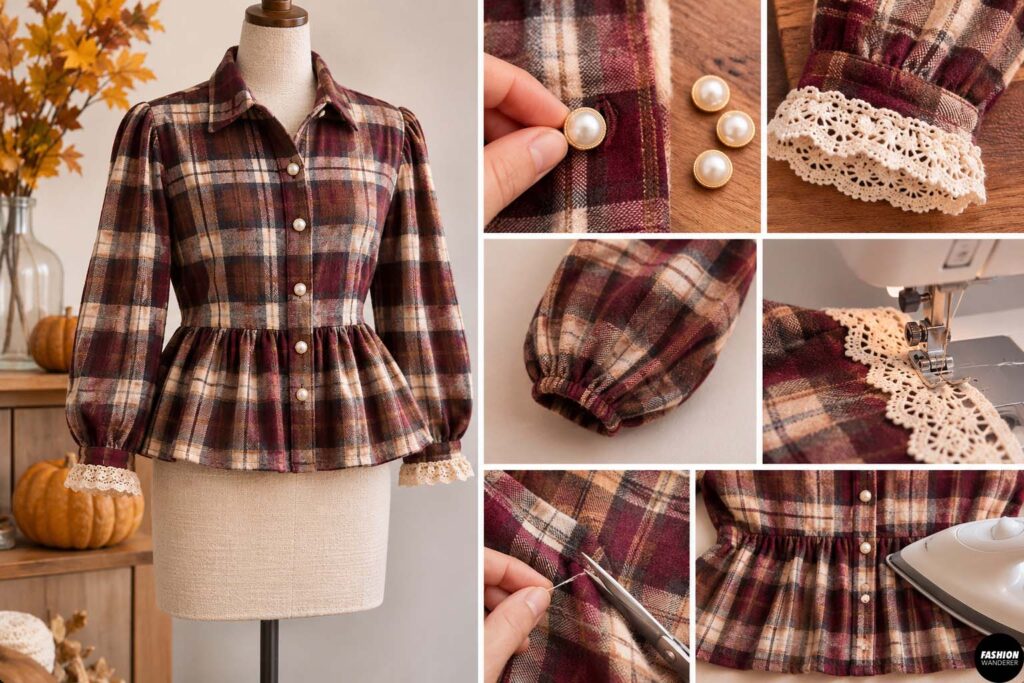
Now it’s time to make your upcycled flannel blouse feel extra special.
Consider adding delicate lace trim along the sleeve cuffs or replacing the original buttons with small pearl-style buttons.
You could also shorten the sleeves to create a puff-sleeve effect or add a narrow elastic casing at each cuff.
For an especially romantic appearance, use a subtle gathered peplum with slightly bloused sleeves.
Trim loose threads and give the entire blouse a final press.
Check that the front buttons close smoothly and that the waist seam feels comfortable.
Your DIY men’s flannel shirt to feminine peplum blouse is complete!
How to Style Your DIY Peplum Blouse for Thanksgiving
This handmade blouse pairs beautifully with classic autumn wardrobe pieces.
For a casual Thanksgiving dinner, wear it with dark skinny jeans, ankle boots, and simple gold jewelry.
For a more feminine outfit, combine your peplum blouse with a fitted denim skirt, tights, and knee-high boots.
You can even layer it under a cropped cardigan for extra warmth.
Choose a rust, burgundy, cream, or olive plaid to complement cozy Thanksgiving accessories.
Final Thoughts
Turning an old men’s flannel shirt into a feminine peplum blouse is a creative way to refresh your fall wardrobe without spending much money.
With a few simple cuts, gathering stitches, and a neatly finished hem, you can transform a basic oversized button-down into a flattering handmade Thanksgiving outfit.
This easy sewing upcycle project is perfect for beginners looking to practice garment alterations while exploring sustainable DIY fashion.
Before throwing away another old flannel shirt, imagine what it could become!