
Handmade fall décor does not have to be complicated. If you can knit a simple rectangle, you can make adorable DIY knitted pumpkins for Thanksgiving decorations in an afternoon.
These soft pumpkins are perfect for decorating a Thanksgiving table, mantel, entryway, bookshelf, coffee table, or fall centerpiece. They also make cute handmade hostess gifts and are a great way to use leftover yarn from other knitting projects.
The best part? You do not need advanced knitting skills. This beginner-friendly knitted pumpkin tutorial uses basic stitches and simple shaping to create a cozy farmhouse-style pumpkin that looks much more complicated than it actually is.
Materials You’ll Need
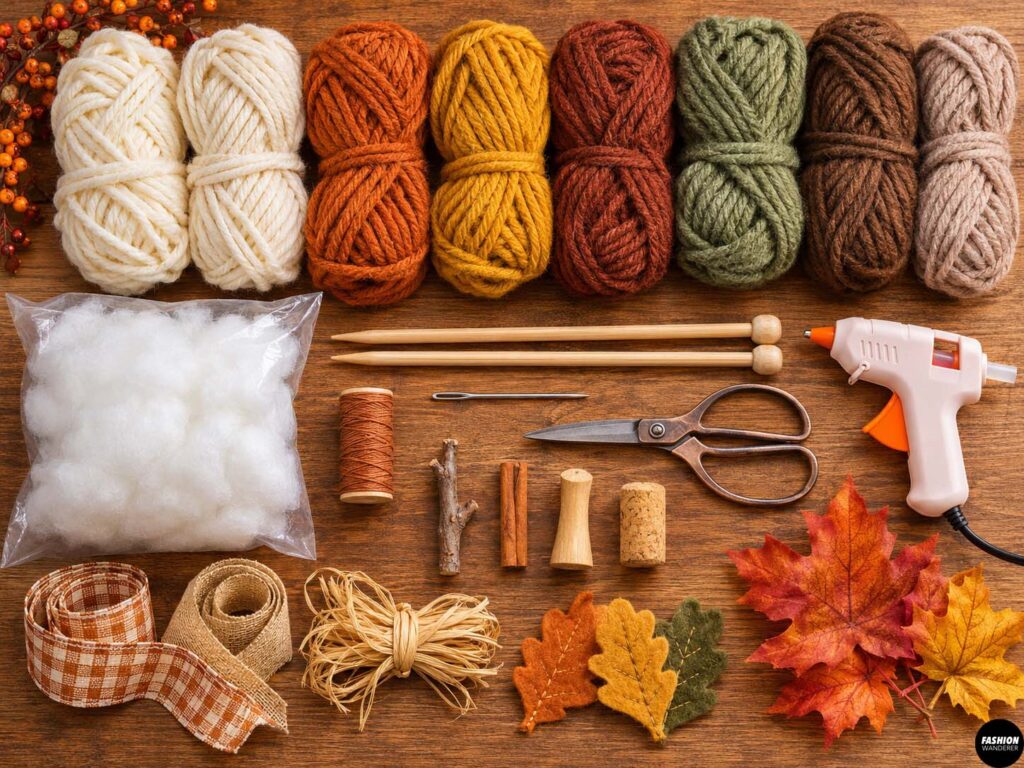
To make one knitted pumpkin, gather:
- Medium or bulky weight yarn
- Knitting needles recommended for your yarn
- Yarn needle or tapestry needle
- Scissors
- Polyester fiberfill
- Strong matching yarn or embroidery thread
- Small twig, cinnamon stick, wooden stem, or cork
- Optional hot glue gun
- Optional ribbon, raffia, faux leaves, or felt leaves
For chunky pumpkins, bulky or super bulky yarn creates a beautiful textured finish. Cream, ivory, burnt orange, mustard, rust, sage green, brown, and dusty beige are especially pretty for Thanksgiving décor.
You can also combine several colors to create a collection of pumpkins in different sizes.
Recommended Knitting Stitch
A simple ribbed stitch works especially well because it creates natural vertical lines that resemble pumpkin sections.
For an easy ribbed texture, repeat:
Knit 1, purl 1
across every row.
You can also use garter stitch by knitting every row if you want an even easier project.
Finished Pumpkin Size
Your finished size depends on the width and length of your knitted rectangle.
For a medium pumpkin, aim for approximately:
- 8 to 10 inches wide
- 12 to 15 inches long
A smaller rectangle creates a mini pumpkin, while a wider and longer rectangle creates a large decorative pumpkin.
The rectangle should usually be longer than it is wide.
DIY Knit Pumpkins Pattern
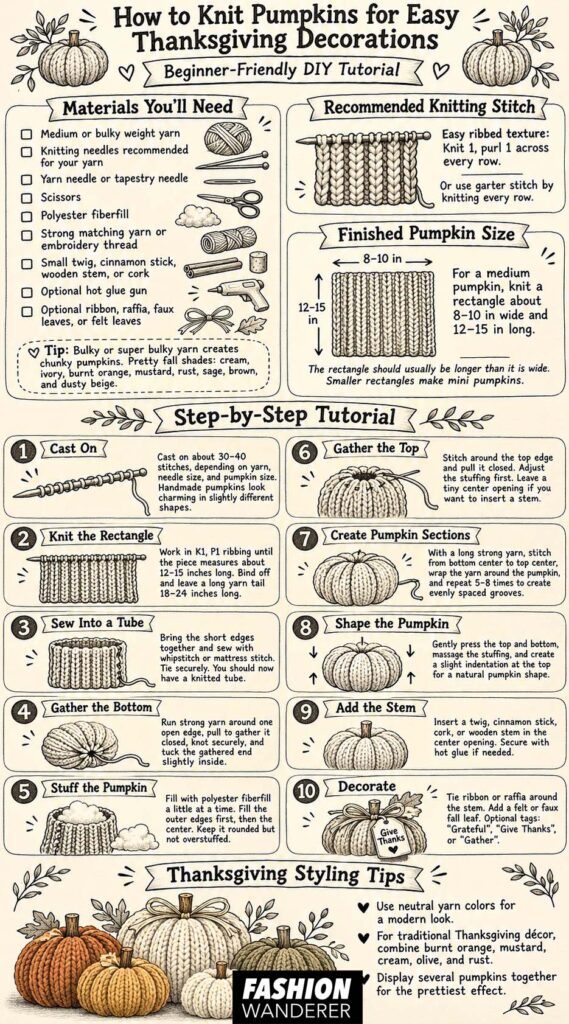
Step 1: Cast On Your Stitches
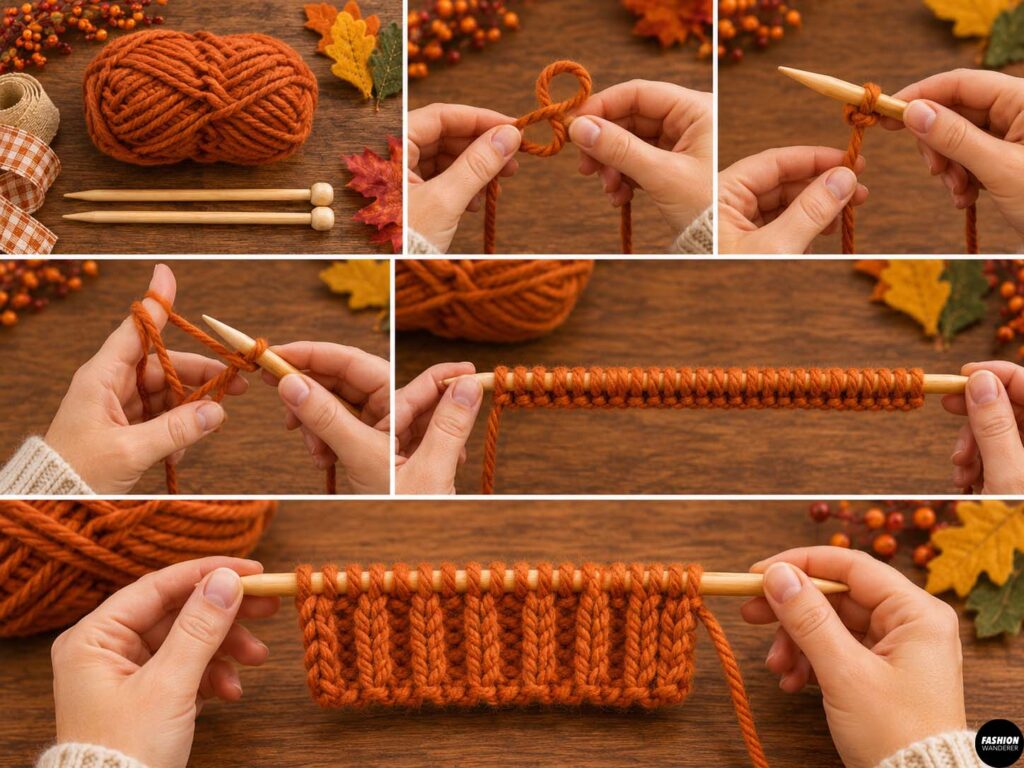
Begin by casting approximately 30 to 40 stitches onto your knitting needles.
The exact number depends on your yarn thickness, needle size, and desired pumpkin size.
For bulky yarn, you may need fewer stitches. For medium-weight yarn, you may need more.
Do not worry too much about exact measurements. Handmade pumpkins look charming in slightly different shapes and sizes.
Step 2: Knit the Pumpkin Rectangle
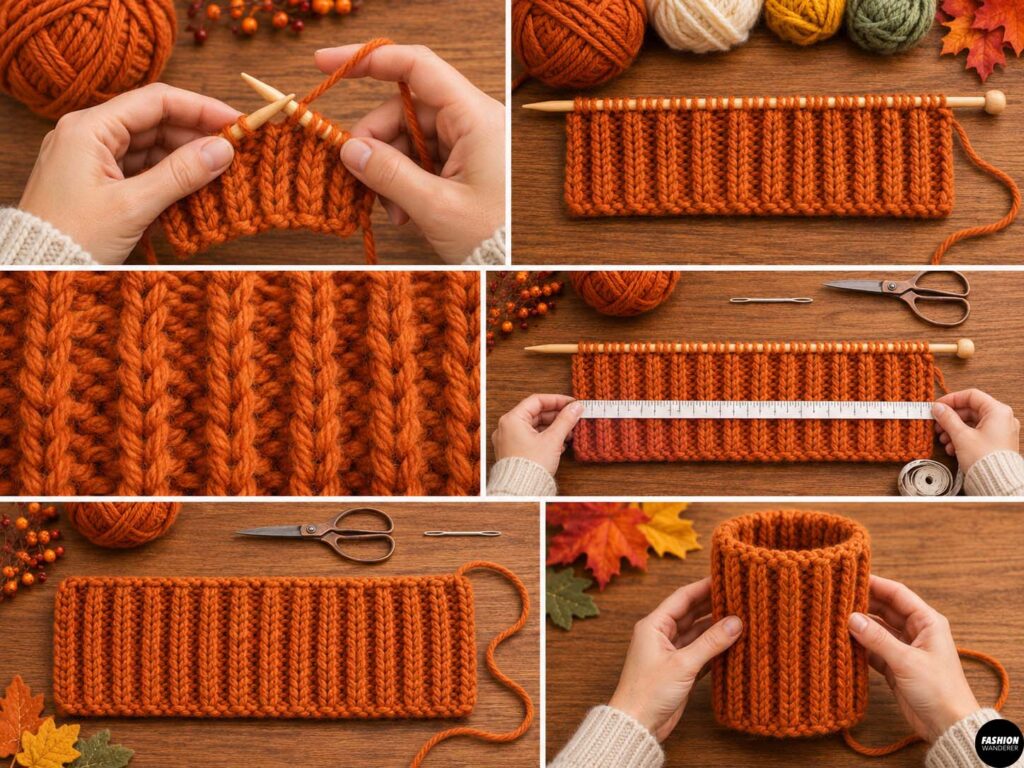
Work in knit-one, purl-one ribbing across the first row.
Continue repeating the ribbed stitch pattern for every row.
Keep knitting until the rectangle measures approximately 12 to 15 inches long.
Check the proportions occasionally.
When the rectangle is wrapped into a tube, it should look slightly taller than you want your finished pumpkin to be because the pumpkin will become shorter once it is stuffed and shaped.
Bind off your stitches, leaving a long yarn tail approximately 18 to 24 inches long.
Step 3: Sew the Rectangle Into a Tube
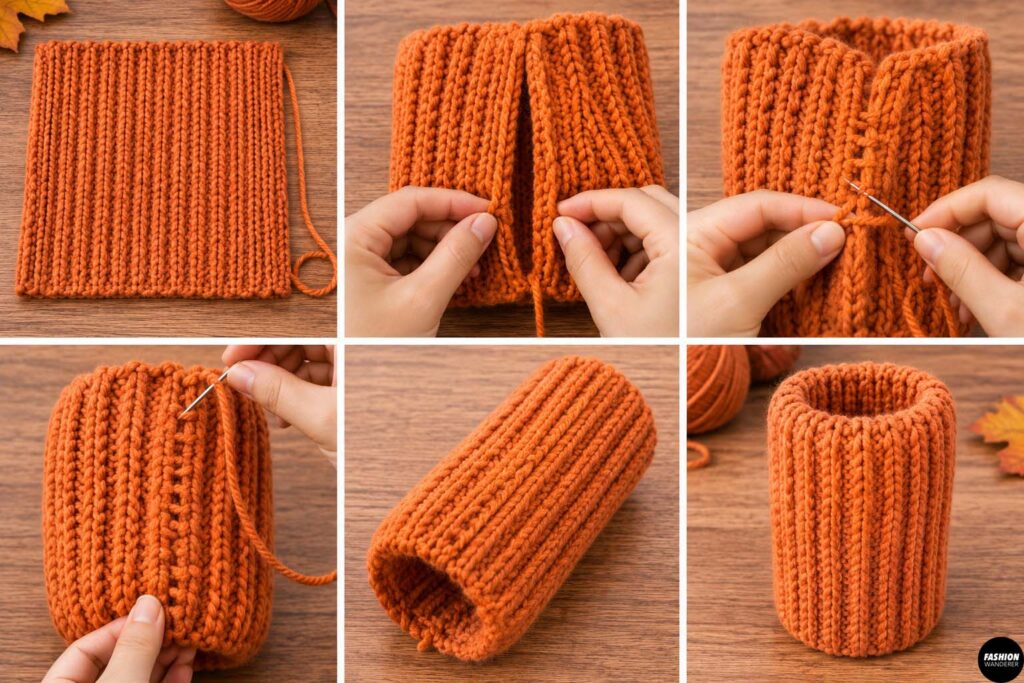
Place the knitted rectangle flat with the short edges facing each other.
Thread the long yarn tail through a tapestry needle.
Bring the two short edges together and sew them using a whipstitch or mattress stitch.
Continue sewing until the rectangle forms a tube.
Pull the yarn snug enough to close the seam but avoid stretching or puckering the knitted fabric.
Tie a secure knot.
You should now have a knitted cylinder with an opening at the top and bottom.
Step 4: Gather the Bottom of the Pumpkin
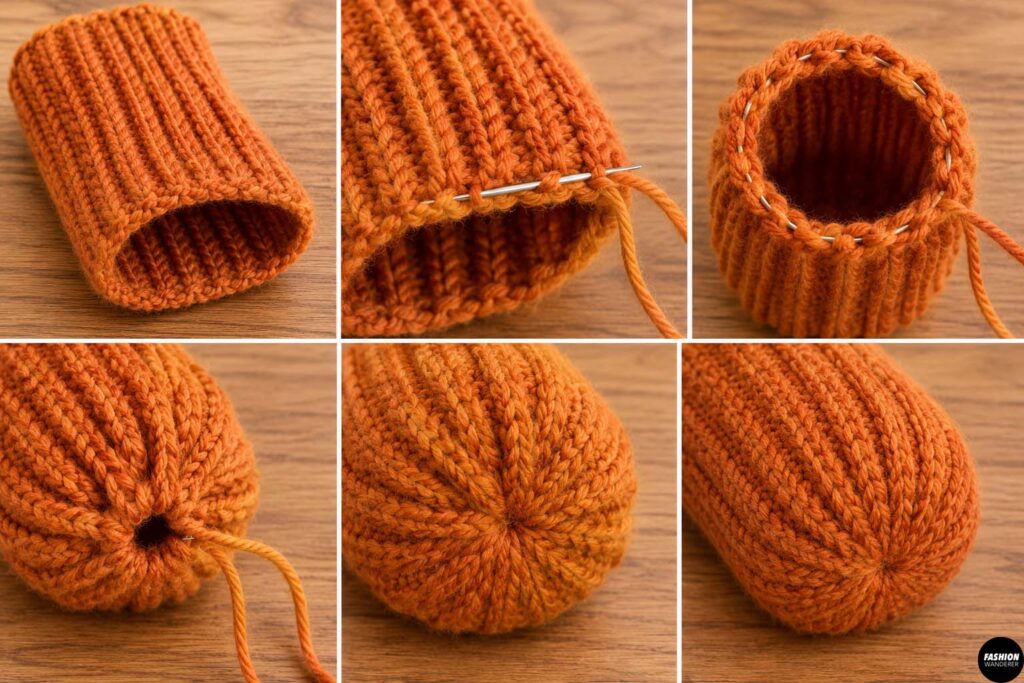
Thread another long piece of strong yarn through your tapestry needle.
Run the needle through the stitches around one open edge of the tube.
Work approximately ¼ to ½ inch from the edge.
Continue stitching around the entire opening.
Once you reach the starting point, gently pull both ends of the yarn.
The opening will begin gathering closed.
Pull firmly until the bottom is completely closed.
Tie several strong knots.
Push the gathered section slightly inside the pumpkin so the knot is hidden.
Step 5: Stuff the Knitted Pumpkin
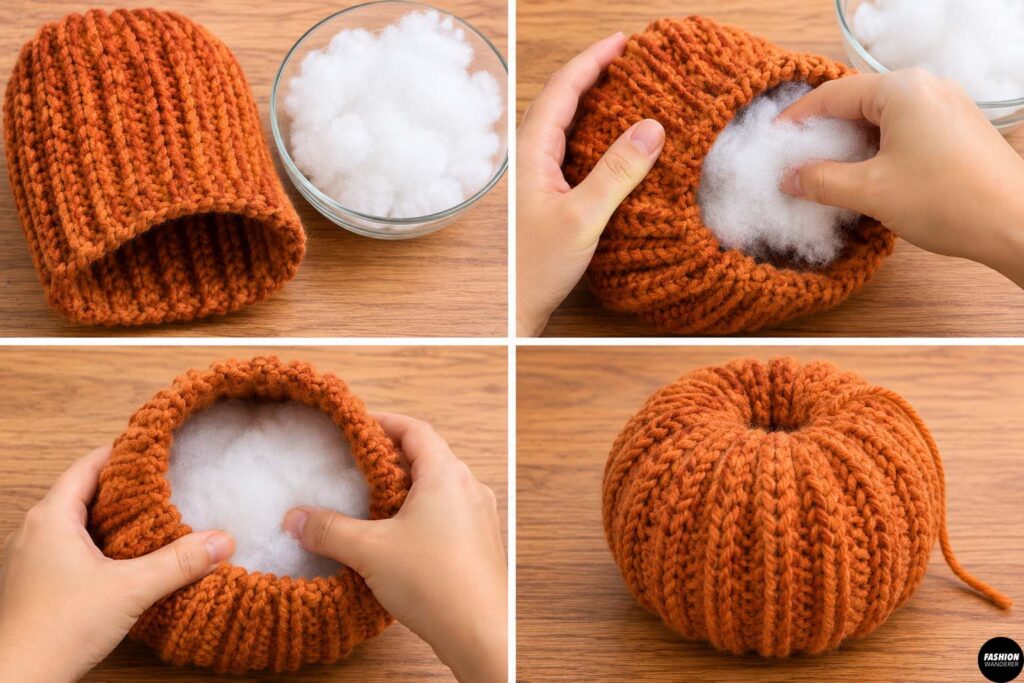
Turn the pumpkin right side out if necessary.
Begin filling the pumpkin with polyester fiberfill.
Add small amounts gradually rather than pushing in one large handful.
Fill the outer edges first and continue adding stuffing toward the center.
For a soft rounded pumpkin, keep the filling slightly loose.
For a plumper pumpkin, add more fiberfill.
Avoid overstuffing because you still need to gather the top closed.
Step 6: Gather the Top Opening
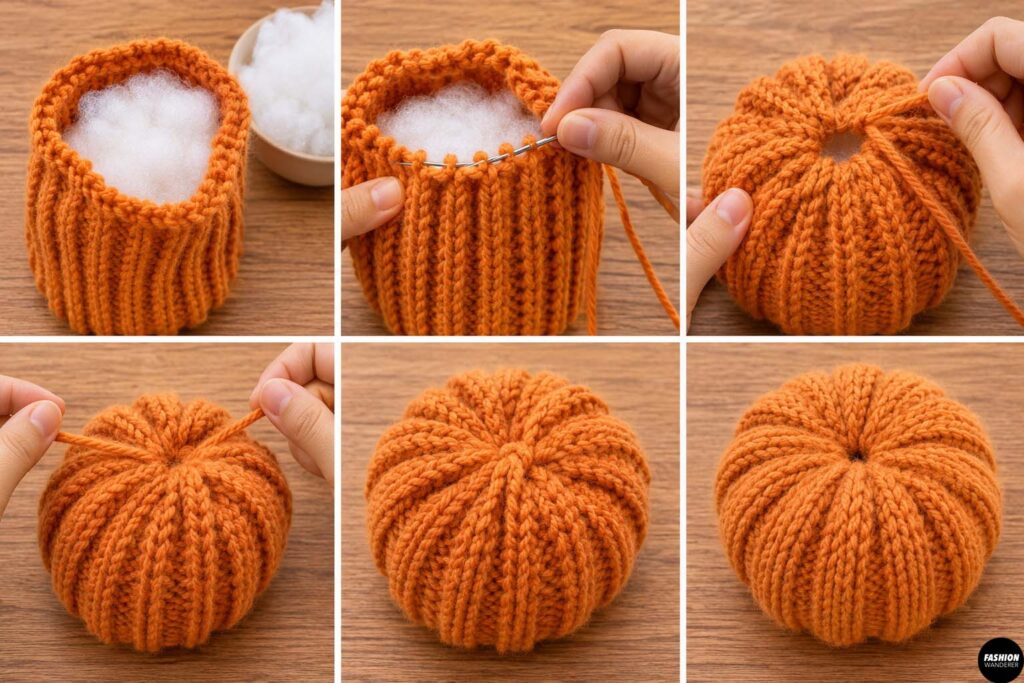
Thread another long piece of yarn through your tapestry needle.
Sew around the upper edge exactly as you did for the bottom.
Pull the yarn carefully until the opening closes.
Before tightening completely, adjust the stuffing and make sure the pumpkin has an even rounded shape.
Finish pulling the yarn tightly and tie several secure knots.
Leave a tiny opening in the center if you plan to insert a twig or cinnamon-stick stem.
Step 7: Create the Pumpkin Sections
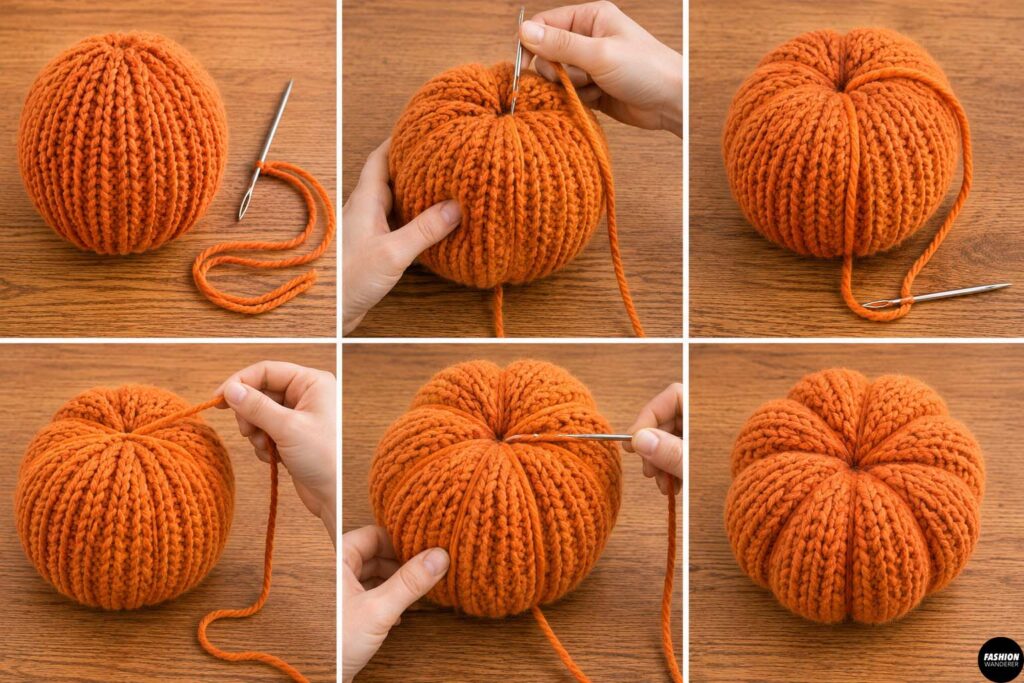
This step gives your knitted pumpkin its classic segmented shape.
Thread a very long piece of strong yarn through your tapestry needle.
Insert the needle through the center bottom of the pumpkin and bring it out through the center top.
Pull the yarn firmly.
Wrap the yarn around the outside of the pumpkin and insert the needle back through the bottom.
Bring it through the center again.
Pull gently until the yarn presses into the pumpkin and creates a groove.
Repeat around the pumpkin.
Create approximately five to eight sections depending on the look you want.
Space the grooves evenly.
Avoid pulling too tightly or the pumpkin may become distorted.
Step 8: Shape the Pumpkin
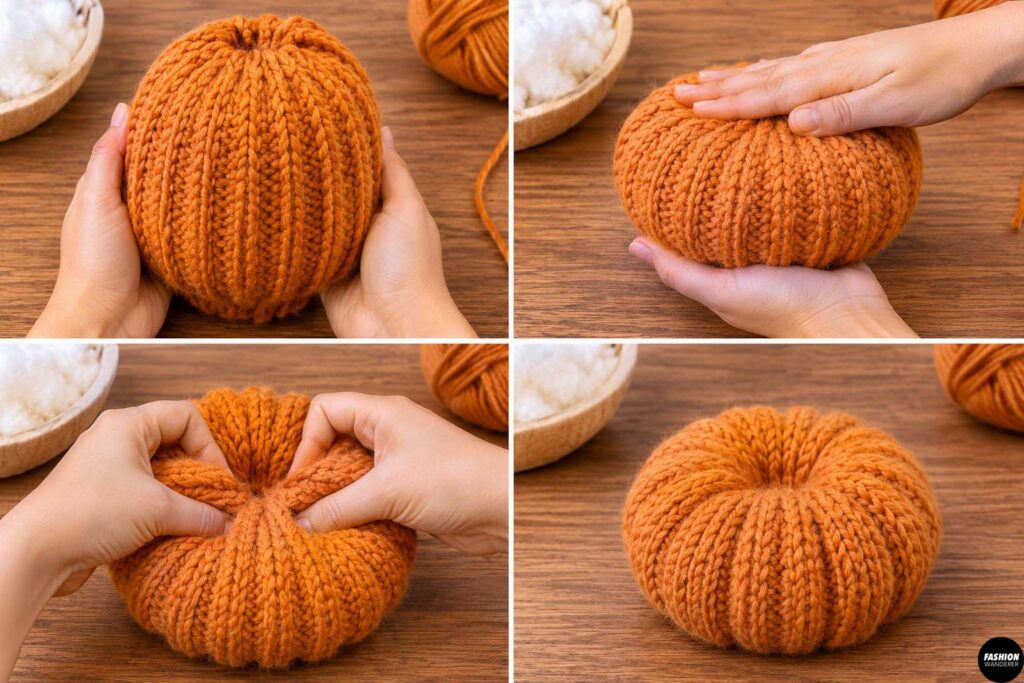
Gently press down on the top of the pumpkin while supporting the bottom.
This creates a shorter, wider pumpkin shape.
Massage and redistribute the stuffing until the pumpkin looks evenly rounded.
You can also push the center slightly downward to create the natural indentation where a pumpkin stem would sit.
This little bit of shaping makes a huge difference in the finished appearance.
Step 9: Add the Pumpkin Stem
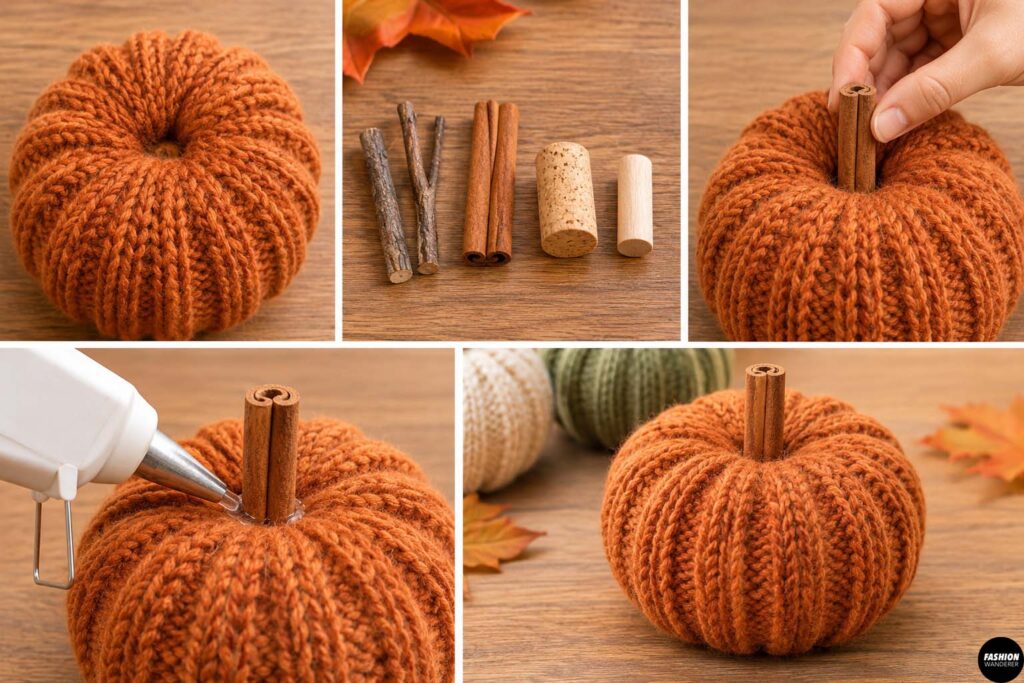
Insert a small twig, cinnamon stick, wine cork, or wooden stem into the center opening.
A real twig creates a rustic farmhouse look, while a cinnamon stick adds a warm seasonal detail.
Secure the stem with hot glue if needed.
Hold it in place until the glue sets completely.
Step 10: Add Thanksgiving Decorations
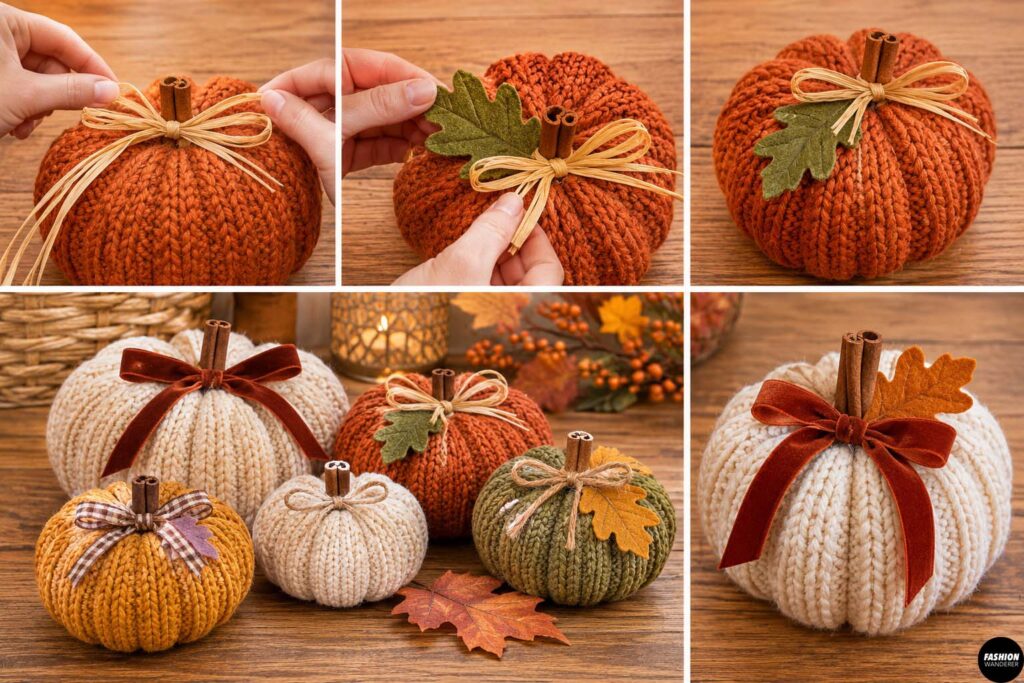
Your knitted pumpkin can stay simple, or you can dress it up with a few decorative details.
Tie raffia or velvet ribbon around the stem.
Add a small felt leaf or faux fall leaf.
You can also attach a tiny wooden tag with a Thanksgiving message such as “Grateful,” “Give Thanks,” or “Gather.”
For a modern look, keep the decorations minimal and use neutral yarn colors.
For traditional Thanksgiving décor, combine burnt orange, mustard, cream, olive, and rust.
Easy Ways to Display Knitted Pumpkins
Make several pumpkins in different sizes and arrange them together for a cozy fall centerpiece.
Try placing them:
- Around candles on a Thanksgiving table
- Inside a wooden dough bowl
- Along a fireplace mantel
- On bookshelves
- Inside woven baskets
- Around a fall wreath
- Beside pumpkins and pinecones
- On an entryway console table
Mixing knitted pumpkins with real mini pumpkins, dried leaves, eucalyptus, candles, and pinecones creates an easy layered Thanksgiving display.
Final Thoughts
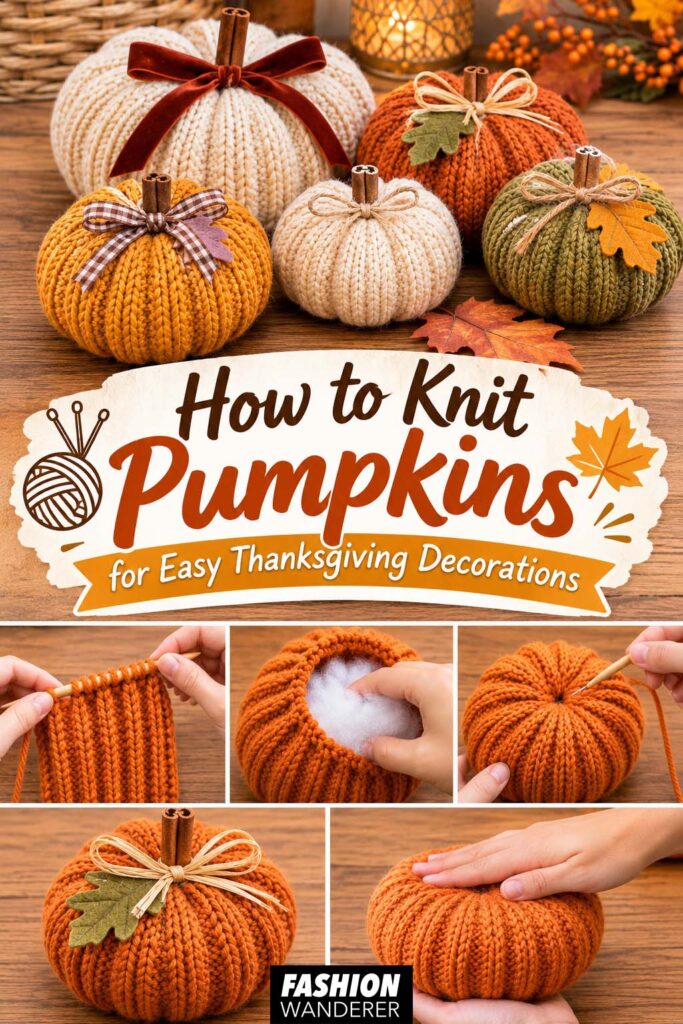
Learning how to knit pumpkins for easy Thanksgiving decorations is a great beginner knitting project because the construction is incredibly simple.
You are essentially knitting a rectangle, sewing it into a tube, stuffing it, and shaping it into a pumpkin.
Once you make one, you can easily create an entire collection in different colors and sizes.
Use chunky yarn for cozy oversized pumpkins, neutral yarn for modern farmhouse décor, or warm orange and rust shades for a traditional Thanksgiving look.
These handmade knitted pumpkins can be reused year after year, making them an inexpensive and charming addition to your fall decorating collection.