
Fast fashion might tempt us with new accessories every season, but the most stylish statement pieces are often the ones you make yourself. If you’ve got an old pair of tights tucked in your drawer—maybe they’ve got a snag, a hole, or they’re just too stretched out to wear—don’t throw them away just yet.
With a little creativity, you can turn those tights into a matching choker necklace and keychain set that feels trendy, sustainable, and totally unique.
This DIY project is beginner-friendly, budget-conscious, and eco-friendly. It’s the perfect way to upcycle fabric that would otherwise end up in the trash, and the results make great gifts or everyday accessories. Below, I’ll walk you through the full step-by-step tutorial.
Why Use Old Tights?
Tights are made from stretchy materials like nylon and spandex, which means they:
- Stretch comfortably around your neck, making chokers secure but not too tight.
- Don’t fray easily, so you can cut them without worrying about messy edges.
- Are versatile—you can use sheer tights for a delicate look or opaque tights for something bold.
- Offer endless colors and textures to play with, from black fishnets to patterned florals.
Why This DIY Works
Making a matching choker and keychain set from old tights isn’t just about saving money. It’s about:
- Sustainability – Upcycling gives new life to worn-out clothes.
- Creativity – Every pair of tights has potential, whether it’s sheer, opaque, fishnet, or patterned.
- Practicality – The keychain is functional, while the choker is a fashion statement.
- Trendy Style – Chokers are a timeless accessory that cycle back into fashion every few years.
Materials You’ll Need

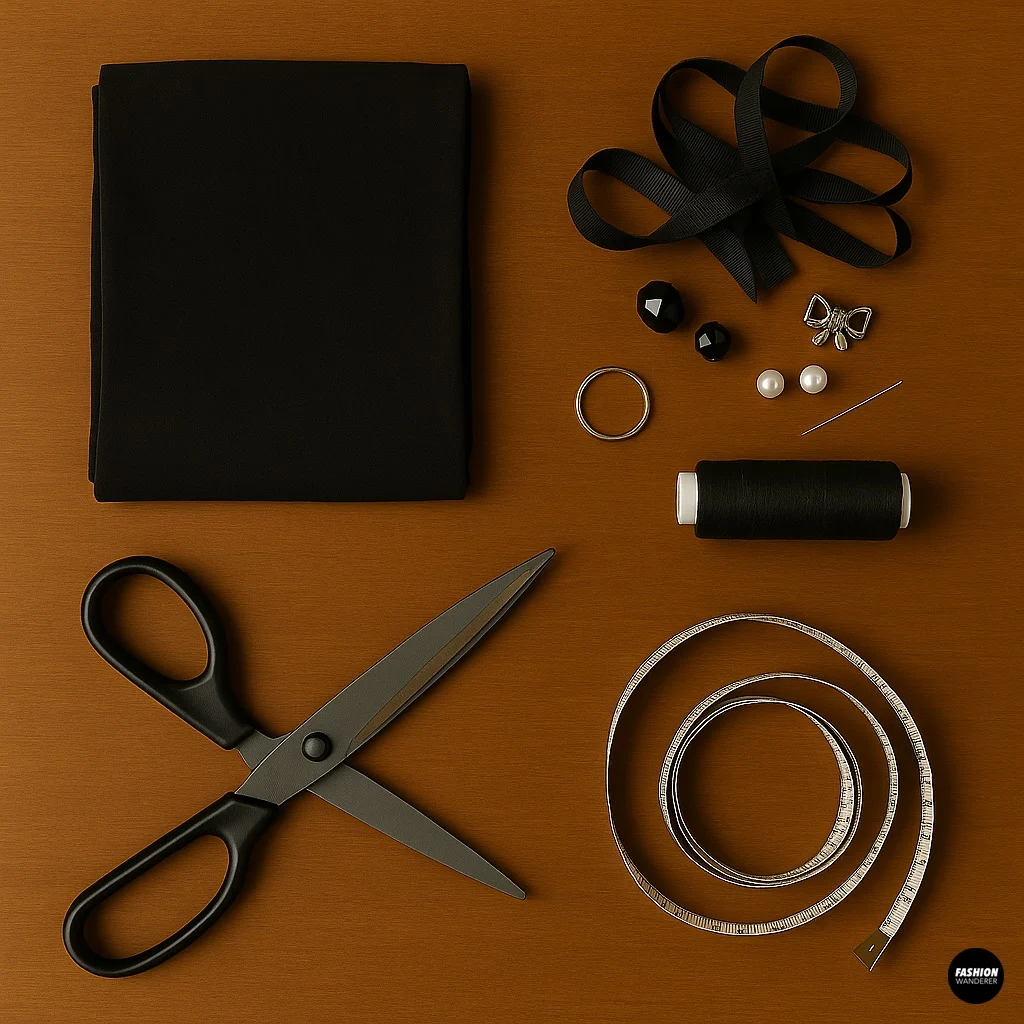
Gather the following supplies before you begin:
- 1 pair of old tights (opaque or sheer depending on your style)
- Fabric scissors
- Small keychain ring or clasp
- Needle and thread (or fabric glue for a no-sew option)
- Optional: beads, charms, or ribbon for embellishment
- Measuring tape
DIY Matching Choker + Keychain Set

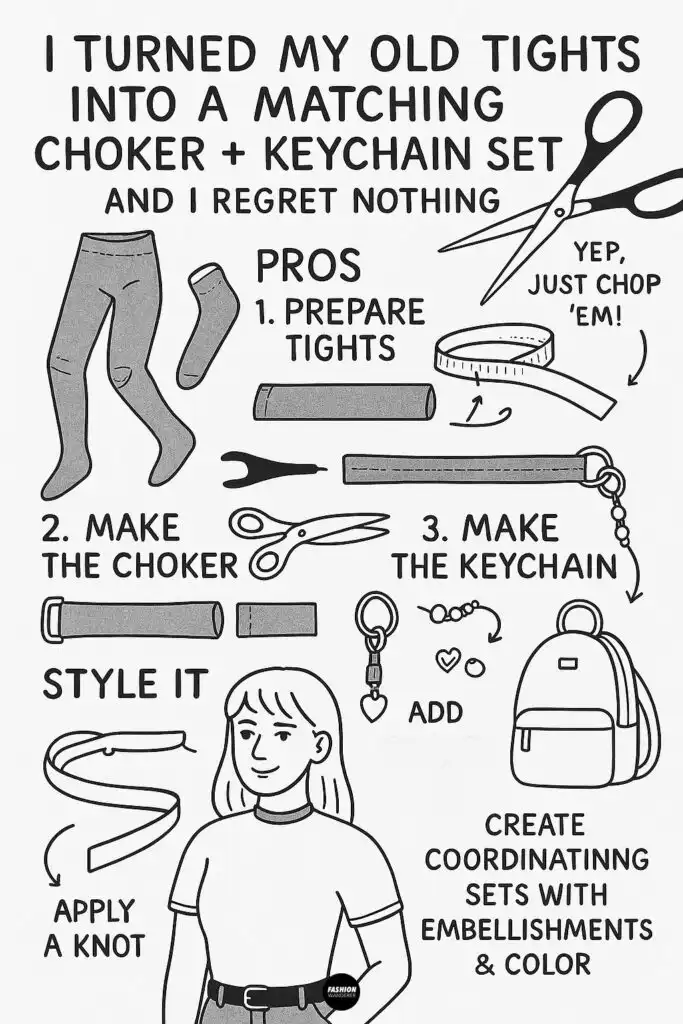
Step 1: Prepare Your Tights

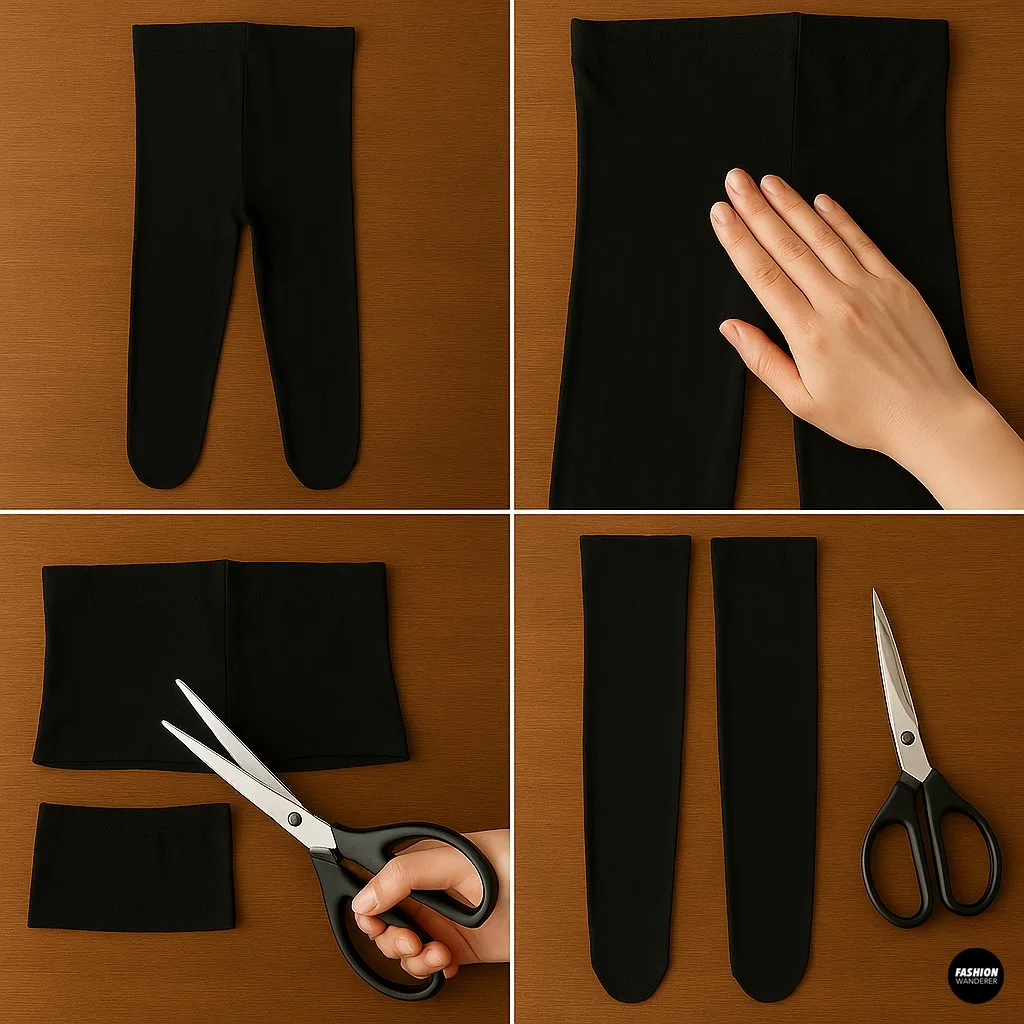
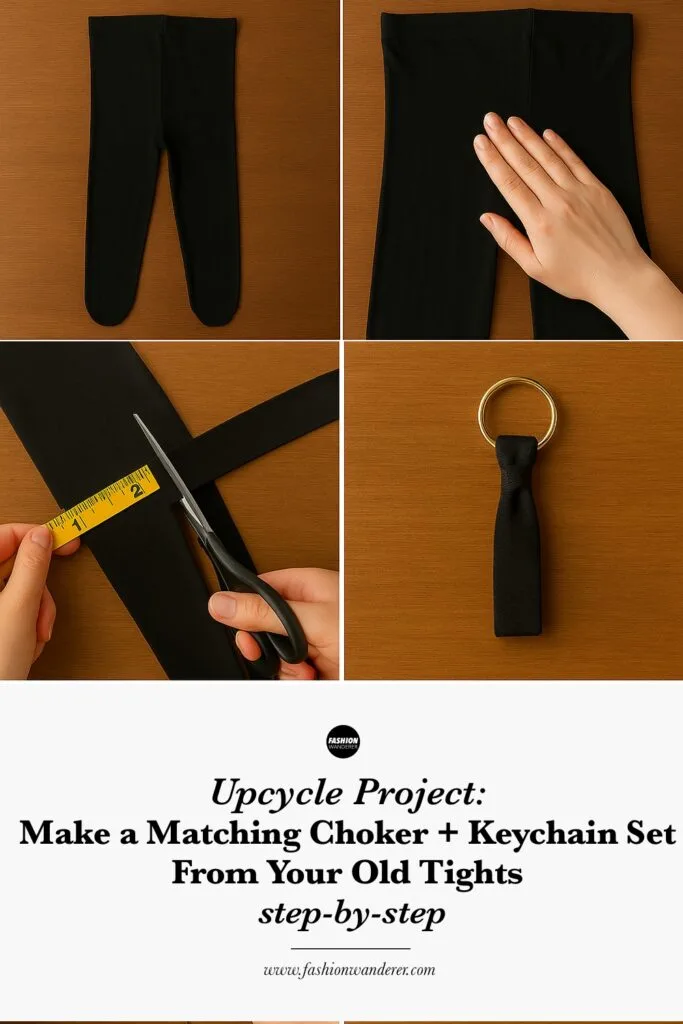
Lay the tights flat on a table. Smooth them out to remove any wrinkles. Use fabric scissors to cut off the waistband and feet so you’re left with long tubes of fabric.
If your tights are opaque, cut from the thigh area where the material is most even. If they’re sheer, avoid snags or worn-out sections to get the best results.
Step 2: Make the Choker

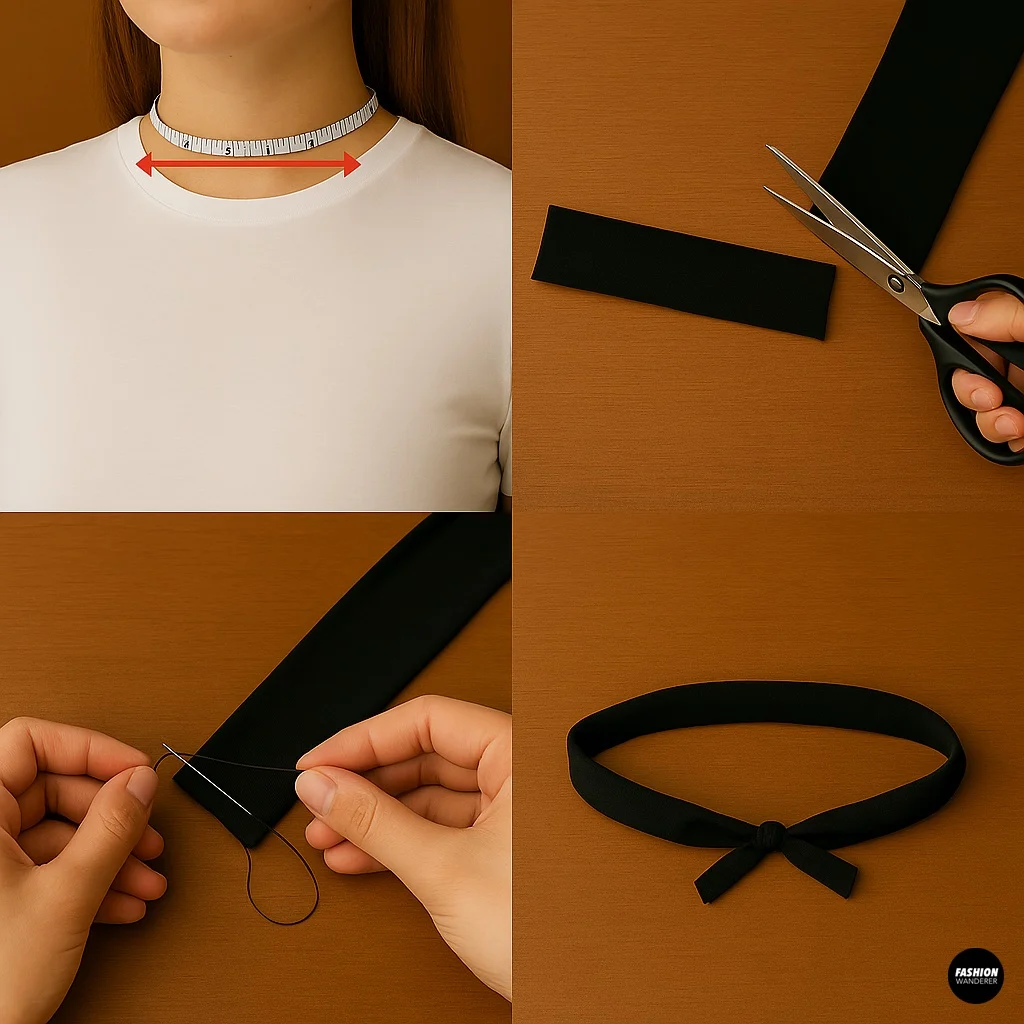
- Measure your neck – Use a measuring tape to find the circumference of your neck. Subtract about 1 inch, since tights stretch naturally.
- Cut your strip – From one leg of the tights, cut a strip that’s 1–2 inches wide and slightly shorter than your measurement.
- Finish the ends – Fold over the ends and stitch them down with a needle and thread. If you’re using fabric glue, apply a thin line along the cut edge and let it dry.
- Add a closure – For a quick and simple closure, tie the ends in a knot behind your neck. For a polished look, sew or glue on small hook-and-eye clasps, snap fasteners, or even ribbon ties.
Pro Tip: Layer two strips together for a thicker choker, or braid three strips for a trendy twist.
Step 3: Make the Keychain

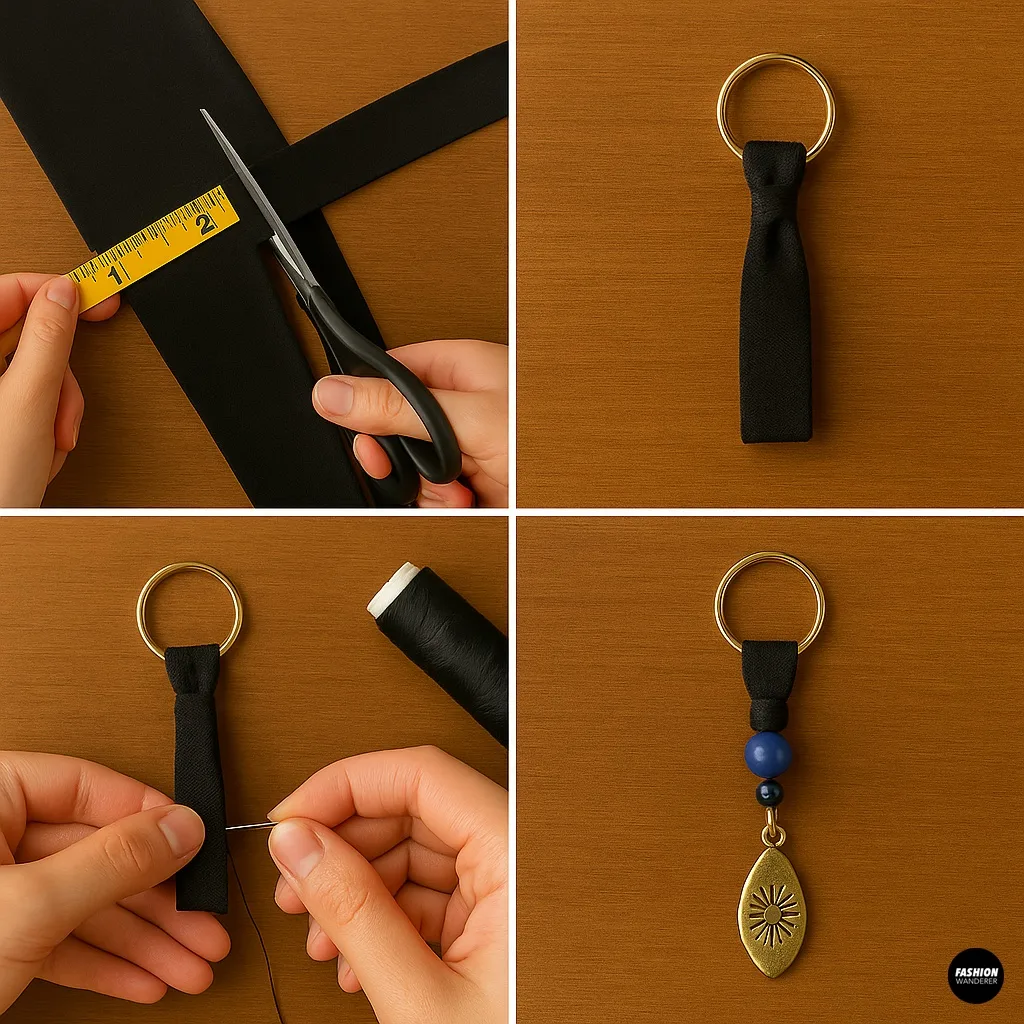
- Cut your strip – From the second leg of the tights, cut a strip about 5–6 inches long and 1 inch wide.
- Loop the fabric – Thread the strip through a keychain ring so both ends hang evenly.
- Secure the ends – Fold the raw edges under and stitch them together neatly. You can also wrap the base with thread or ribbon for a decorative touch.
- Add embellishments – Slide on beads or attach a charm for personalization.
Variation: If your tights are patterned (lace, polka dots, or floral), let the print show as the main design feature.
Step 4: Create a Coordinated Set


The magic of this project is that both accessories come from the same pair of tights, giving you a perfectly coordinated set. To elevate the look:
- Use the same embellishment (like silver beads or a bow) on both the choker and keychain.
- Experiment with color—black tights for a gothic aesthetic, pastel tights for a coquette vibe, or bold prints for festival fashion.
- Make multiple chokers from the leftover fabric in different widths—skinny for layering, wide for a statement piece.
Step 5: Style Your New Accessories

Here are some ideas to rock your new set:
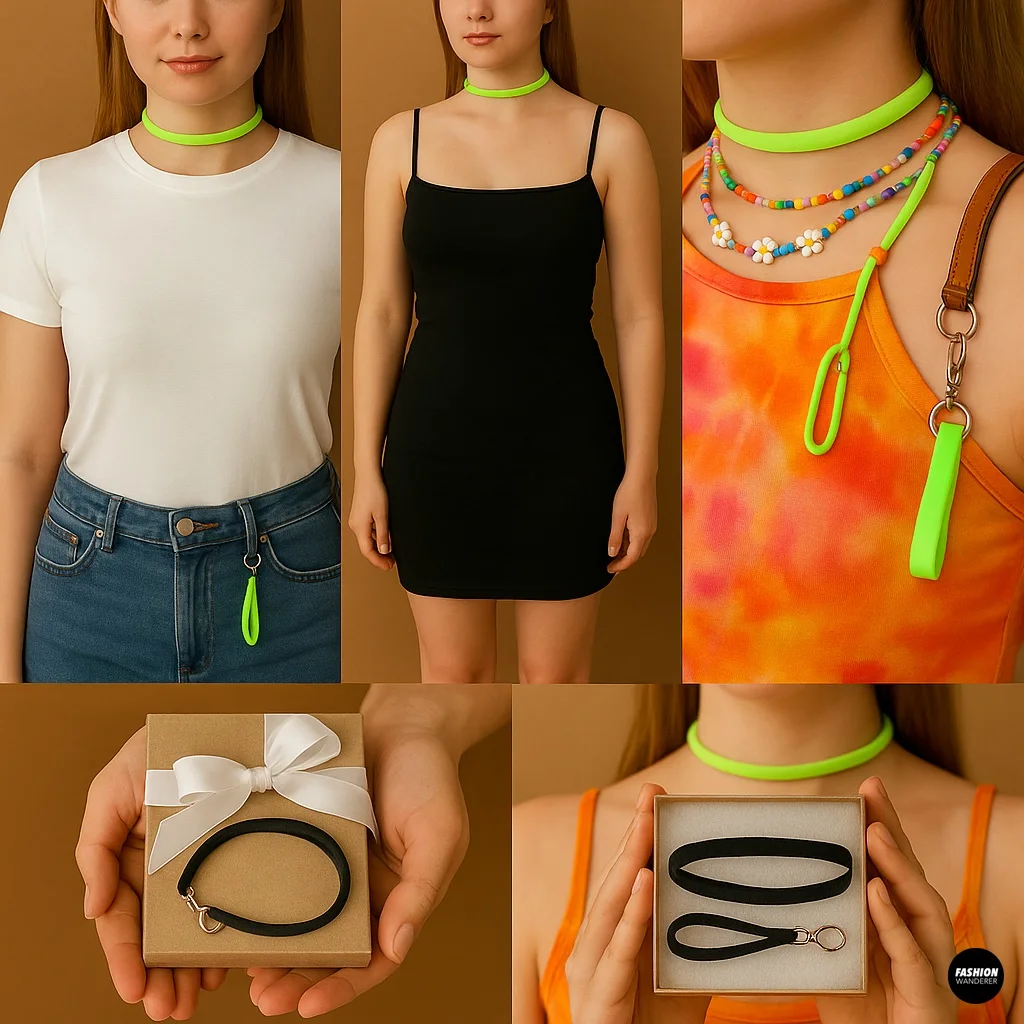
- Everyday Casual – Wear the choker with a simple tee and jeans, and clip the keychain onto your backpack or belt loop.
- Night Out – Pair a black tights choker with a little black dress and boots for an edgy statement.
- Festival Ready – Use colorful tights to create a neon choker and keychain, then stack them with other jewelry.
- Gift Idea – Package a handmade choker and keychain in a small box tied with ribbon for a personalized gift.
Tips for Success
- Avoid Runs: Use sharp scissors for clean cuts—dull blades can cause runs in the fabric.
- Secure Stretch: Tights stretch, so always cut your strips slightly smaller than your measurements.
- Customize: Add studs, sequins, or charms to make the set truly yours.
- No-Sew Hack: If you’re not into sewing, fabric glue or even hot glue works to secure the ends.
Final Thoughts

Fashion doesn’t have to mean fast fashion. With just one pair of old tights, you can craft a stylish choker necklace and keychain set that looks store-bought but feels one-of-a-kind. It’s quick, easy, and endlessly customizable.
So the next time you find a run in your tights, don’t toss them—transform them into your new favorite accessories. A matching DIY set not only saves you money but also adds a personal, eco-friendly touch to your wardrobe.
Once you try it, you’ll never look at your old tights the same way again!
Trendy, Affordable Sewing Patterns for All Sizes


Tie Shoulder Jumpsuit Pattern


Palazzo Pants Sewing Pattern


Pocket Overall Romper Pattern


Wrap Maxi Skirt Sewing Pattern


Tie Back Top Sewing Pattern