
Looking for an easy men’s Halloween costume you can make without sewing an entire outfit from scratch? This Old Denim Shirt to Undead Cowboy Costume is a fun, budget-friendly Halloween upcycle that starts with clothing you may already have in your closet.
With an old denim shirt, worn jeans, a few fabric scraps, and some simple distressing techniques, you can create a spooky cowboy costume that looks creative without requiring advanced sewing skills. This project is perfect for beginners because most of the work involves cutting, patching, fraying, and adding decorative details rather than constructing a garment from the beginning.
Whether you need a last-minute men’s Halloween costume, a DIY costume for a party, or a unique thrift-store upcycle, this undead cowboy look is easy to customize.
Materials You Will Need
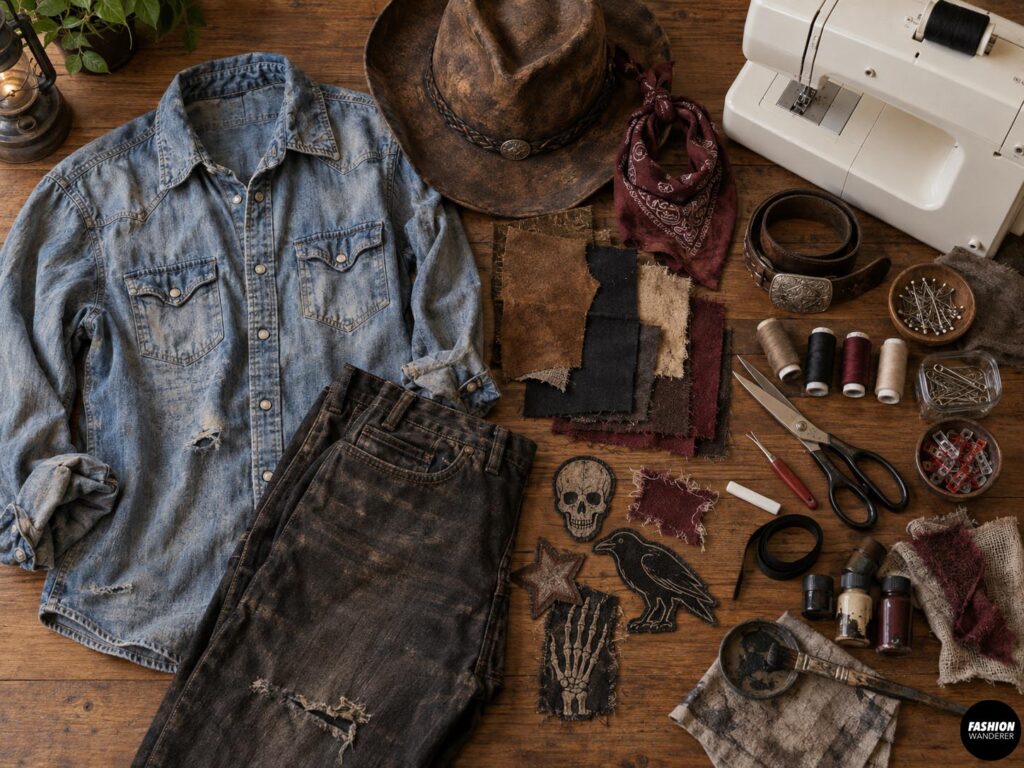
- Old denim or chambray button-up shirt
- Old jeans or dark work pants
- Brown, tan, black, or burgundy fabric scraps
- Faux suede or felt
- Sewing machine
- Coordinating thread
- Fabric scissors
- Pins or sewing clips
- Fabric chalk or washable marker
- Seam ripper
- Small piece of elastic or ribbon
- Cowboy hat
- Bandana or neck scarf
- Optional old belt
- Optional decorative patches
- Optional fabric paint
- Optional safety pins
For the best undead look, choose clothing that already looks slightly worn or faded.
DIY Undead Cowboy Costume
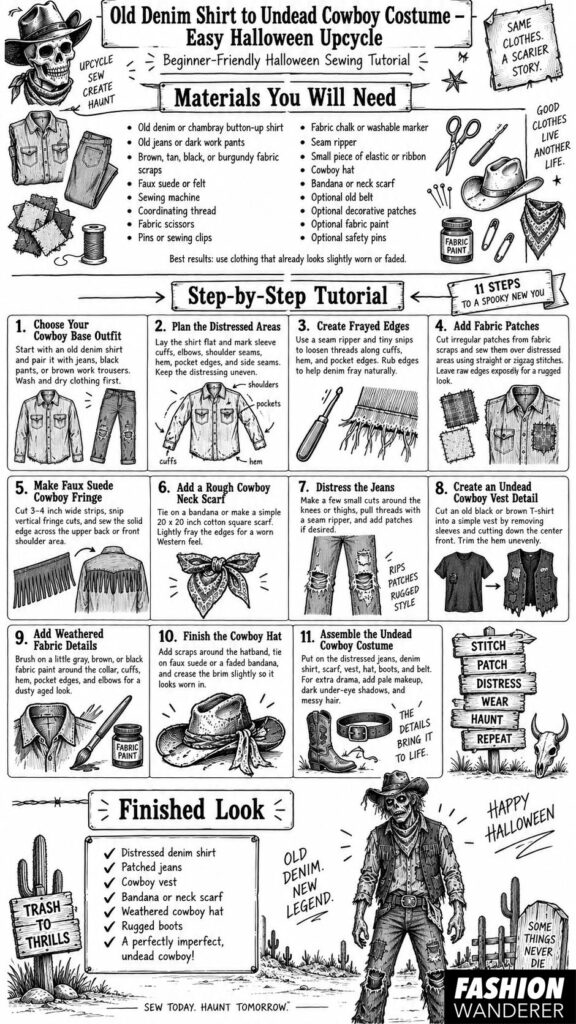
Step 1: Choose Your Cowboy Base Outfit
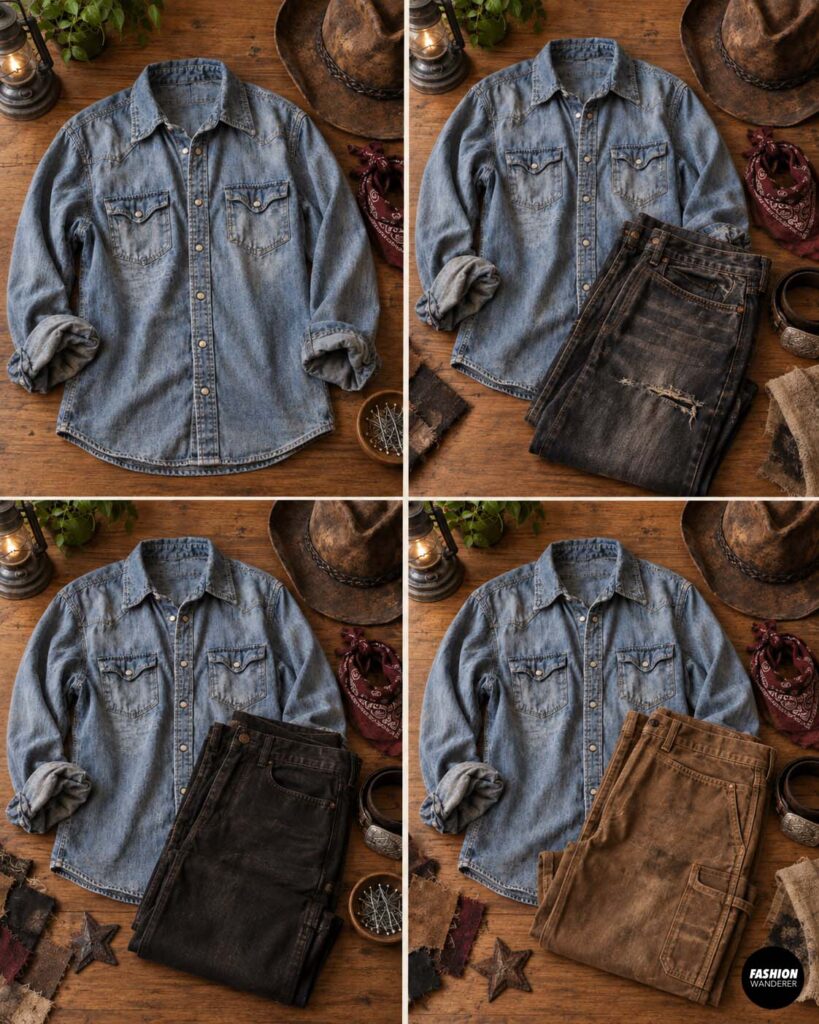
Start with an old denim shirt that fits comfortably.
A medium- or dark-wash denim shirt works especially well because distressed details show up clearly against the fabric.
Pair it with old jeans, black pants, or brown work trousers.
Do not worry if the shirt is slightly oversized. A loose fit can actually make the costume look more rugged and dramatic.
Before you begin, wash and dry all clothing so the fabric is clean and pre-shrunk.
Step 2: Plan the Distressed Areas
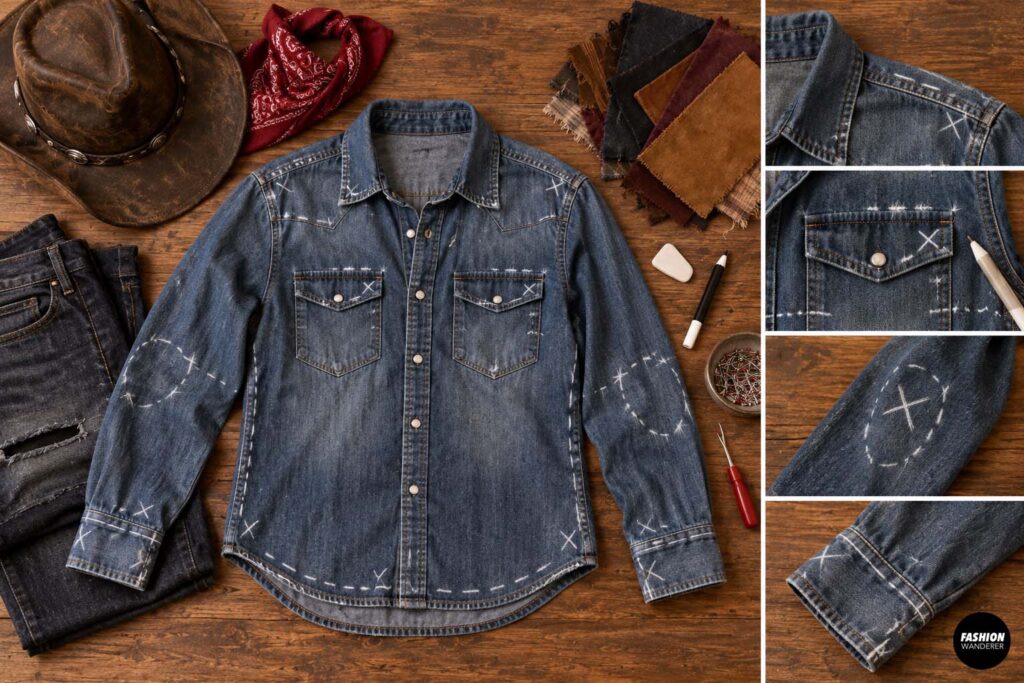
Lay the denim shirt flat on your work surface.
Using fabric chalk, lightly mark areas where you want to add distressing.
Good places include:
- Sleeve cuffs
- Elbows
- Shoulder seams
- Shirt hem
- Pocket edges
- Side seams
Keep the distressing uneven rather than perfectly symmetrical.
The goal is to make the shirt look old and weathered, not carefully designed.
Avoid cutting large holes near important seams because you still want the shirt to remain wearable.
Step 3: Create Frayed Edges
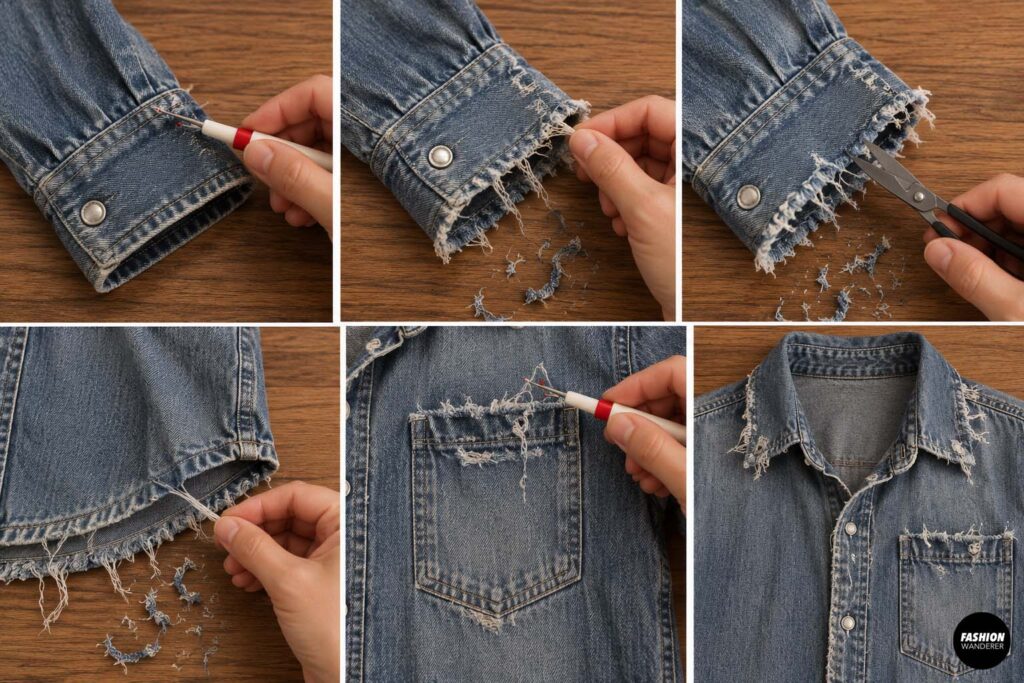
Use a seam ripper to loosen a few threads along the cuffs, hem, and pocket edges.
Gently pull individual threads out with your fingers.
For a rougher appearance, make a few tiny snips with fabric scissors and rub the cut edges between your fingers.
Denim naturally frays, so even small cuts can create a convincing worn effect.
Start with less distressing than you think you need. You can always add more later.
Step 4: Add Fabric Patches
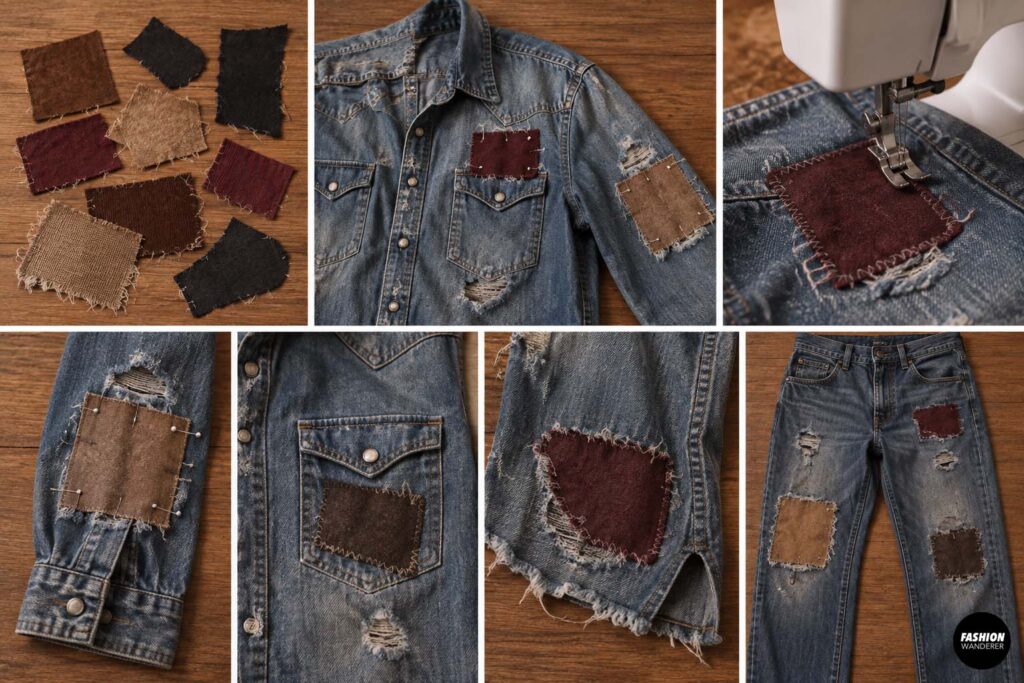
Cut several irregular patches from brown, tan, burgundy, or black fabric scraps.
Try rectangles, crooked squares, and uneven oval shapes.
Place the patches over distressed areas of the shirt.
Pin each patch in place.
Using a straight stitch or zigzag stitch, sew around the edges.
For a more rugged look, leave the raw edges exposed so they can fray naturally.
You can also sew one or two patches onto the jeans to make the entire costume feel coordinated.
Step 5: Make Faux Suede Cowboy Fringe
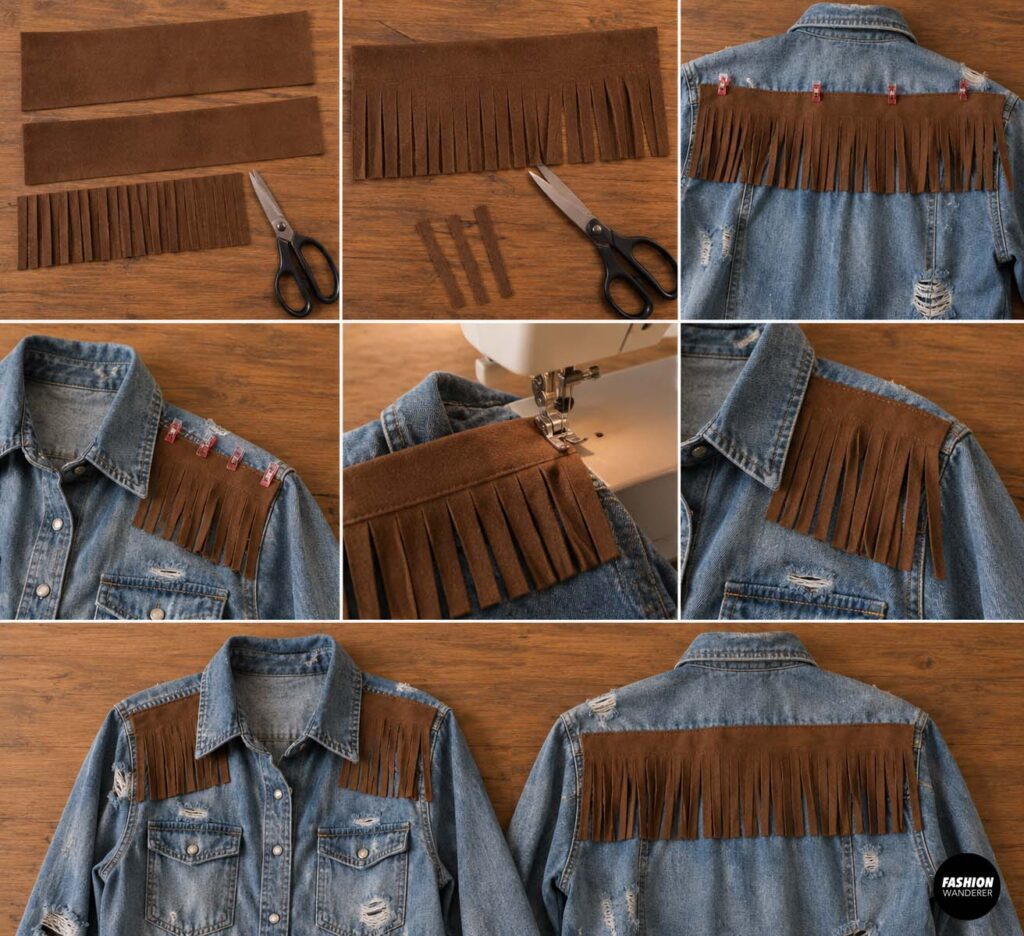
Cut two strips of faux suede or felt approximately 3 to 4 inches wide.
Measure across the upper back or shoulder area of your denim shirt.
Trim the strips to fit.
Cut narrow vertical slits into the lower edge of each strip, stopping about ½ inch from the top.
Space the cuts approximately ¼ to ½ inch apart.
This creates cowboy-style fringe.
Pin one strip across the upper back of the shirt and another across the front shoulder area if desired.
Sew along the solid upper edge using a straight stitch.
The fringe should hang freely.
Step 6: Add a Rough Cowboy Neck Scarf
A bandana instantly makes the outfit look more Western.
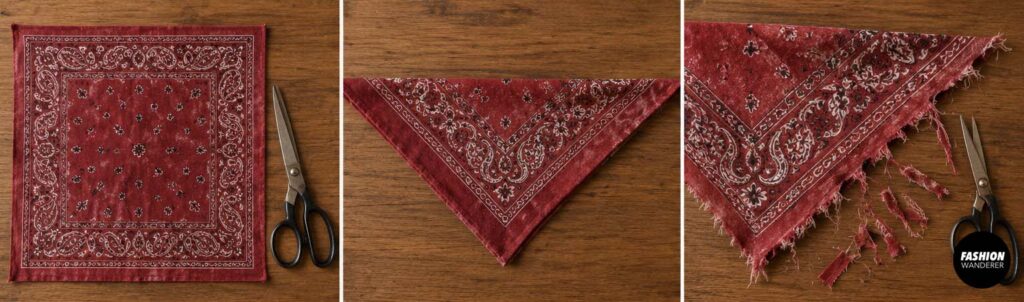
Use an old red, black, brown, or faded patterned bandana.
For a more handmade version, cut a square approximately 20 x 20 inches from lightweight cotton.
Fold it diagonally into a triangle.
Tie it loosely around the neck with the point hanging toward the chest.
You can lightly fray the edges by pulling a few threads or cutting small irregular notches.
Step 7: Distress the Jeans
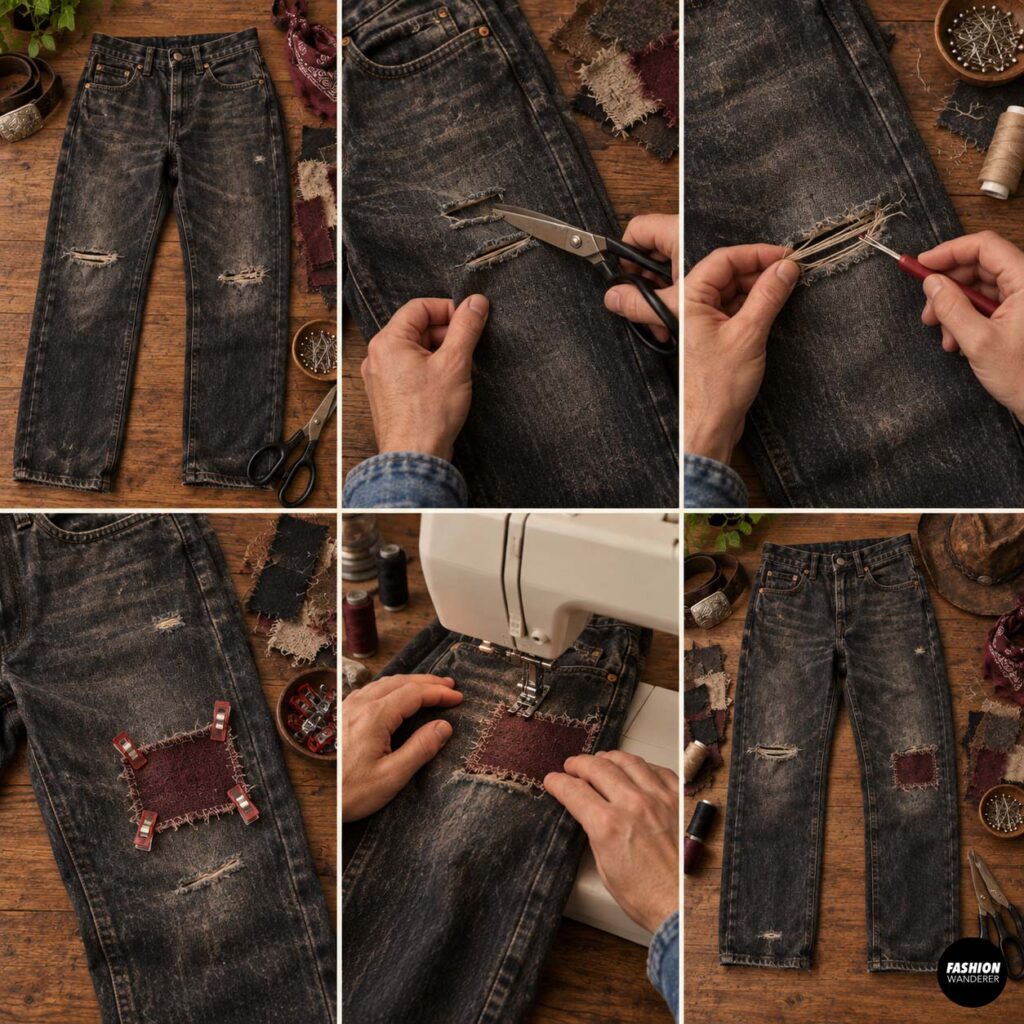
Lay the jeans flat.
Make two or three small horizontal cuts around the knees or upper thighs.
Use a seam ripper to pull out a few threads.
You can also sew mismatched patches over one knee or near a pocket.
Keep the jeans comfortable and safe to walk in.
Avoid cutting too deeply around the crotch or major structural seams.
Step 8: Create an Undead Cowboy Vest Detail
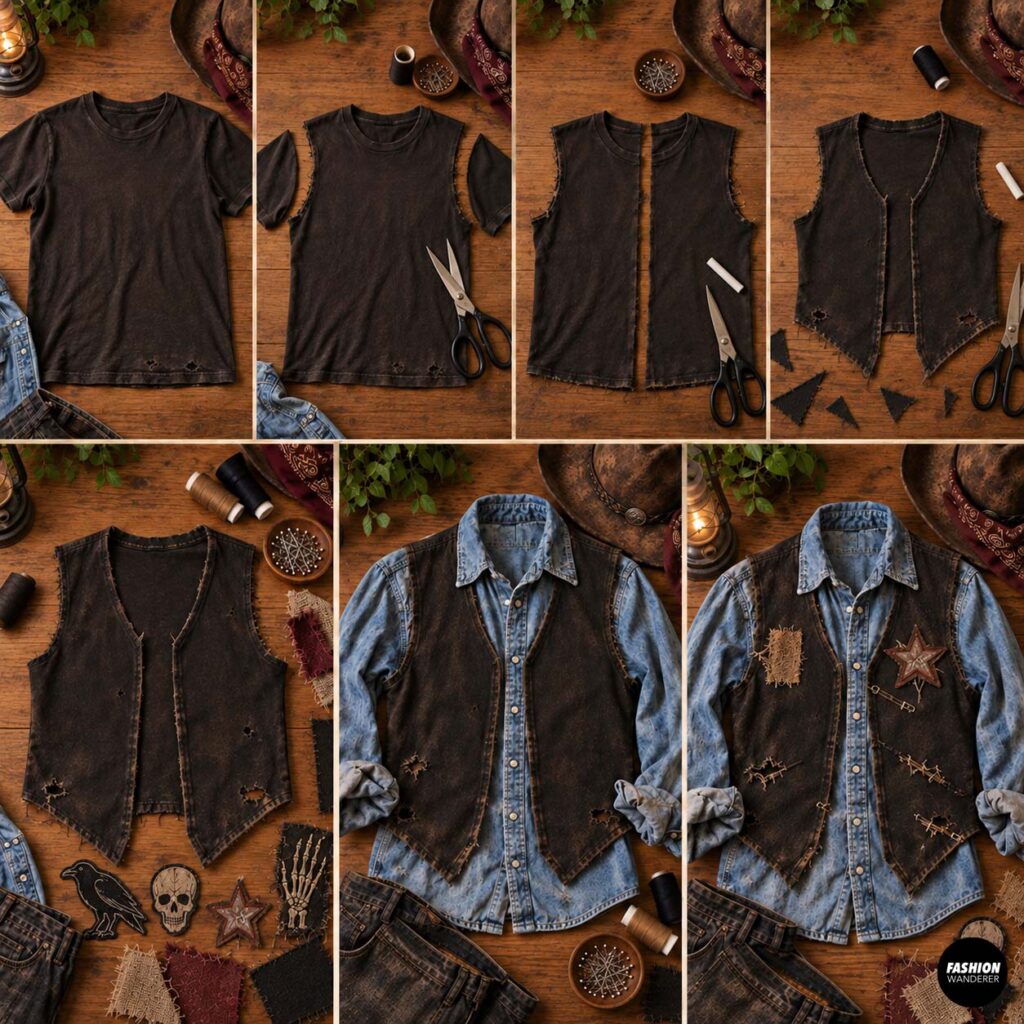
If you want to add another layer, cut an old black or brown T-shirt into a simple vest.
Remove the sleeves.
Cut straight down the center front.
Trim the hem into slightly uneven points.
Layer the vest over the denim shirt.
You can leave the raw knit edges unfinished because most T-shirt fabrics do not fray heavily.
Add a few patches or decorative stitches for extra texture.
Step 9: Add Weathered Fabric Details
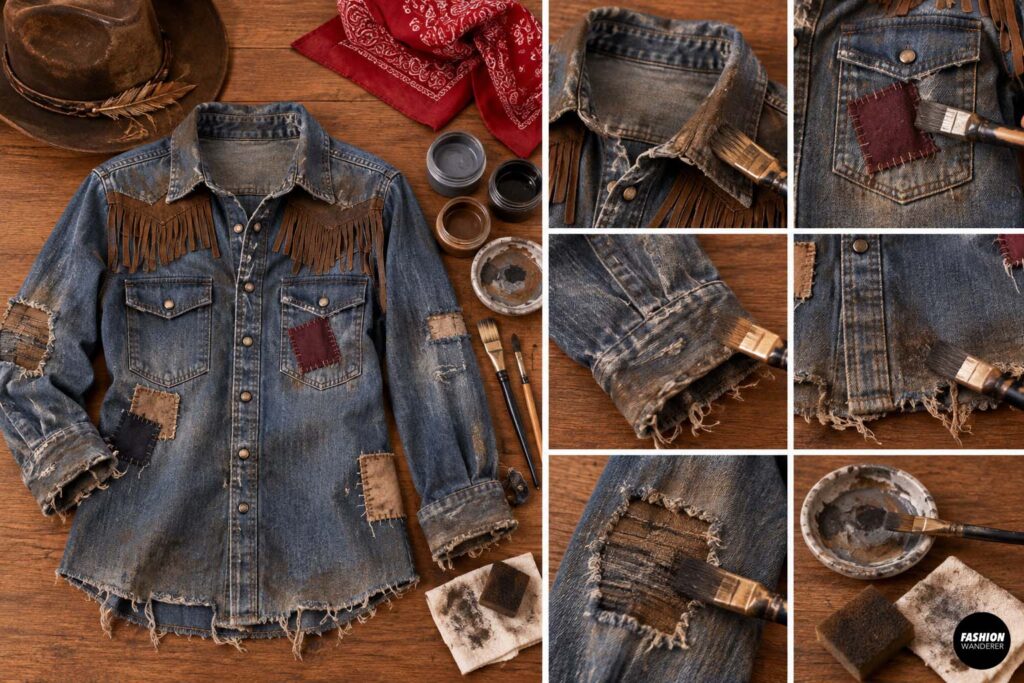
To make the costume look dusty and aged, lightly brush gray, brown, or black fabric paint onto the edges of the shirt.
Use a dry brush or small sponge.
Concentrate color around:
- Collar
- Cuffs
- Hem
- Pocket edges
- Elbows
Use very little paint at a time.
You want a worn appearance rather than solid blocks of color.
Let the paint dry completely before wearing the costume.
Step 10: Finish the Cowboy Hat
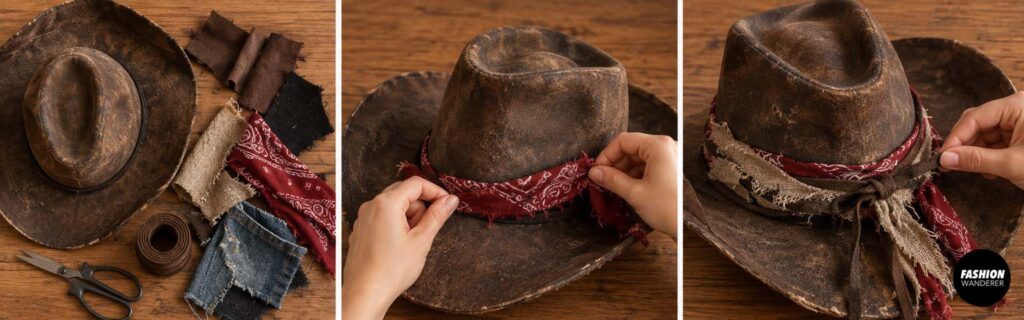
Use an old cowboy hat or inexpensive thrifted hat.
Add a few fabric scraps around the hatband.
Tie on a thin strip of faux suede or a faded bandana.
You can also lightly rough up the brim with your fingers.
If the hat looks too new, gently crease the crown and bend the brim slightly for a more worn-in look.
Step 11: Assemble the Undead Cowboy Costume
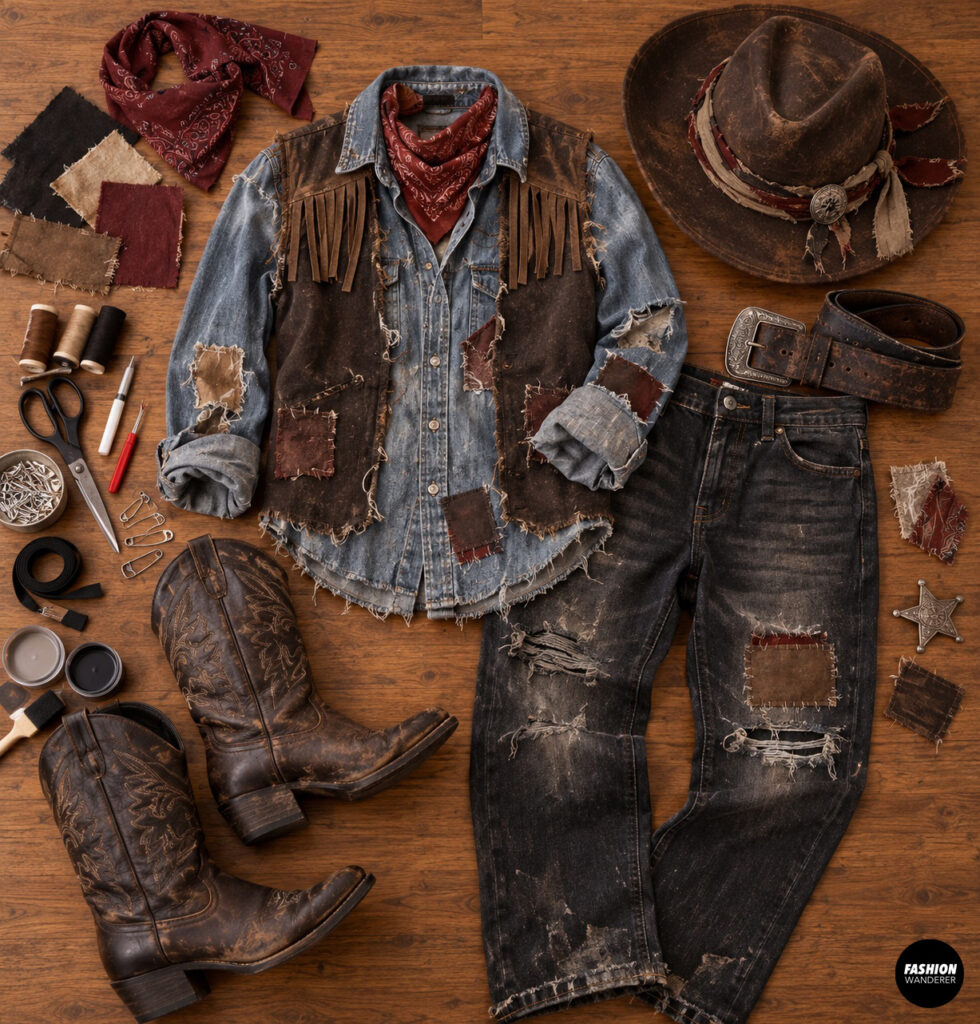
Put on the distressed jeans first.
Add the denim shirt and leave the top one or two buttons open.
Tie the bandana around your neck.
Add the vest if you made one.
Finish with the cowboy hat, boots, and an old belt.
For a more dramatic Halloween look, use pale face makeup, dark shadows around the eyes, and slightly messy hair.
Tips for a Better DIY Undead Cowboy Costume
Stick to a limited color palette of denim blue, black, brown, tan, burgundy, and faded red.
This keeps all the upcycled pieces looking intentional.
Use lightweight scraps whenever possible so the shirt does not become too heavy.
If you are sewing fringe or patches onto stretch fabric, avoid pulling the material as you sew.
Try the costume on after each major change so you can check comfort and movement.
Why This Halloween Upcycle Works
This DIY undead cowboy costume is easy because you begin with finished clothing instead of making a costume from a sewing pattern.
The recognizable cowboy details do most of the work: denim, fringe, bandana, distressed jeans, boots, and a hat.
The worn patches and frayed edges then turn the outfit into something spooky and Halloween-ready.
Best of all, you can reuse old clothes, thrift-store finds, and fabric scraps you already have.
Final Thoughts
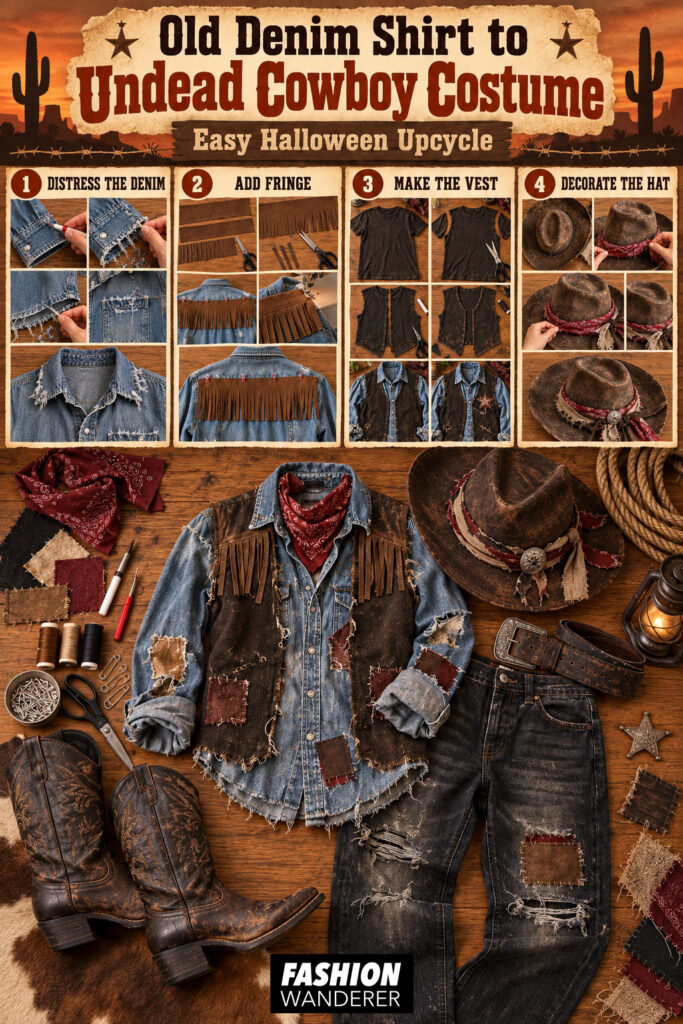
Turning an old denim shirt into an undead cowboy costume is a simple way to create a fun men’s Halloween outfit without spending a lot of money.
With a few distressed edges, handmade patches, faux suede fringe, and Western accessories, an ordinary shirt and jeans can become a completely different costume.
This beginner-friendly Halloween upcycle is especially useful for last-minute costumes because the sewing is simple, the fit is already handled by the original garments, and every version can look a little different.
Add your cowboy hat, tie on the bandana, and your undead cowboy is ready for Halloween.