
Looking for a last-minute men’s Halloween costume that is easy, inexpensive, and actually fun to make? Turn an old work jumpsuit or pair of coveralls into a creepy Zombie Mechanic Costume using simple sewing, fabric scraps, and a little strategic distressing.
This DIY Halloween upcycle is perfect if you already have an old mechanic jumpsuit, utility coveralls, or workwear sitting in the back of a closet. Instead of buying a brand-new costume, you can transform what you already own into something spooky and completely unique.
The best part? You do not need advanced sewing skills. Most of the details can be added with straight stitching, raw-edge patches, hand sewing, and basic fabric cutting.
This tutorial shows you exactly how to make a zombie mechanic costume from an old jumpsuit in a few easy steps.
Why This Halloween Upcycle Works
A mechanic jumpsuit already gives you the perfect costume base. It has pockets, seams, a rugged workwear look, and plenty of space for patches, fake repairs, and Halloween details.
By adding torn fabric, mismatched patches, a fake name badge, visible stitching, and distressed areas, you can make the jumpsuit look like it has survived years in a haunted garage.
Pair it with simple zombie makeup and work boots, and your costume is finished.
Materials You Will Need
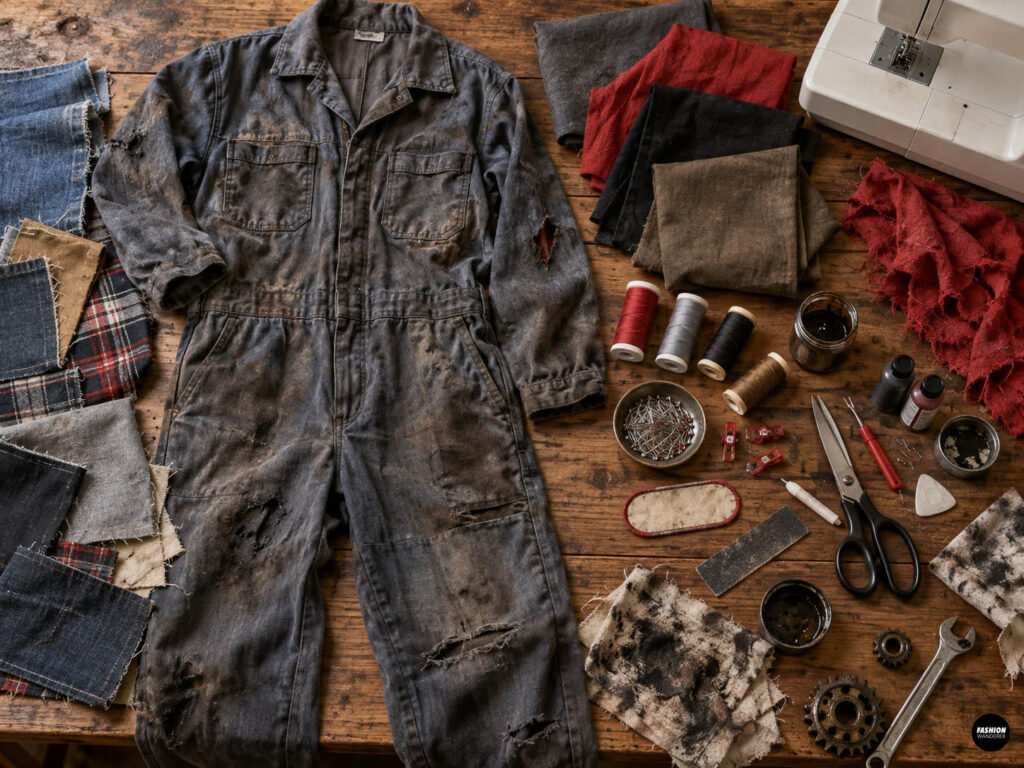
- Old mechanic jumpsuit, coveralls, or utility jumpsuit
- Assorted fabric scraps
- Red, gray, black, or brown cotton fabric
- Fabric scissors
- Sewing machine
- Matching or contrasting thread
- Pins or sewing clips
- Hand-sewing needle
- Seam ripper
- Fabric chalk or washable marker
- Sandpaper or nail file
- Optional iron-on name patch
- Optional fabric paint
- Optional fake oil or grease effects
- Optional red fabric for faux torn sections
Choose fabric scraps that look worn or mismatched. Denim, canvas, plaid, and cotton all work well.
DIY Zombie Mechanic Costume
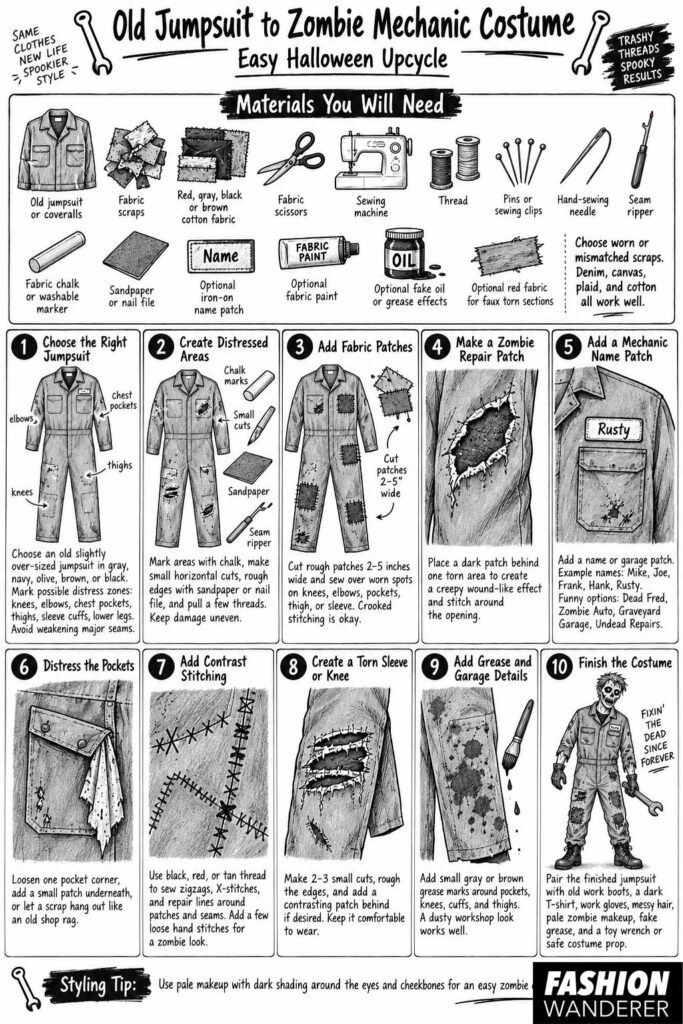
Step 1: Choose the Right Jumpsuit
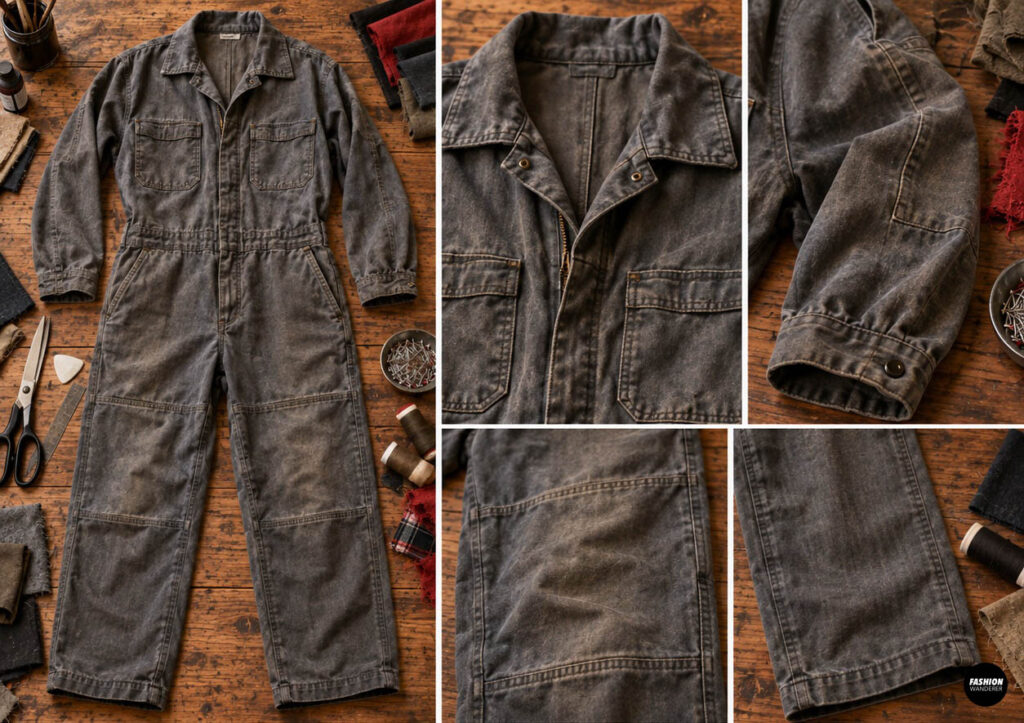
Start with an old work jumpsuit that fits comfortably.
A slightly oversized style works especially well because it gives the costume a rugged, relaxed shape and leaves room for layering underneath.
Gray, navy, olive, brown, and black jumpsuits are ideal for a mechanic costume.
Wash and dry the jumpsuit before beginning so you are working with a clean surface.
Lay it flat and decide which areas you want to distress.
Good places include:
- Knees
- Elbows
- Chest pockets
- Thighs
- Sleeve cuffs
- Lower legs
Avoid weakening important seams around the crotch, zipper, or underarms.
Step 2: Create Distressed Areas
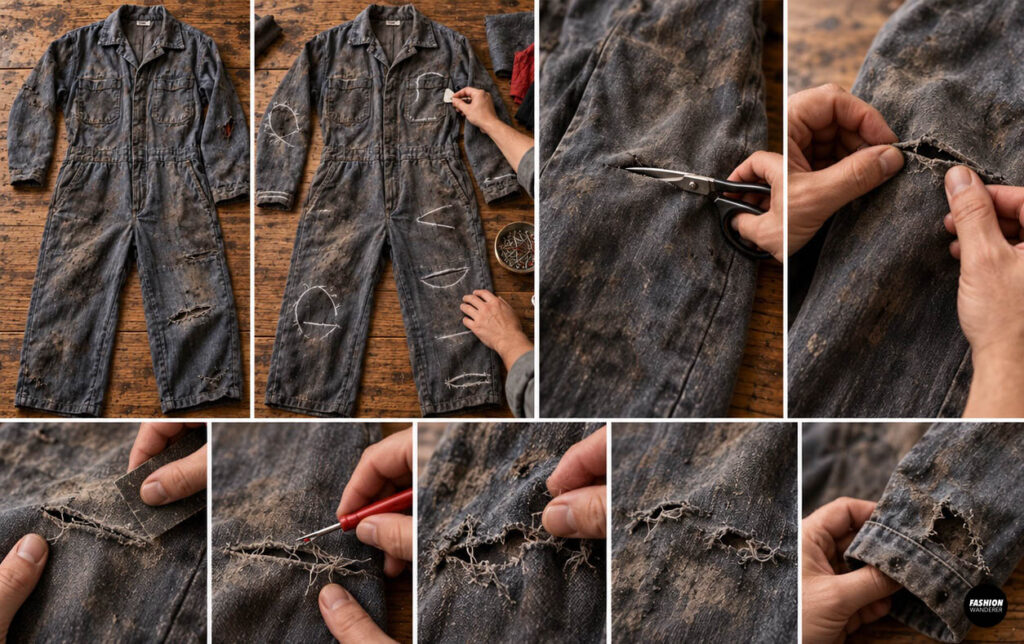
Use fabric chalk to lightly mark a few areas where you want the jumpsuit to look torn or worn.
Make small horizontal cuts rather than large holes.
Use your fingers, sandpaper, or a nail file to rough up the edges.
For heavier distressing, use a seam ripper to gently pull a few threads from the fabric.
Keep the damage uneven. Real worn clothing does not look perfectly symmetrical.
A mix of small tears and frayed edges will look more realistic than one giant cut.
Step 3: Add Fabric Patches
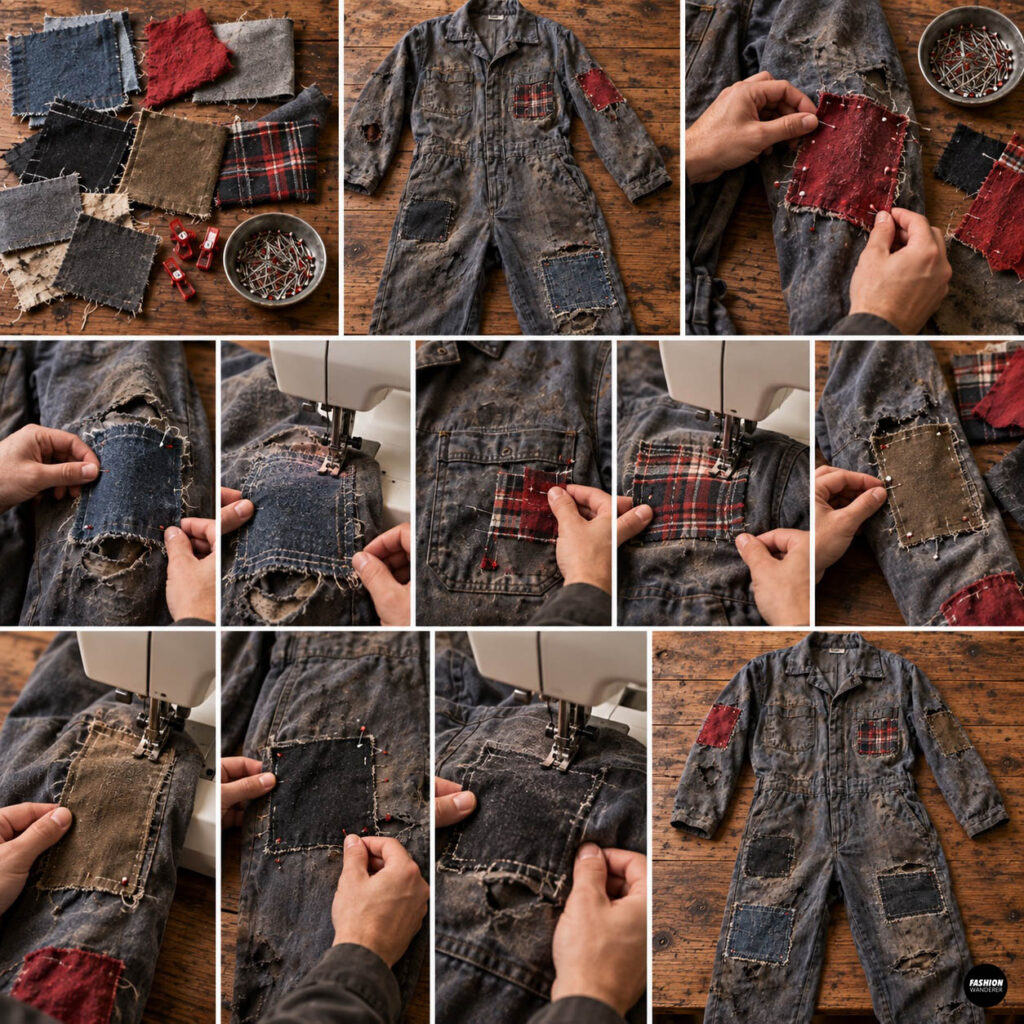
Cut several fabric scraps into rough squares, rectangles, or irregular shapes.
Make the pieces approximately 2 to 5 inches wide.
Place them over some of the distressed areas.
You can position patches:
- Over one knee
- Across an elbow
- Near a pocket
- On one thigh
- Along a sleeve
Pin the patches in place.
Sew around each patch using a straight stitch approximately ⅛ inch from the edge.
Do not worry about perfect stitching.
Slightly crooked stitching actually makes the costume look more authentic.
For an even rougher look, leave the patch edges raw so they fray over time.
Step 4: Make a Zombie Repair Patch
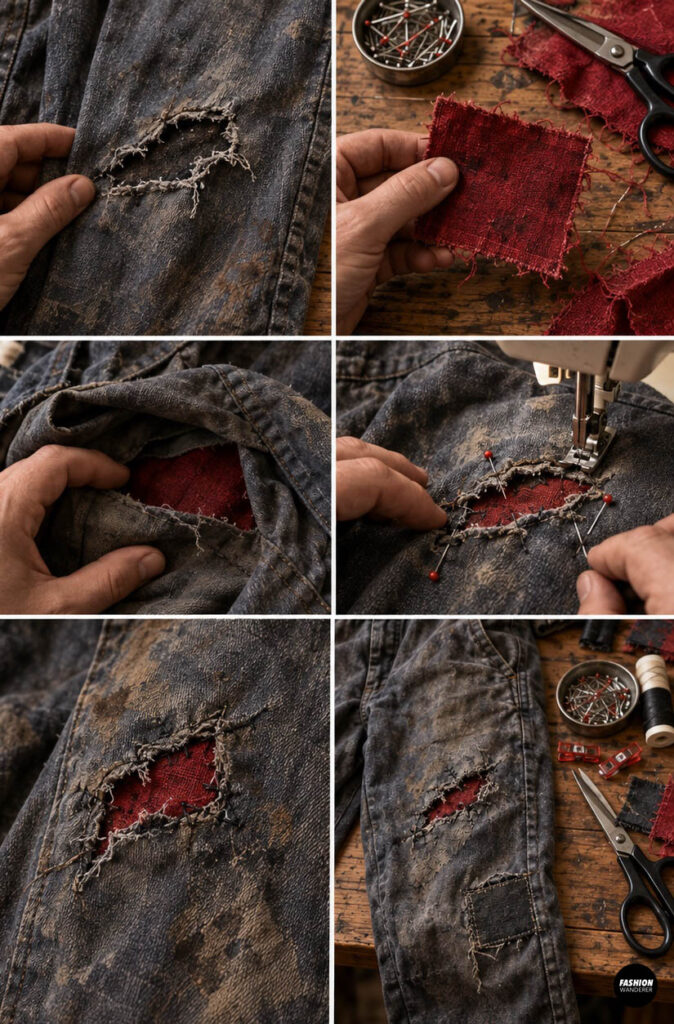
For one especially creepy detail, place a piece of dark red fabric behind one of the torn areas.
The red fabric will show through the opening and create the illusion of an old wound beneath the jumpsuit.
Cut a small red rectangle slightly larger than the tear.
Position it behind the damaged area.
Pin it in place from the inside.
Sew around the opening using uneven straight stitches.
This creates a layered, distressed effect without making the costume uncomfortable to wear.
Step 5: Add a Mechanic Name Patch
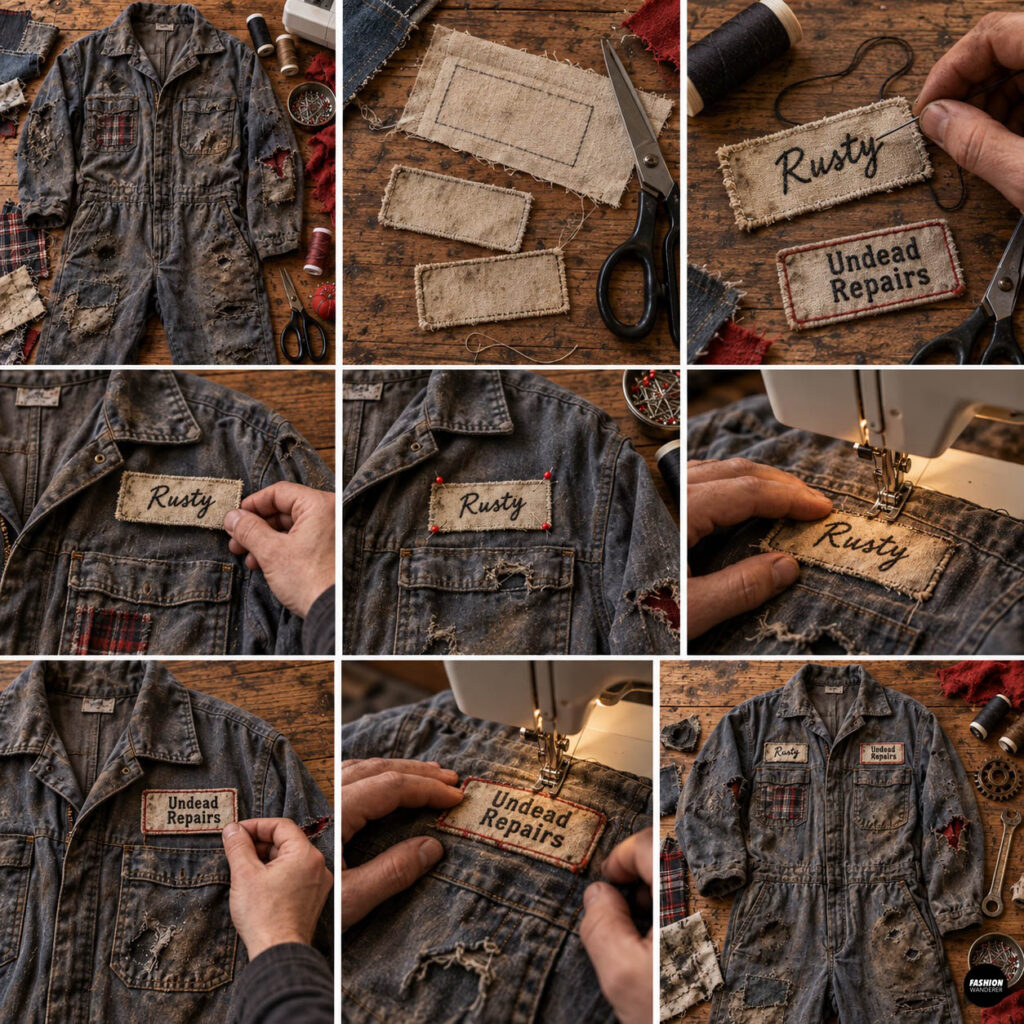
A name badge instantly makes the costume read as a mechanic uniform.
You can use an old embroidered workwear patch or create your own from fabric.
Cut a rectangle approximately:
1½ inches tall x 4 inches wide
Use white, beige, or faded fabric.
Write or embroider a simple name such as:
- Mike
- Joe
- Frank
- Hank
- Rusty
For extra Halloween humor, try:
- Dead Fred
- Zombie Auto
- Graveyard Garage
- Undead Repairs
Place the patch above one chest pocket and sew around the edges.
You can also add a second patch with a fake garage name on the opposite side.
Step 6: Distress the Pockets
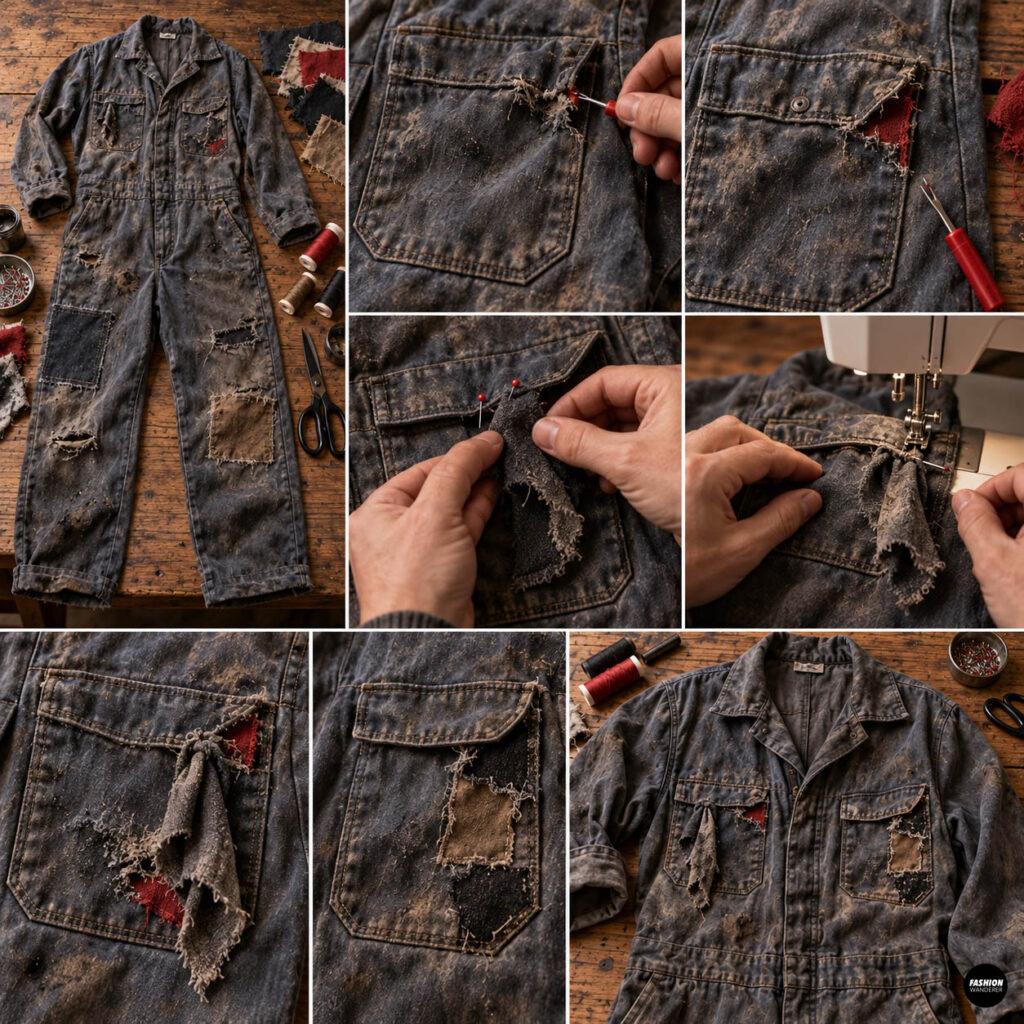
Mechanic jumpsuits usually have large pockets, which are perfect for extra Halloween details.
Use a seam ripper to loosen one corner of a pocket slightly.
Add a small patch underneath or attach a scrap of red or black fabric so it peeks through.
You can also stitch a short piece of fabric or ribbon inside a pocket so it hangs out like an old rag.
Do not completely remove the pocket because it is useful for holding your phone or keys while wearing the costume.
Step 7: Add Contrast Stitching
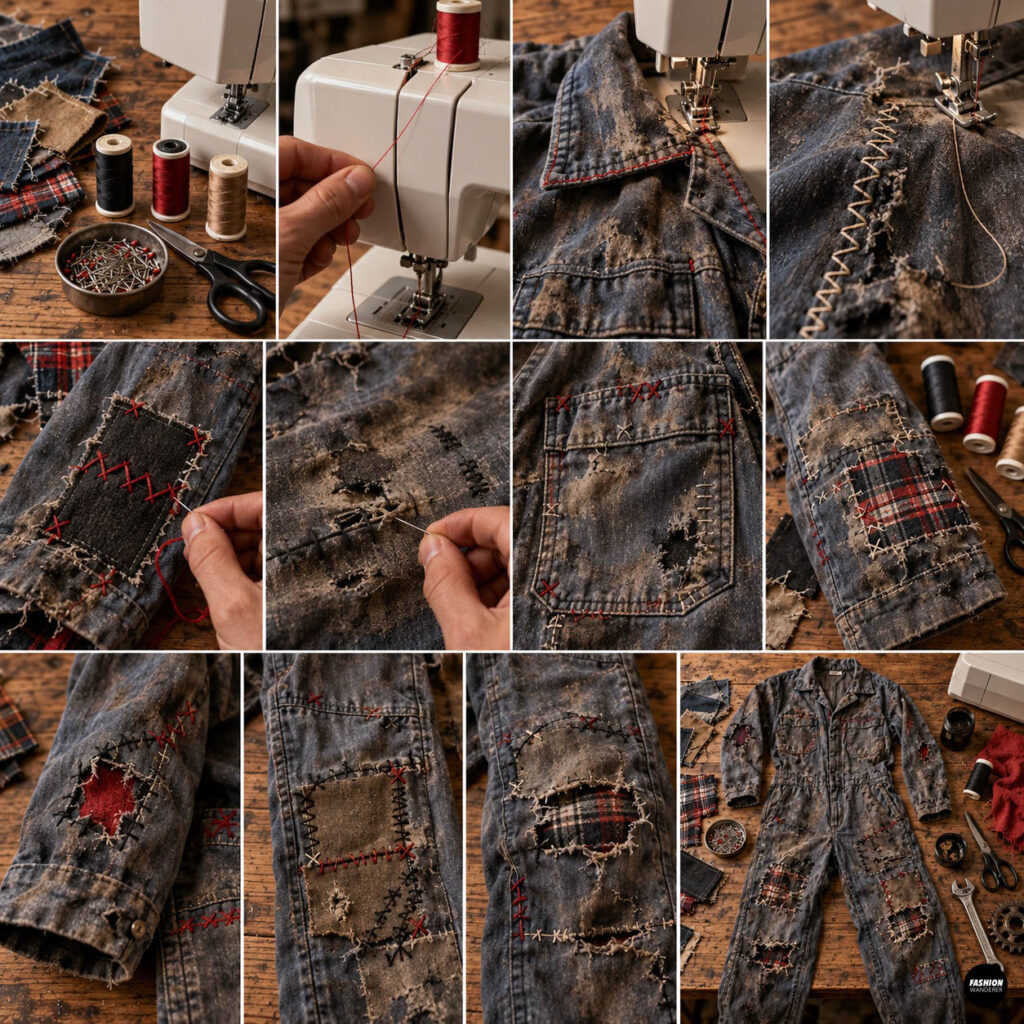
Thread your sewing machine with black, red, or tan thread.
Add a few visible lines of stitching around existing seams.
You can sew uneven zigzags, X-shaped repairs, or short lines across patches.
These details make the jumpsuit look heavily repaired.
For a handmade zombie effect, add a few large hand stitches with embroidery thread.
Keep the stitches loose-looking but secure.
Step 8: Create a Torn Sleeve or Knee
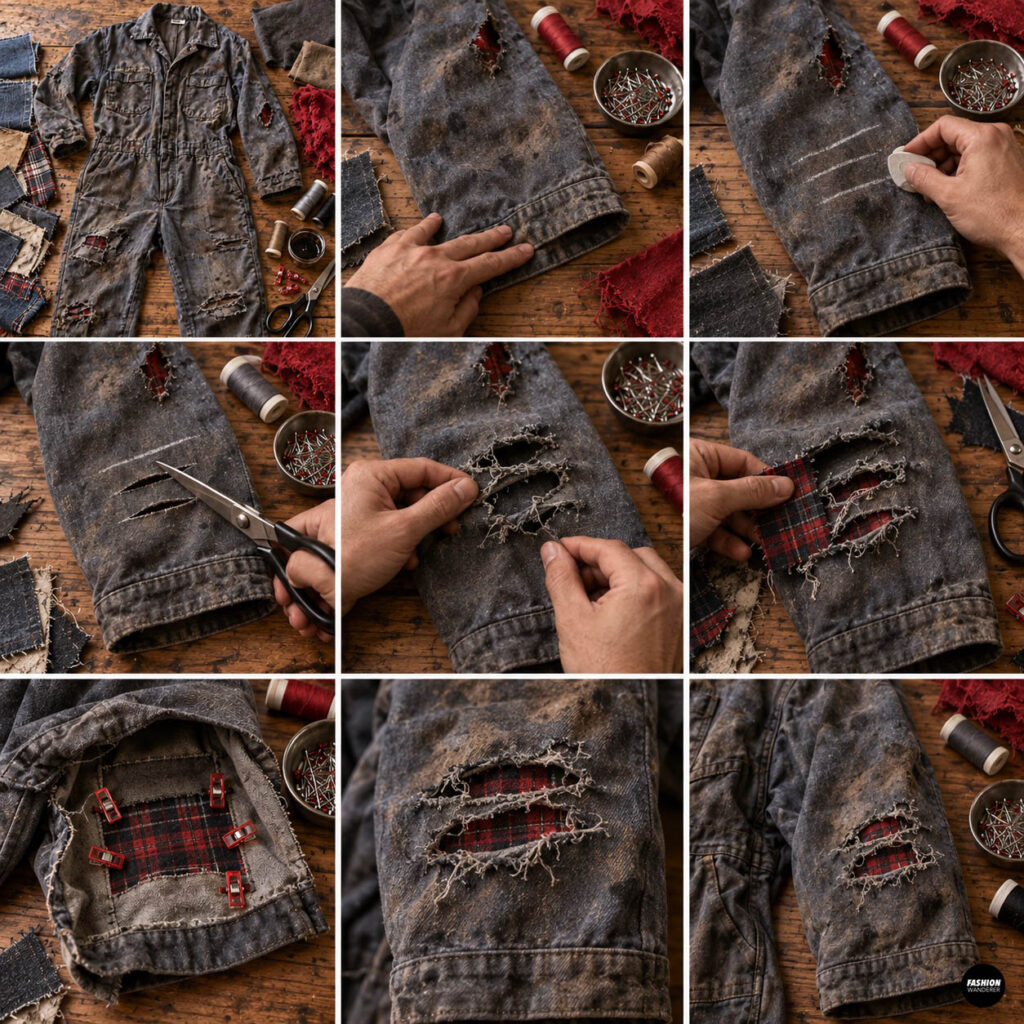
Choose one sleeve cuff or knee for a larger distressed feature.
Make two or three small parallel cuts.
Gently stretch the fabric and rough up the edges.
Place a contrasting patch behind the cuts if desired.
This is an easy way to add texture without cutting away too much of the jumpsuit.
Remember that the garment still needs to be comfortable enough to move around in.
Step 9: Add Grease and Garage Details
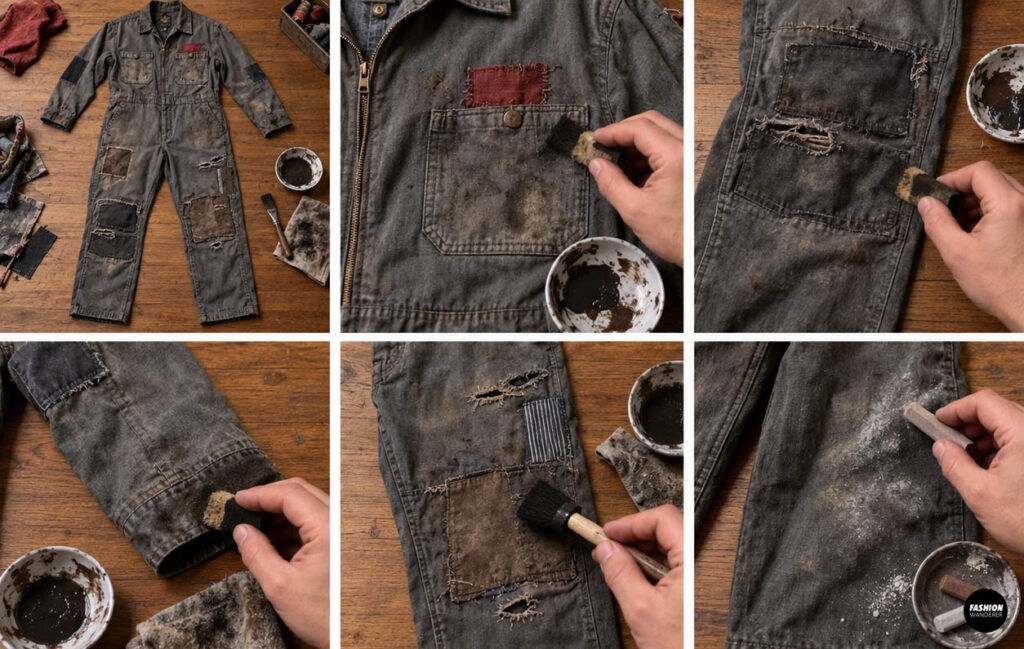
Once the sewing is finished, you can add optional mechanic-style details.
Use small amounts of washable fabric paint in dark gray or brown to imitate grease marks.
Apply sparingly around:
- Pockets
- Knees
- Sleeve cuffs
- Thighs
You can also rub dry chalk lightly onto the fabric for a dusty workshop look.
Avoid applying anything wet, sticky, or unsafe directly to areas that touch your skin.
Step 10: Finish the Zombie Mechanic Costume
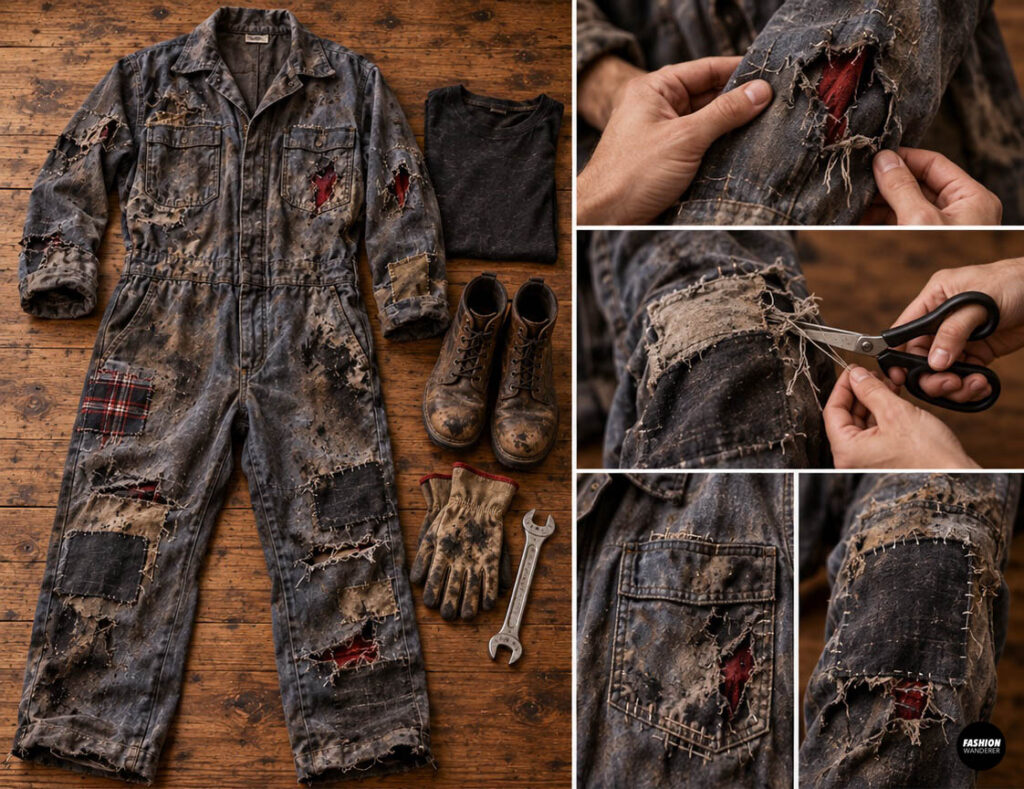
Try the jumpsuit on and check all the distressed areas.
Make sure no tears are expanding into important seams.
Trim any excessively long loose threads.
Pair your finished zombie mechanic jumpsuit with:
- Old work boots
- Dark T-shirt
- Work gloves
- Messy hair
- Pale zombie makeup
- Fake grease on the face
- Toy wrench or safe costume prop
For a simple zombie look, use pale face makeup with dark shading around the eyes and cheekbones.
Tips for Making the Costume Look More Realistic
Do not overdo every detail.
A few carefully placed patches and tears often look more convincing than covering every inch of the jumpsuit.
Use different fabrics instead of matching everything.
Mismatched patches make the costume feel like it has been repaired many times.
Focus the distressing on high-wear areas such as knees, elbows, cuffs, and pockets.
Most importantly, keep the jumpsuit comfortable and easy to move in.
Final Thoughts
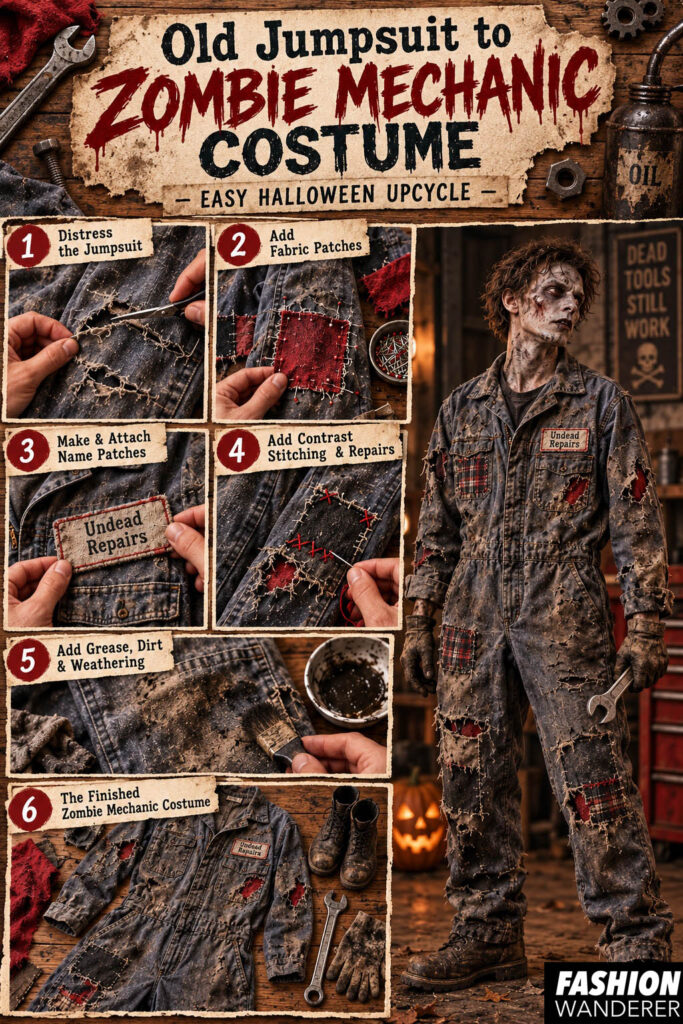
Turning an old jumpsuit into a Zombie Mechanic Costume is one of the easiest ways to create a fun men’s Halloween costume without buying a completely new outfit.
With a few fabric scraps, simple patches, distressed edges, and basic sewing, an ordinary pair of coveralls can become a spooky garage-uniform costume in very little time.
This easy Halloween upcycle is budget-friendly, beginner-friendly, and perfect for anyone who loves DIY costumes made from clothes they already own.
Save those old work clothes—you never know when they might become the perfect Halloween costume.