
Looking for an easy DIY dog Halloween costume that doesn’t require a complicated sewing pattern? This DIY pumpkin dog costume made from an old T-shirt is quick, inexpensive, beginner-friendly, and ridiculously cute. With a few scraps of felt, a basic shirt, and about 20 minutes, you can turn something already in your closet into a festive pumpkin outfit for your dog.
Keep your Halloween sewing simple this year with these quick-upcycle DIY Halloween costumes for pets, including beginner-friendly ideas made from everyday clothing.
This project works especially well for small and medium dogs, but you can easily adjust the sizing for larger breeds. The best part is that the costume stays soft and flexible, so your dog can still walk, sit, and move comfortably.
Materials You Will Need
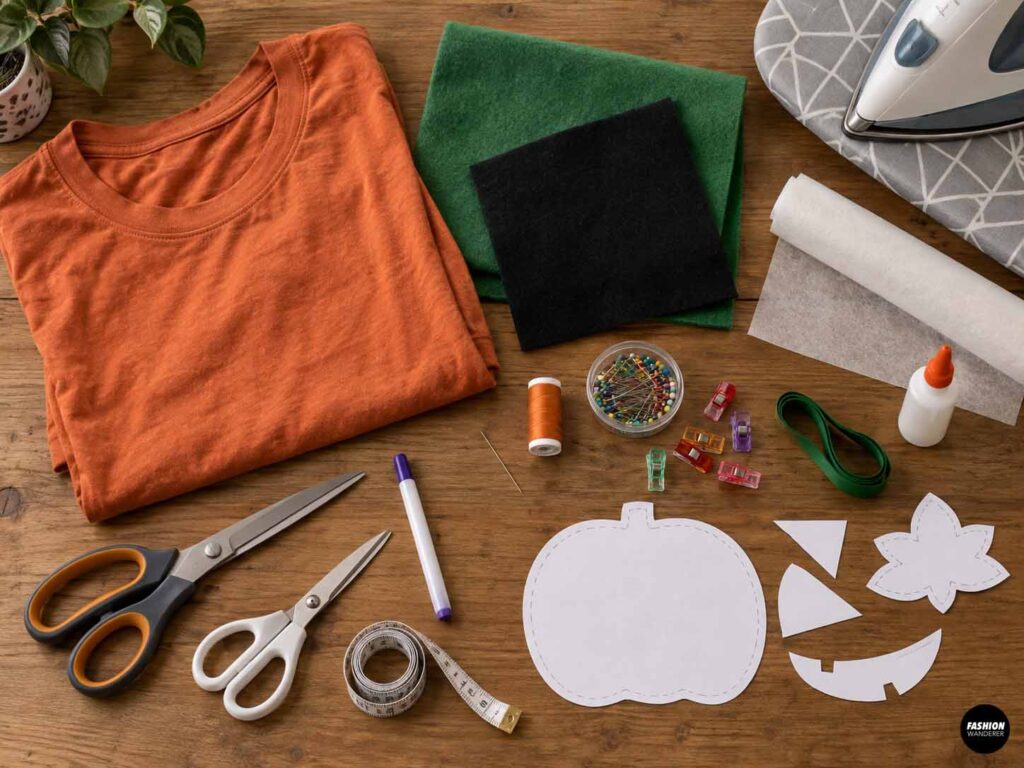
You only need a few basic supplies:
- 1 old orange, rust, coral, or red-orange T-shirt
- Green felt or fleece
- Black felt for the pumpkin face, optional
- Coordinating polyester thread
- Sewing machine or hand-sewing needle
- Fabric scissors
- Paper scissors
- Pins or sewing clips
- Fabric marker or tailor’s chalk
- Measuring tape
- Paper for templates
- Optional fusible web
- Optional fabric glue
- Optional green ribbon or elastic
- Iron and ironing board
Felt and fleece are especially useful because the raw edges usually do not fray, which makes this project much faster.
DIY Dog Pumpkin Costume
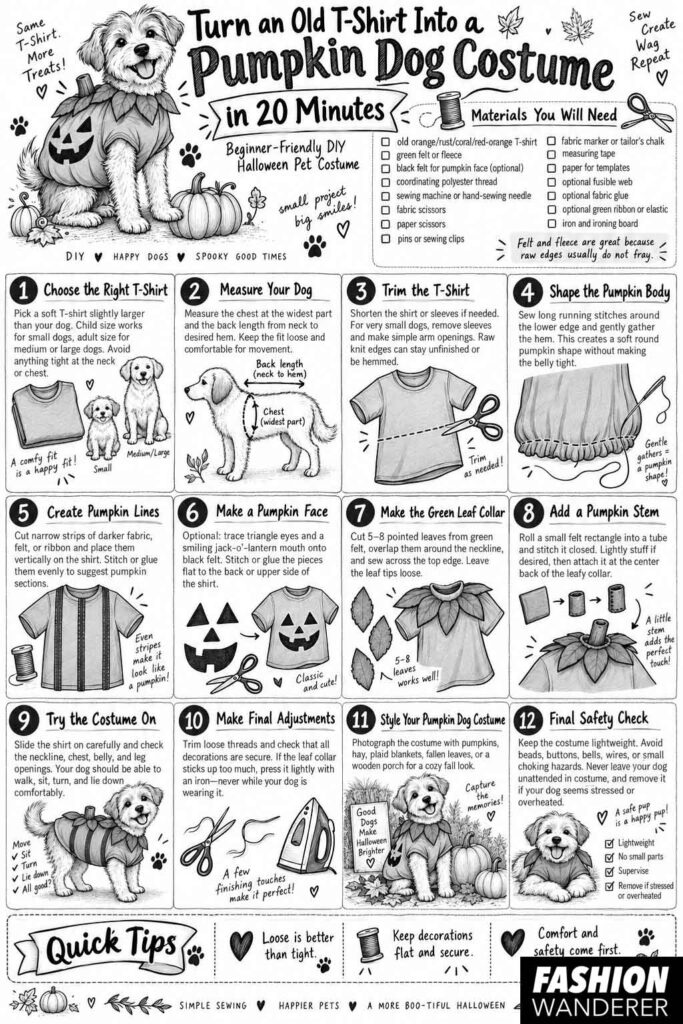
Step 1: Choose the Right T-Shirt
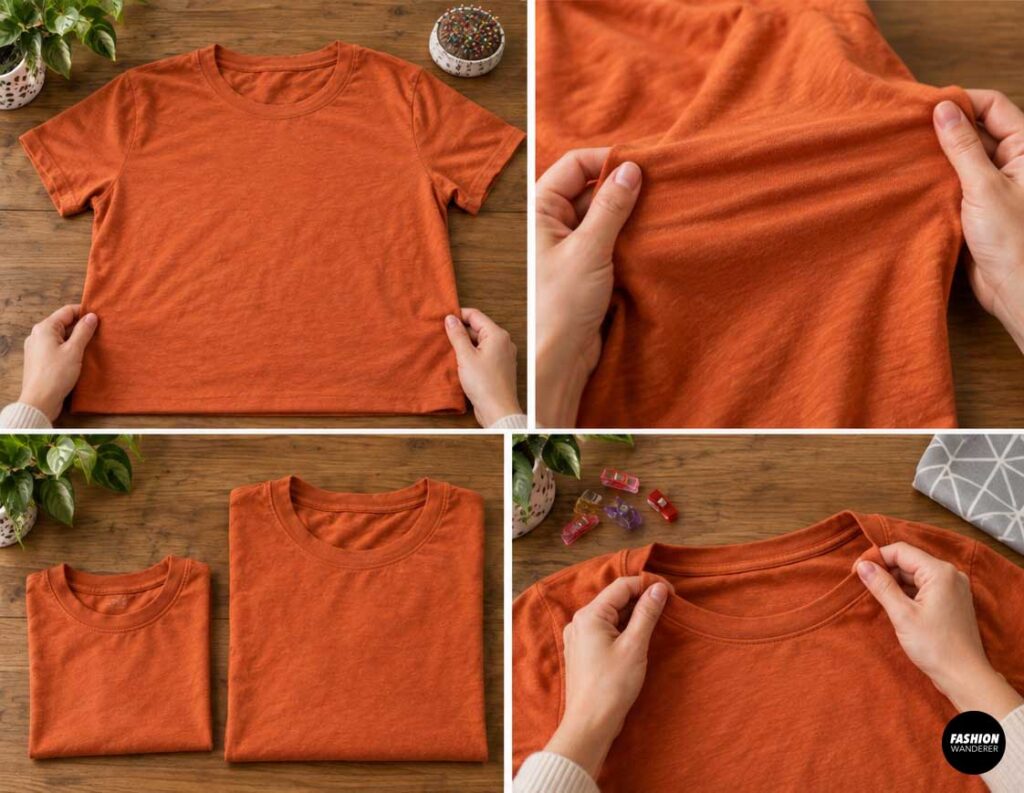
Start with a soft T-shirt that is slightly larger than your dog’s body measurement.
Orange is the obvious pumpkin choice, but rust, coral, terracotta, or even mustard can create a cute fall-inspired look.
Lay the T-shirt flat and check that the fabric stretches comfortably.
For smaller dogs, a child-size T-shirt may work better than an adult shirt. For medium or large dogs, use an adult T-shirt.
Avoid anything tight around your dog’s neck or chest.
Step 2: Measure Your Dog
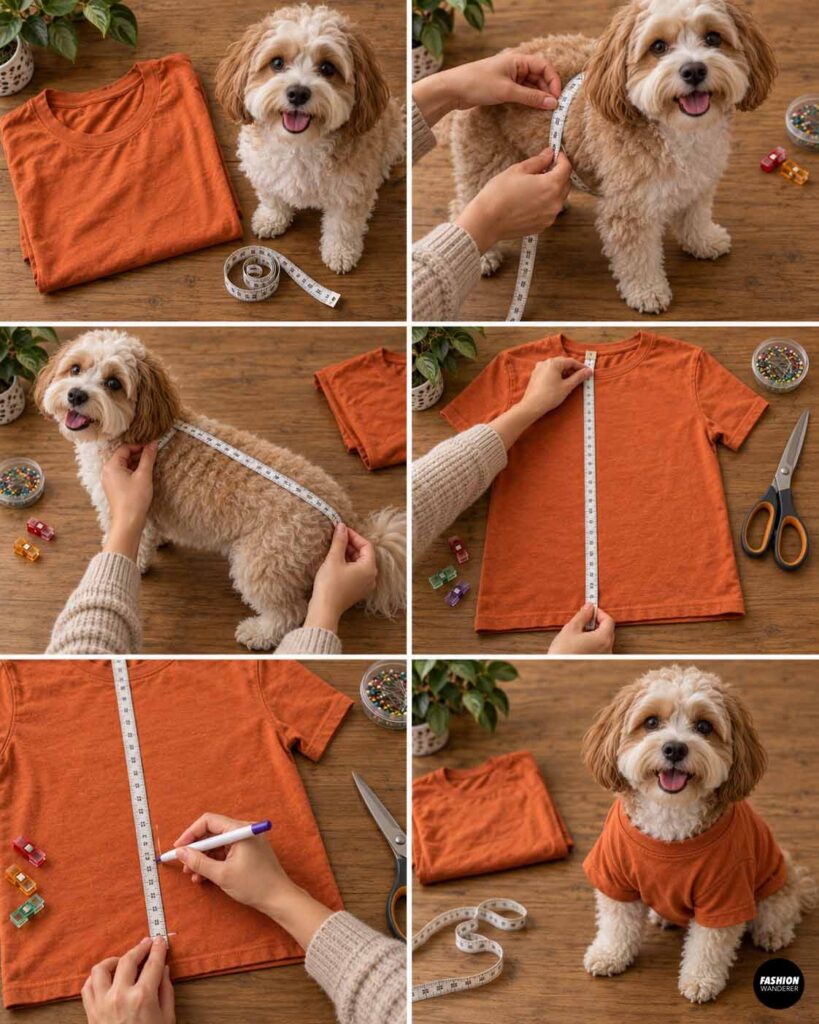
Measure around the widest part of your dog’s chest.
Then measure from the base of the neck to where you want the costume to end along the back.
You do not need an exact tailored fit. A slightly loose costume is more comfortable and easier to put on.
If the shirt is too long, mark the desired finished length.
Leave enough room so the fabric does not interfere with walking, using the bathroom, or wagging the tail.
Step 3: Trim the T-Shirt
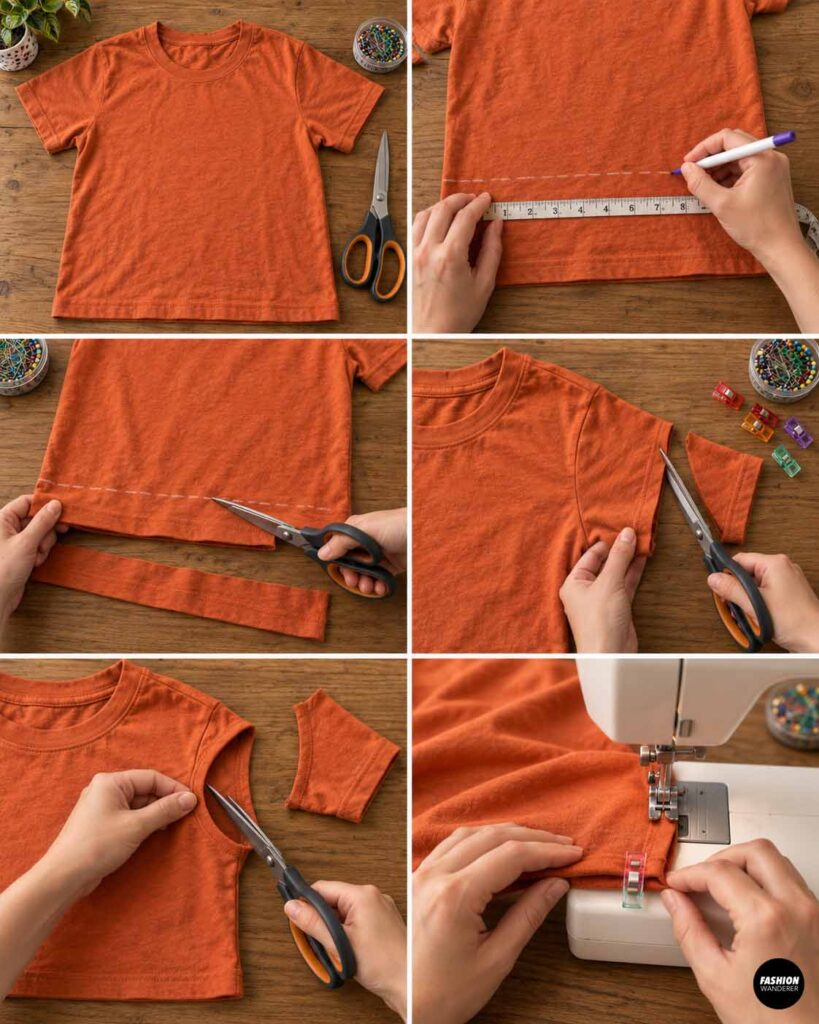
Place the shirt flat with the front facing upward.
If needed, shorten the shirt by trimming the bottom edge.
You can leave the knit edge raw because most T-shirt jersey does not unravel heavily, or fold the edge toward the wrong side by about 1/2 inch and stitch it for a cleaner finish.
If the sleeves are too long, shorten those as well.
For a very small dog, you can remove the sleeves entirely and create simple arm openings.
Step 4: Shape the Pumpkin Body
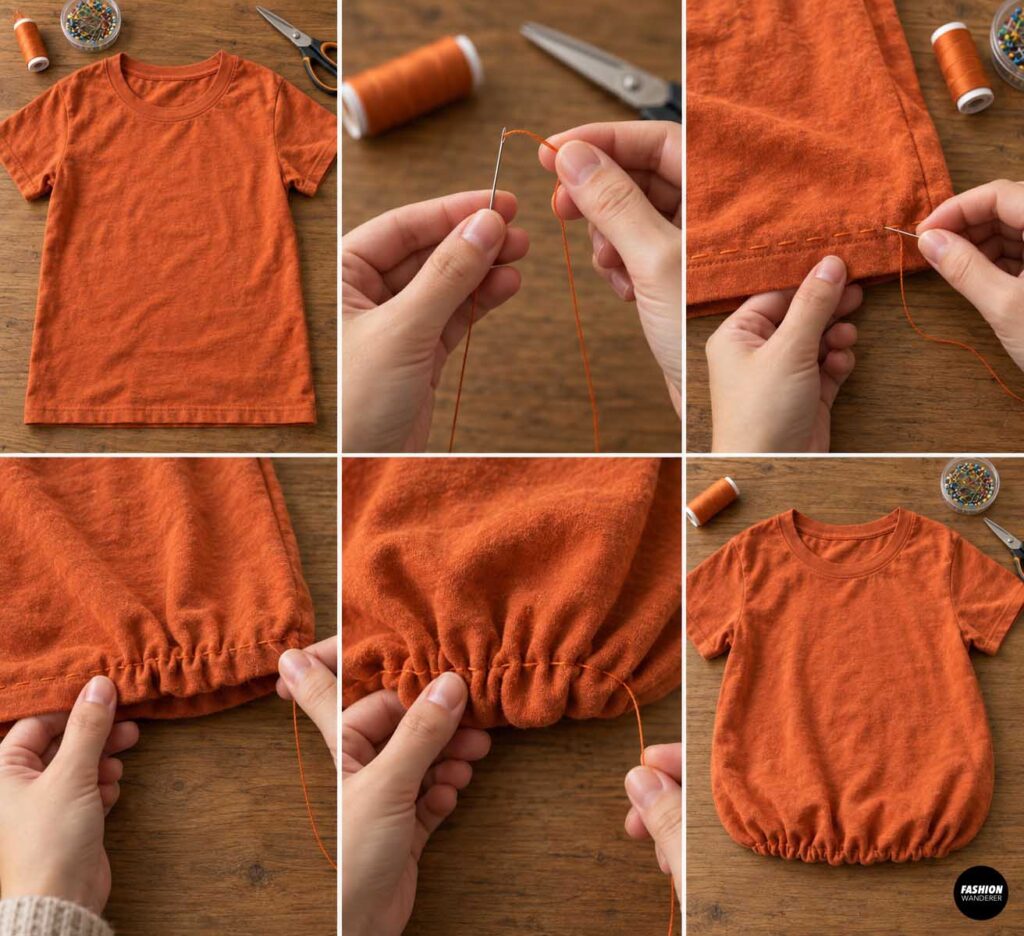
To make the T-shirt look more like a round pumpkin, lightly gather the lower edge.
Thread a hand-sewing needle with strong polyester thread and sew long running stitches around the bottom hem.
Gently pull the thread until the shirt curves inward slightly.
Do not pull it tight.
You want just enough gathering to give the costume a soft pumpkin shape while leaving plenty of room around your dog’s belly.
Knot securely.
Step 5: Create Pumpkin Lines
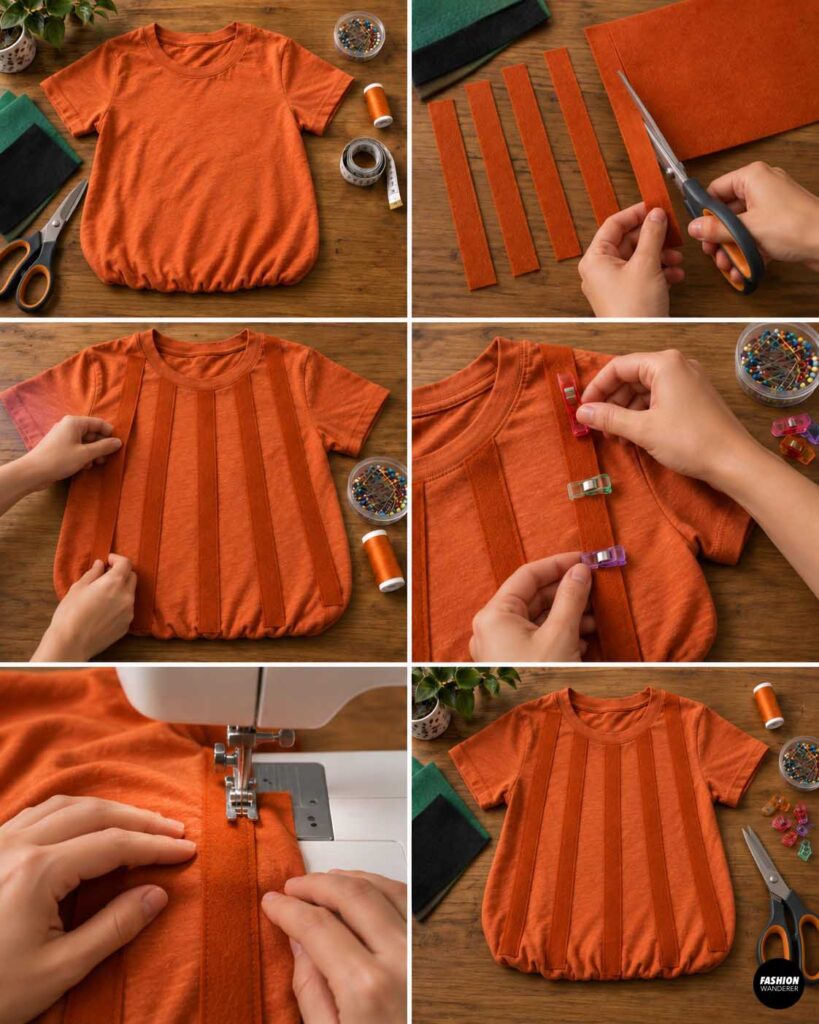
Pumpkins look more recognizable when they have vertical sections.
Cut several narrow strips of darker orange felt, ribbon, or fabric.
Place them vertically from the upper chest toward the hem.
Space them evenly across the shirt.
You can stitch the strips down with a straight stitch or narrow zigzag stitch.
For an even faster no-sew option, use small amounts of fabric glue.
Avoid making the costume stiff by using too many decorative pieces.
Step 6: Make a Pumpkin Face
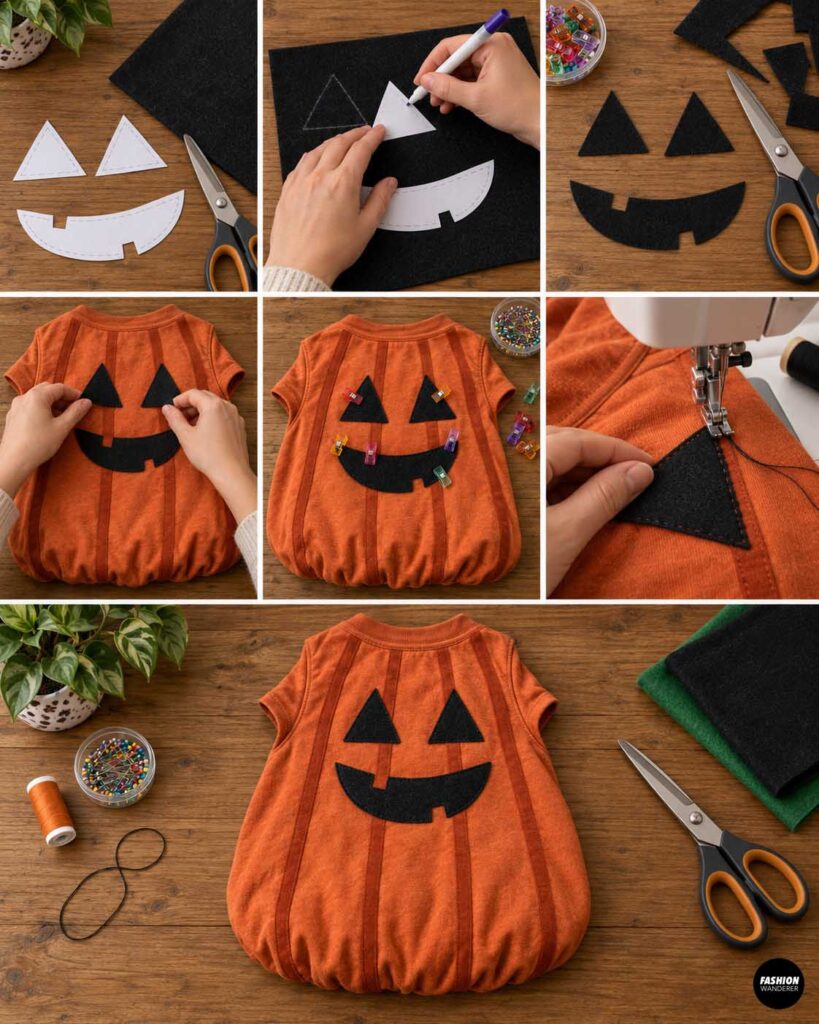
This step is optional, but it makes the costume especially fun for Halloween.
Draw simple triangle eyes and a smiling jack-o’-lantern mouth on paper.
Cut out the shapes and use them as templates.
Trace them onto black felt and cut them out.
Position the face on the back or upper side of the T-shirt where it will be easy to see.
Pin or clip the pieces in place.
Stitch around the edges with black thread, or attach them with fabric glue.
Keep all appliqués flat so your dog cannot easily grab or chew them.
Step 7: Make the Green Leaf Collar
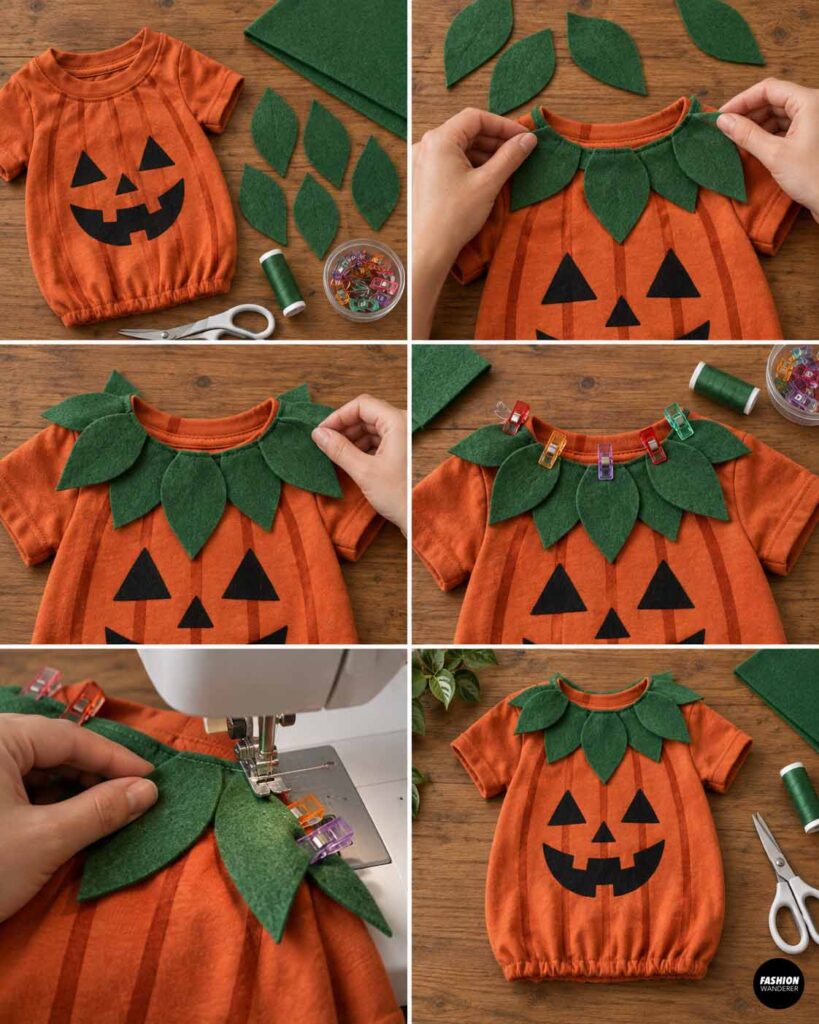
Cut 5 to 8 pointed leaf shapes from green felt.
Each leaf can be approximately 2 to 4 inches long depending on your dog’s size.
Arrange the leaves around the neckline with the points facing outward.
Overlap them slightly for a full pumpkin-top effect.
Pin the leaves just below the neckline.
Sew across the top edge of each leaf.
Leave the pointed ends loose so they move naturally.
Step 8: Add a Pumpkin Stem
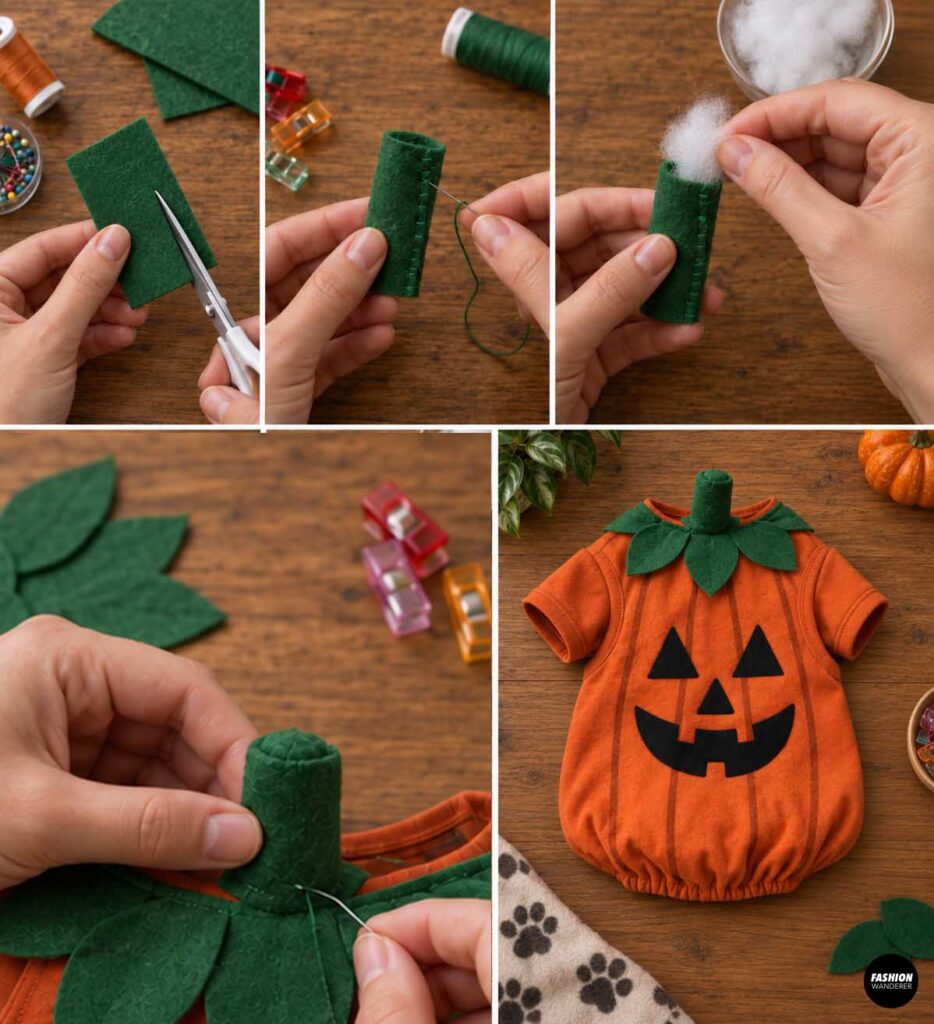
Cut a small rectangle of green felt.
Roll it into a tube and hand stitch the edge closed.
For extra shape, lightly stuff it with polyester fiberfill.
Attach the stem to the center back of the leafy collar.
You can also attach the stem to a separate headband or soft elastic accessory, but only use headwear if your dog is comfortable wearing it.
Step 9: Try the Costume On
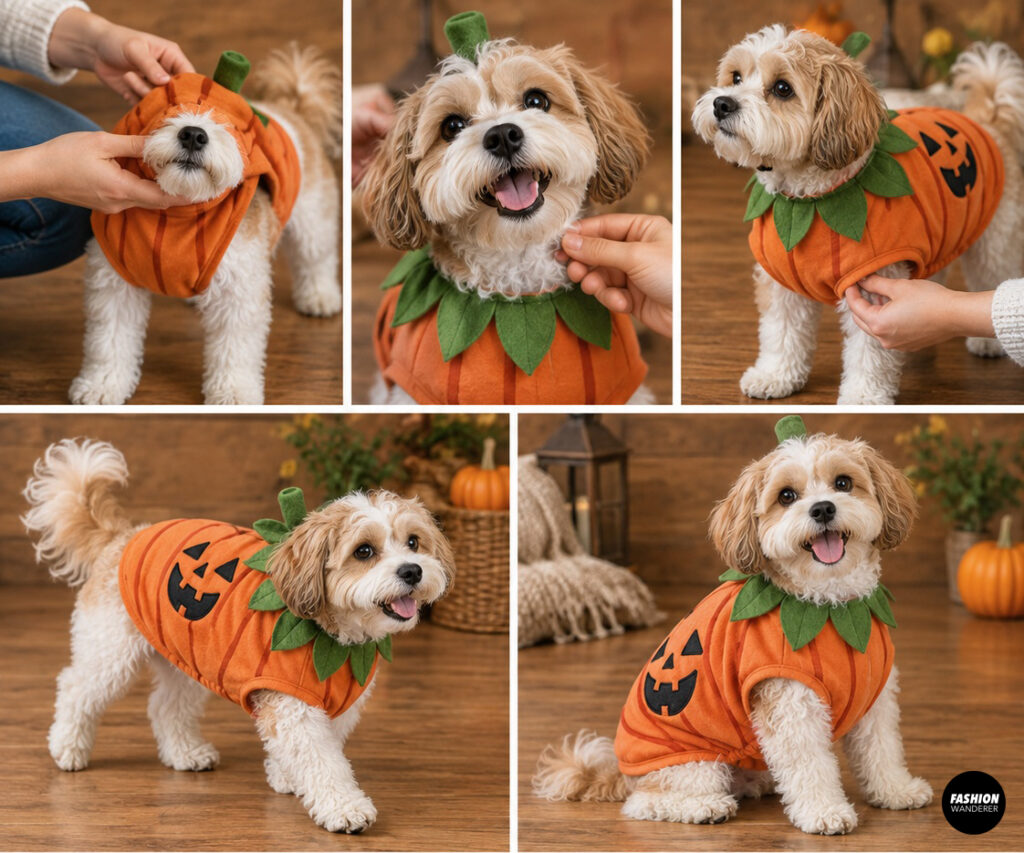
Carefully slide the T-shirt over your dog’s head and guide the front legs through the openings.
Check the neckline first.
You should be able to comfortably fit two fingers between the costume and your dog.
Then check the chest, legs, belly, and hem.
Your dog should be able to walk, sit, turn, and lie down without restriction.
If the shirt bunches underneath the belly, trim or shorten it.
Step 10: Make Final Adjustments
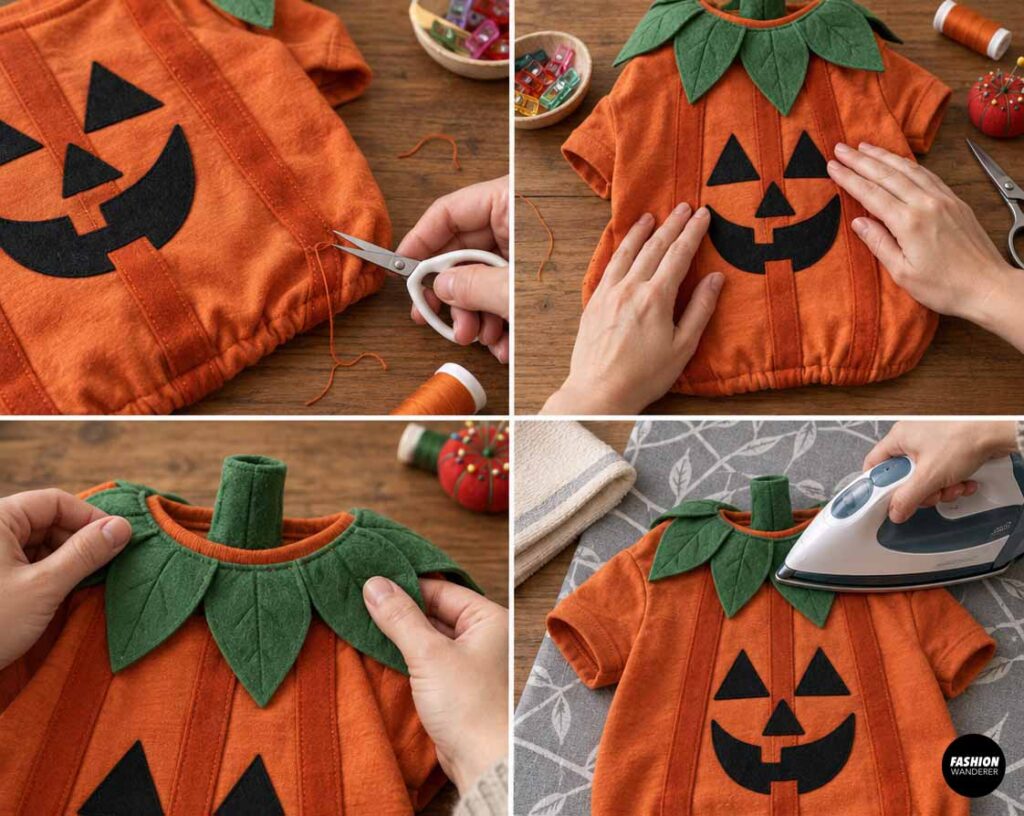
Trim any loose threads and check every sewn or glued decoration.
Make sure nothing can easily detach.
If the leafy collar sticks up too much, lightly press it with an iron before putting the costume back on your dog.
Never iron the costume while your dog is wearing it.
Step 11: Style Your Pumpkin Dog Costume
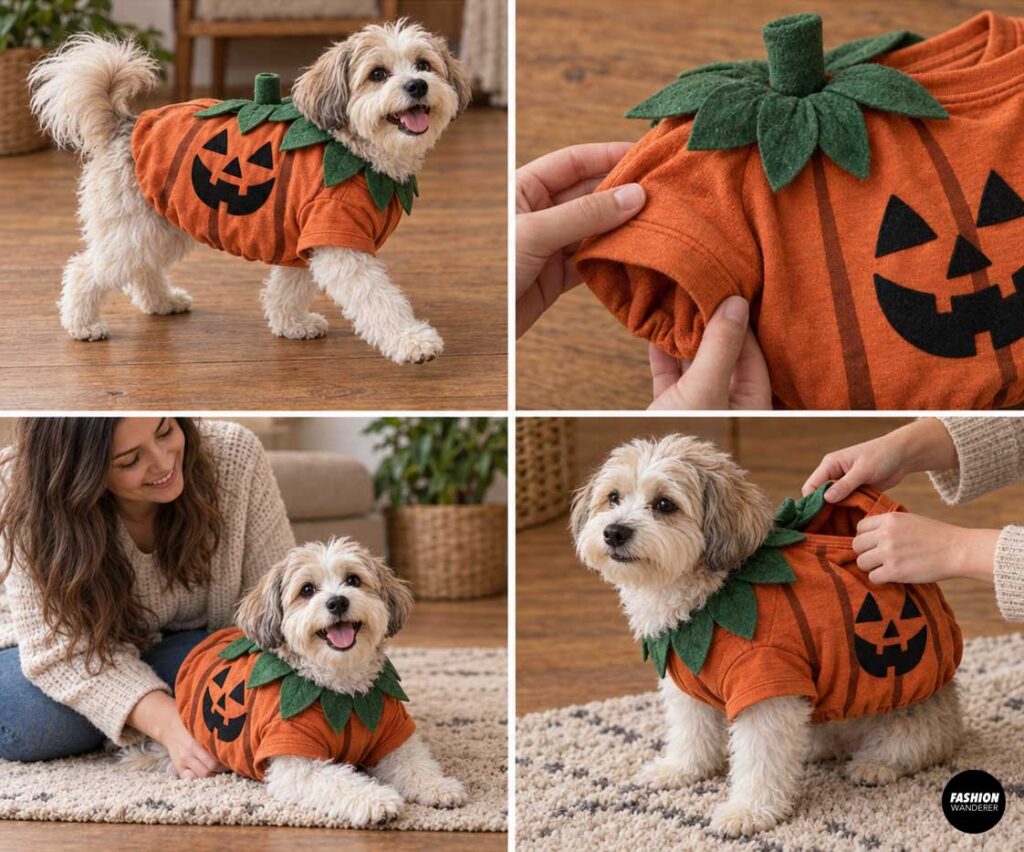
For photos, pair the pumpkin T-shirt with a simple fall setting.
Think pumpkins, hay bales, plaid blankets, fallen leaves, or a wooden porch.
You can also coordinate your dog’s costume with a child’s strawberry, scarecrow, witch, or farmer costume for a cute family Halloween theme.
Your DIY Pumpkin Dog Costume Is Finished
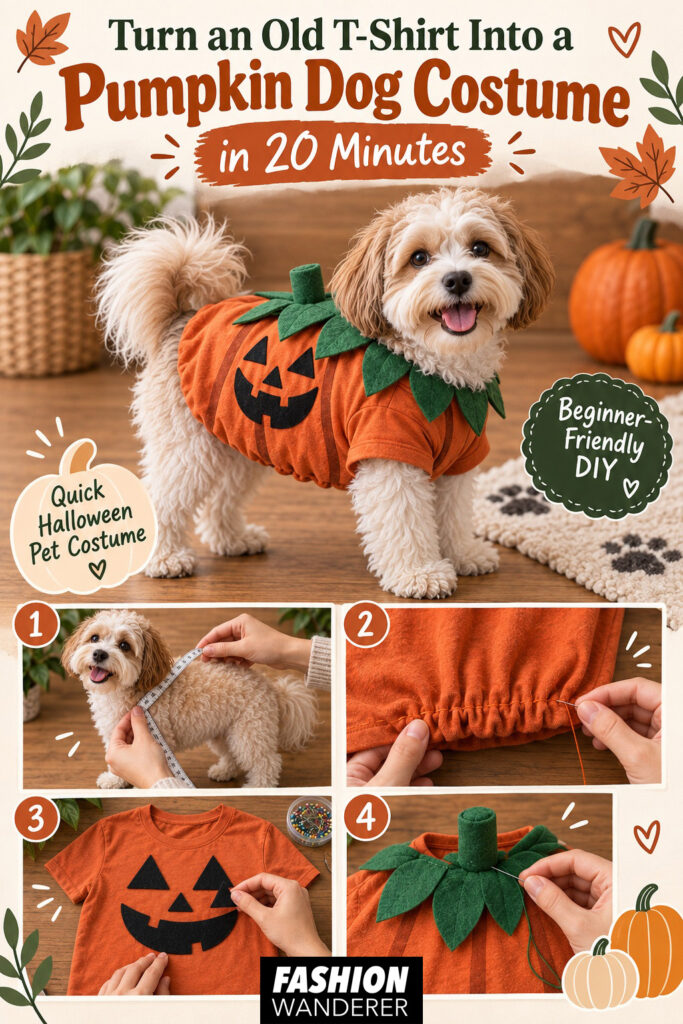
That’s it—an easy DIY pumpkin dog costume from an old T-shirt in about 20 minutes.
This beginner-friendly Halloween project is perfect for using clothes and fabric scraps you already have, and you can customize it with a pumpkin face, green leaves, or a tiny stem. It’s quick enough to make at the last minute but cute enough for Halloween photos, trick-or-treating, pet costume contests, and fall family pictures.