
If cozy slippers and ridiculously cute handmade projects are your weakness, these DIY Chubby Duck Plushie Slippers deserve a spot on your sewing list. With their rounded plush bodies, soft yellow fabric, tiny wings, orange duck feet, and sweet little faces, these slippers look like two chubby ducks waddled straight into your craft room.
Even better, this sewing project is beginner-friendly and works beautifully with fleece, minky, sherpa, or other soft plush fabrics. These DIY plushie house slippers are padded for comfort, lined on the inside, and finished with a non-slip sole so they are practical enough to wear around the house.
Use the free duck plushie slipper sewing pattern to make a pair for yourself, as a handmade gift, or even as a fun item to sell at craft fairs and online shops.
Materials You Will Need
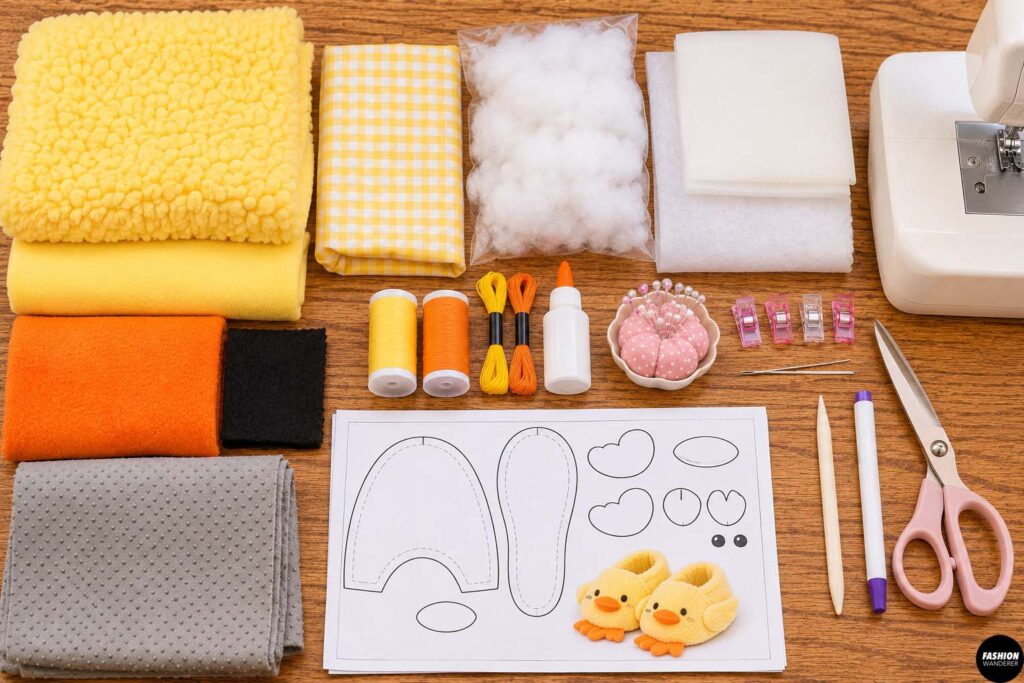
To make one pair of chubby duck slippers, gather:
- Free duck slipper sewing pattern
- ½ yard yellow fleece, minky, sherpa, or plush fabric
- ¼ yard lining fabric
- ¼ yard orange fleece or felt
- Small scraps of black felt
- Fusible fleece or foam interfacing
- Non-slip sole fabric
- Polyester fiberfill
- Matching yellow and orange thread
- Sewing machine
- Hand-sewing needle
- Fabric scissors
- Pins or sewing clips
- Fabric marker or chalk
- Turning tool or chopstick
- Optional embroidery thread
- Optional fabric glue
Choose a soft fabric with enough structure to hold the duck shape. Fleece is one of the easiest options for beginners because it does not fray heavily.
DIY Chubby Duck Plushie Slippers
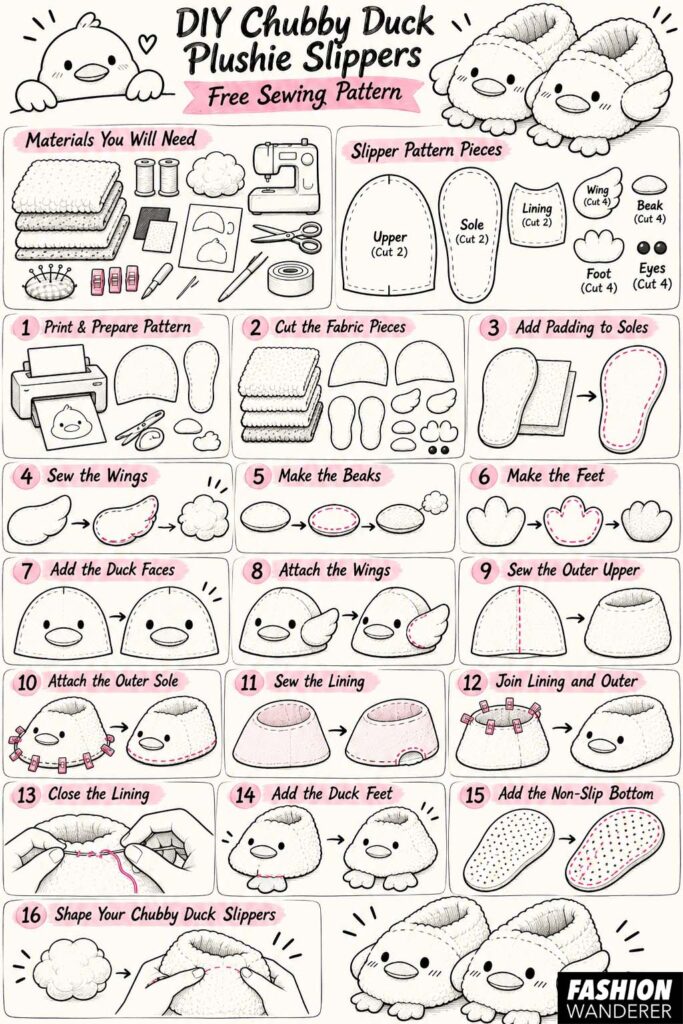
Step 1: Print and Prepare the Free Pattern
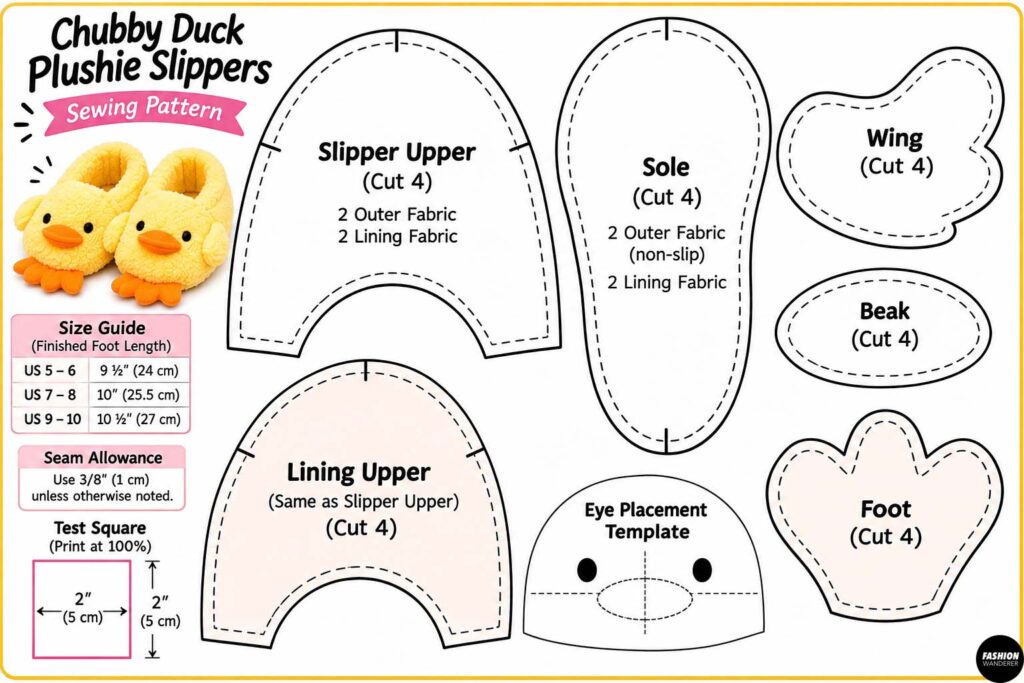
Download and print the free chubby duck plushie slipper sewing pattern at 100% scale.
Do not use “fit to page” unless the pattern instructions specifically tell you to.
Cut out all pattern pieces, including:
- Slipper upper
- Sole
- Lining
- Duck wing
- Duck beak
- Duck foot
- Eye placement template
Check the size guide before cutting your fabric.
If you prefer a roomier slipper, especially when using thick fleece or sherpa, size up slightly.
Step 2: Cut the Fabric Pieces
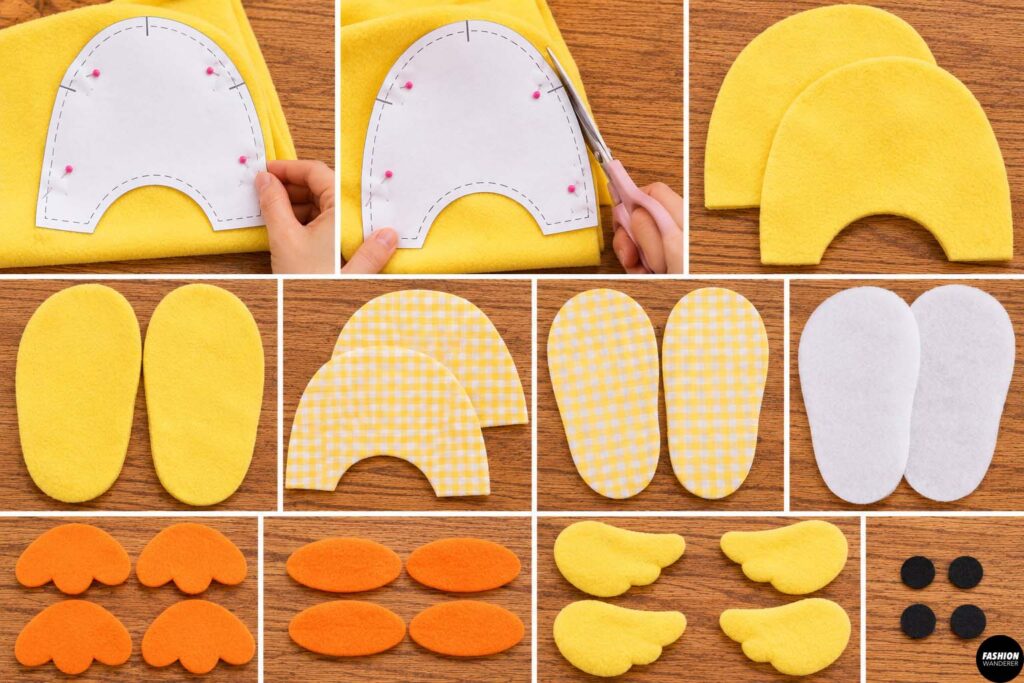
Fold the yellow plush fabric with right sides together.
Pin the slipper upper pattern to the fabric and cut two mirrored pairs.
Cut two yellow outer sole pieces.
From the lining fabric, cut two slipper uppers and two sole pieces.
Cut another two sole pieces from fusible fleece or foam interfacing.
From orange fleece or felt, cut:
- Four duck feet
- Four beak pieces
Cut four wing pieces from the yellow fabric.
Finally, cut four small circles or ovals from black felt for the eyes.
Keep the left and right slipper pieces separated so they do not become mixed up.
Step 3: Add Padding to the Slipper Soles
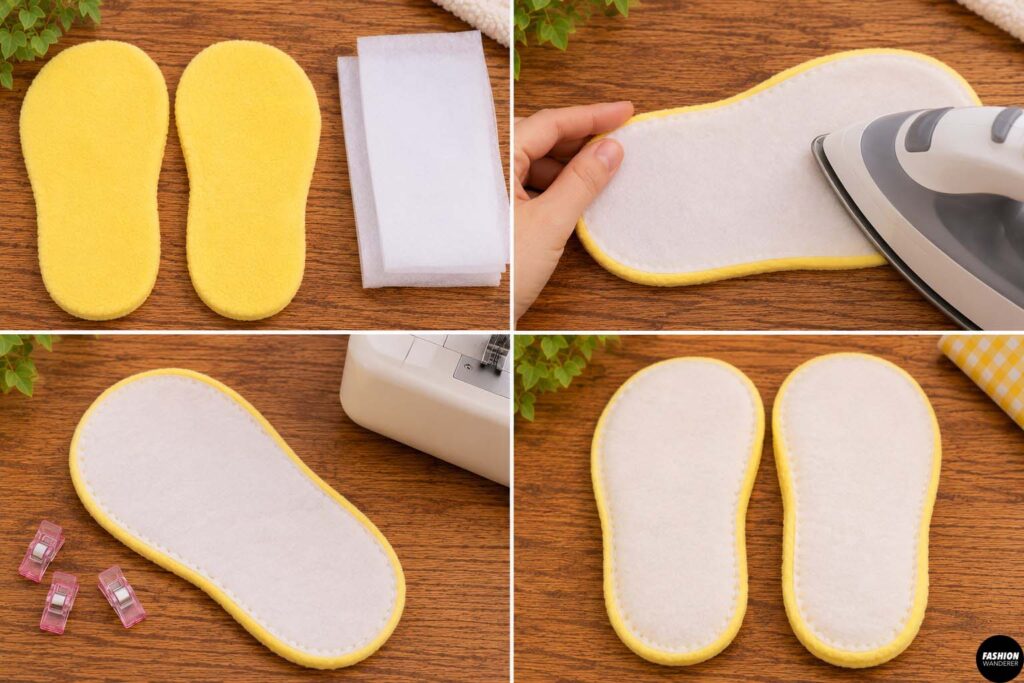
Fuse or baste the interfacing to the wrong side of each outer sole piece.
The padding gives the slippers a softer, more structured base.
If your interfacing is not fusible, sew around the edge approximately ⅛ inch from the raw edge.
For extra-cushy slippers, you can use thin foam instead.
Avoid making the sole overly thick because extremely bulky layers can become difficult to sew.
Step 4: Sew the Duck Wings
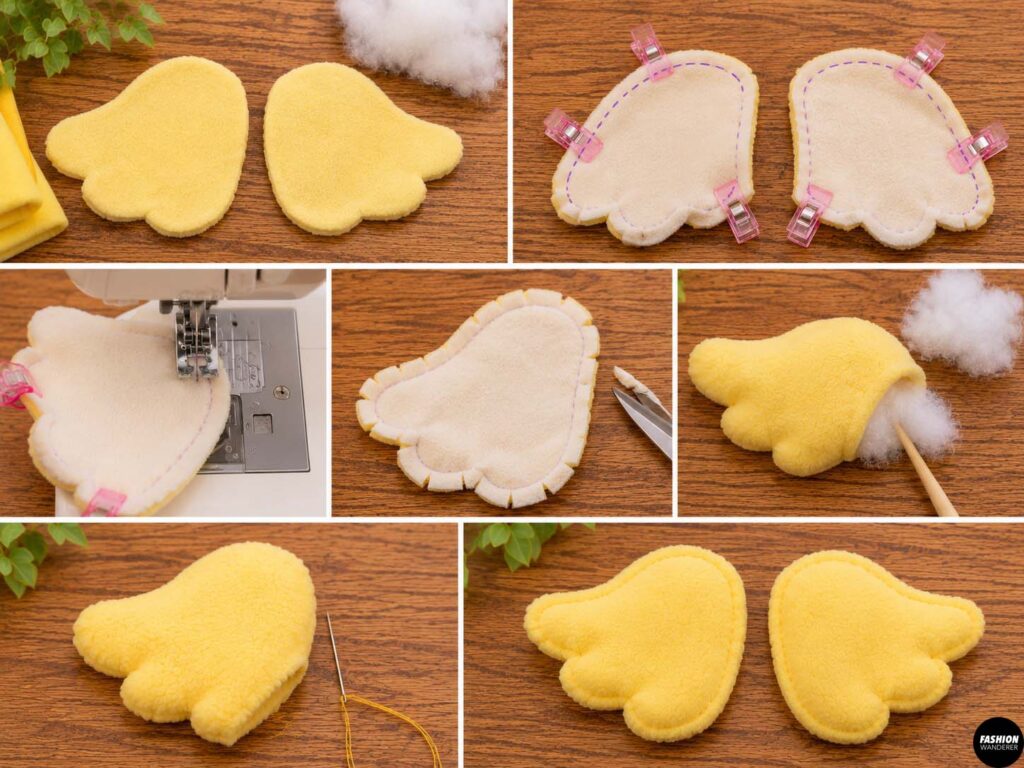
Place two yellow wing pieces right sides together.
Sew around the curved edge using approximately a ¼-inch seam allowance, leaving the straight edge open.
Clip around the curves.
Turn the wing right side out.
Lightly stuff it with a very small amount of polyester fiberfill.
Repeat for the second wing.
Topstitch around the wing if you want a more defined plush-toy appearance.
Step 5: Make the Duck Beaks
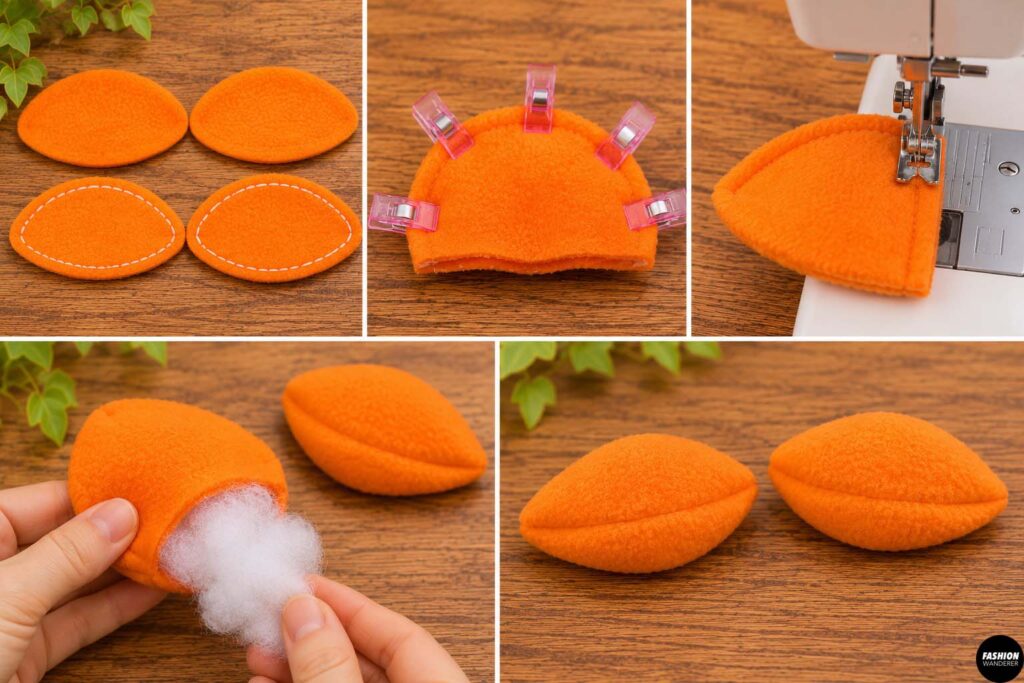
Place two orange beak pieces right sides together.
Sew around the outer edge, leaving the attachment edge open.
Turn the piece right side out.
Add a tiny amount of stuffing.
Repeat for the second slipper.
Keep the beaks soft and slightly rounded rather than heavily stuffed.
Step 6: Make the Duck Feet
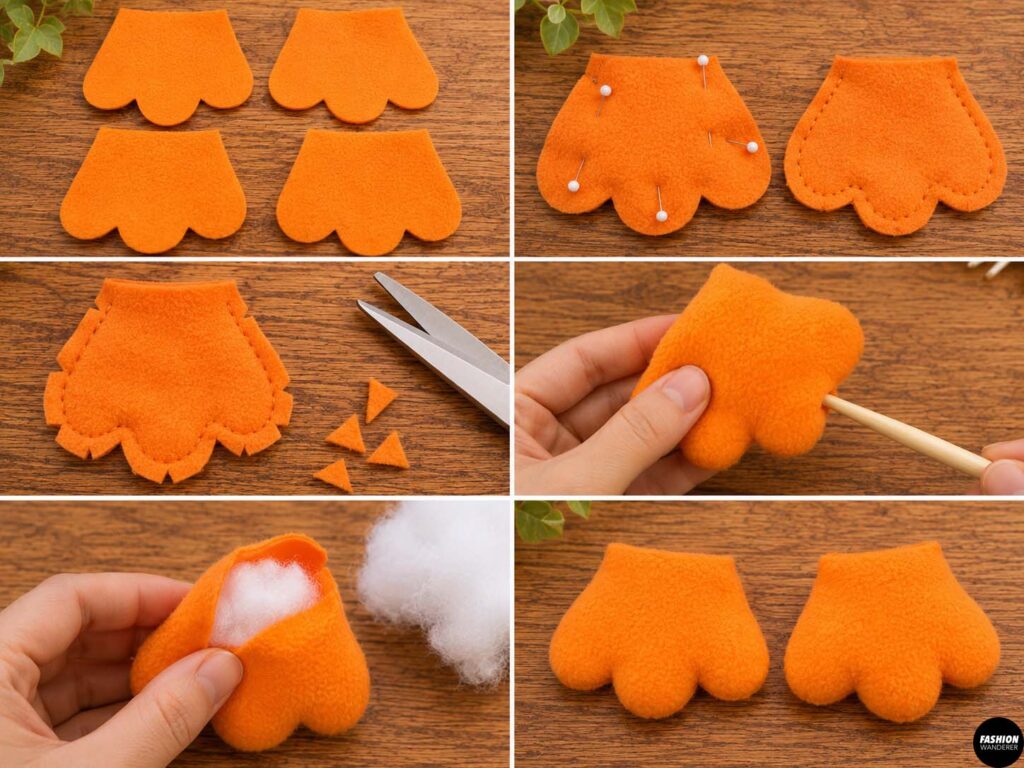
Pair two orange foot pieces right sides together.
Sew around the edges, leaving the top edge open.
Clip into any tight corners between the duck toes.
Turn right side out and gently push out the shape using a turning tool.
Repeat with the remaining foot pieces.
Lightly stuff the feet if you want an extra chubby finish.
Step 7: Add the Duck Faces
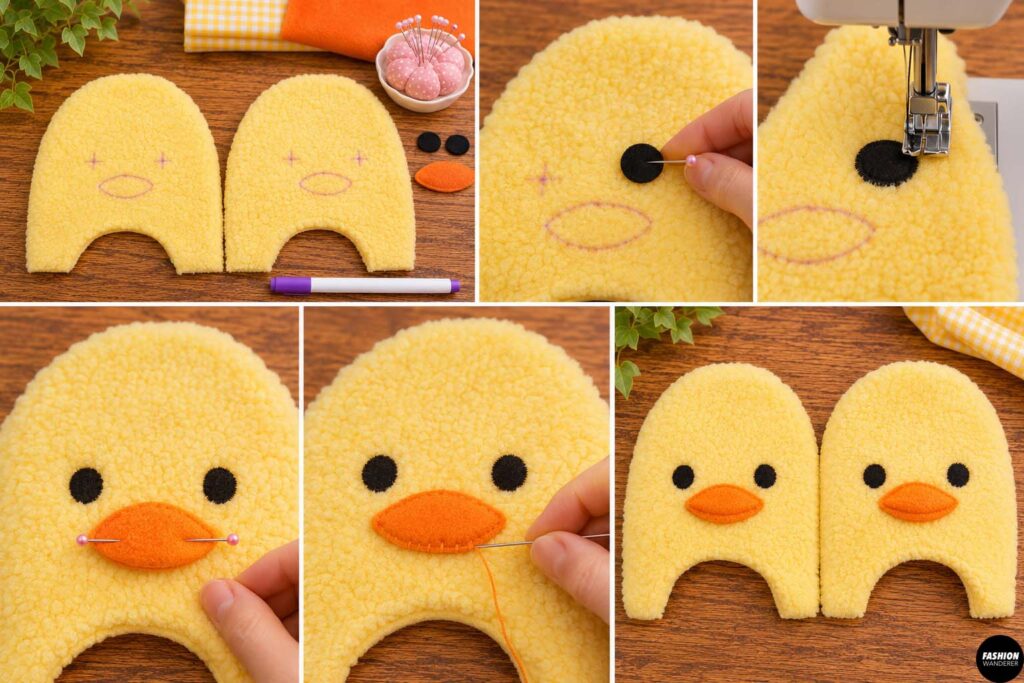
Lay the yellow slipper upper pieces right side up.
Use the pattern markings to position the eyes and beaks.
Sew the black felt eyes in place with a narrow zigzag stitch or hand sew them using black embroidery thread.
Position the beak between the eyes, slightly lower on the face.
Baste the raw edge of the beak to the slipper upper.
For a cute expression, angle the eyes very slightly toward the center.
Step 8: Attach the Wings
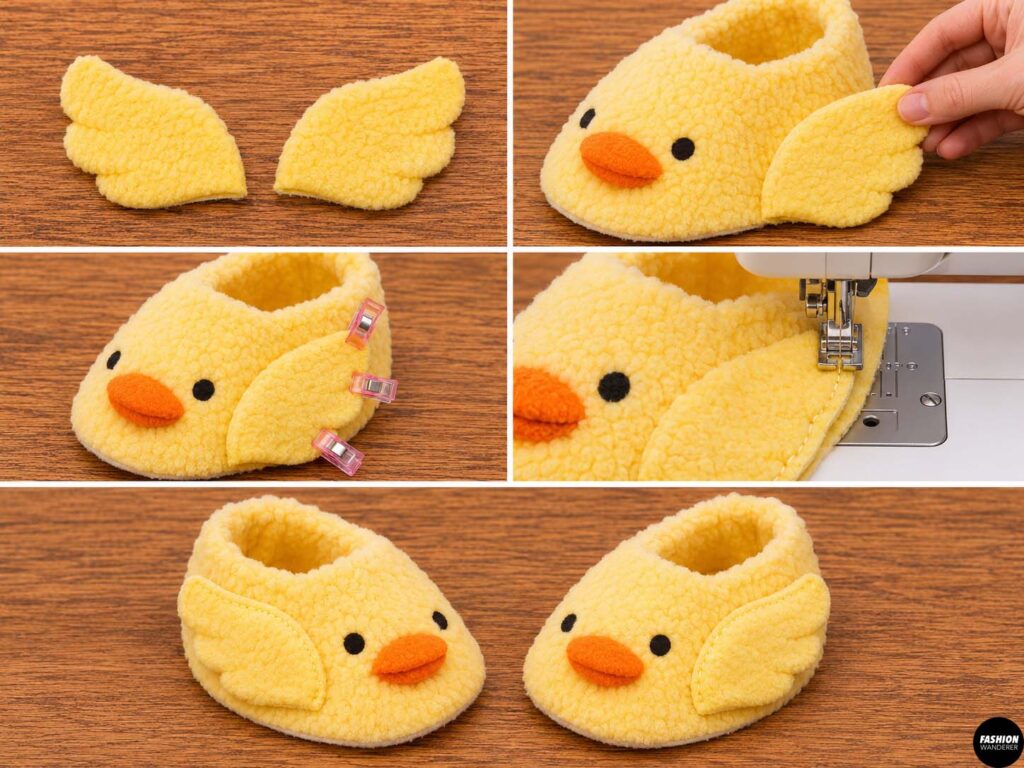
Position one wing along the outer side of each slipper.
The raw edge should line up with the raw edge of the slipper upper.
Baste the wing in place.
Angle the wing slightly downward so it sits naturally when the slipper is worn.
Check that you are attaching the wings to opposite sides so both ducks face correctly.
Step 9: Sew the Outer Slipper Upper
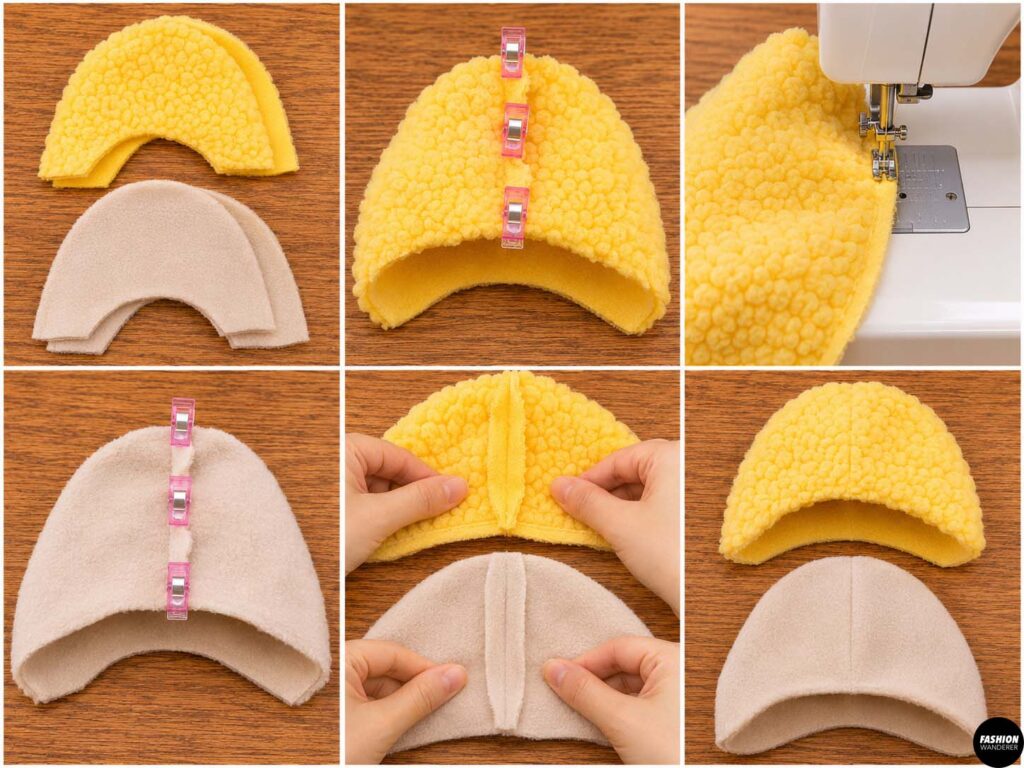
Fold each yellow upper piece according to the pattern markings.
Match the center back edges with right sides together.
Pin or clip.
Sew the center back seam using a ⅜-inch seam allowance.
Repeat with the lining pieces.
Press or finger-press the seams open.
You should now have two rounded slipper upper shapes.
Step 10: Attach the Outer Sole
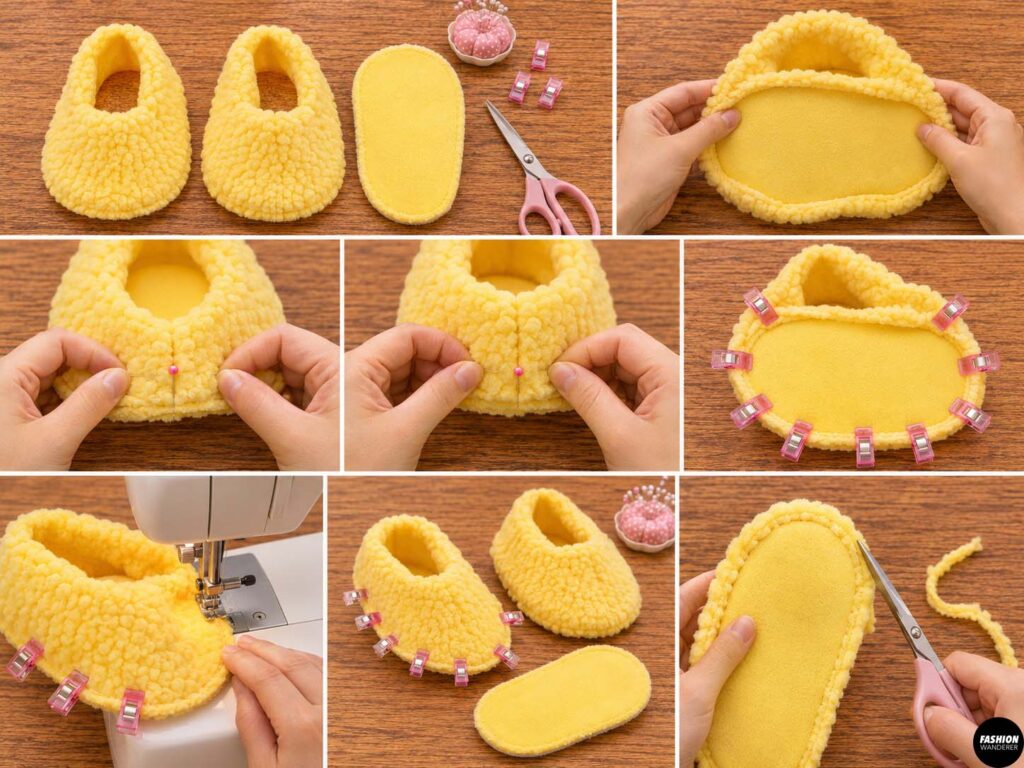
With right sides together, pin the yellow slipper upper around the padded yellow sole.
Start by matching the center front and center back.
Then pin evenly around both sides.
Sew around the entire sole using a ⅜-inch seam allowance.
Go slowly around the curved toe.
Repeat for the second slipper.
Trim any bulky seam allowance if necessary.
Step 11: Sew the Lining
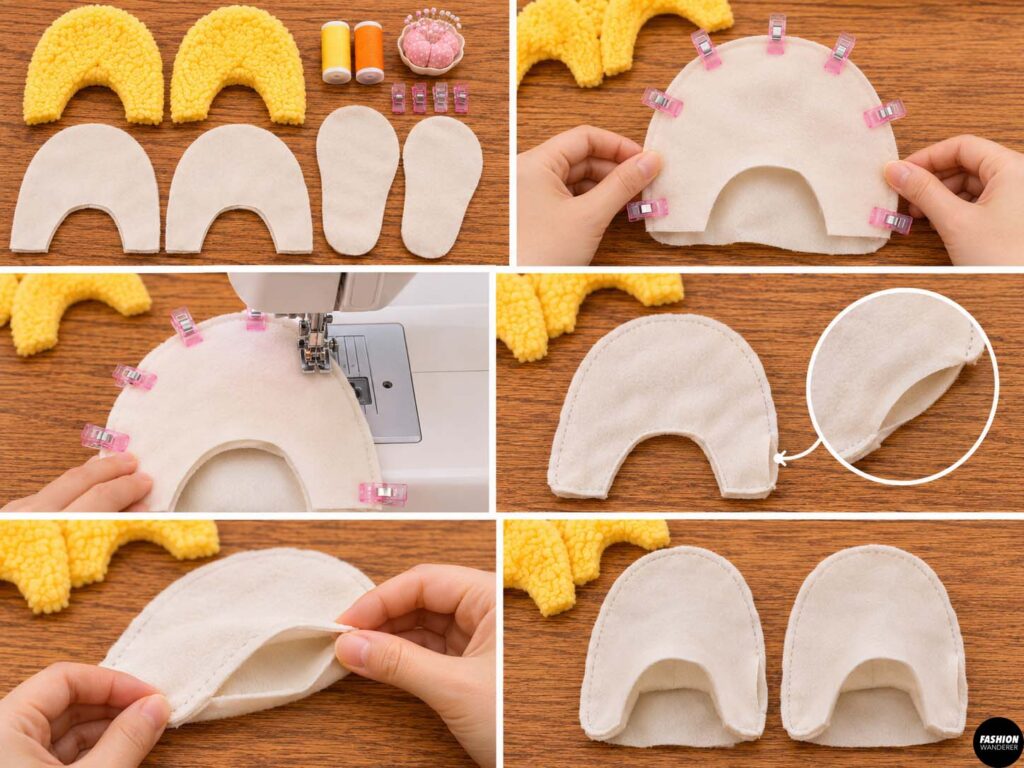
Attach each lining upper to a lining sole using the same method.
Leave approximately a 3-inch opening along one side of the lining sole.
This opening will be used to turn the finished slipper right side out.
Step 12: Join the Lining and Outer Slipper
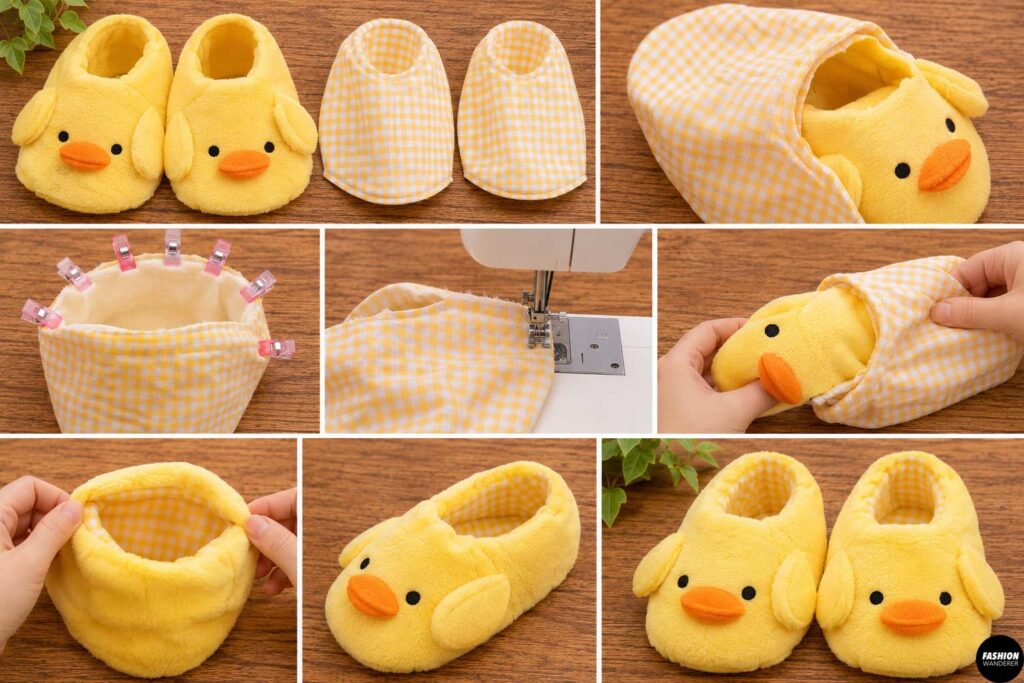
Place the outer slipper inside the lining with right sides facing.
Match the opening around the ankle.
Pin around the entire upper edge.
Sew using a ⅜-inch seam allowance.
Pull the outer slipper through the opening left in the lining.
Continue turning until the entire slipper is right side out.
Push the lining inside the slipper.
Repeat for the second slipper.
Step 13: Close the Lining
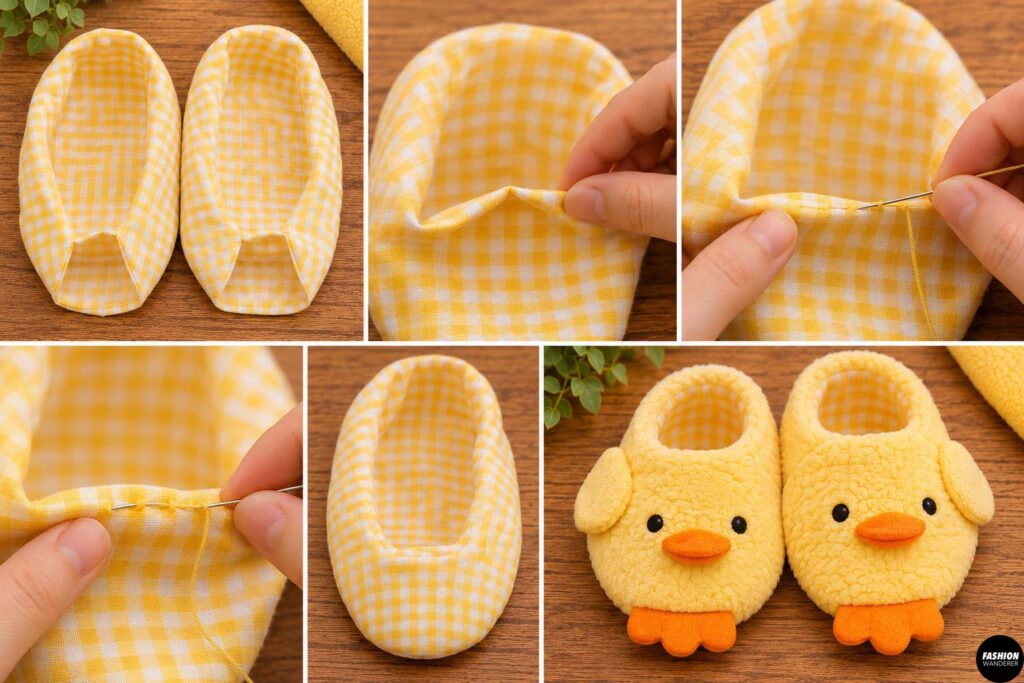
Fold the raw edges of the lining opening inward.
Hand sew the opening closed using a ladder stitch.
You can also topstitch it closed if the seam will not be visible.
Smooth the lining into place.
Step 14: Add the Duck Feet
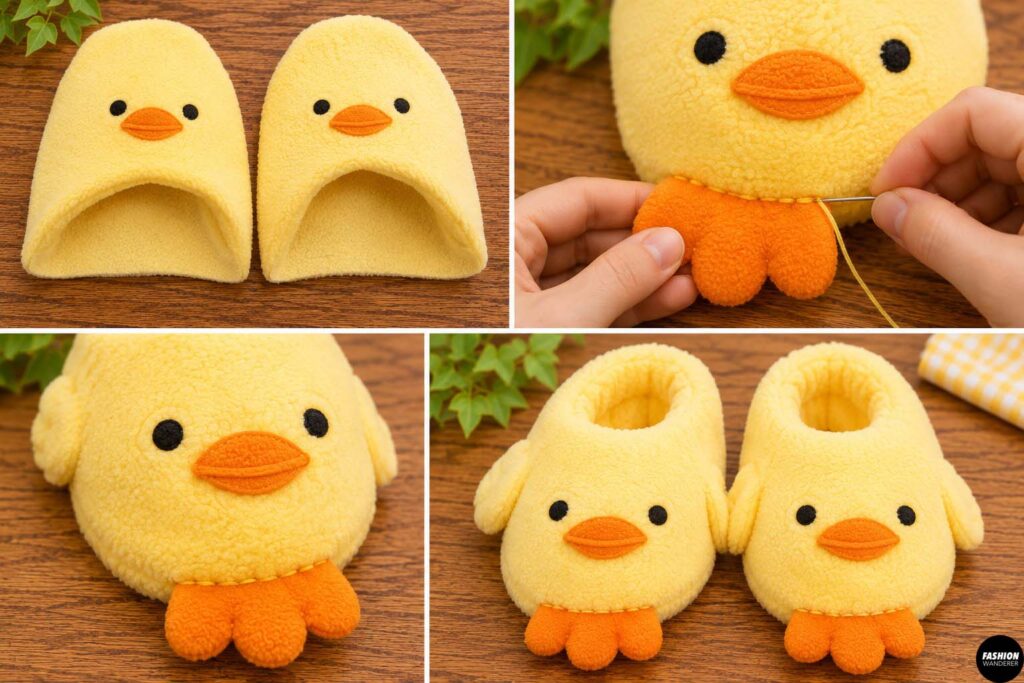
Position one orange duck foot near the front of each slipper.
Hand sew it securely to the lower front edge.
The feet should extend slightly beyond the slipper toe.
Use several strong stitches because this area may receive extra movement during wear.
Step 15: Add the Non-Slip Bottom
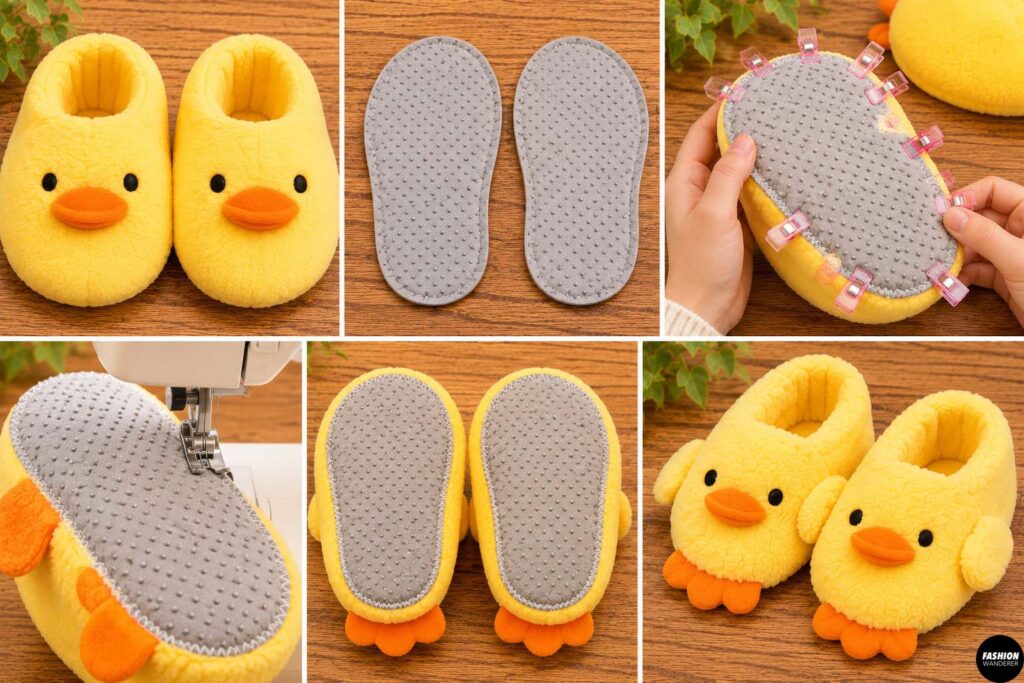
Trace the sole pattern onto non-slip fabric.
Cut two sole shapes slightly smaller than the finished slipper bottoms.
Pin or clip them underneath each slipper.
Sew around the perimeter using a narrow zigzag stitch.
If your non-slip fabric is too thick for your sewing machine, hand sew it securely instead.
This extra layer helps prevent the slippers from sliding on smooth flooring.
Step 16: Shape Your Chubby Duck Slippers
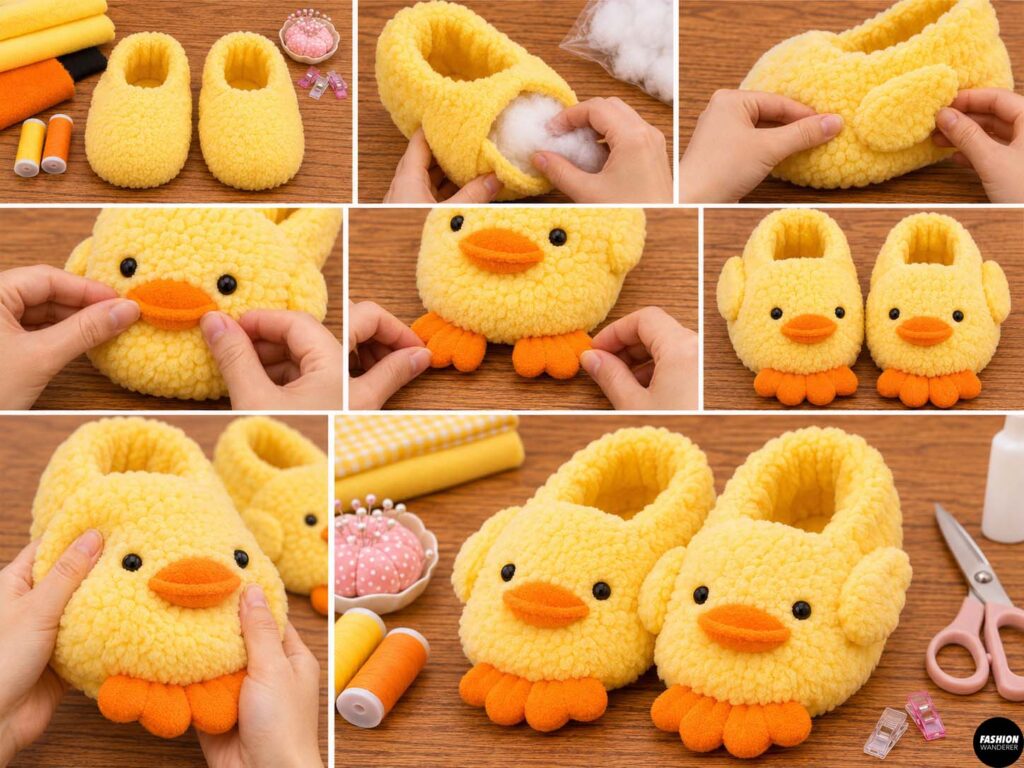
Use your fingers to shape the wings, beak, feet, and rounded toe.
Add tiny amounts of fiberfill underneath the upper fabric if you want a fuller plush-toy look.
Avoid overstuffing the slippers because they should still remain comfortable to walk in.
Your finished DIY chubby duck plushie slippers should look soft, squishy, slightly oversized, and adorably round.
Finished DIY Duck Plushie Slippers
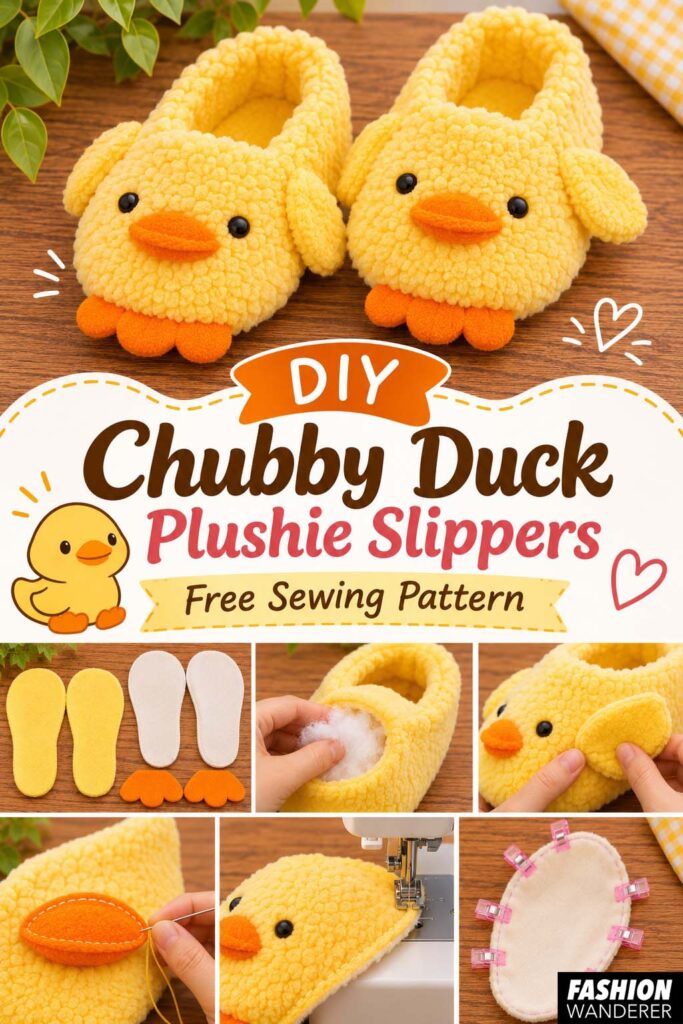
These free duck slipper sewing pattern slippers combine cozy loungewear with plush-toy cuteness, making them an especially fun sewing project for fall, winter, birthdays, sleepovers, and handmade Christmas gifts.
Try making them in classic yellow and orange, or customize the pattern with pastel pink, cream, brown, or even fuzzy white fabric.
Once you make one pair, you may suddenly find yourself wanting an entire flock.